Hello, world!
Qmonus SDKでAPI開発を体験しましょう。ここでは、Hello, world!メッセージを応答するだけのAPIをポータルから作ります。
シナリオの作成
1. シナリオエディタの表示
- メインメニューから[Workflow Scenario as a Service] > [Scenario]を選択し、シナリオエディタを表示します。
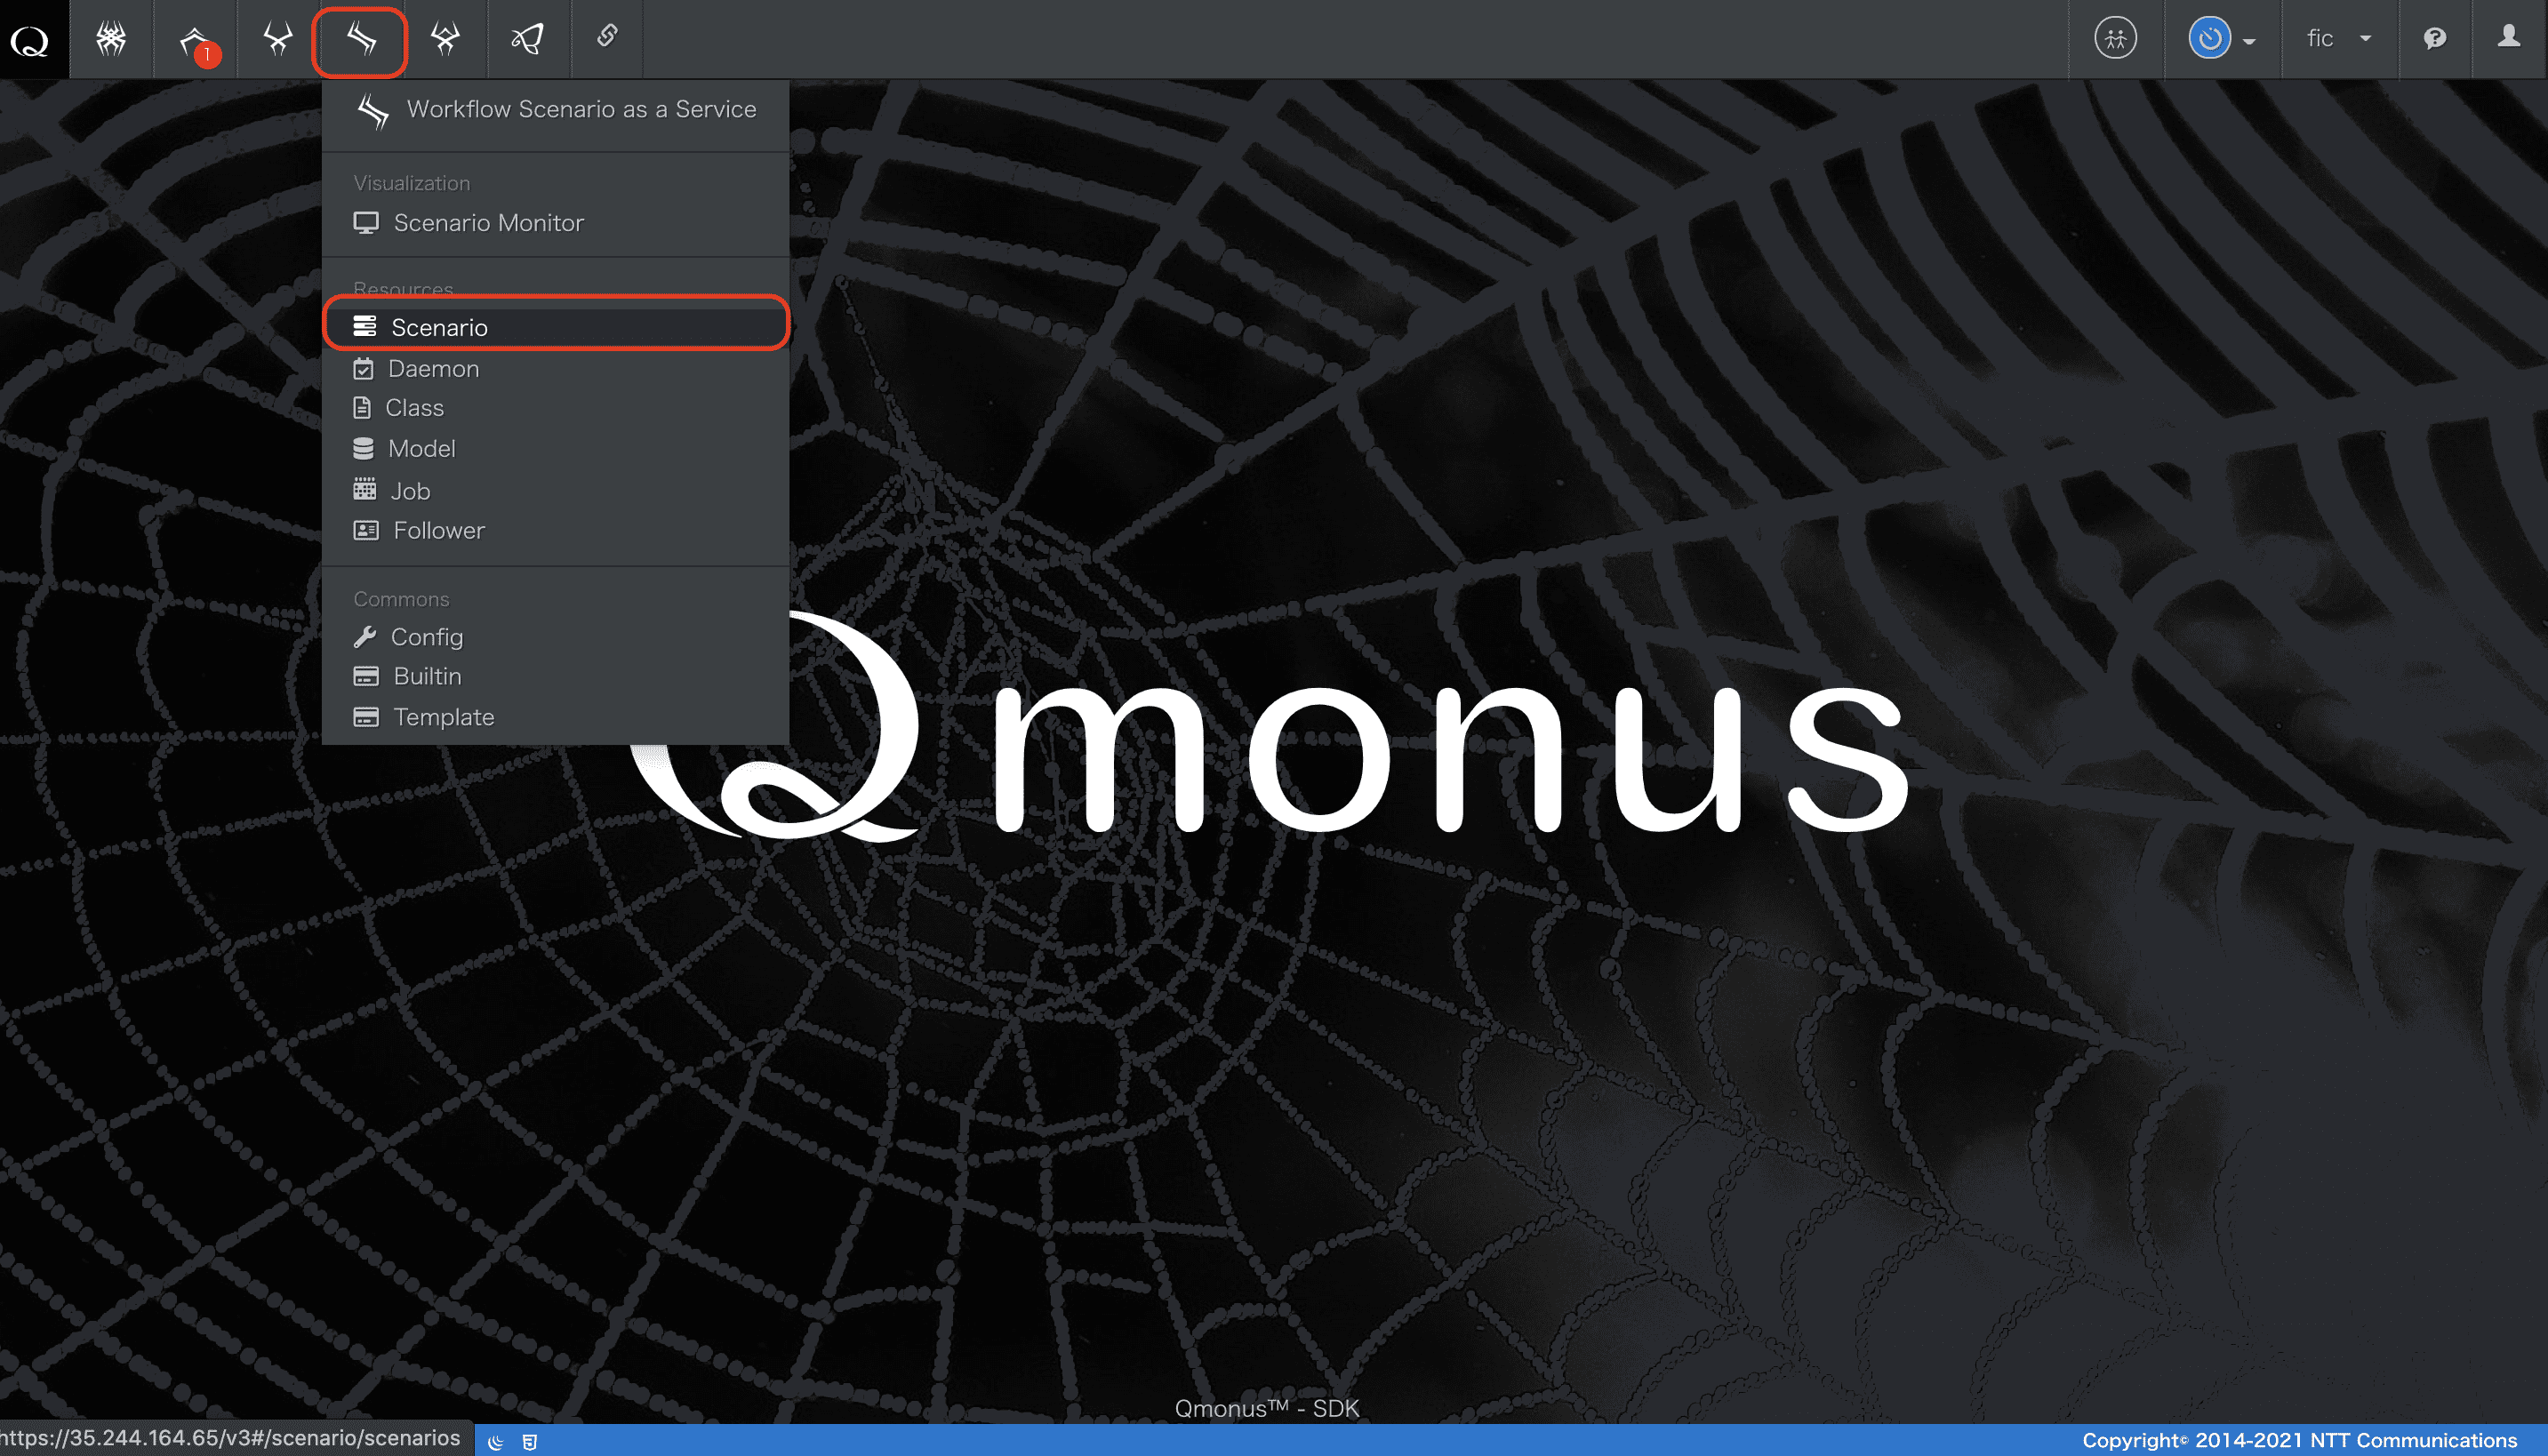
- こちらのエディタを使いシナリオを作成していきます。
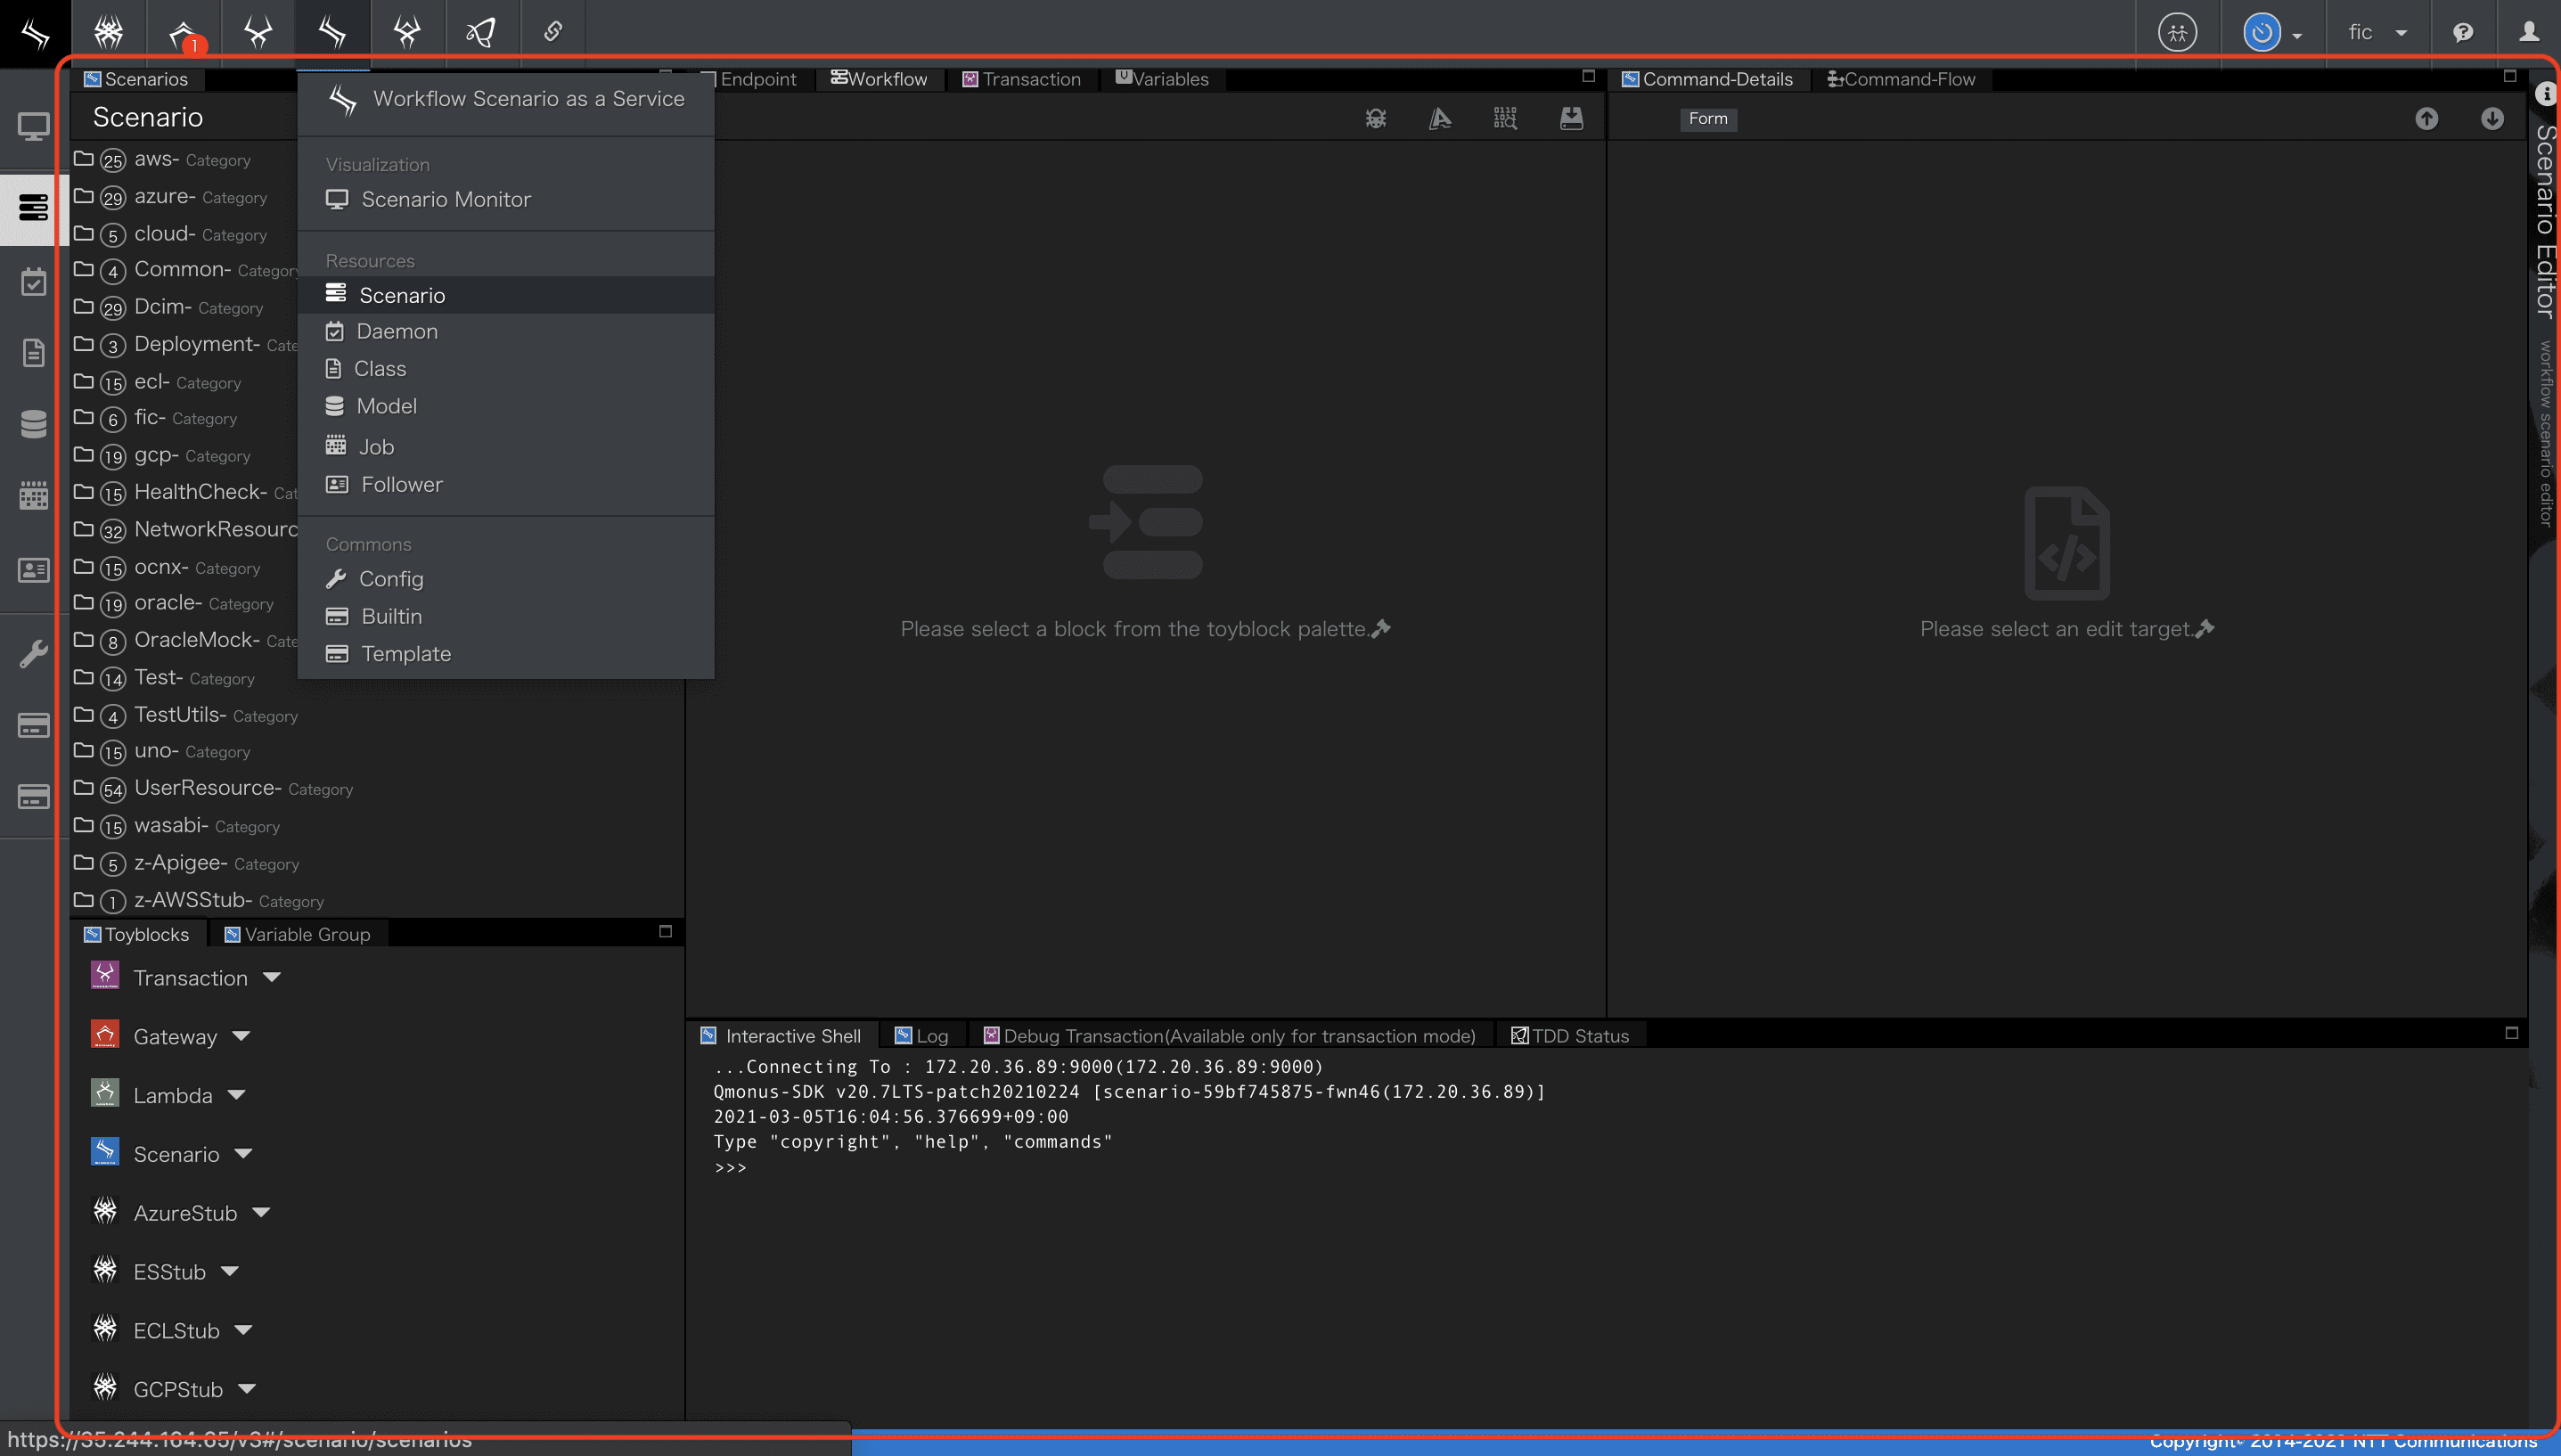
2. シナリオ定義
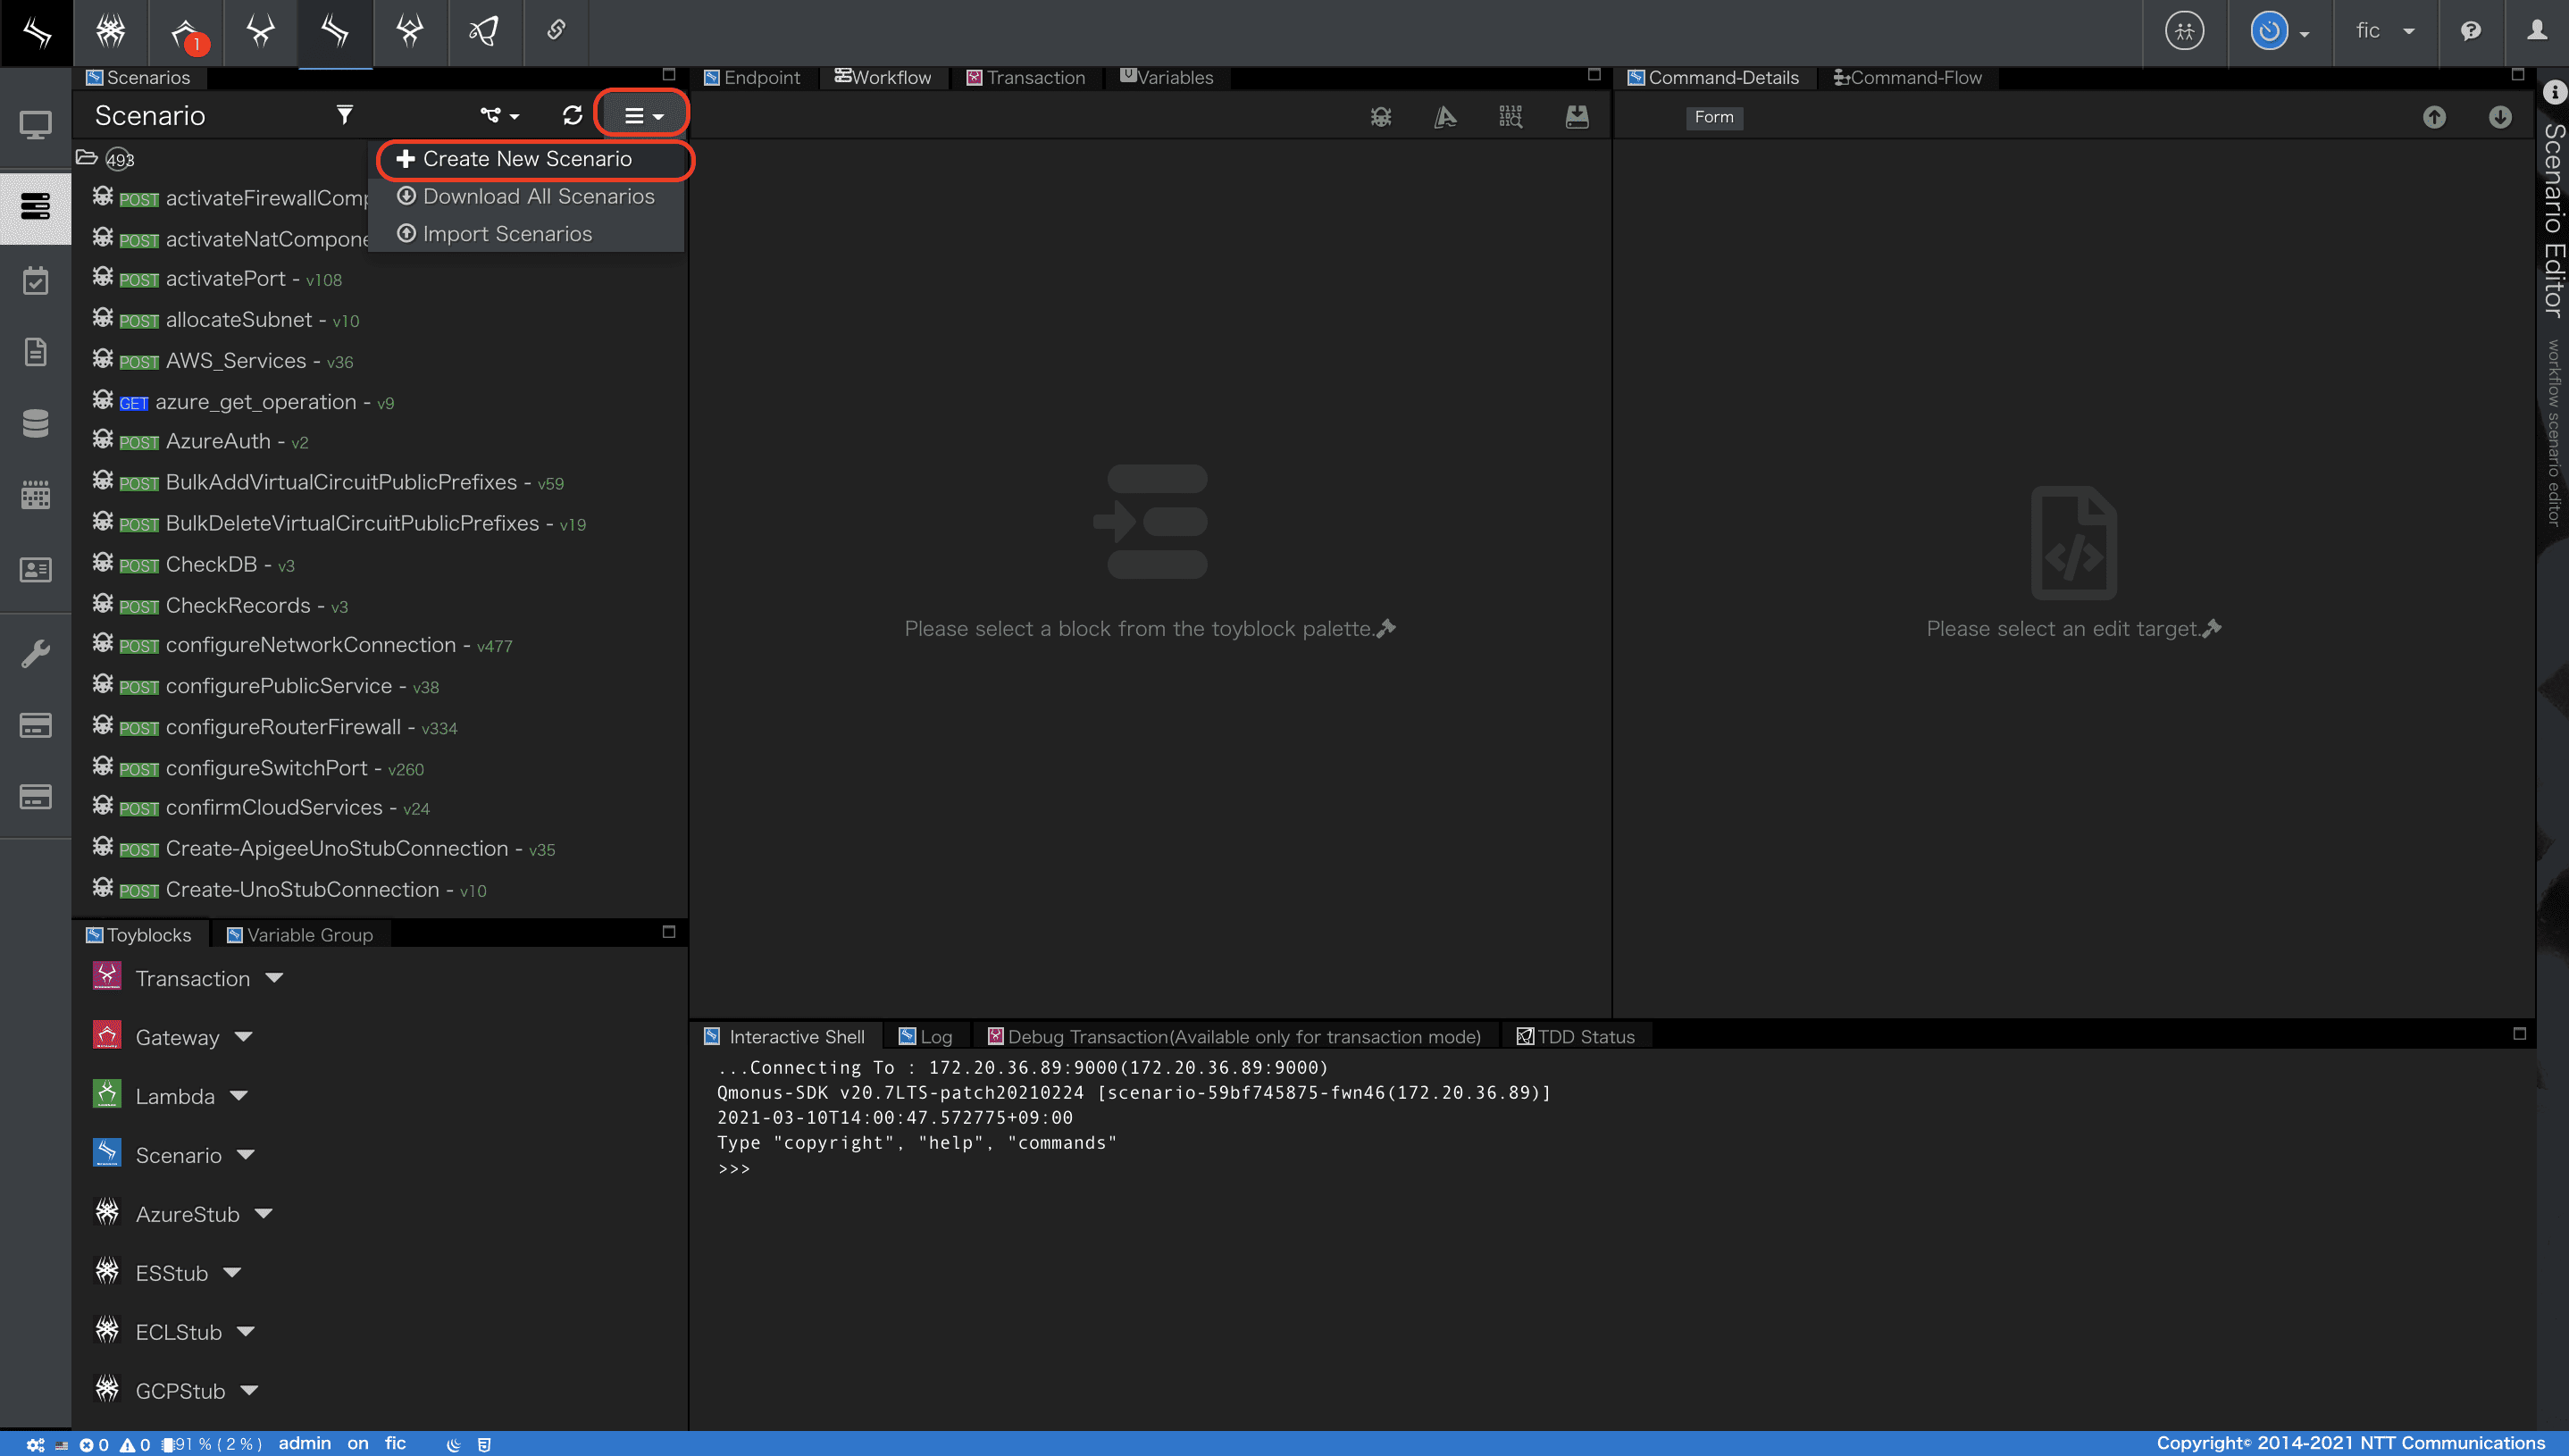
- シナリオエディタの画面左上部にあるメニューから[Create New Scenario]を選択します。
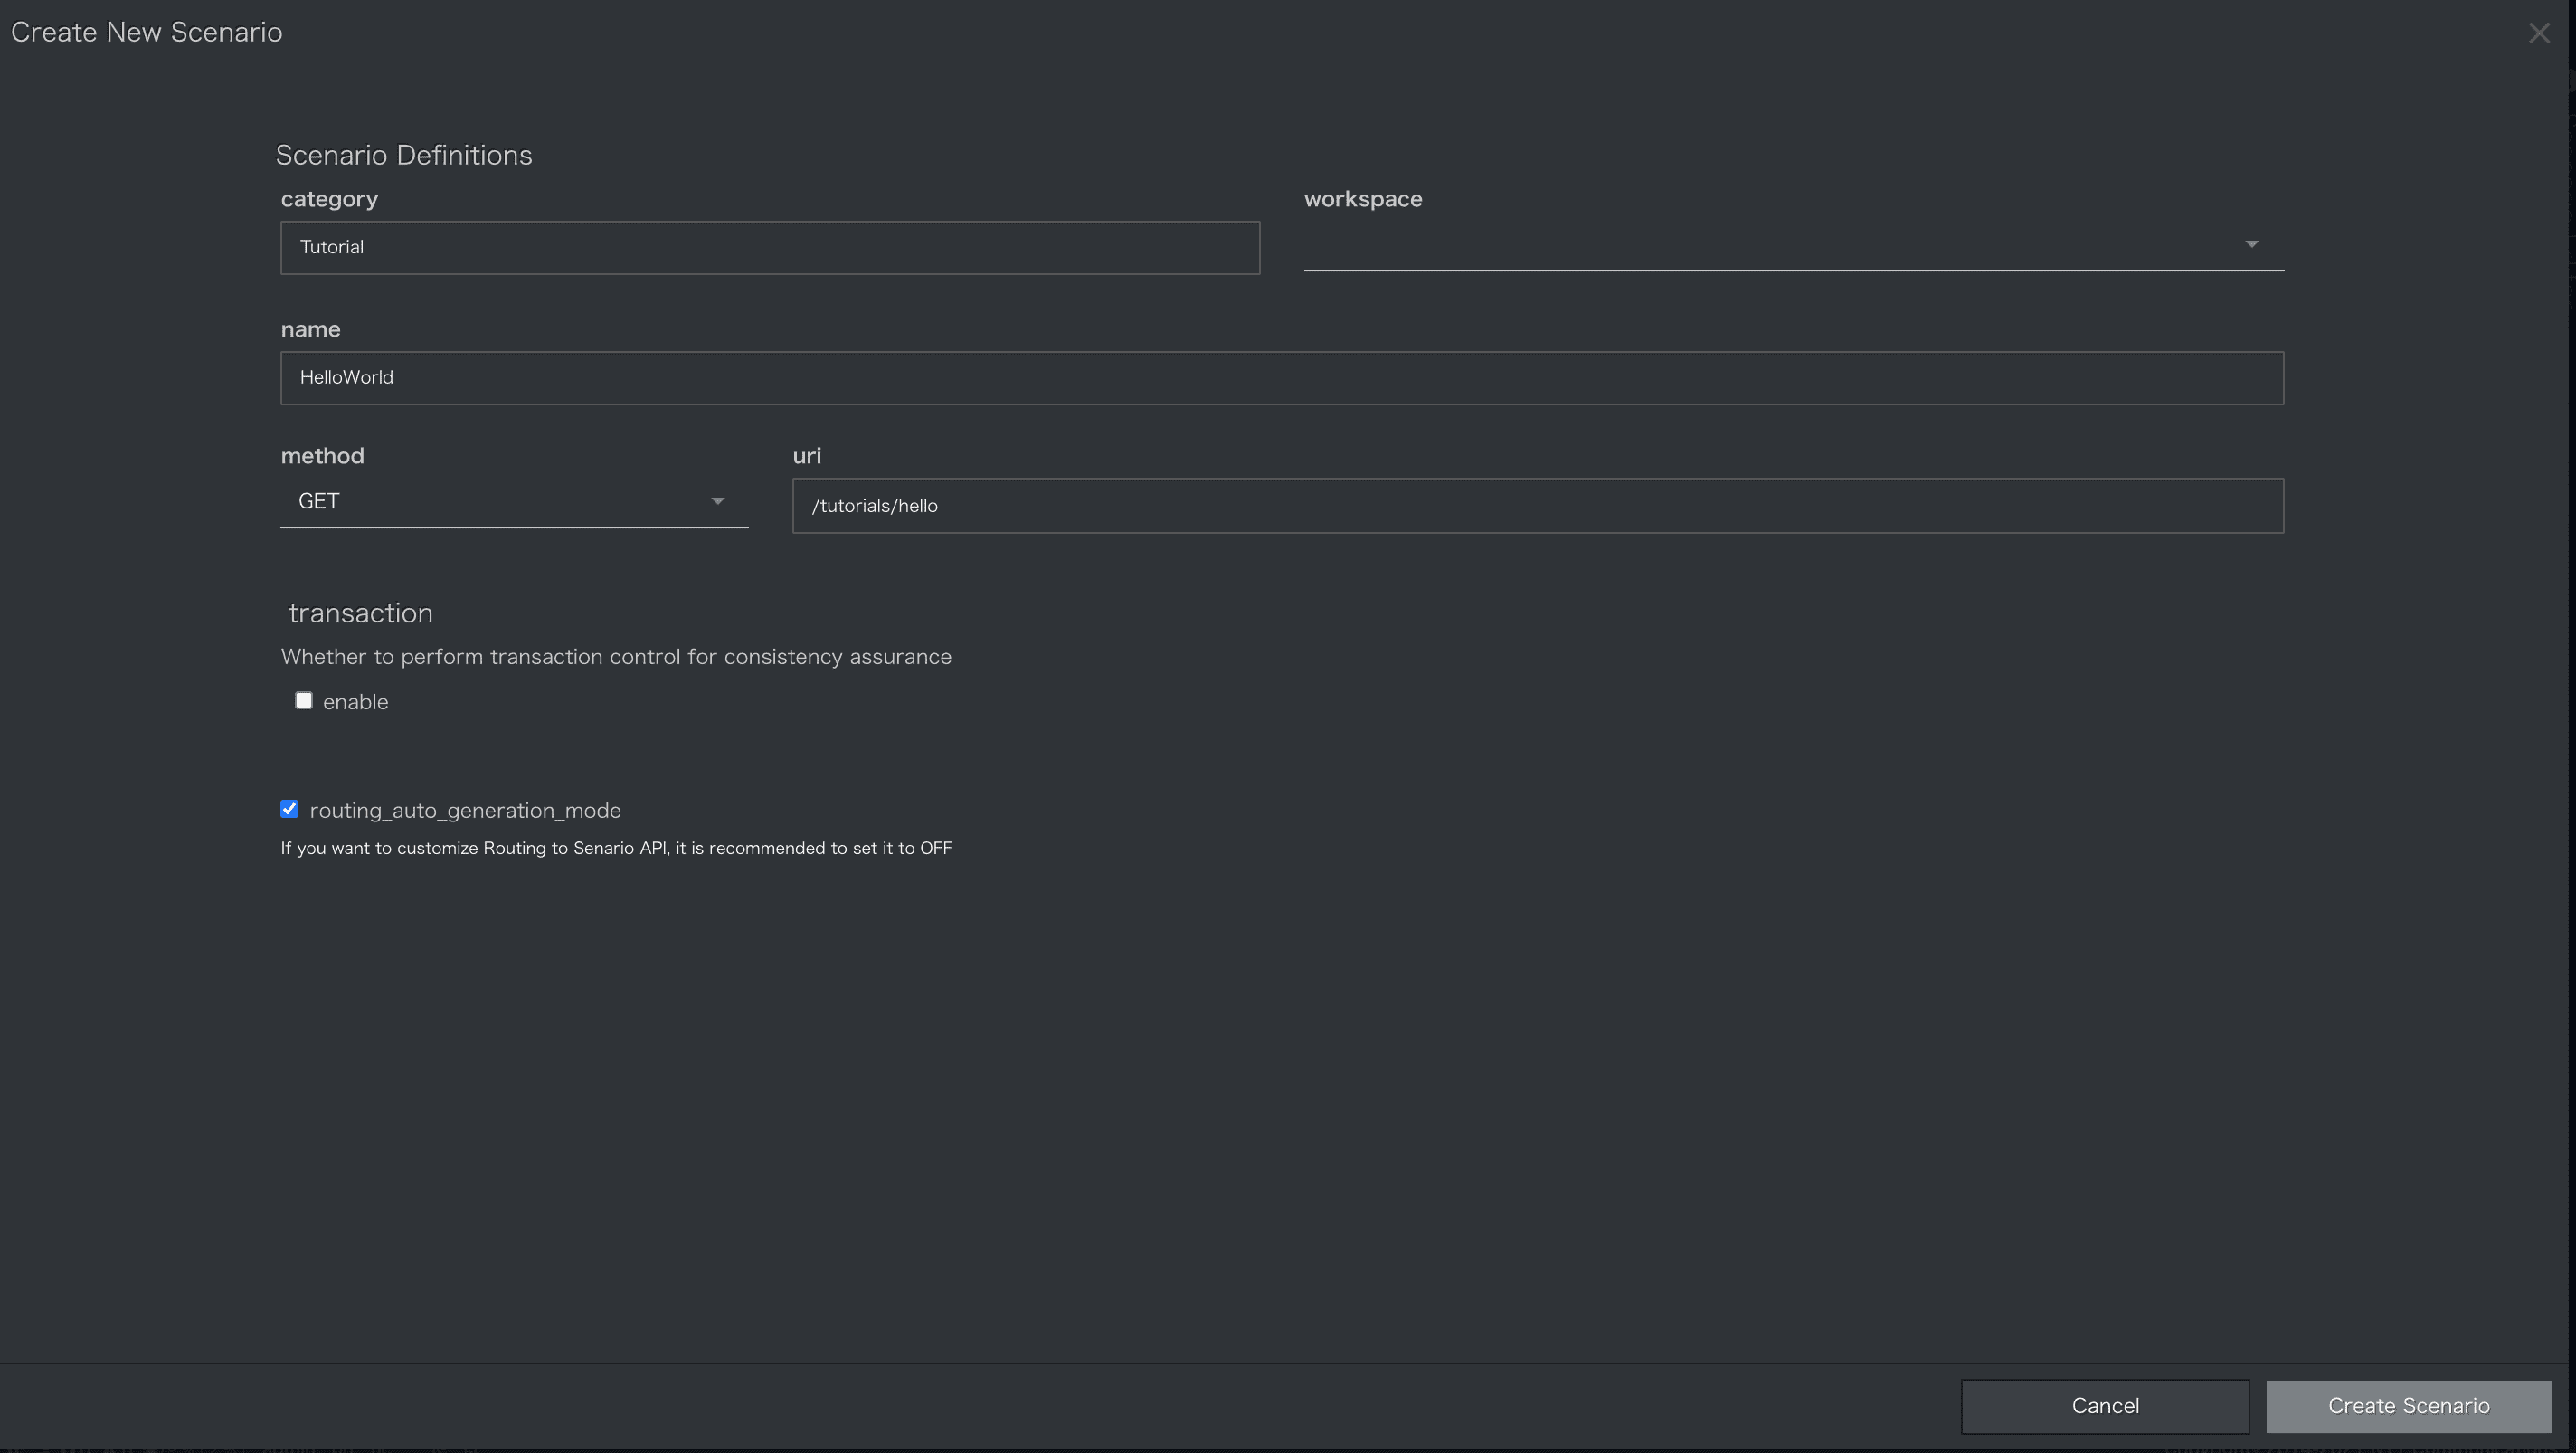
- シナリオ定義画面が開きますので、ここでシナリオの各種属性を定義します。
シナリオを新規作成する際はこのシナリオ定義から行います。
[シナリオ定義画面]
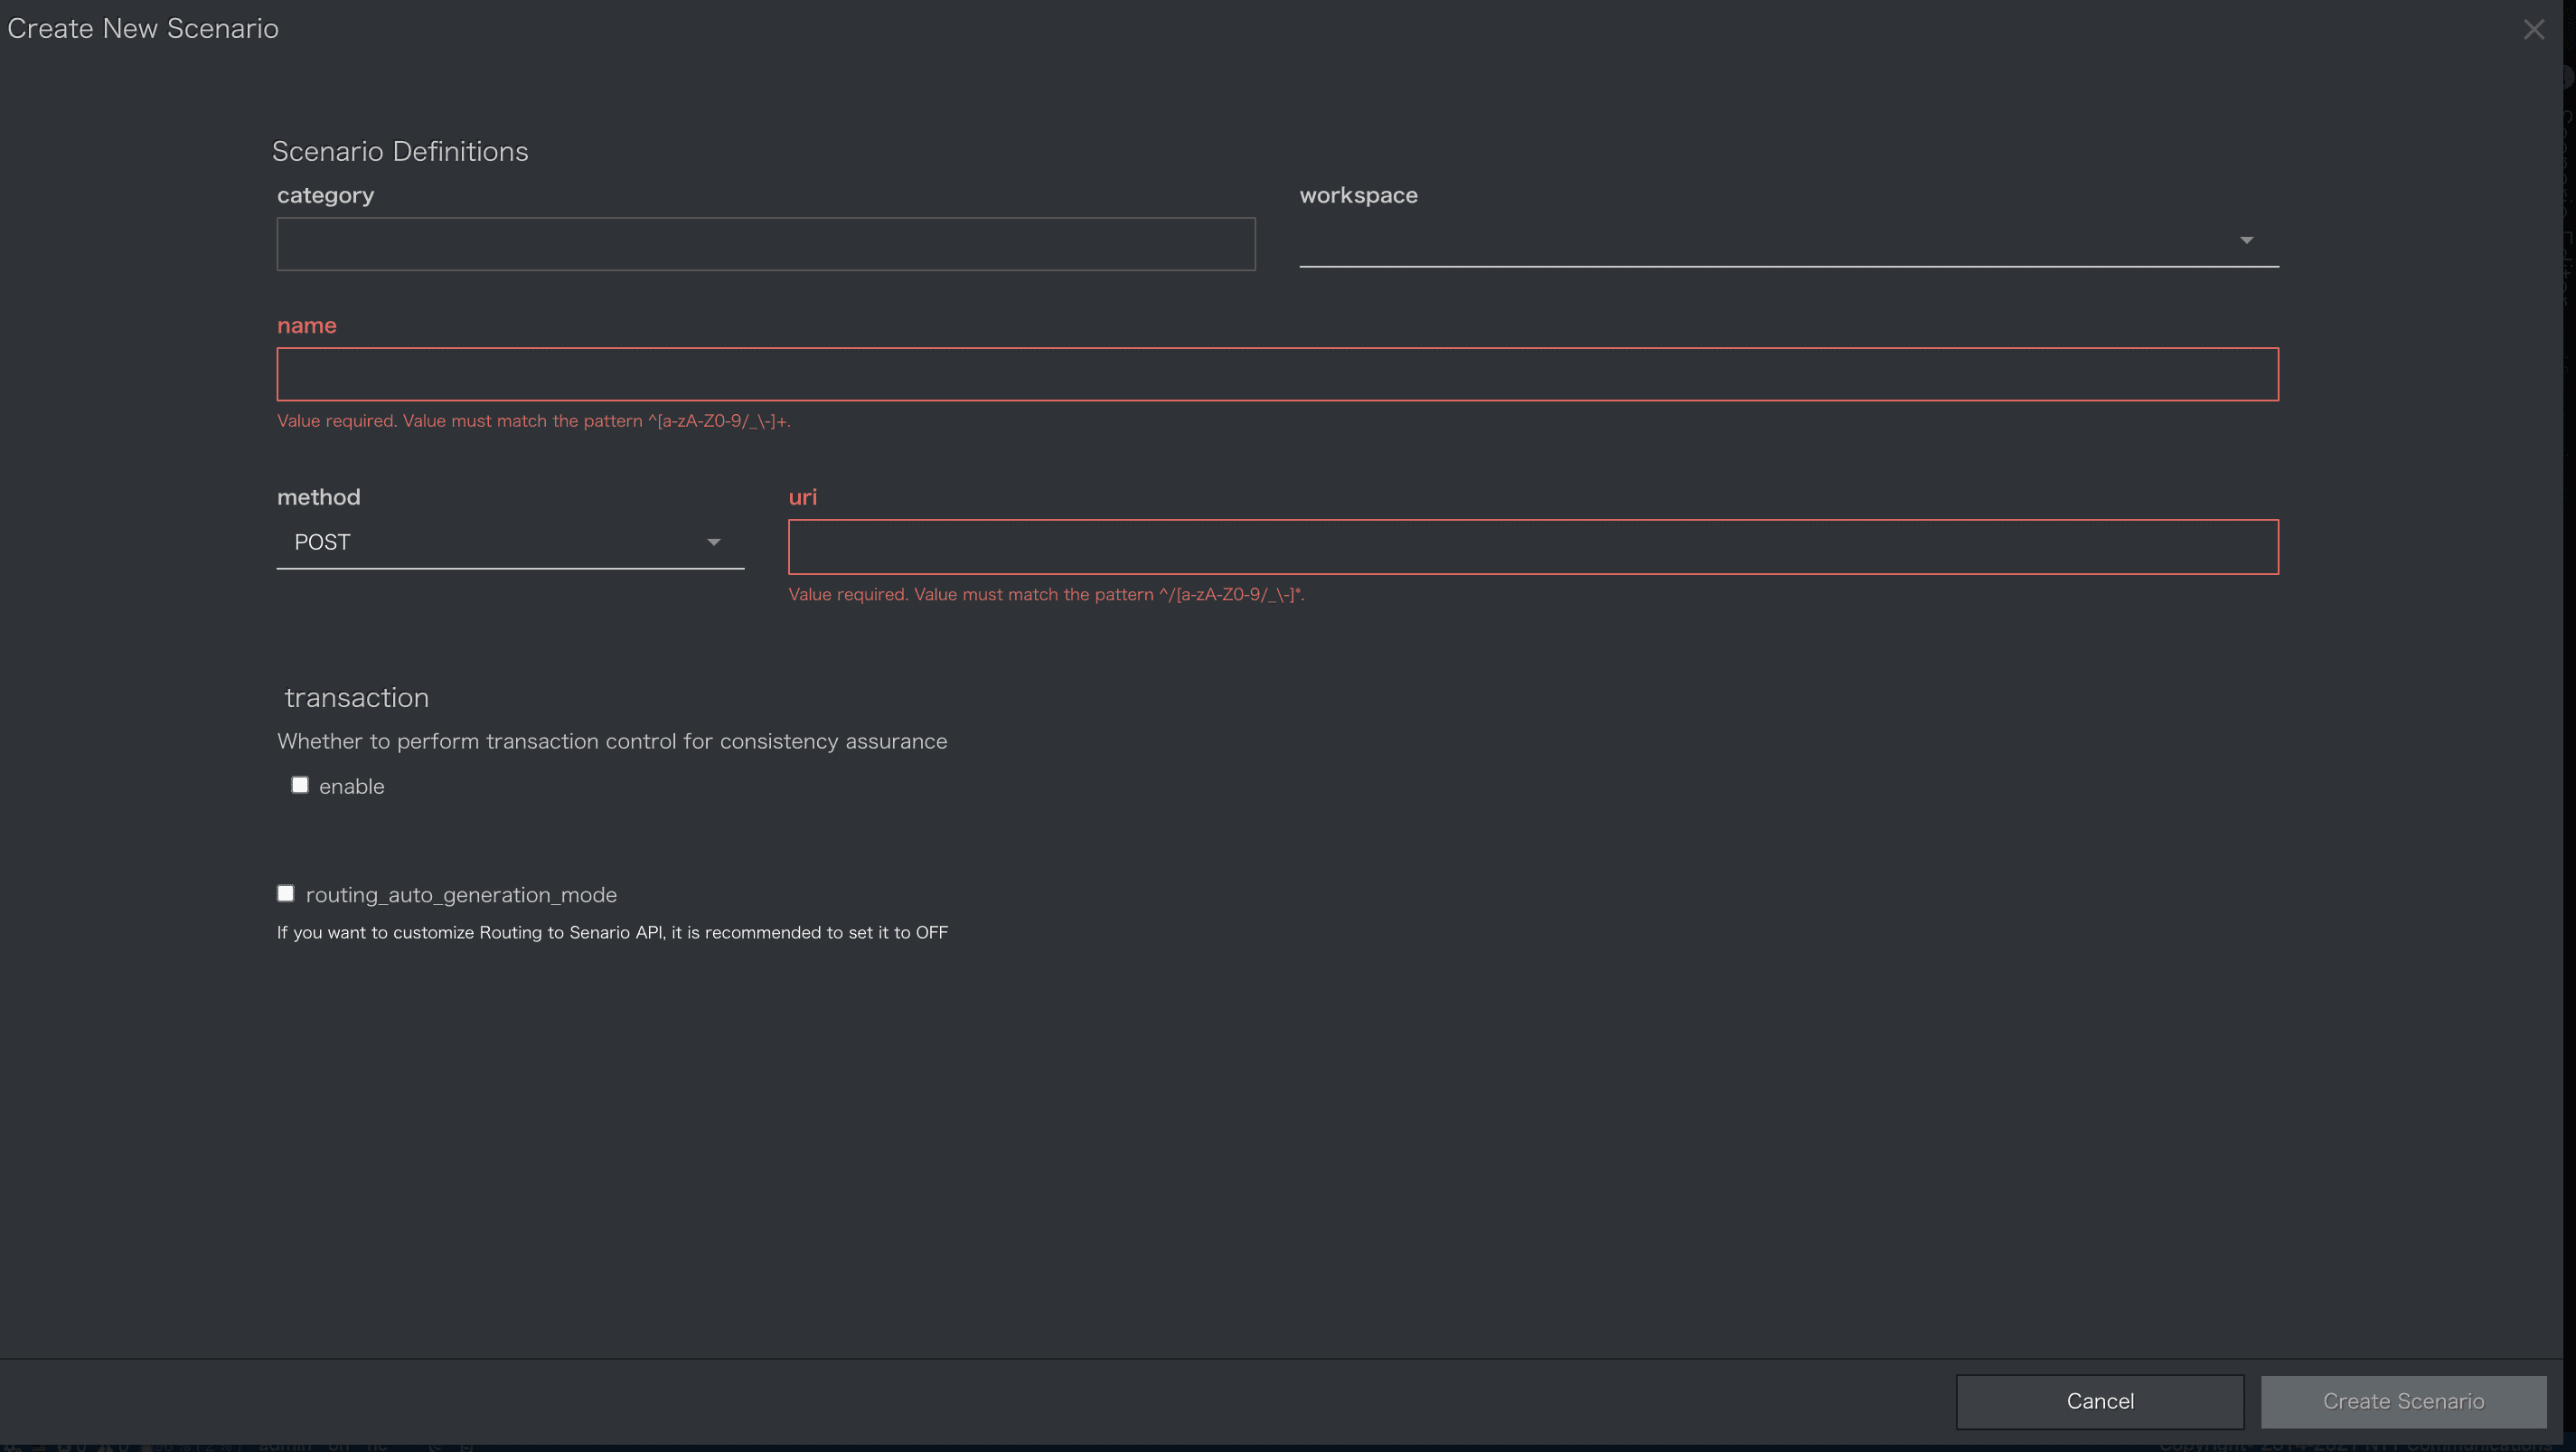
- 以下の項目を入力してください。
| 項番 | 項目 | 入力値 | 説明 |
|---|---|---|---|
| 1 | category | Tutorial | シナリオが属する分類を指定してください。この情報はシナリオエディタでの階層表示のためのタグとしてのみ使用されます |
| 2 | workspace | 未入力 | シナリオのワークスペースを設定します |
| 3 | name | HelloWorld | シナリオの名前を指定します。ユニークである必要があります。 |
| 4 | method | GET | APIとして待機するHTTPメソッドを指定します。 |
| 5 | uri | /tutorials/hello | APIとして待機するHTTPパスを指定します。 |
| 6 | transaction | 未選択 | トランザクションサービスと連携します。今回は利用しません。 |
| 7 | routing_auto_generation_mode | 選択 | API Gatewayにルーティングを自動登録するか選択します。 |
-
入力後、画面右下部にある[Create Scenario]ボタンを押下します。
-
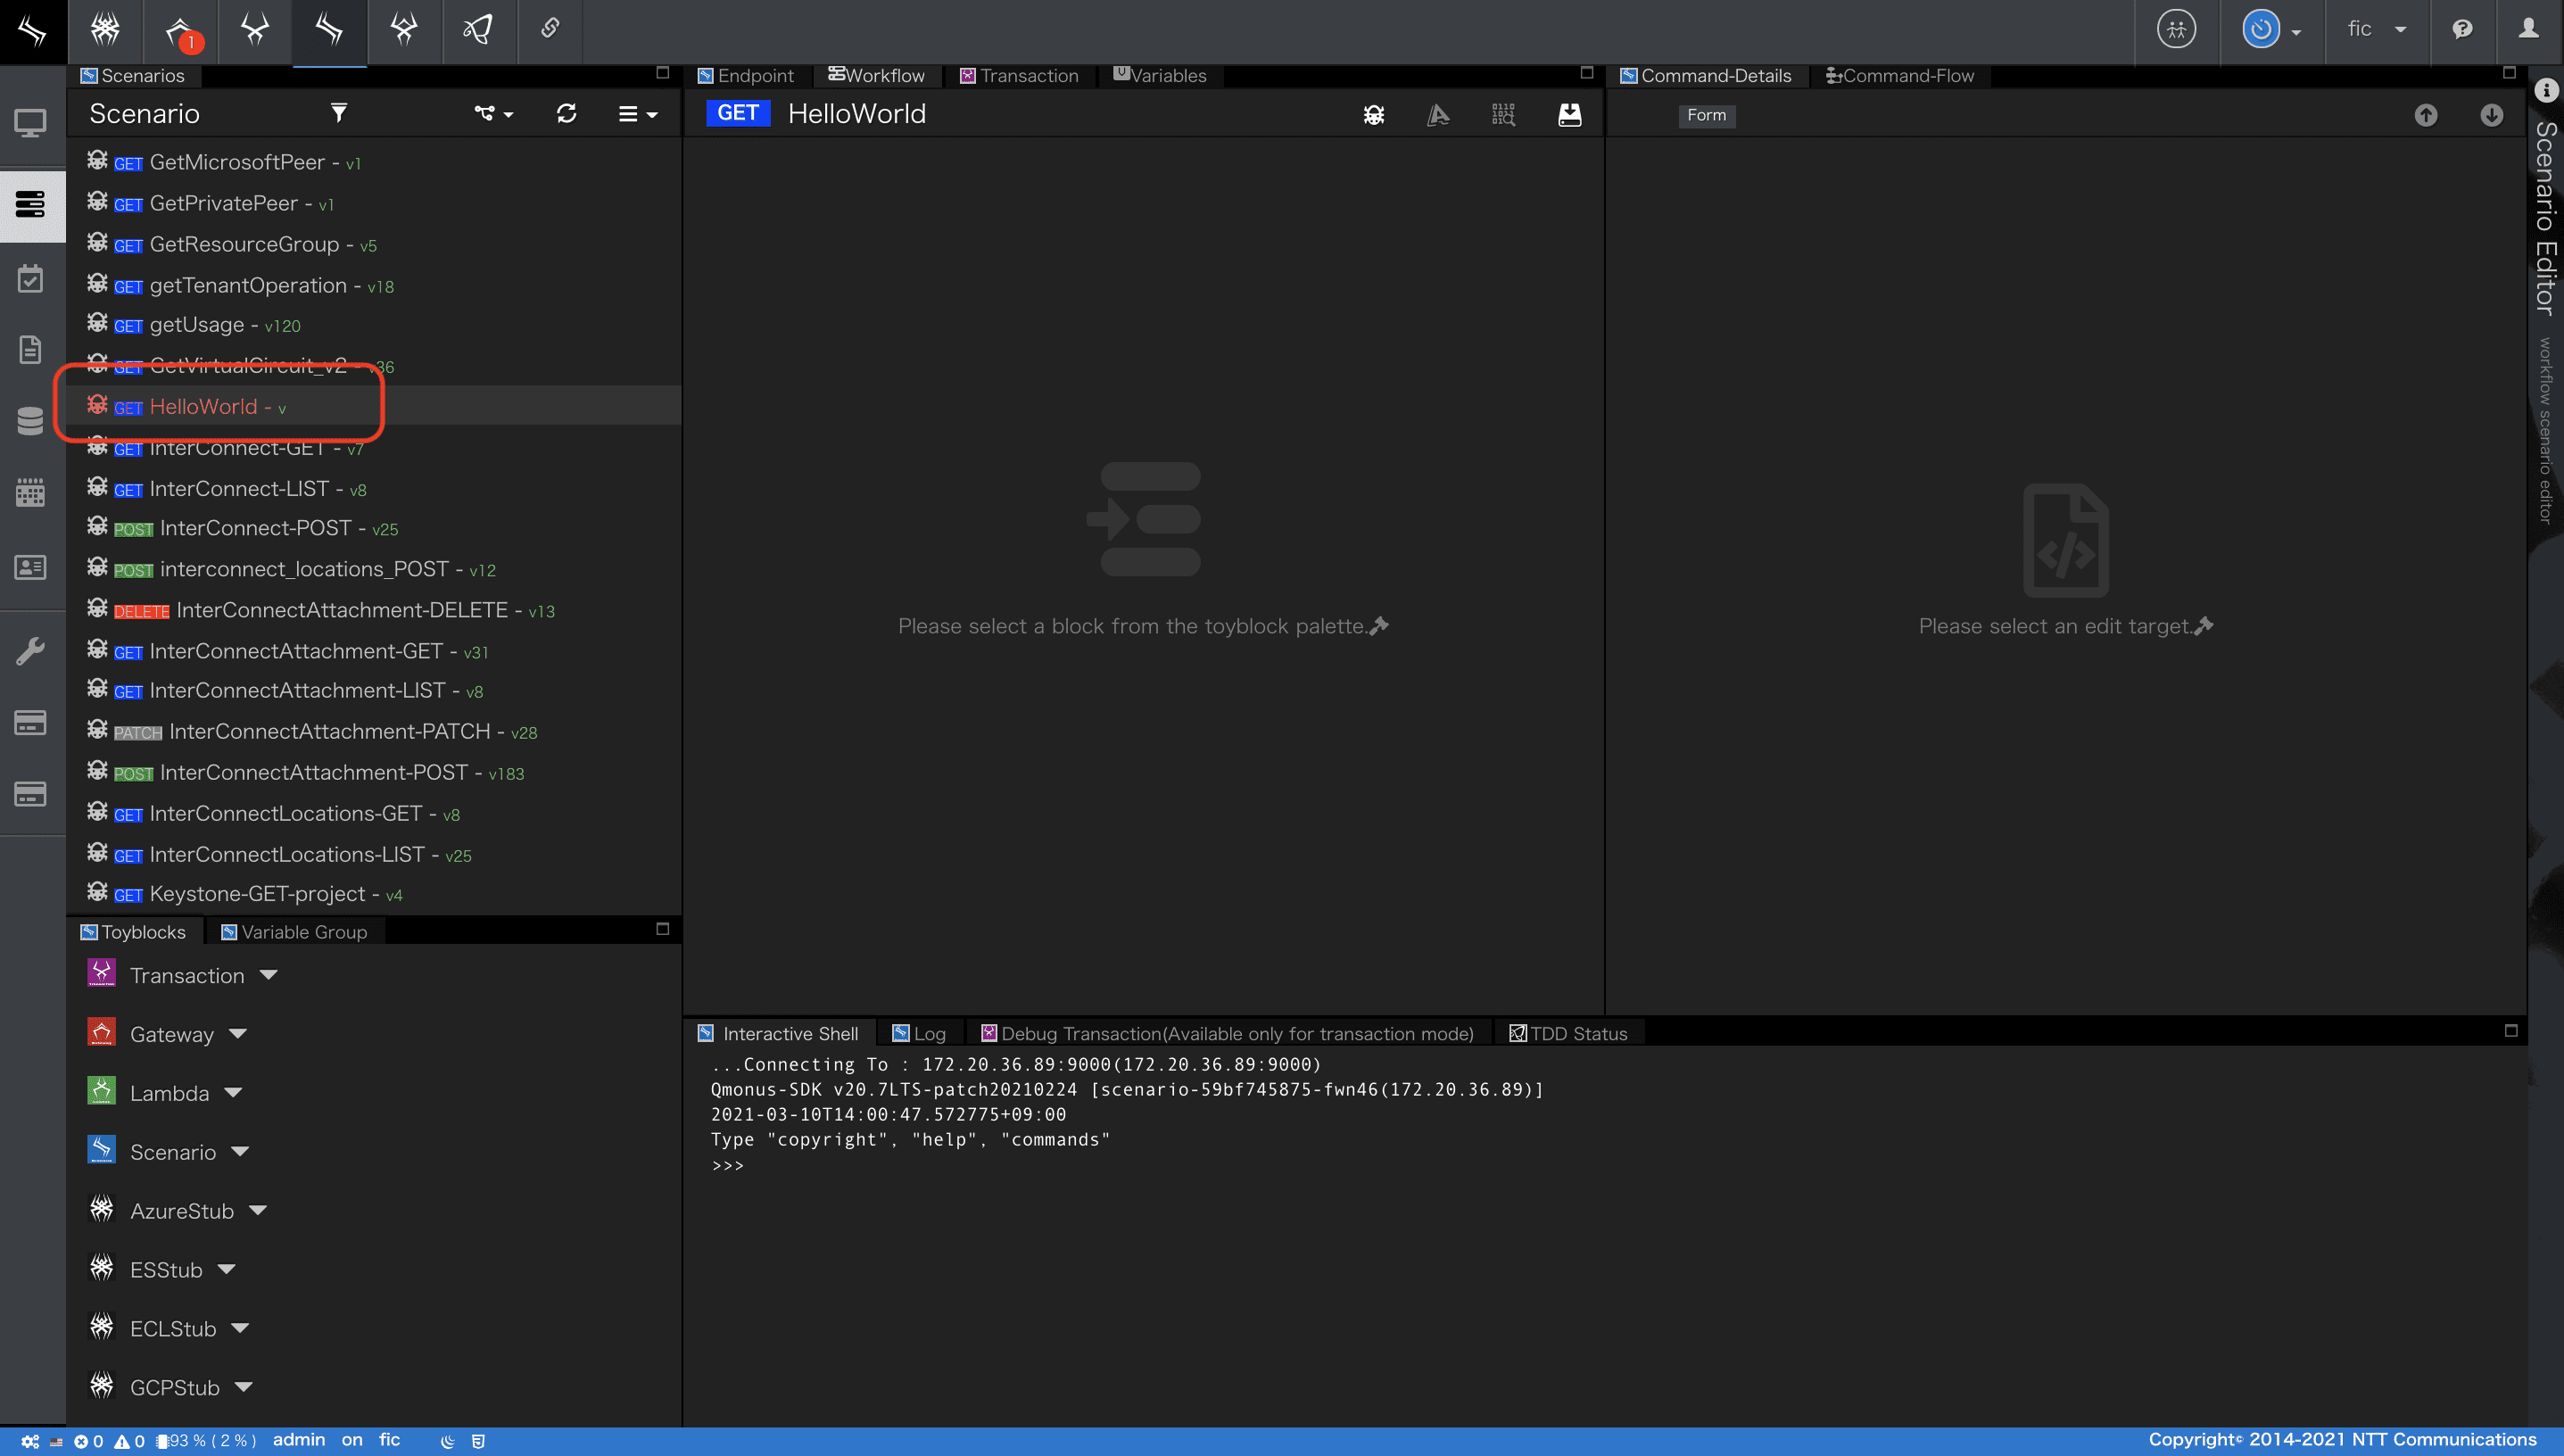
シナリオ定義画面が閉じ、シナリオエディタが表示されます。
画面左部にあるシナリオ一覧から、今回作成するHelloWorldシナリオが確認できます。
シナリオが保有するその他の属性や、ワークフロー設定で利用する組込みコマンド等シナリオについての詳細は
Qmonus SDK Programming Guide » Scenario » シナリオ
を参照してください。
3. ワークフロー設定
-
続いてシナリオ実行時のワークフローを設定します。
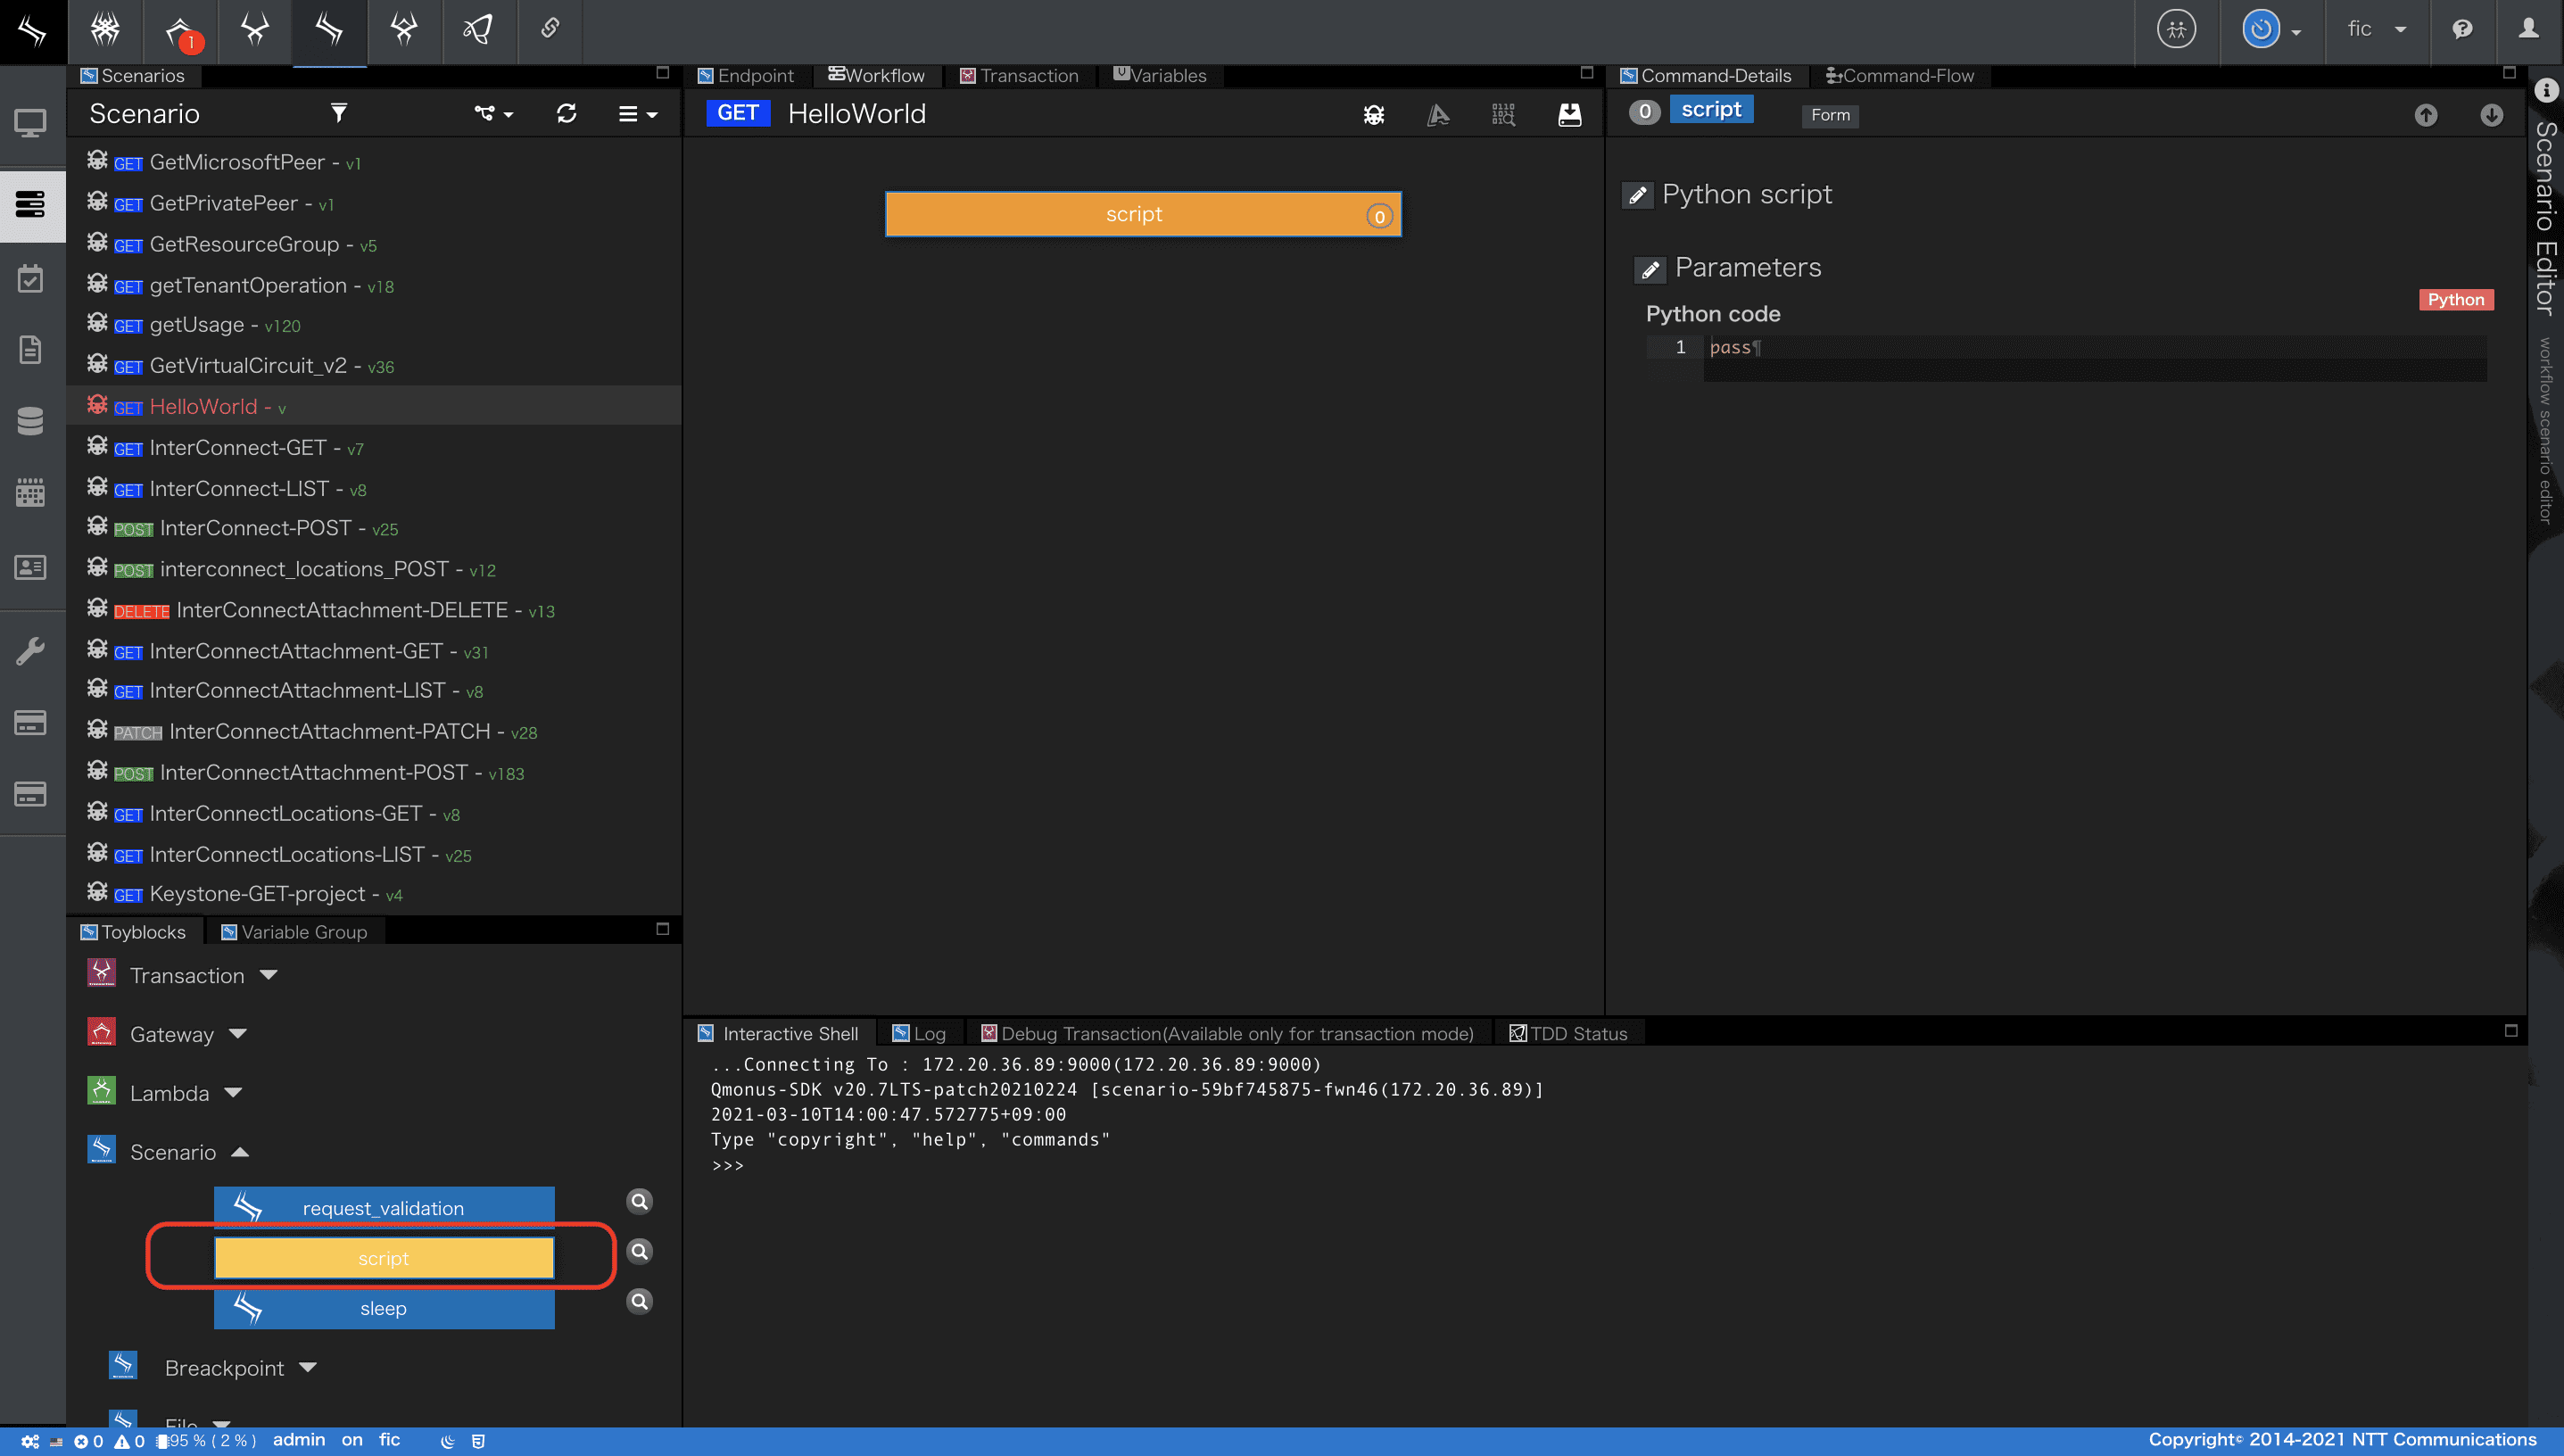
シナリオエディタ画面左下部にあるToyblocksからScenarioのscriptブロックをクリックしてください。
画面中央上部のWorkflowにscriptブロックが配置されます。
-
Workflowの
scriptブロックを選択すると画面右上部で、このブロックで実行する内容を設定することができます。
ここでは、以下のPython codeを入力し、API呼び出しに対する応答を返却する設定します。
python
context.session.finish({"message": "Hello, world!"})
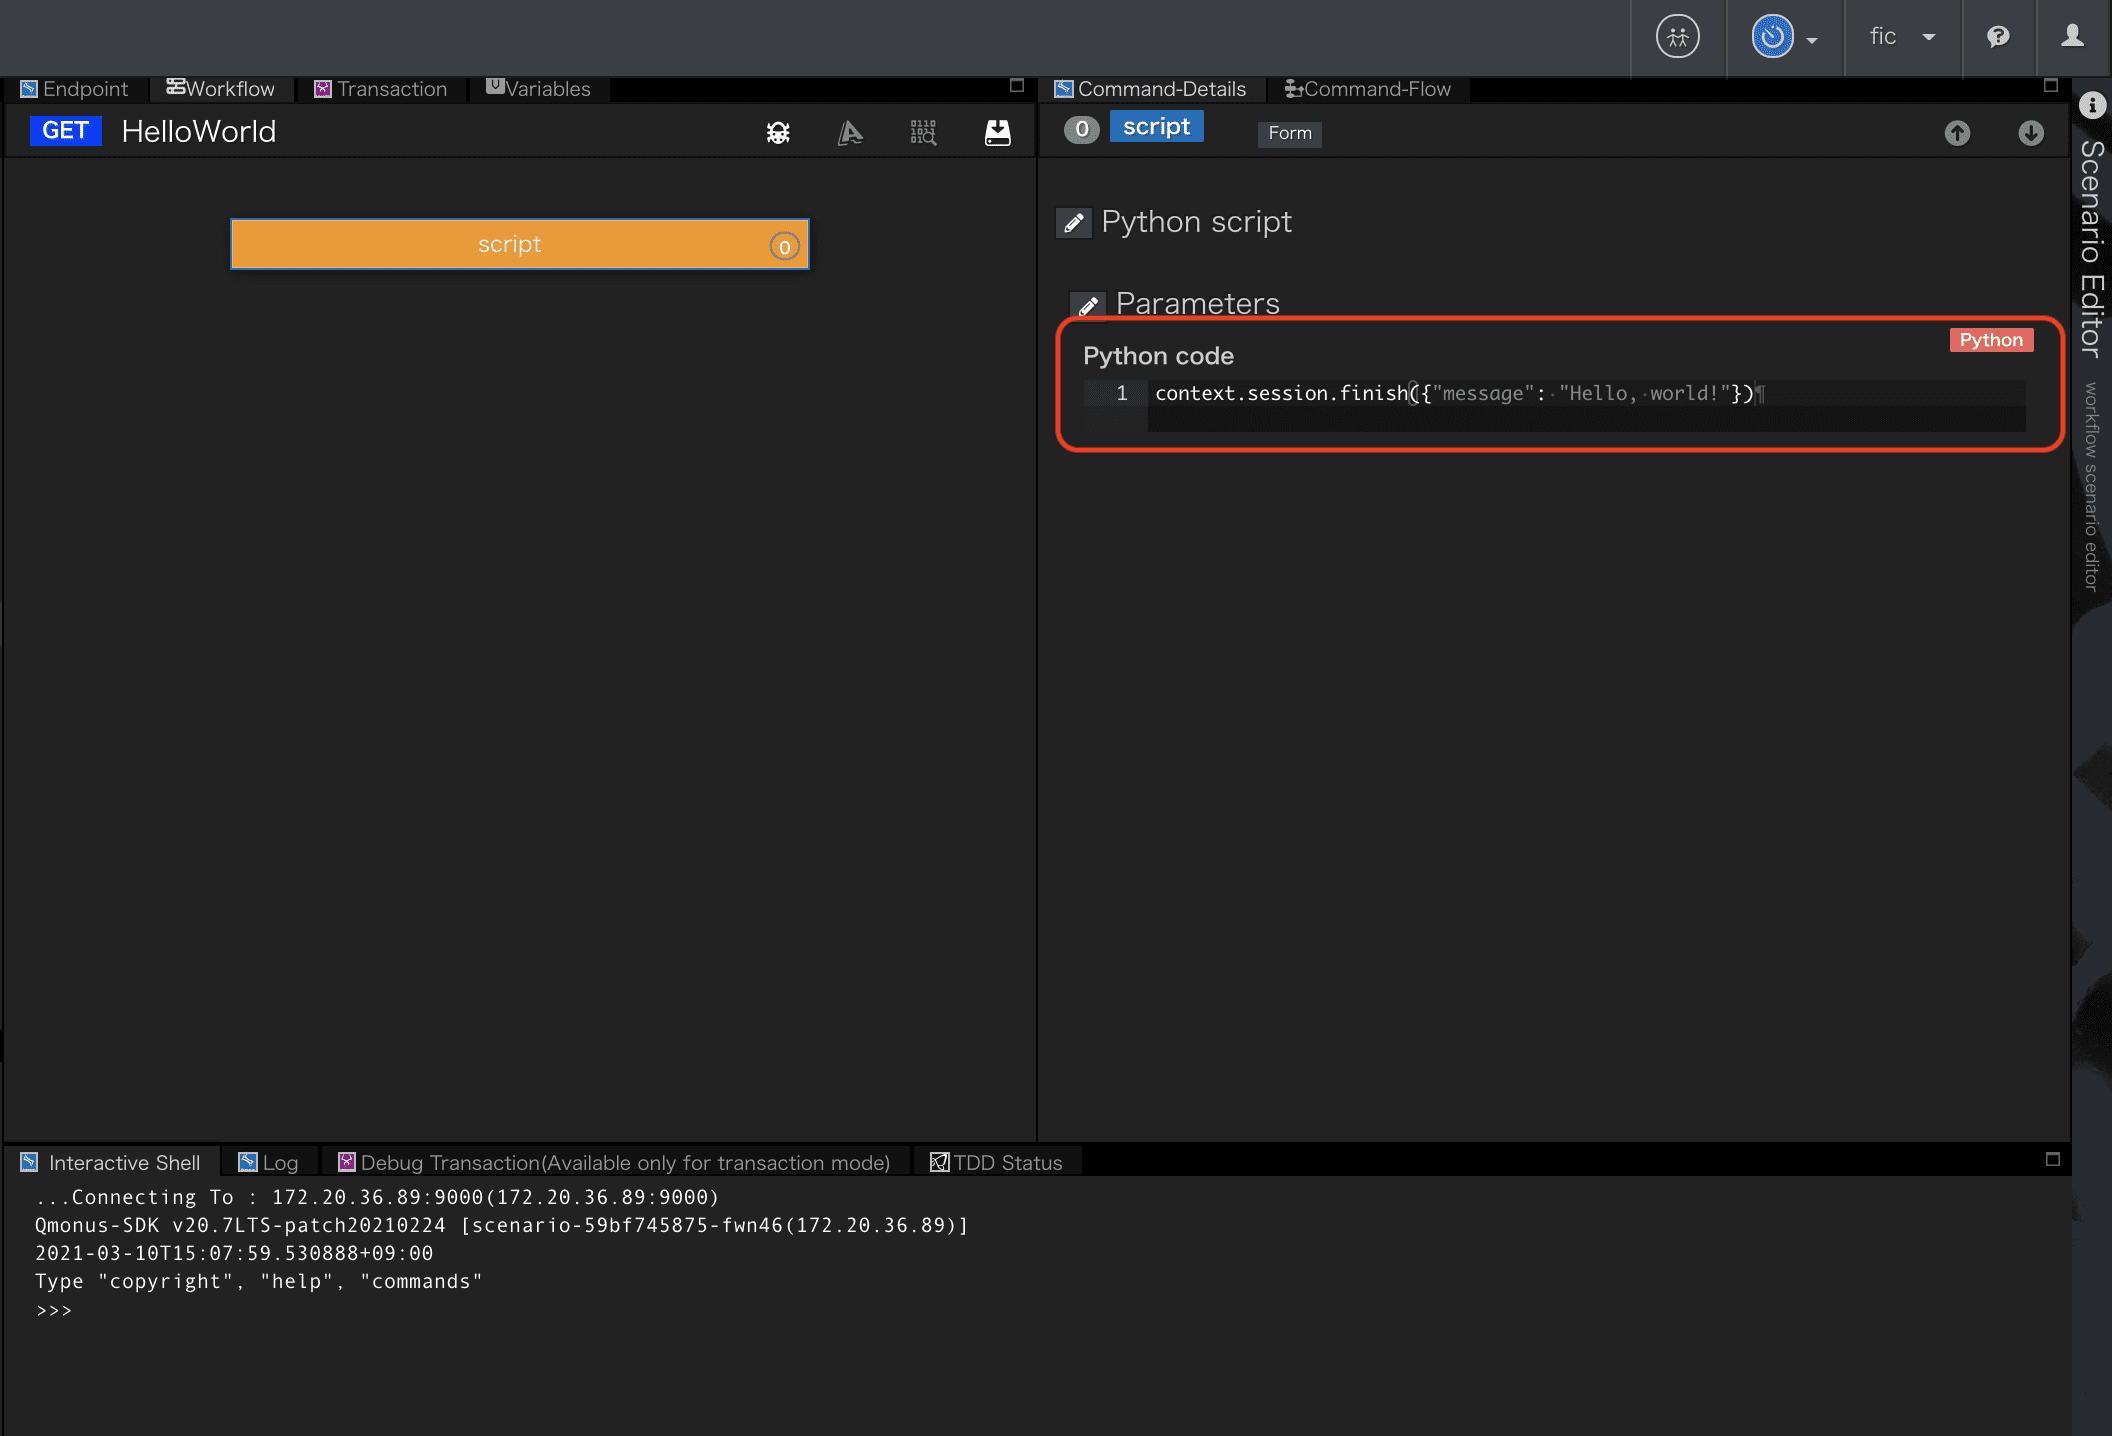
scriptの設定後、画面中央上部にあるアイコンからシナリオをSaveします。
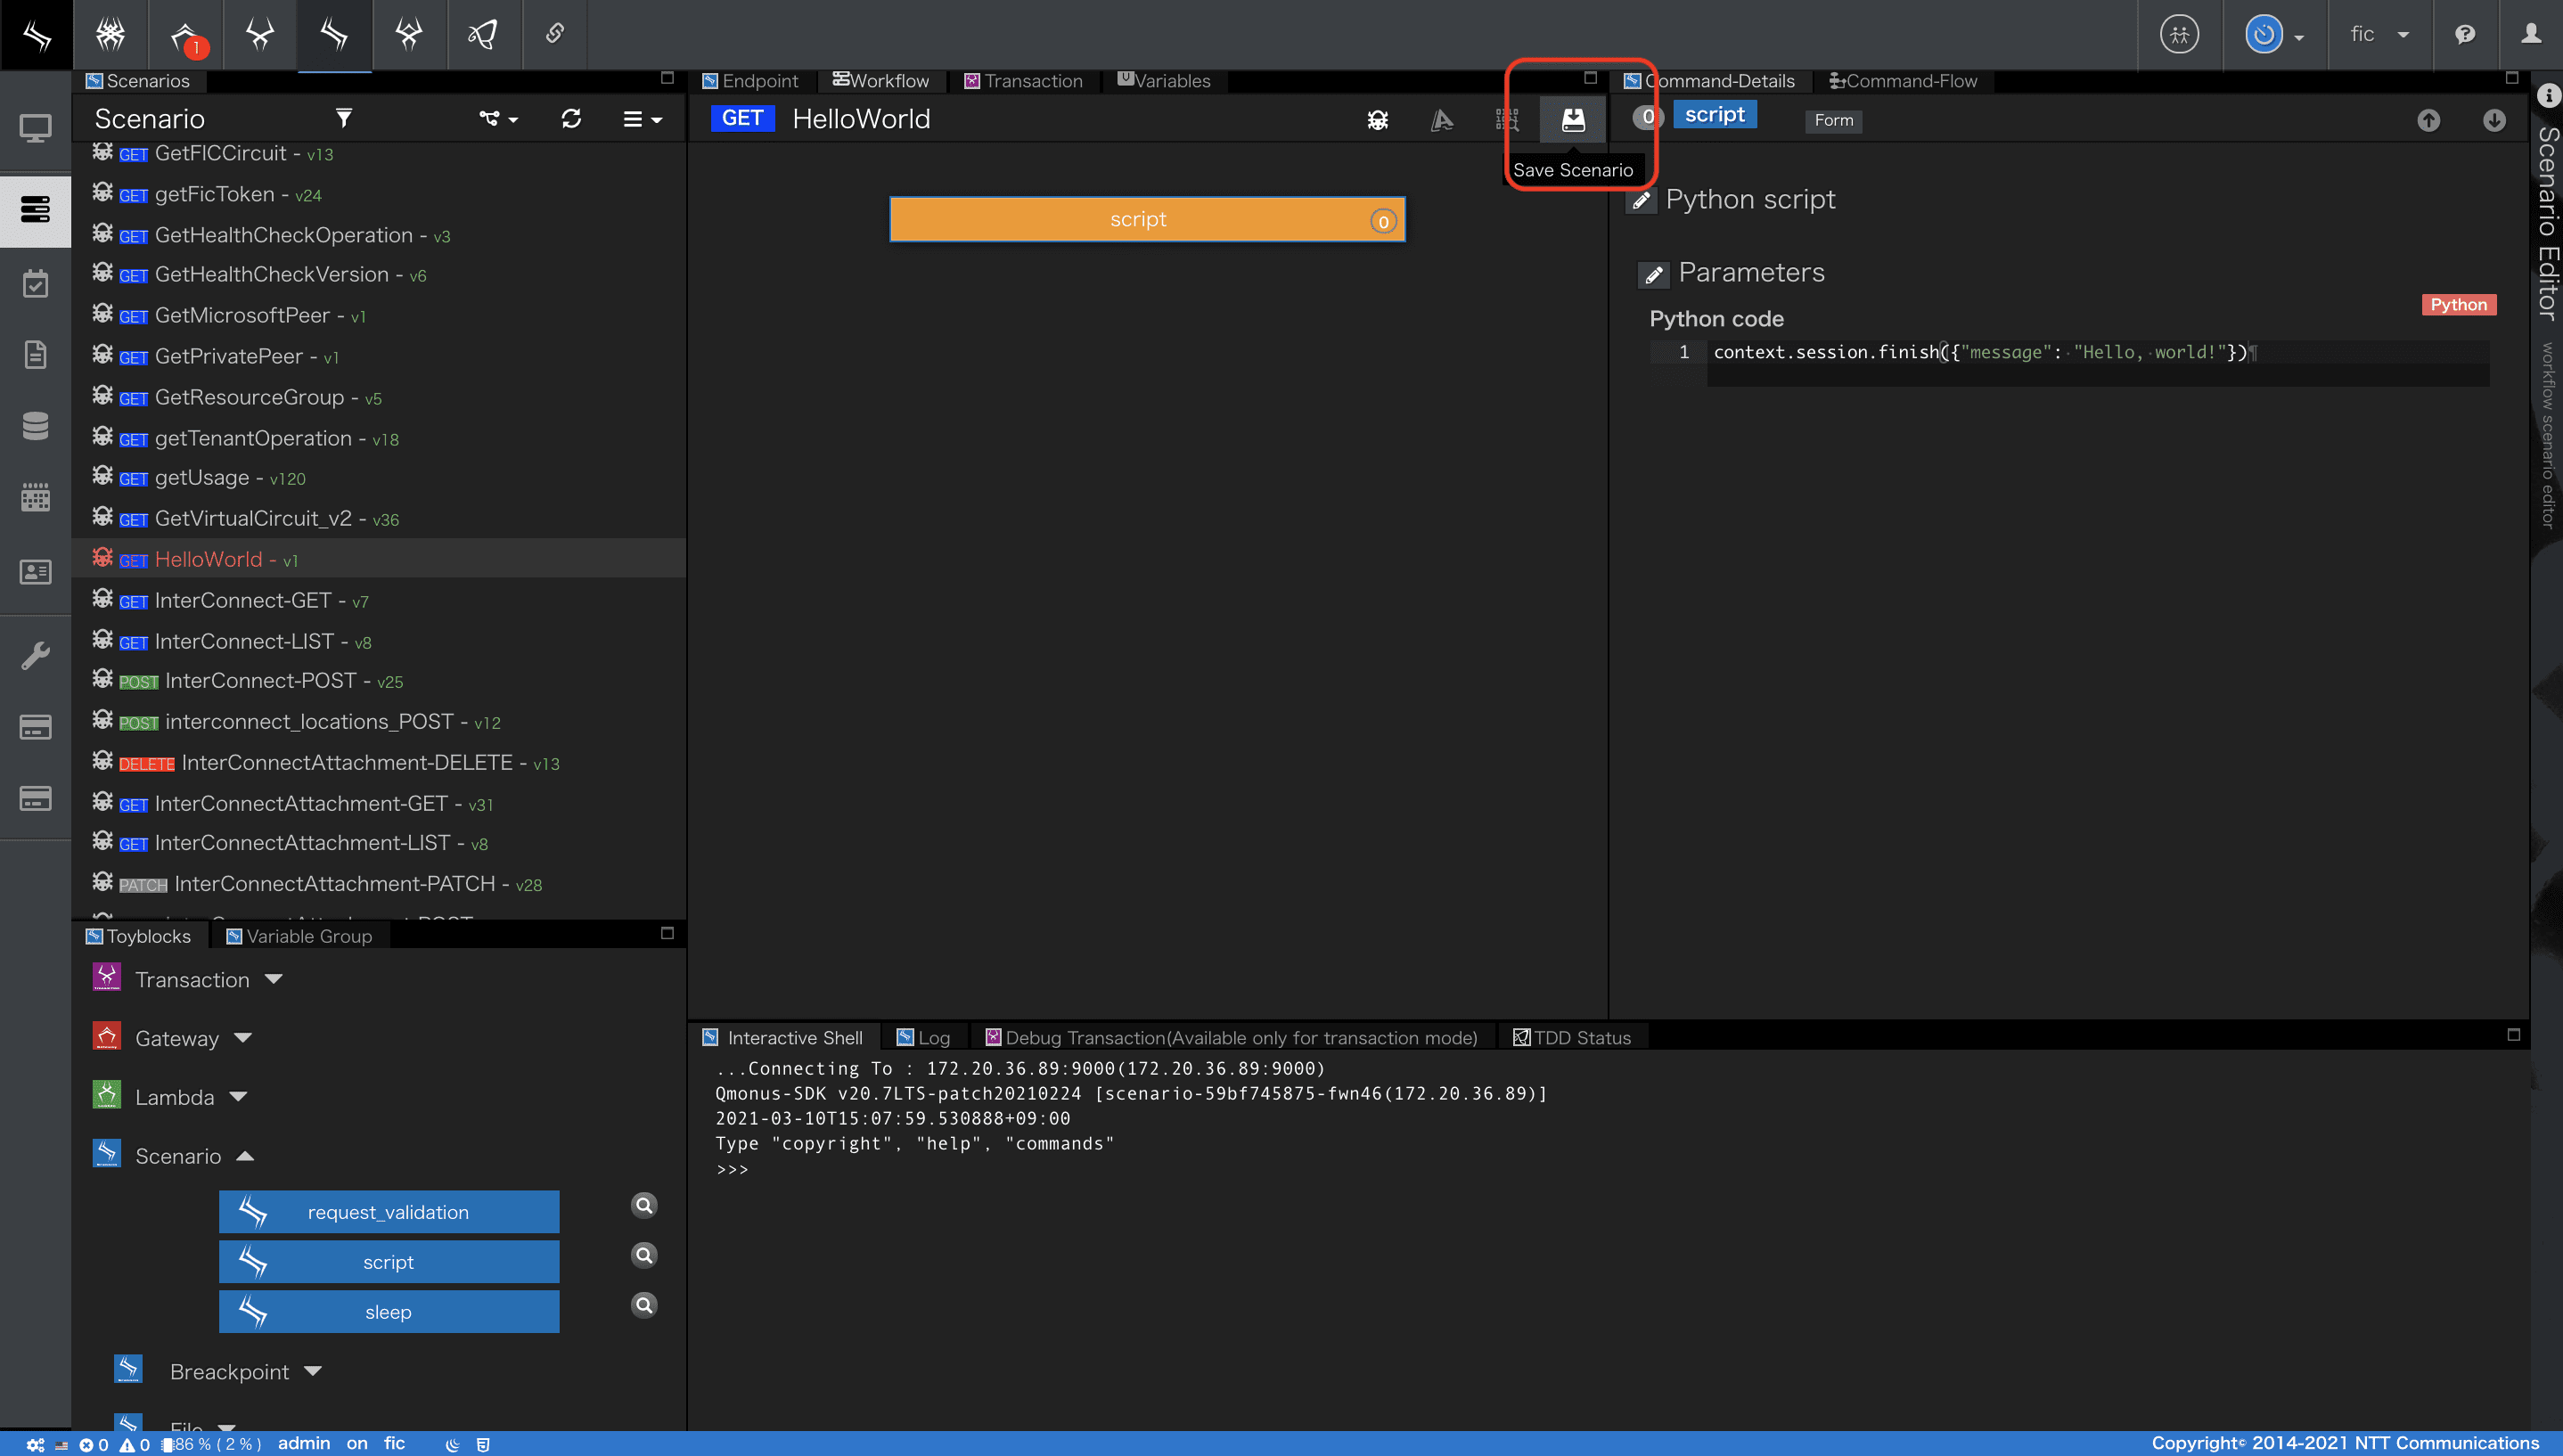
- このワークフローは、GET
/tutorials/helloのHTTPリクエストを受け付けます。ワークフローは、1つのコマンドブロックのみで構成され、1行のPythonスクリプトのみが実行されます。
context.sessionは、Webセッションオブジェクトへのアクセッサです。finishメソッドは、辞書オブジェクトまたは文字列を引数として取ります。
finishメソッドが呼び出されると、HTTP応答が返されます。
組込みオブジェクトの詳細は
Qmonus SDK Programming Guide » 名前空間 » リファレンス » Scenarioにおけるプログラミング
を参照してください。
APIの呼び出し
APIの呼び出し方法はいくつかありますが、
ここではシナリオの[Try API Call]メニューから実行します。
-
[HelloWorld]シナリオを開きます。
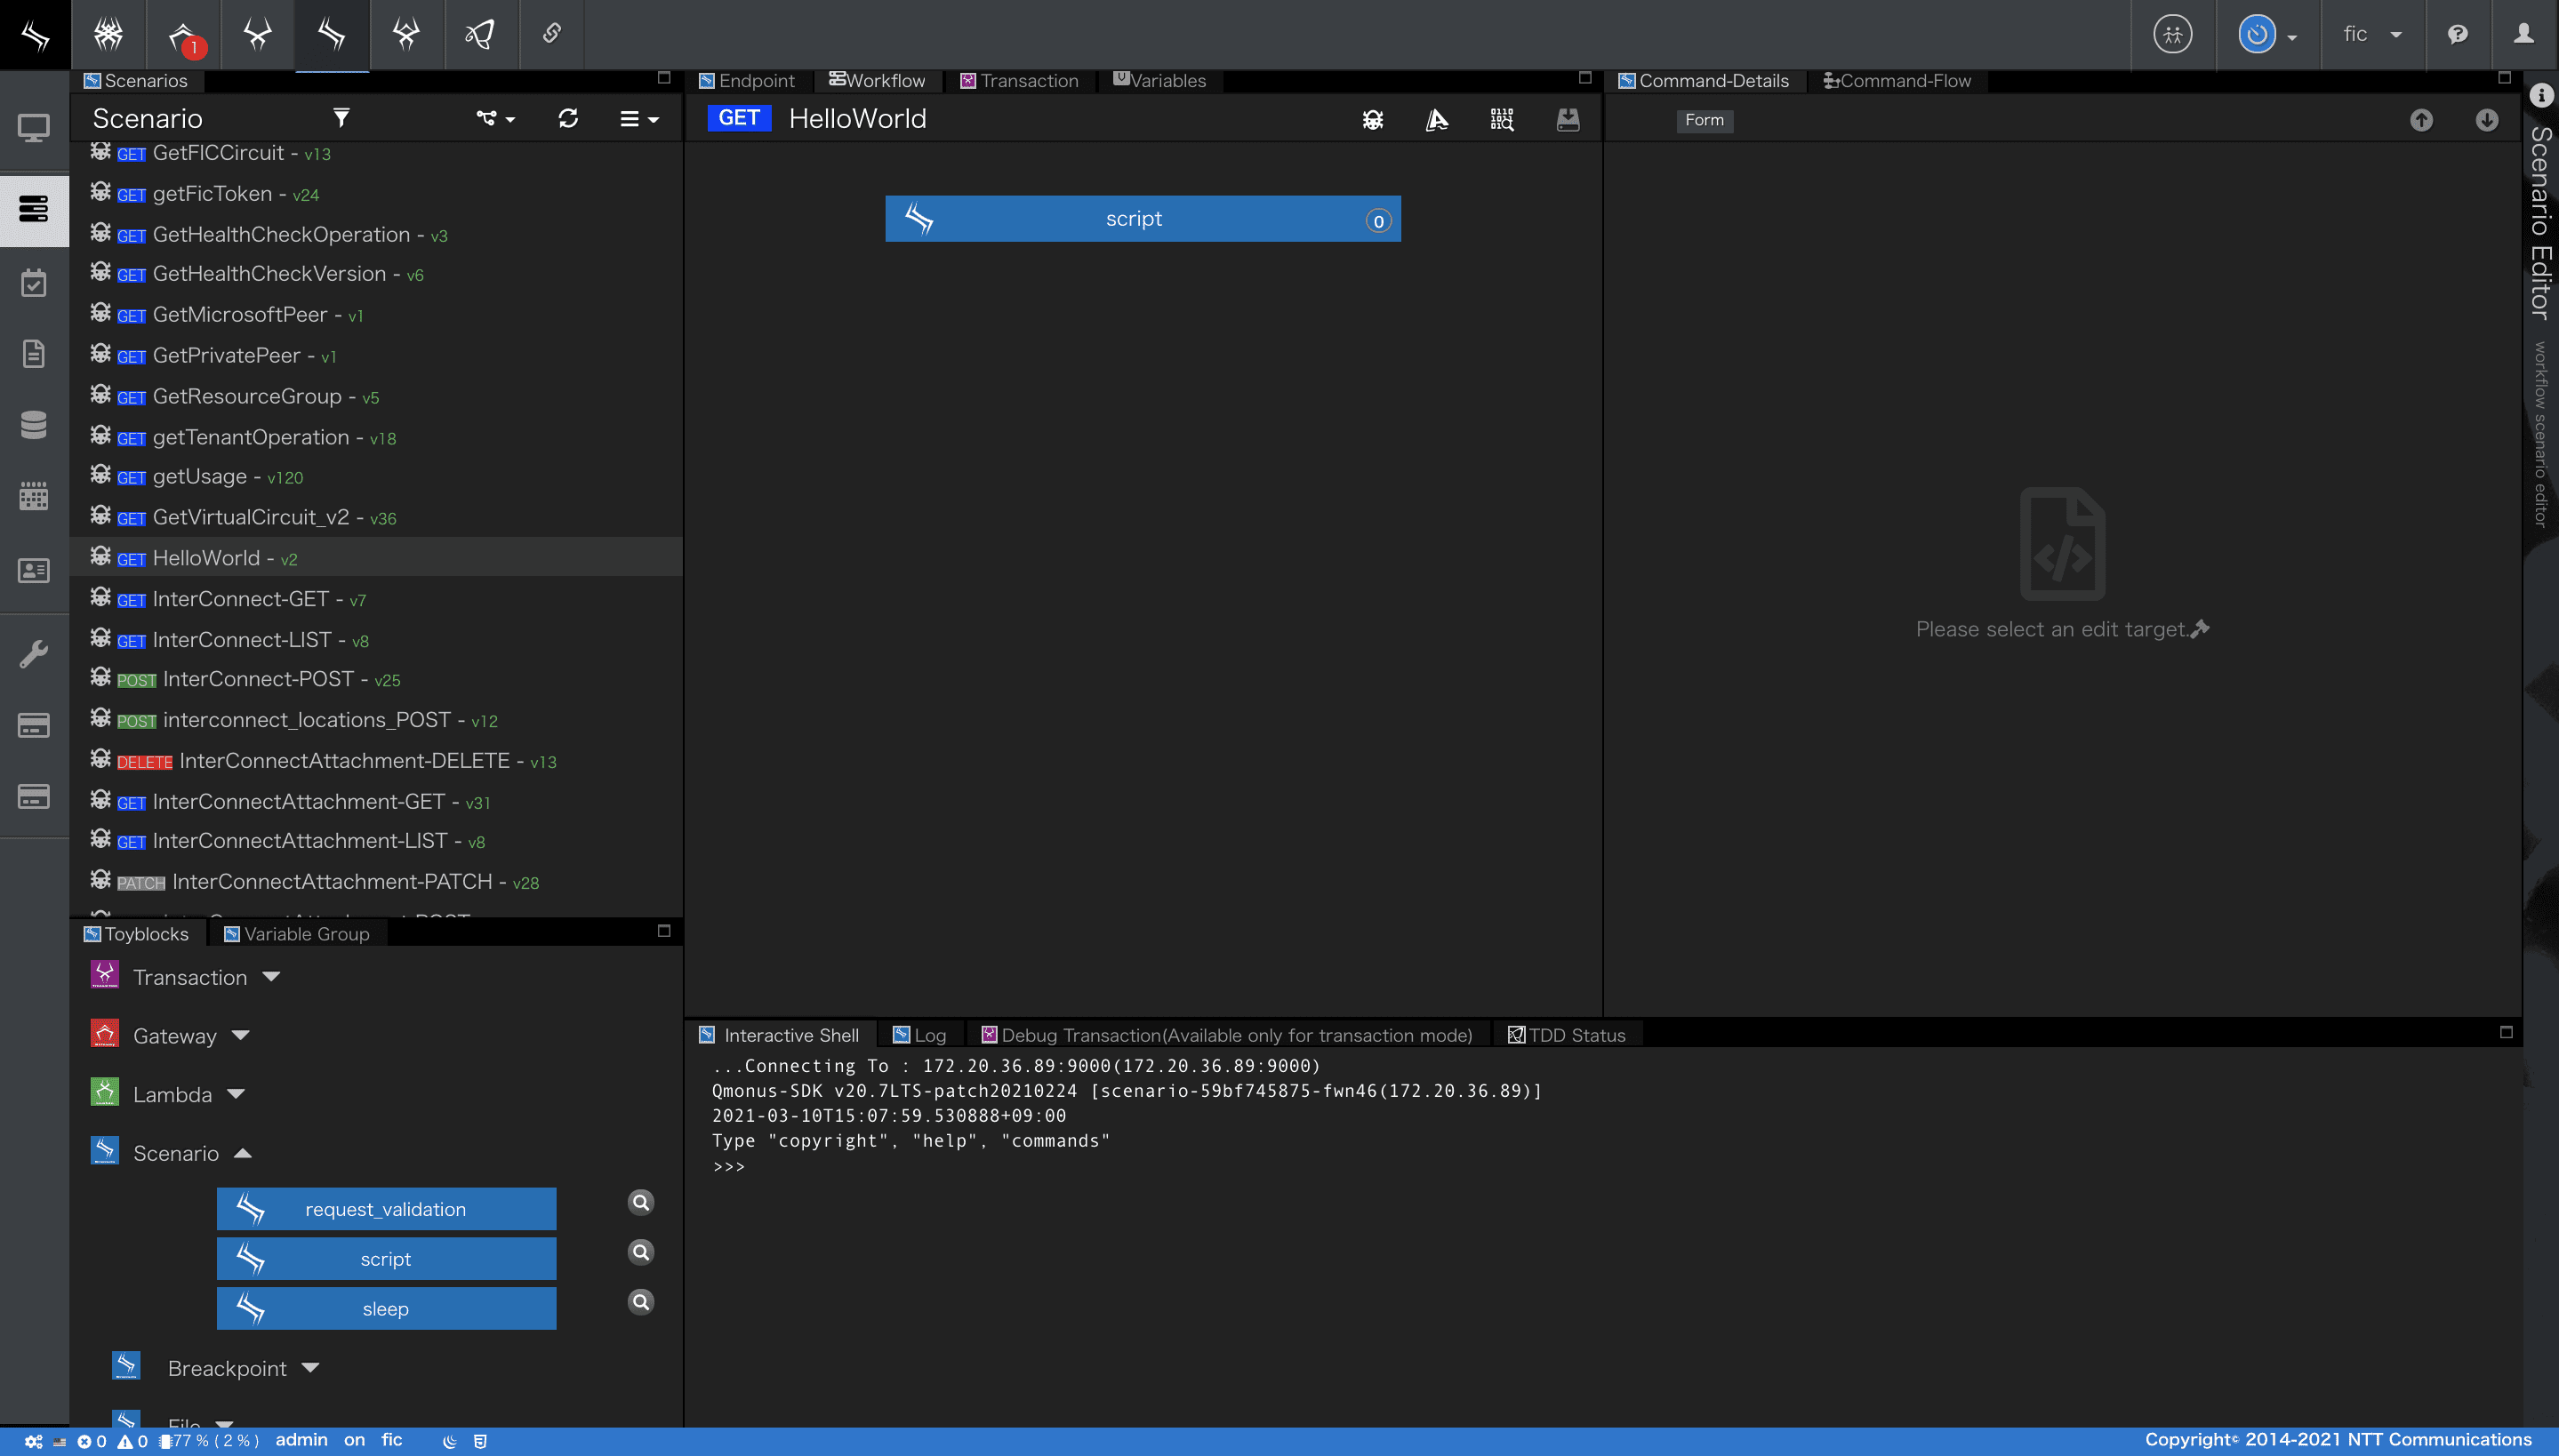
-
シナリオエディタ画面中央上部にある[Try API Call]メニューを選択します。

-
画面右下の「Execute Debug」ボタンを押下します。
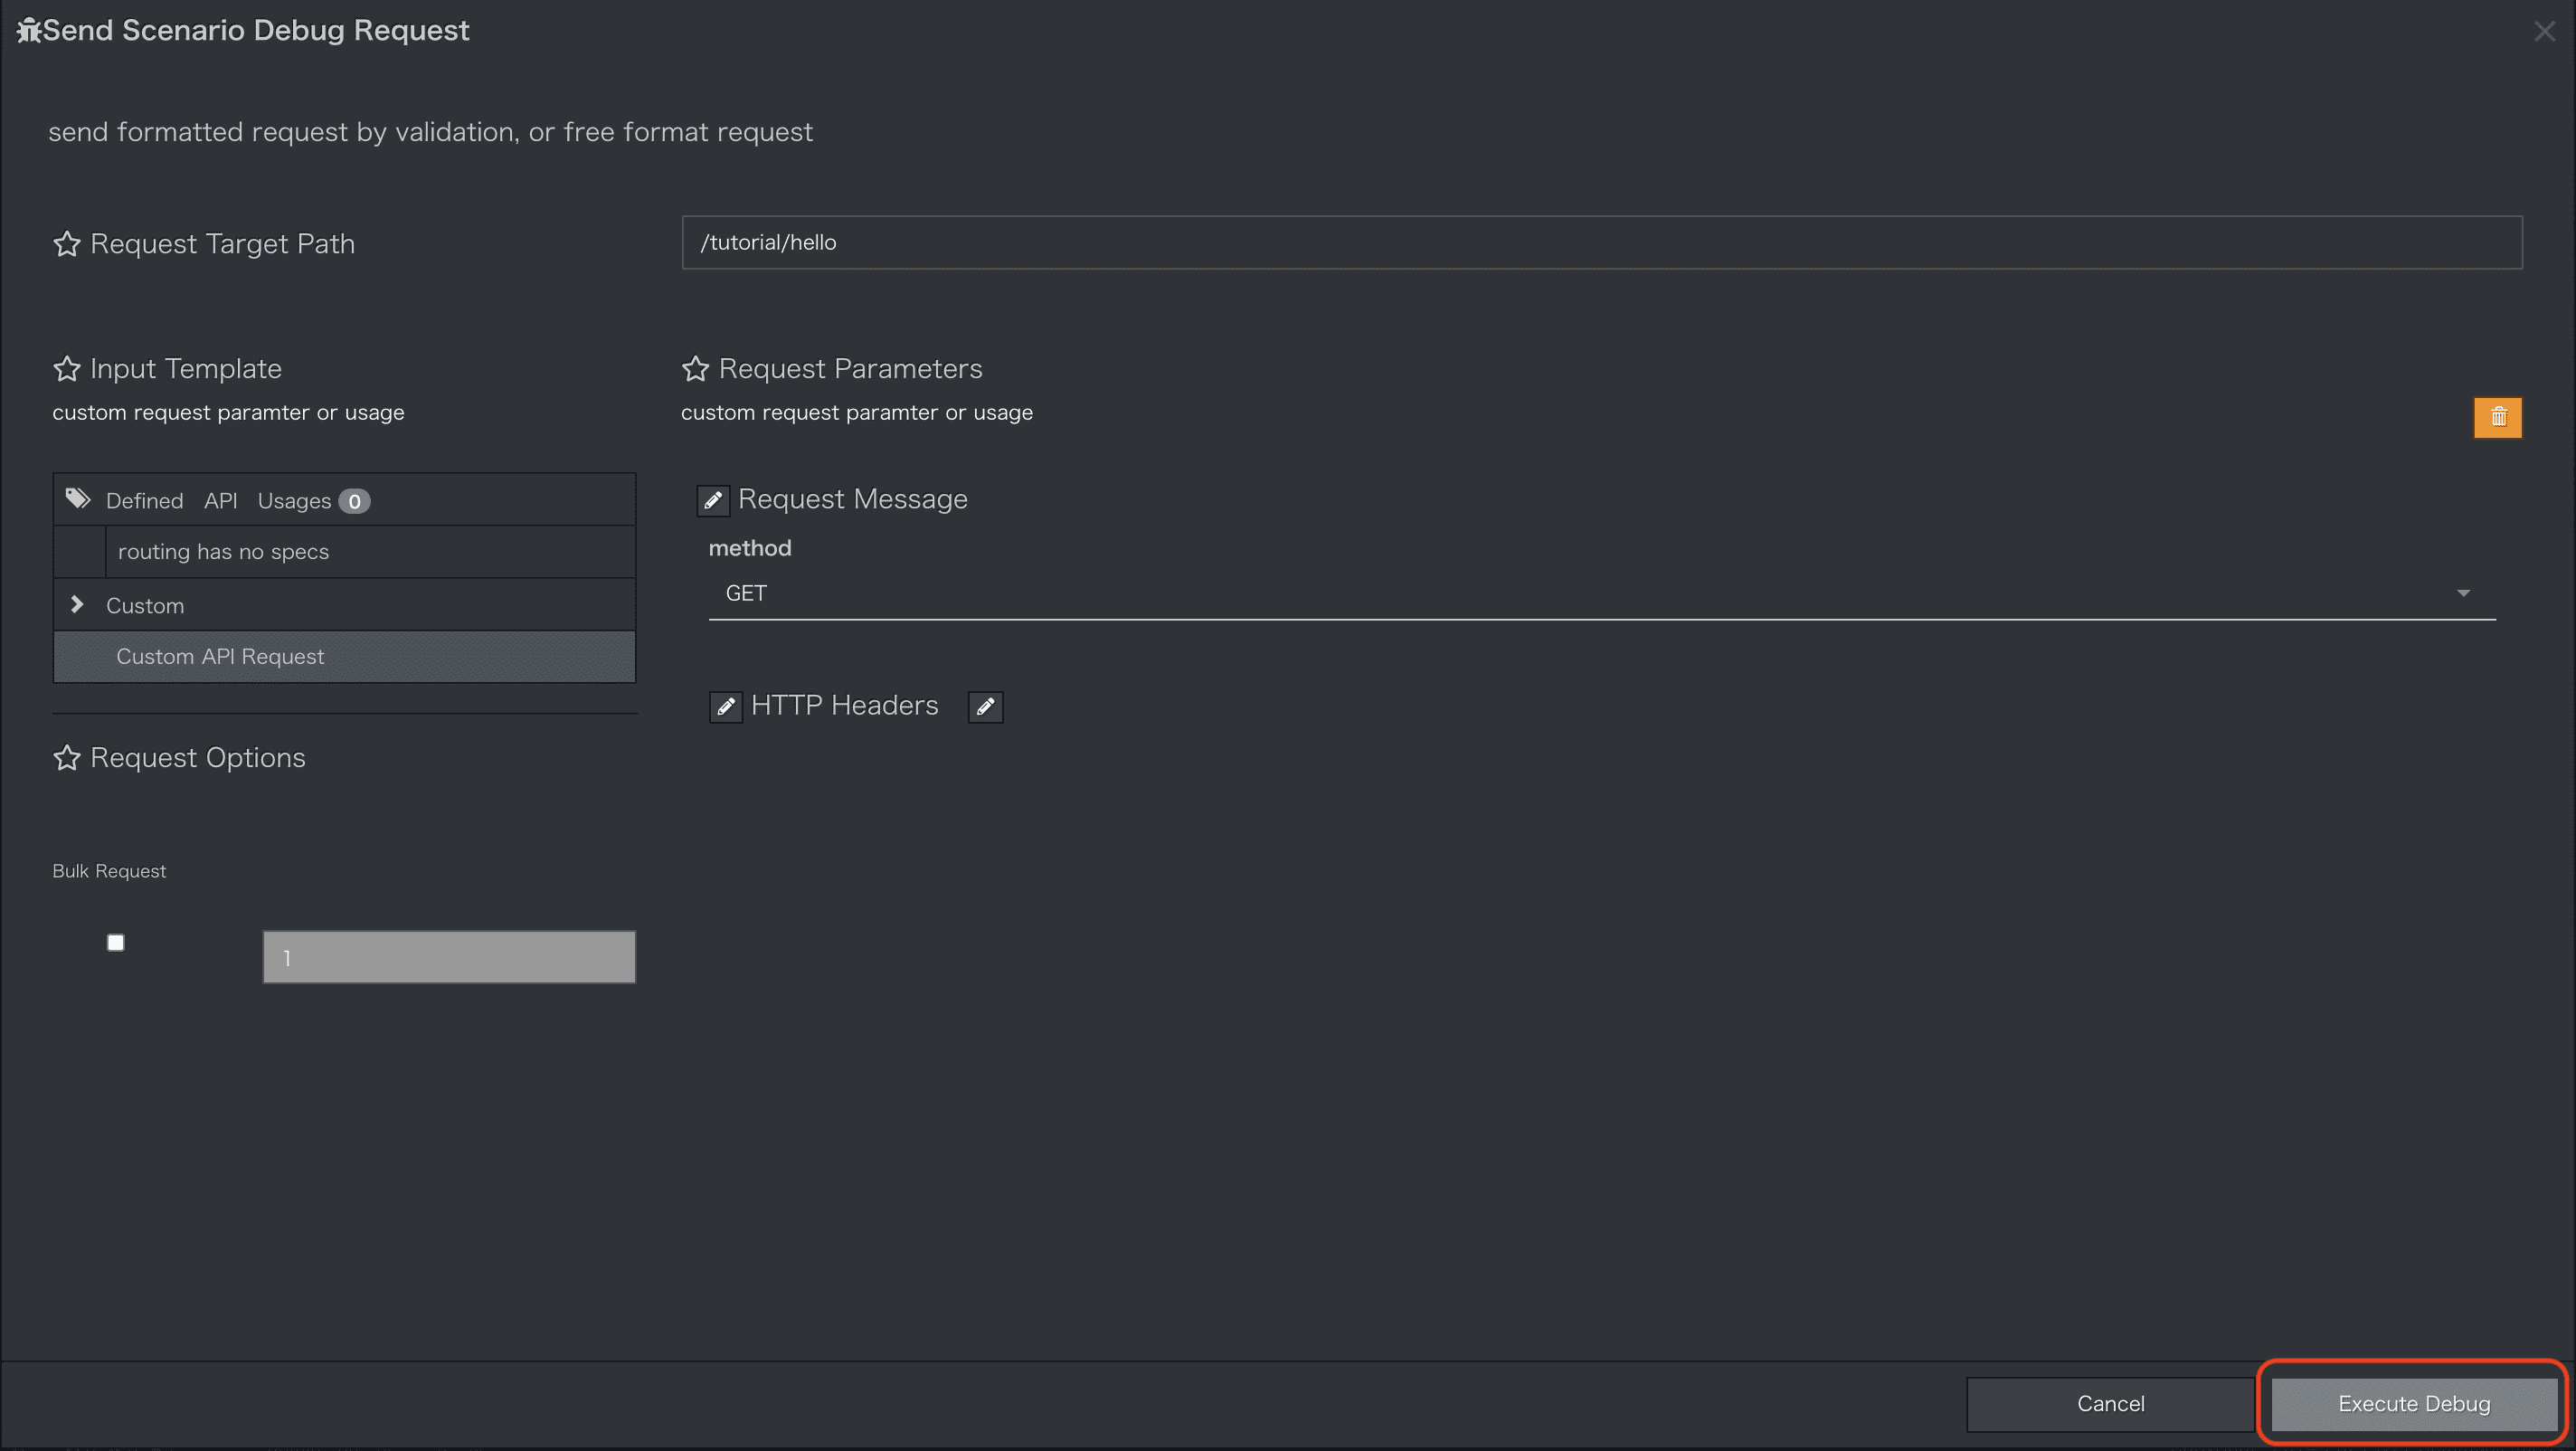
-
APIが実行され結果が表示されます。
ワークフローのscriptブロックで設定した「{"message": "Hello, world!"}」が正しく返却されていることが確認できます。
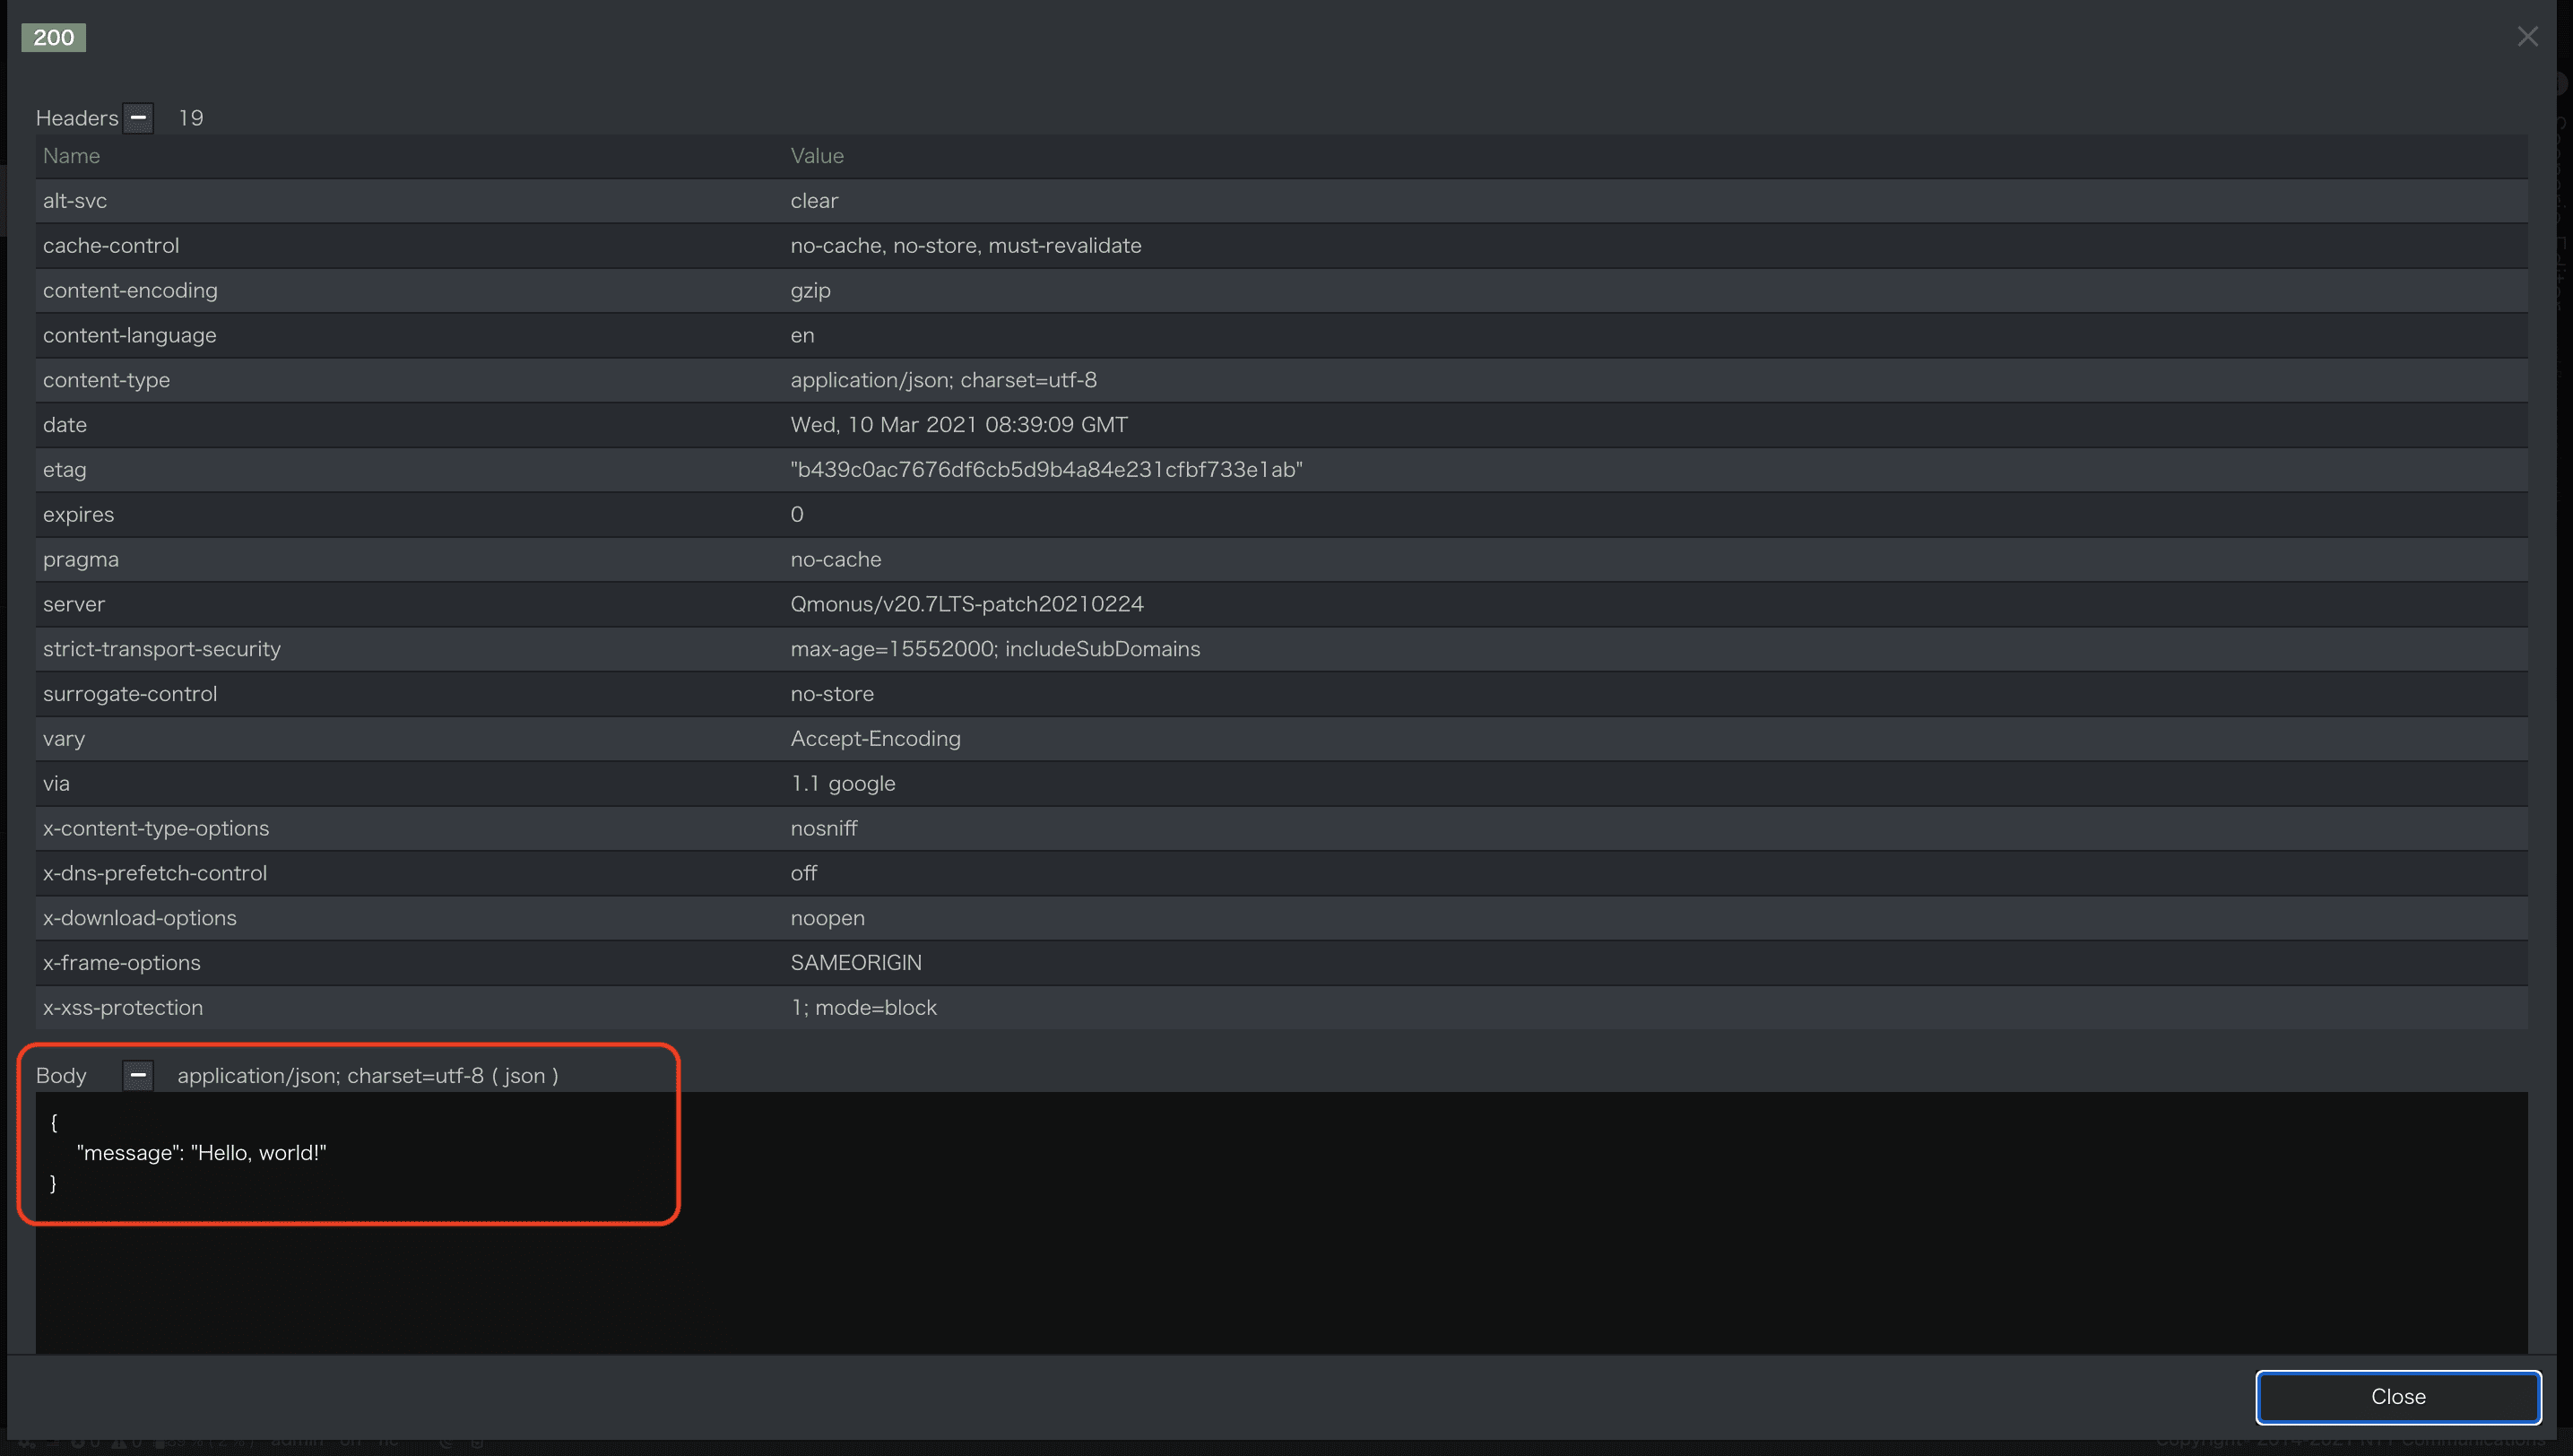
シナリオ定義でrouting_auto_generation_modeにチェックを入れたことにより、 API Gatewayに/tutorials/helloというroutingが自動登録されました。
[Try API Call]はAPI Gatewayに登録されているroutingを利用し、シナリオのAPIを呼び出すメニューになります。
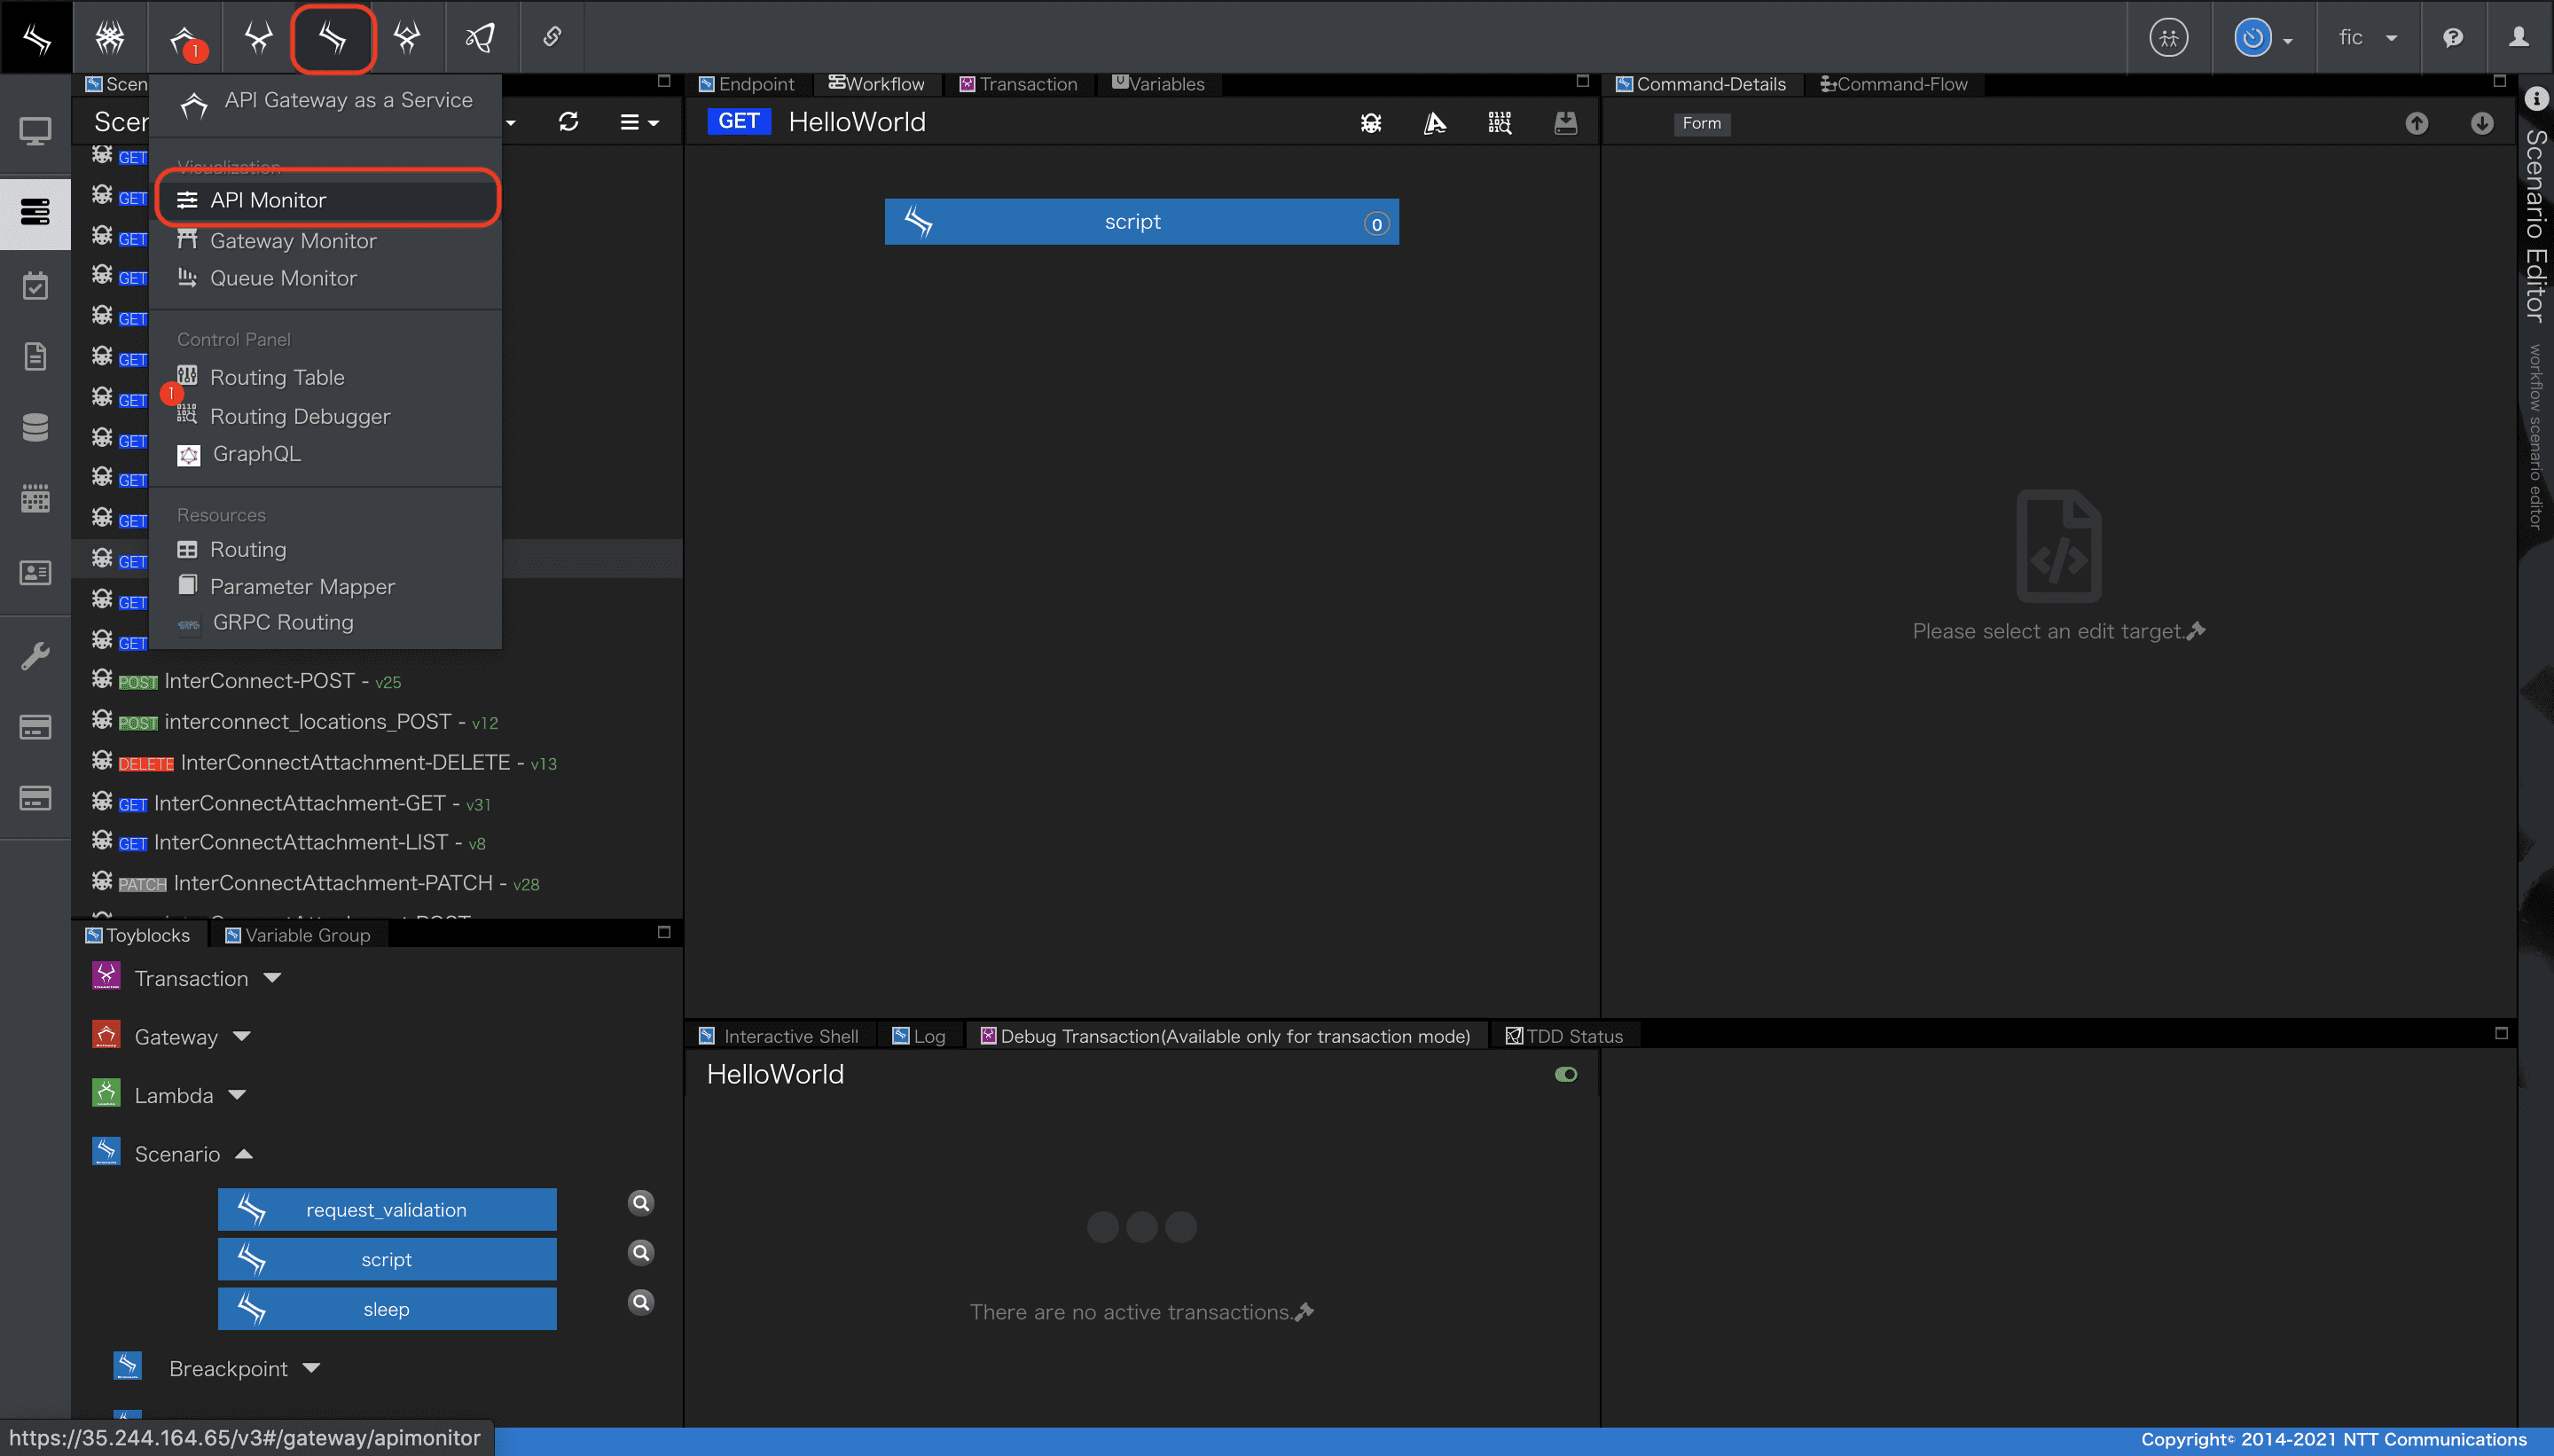
別WindowでAPI Monitorを表示した状態で[Try API Call]を実行すると、API GatewayからScenarioにAPI Callしている様子が確認できます。
-
API Monitorを表示
-
「Try API Call」メニューからAPI呼び出し

チュートリアル Hello, world!は以上となります。
Simple CRUD - シナリオ編
本チュートリアルは、単一のデータモデルを定義し、データモデルに対してCRUDするためのAPIを作成します。 Modelでデータベーススキーマを定義し、生成されたデータモデルをScenarioからCRUD操作するアプリケーションを作成しましょう。
データモデルの作成
Employmentという名前のデータモデルを作成していきます。
Modelは、jsonスキーマまたはyaml形式で記述されたテーブル定義からデータベーステーブルを自動生成し、SQLAlchemyでORマップしてmodel共通コンテキストにエントリするサービスです。後述するATOMサービスから生成されるテーブルオブジェクトも本サービスを内部的に利用しています。
モデルの詳細は
Qmonus SDK Programming Guide » Scenario » モデル
を参照してください。
1. モデルエディタの表示
- メインメニュー[Workflow Scenario as a Service]>[Model]を選択しモデルエディタを表示します。
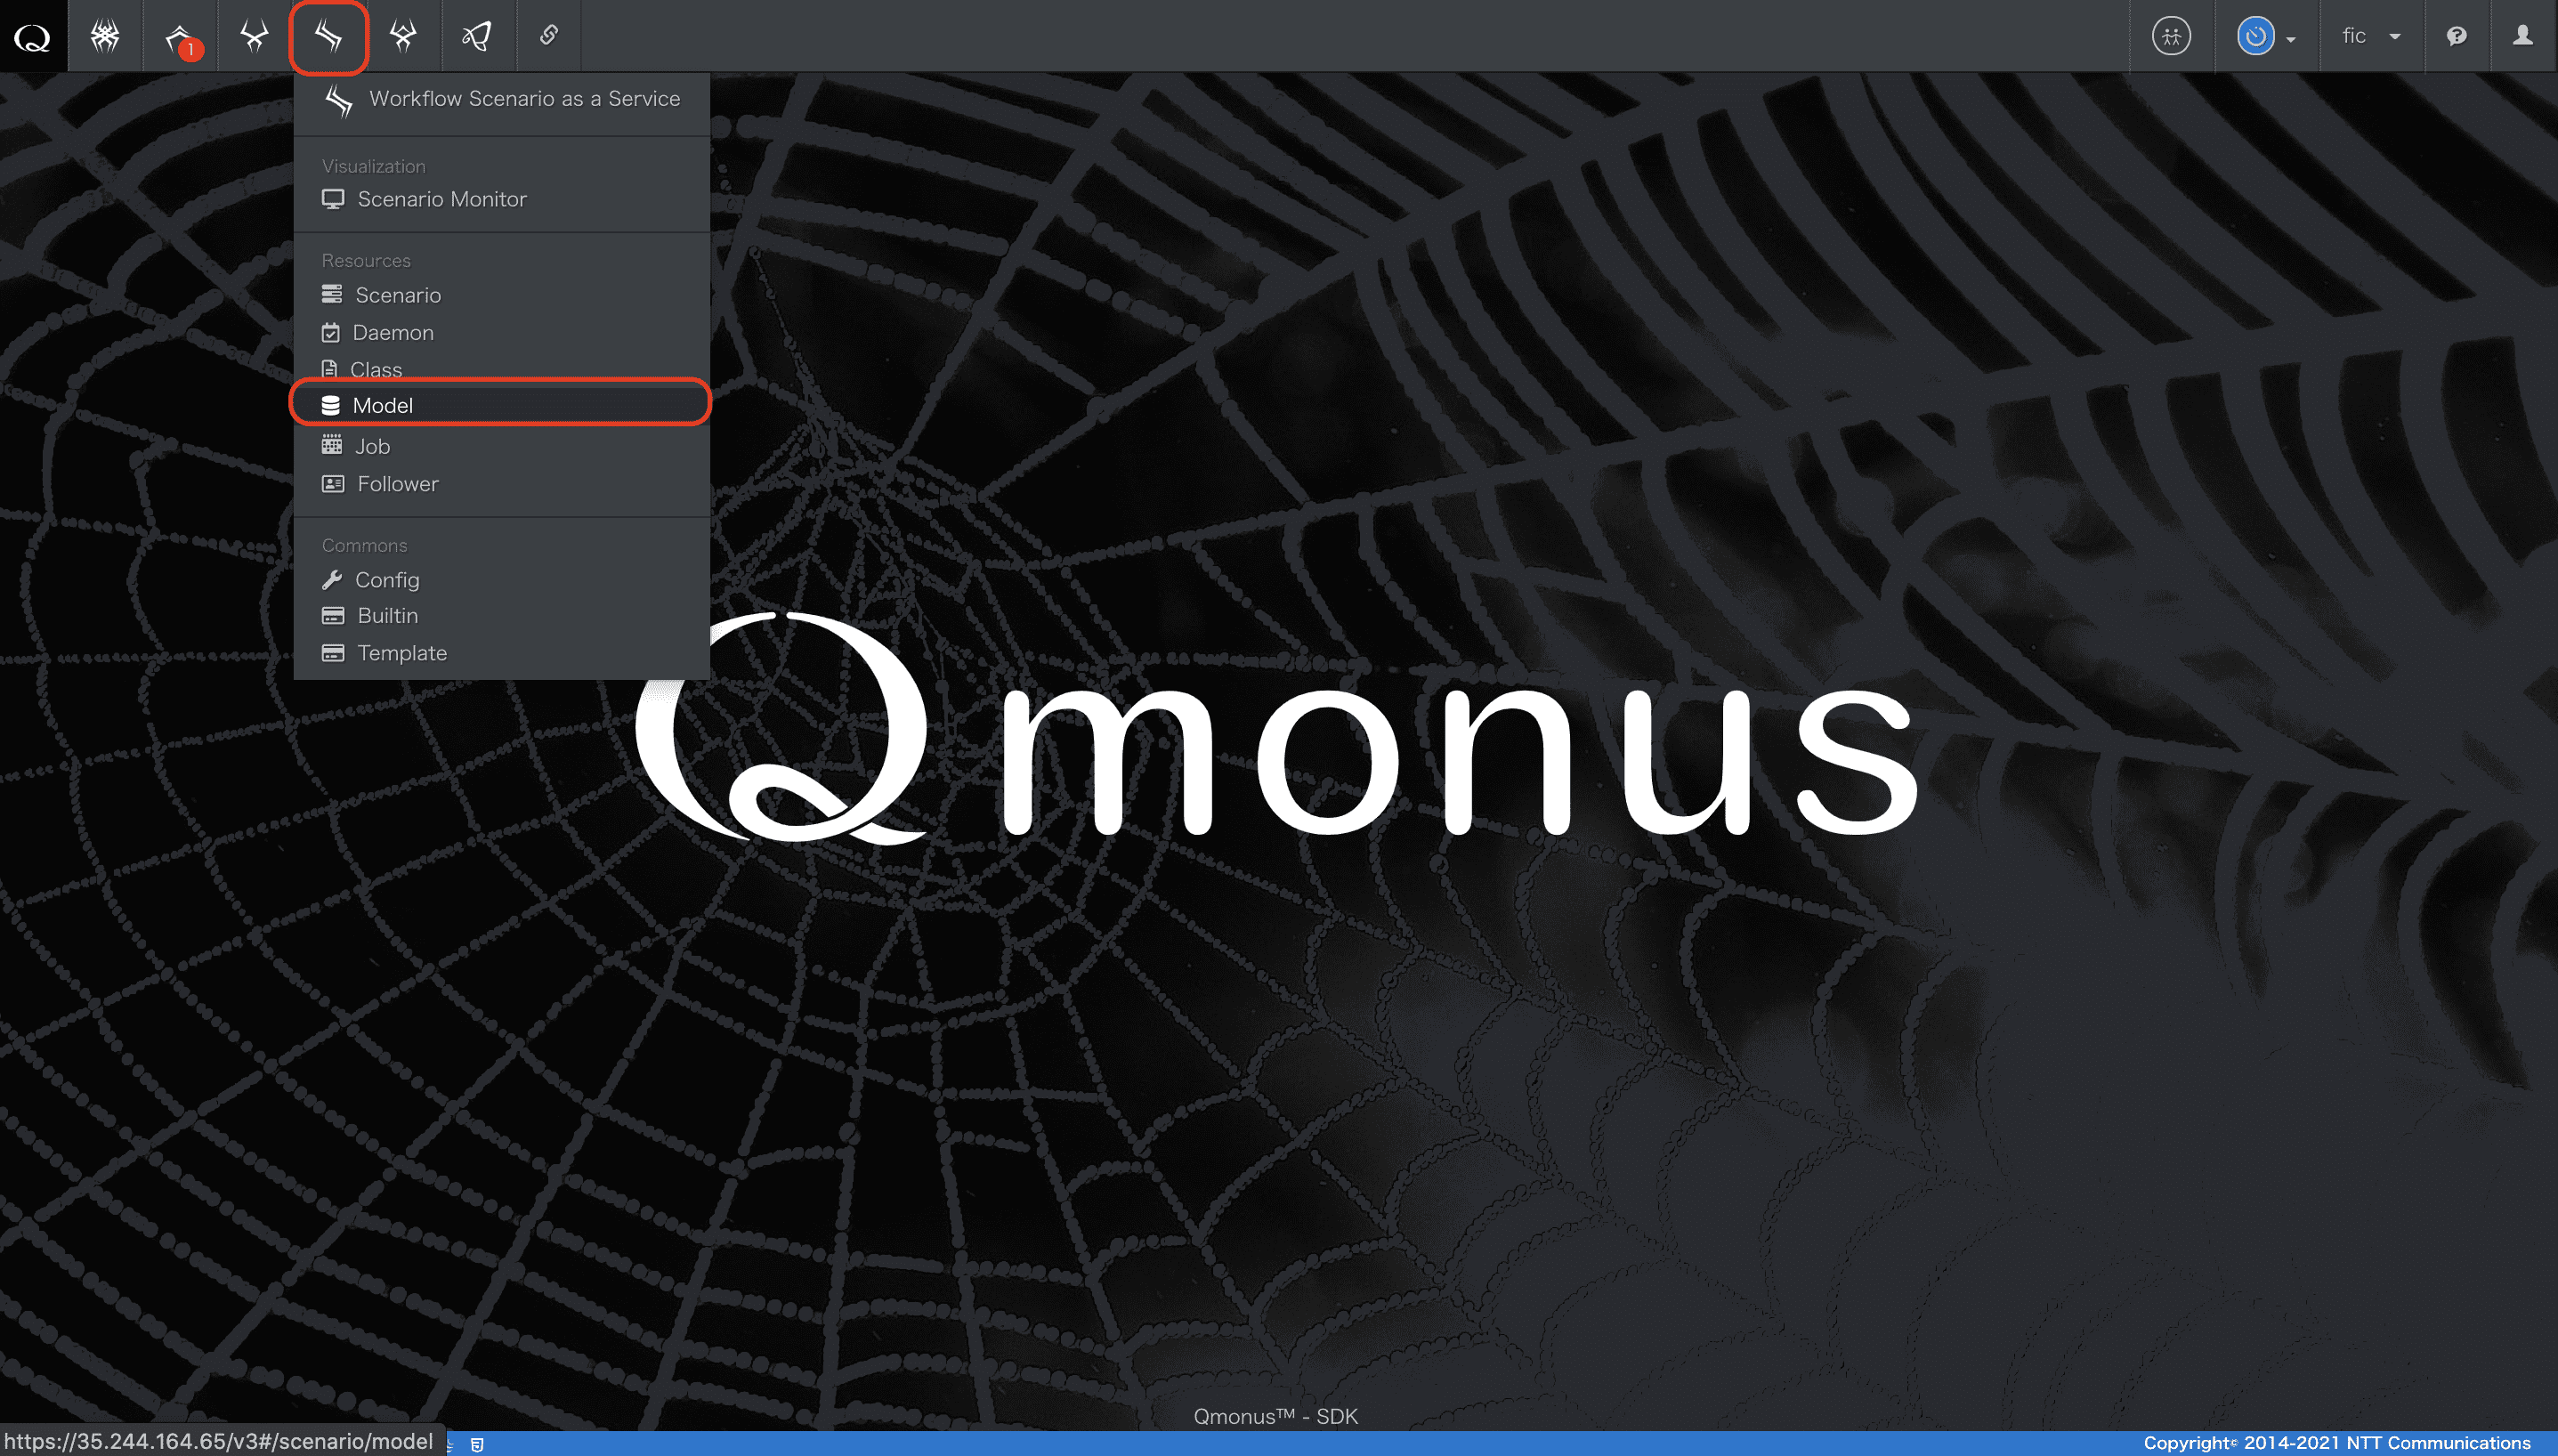
- こちらのエディタを使いモデルを作成していきます。
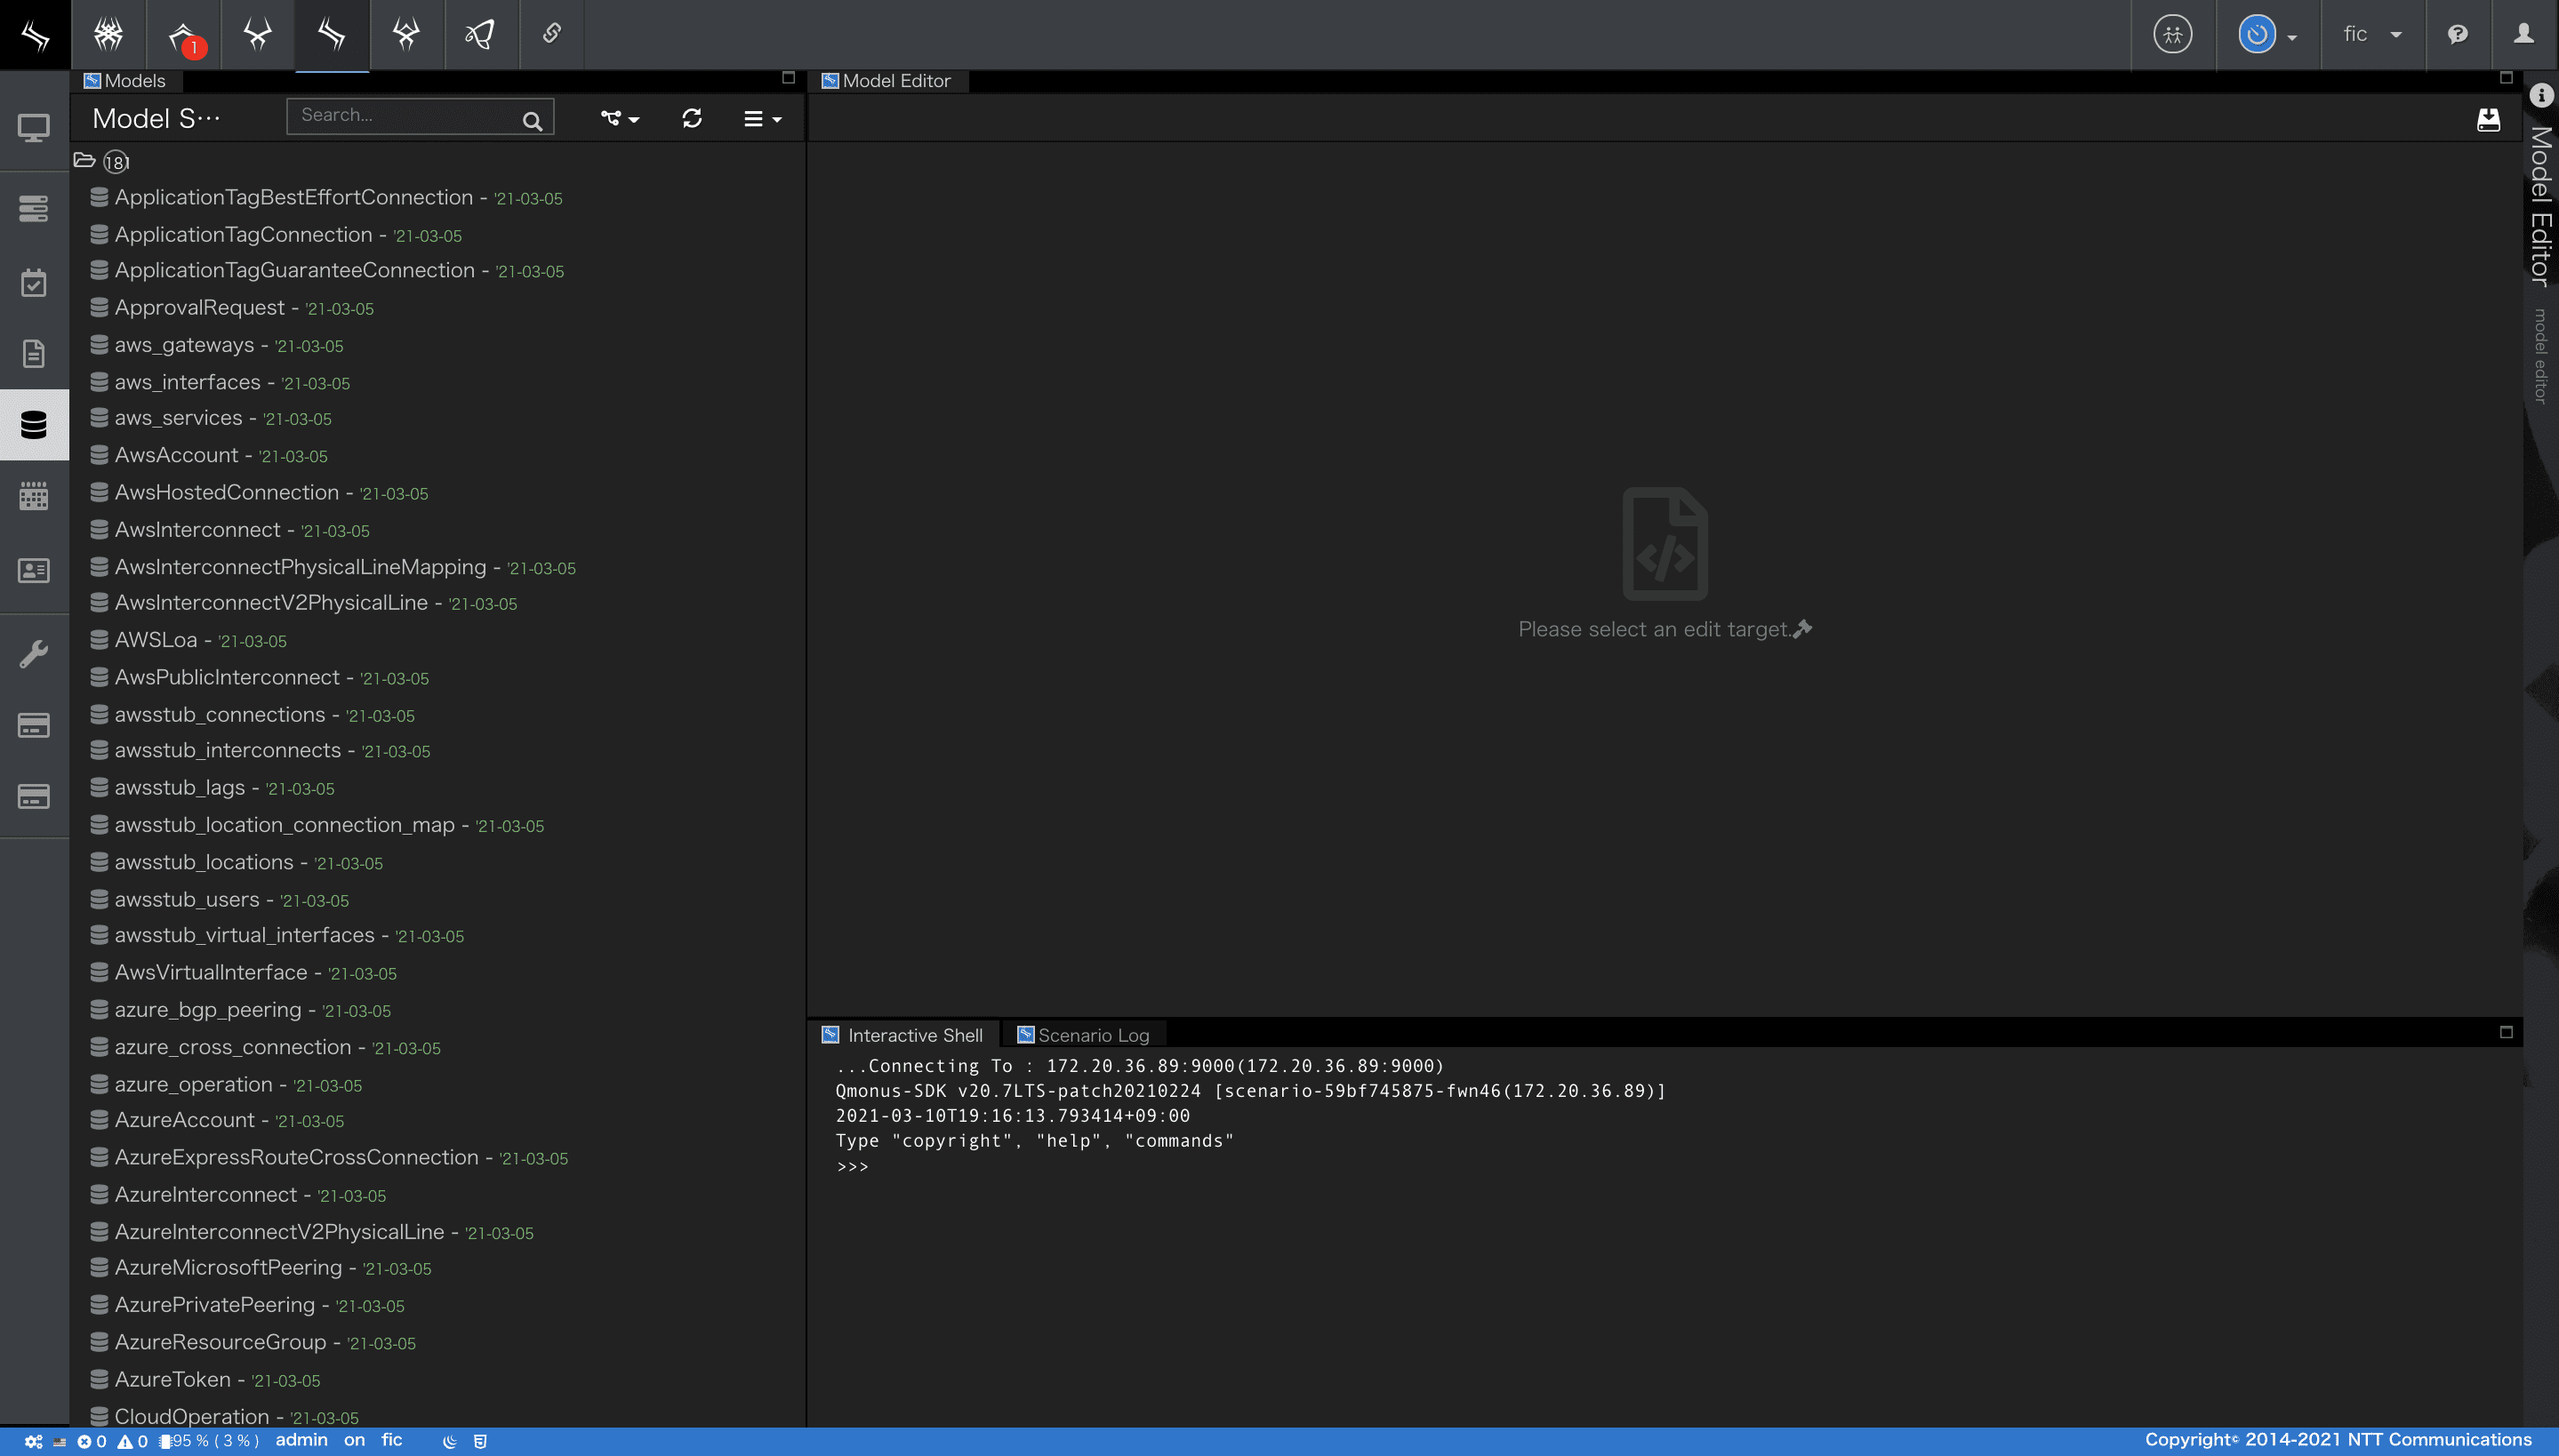
2. モデル定義
-
モデルエディタの画面左上部にあるメニューから[Create New Model]を選択します。
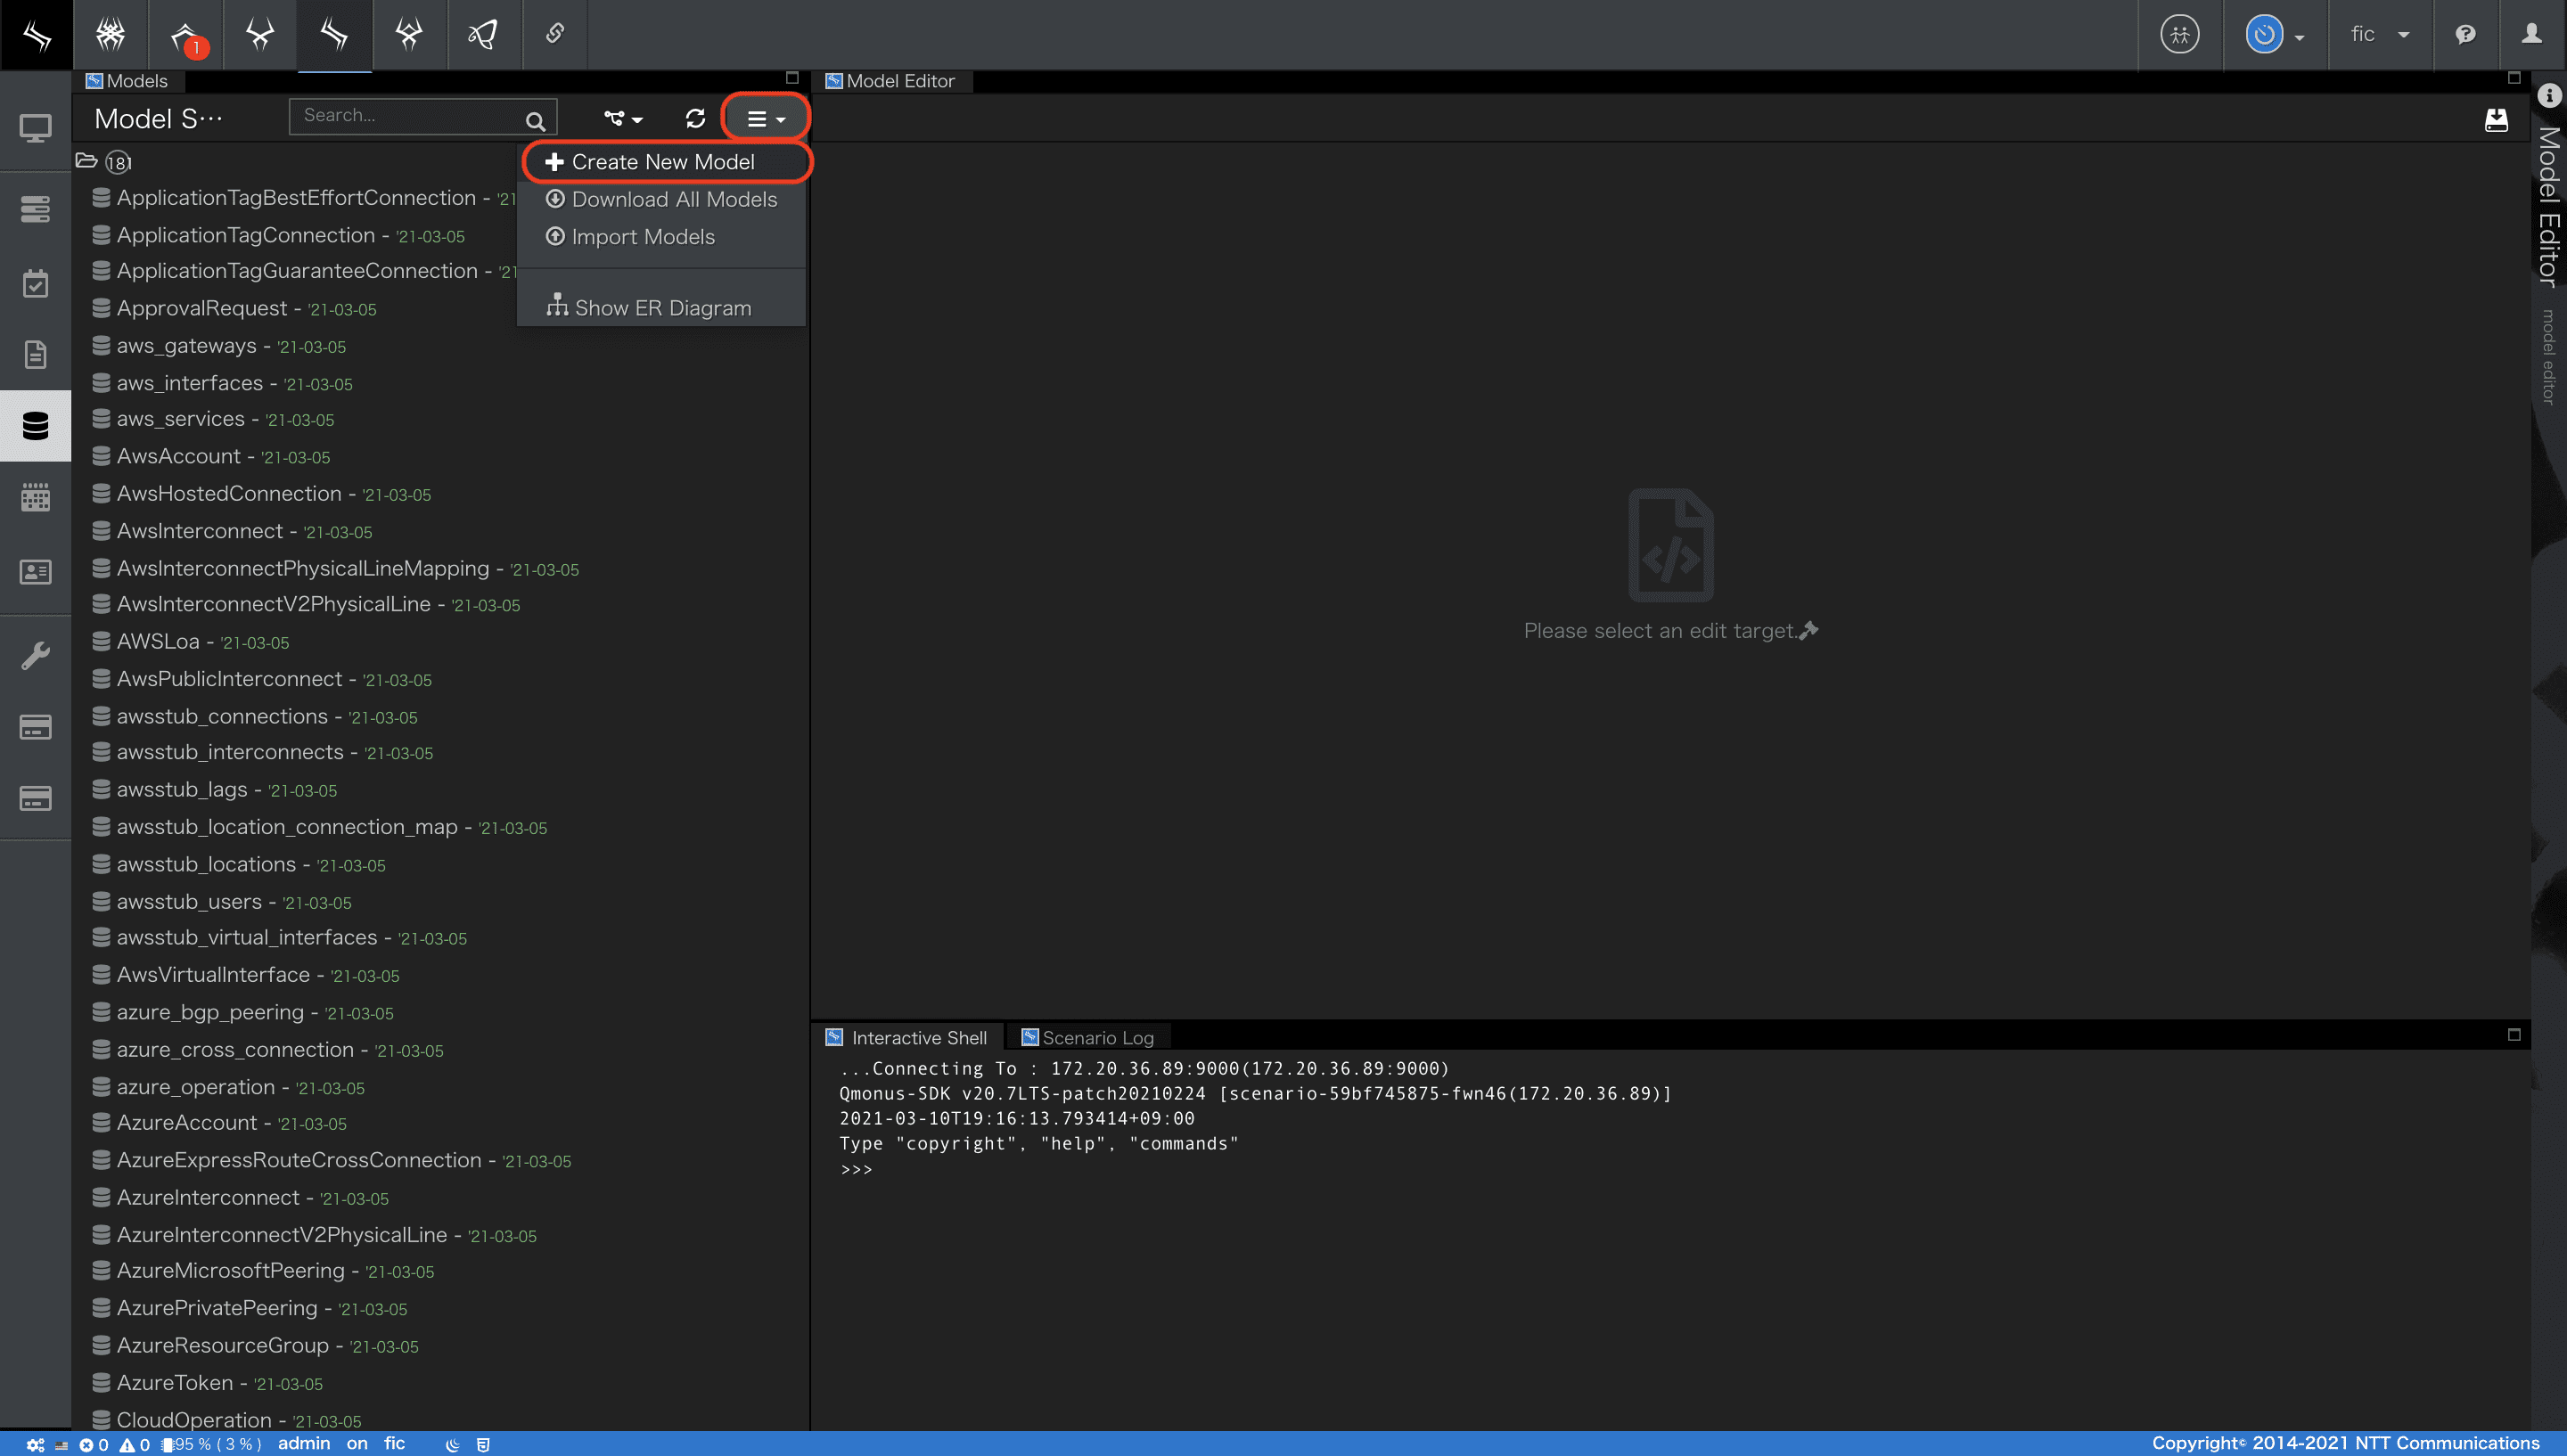
-
モデル定義画面が開きますので、ここでモデルの各種属性を定義します。
モデルを新規作成する際はこのモデル定義から行います。
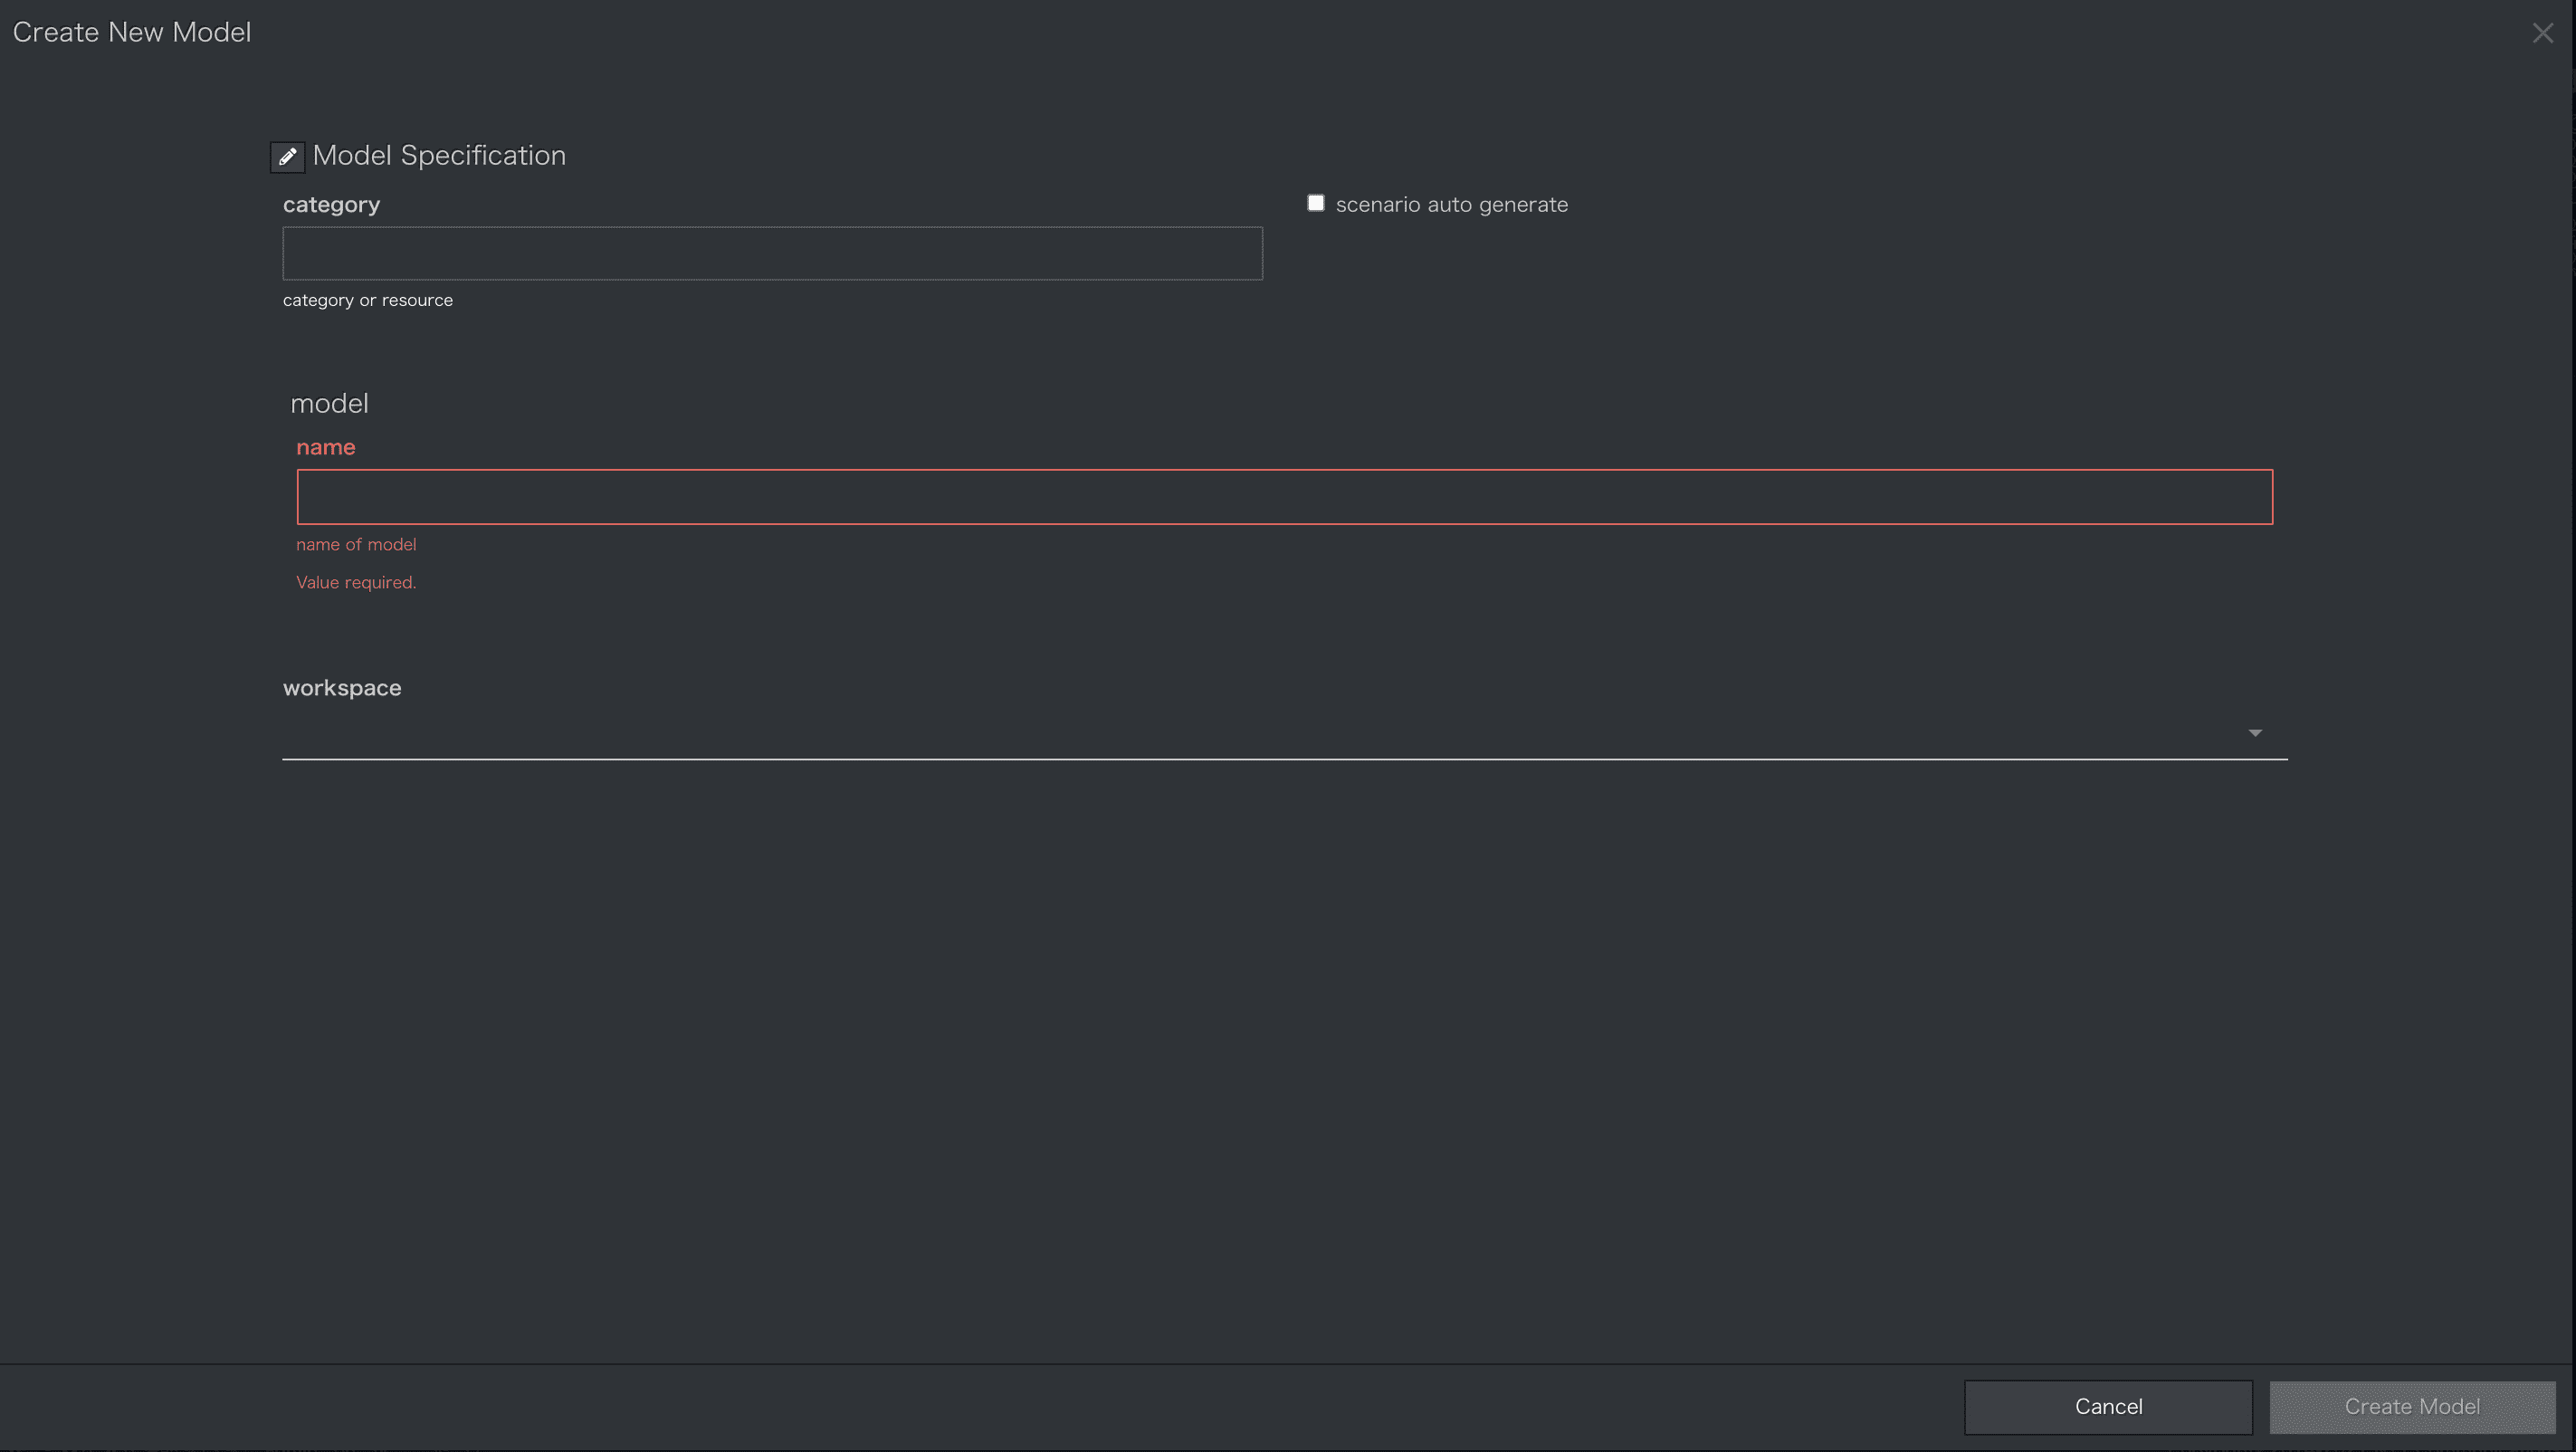
- 以下の項目を入力してください。
| 項番 | 項目 | 入力値 | 説明 |
|---|---|---|---|
| 1 | category | Tutorial | テーブルのカテゴリを指定します。カテゴリには特別な役割はありません。シンプルなラベルです。 |
| 2 | name | Employment | モデルの名前をユニークに指定します。データベースのテーブル名となります。 |
| 3 | workspace | 未入力 | ワークスペースを設定します。 |
| 4 | scenario_auto_generation_mode | 未選択 | テーブルのCRUDシナリオを自動的に生成するためのモードを指定します。ATOMの利用を推奨している為、将来的には廃止される予定です。 |
-
入力後、画面右下部にある[Create Model]ボタンを押下します。
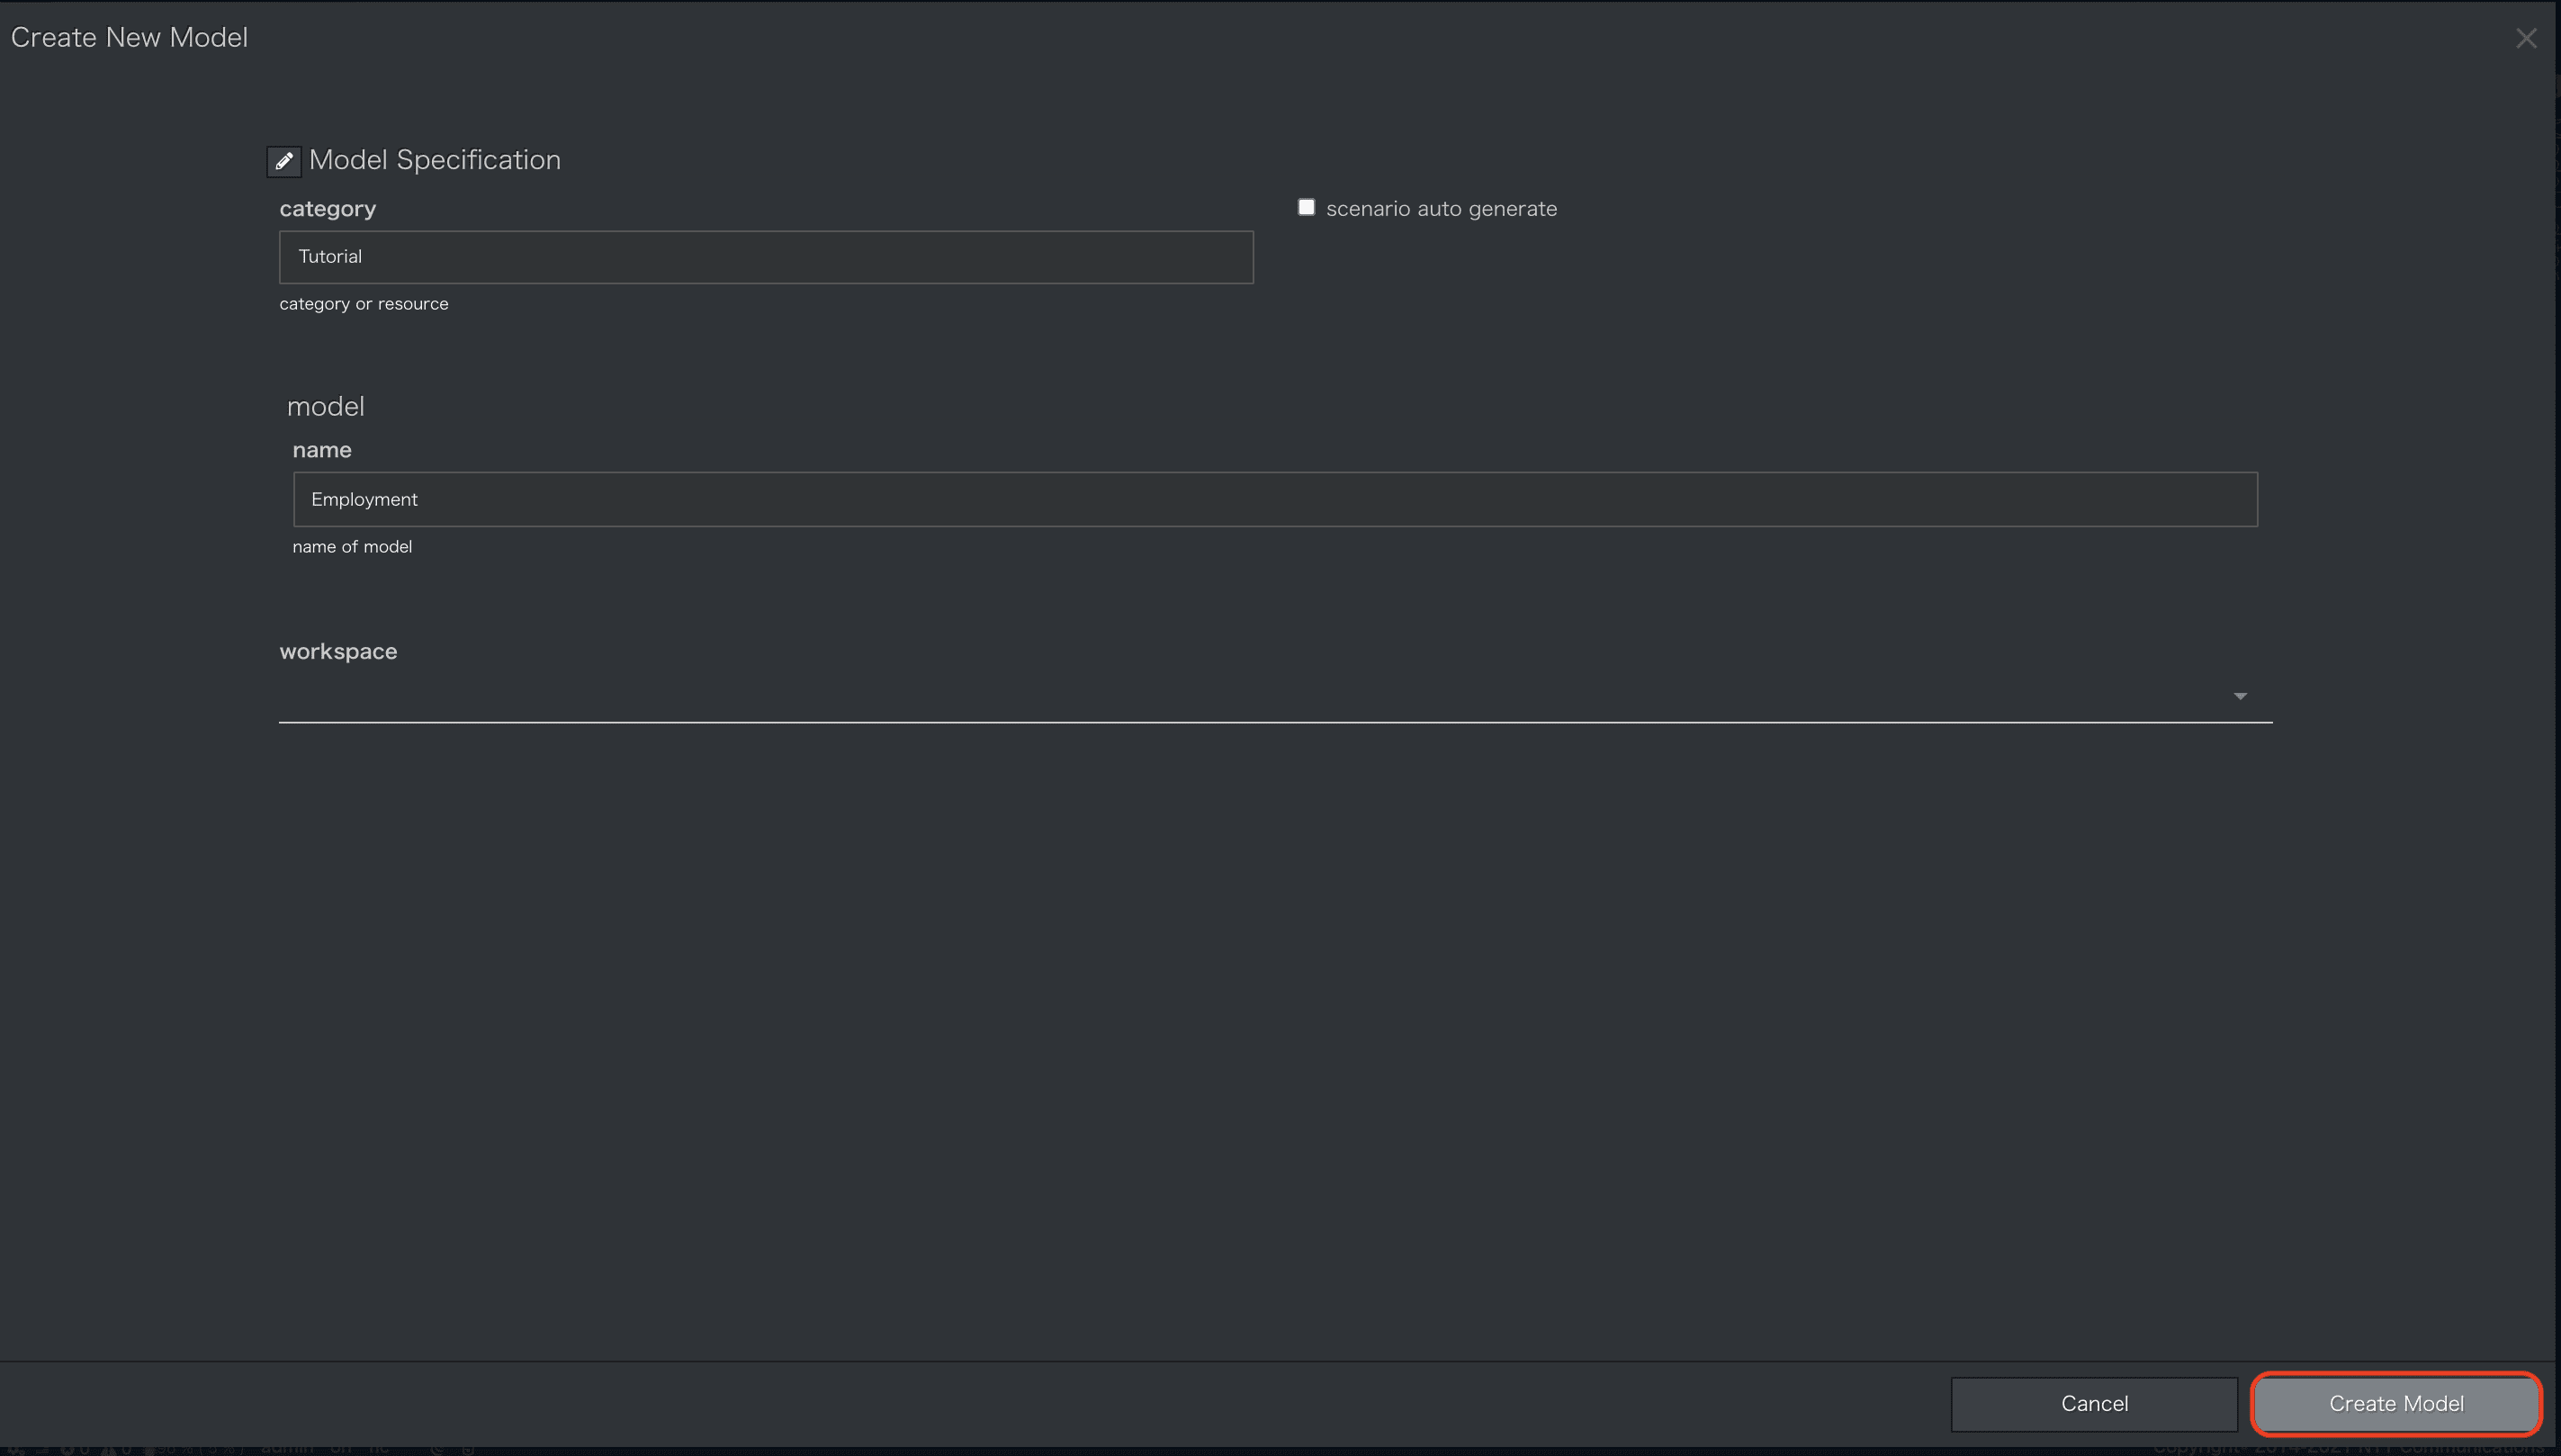
-
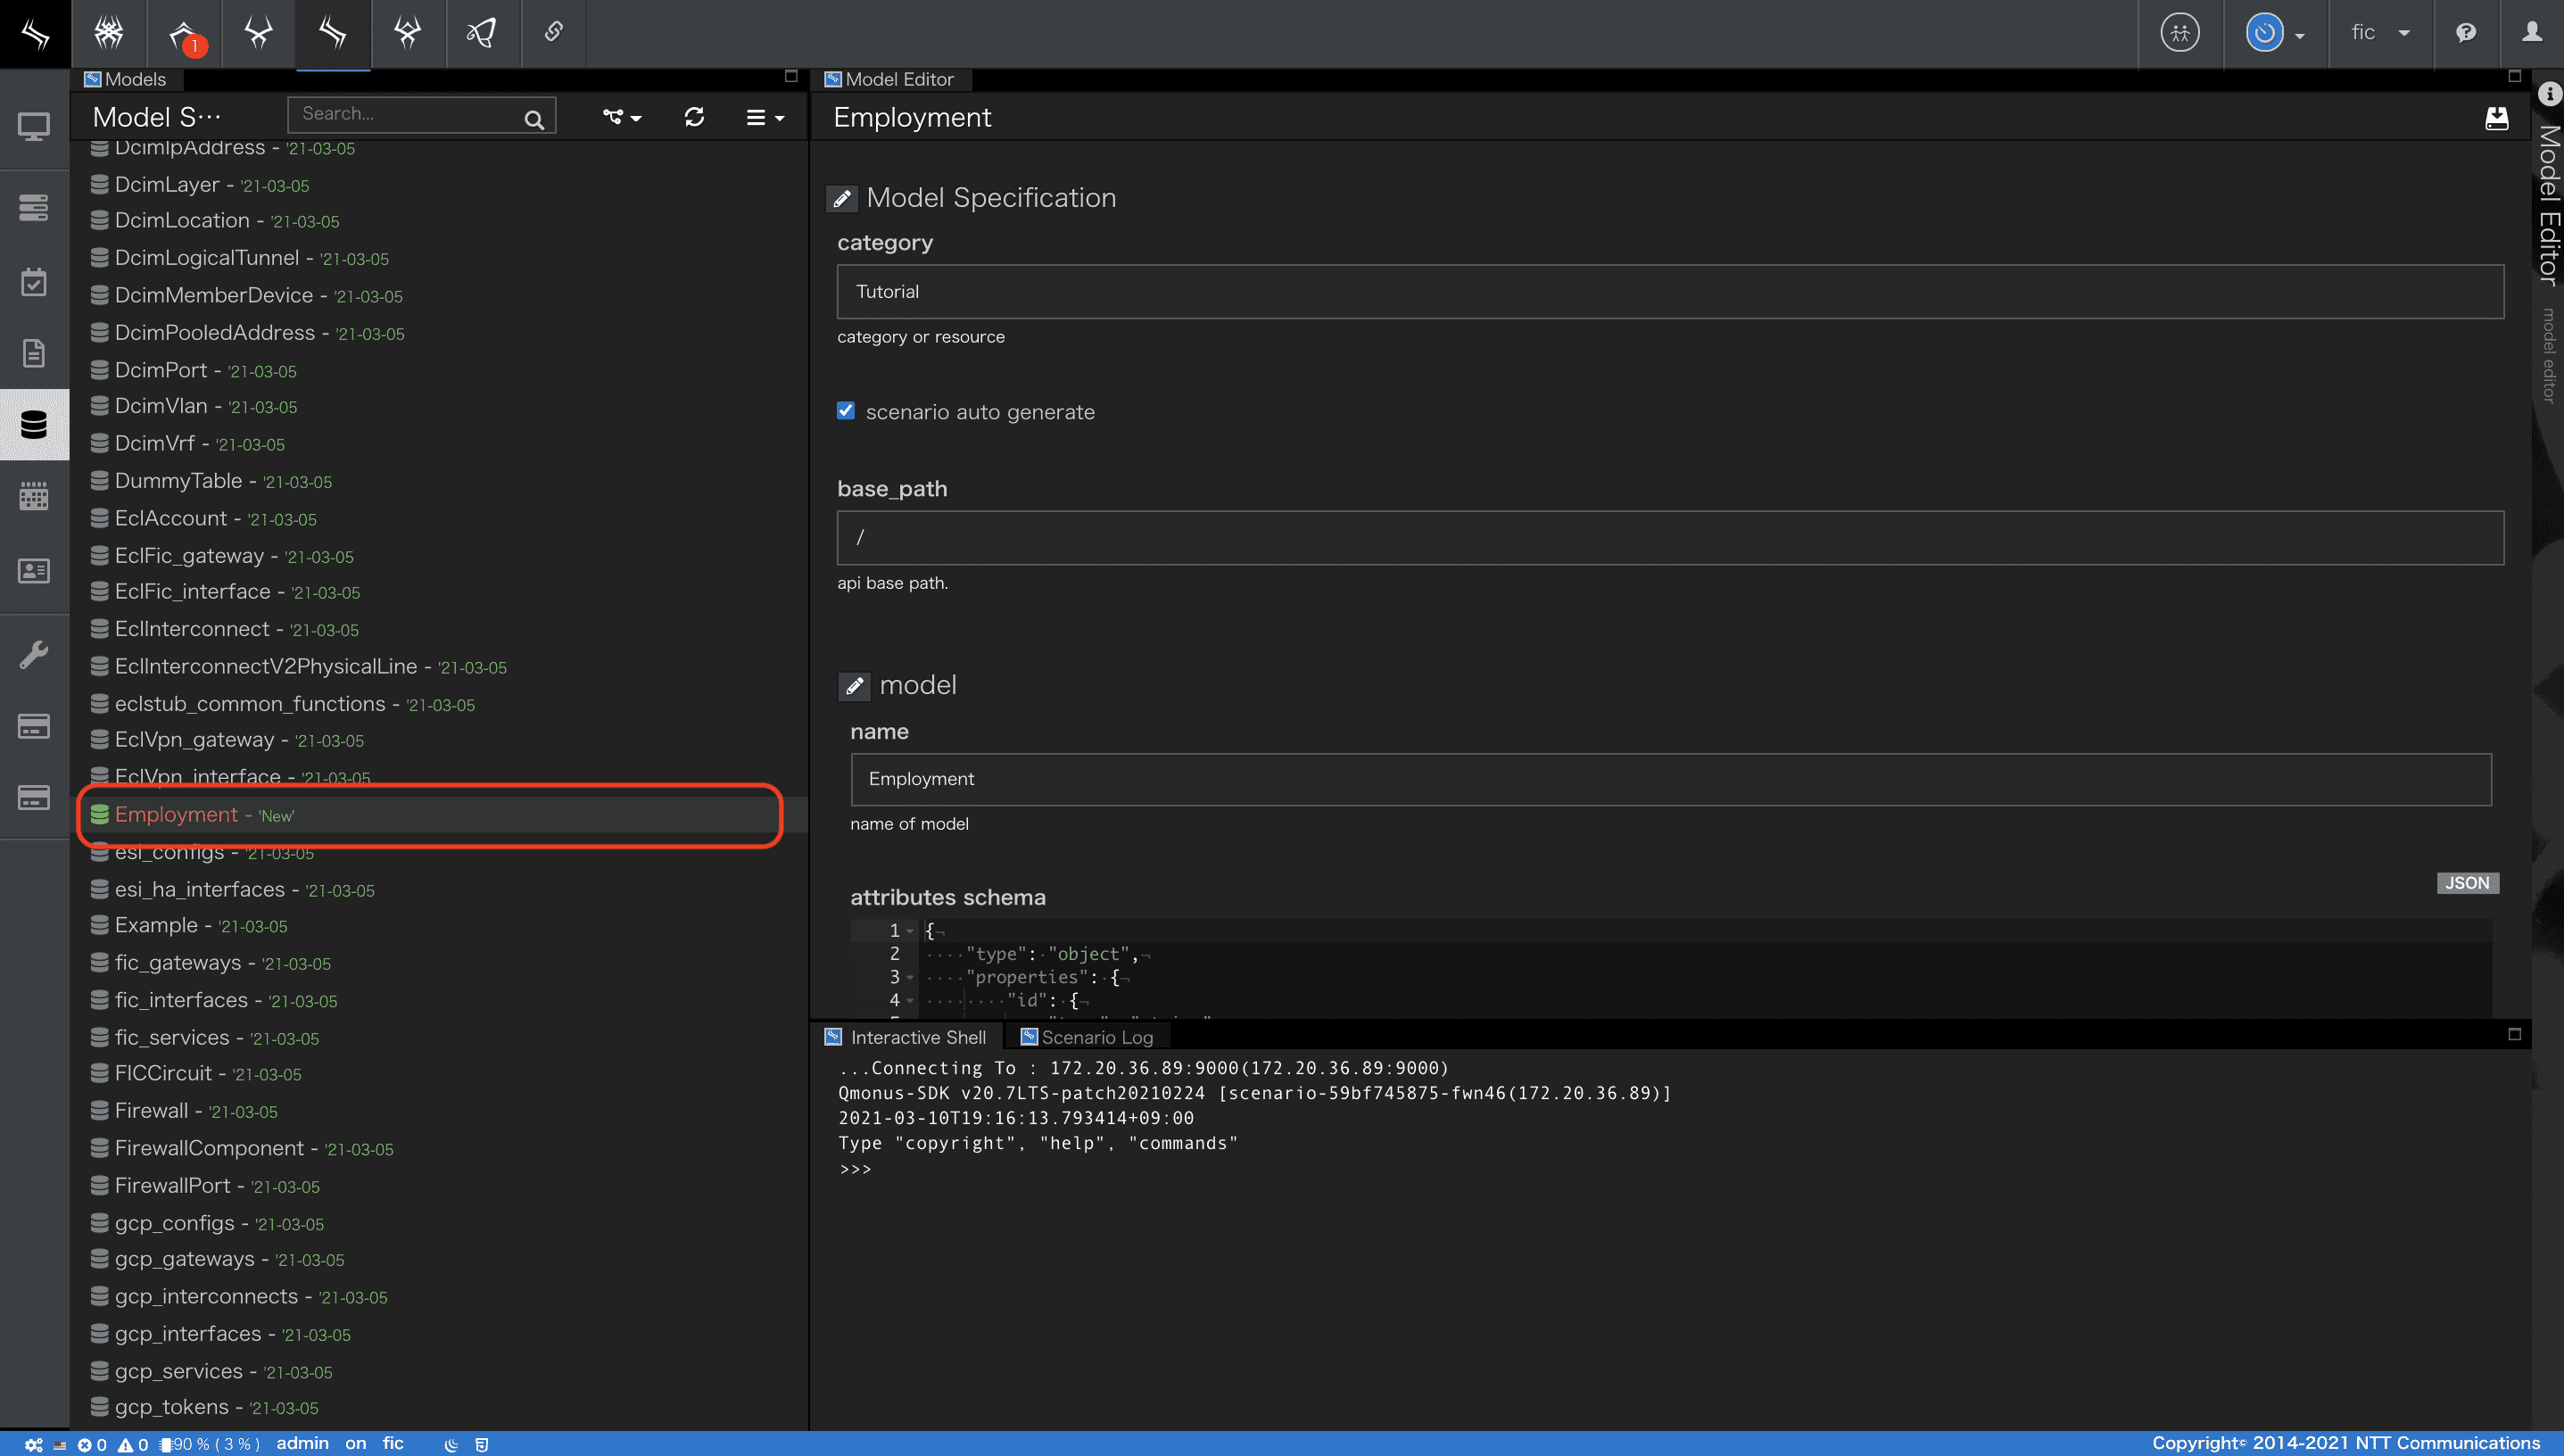
モデル定義画面が閉じ、モデルエディタが表示されます。
画面左部にあるモデル一覧から、今回作成するEmploymentモデルが確認できます。
3. モデル-データベーススキーマ定義
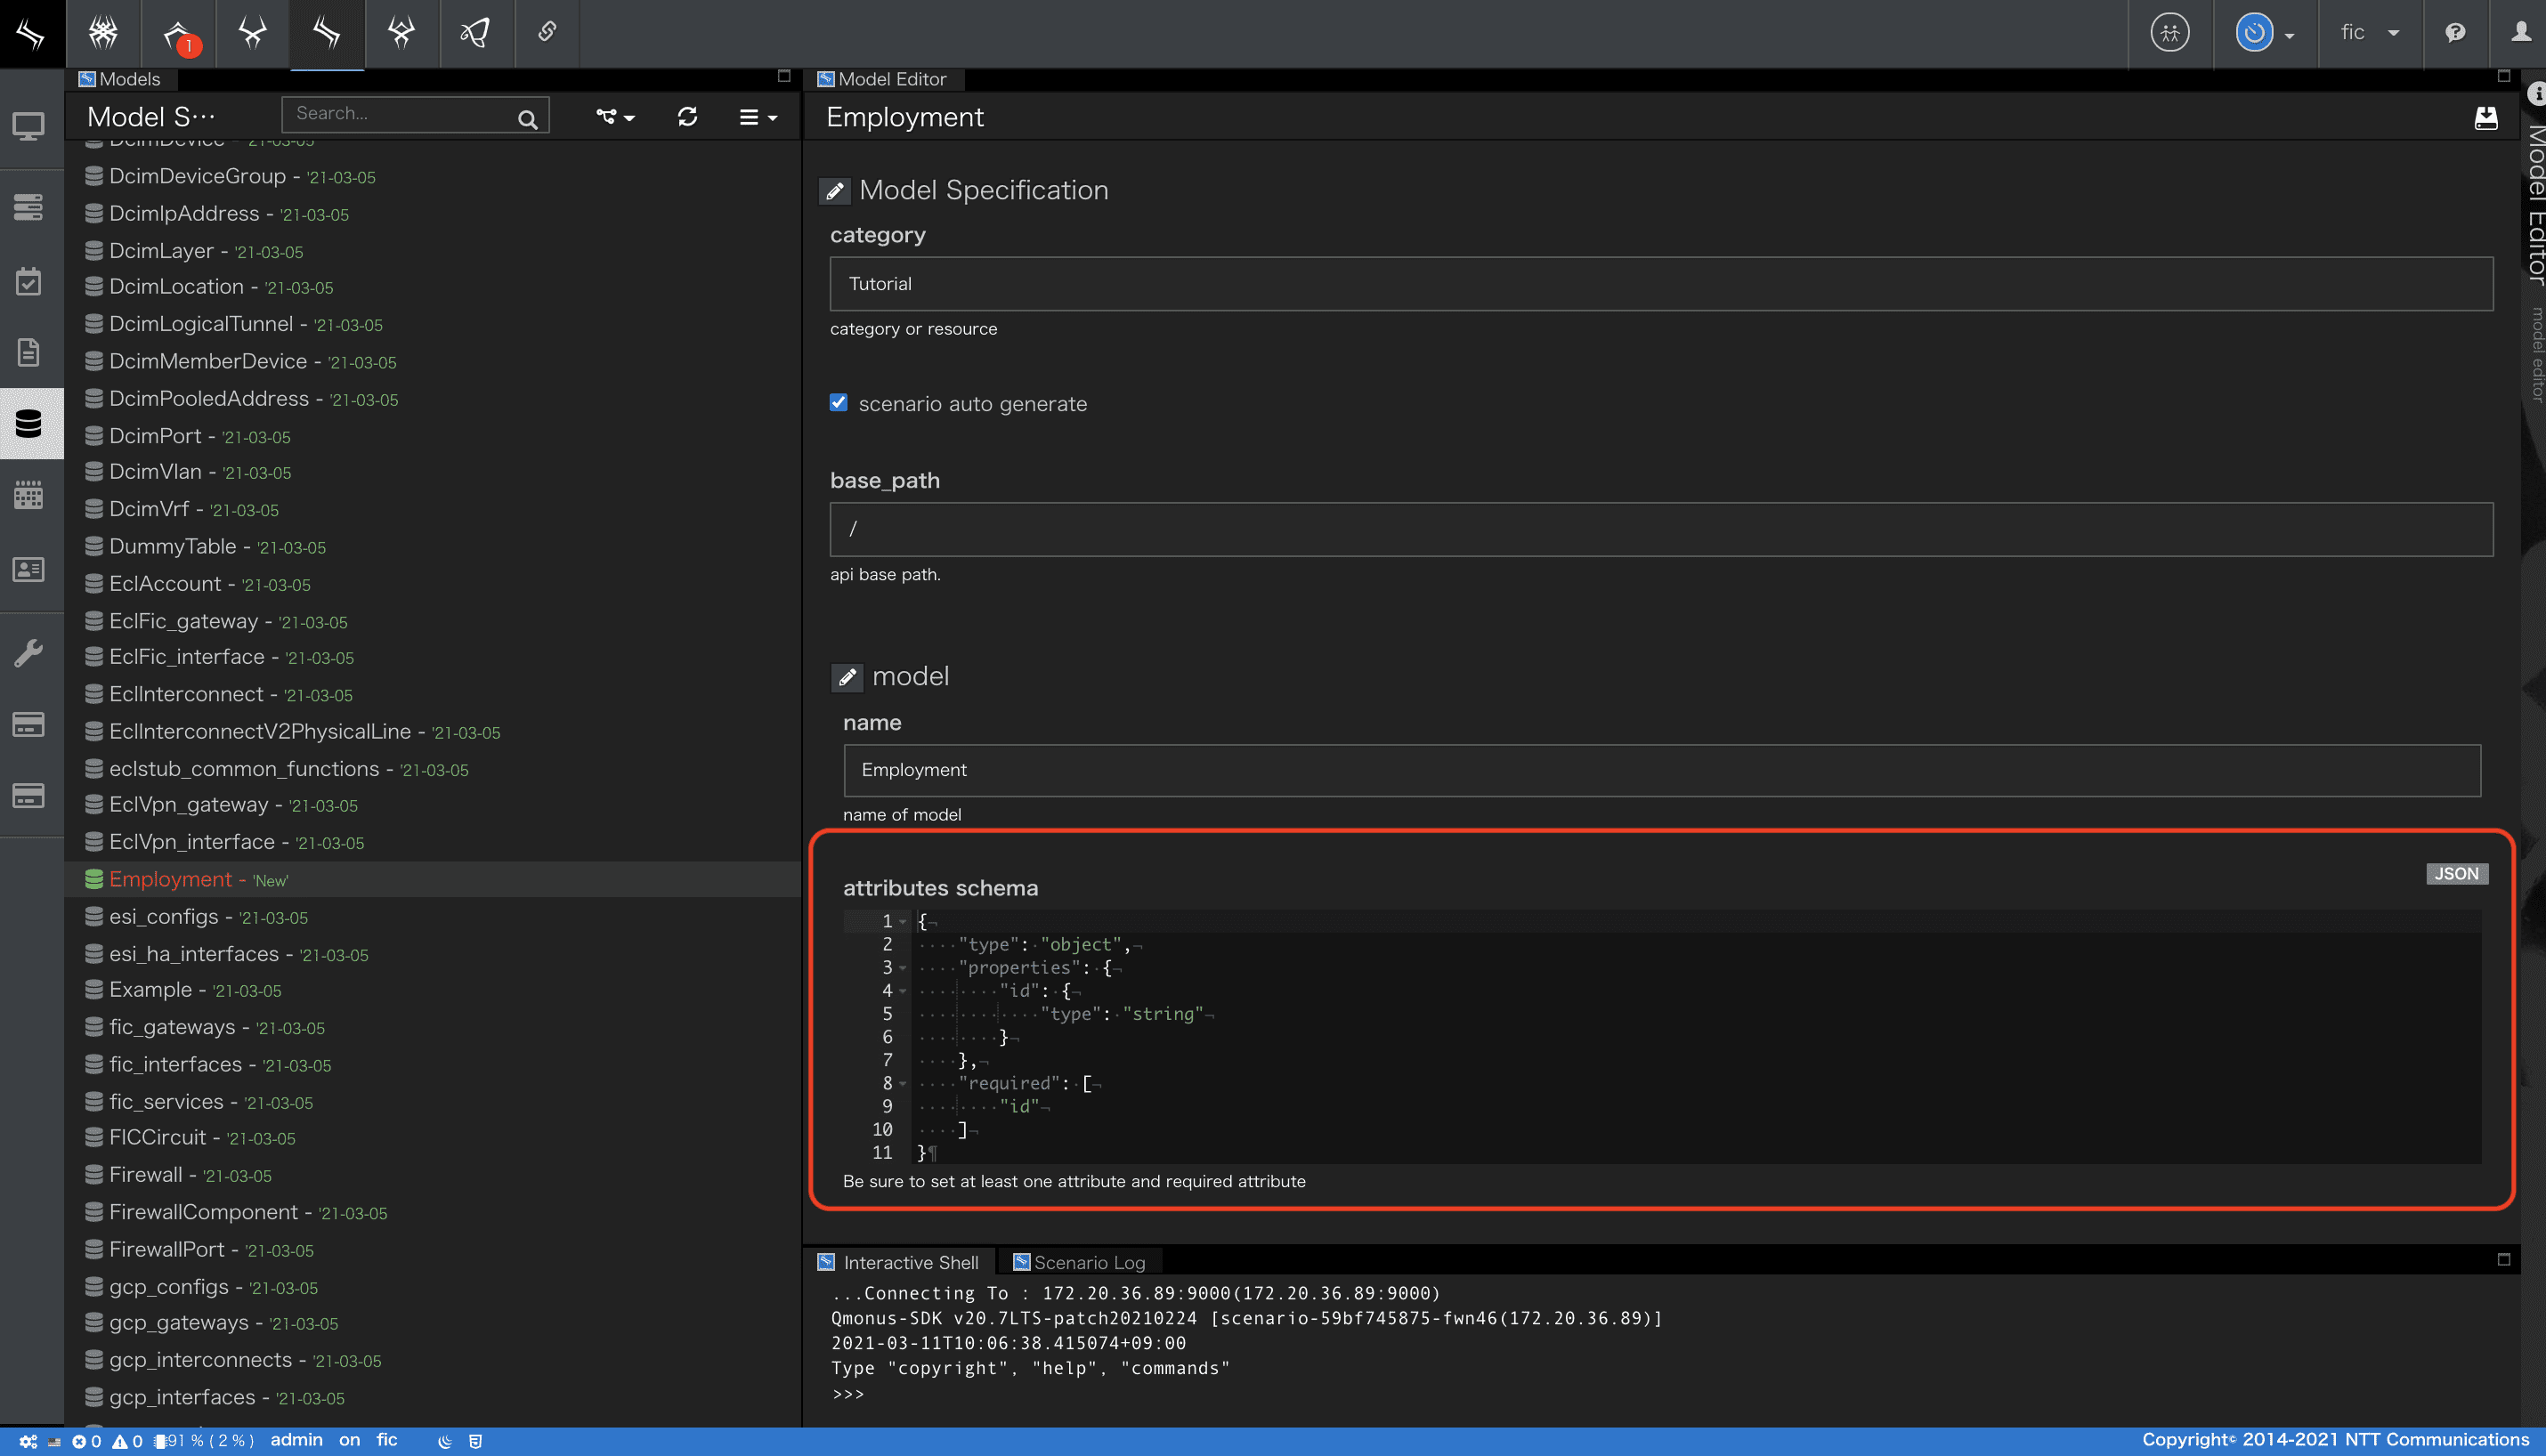
- jsonschemaによってデータベーススキーマを定義します。
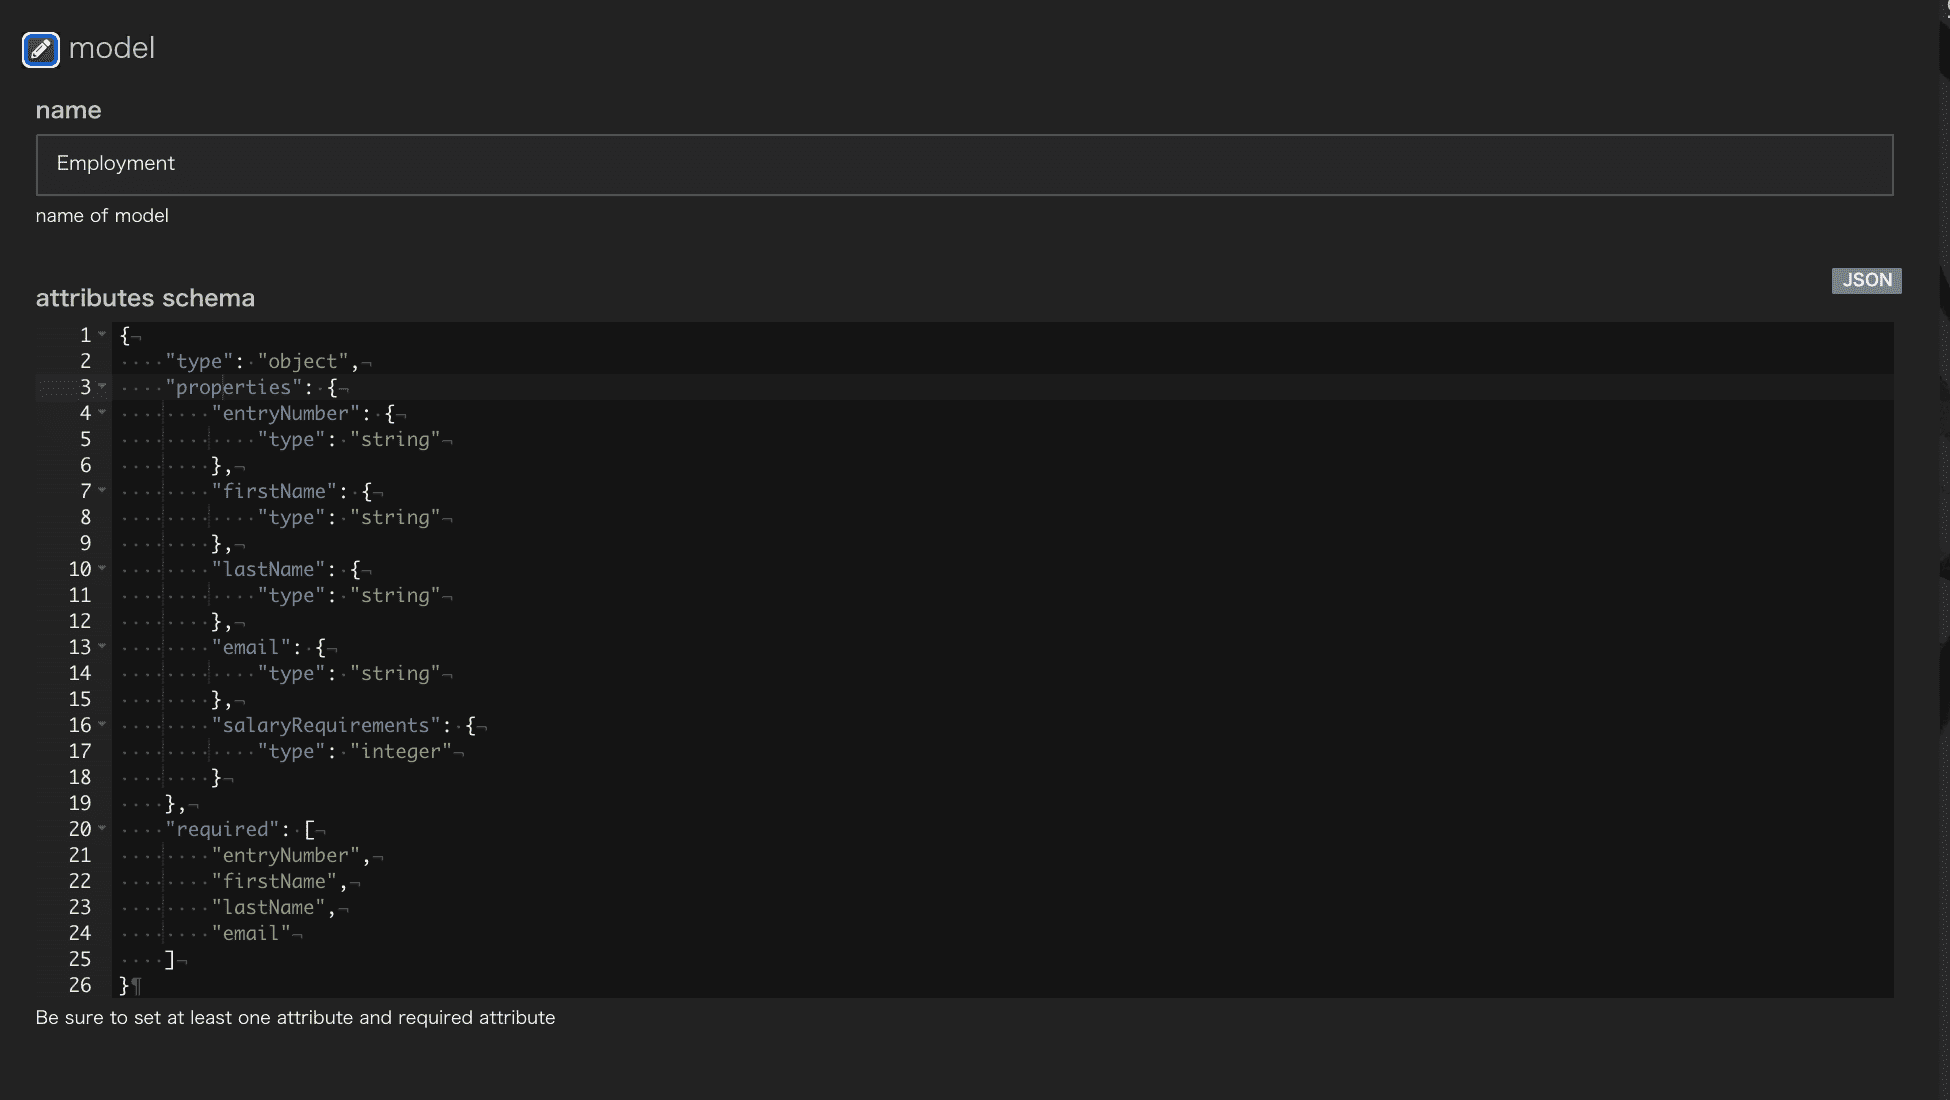
画面赤枠のattributes schemaに以下のjsonschemaを入力します。
{
    "type": "object",
    "properties": {
        "entryNumber": {
            "type": "string"
        },
        "firstName": {
            "type": "string"
        },
        "lastName": {
            "type": "string"
        },
        "email": {
            "type": "string"
        },
        "salaryRequirements": {
            "type": "integer"
        }
    },
    "required": [
        "entryNumber",
        "firstName",
        "lastName",
        "email"
    ]
}
primary_keyの設定
次はattributes schemaに定義した属性の中からprimary_keyを設定します。
ここではentryNumberをprimary_keyとします。
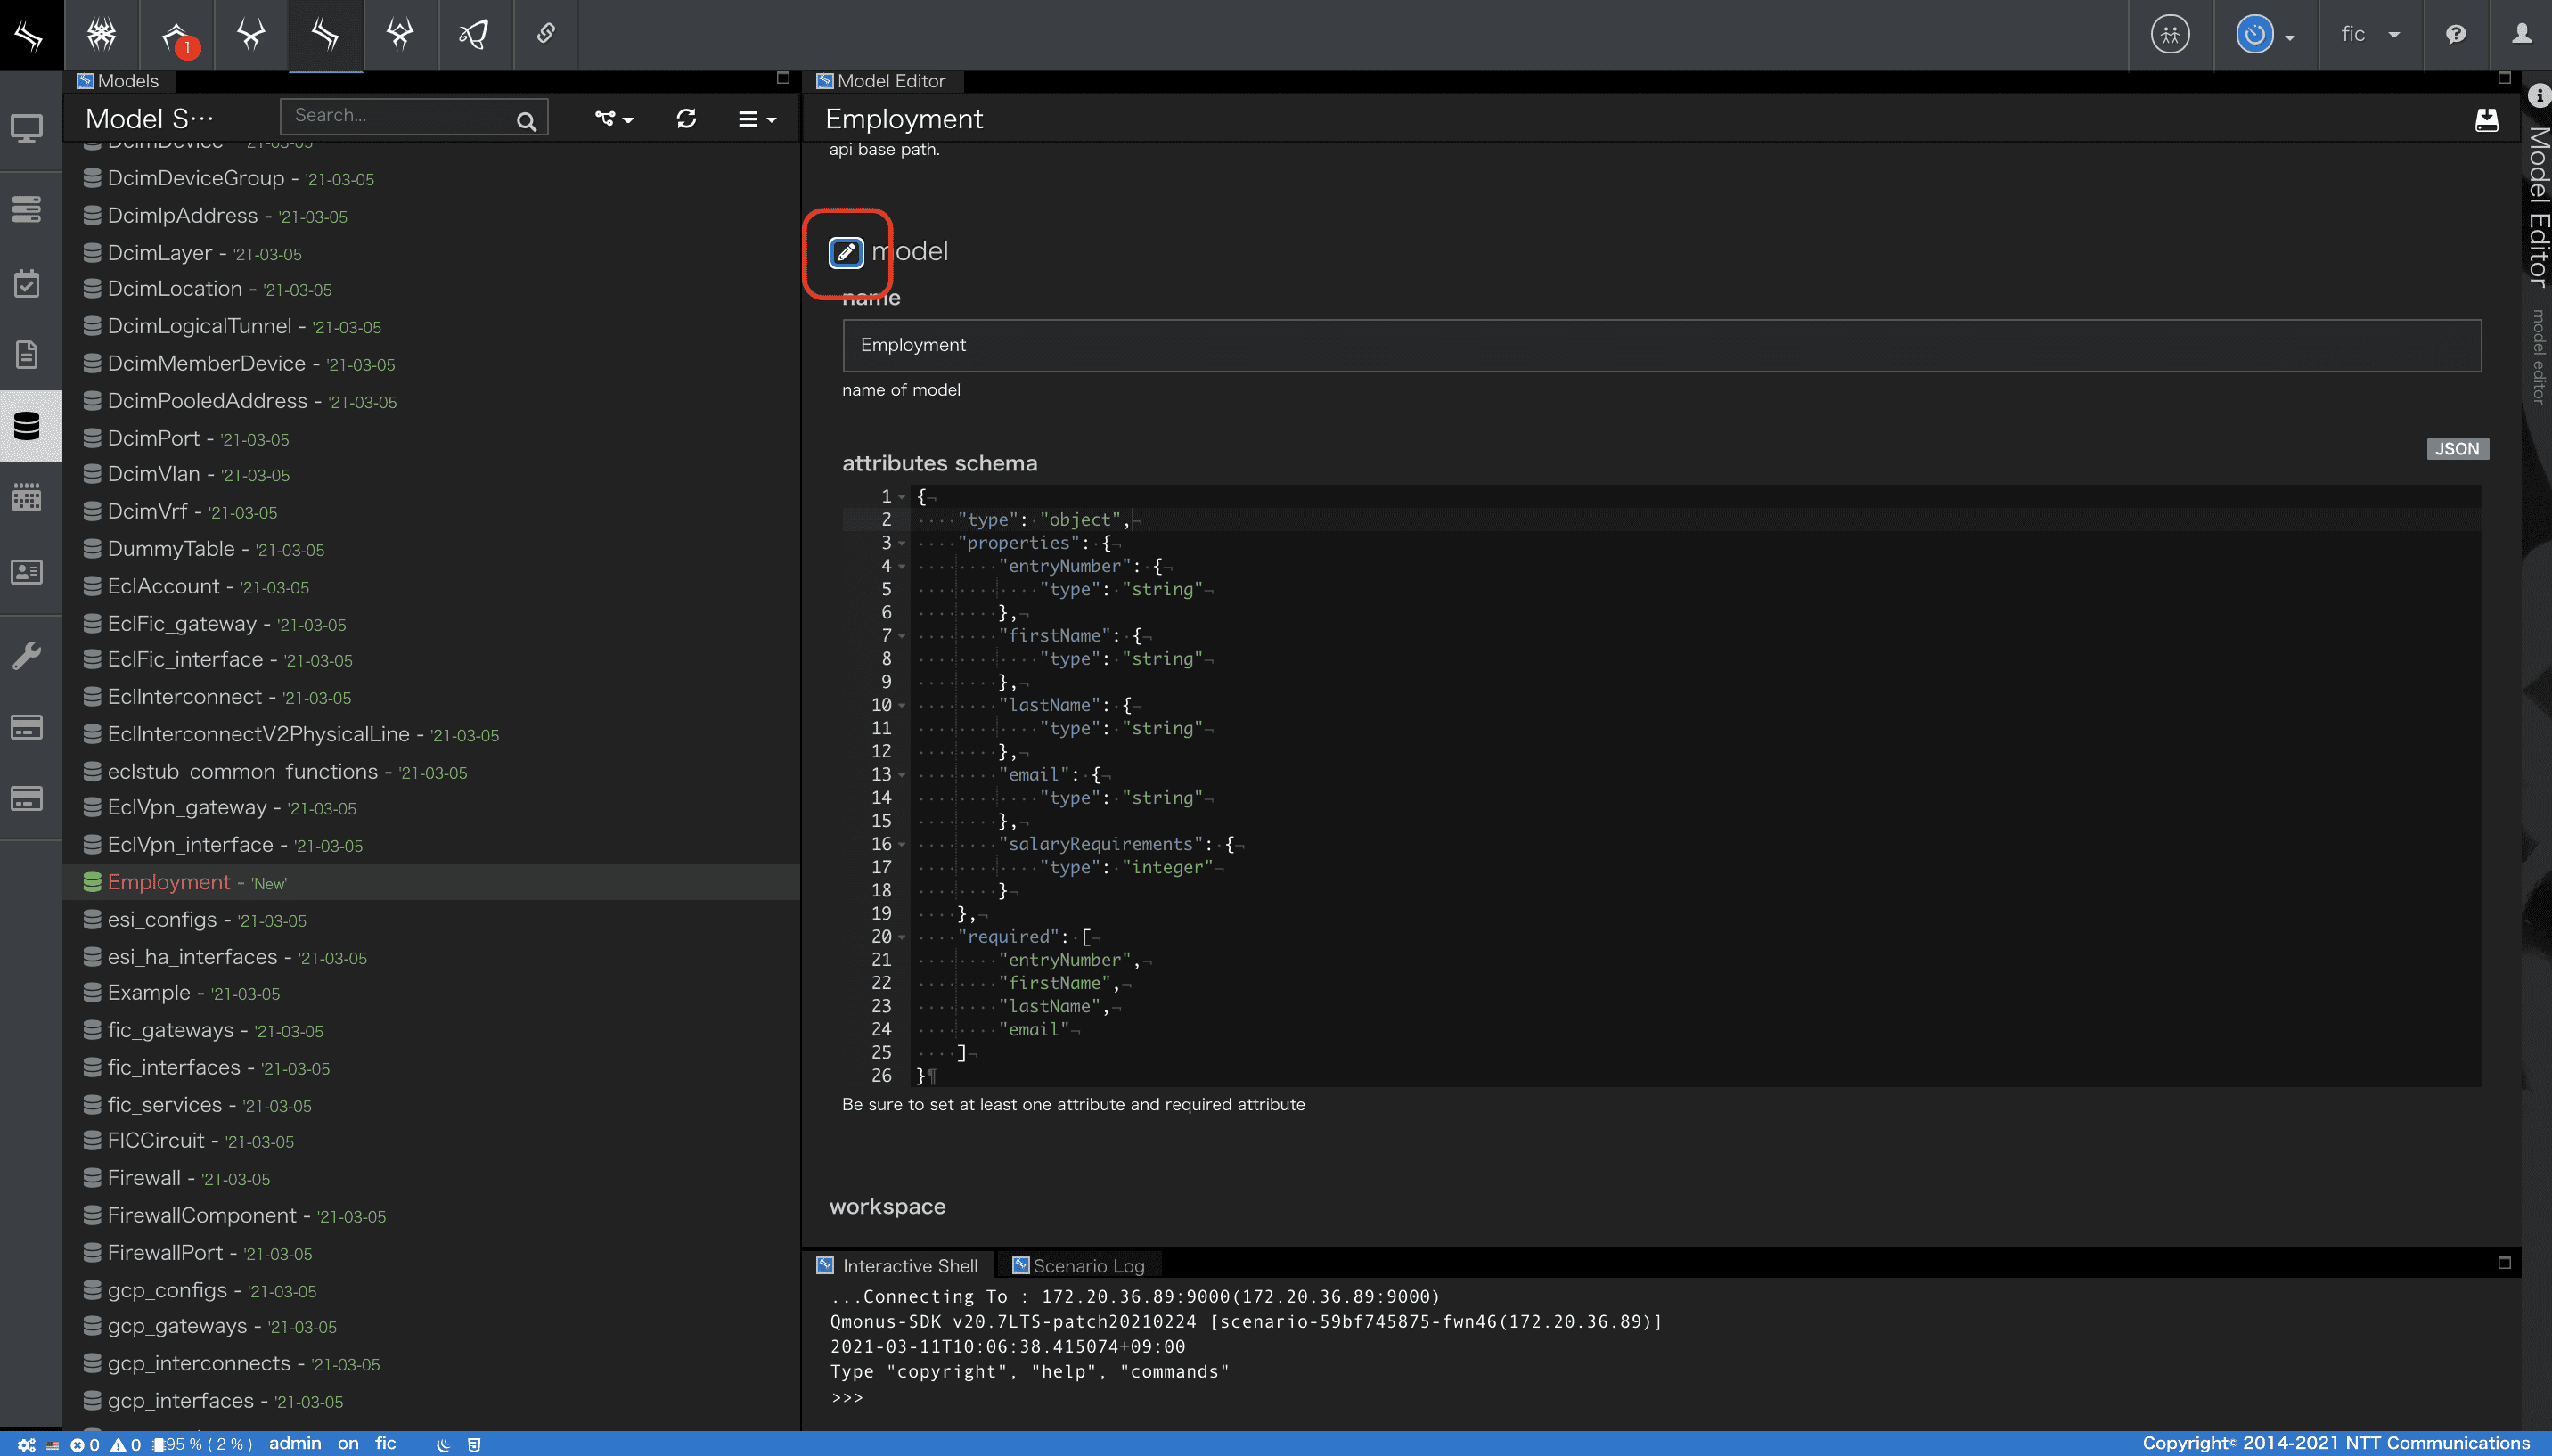
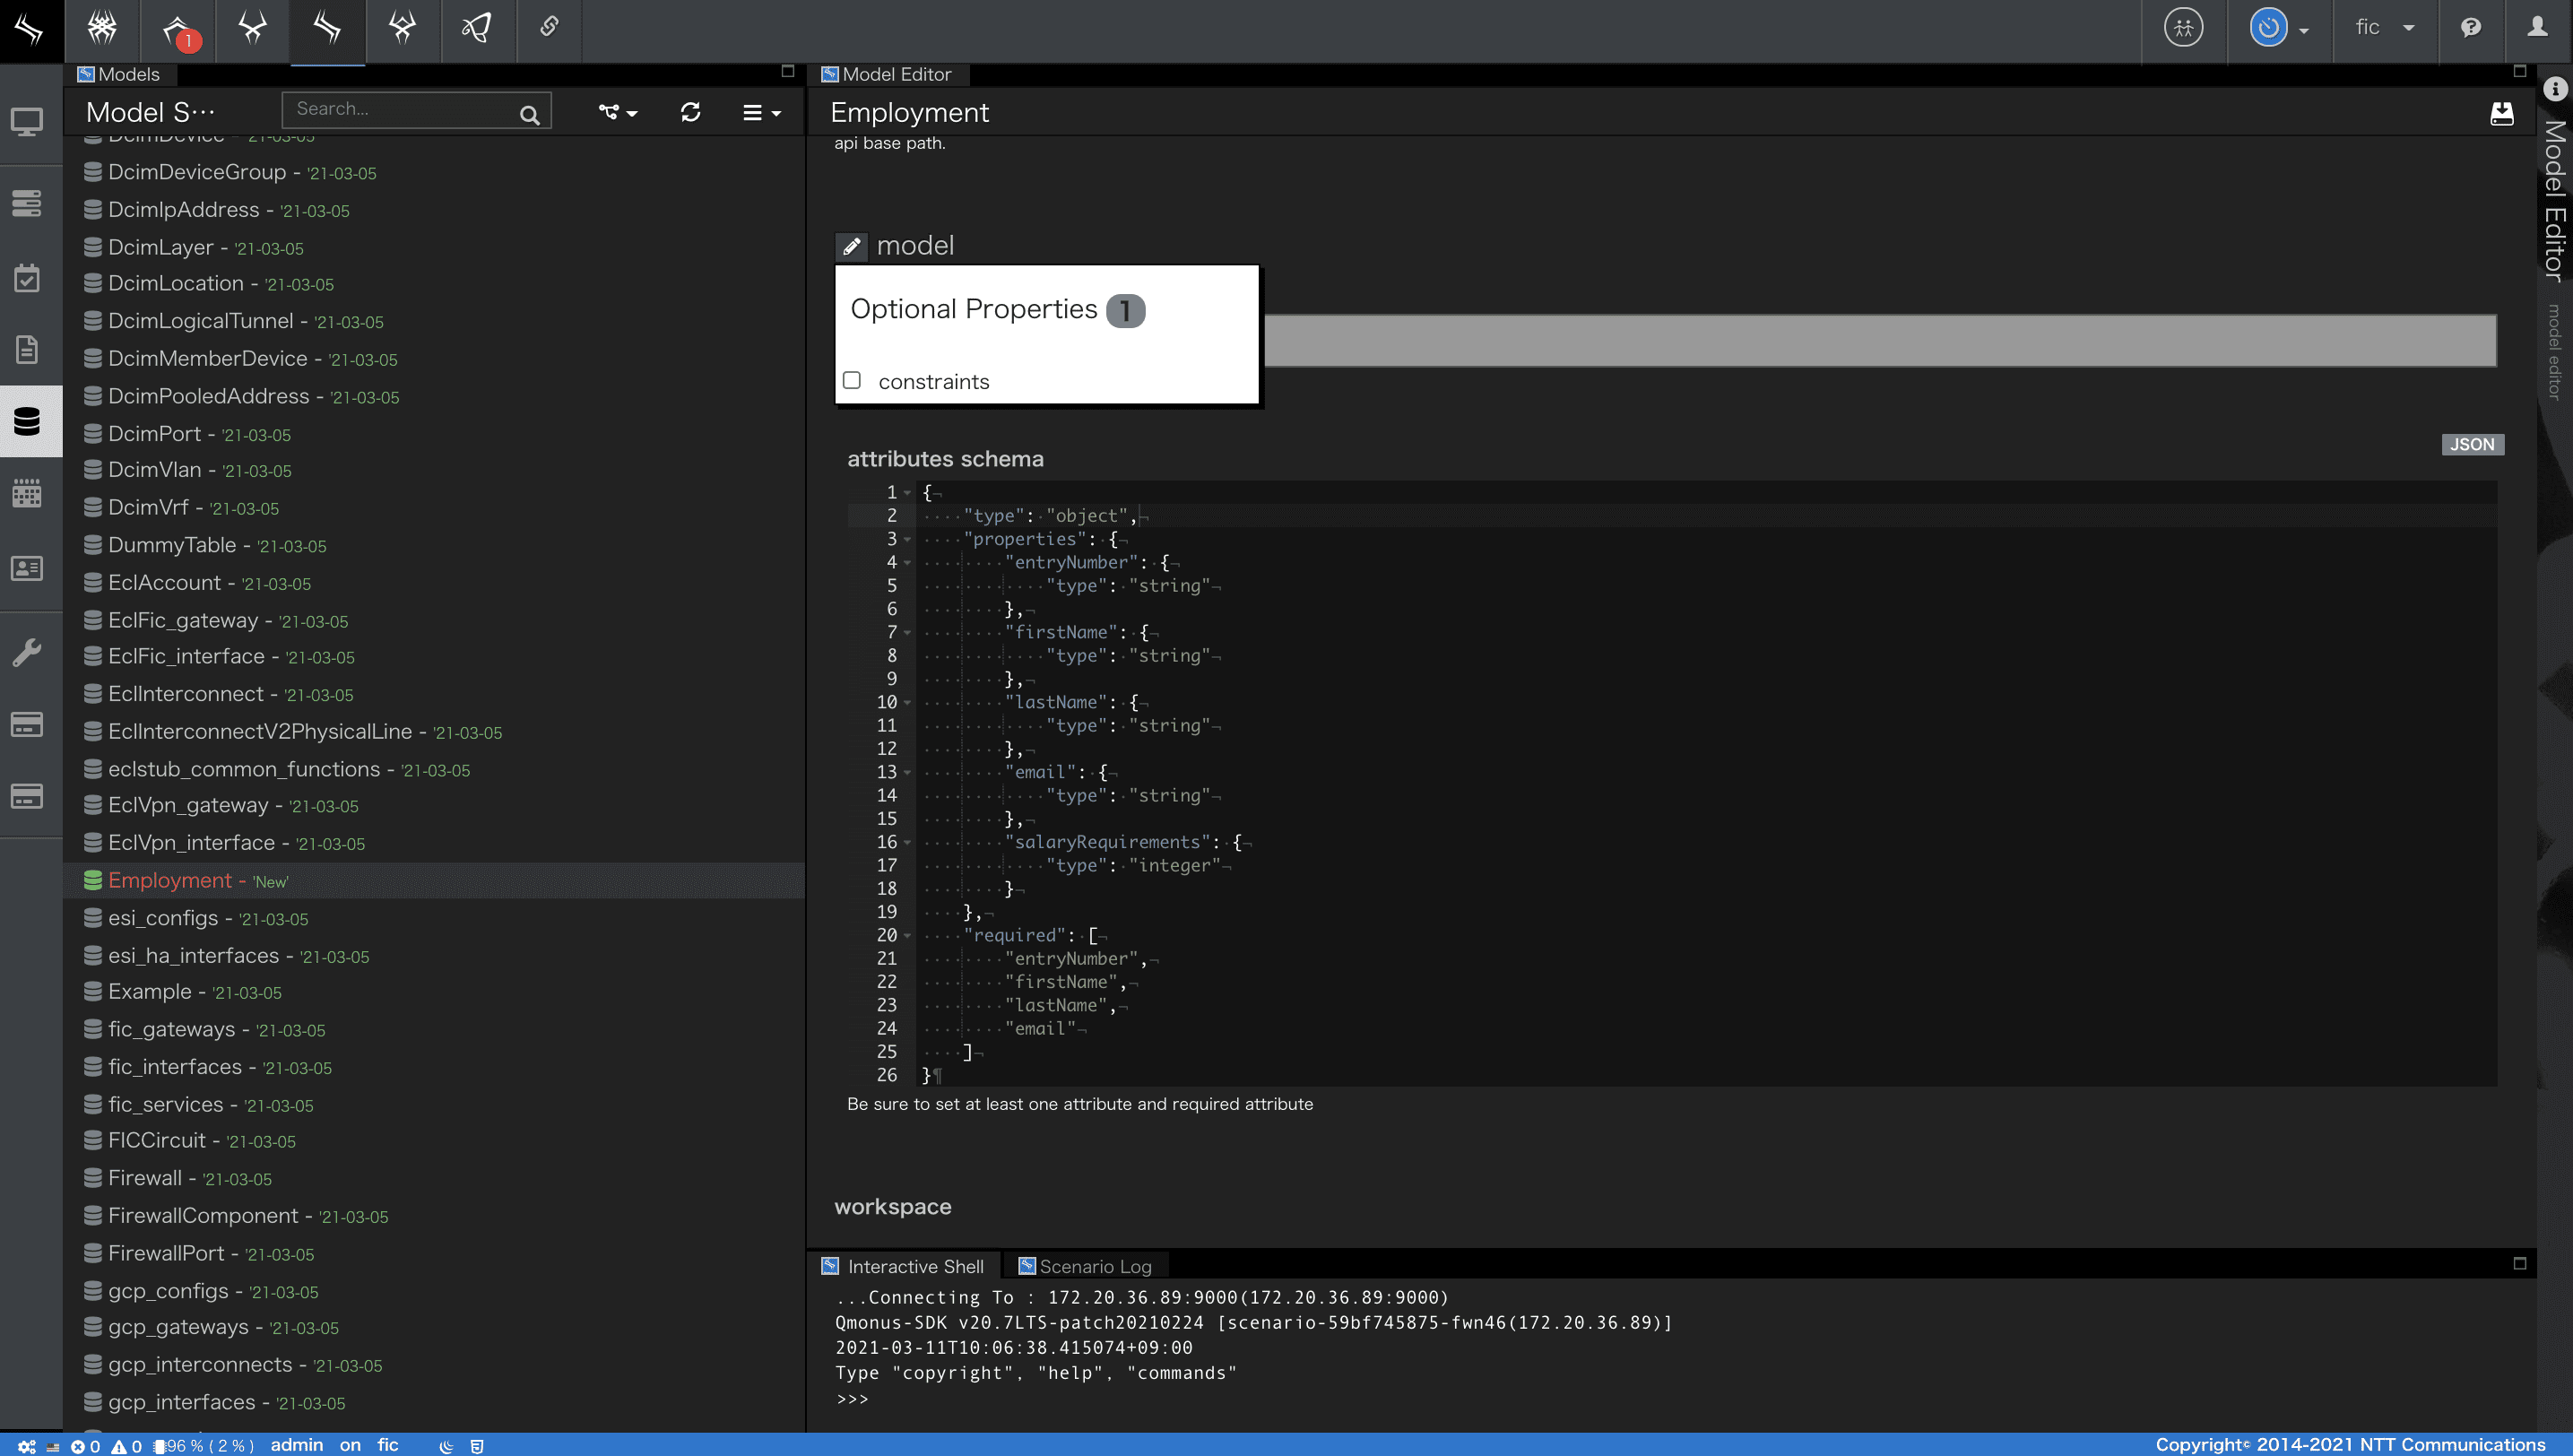
- model項目左のアイコンをクリックし
Optional Propertiesを開きます。
-
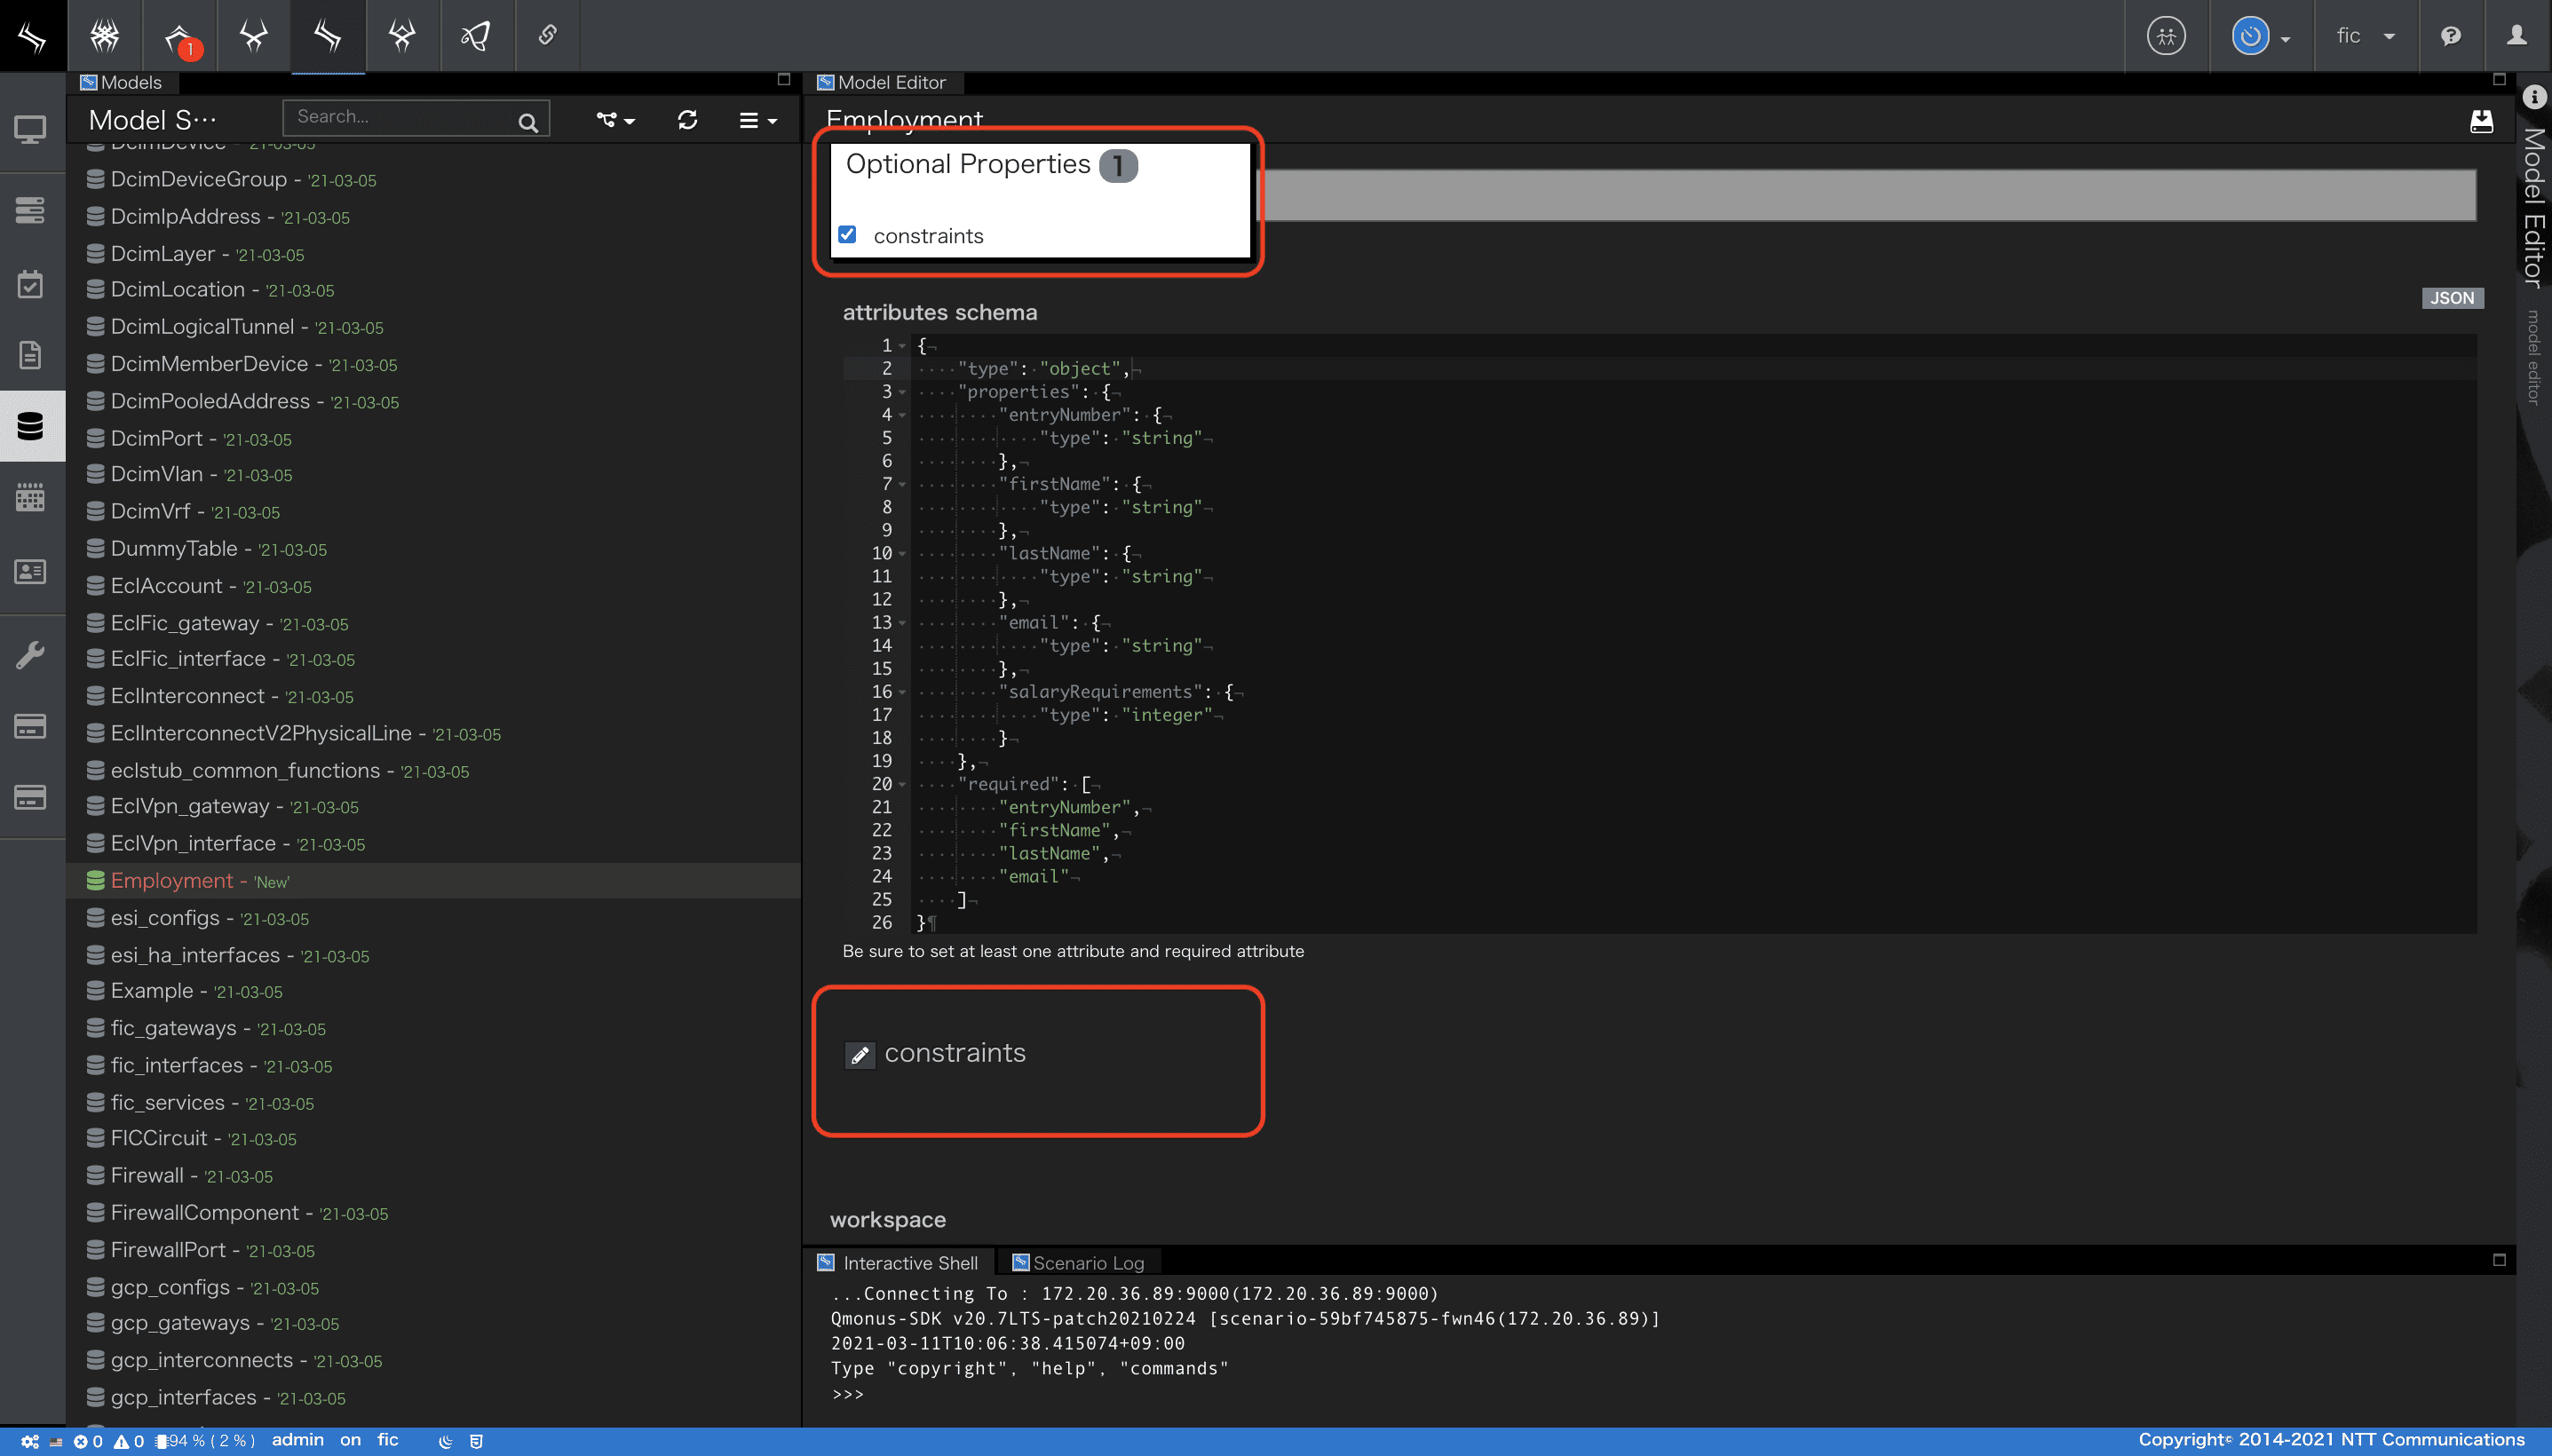
constraintsにチェックを入れると、attributes schemaの下にconstraints項目が表示されます。
-
constraints項目左のアイコンをクリックし、Optional Propertiesを開きます。
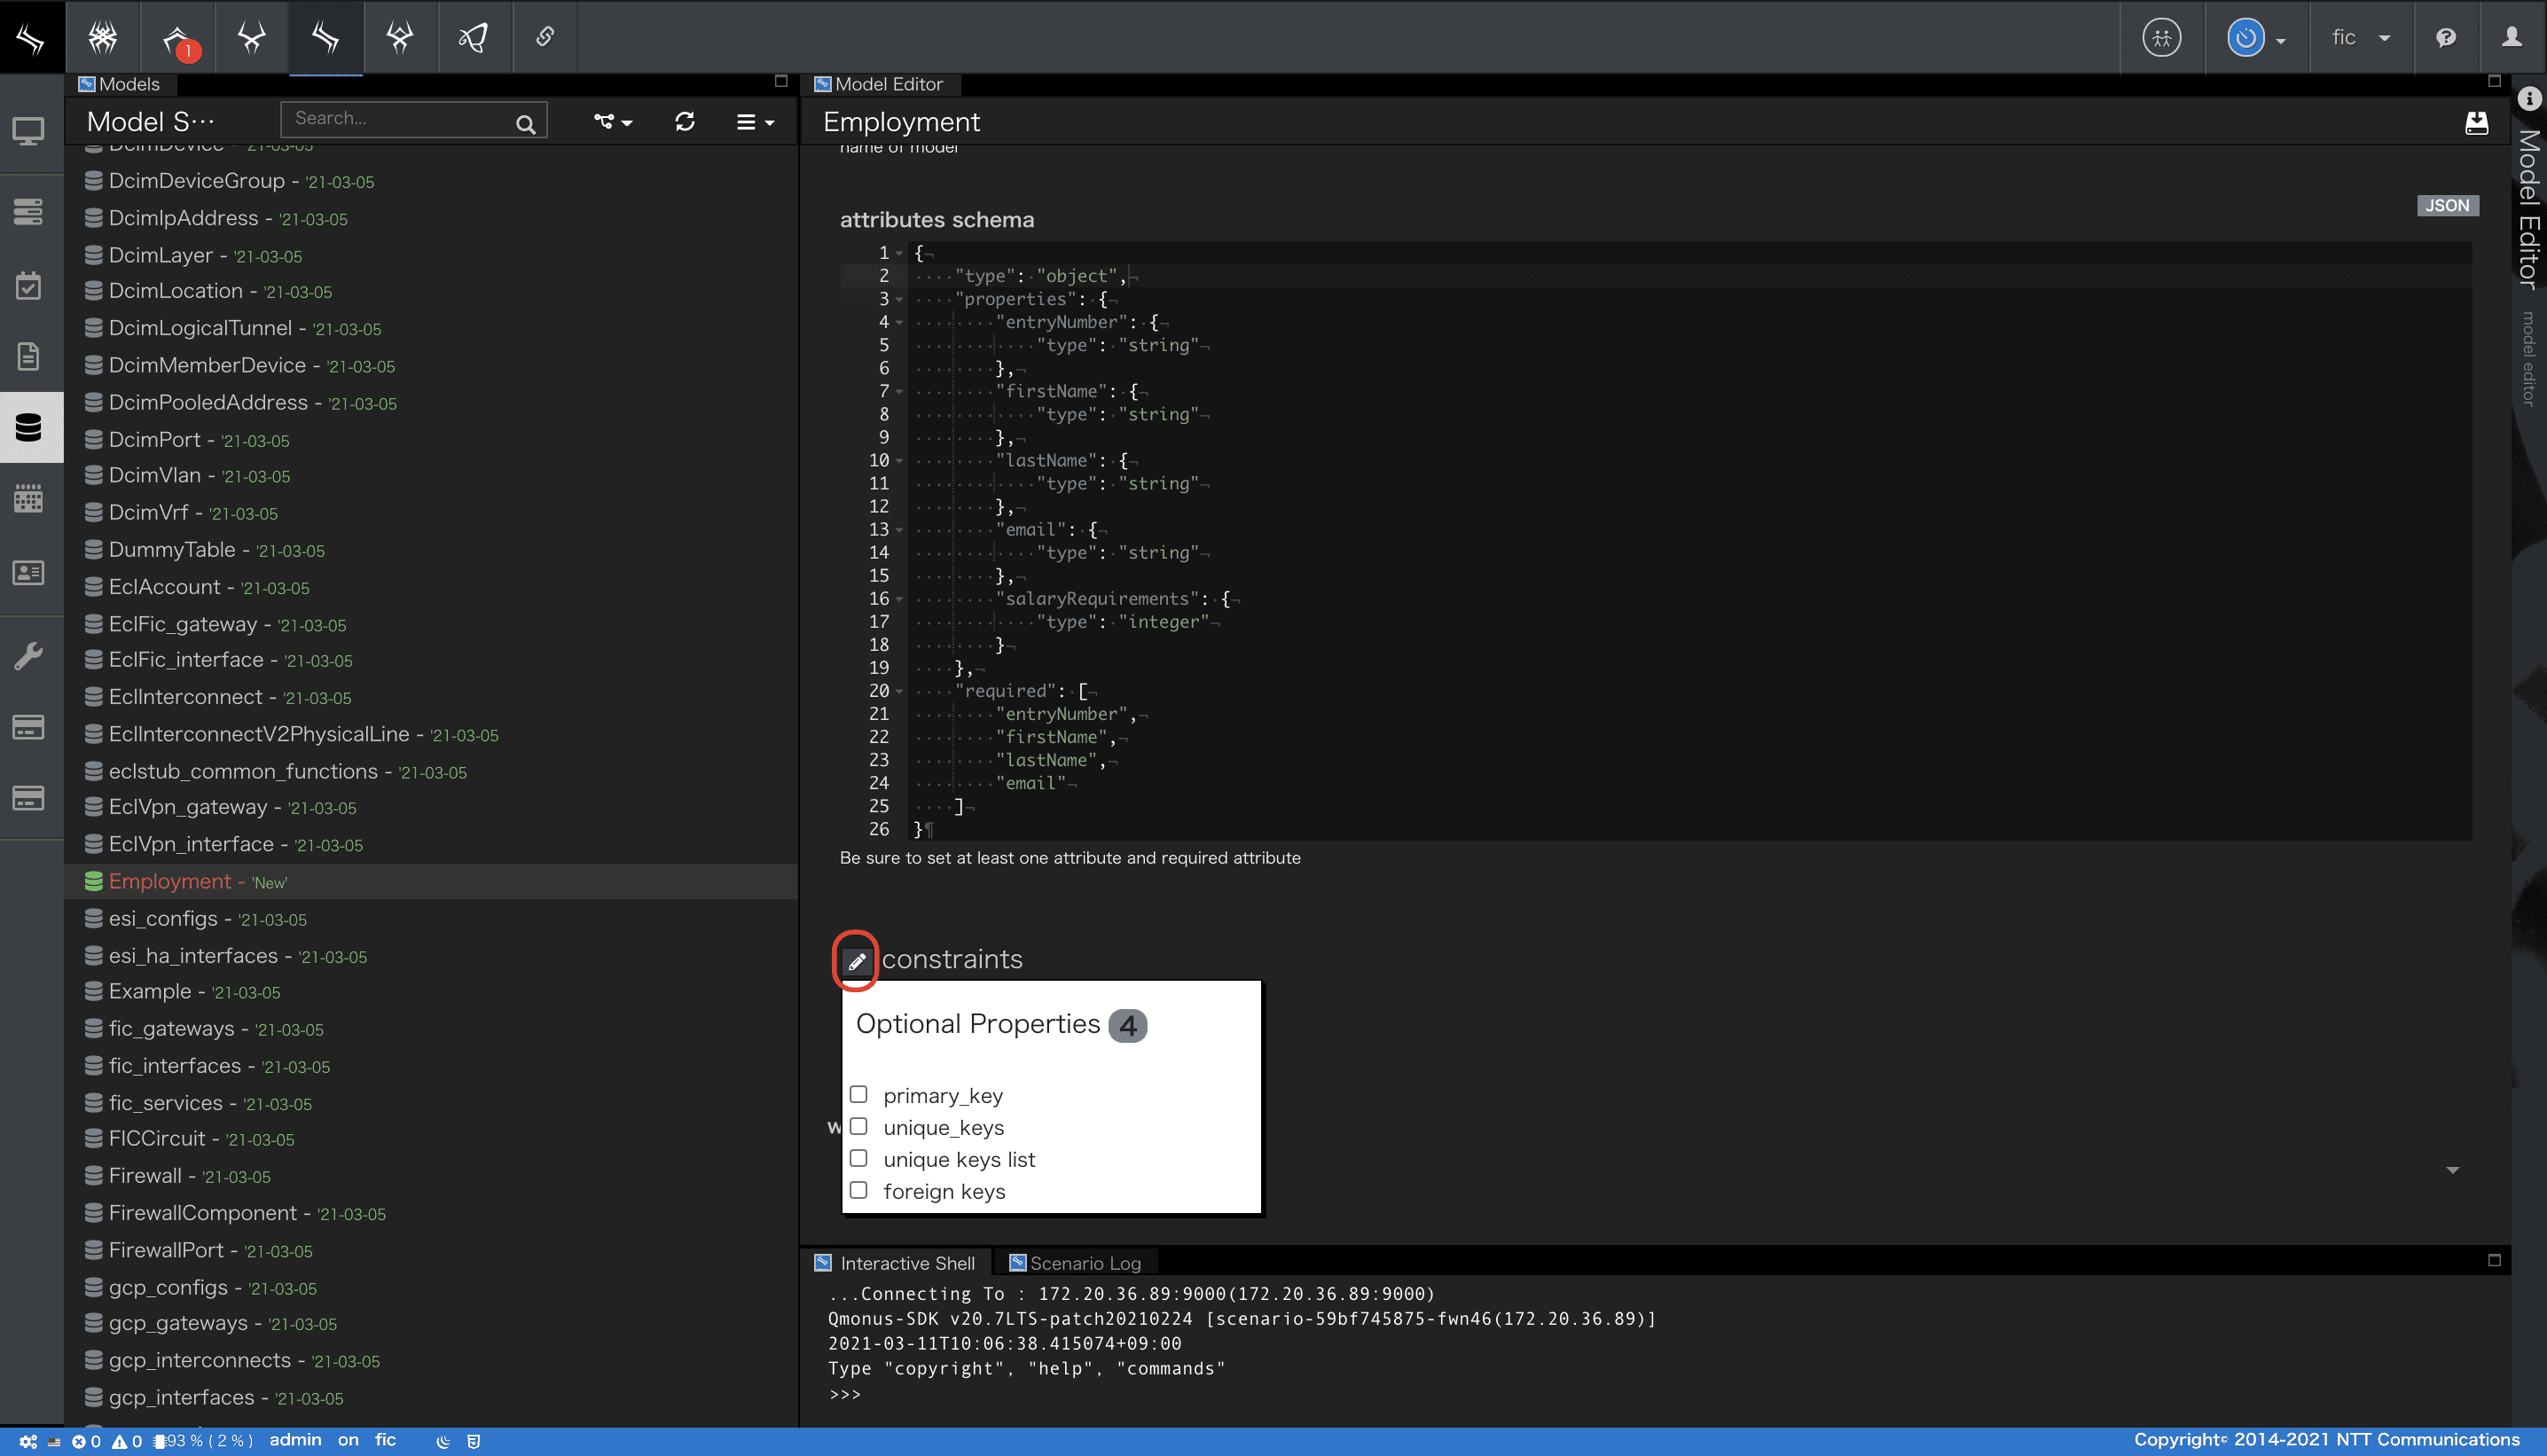
-
primary_keyをチェックし、再度constraints項目左のアイコンをクリックすると、Optional Propertiesが閉じ、入力可能なprimary_key項目が表示されます。
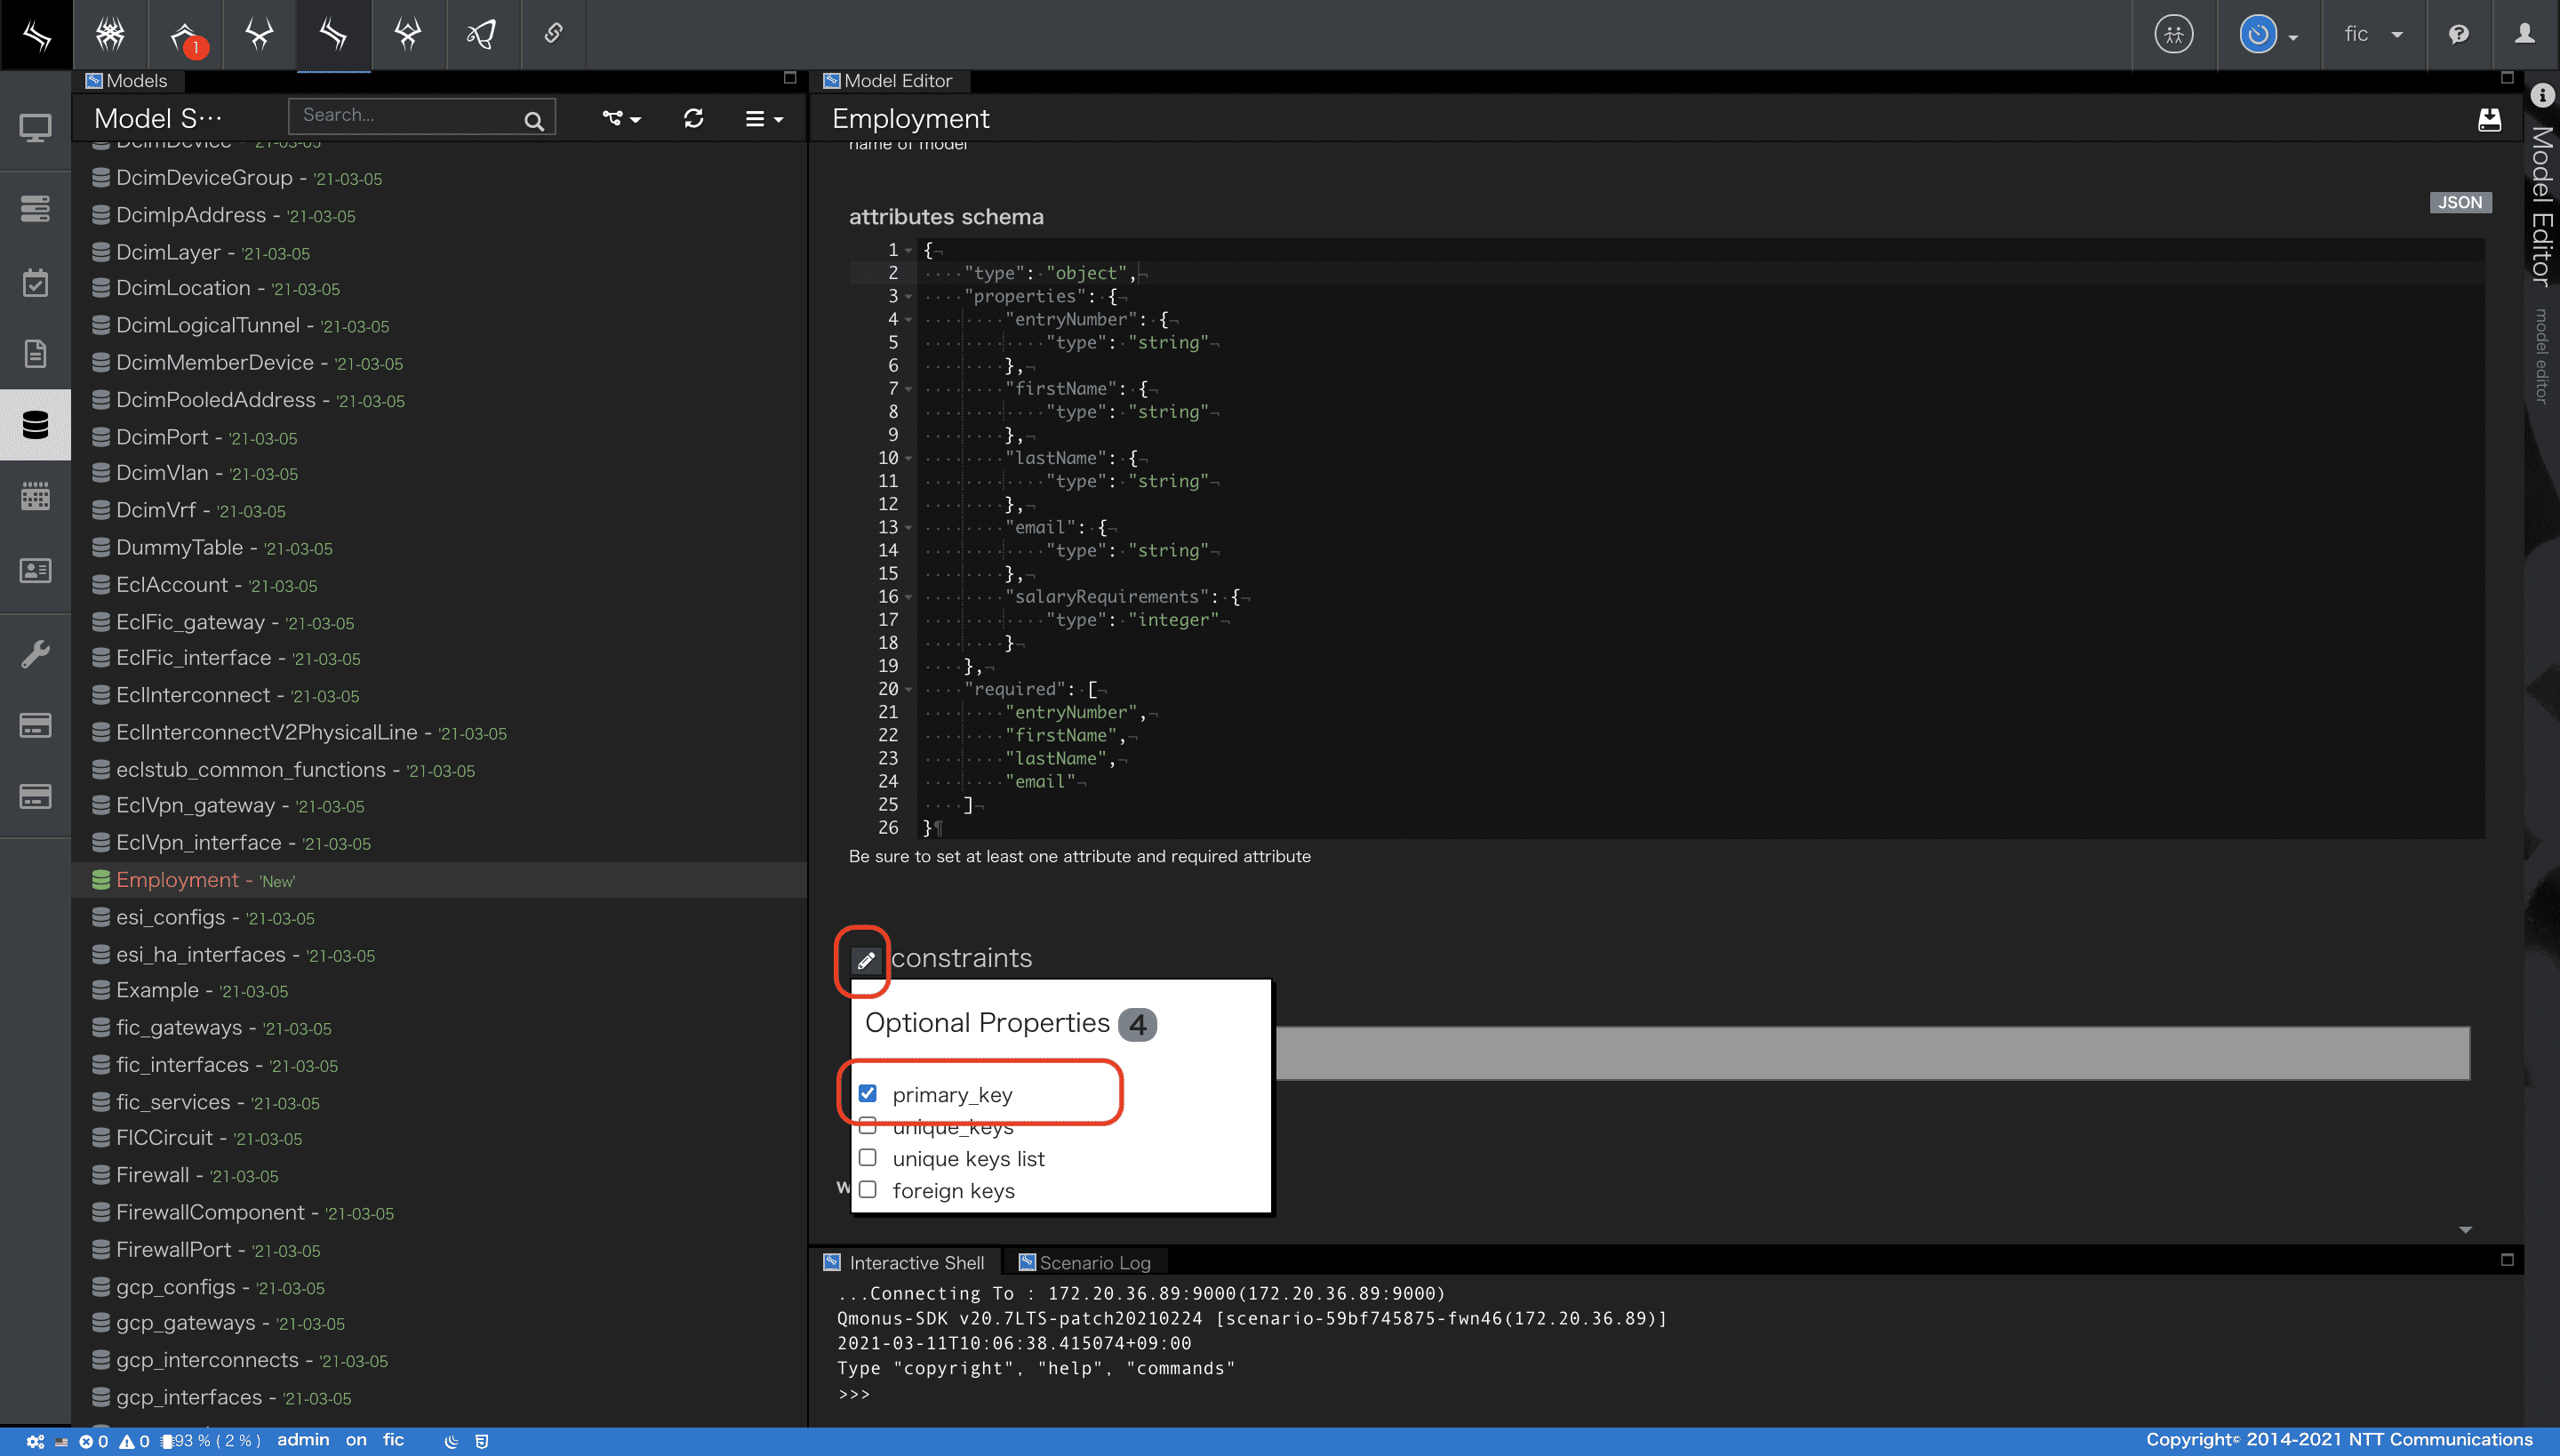
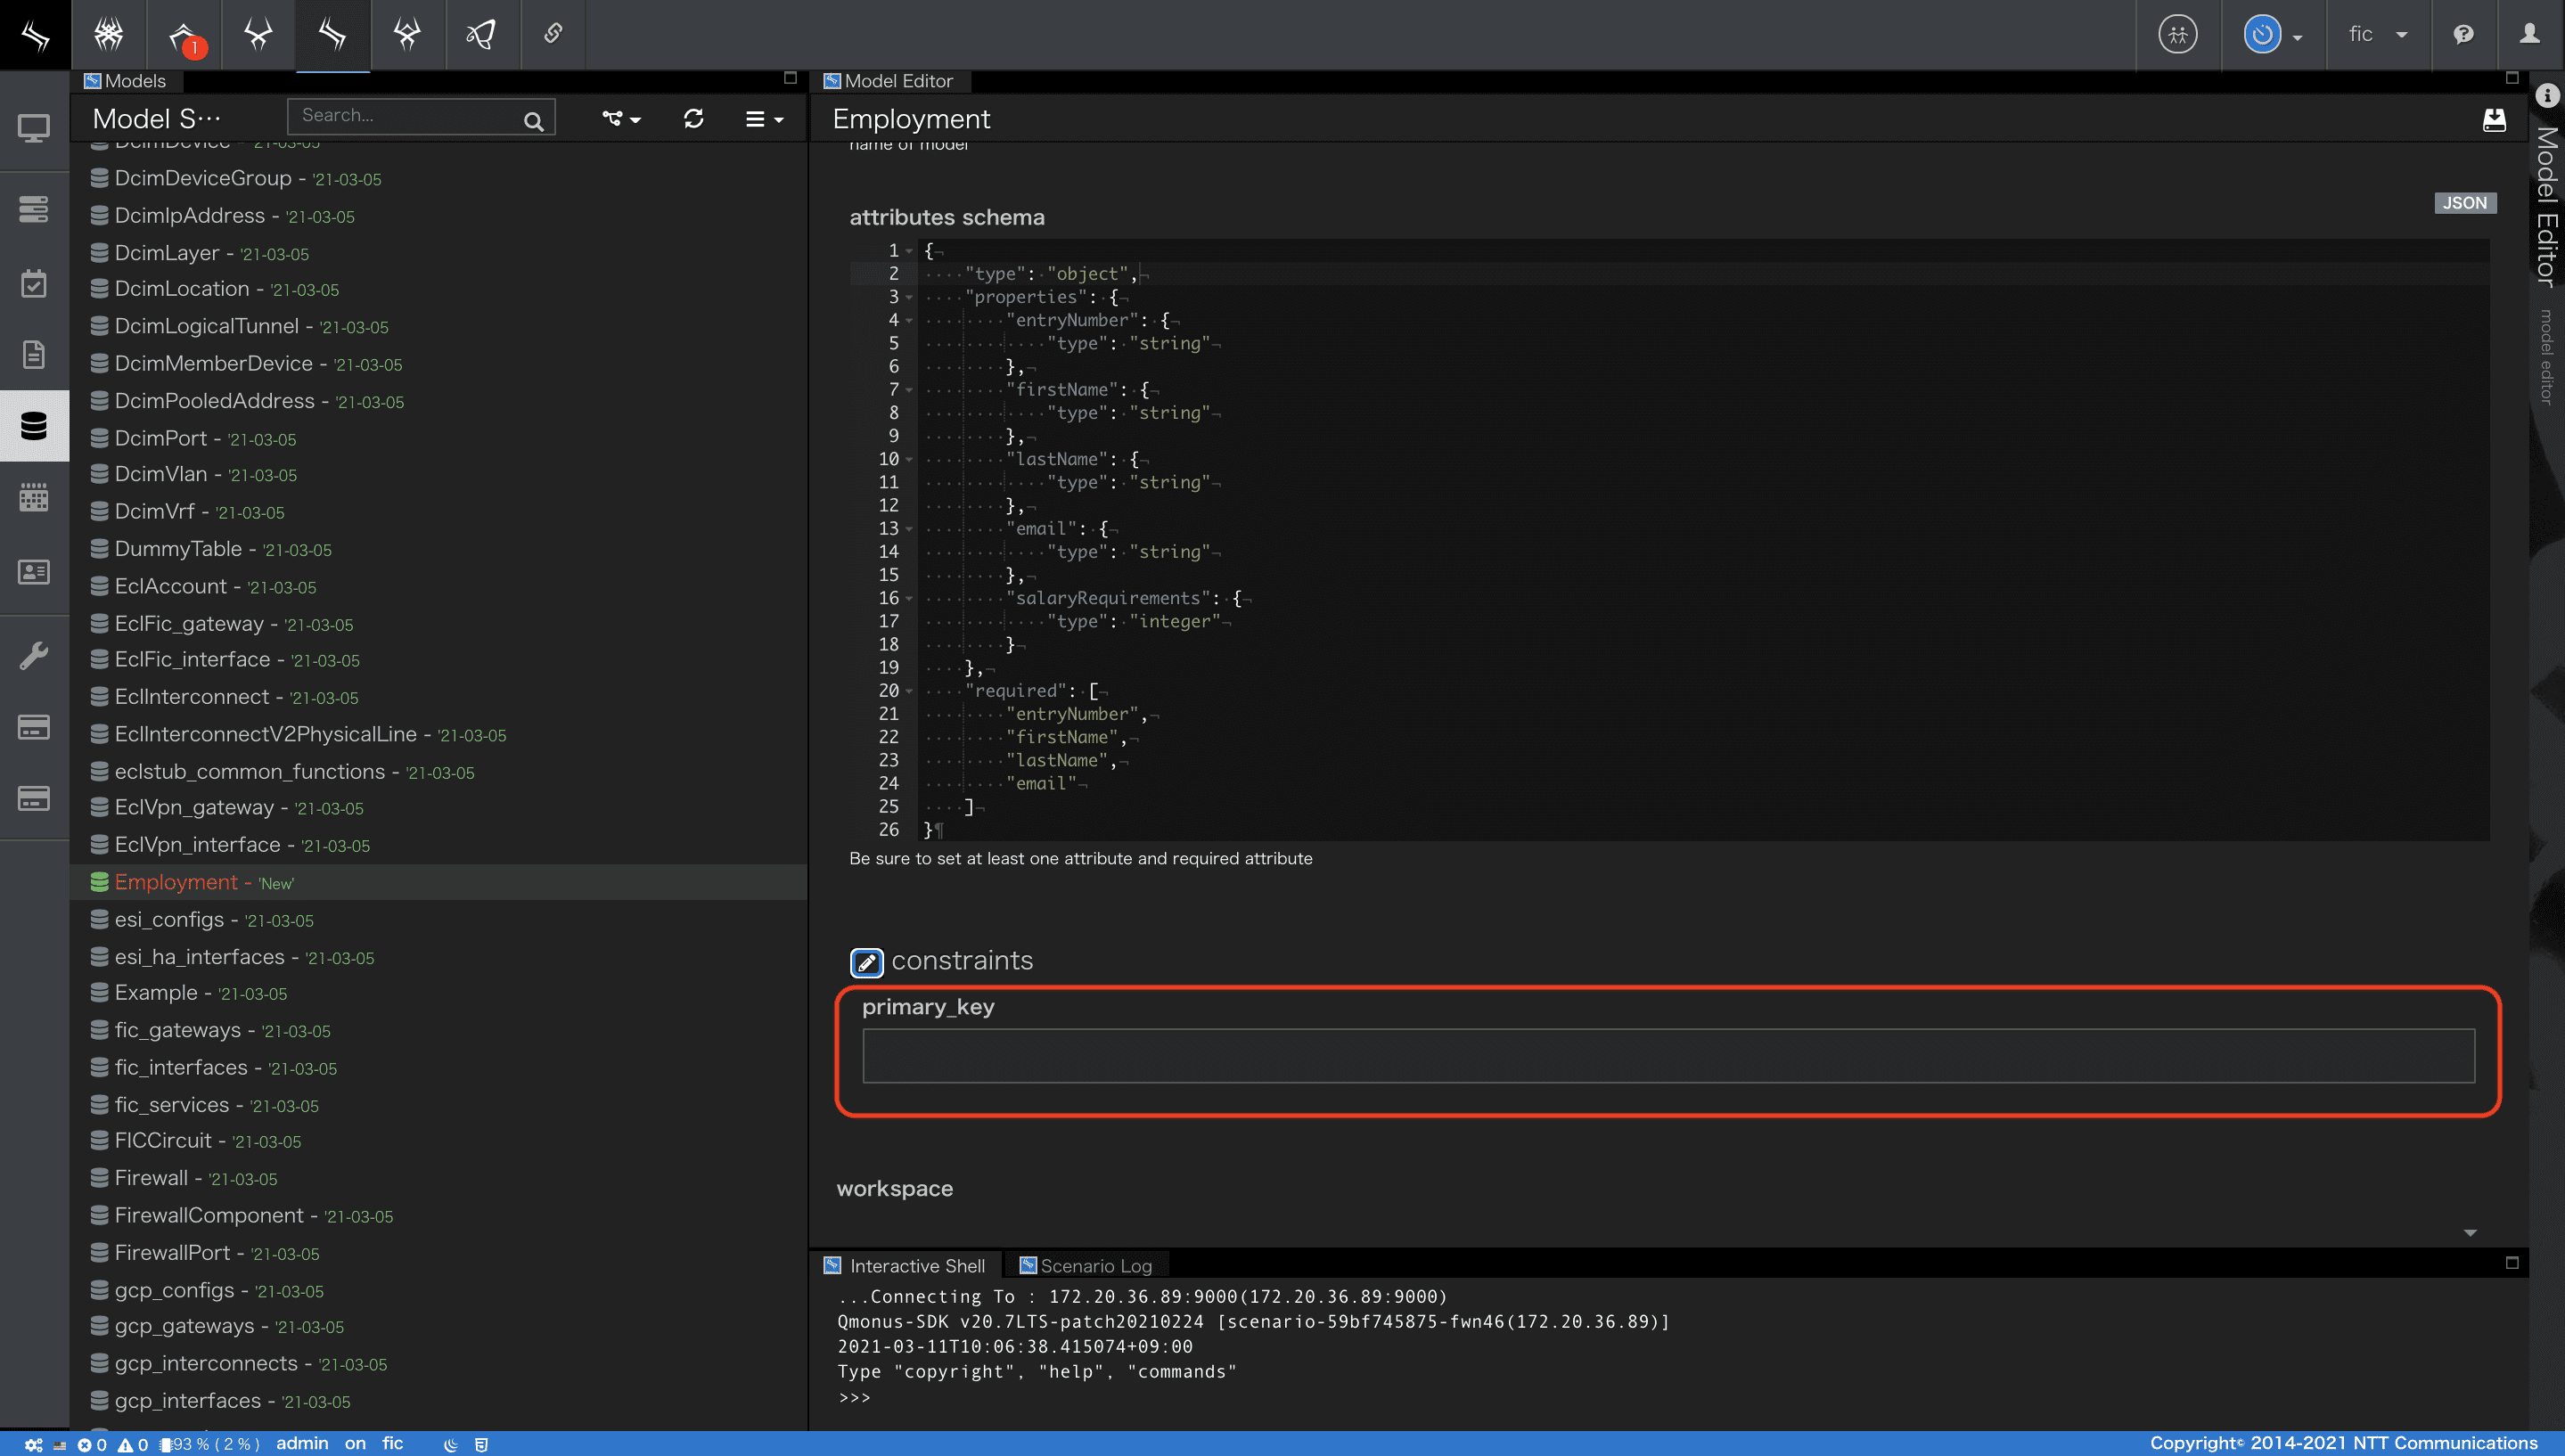
-
entryNumberを入力します。

-
最後にモデルのセーブをします。
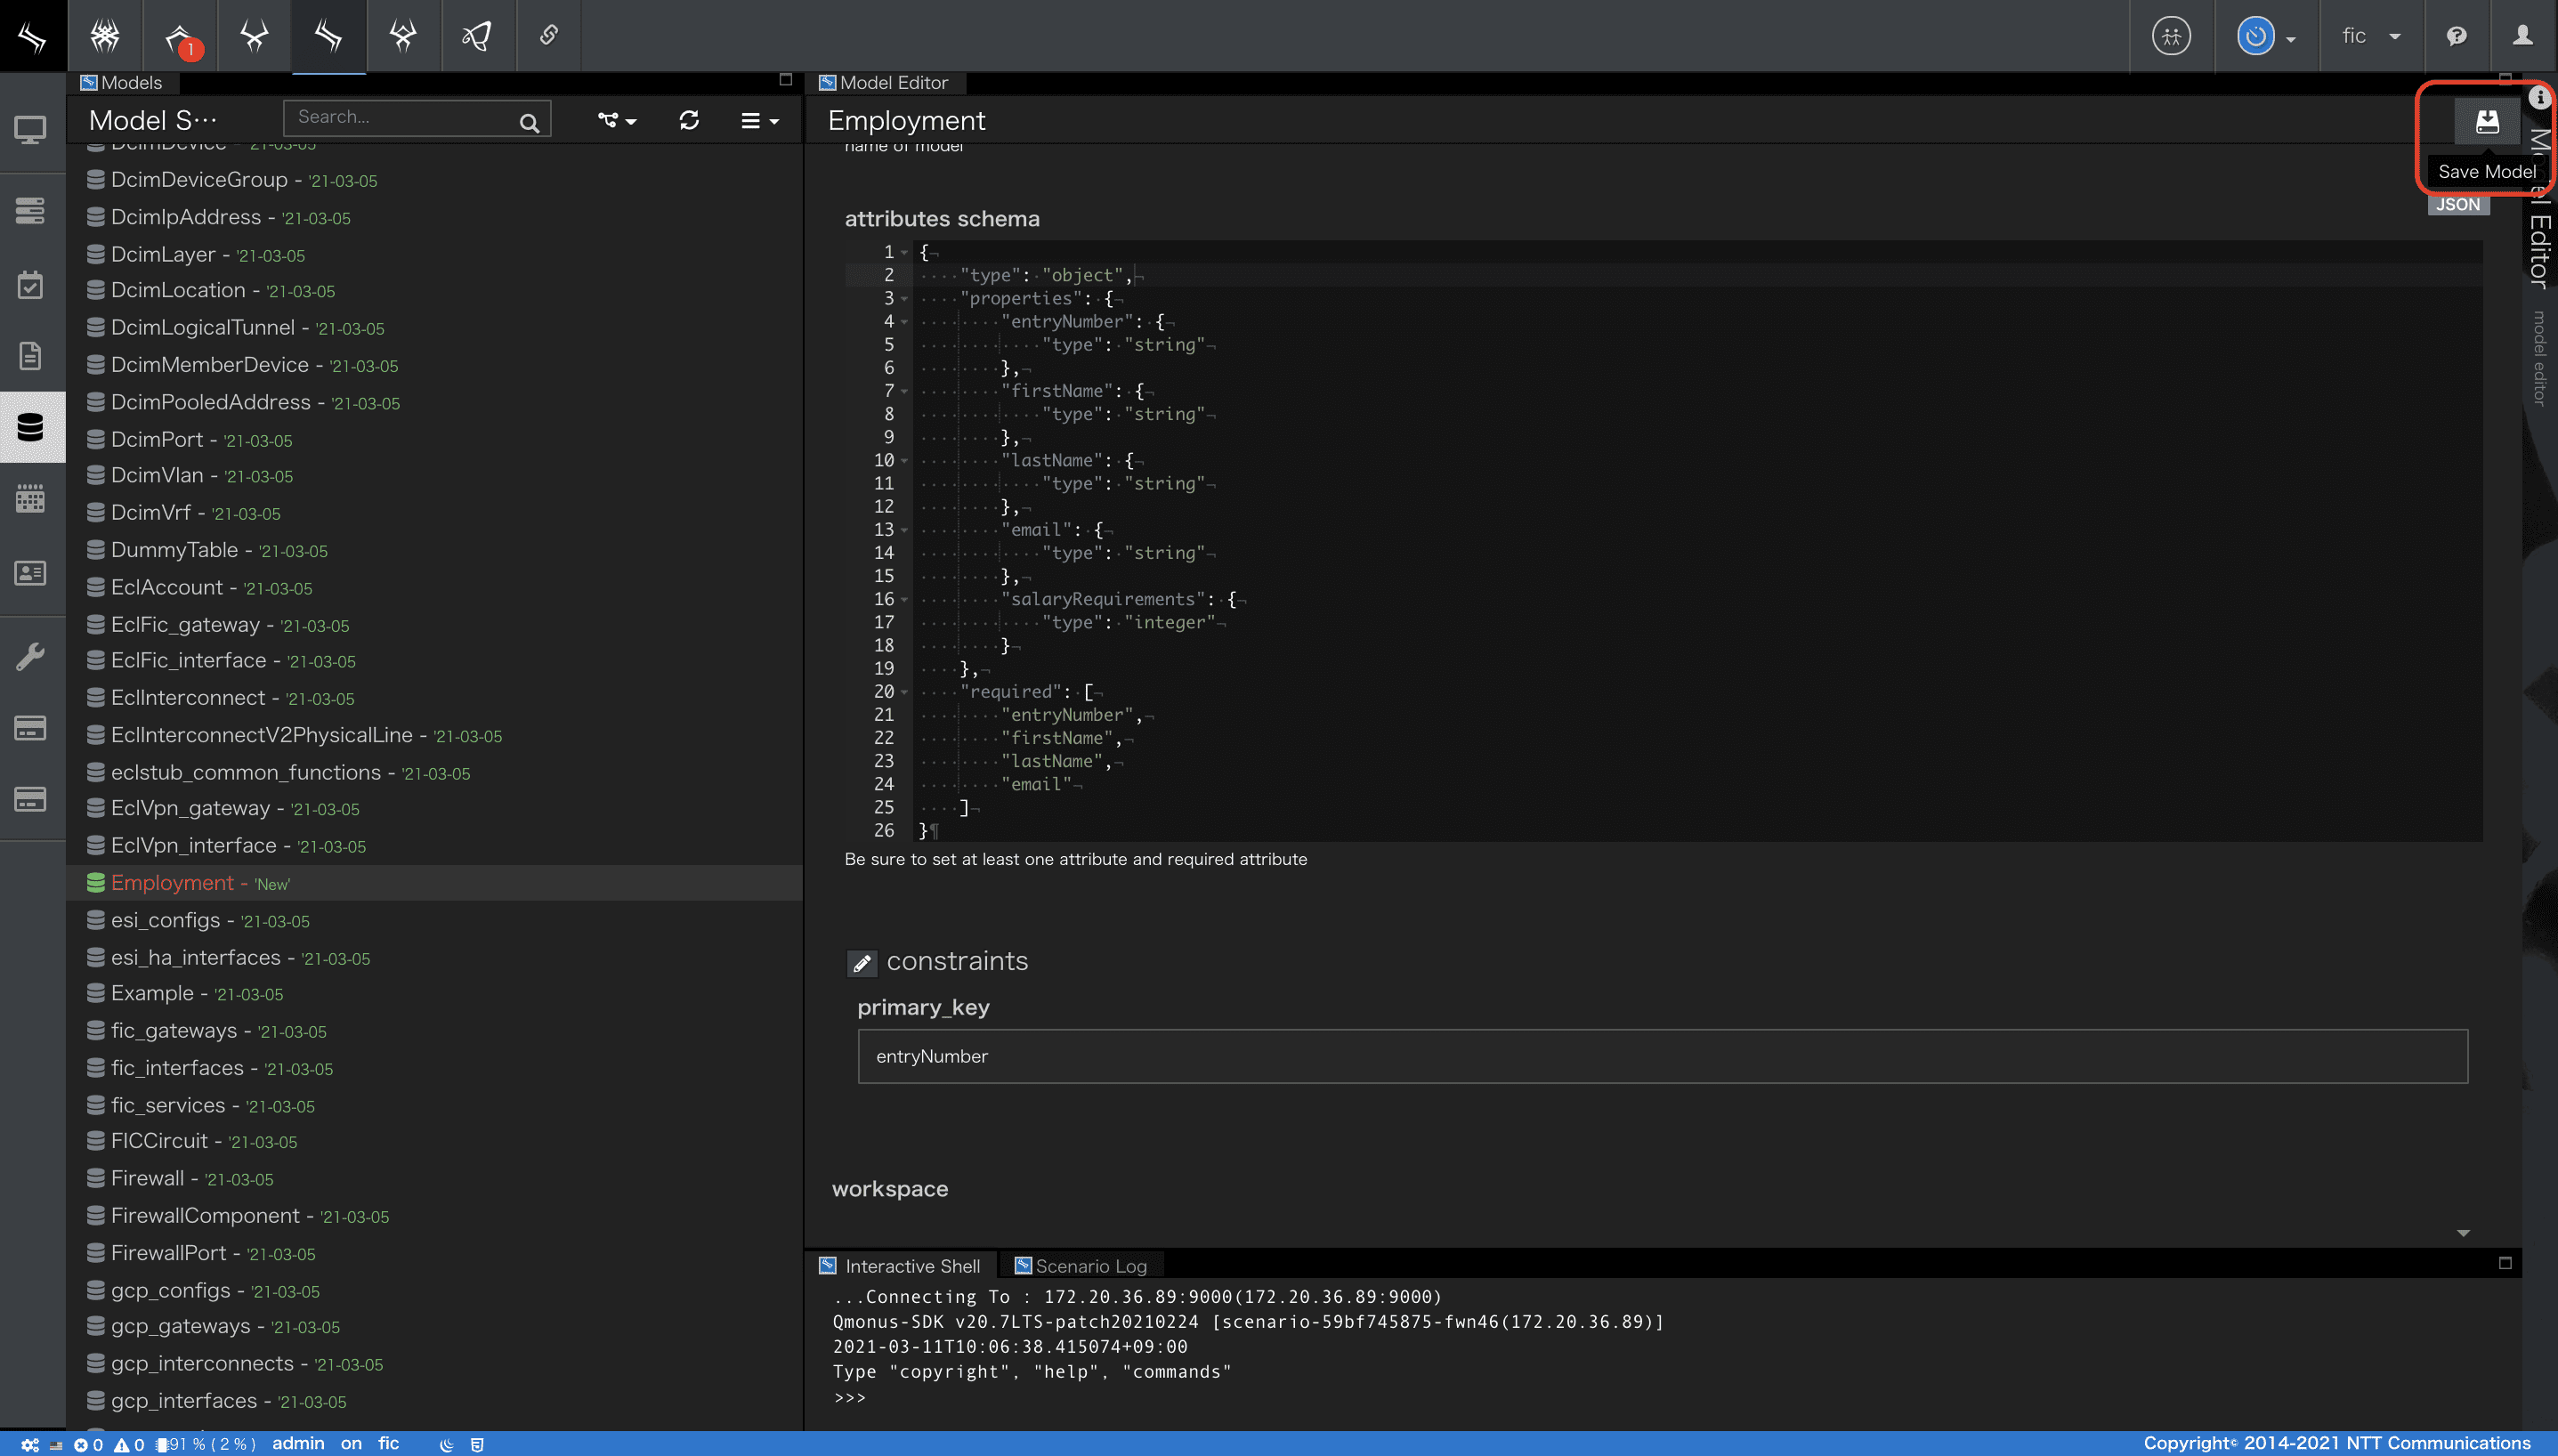
以上でモデルが作成できました。
カウンタの作成
作成したデータモデルEmploymentの主キーは、entryNumberです。新規登録時は、entryNumberを払い出す必要があります。ここでは、entryNumberは、E + 数字4桁の文字列とします。
Counterサービスを利用してユニークなentryNumberを払い出せるようにしましょう。
- メインメニュー [Transaction as a Service]>[Transaction Settings]を選択します。
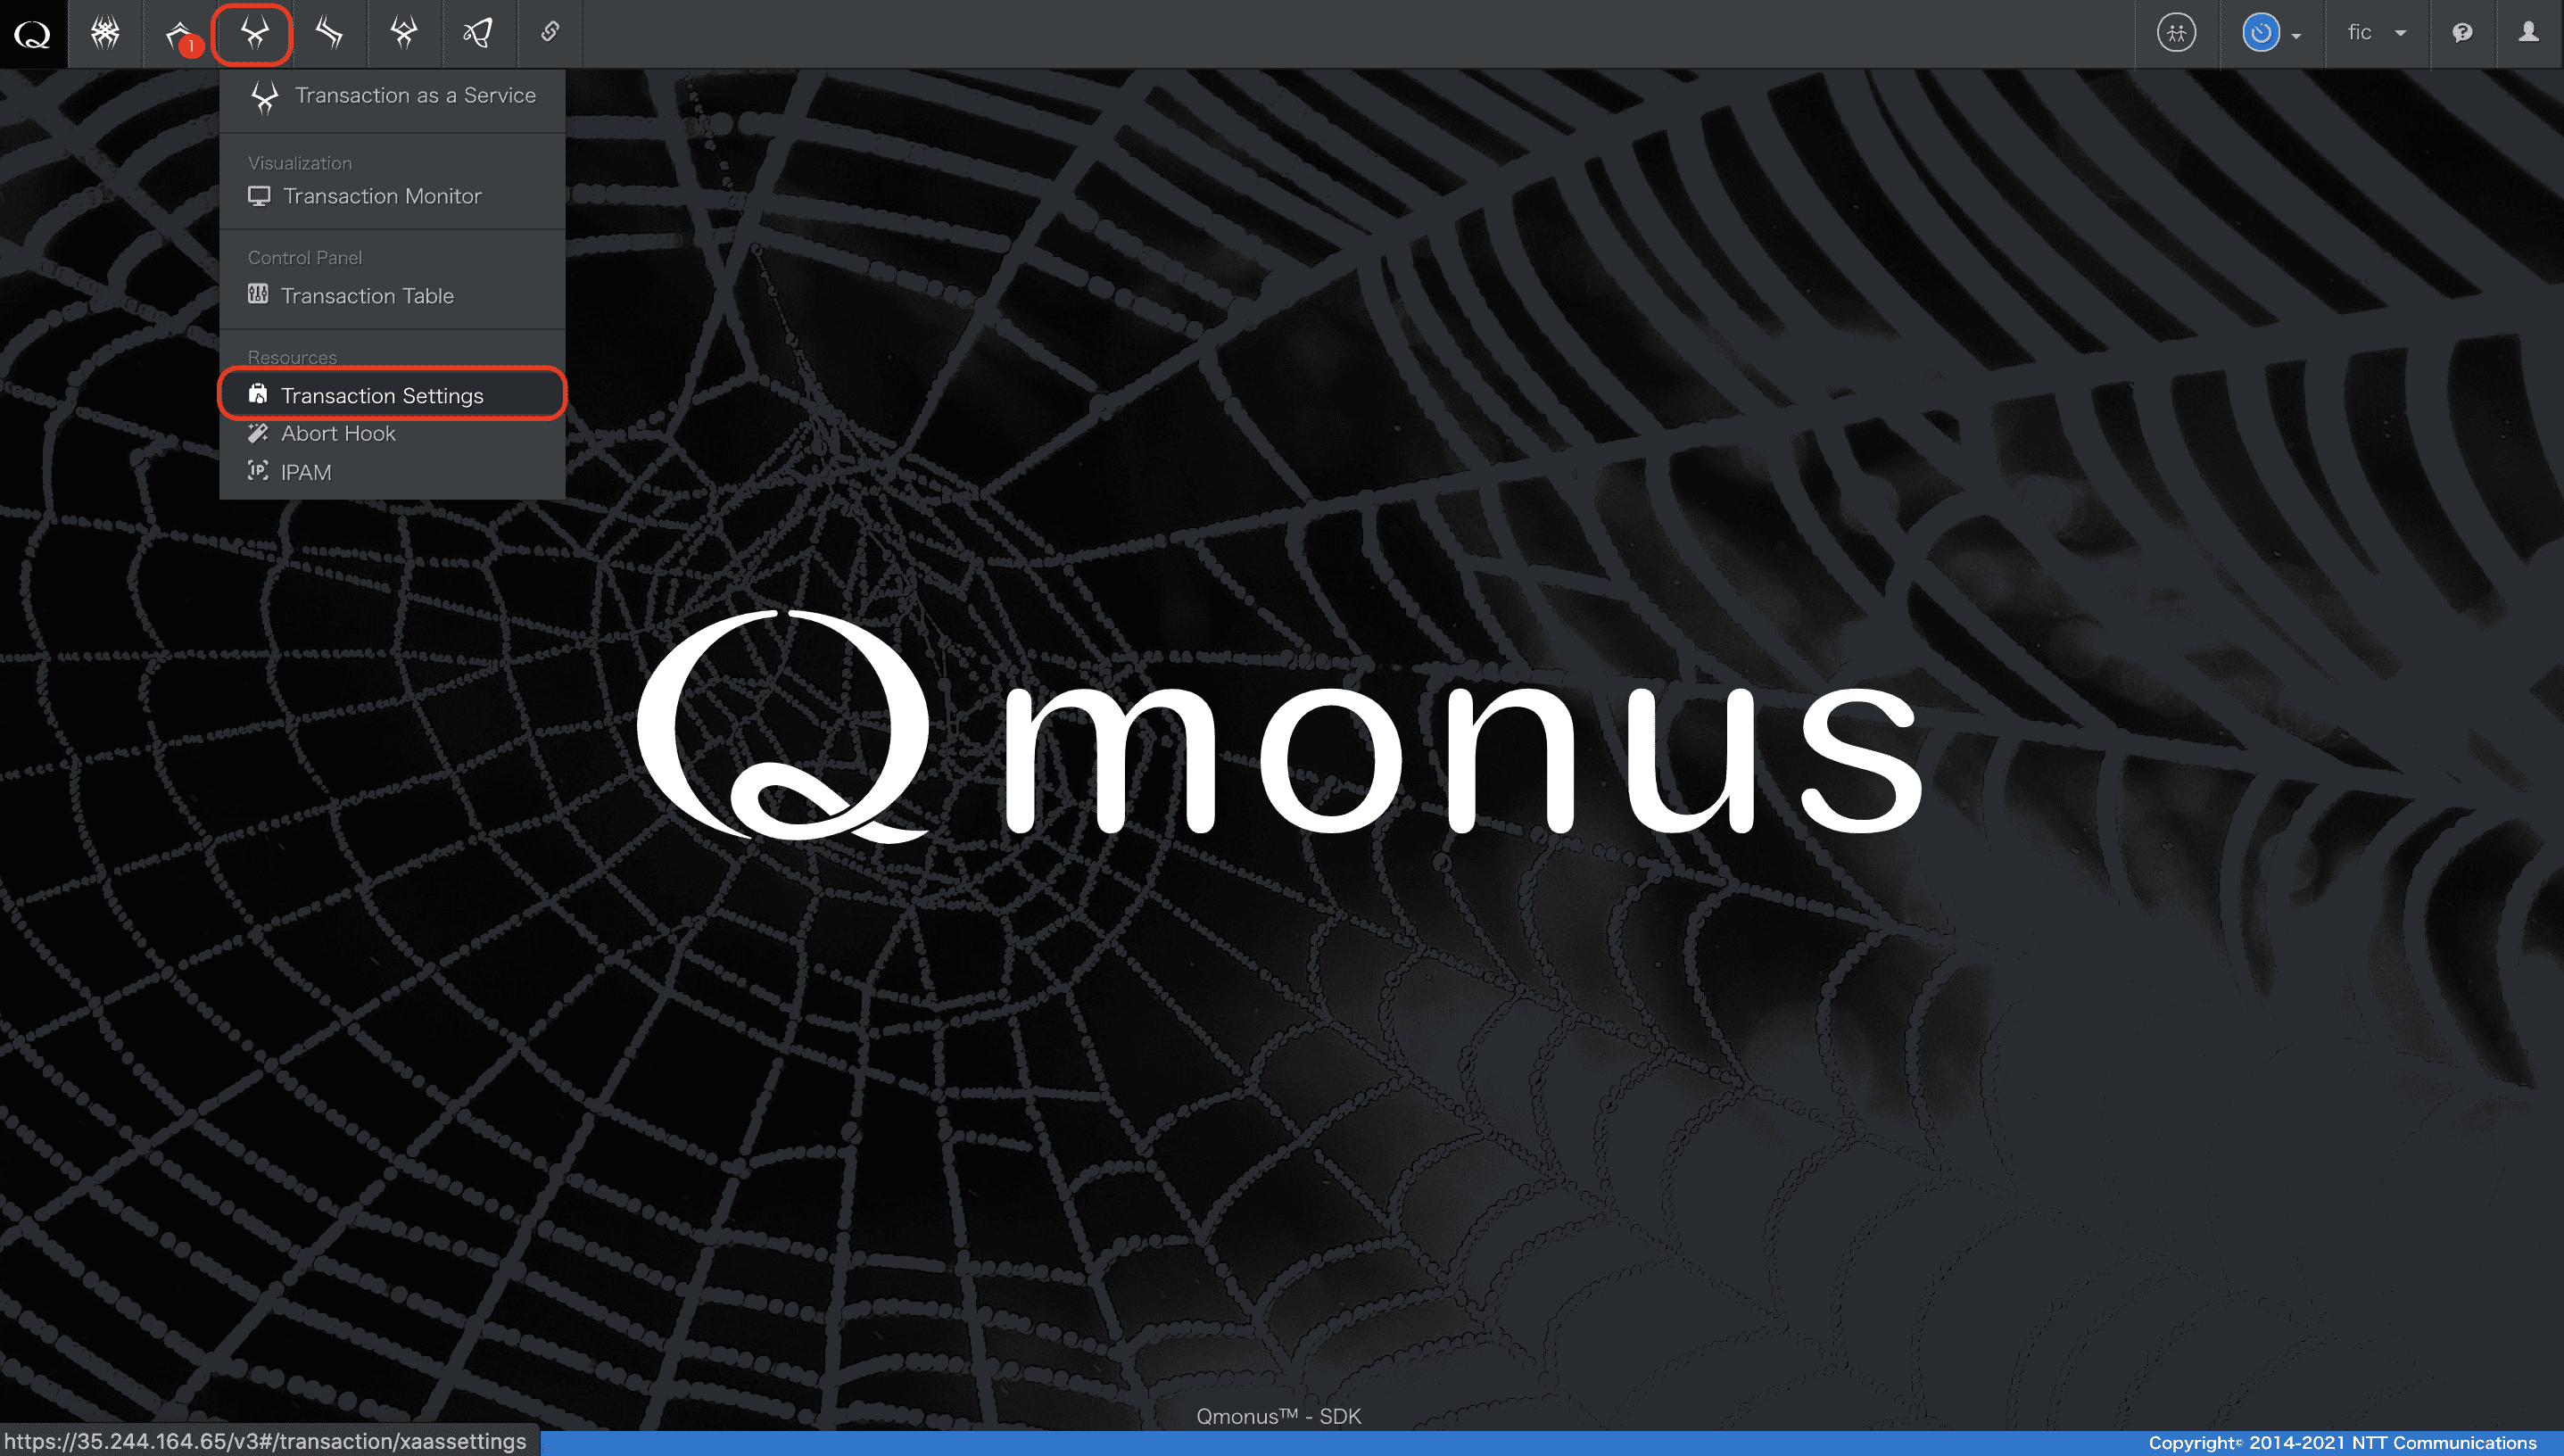
[Transaction Settings]
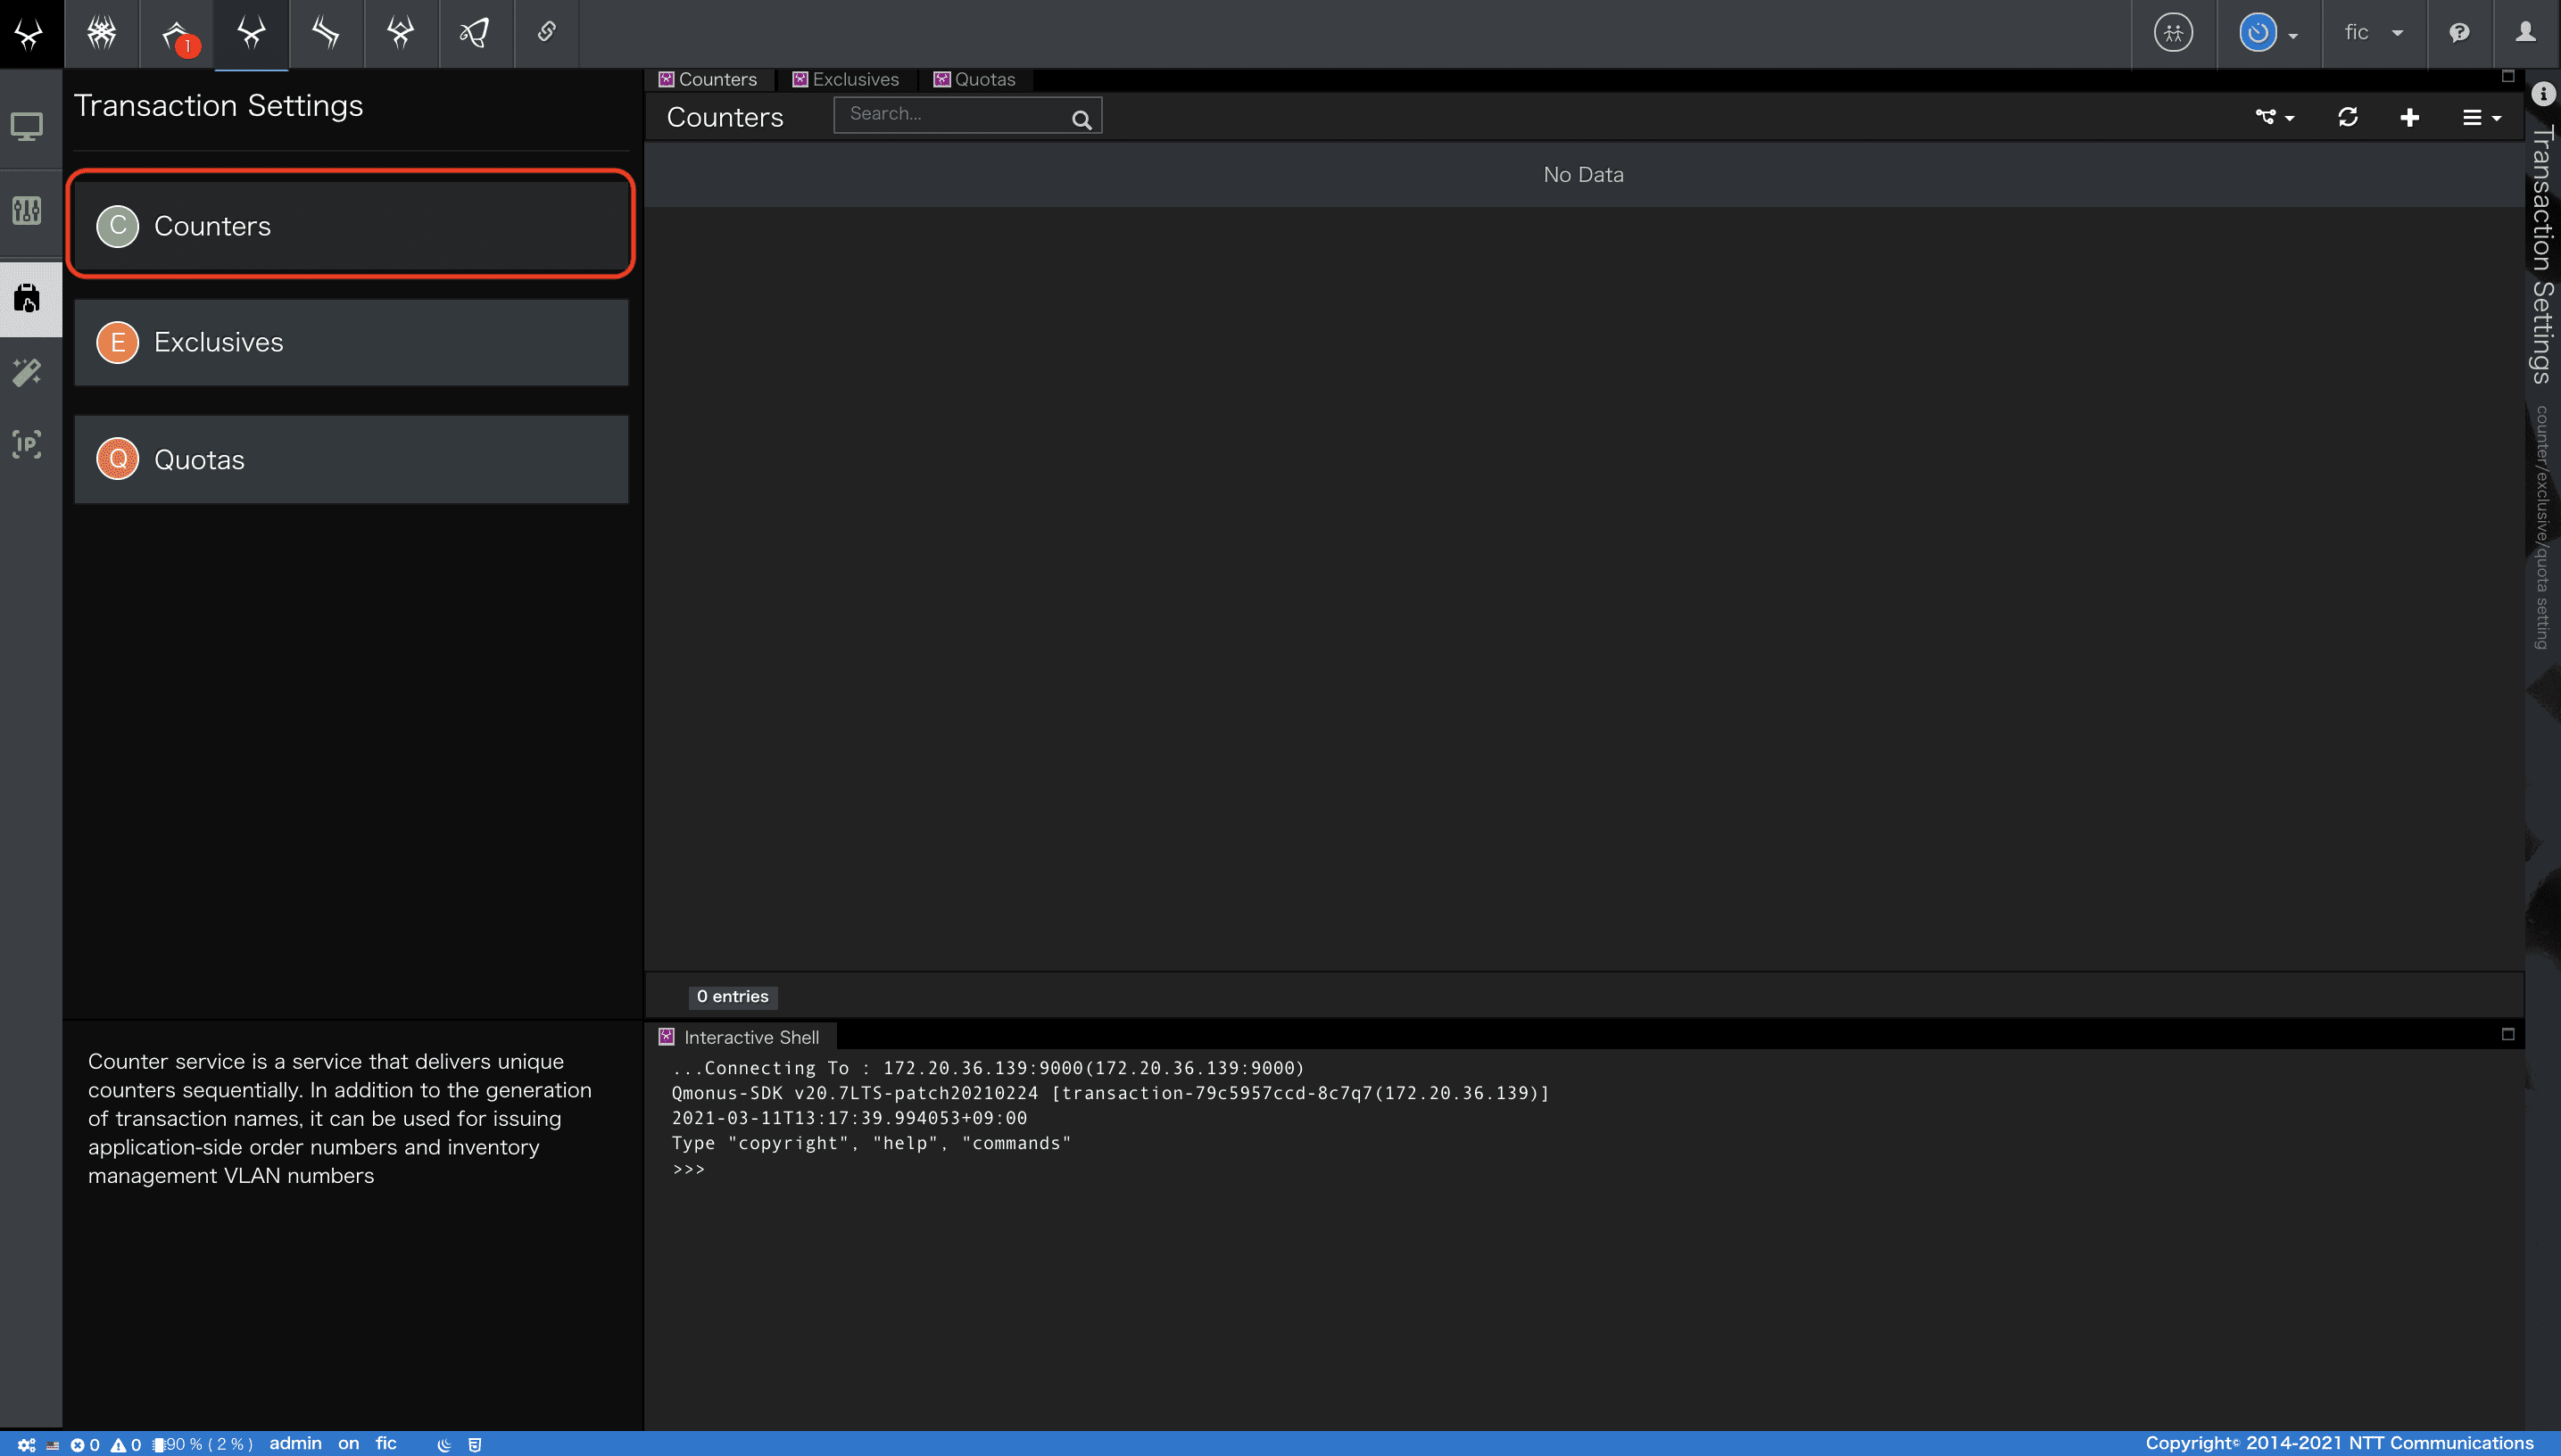
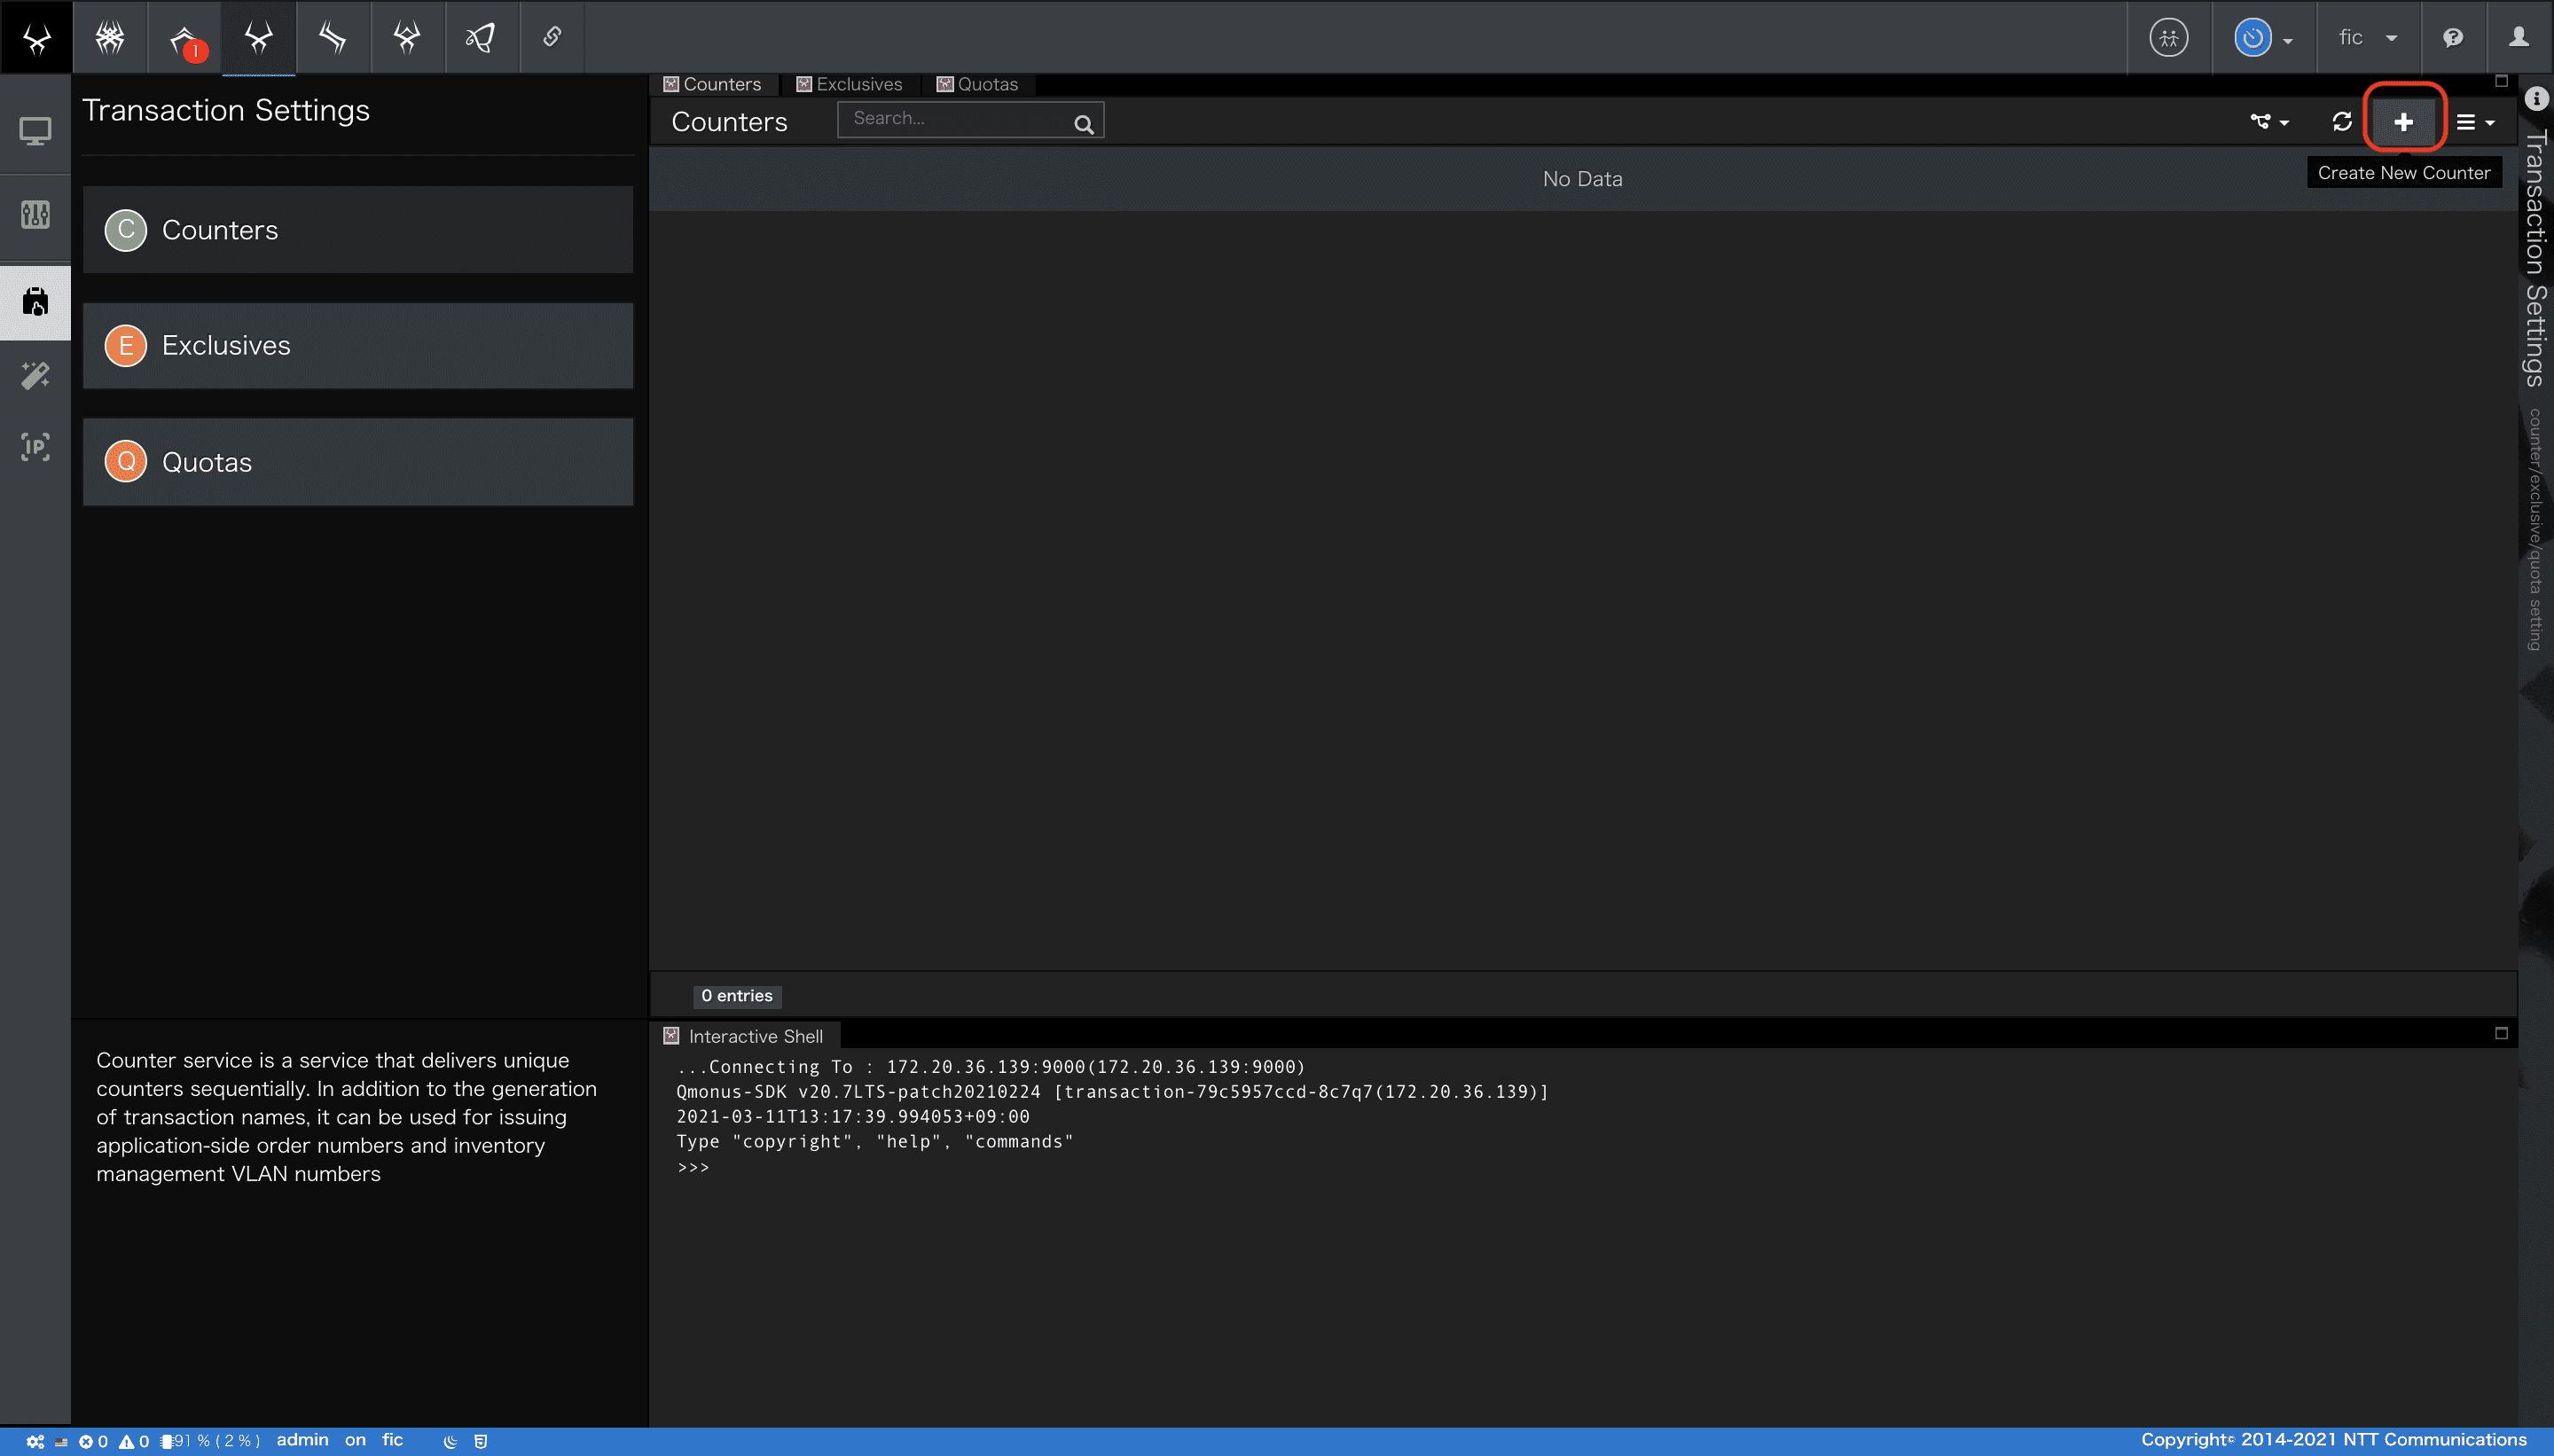
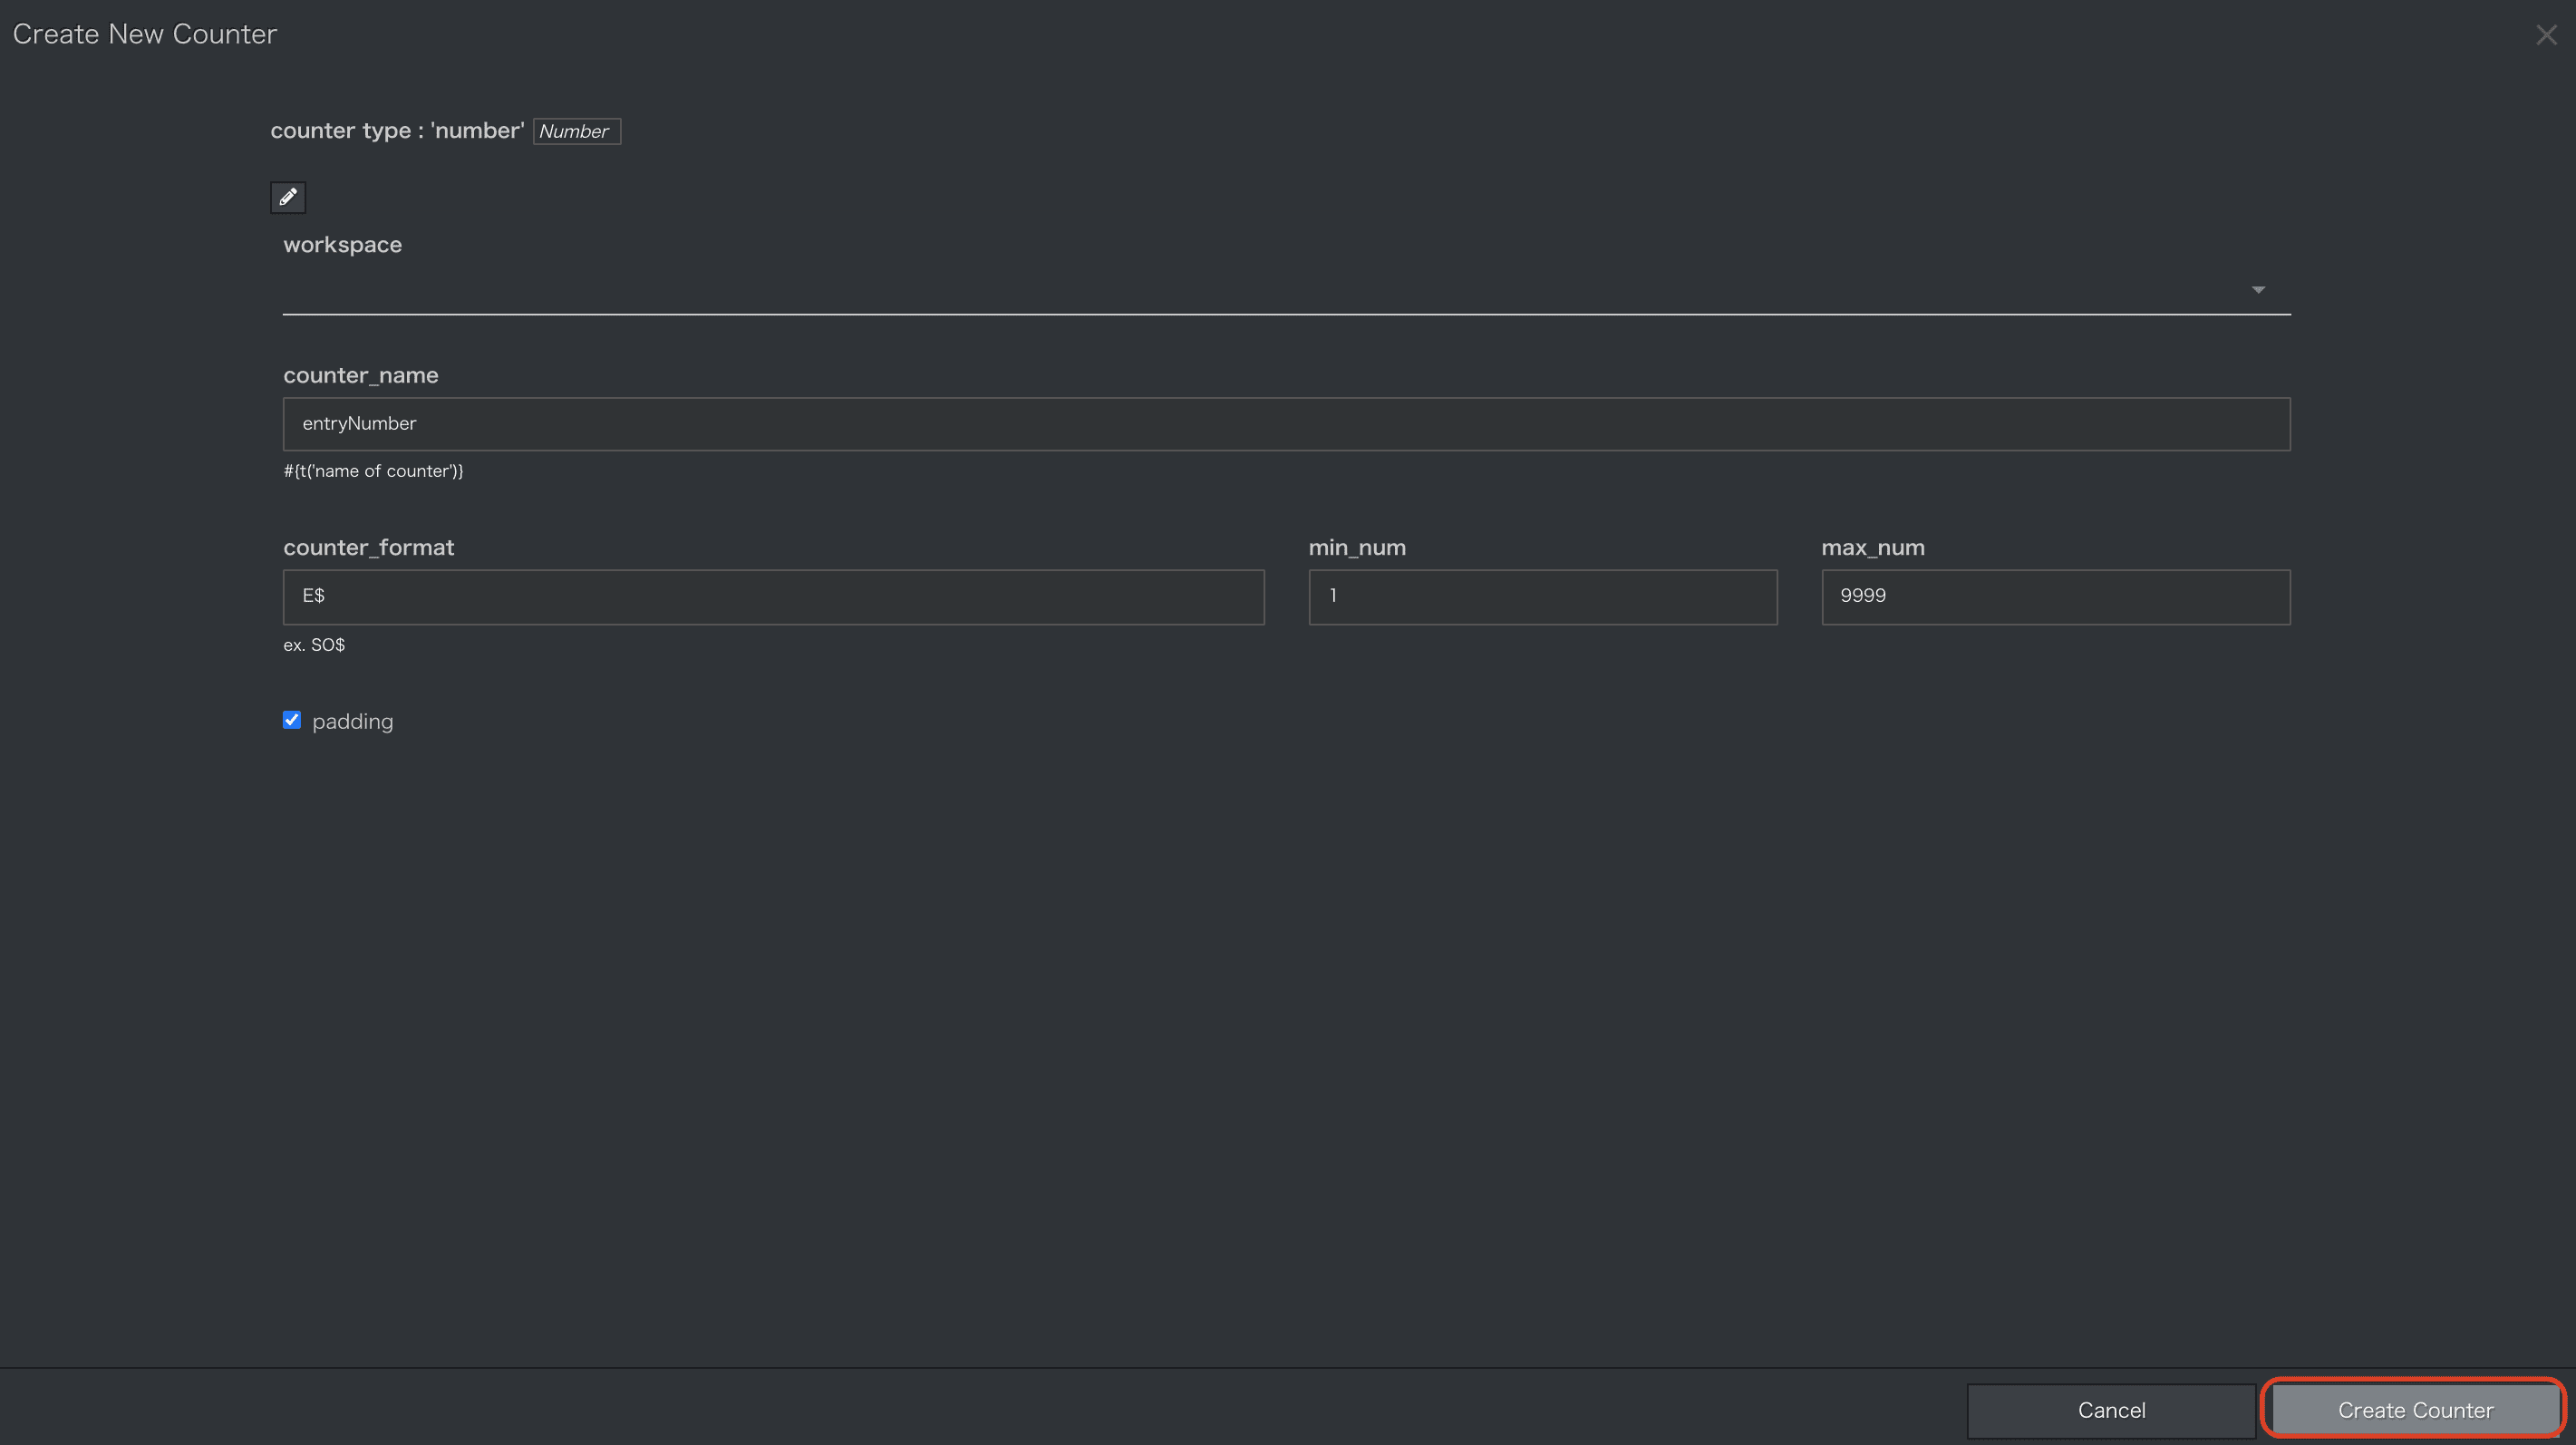
- 画面右上にある[+]ボタンを押下すると、カウンタ作成画面が開きます。
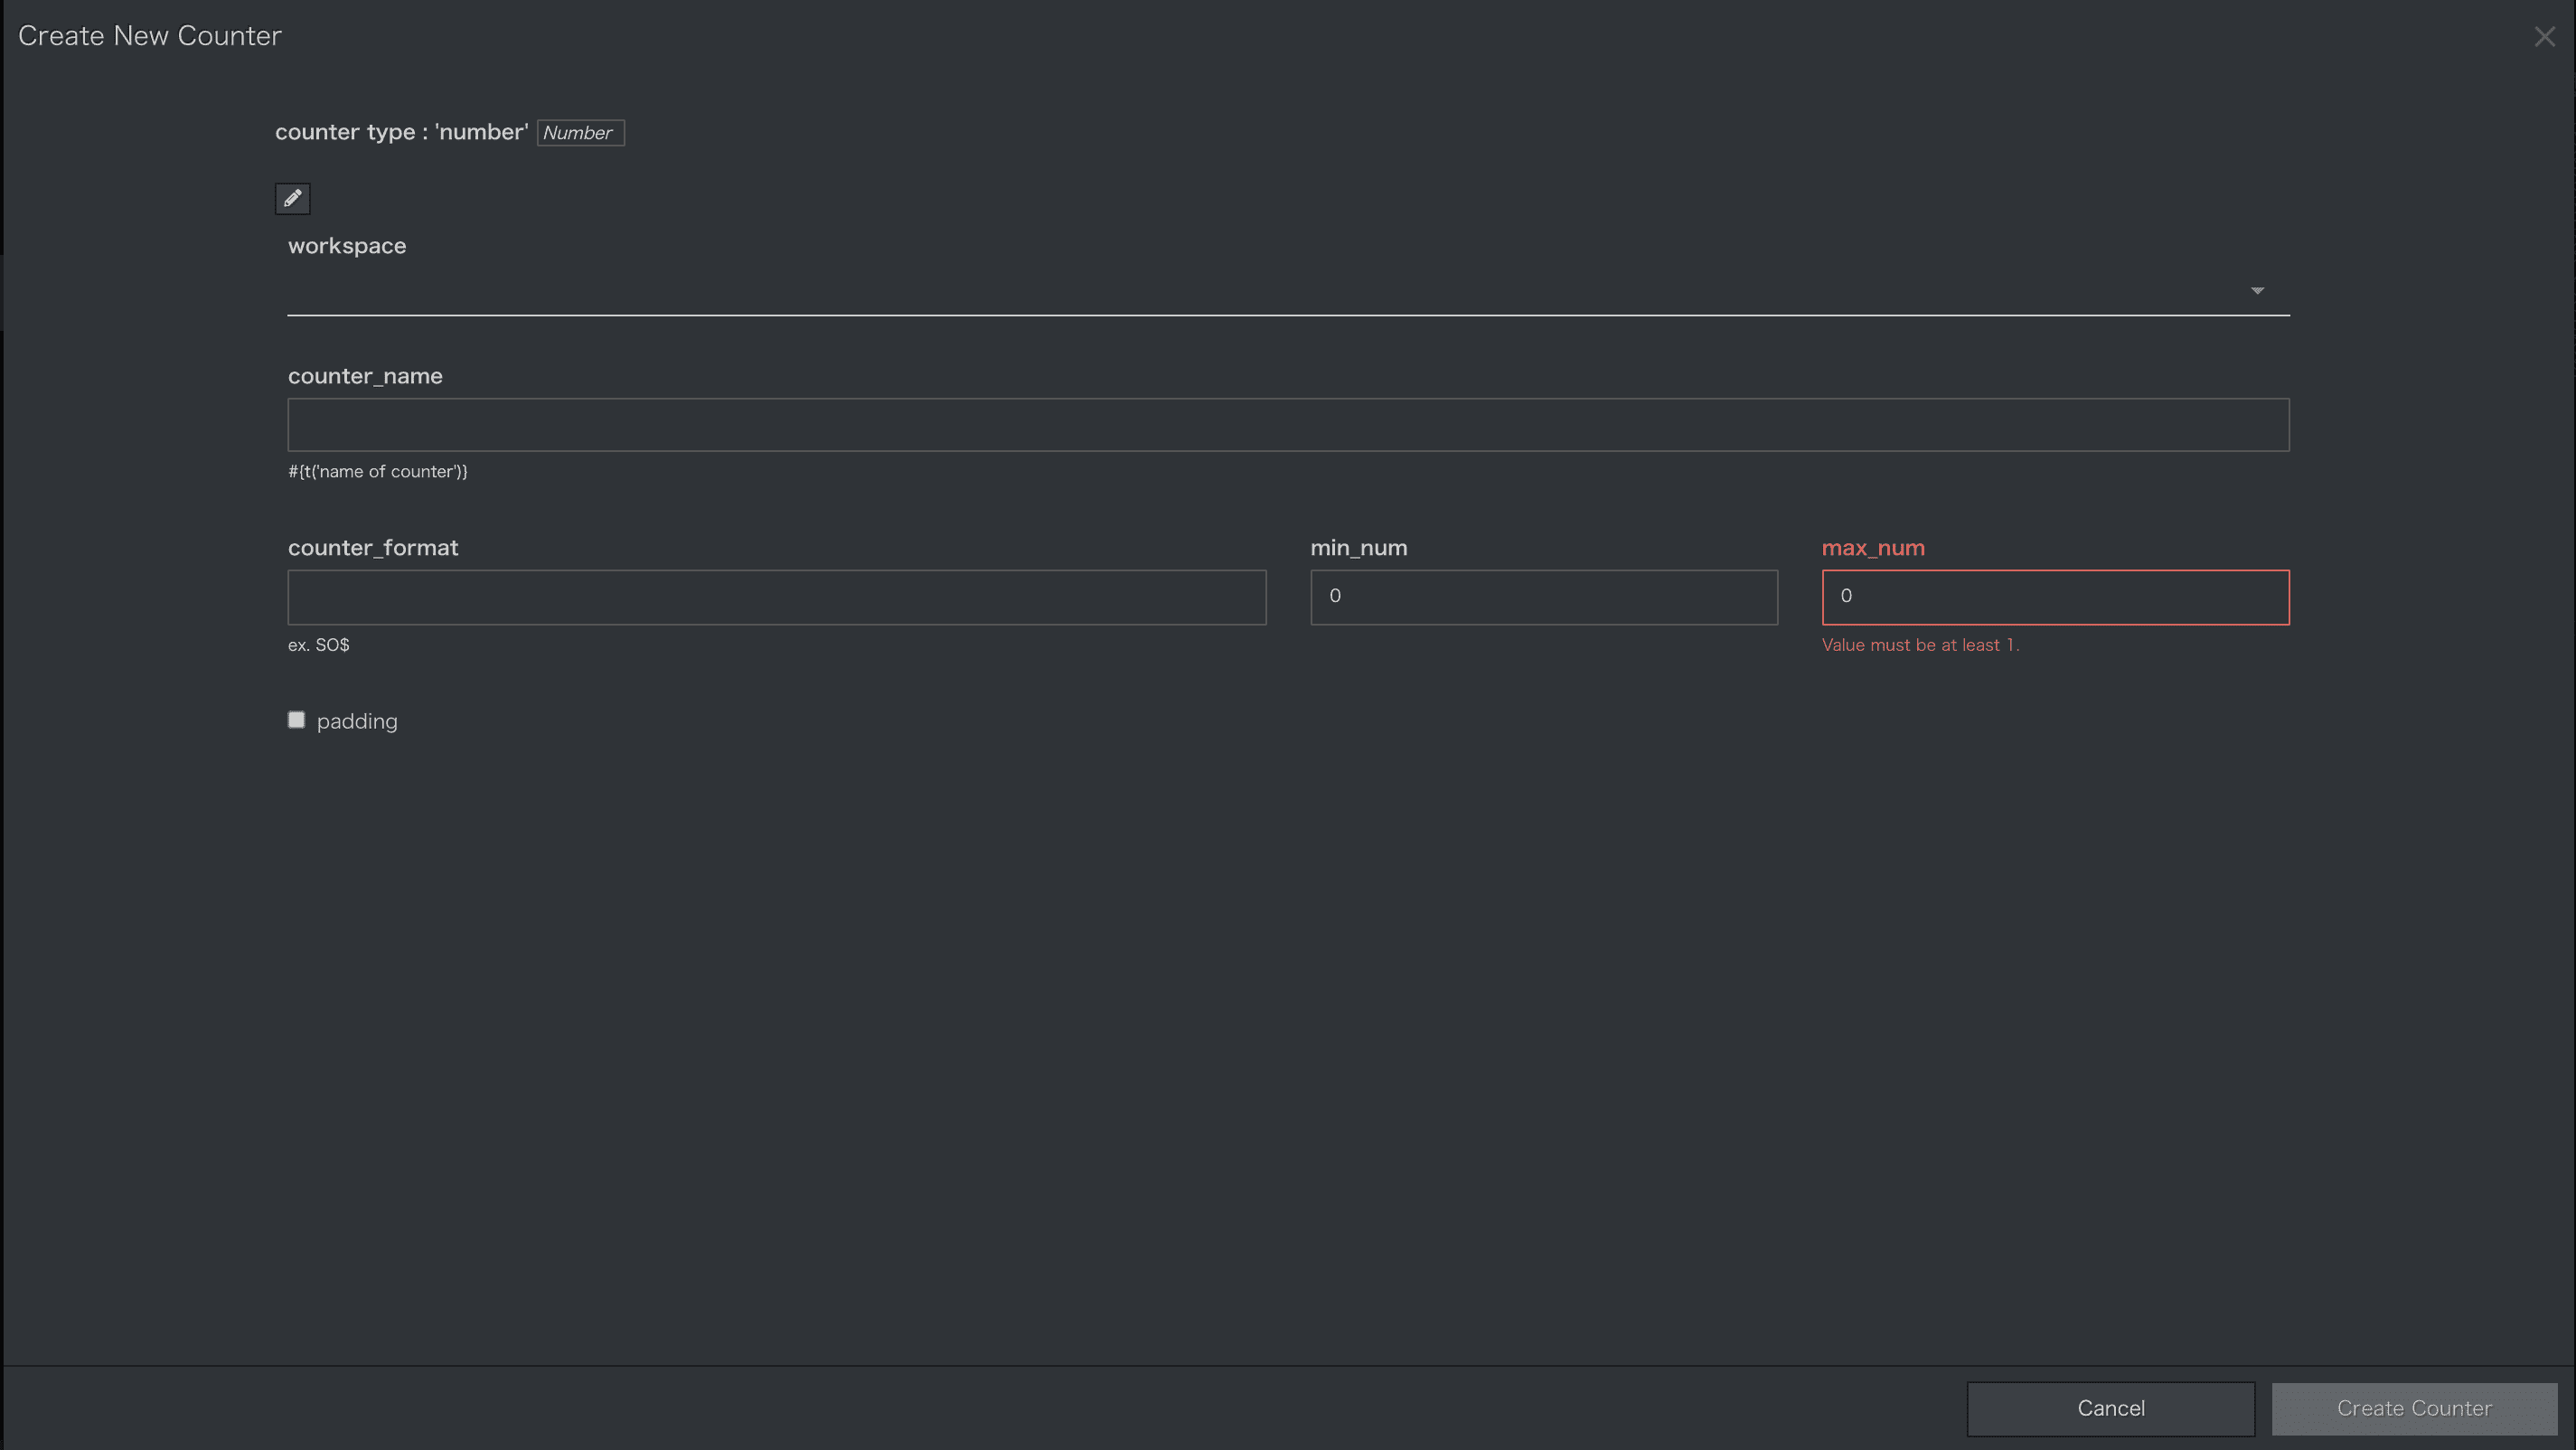
- 以下の項目を入力してください。
| 項番 | 項目 | 入力値 | 説明 |
|---|---|---|---|
| 1 | counter_type | Number | カウンタの種類を指定します。 Number、UUID、Inventoryの3つのタイプがあります。 |
| 2 | workspace | 未入力 | ワークスペースを設定します。 |
| 3 | counter_name | entryNumber | カウンタを一意に識別する名前を指定します。 |
| 4 | counter_format | E$ | カウンタから返される値の形式を指定します。値は$で表されます。 |
| 5 | min_num | 1 | カウンタの最小値を指定します。 |
| 6 | max_num | 9999 | カウンタの最大値を指定します。 |
| 7 | padding | 選択 | ゼロパディングモードを指定します。 |
- 入力後、画面右下部にある[Create Counter]ボタンを押下します。
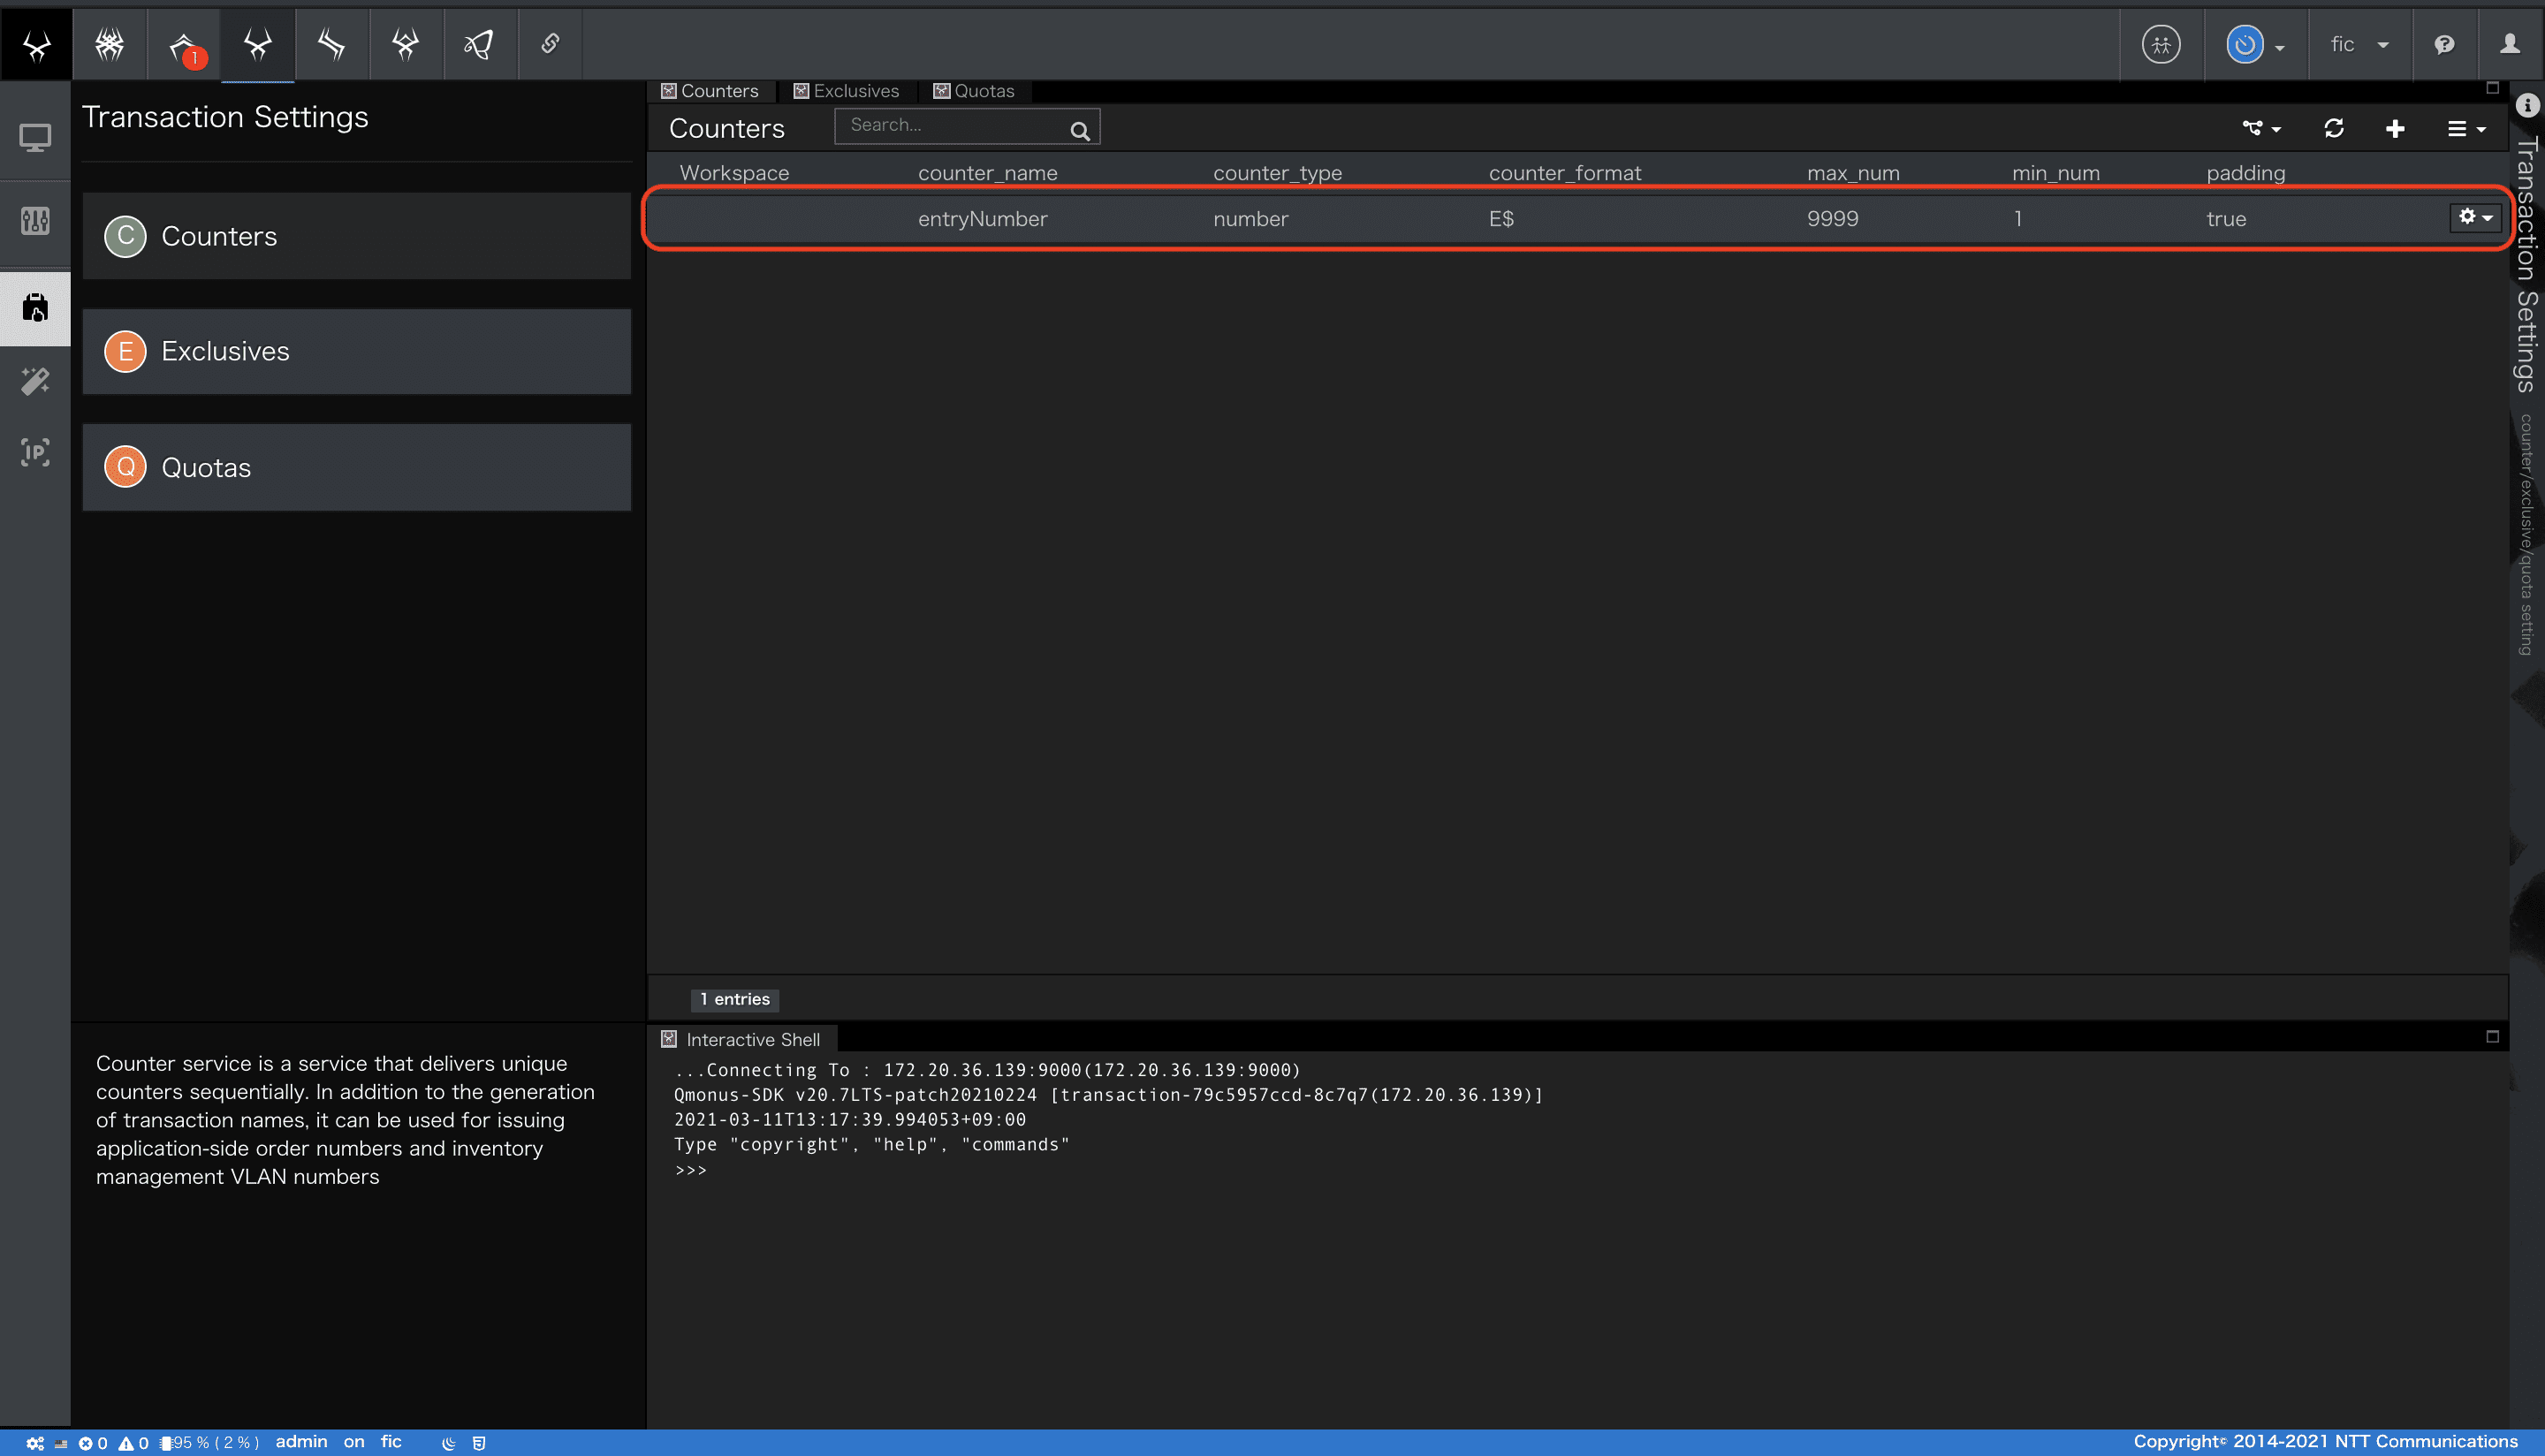
以上でカウンタの作成ができました。
カウンタの詳細は
Qmonus SDK Programming Guide » Transaction » グローバルカウンタ
を参照してください。
登録シナリオの作成
シナリオを新規作成する手順は、チュートリアルHello, world!の通りです。
ここではあらかじめ用意したyamlファイルをImportすることでシナリオを作成したいと思います。
1. 登録シナリオのImport
- createEmployment.ymlファイルをダウンロードしてください。
createEmployment.yml ダウンロード
yaml
category: Tutorial
name: createEmployment
uri: /tutorials/employments
method: POST
routing_auto_generation_mode: true
spec:
  response:
    normal:
      codes:
        - 200
  request:
    headers:
      type: object
      properties:
        Content-Type:
          type: string
          default: application/json
      required:
        - Content-Type
    body:
      type: object
      properties:
        firstName:
          type: string
          pattern: '[a-zA-Z]'
        lastName:
          type: string
          pattern: '[a-zA-Z]'
        email:
          type: string
          format: email
        salaryRequirements:
          type: integer
          minimum: 0
          maximum: 99999999
      required:
        - firstName
        - lastName
        - email
        - salaryRequirements
commands:
  - command: script
    kwargs:
      code: |-
        entryNumber = await Counter.allocate("entryNumber")
        async with model.aiodb() as conn:
            cursor = await conn.execute(model.Employment.select().where(model.Employment.c.email==context.request.body.email))
            if cursor.rowcount != 0:
                raise Error(400, reason="E-mail address is already registered")

            await conn.execute(model.Employment.insert().values(entryNumber=entryNumber,
                                                                firstName=context.request.body.firstName,
                                                                lastName=context.request.body.lastName,
                                                                email=context.request.body.email,
                                                                salaryRequirements=context.request.body.salaryRequirements))
        context.session.finish({"entryNumber": entryNumber})
request_timeout: 60
connect_timeout: 60
-
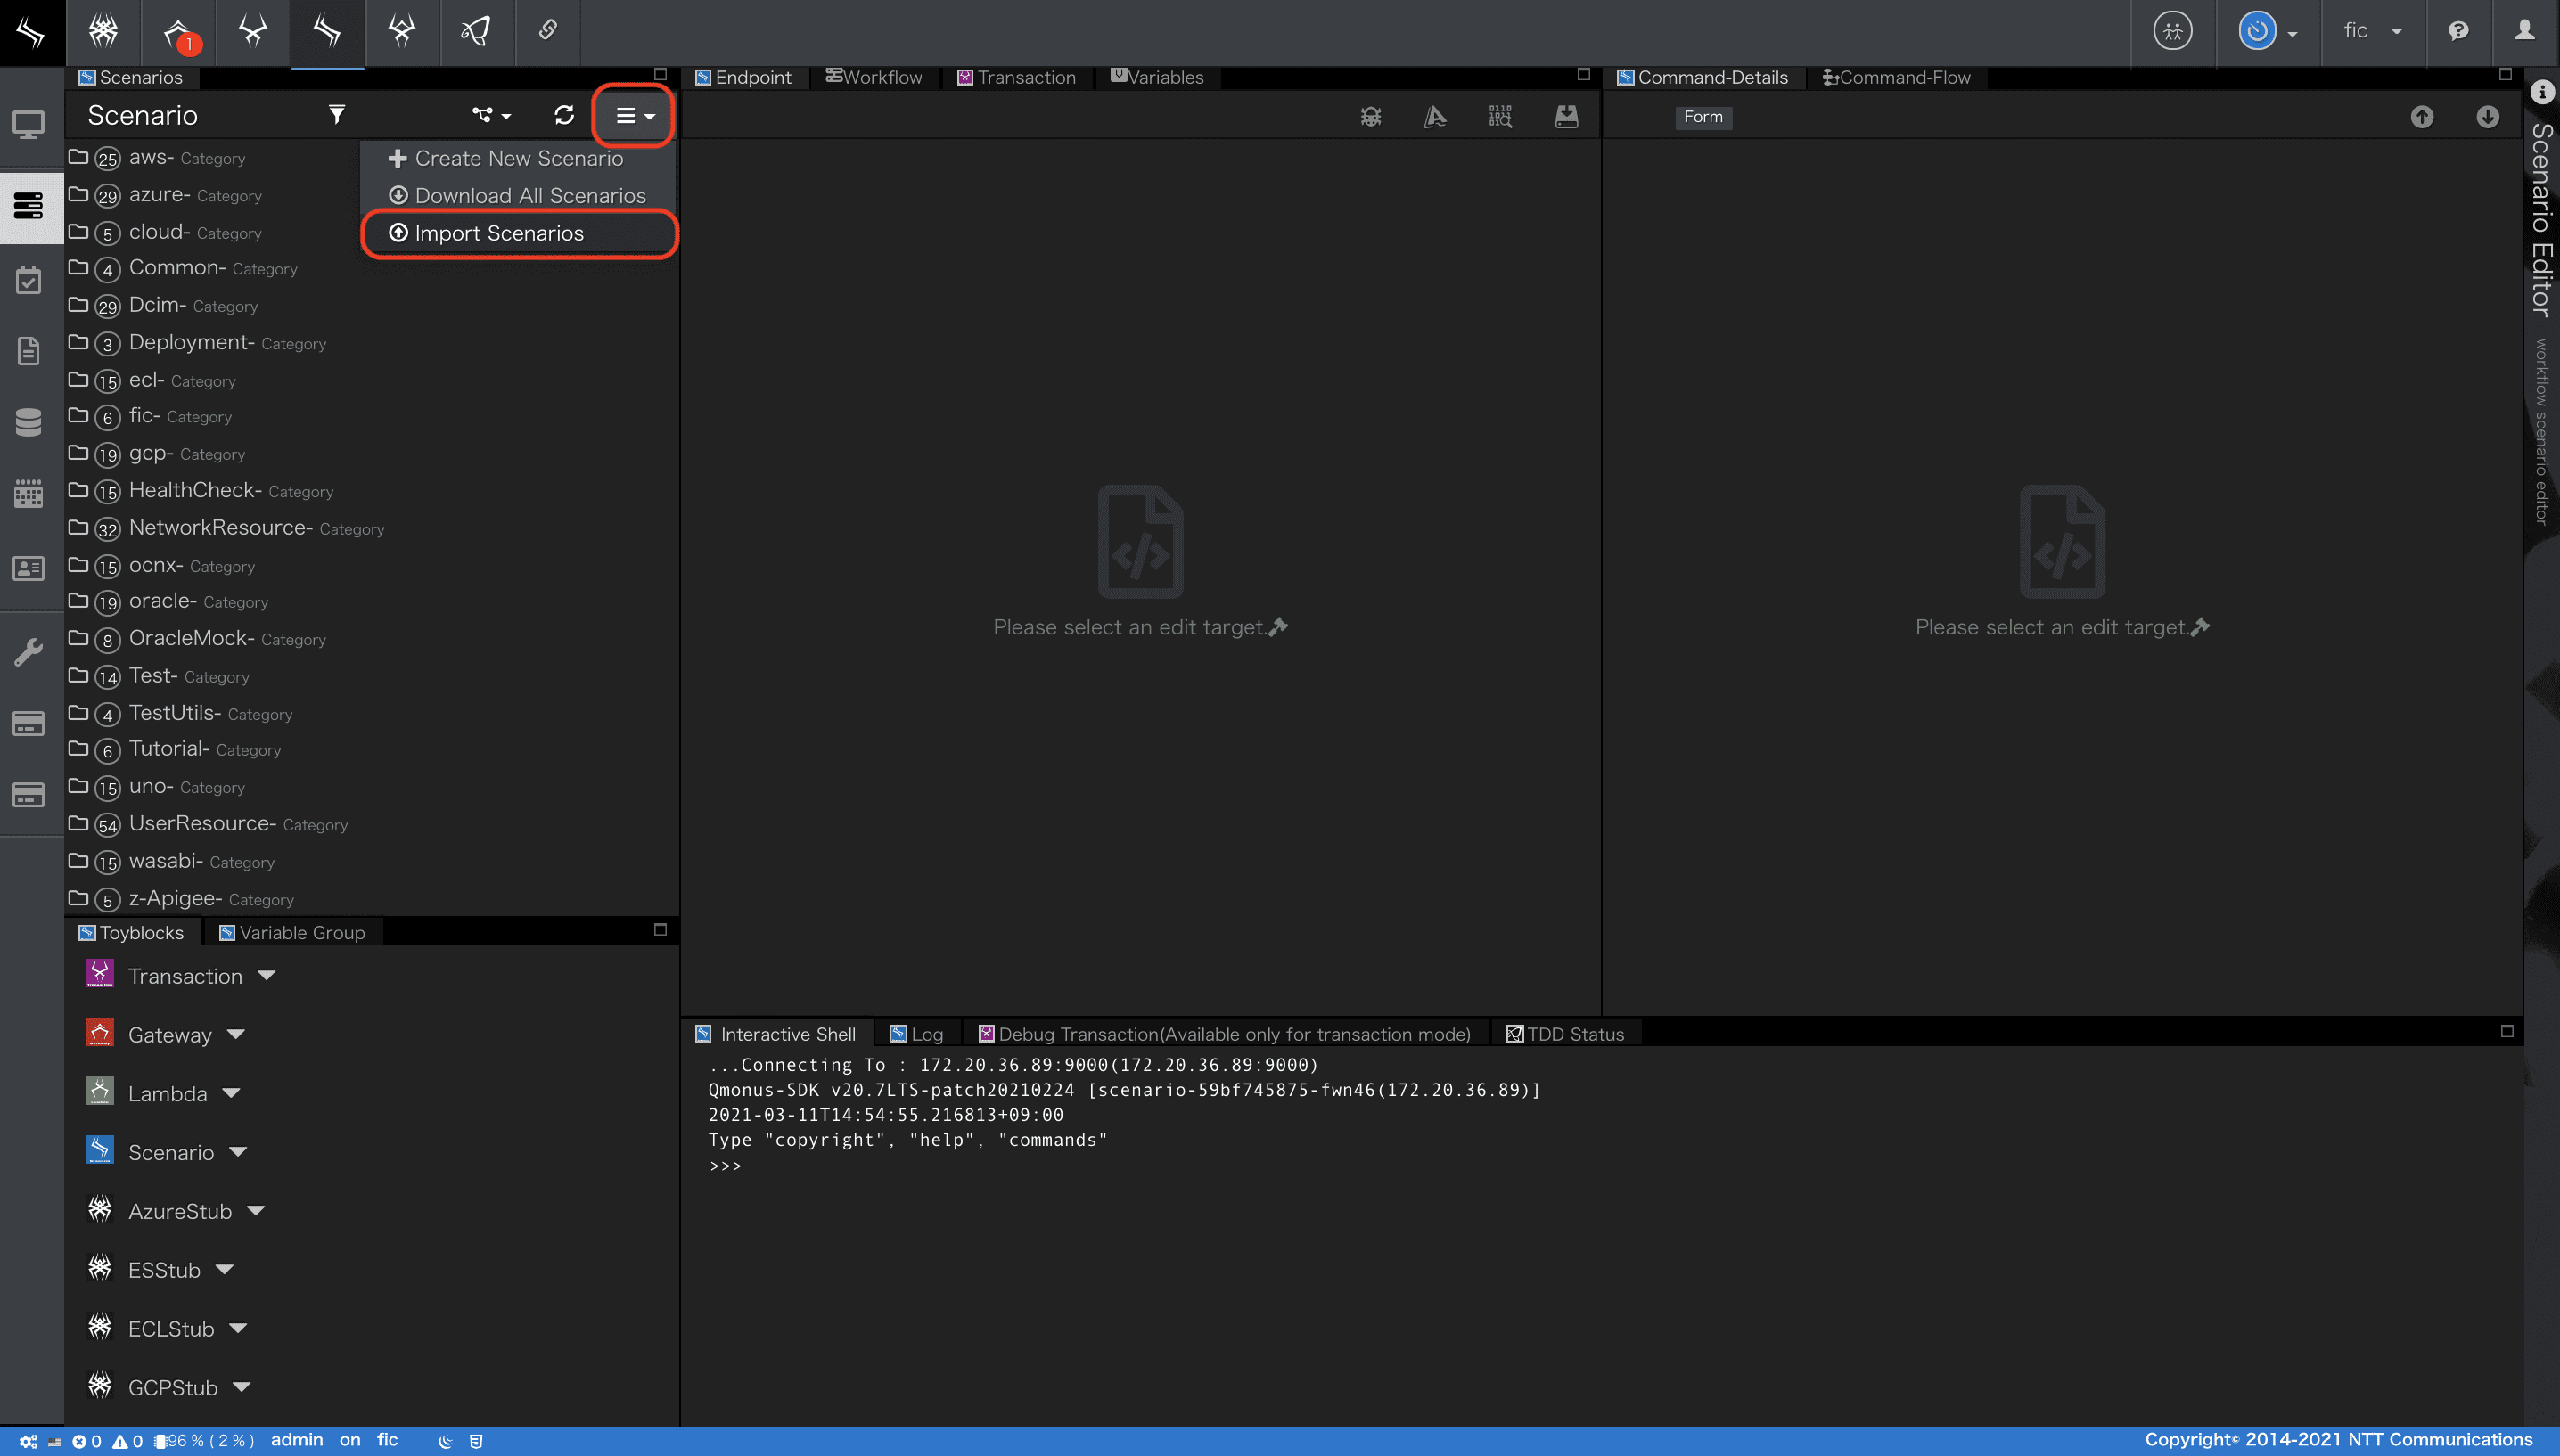
シナリオエディタを表示し、メニュー[Import Scenarios]を選択します。
-
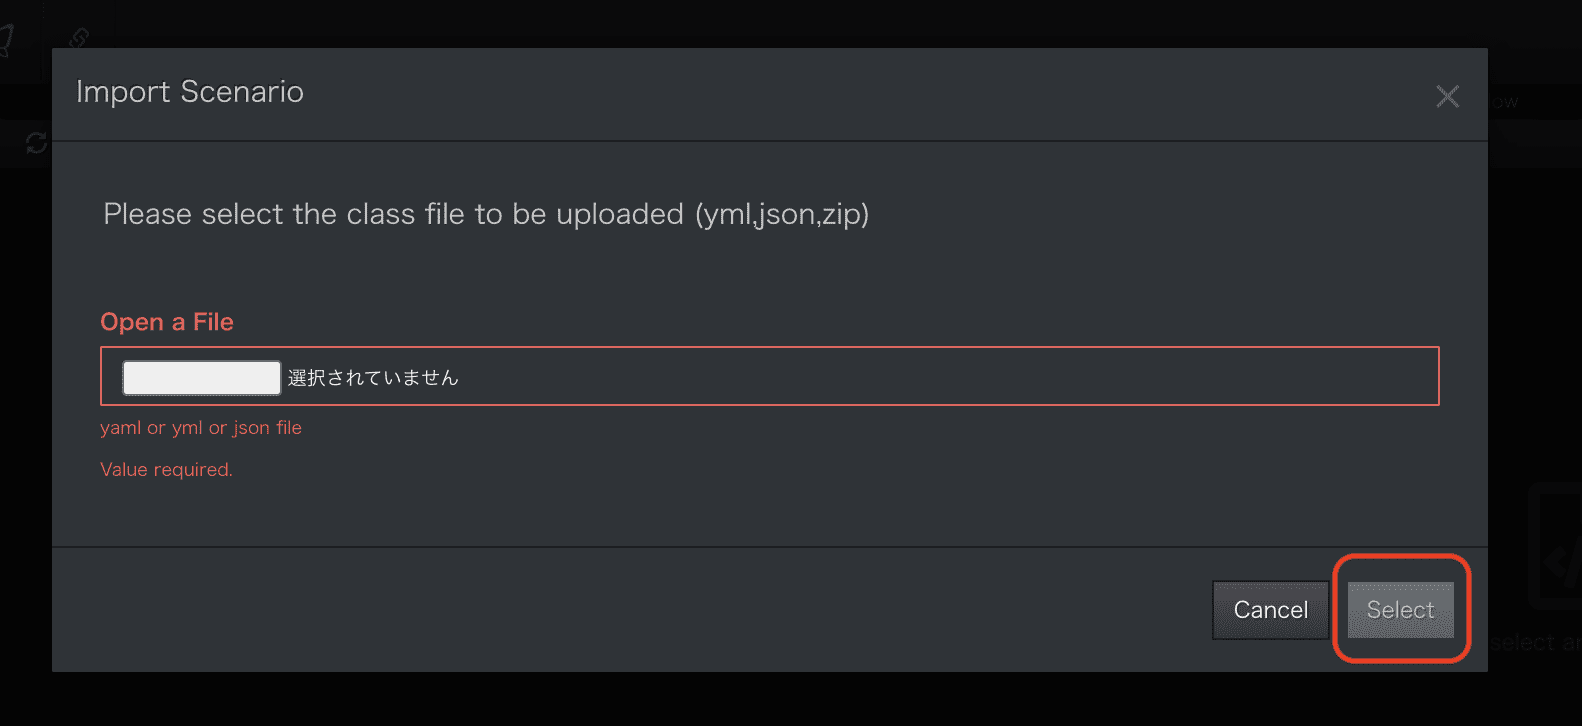
ファイル選択画面が表示されます。ダウンロードしたyamlファイルを指定し
Selectボタンを押下します。
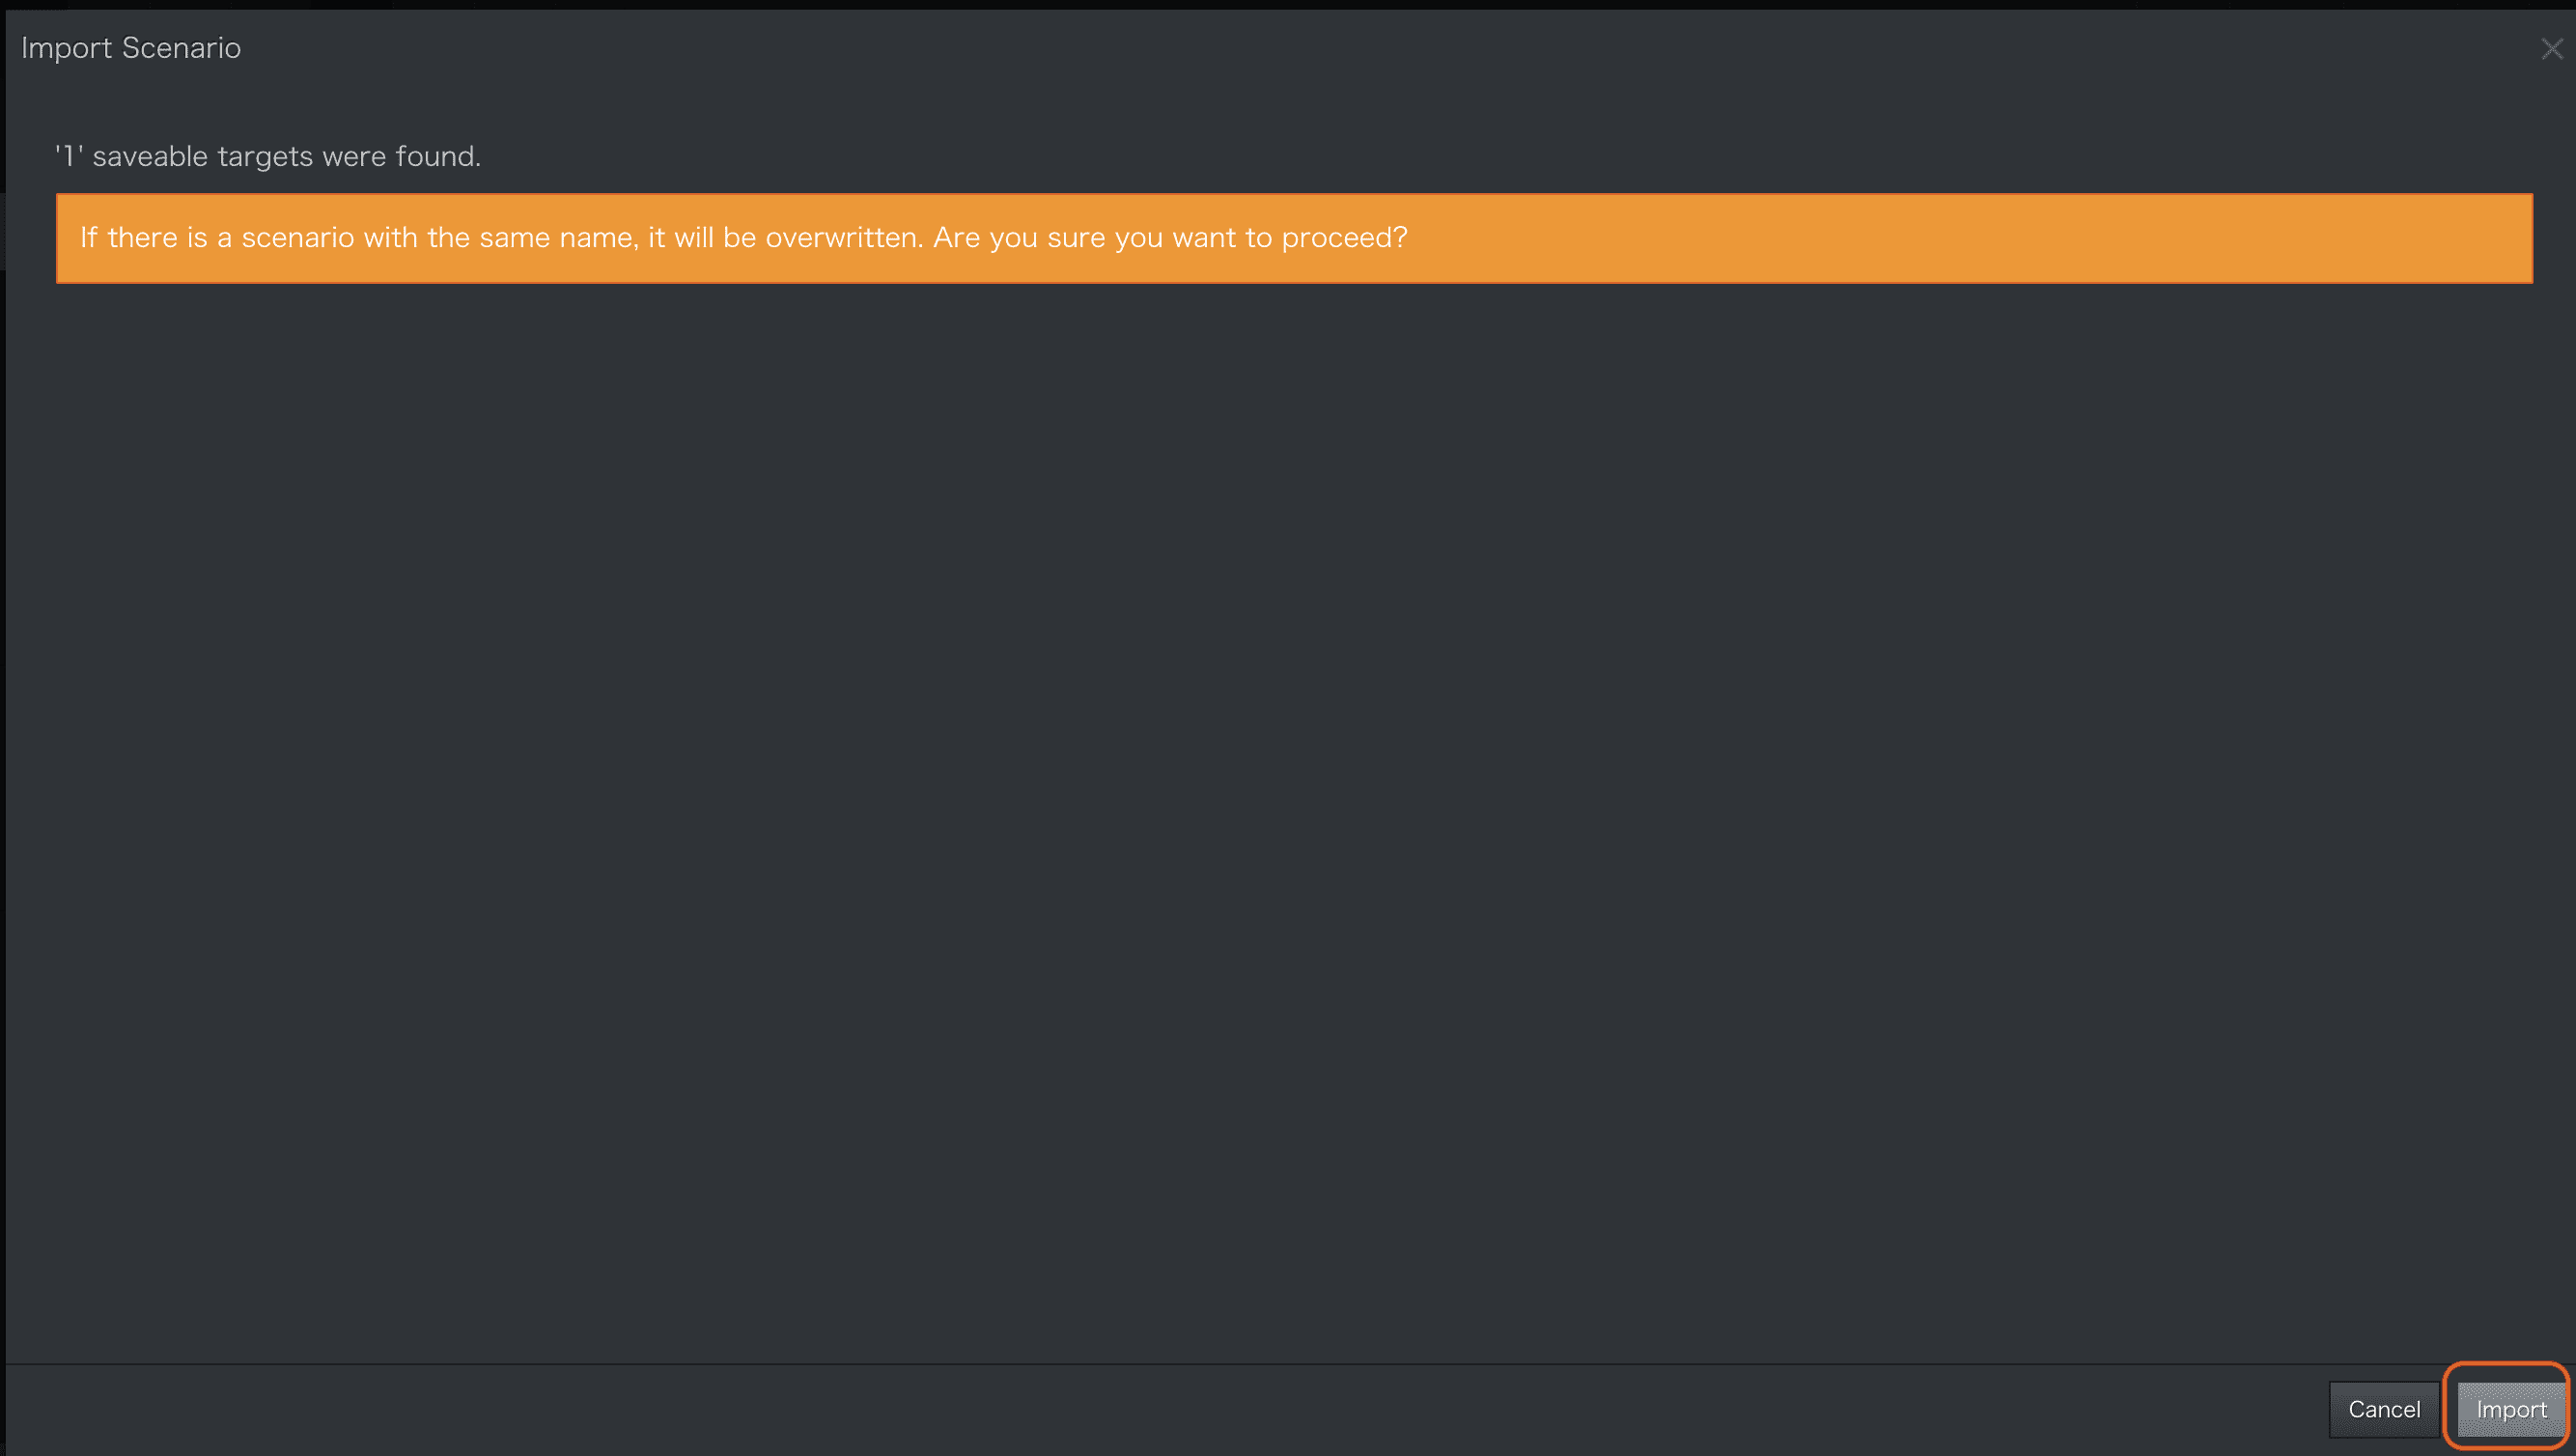
同一名のシナリオがすでに存在する場合は上書きされる旨の警告が表示されます。そのままImportボタンを押下します。
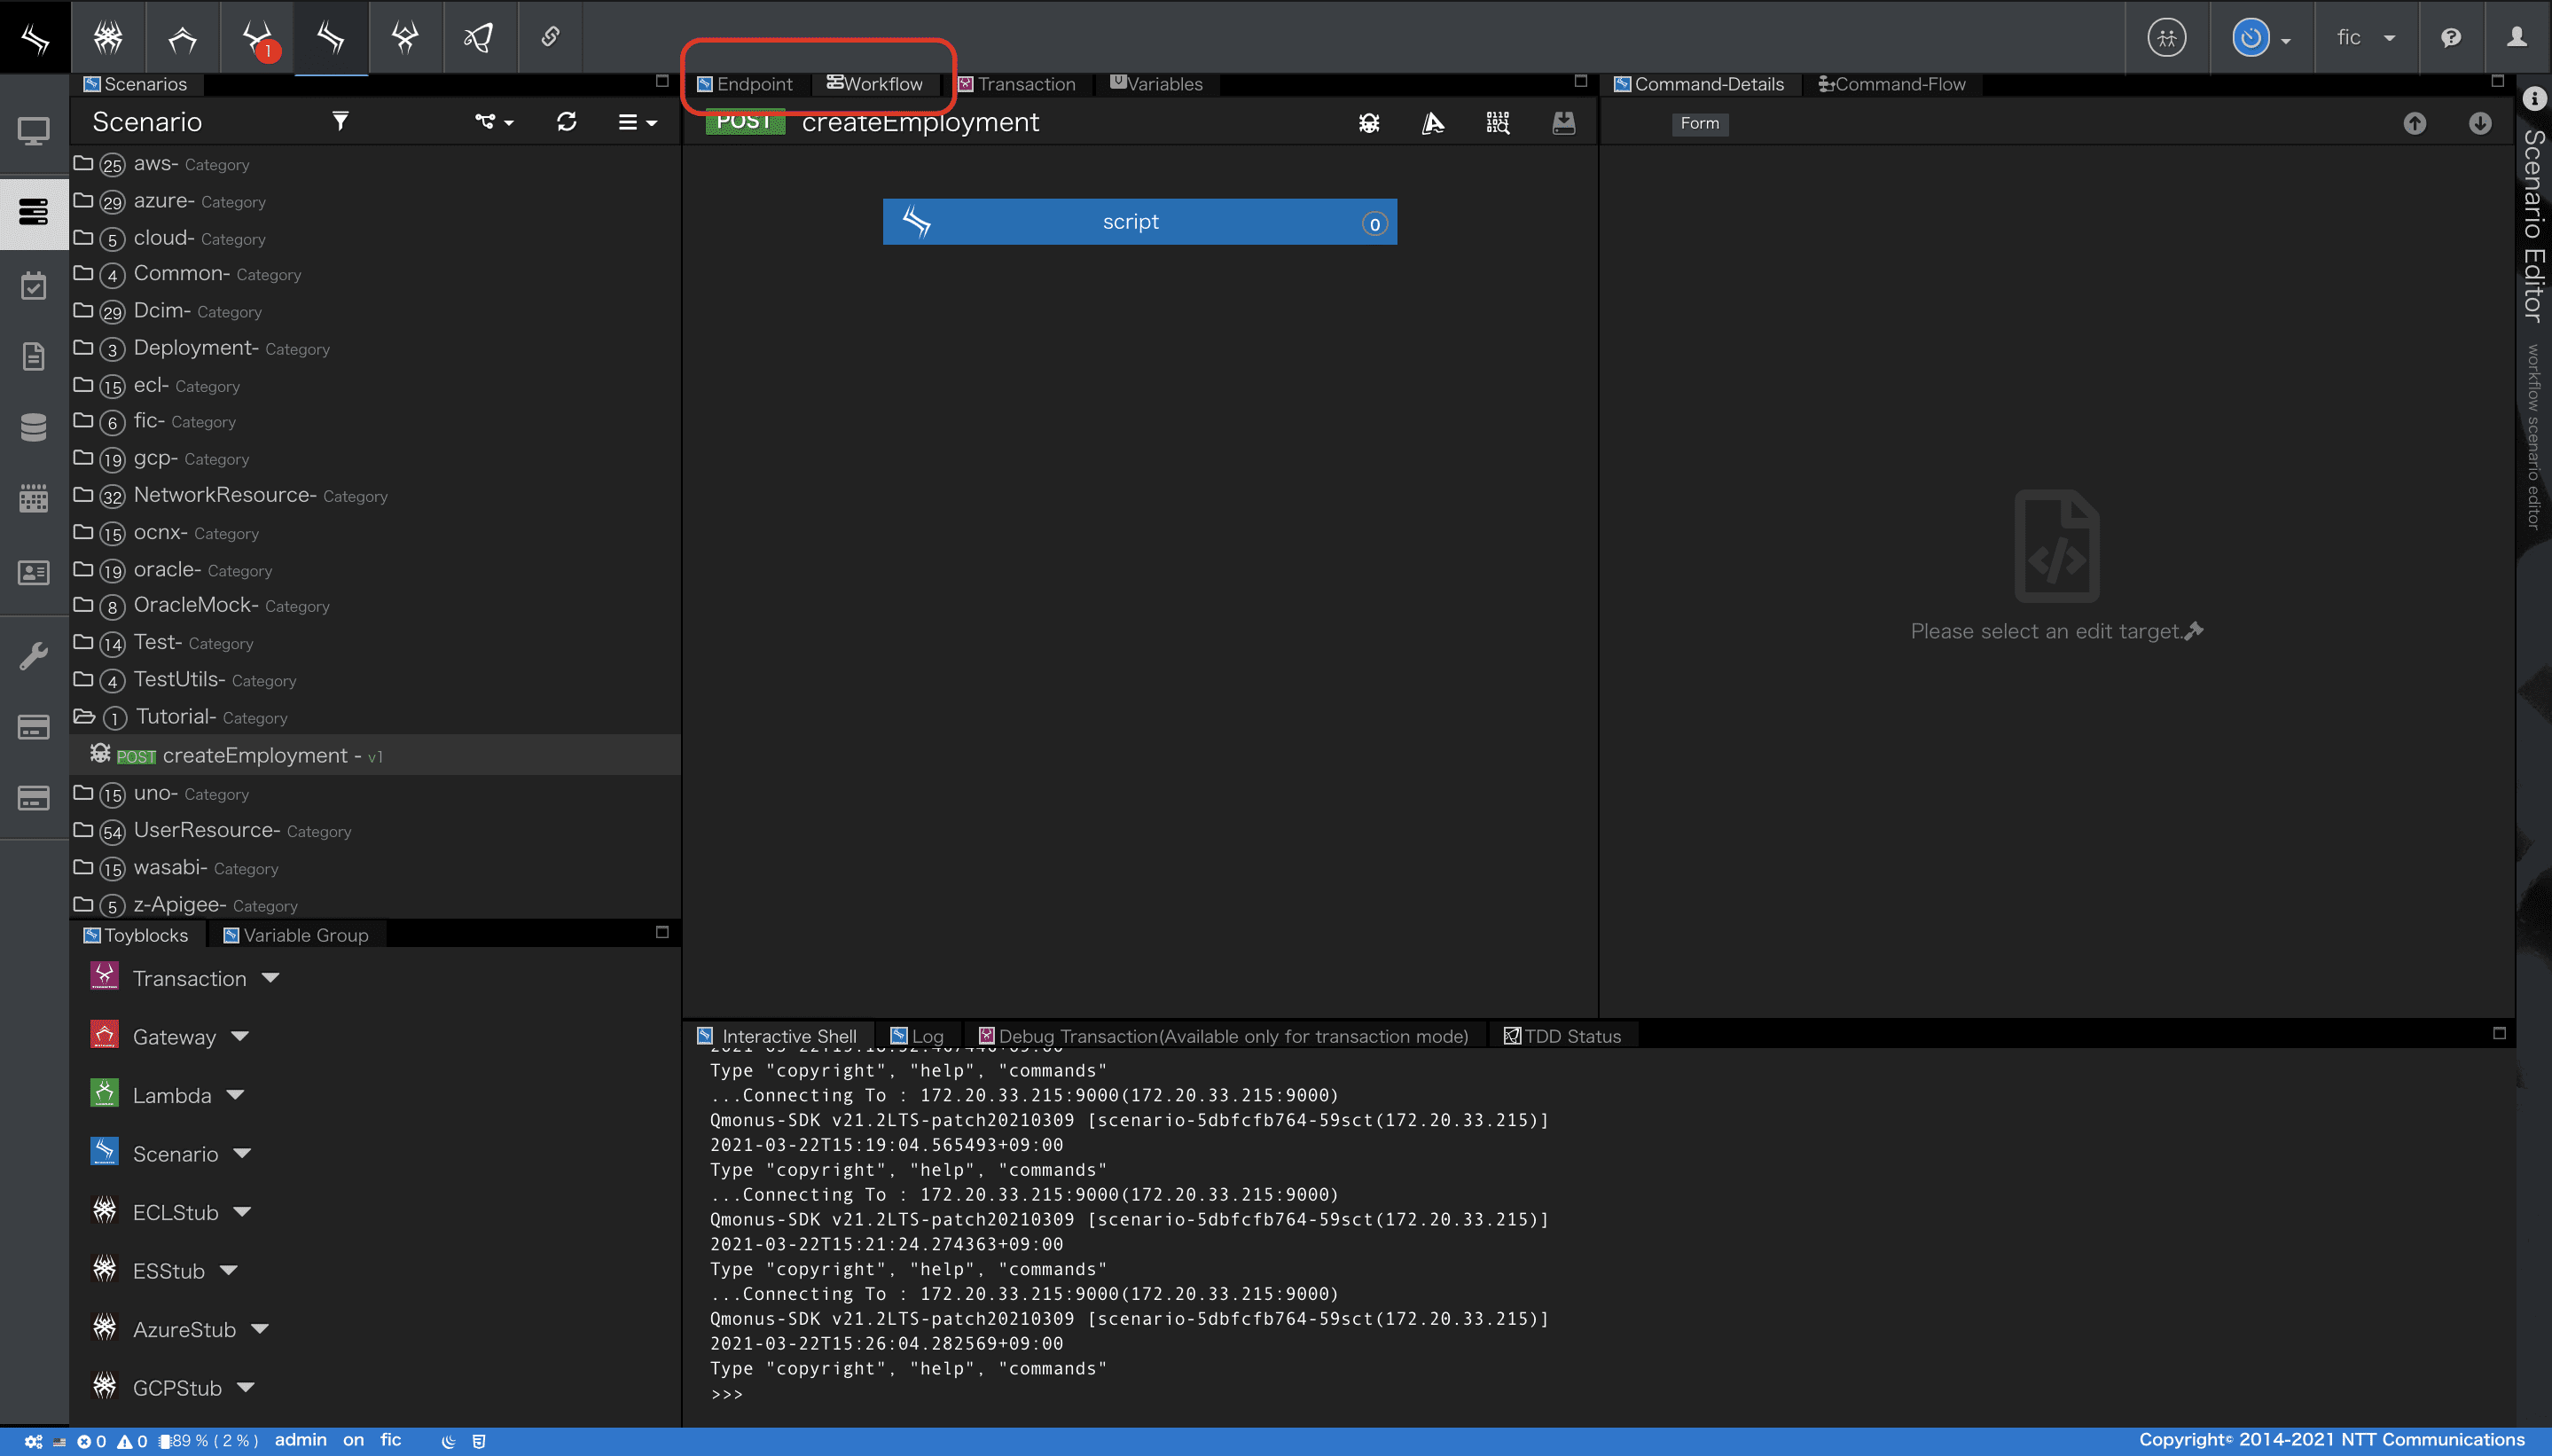
- Importに成功すると画面左部にあるシナリオ一覧にImportしたシナリオが表示されます。
createEmploymentシナリオを選択すると、yamlで定義した内容が反映されていることが確認できます。

- シナリオエディタ画面中央上部にある
EndpointWorkflowタブから、それぞれの設定を確認していきましょう。
2. Endpoint設定
[Endpoint]
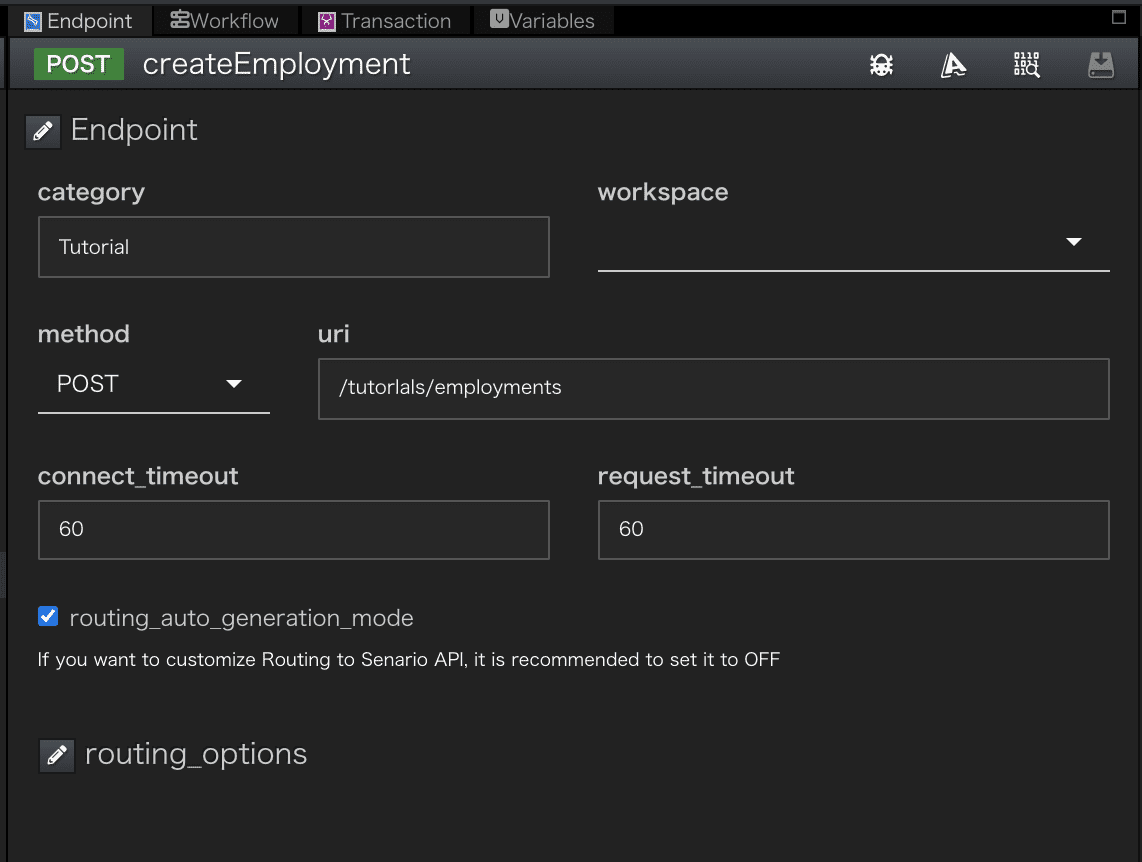
methodはPOSTを指定していますuriは/tutorials/employmentsを使いますrouting_auto_generation_modeが設定されています。シナリオをImportした際にroutingが自動的に登録されます。
[Endpoint-API Spec]
Endpoint下部に設定されているAPI Specを確認しましょう。

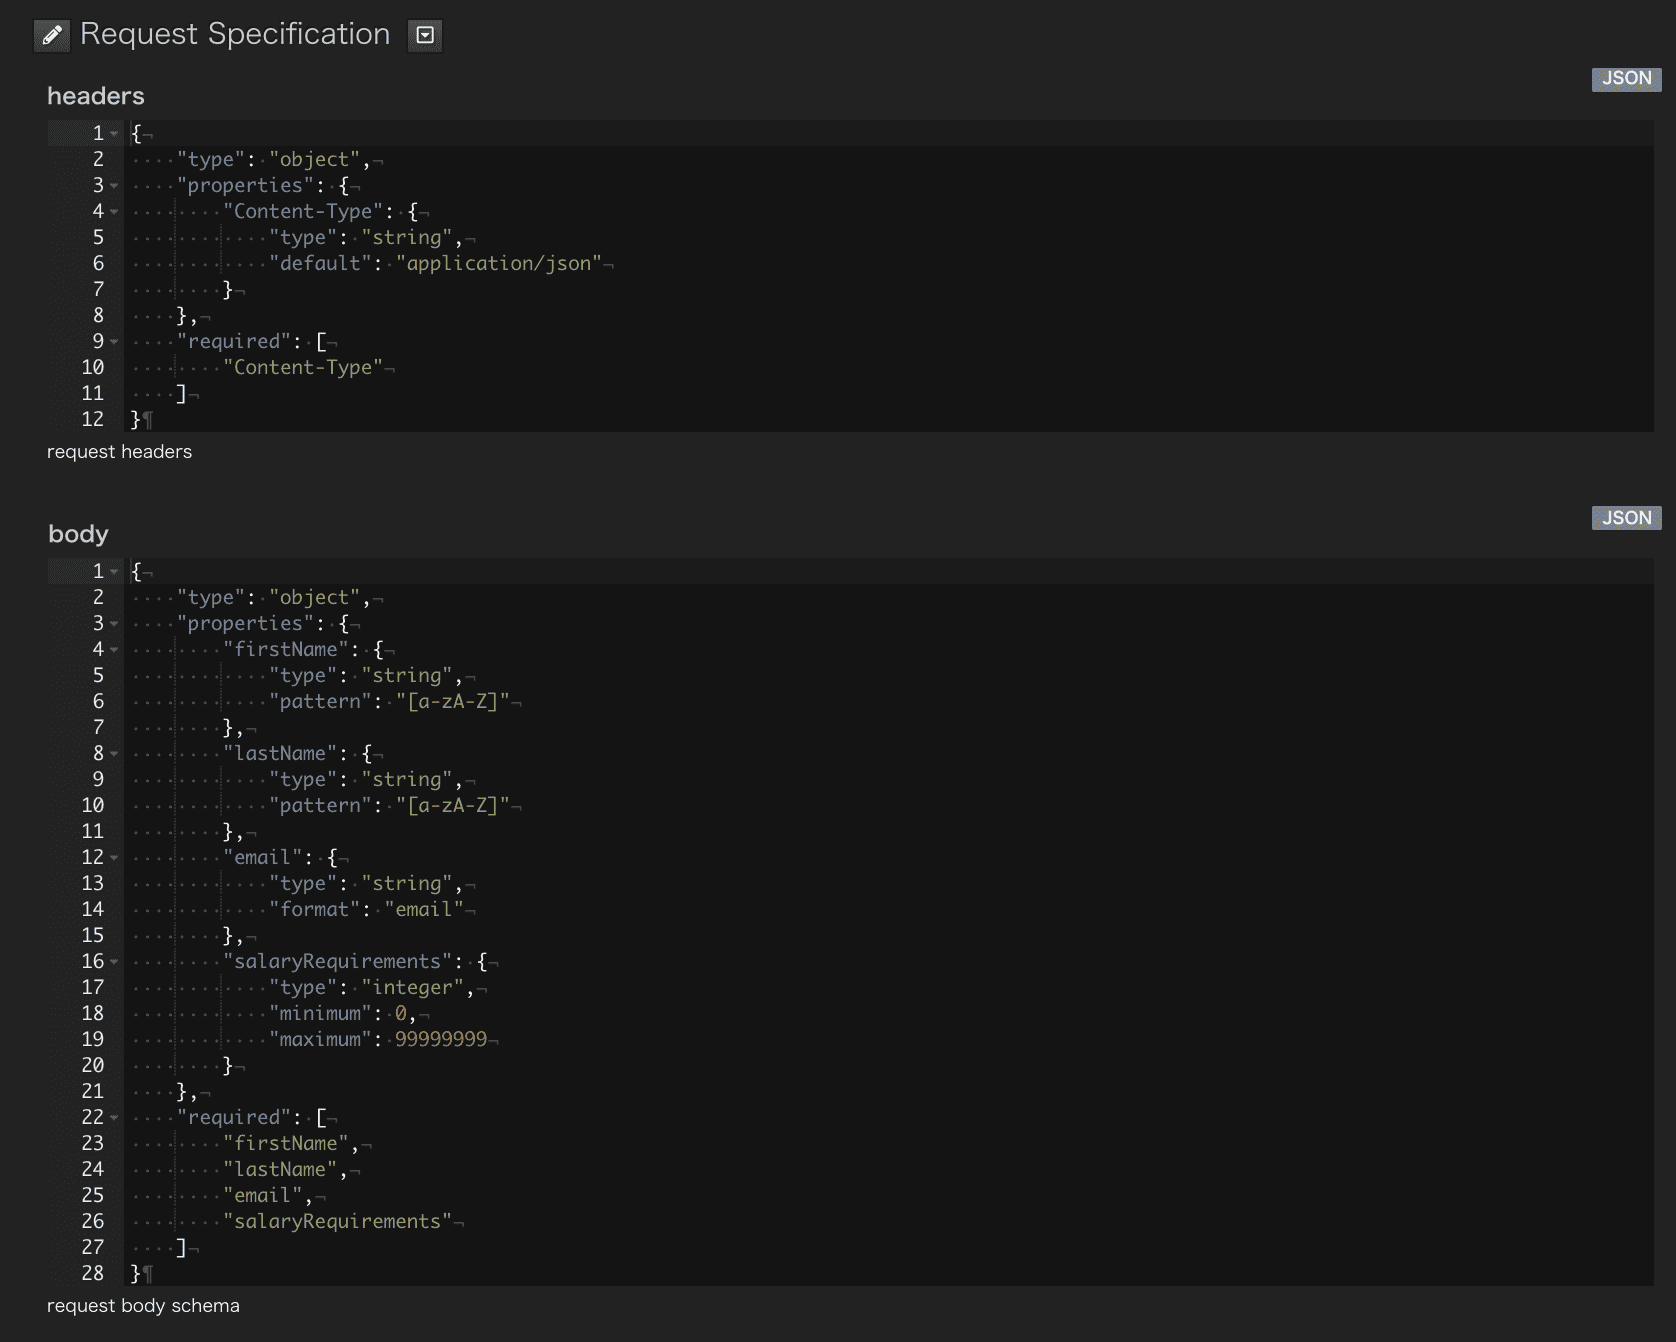
- API Specを定義しておくとリクエスト内容の妥当性を検査することができます。
Request Specificationにjsonschemaで定義した内容はAPI GatewayのRoute情報として管理されリクエストを受信した際に検査します。ここではHeader、Bodyの定義をしています。
routing_auto_generation_modeを選択したシナリオを保存するとそのシナリオに紐づくroutingが自動で登録されますが、これは[API Gateway as a Service]内のリソースとして保存されます。
このリソースはメインメニュー[API Gateway as a Service]>[Routing]から確認することができます。今回の場合、一覧の「/tutorials/employments」を選択し、「Spec Validation」や上側のタブの「Routing」を選択することで登録内容を確認することができます。
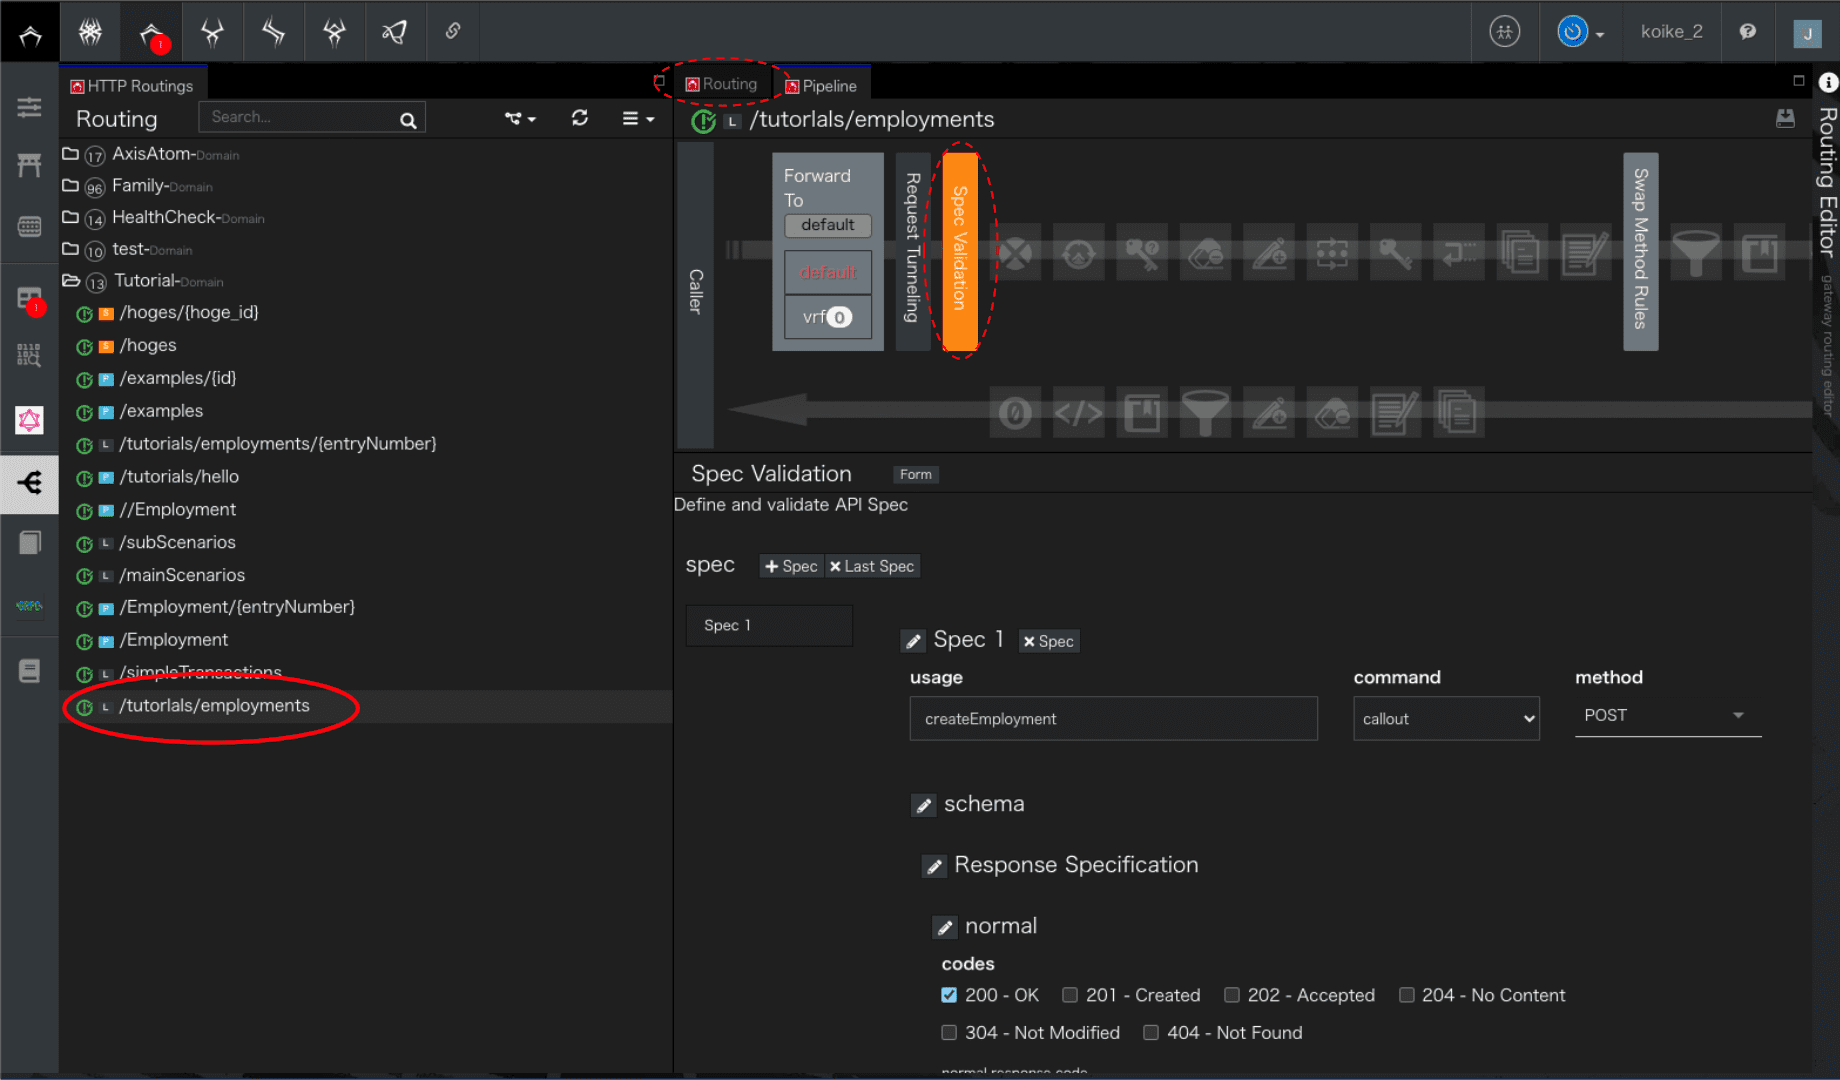
Endpointタブ操作は基本的にそのシナリオに紐づけられた[API Gateway as a Service]内にあるリソースの内容を変更することができます。
新しく作成した場合も同様ですが、この時、デフォルトで表示されない項目があることに注意してください。
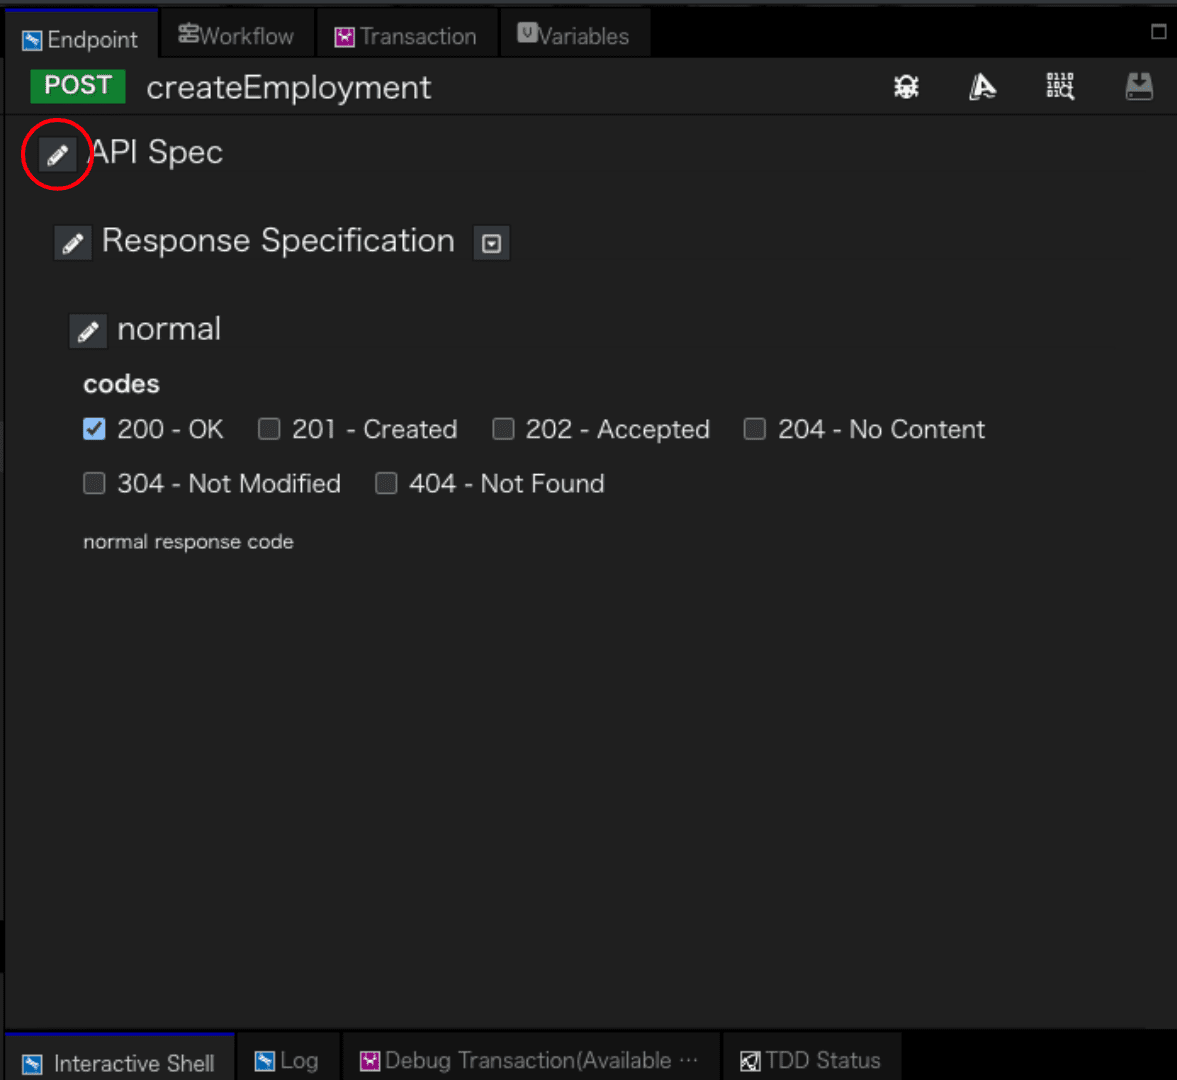
上図は新規作成時のEndpointタブです。
Request Specificationのheaders,bodyはデフォルトでは隠れているため、今回のように利用する場合はAPI Specの横にある鉛筆マークのボタンから必要な項目を選択してください。3. ワークフロー設定
[Workflow]
scripotブロックを選択すると、画面右エリアに設定情報が表示されます。
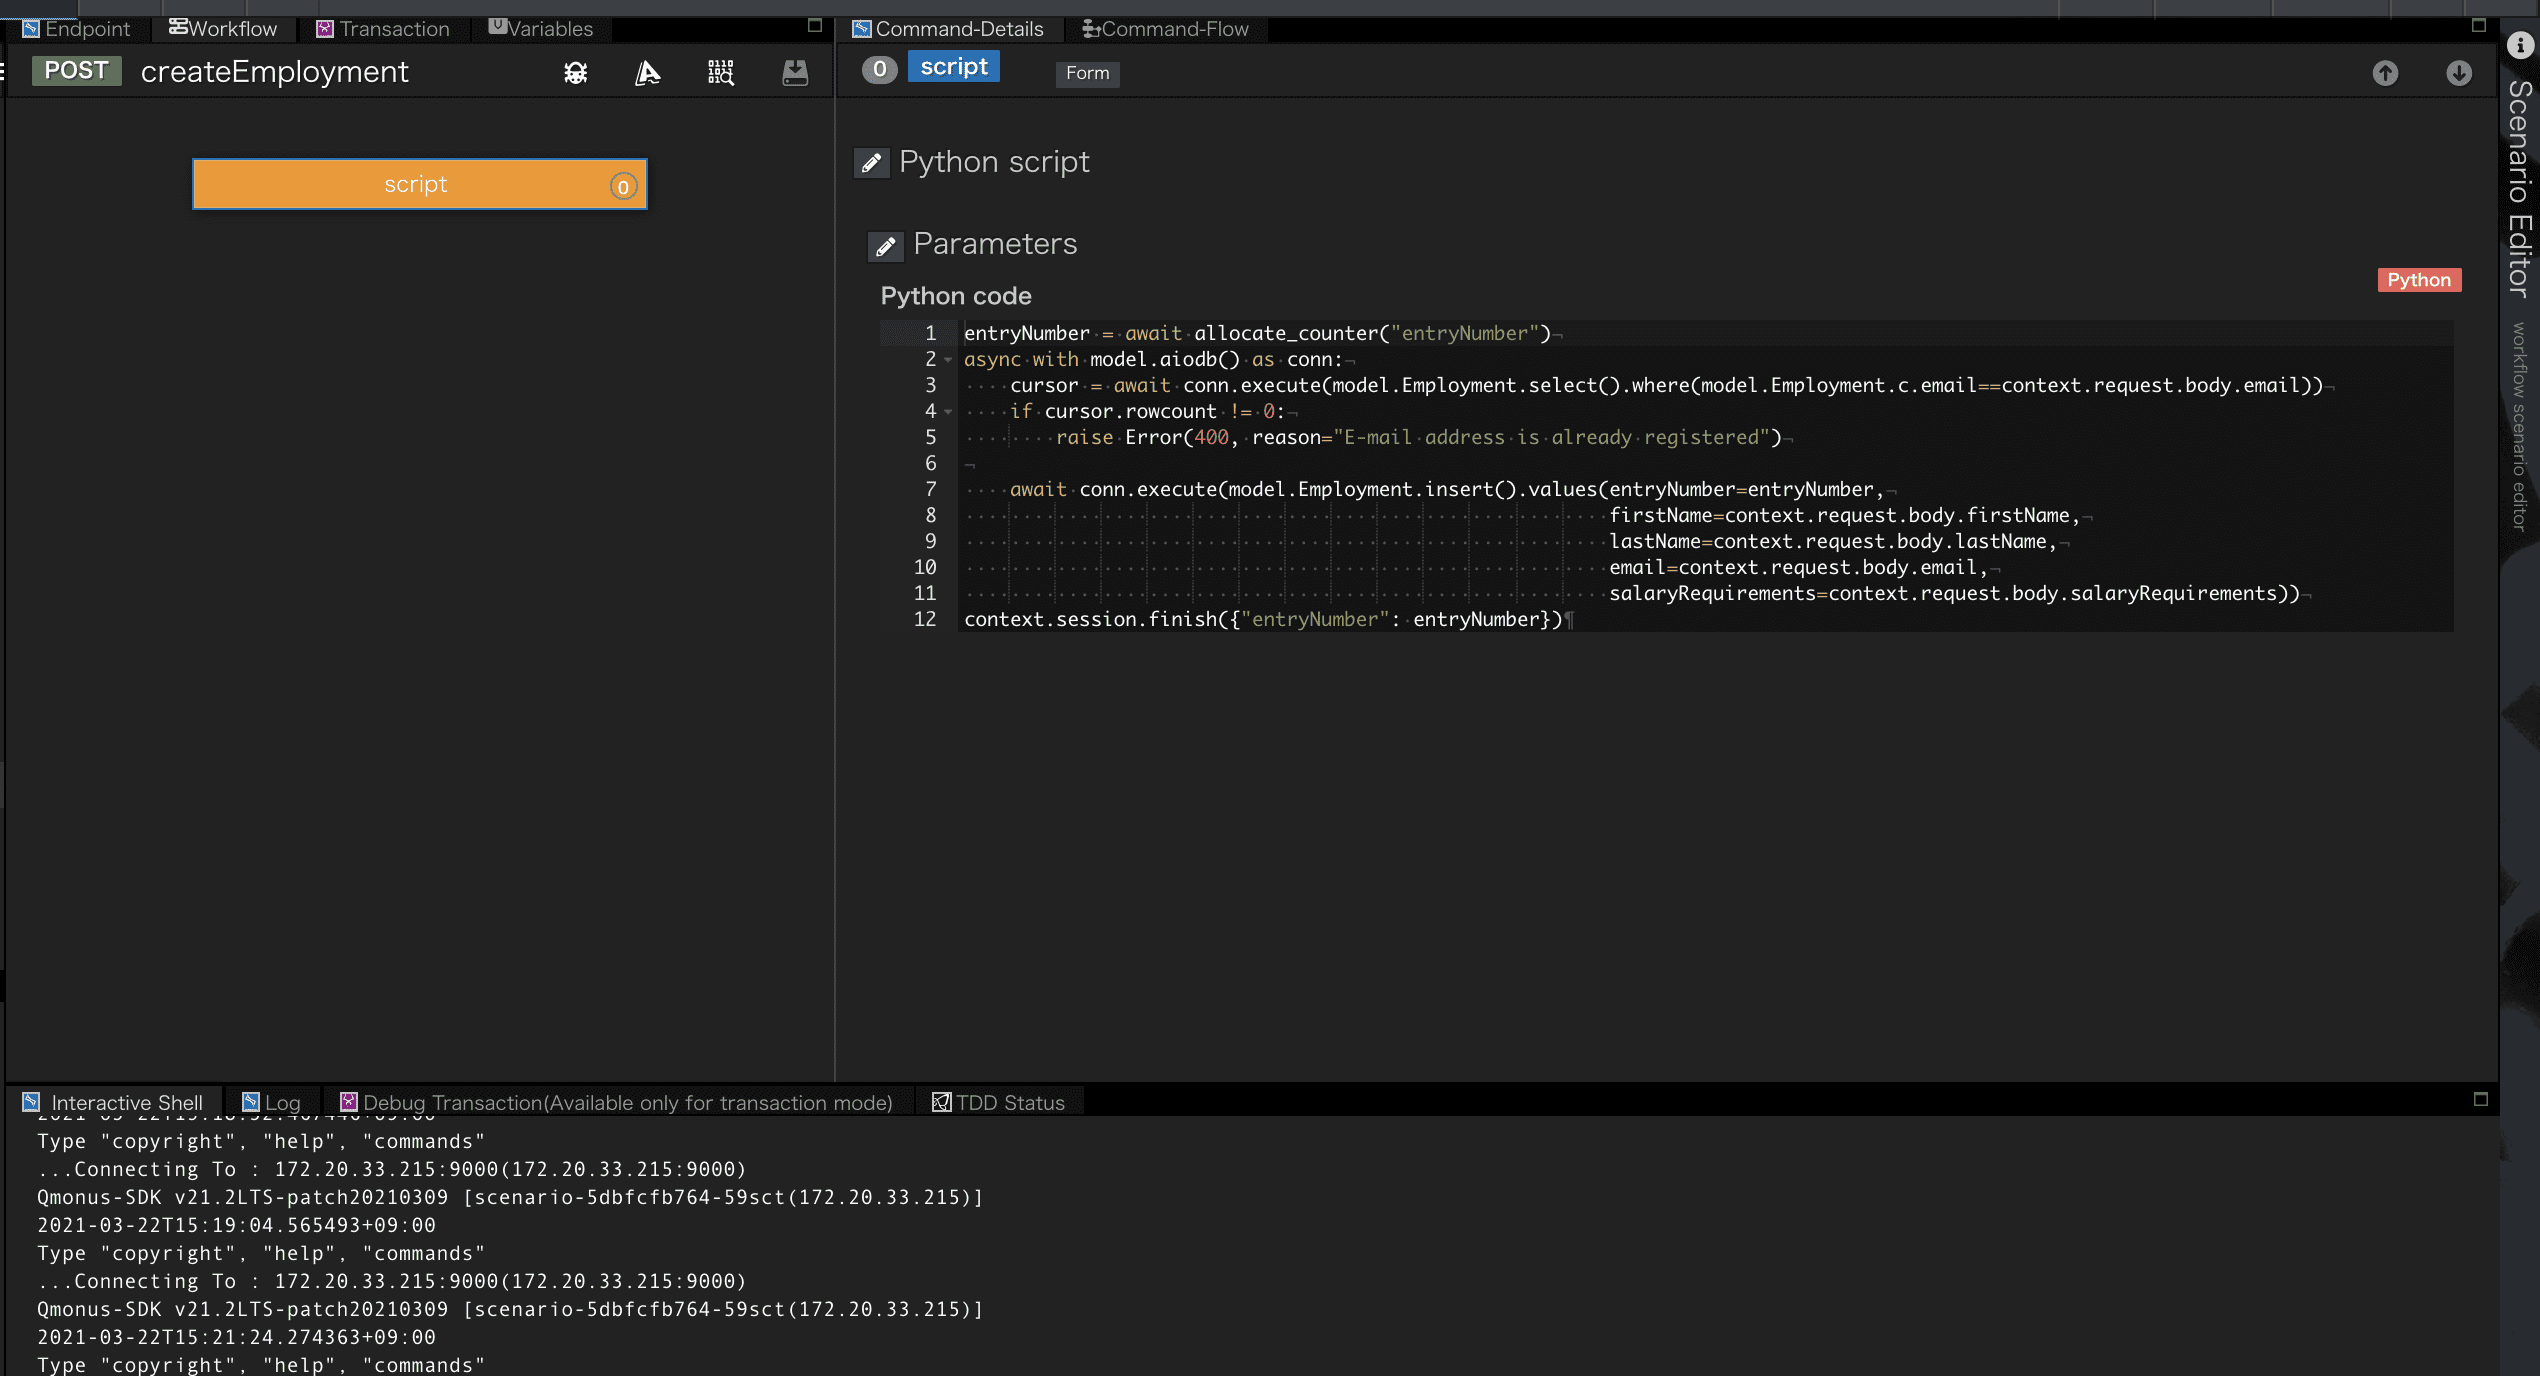
[Workflow-Script]
Scriptに設定されているPython Codeです。
python
entryNumber = await Counter.allocate("entryNumber")
async with model.aiodb() as conn:
    cursor = await conn.execute(model.Employment.select().where(model.Employment.c.email==context.request.body.email))
    if cursor.rowcount != 0:
        raise Error(400, reason="E-mail address is already registered")

    await conn.execute(model.Employment.insert().values(entryNumber=entryNumber,
                                                        firstName=context.request.body.firstName,
                                                        lastName=context.request.body.lastName,
                                                        email=context.request.body.email,
                                                        salaryRequirements=context.request.body.salaryRequirements))
context.session.finish({"entryNumber": entryNumber})
使用している組み込みオブジェクトの詳細
上記で使用したQmonusの組み込みオブジェクトについて、詳細を知りたい方は以下をご覧ください。
- Counter
- model
- context.request (後述のcontext.sessionの章をご参照ください。)
- Error
- context.session
| 行数 | 説明 |
|---|---|
| 1 | 作成したカウンタからentryNumberを払い出します。 |
| 2-11 | 作成したモデルEmploymentにアクセスしデータの検索やRequest Bodyに指定されたEmploymentデータの登録を行います。 |
| 3-4 | すでに登録したデータの中に同一のE-mail addressが存在する場合はBadRequestを返却するValidation処理です。 |
| 7 | Employmentデータの登録を行います。 |
| 12 | 払い出したentryNumberをBodyに設定し、APIの呼び元にResponseを返します。 |
このシナリオを保存すると、POST /tutorials/employmentsで待ち受けるAPIが生成されます。この例のようにspecでAPI入力仕様を記述すると、リクエストバリデーションが有効になります。specに記述されているスキーマ情報は、API Gatewayに生成されるAPIルーティング情報に保存され、API Gatewayでリクエストが受信されたときにバリデーションされます。バリデーションがNGの場合、400 BadRequestを返却します。シナリオ側でもリクエスト受信時にバリデーションする場合は、request_validationコマンドを使用してください。
シナリオの動作としては、最初にカウンタサービスを利用してentryNumberを払い出します。 次にデータベースに接続して、emailが重複しているデータが存在しないかをチェックします。重複している場合は、400 BadRequestを返却します。 重複がない場合は、データを登録します。最後にentryNumberを200 Success応答します。
4. APIの呼び出し
登録シナリオを実行してみましょう。
シナリオエディタ画面中央上部にある[Try API Call]メニューを選択します。

-
画面左部のメニュー[POST Scenario Request Spec]を選択すると[Request Parameters]のBodyにAPI Specで定義した入力項目が表示されます。
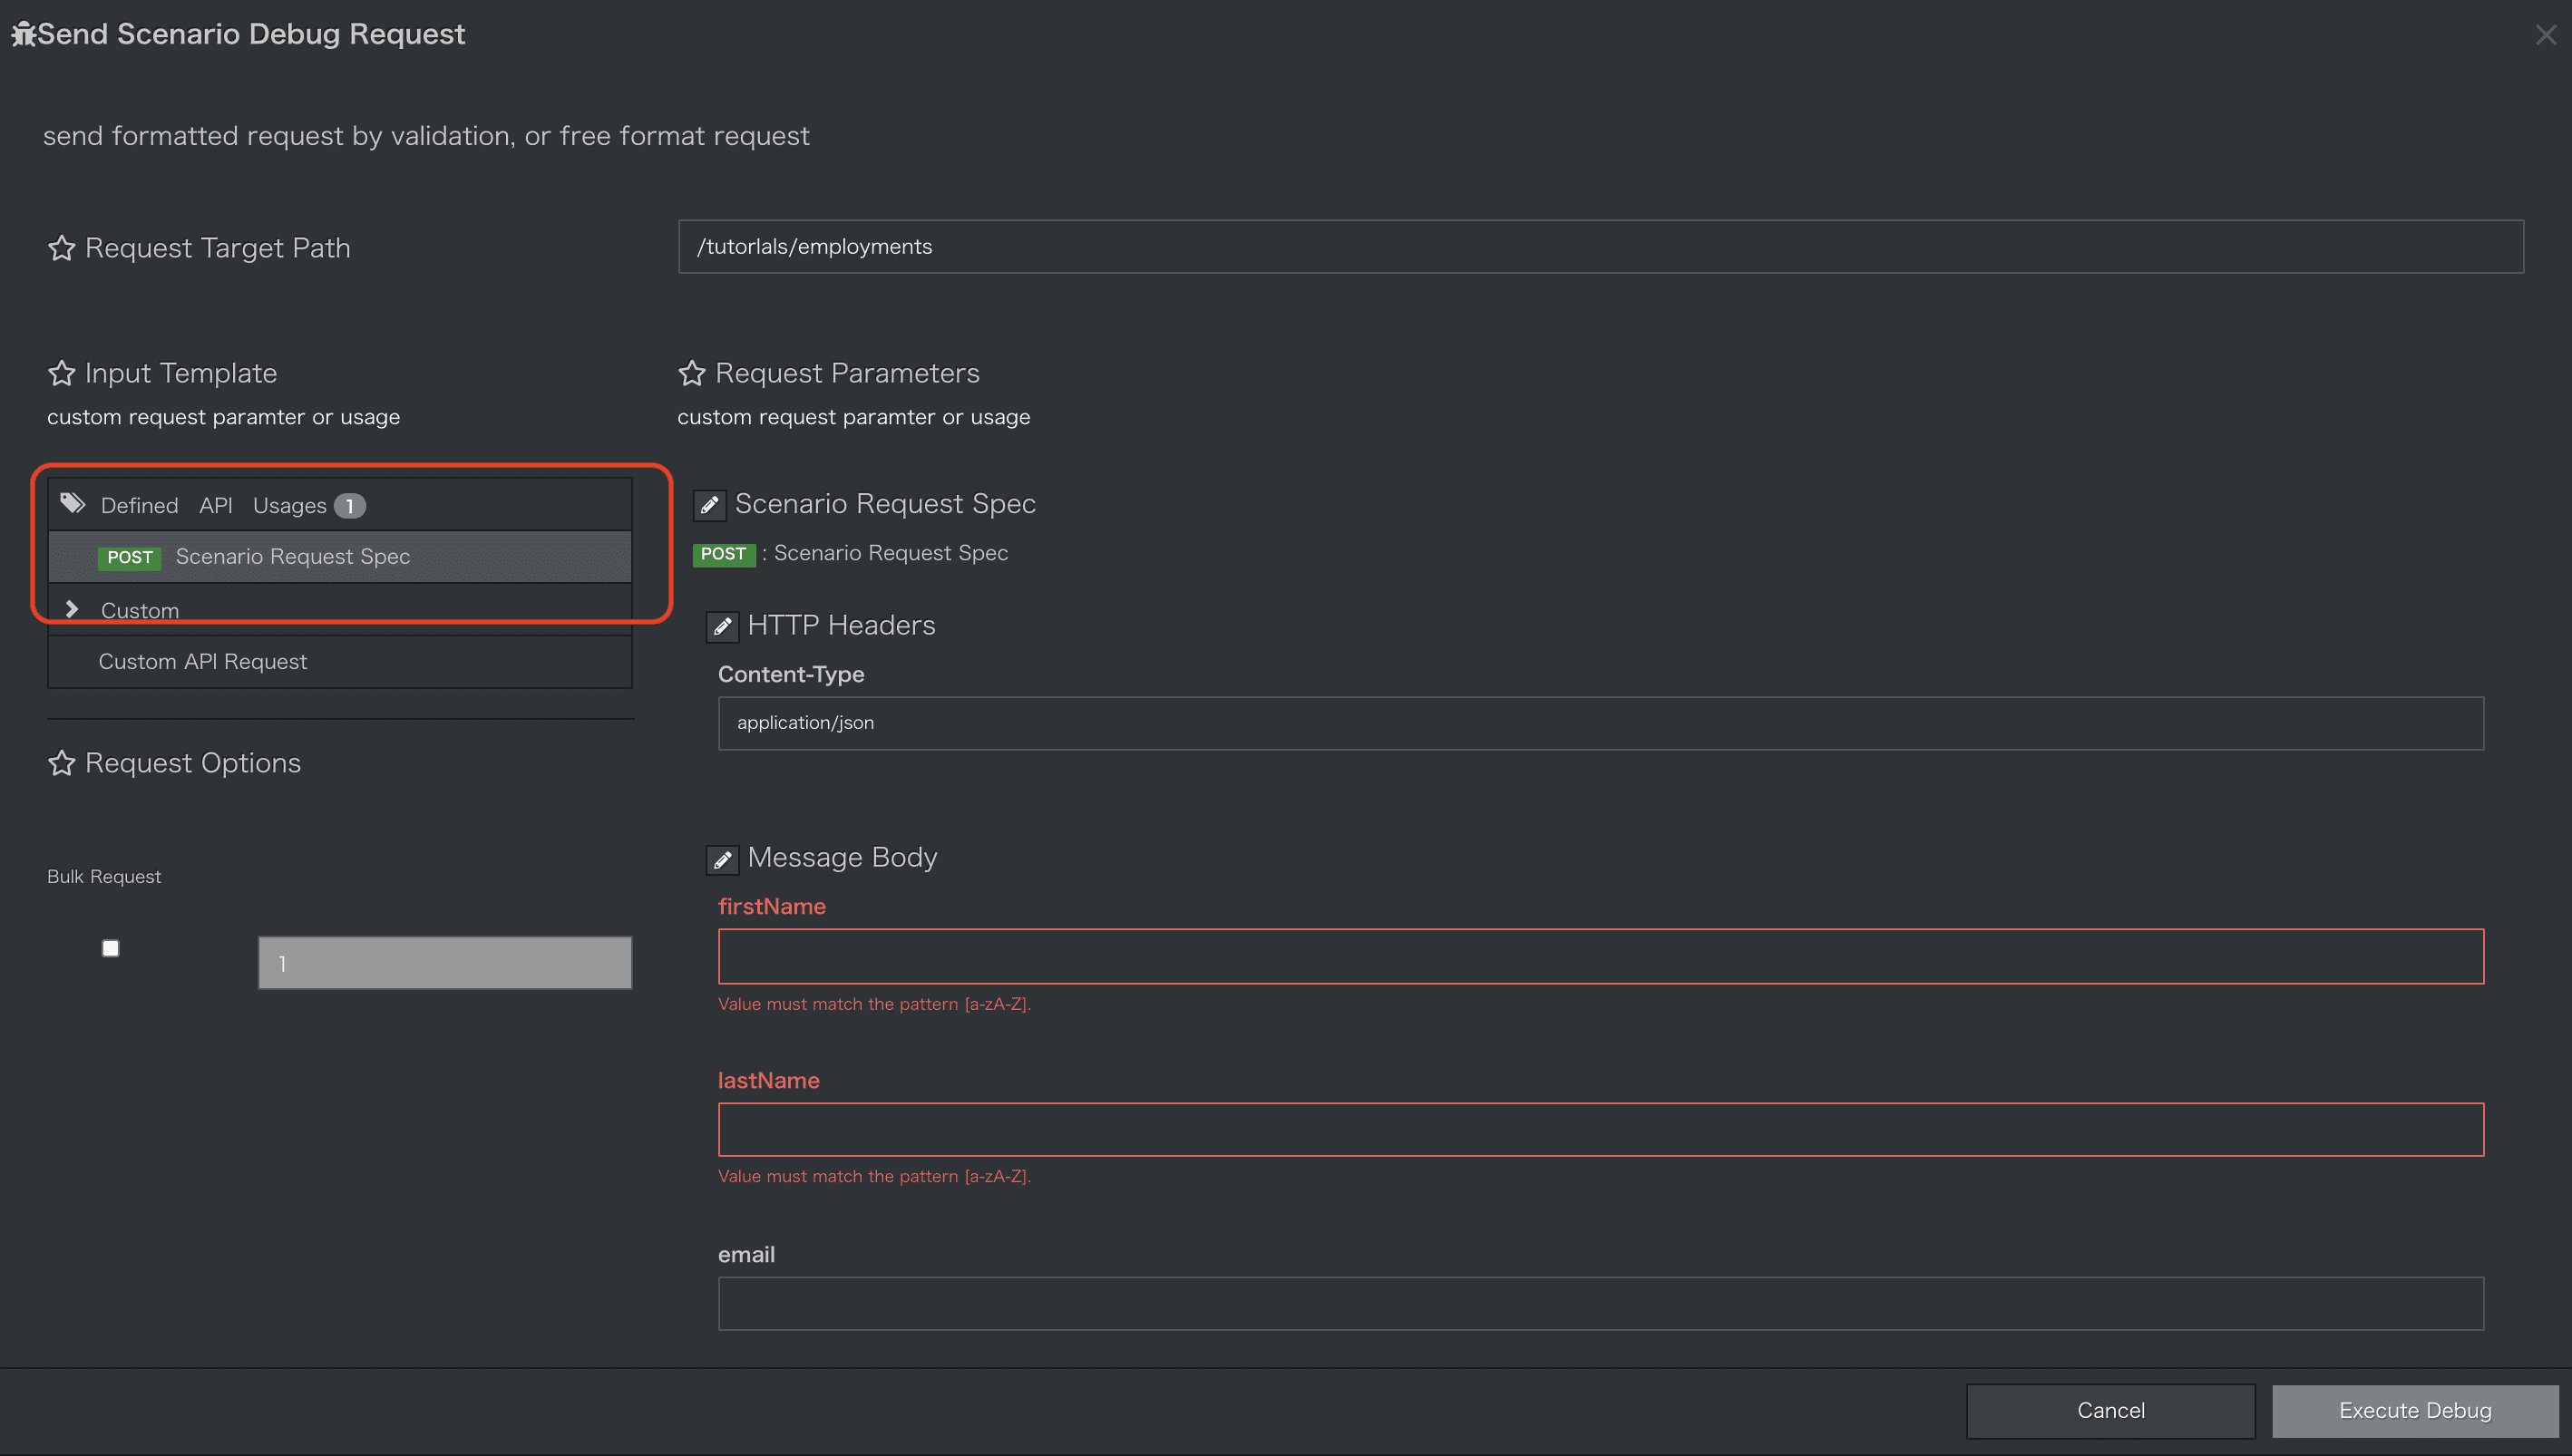
-
以下を入力し
Execute Debugボタンを押下します。
| parameter | Type | sample |
|---|---|---|
| firstName | string | Ray |
| lastName | string | Amuro |
| string | amuroray@uc.com | |
| salaryRequirements | integer | 10000000 |
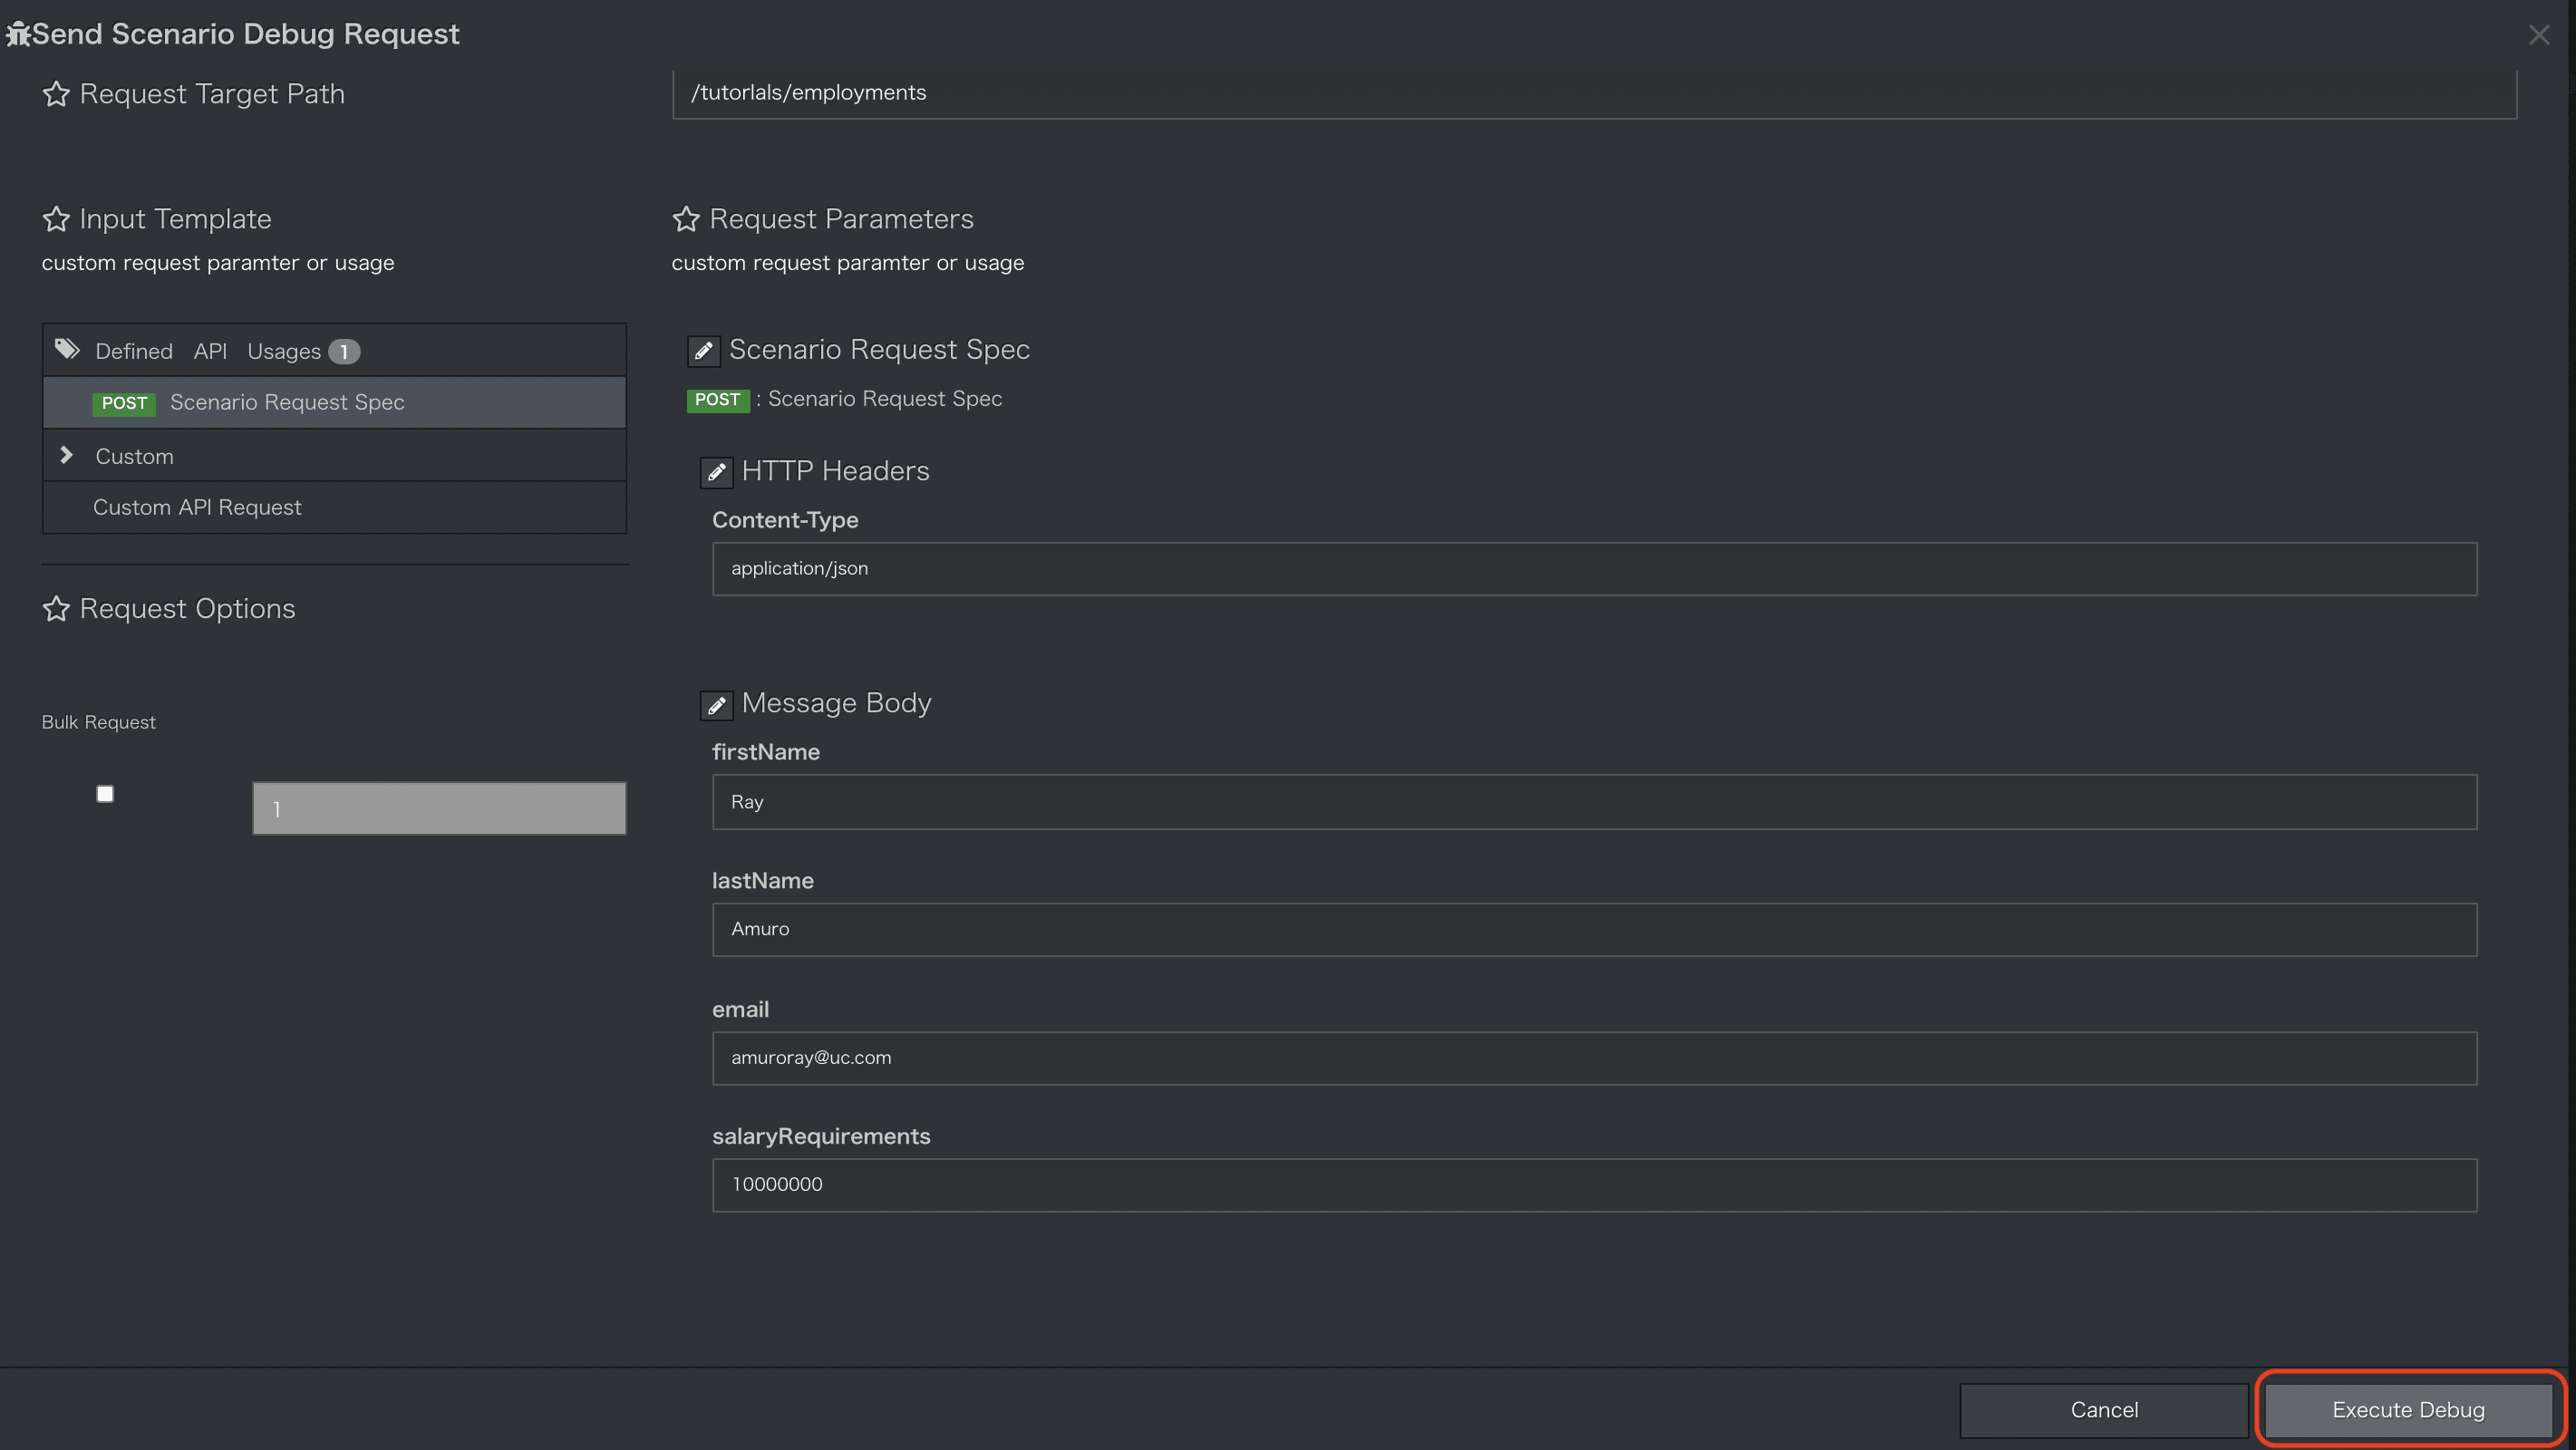
-
APIが実行され結果が表示されます。
Response Bodyにはカウンタから払い出されたentryNumberが設定され返却されていることが確認できます。
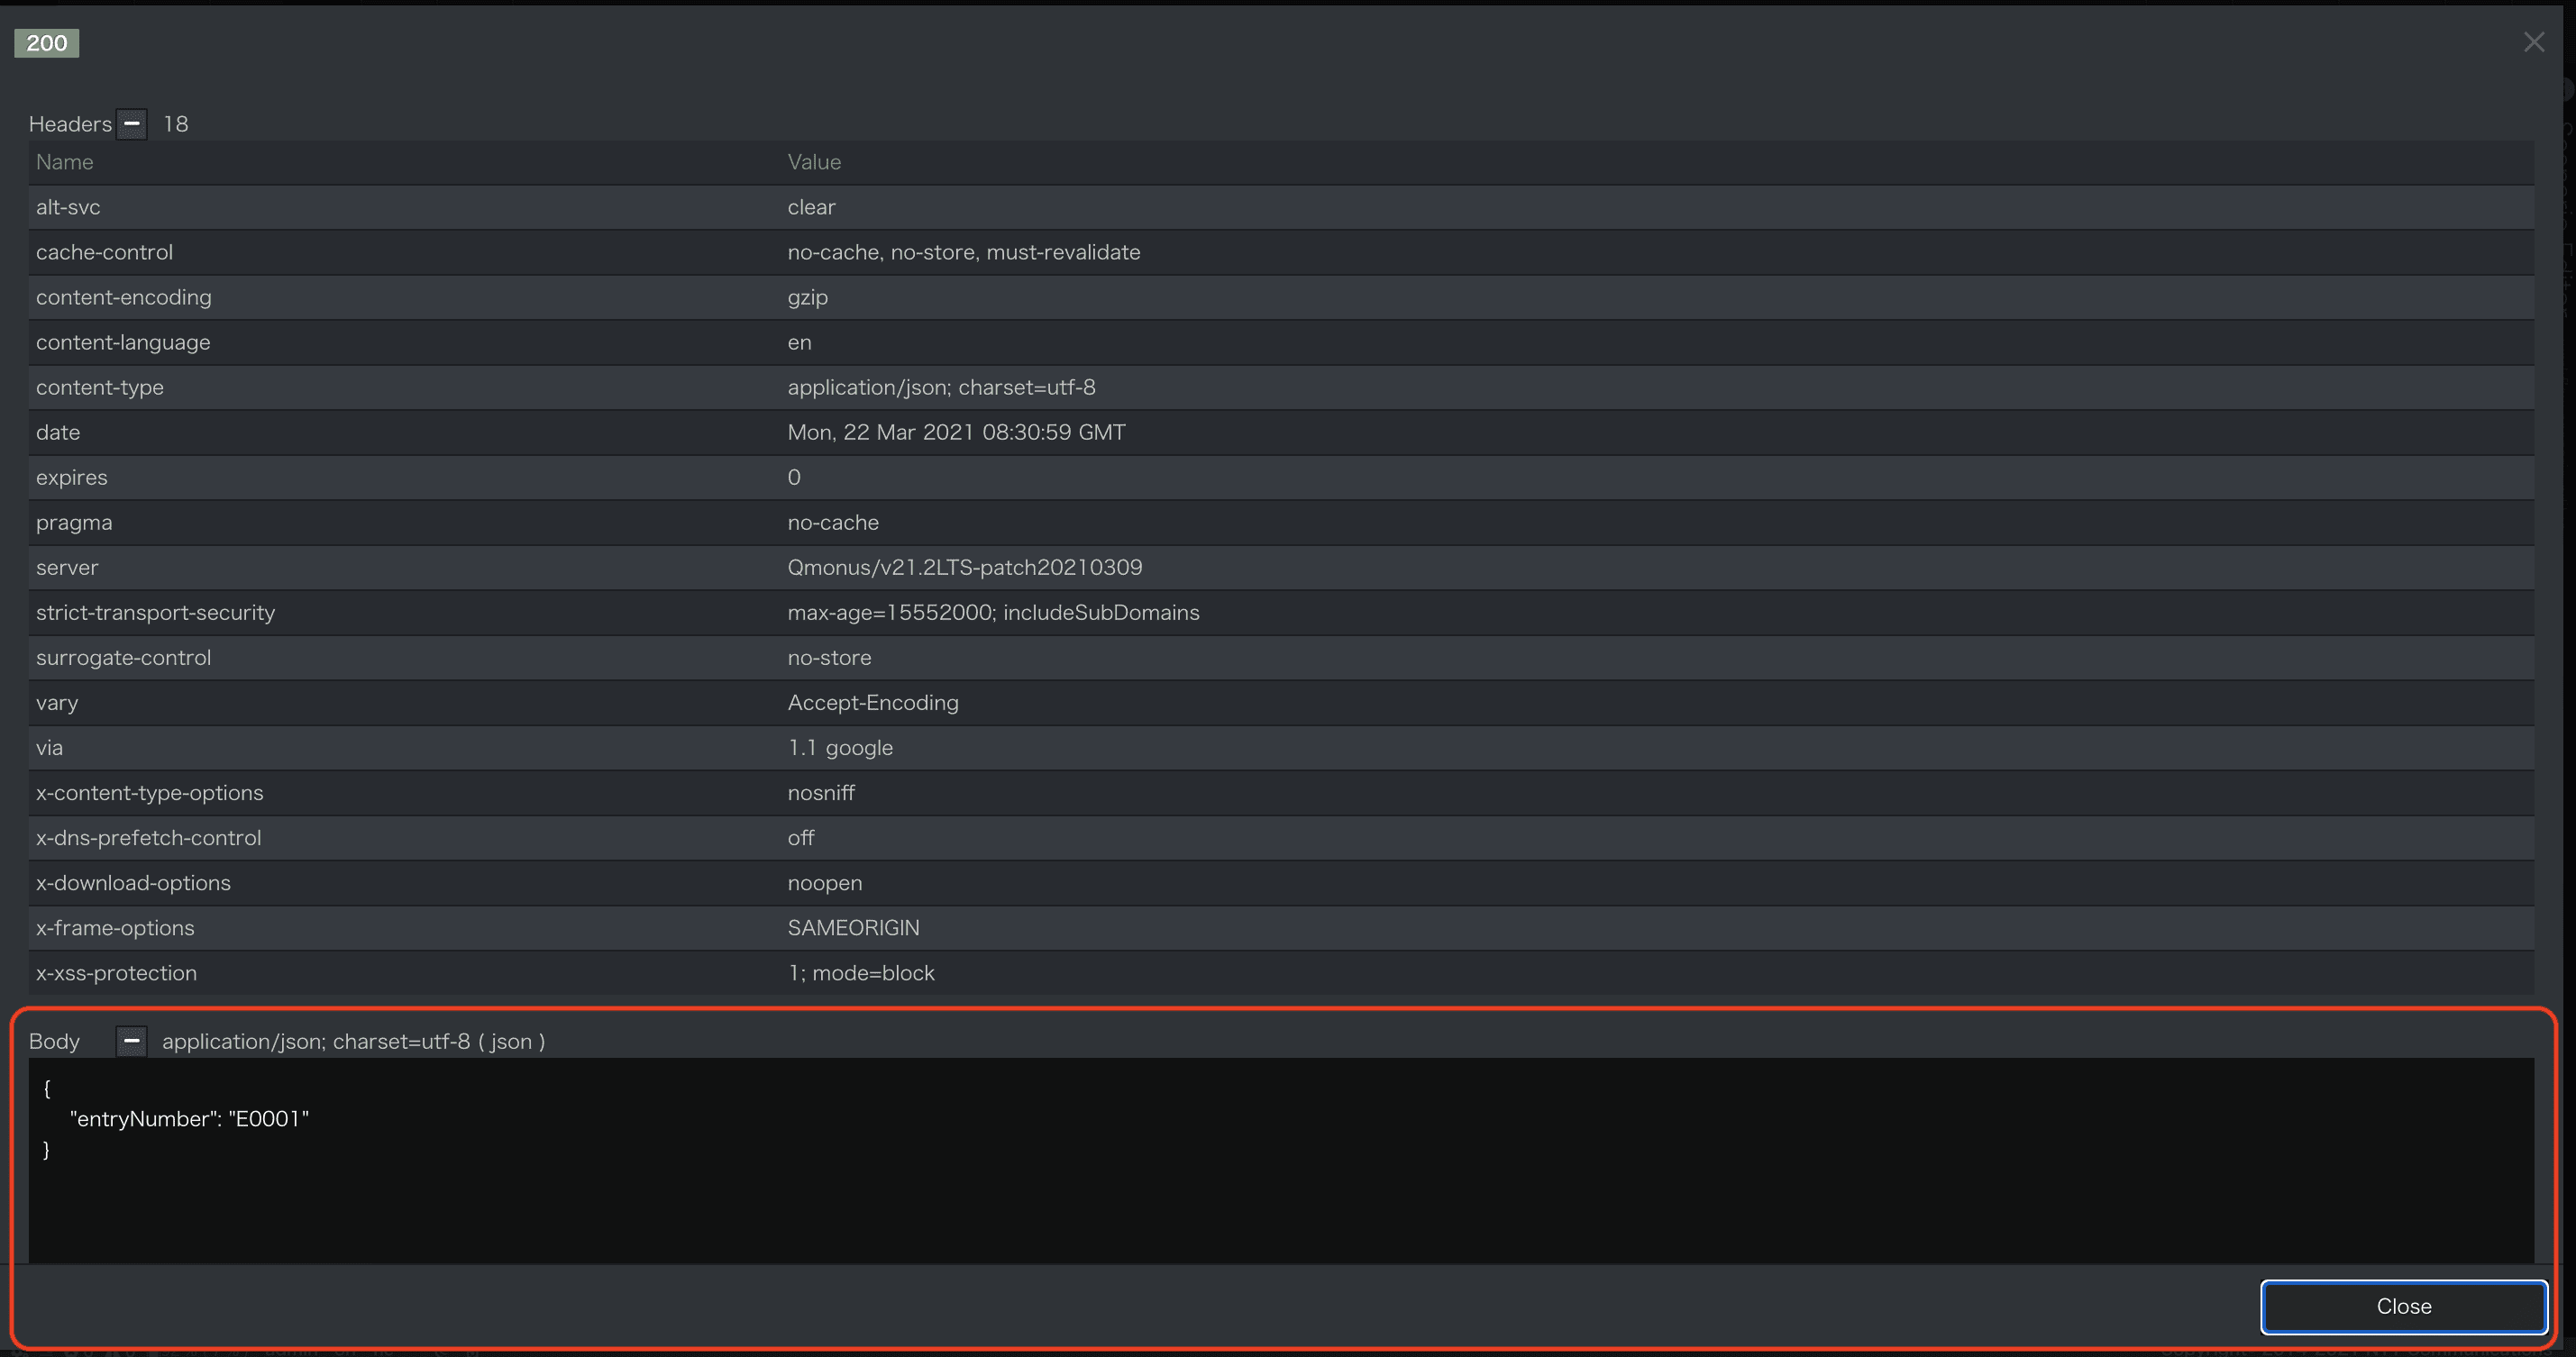
-
次にエラー応答を確認しましょう。
すでに登録されているemailを指定し実行します。
以下の画面が表示され[Scenario-Script]で設定しているエラー応答が確認できます。
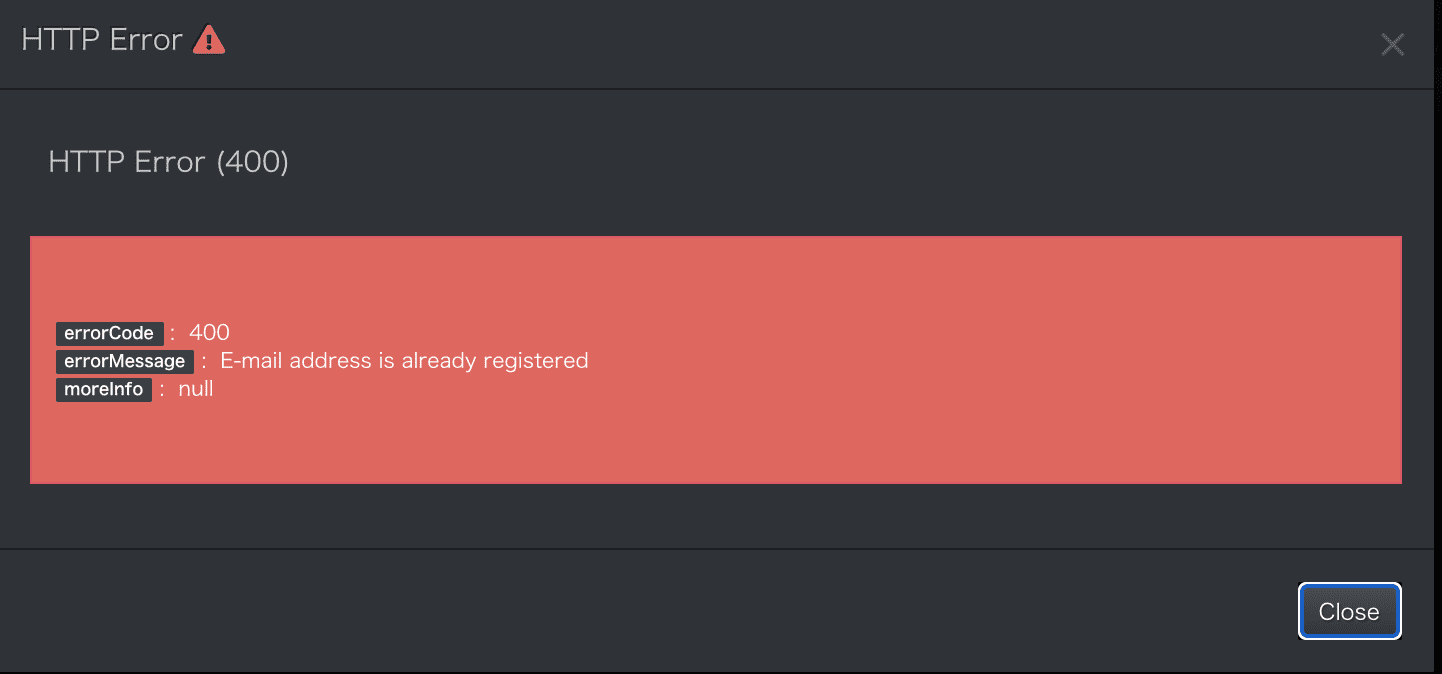
検索シナリオの作成
1. 検索シナリオのImport
- getEmployment.ymlファイルをダウンロードしてください。
getEmployment.yml ダウンロード
yaml
category: Tutorial
name: getEmployment
uri: /tutorials/employments
additional_paths:
  - '/tutorials/employments/{entryNumber}'
method: GET
routing_auto_generation_mode: true
spec:
  response:
    normal:
      codes:
        - 200
  request:
    params:
      type: object
      properties:
        entryNumber:
          type: array
          items:
            type: string
        firstName:
          type: array
          items:
            type: string
            pattern: '[a-zA-Z]'
        lastName:
          type: array
          items:
            type: string
            pattern: '[a-zA-Z]'
        email:
          type: array
          items:
            type: string
            format: email
        salaryRequirements:
          type: array
          items:
            type: integer
            minimum: 0
            maximum: 99999999
    resources:
      type: object
      properties:
        entryNumber:
          type: string
commands:
  - command: script
    kwargs:
      code: |-
        async with model.aiodb() as conn:
            if context.request.resources.entryNumber:
                cursor = await conn.execute(model.Employment.select().where(model.Employment.c.entryNumber==context.request.resources.entryNumber))
                if cursor.rowcount == 0:
                    raise Error(404, reason="Could not found employment")

                employment = await cursor.fetchone()
                context.session.finish(rowtodict(employment))
                return
            logger.info(context.request.params.dictionary)
            cursor = await conn.execute(model.Employment.select().where(where_statement(model.Employment, context.request.params.dictionary)))
            employments = await cursor.fetchall()
            context.session.finish([rowtodict(employment) for employment in employments])
request_timeout: 60
connect_timeout: 60
2. Endpoint設定
[Endpoint]
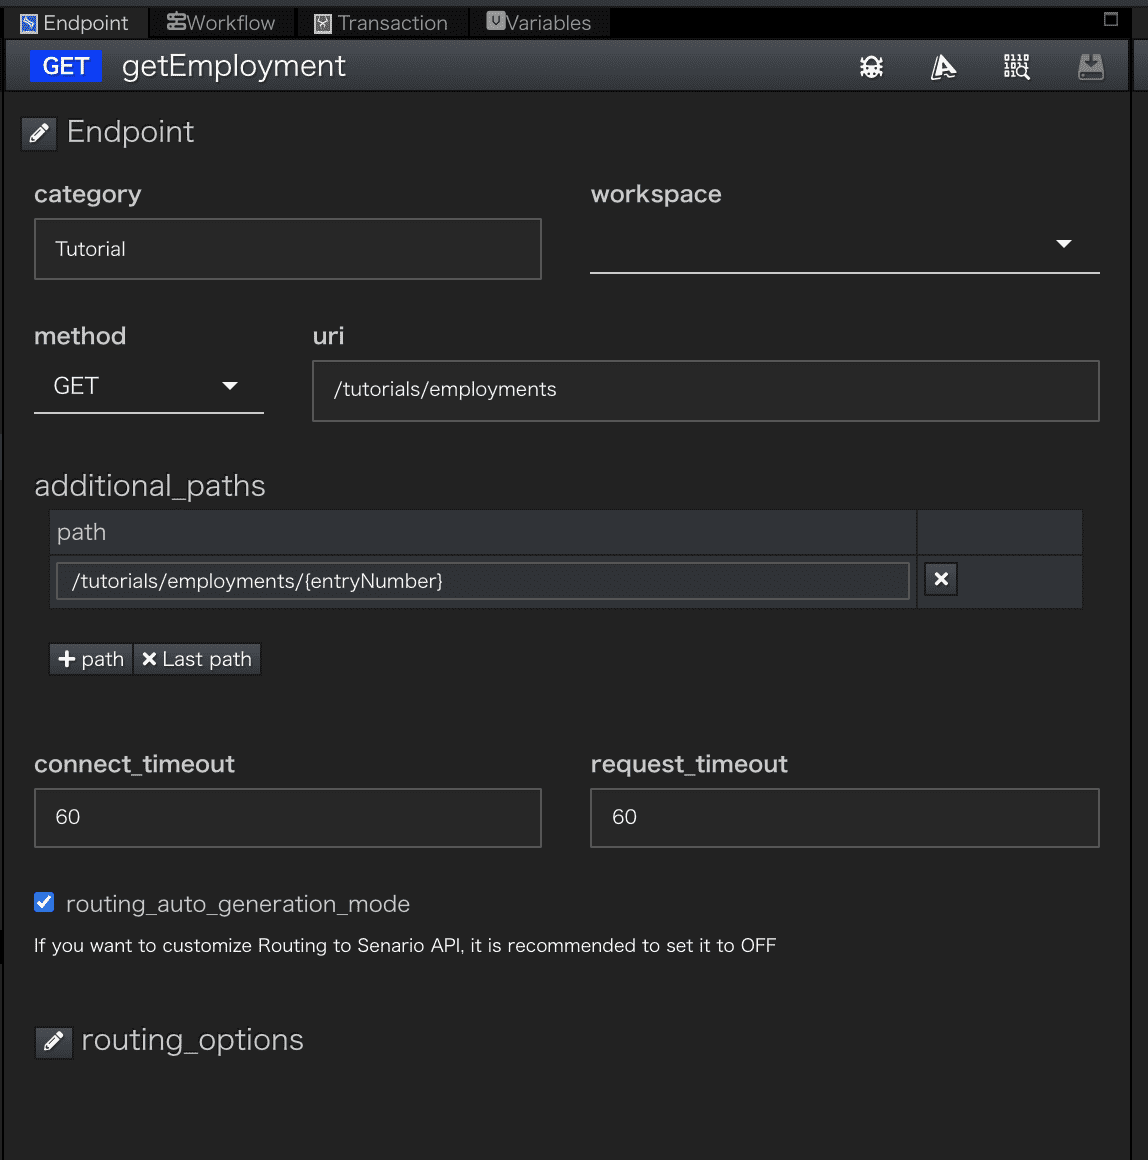
methodにはGETを設定していますuriは/tutorials/employmentsを設定しています。uriにentryNumberを指定したリクエストを受付け可能にするためAdditional_Pathsに/tutorials/employments/{entryNumber}を指定しています。
Additional_Pathsを設定することで、この検索シナリオで受付可能なuriを複数にすることができます。
[Endpoint-API Spec]
Request Specificationのparamsにクエリパラメータの定義、resourcesにentryNumberの定義をしています。
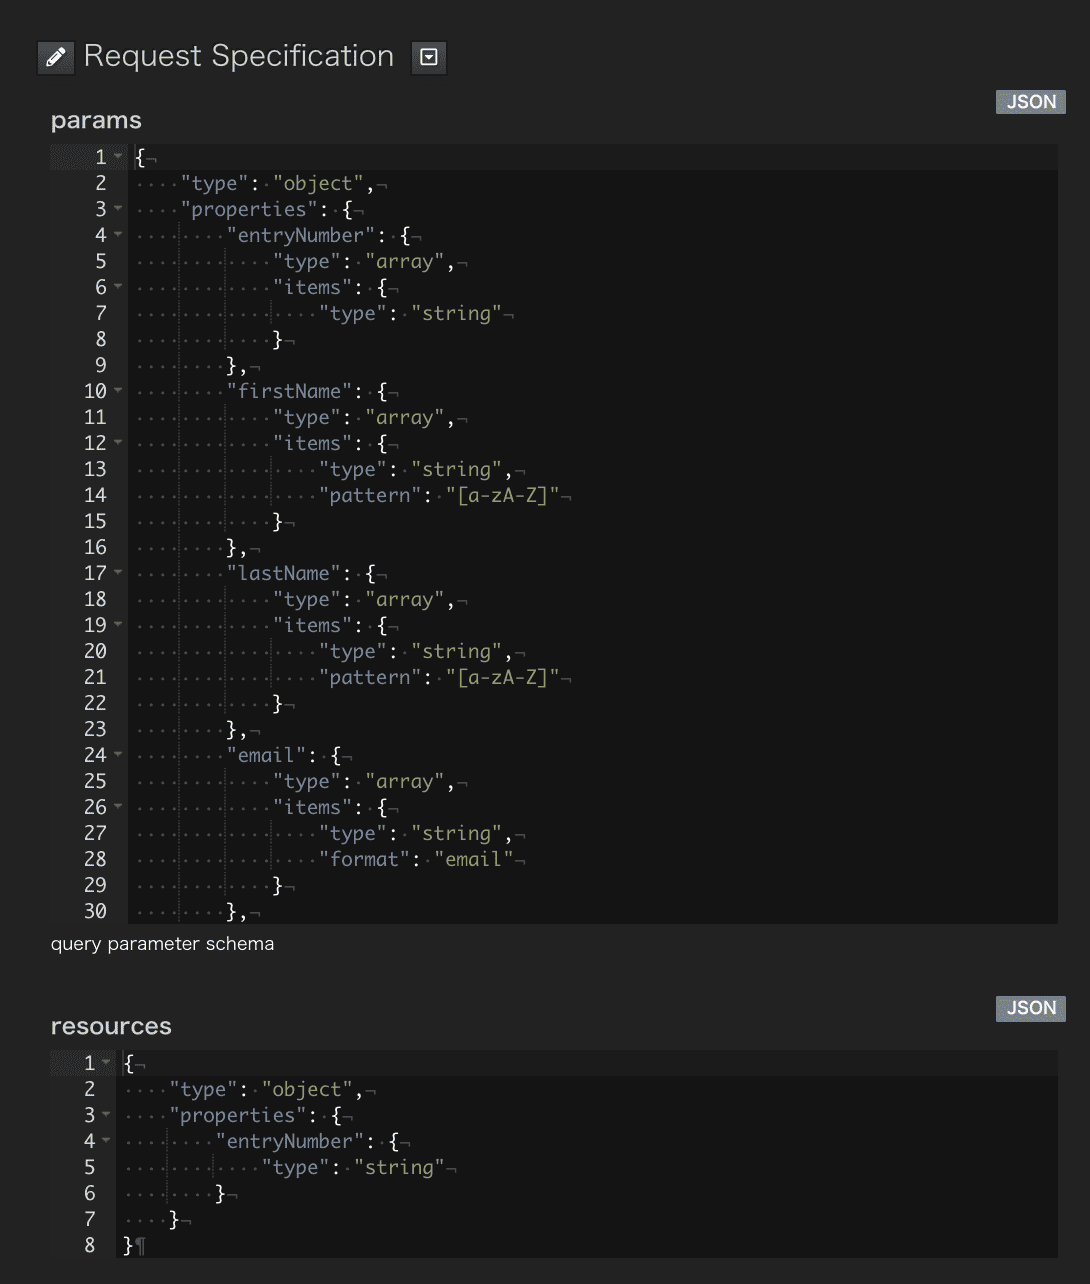
リソースパス、クエリパラメータが格納される変数については
Qmonus SDK Programming Guide » 名前空間 » リファレンス » APIGWにおけるプログラミング
を参照してください。
3. ワークフロー設定
[Workflow]
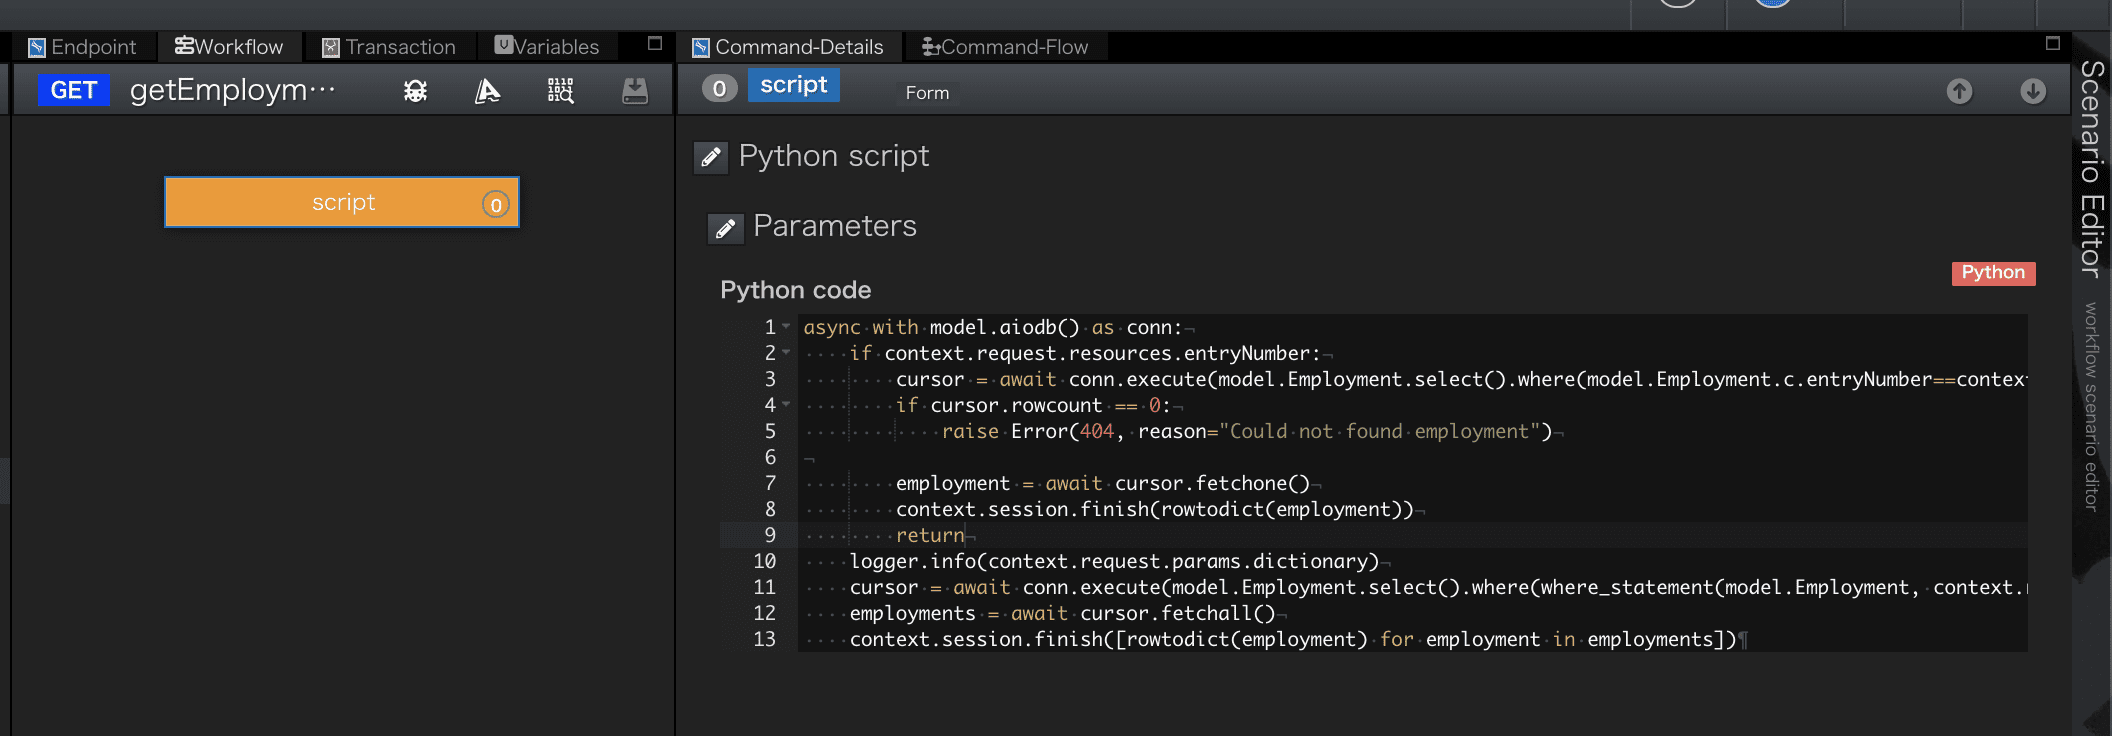
[Workflow-Script]
Scriptに設定されているPython Codeです。
python
async with model.aiodb() as conn:
    if context.request.resources.entryNumber:
        cursor = await conn.execute(model.Employment.select().where(model.Employment.c.entryNumber==context.request.resources.entryNumber))
        if cursor.rowcount == 0:
            raise Error(404, reason="Could not found employment")

        employment = await cursor.fetchone()
        context.session.finish(rowtodict(employment))
        return
    logger.info(context.request.params.dictionary)
    cursor = await conn.execute(model.Employment.select().where(where_statement(model.Employment, context.request.params.dictionary)))
    employments = await cursor.fetchall()
    context.session.finish([rowtodict(employment) for employment in employments])
使用している組み込みオブジェクトの詳細
上記で使用したQmonusの組み込みオブジェクトについて、詳細を知りたい方は以下をご覧ください。
- model
- context.request (後述のcontext.sessionの章をご参照ください。)
- Error
- context.session
- logger.info
- rowtodict
| 行数 | 説明 |
|---|---|
| 2 | URIにentryNumberが指定されているかチェックします |
| 3 | 指定されたentryNumberでデータベースの検索を行います |
| 4-5 | 検索結果の有無を確認し、無い場合は404のレスポンスを返します |
| 7-8 | 指定されたentryNumberで検索したデータを返却します |
| 10 | クエリパラメータをログ出力します |
| 11-13 | データベースを検索し該当したデータを取得、response bodyに設定し返却します |
このAPIは、GET /tutorials/employmentsを介してアクセスするとEmploymentリストを返します。GET /tutorials/employments/{entryNumber}でアクセスすると、対応するEmploymentが返されます。GET /tutorials/employee?lastName=Amuroのようなクエリ検索もできます。クエリ検索に対応するためにSQLのWHERE句を組み立てる必要がありますが、この例ではwhere_statement組込み関数にクエリパラメータの辞書を渡して自動生成しています。
4. APIの呼び出し
検索シナリオを実行してみましょう。
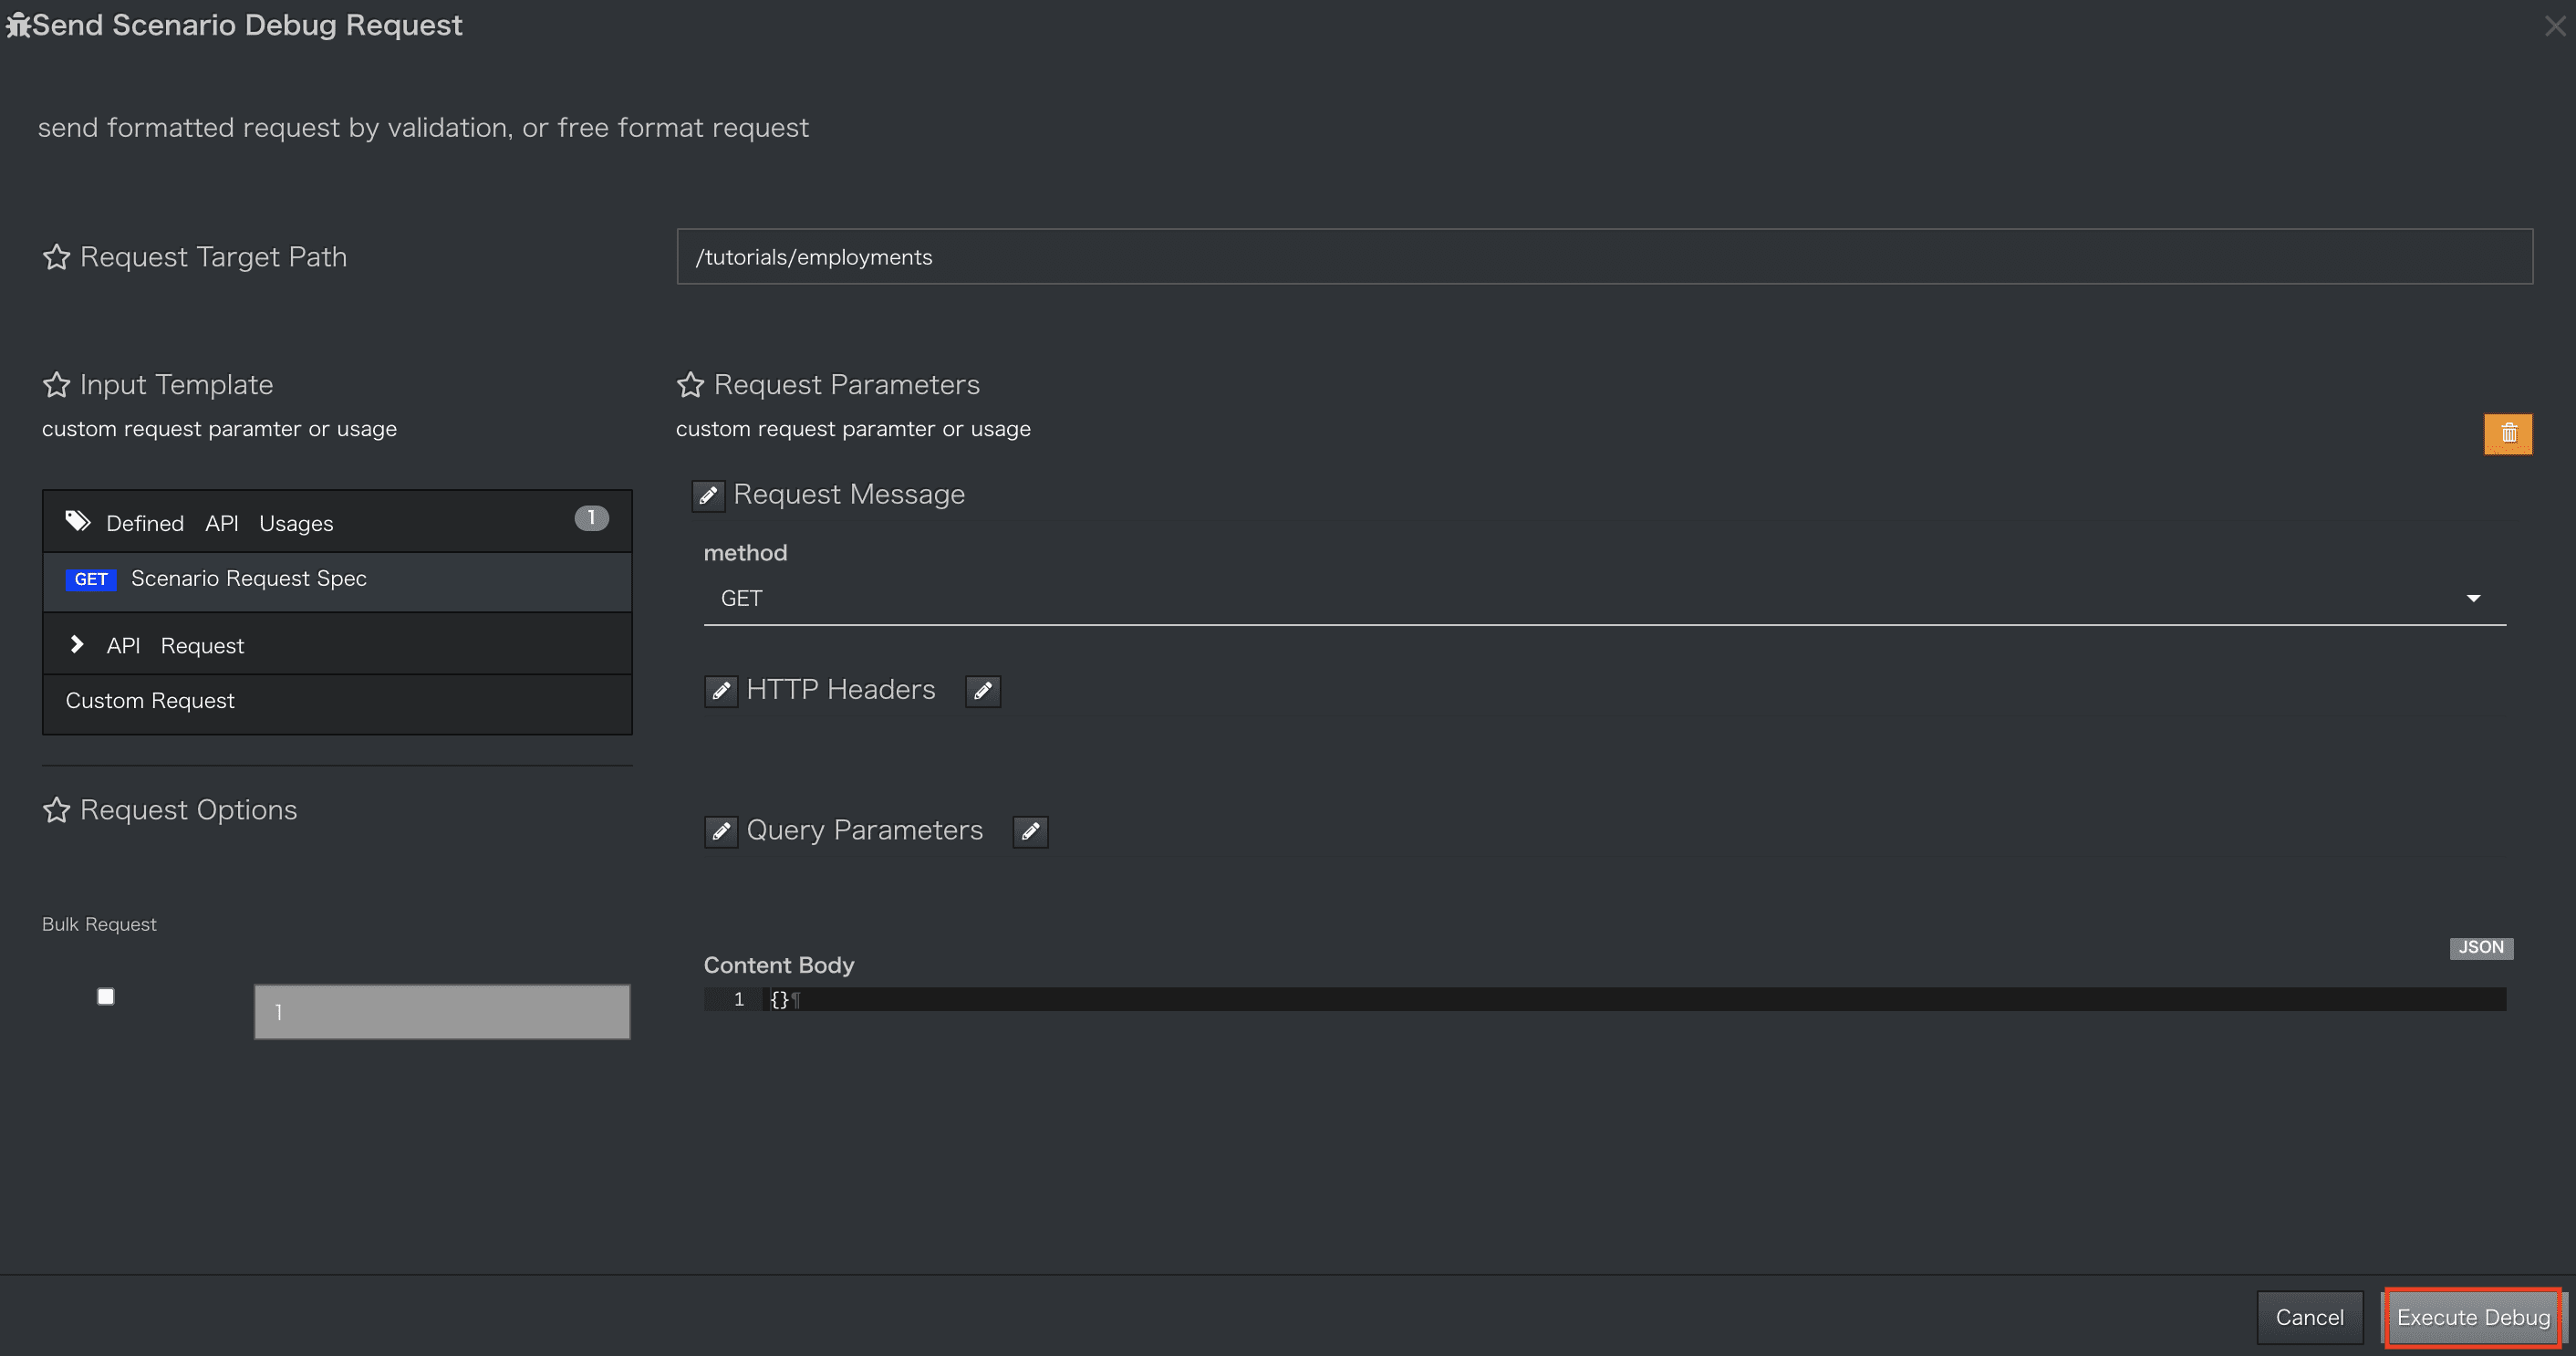
シナリオエディタ画面中央上部にある[Try API Call]メニューを選択します。

-
画面右下の
Execute Debugボタンを押下します。
-
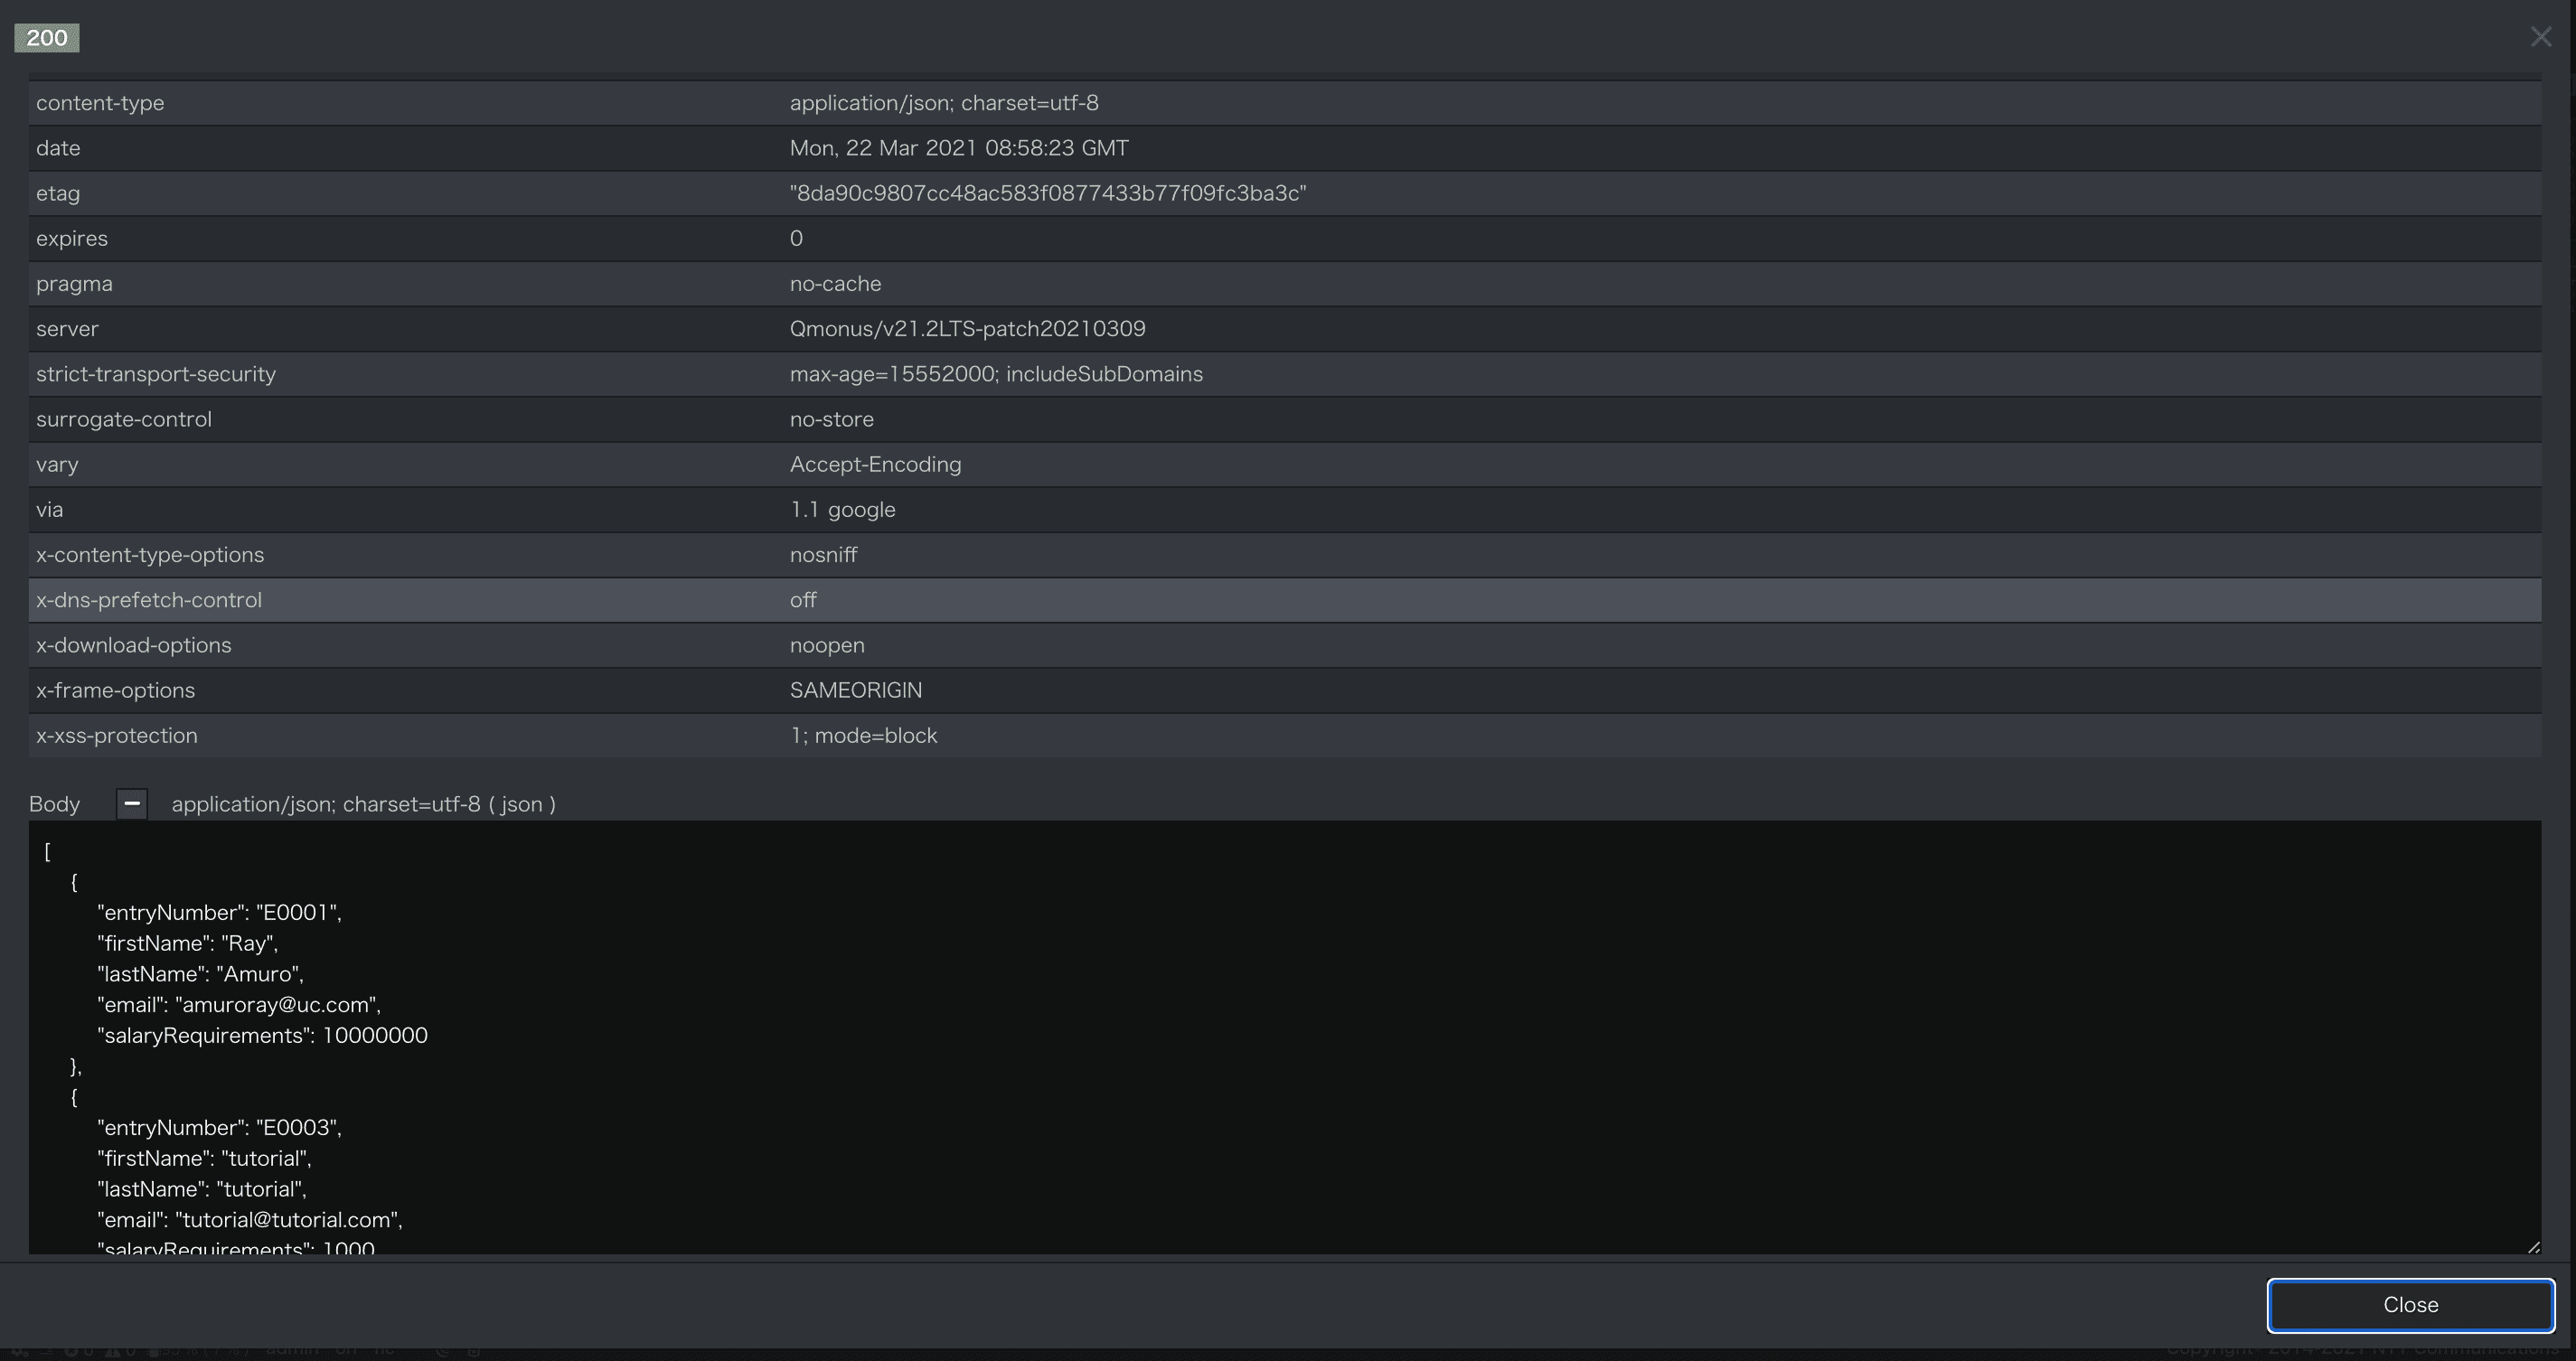
APIが実行され結果が表示されます。登録済みの
Employmentが返却されることを確認できます。
-
次は、Resourcesを指定してAPI(
GET /tutorials/employments/{entryNumber})を実行してみましょう。
API実行結果画面を閉じ、再び[Try API Call]メニューを選択します。 -
/tutorials/employmentsから/tutorials/employments/{entryNumber}に変更します。
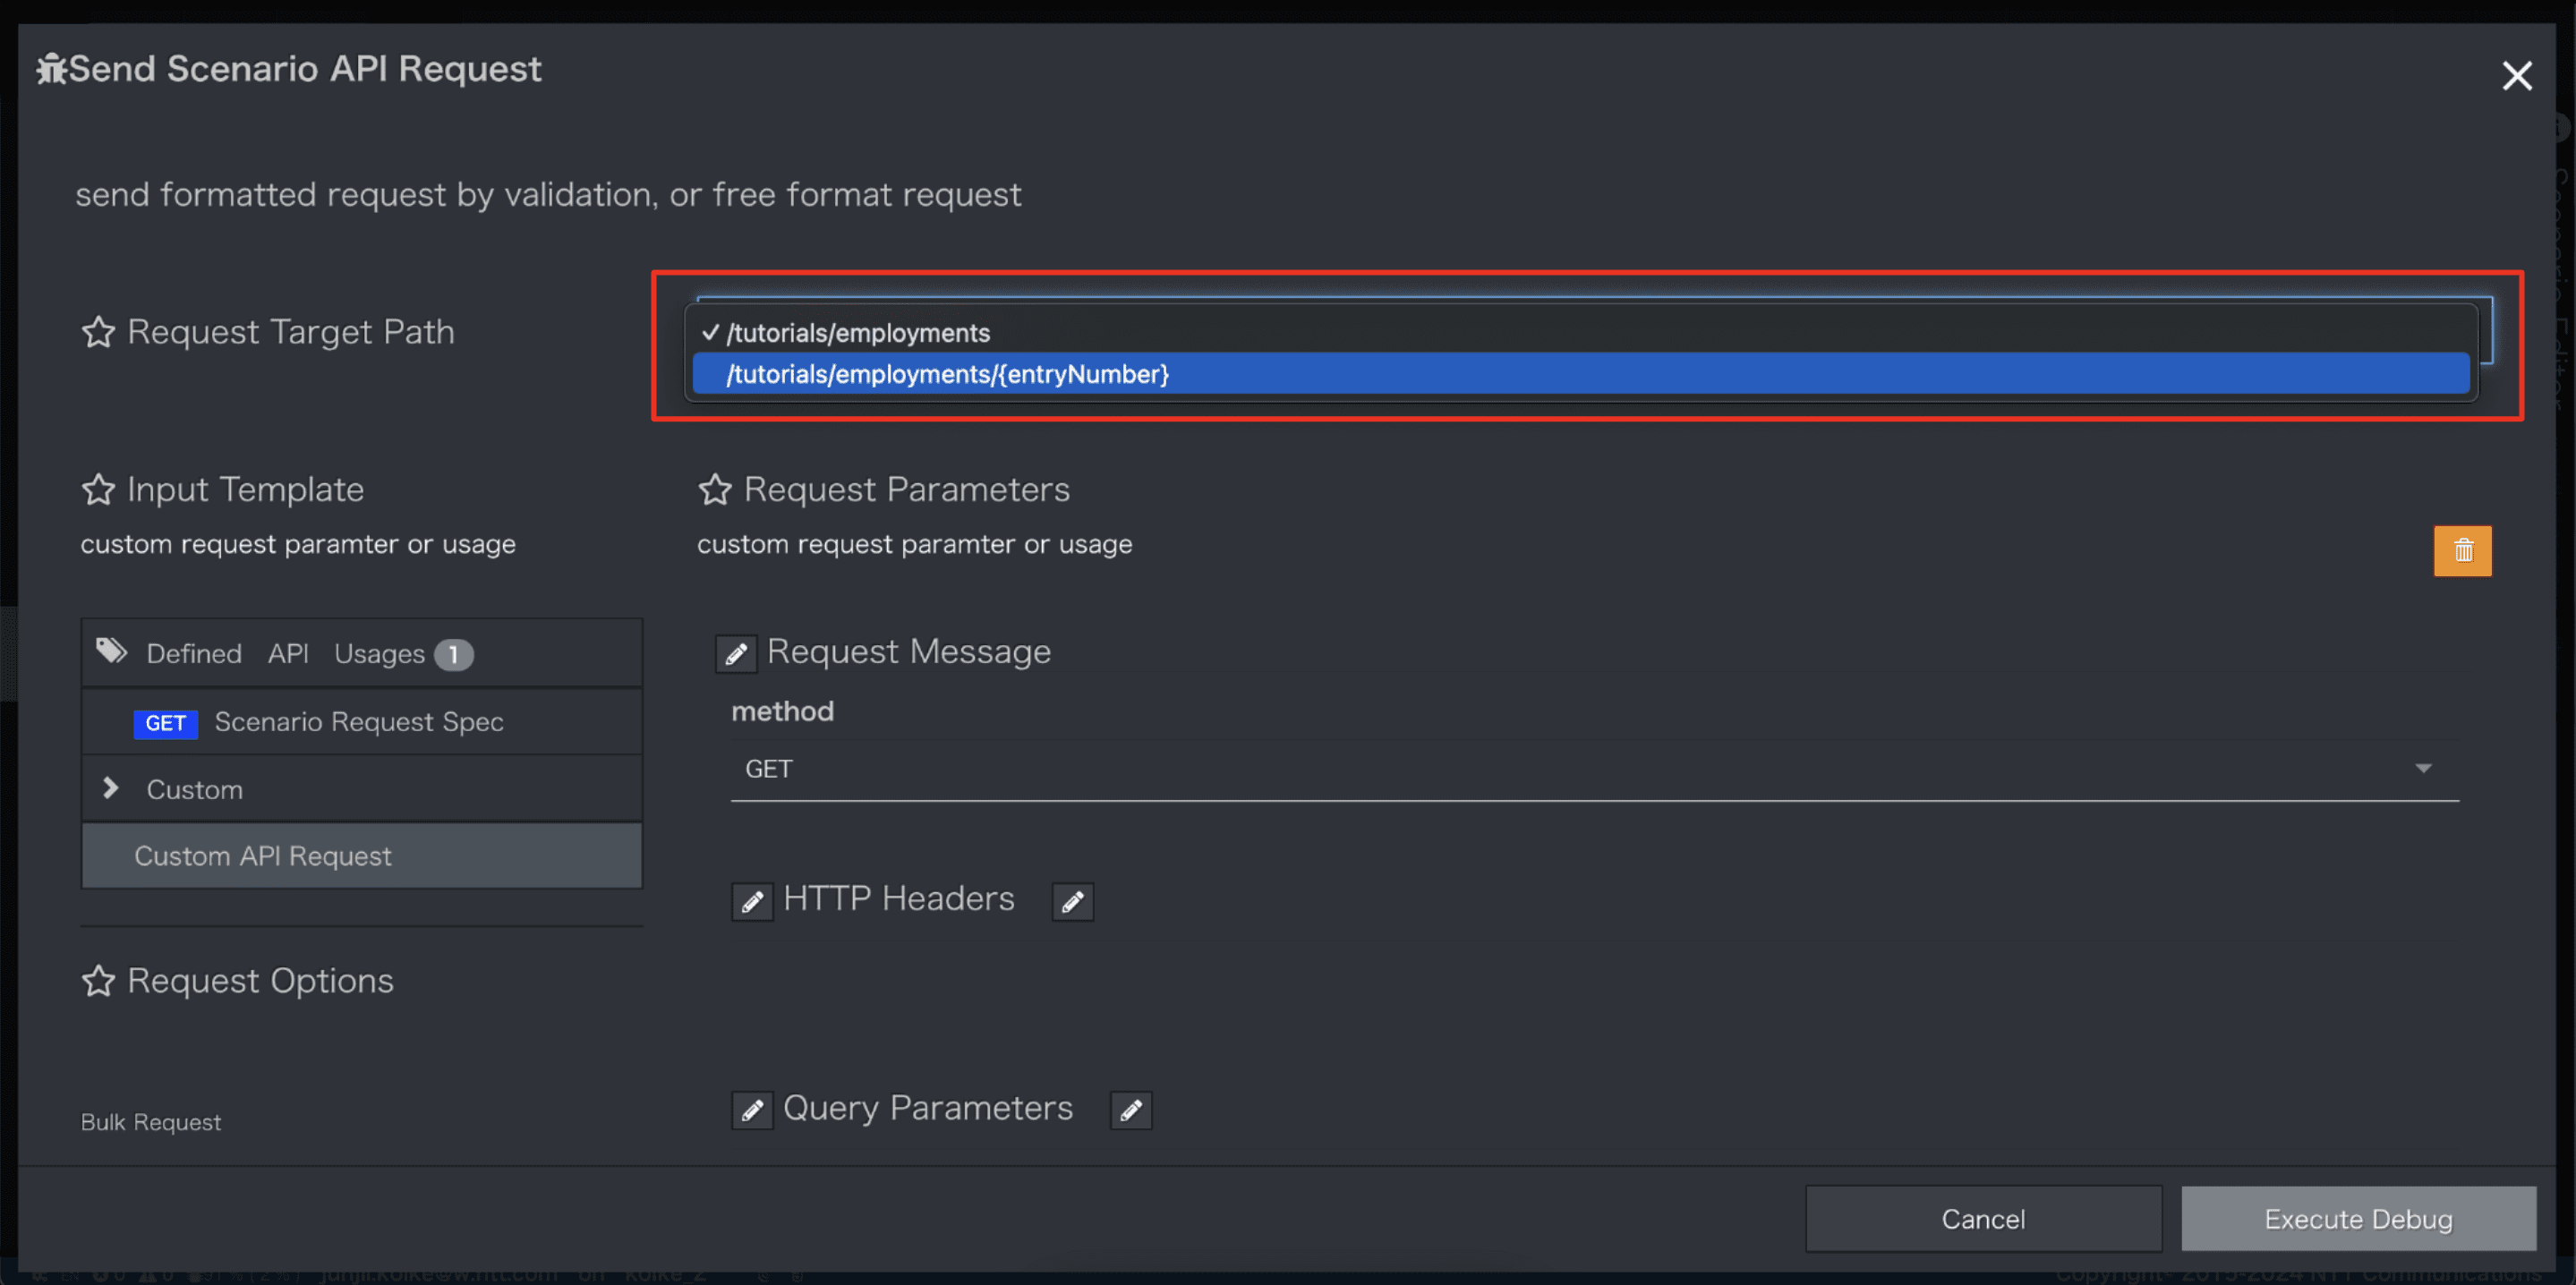
-
画面左部メニュー[GET Scenario Request Spec]を選択し
entryNumberにE0001を指定してExecute Debugボタンを押下します。
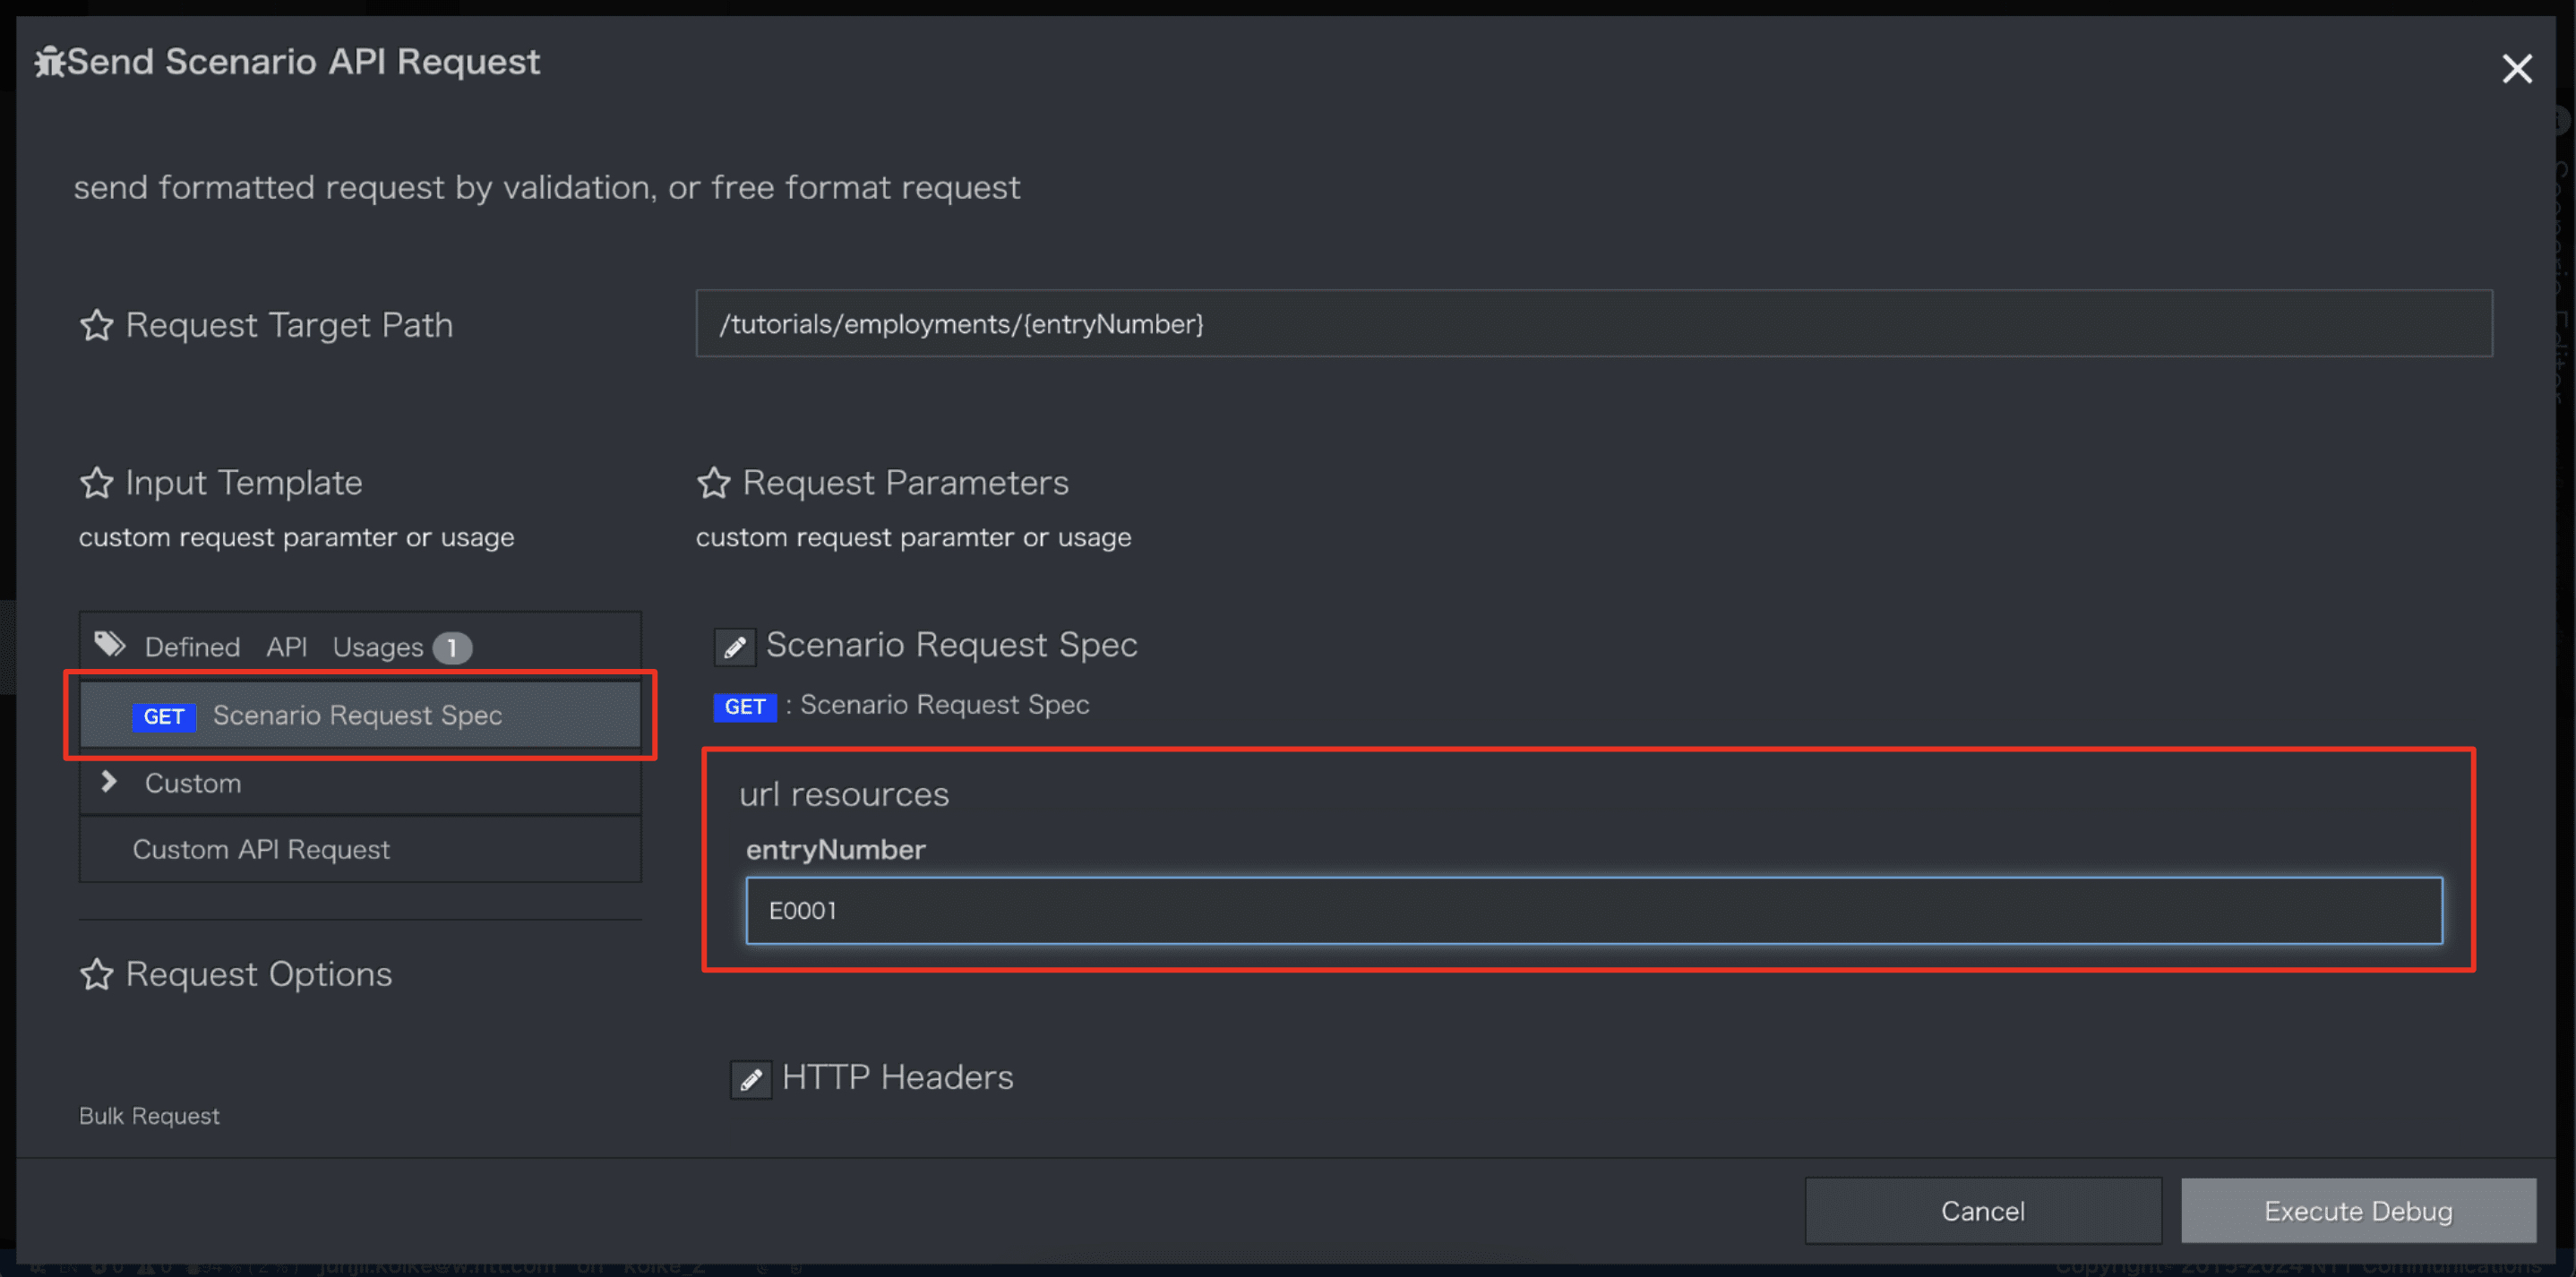
-
entryNumberがE0001のEmploymentデータが1件返却されたことが確認できます。
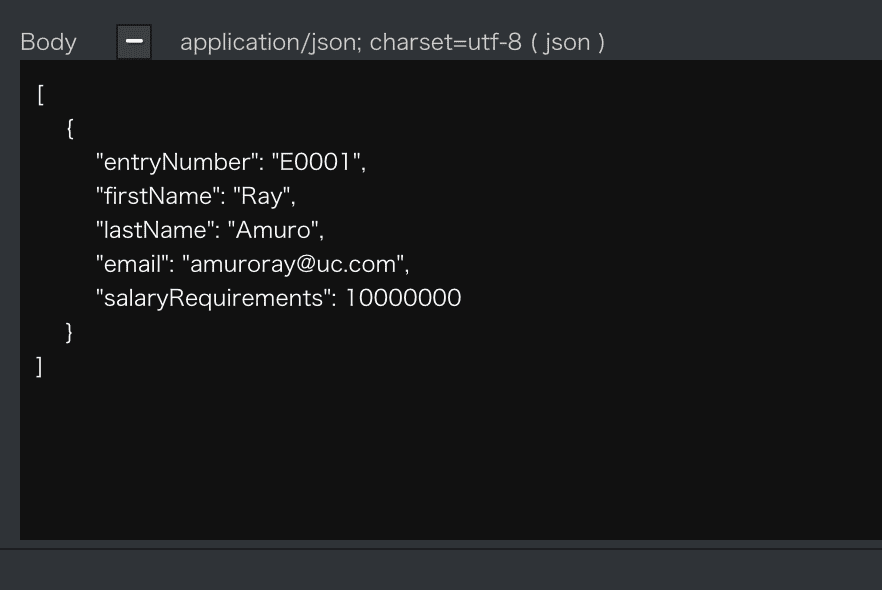
-
今度は
entryNumberに登録されていないデータ(E9999)を指定し実行してみましょう。
以下の画面が表示され[Scenario-Script]で設定しているエラー応答が確認できます。
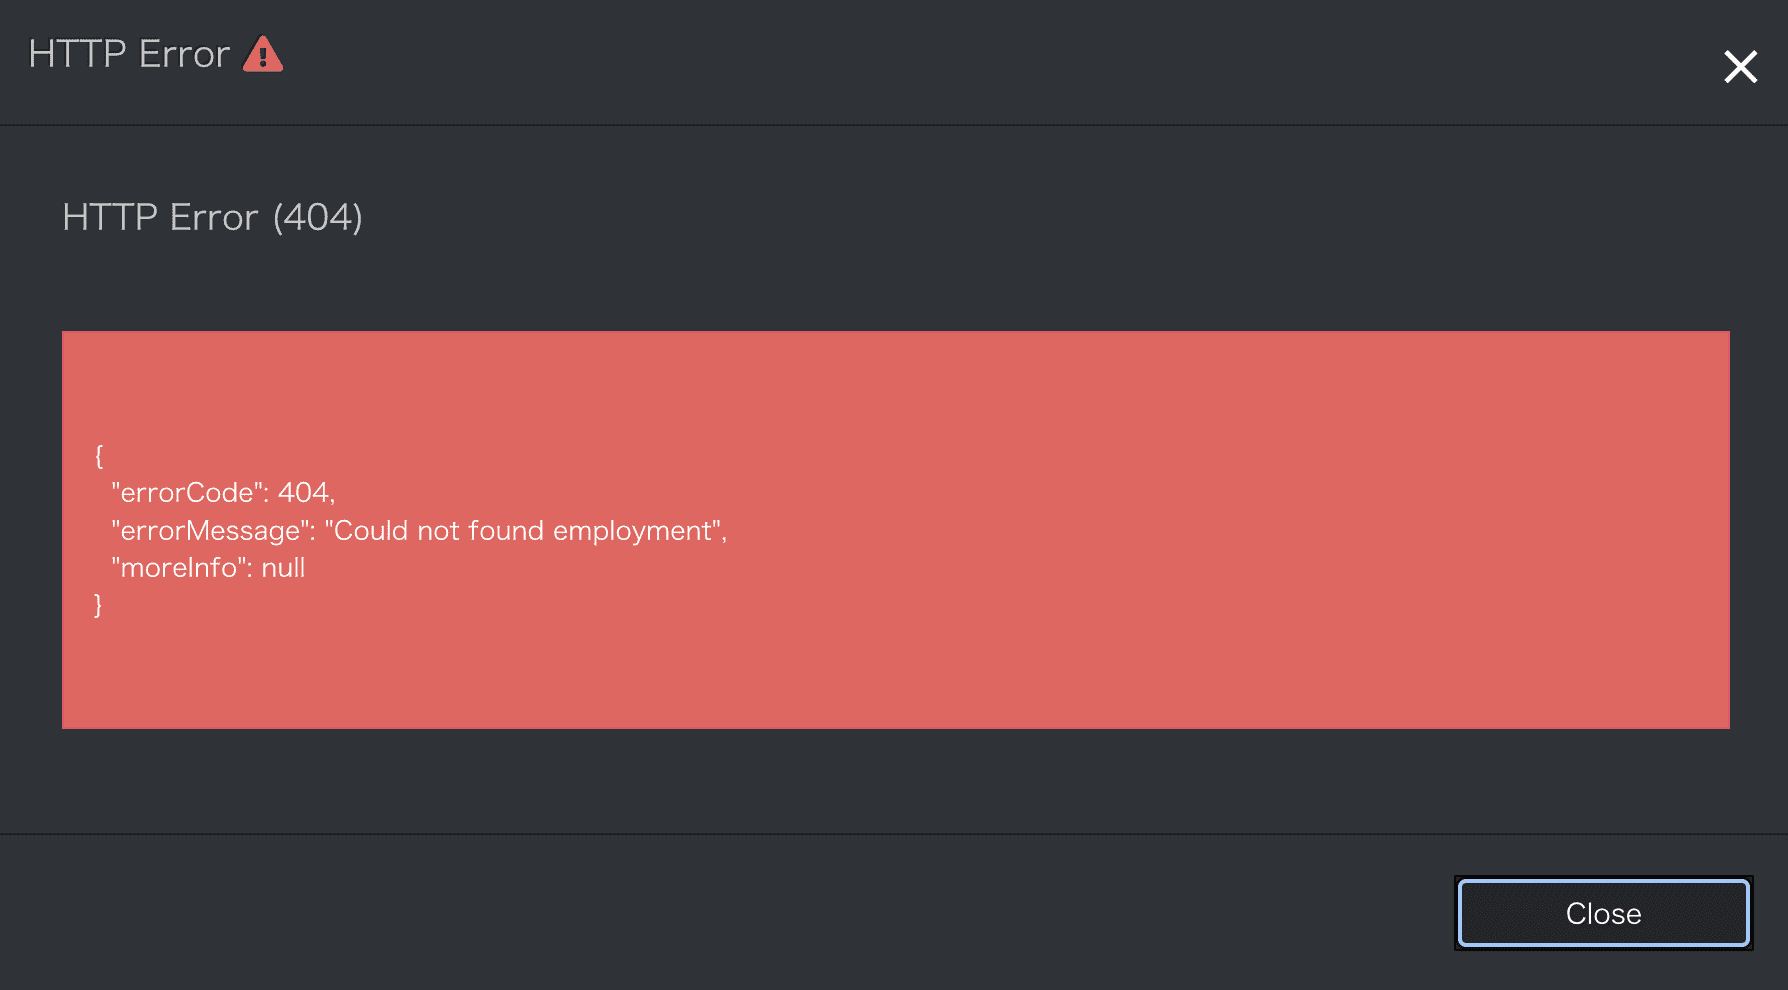
更新シナリオの作成
1. 更新シナリオのImport
- updateEmployment.ymlファイルをダウンロードしてください。
updateEmployment.yml ダウンロード
yaml
category: Tutorial
name: updateEmployment
uri: '/tutorials/employments/{entryNumber}'
method: PUT
routing_auto_generation_mode: true
request_timeout: 60
connect_timeout: 60
spec:
  response:
    normal:
      codes:
        - 200
  request:
    headers:
      type: object
      properties:
        Content-Type:
          type: string
          default: application/json
      required:
        - Content-Type
    body:
      type: object
      properties:
        firstName:
          type: string
          pattern: '[a-zA-Z]'
        lastName:
          type: string
          pattern: '[a-zA-Z]'
        email:
          type: string
          format: email
        salaryRequirements:
          type: integer
          minimum: 0
          maximum: 99999999
    resources:
      type: object
      properties:
        entryNumber:
          type: string
      required:
        - entryNumber
commands:
  - command: script
    kwargs:
      code: |-
        async with model.aiodb() as conn:
            if not context.request.resources.entryNumber:
                raise Error(400, reason="entryNumber is not specified")

            cursor = await conn.execute(model.Employment.select().where(model.Employment.c.entryNumber==context.request.resources.entryNumber))
            if cursor.rowcount == 0:
                raise Error(404, reason="Could not found employment")

            row = await cursor.fetchone()
            employment = rowtodict(row)
            employment.update(context.request.body.dictionary)
            await conn.execute(model.Employment.update().where(model.Employment.c.entryNumber==context.request.resources.entryNumber).values(**employment))
            context.session.finish({"entryNumber": context.request.resources.entryNumber})
2. Endpoint設定
[Endpoint]
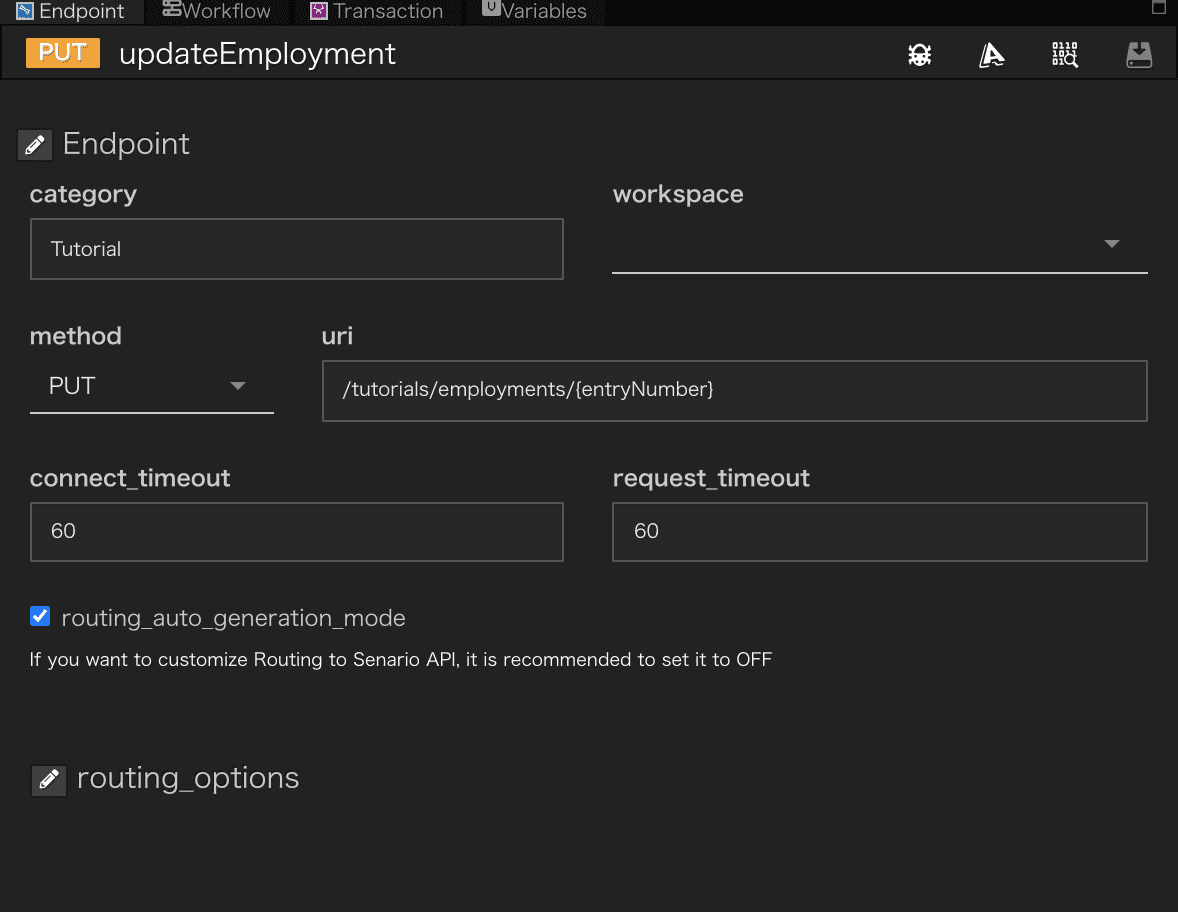
- 更新シナリオの
methodにはPUTを指定しています uriは/tutorials/employments/{entryNumber}です。指定されたentryNumberのデータ更新を行います。
[Endpoint-API Spec]
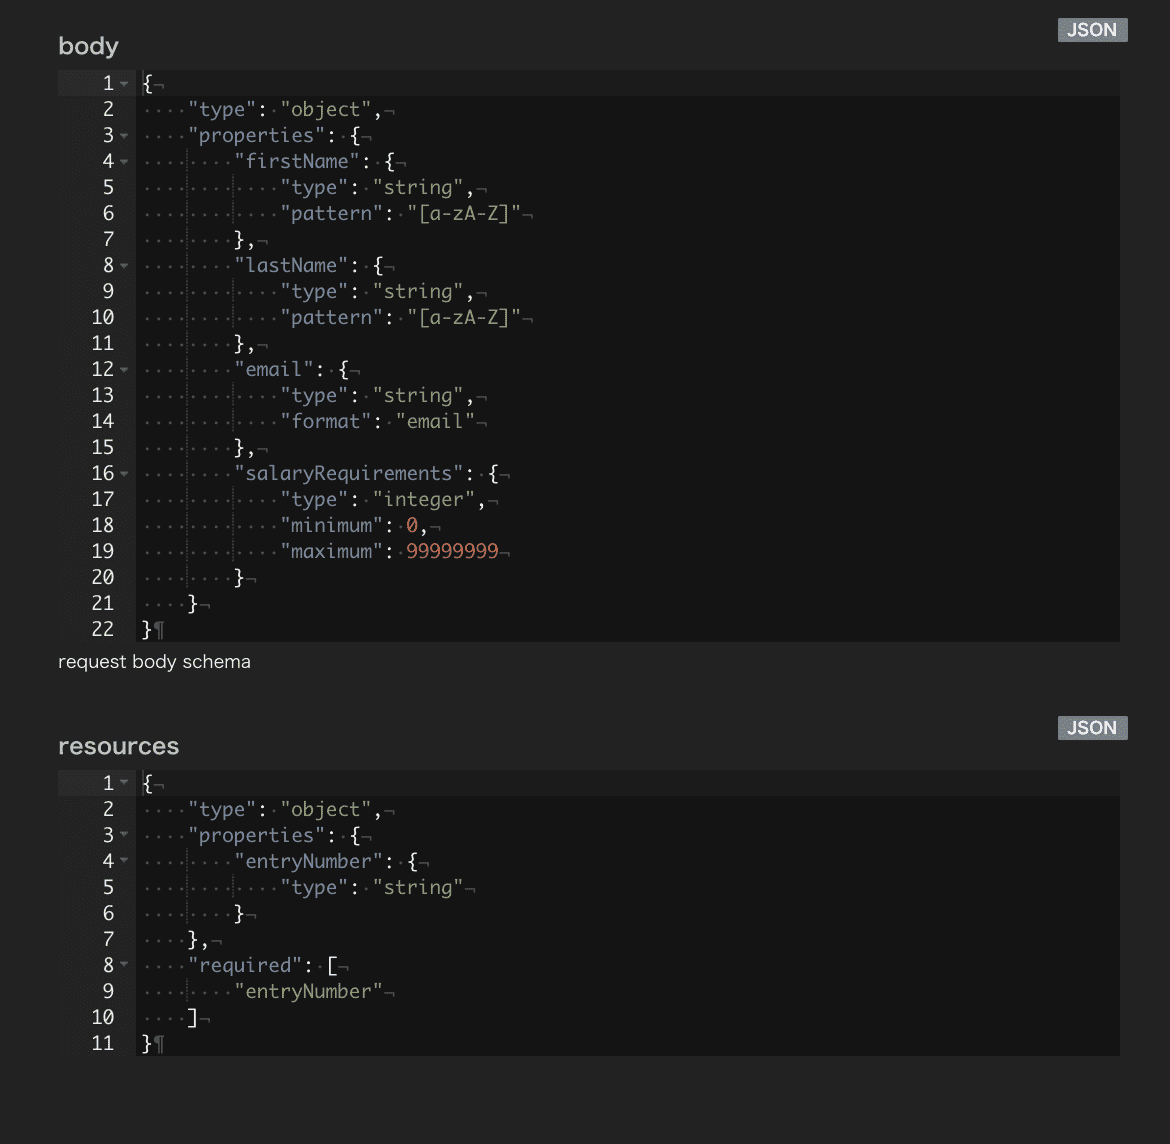
bodyには更新可能な項目が定義されています。
3. ワークフロー設定
[Workflow]
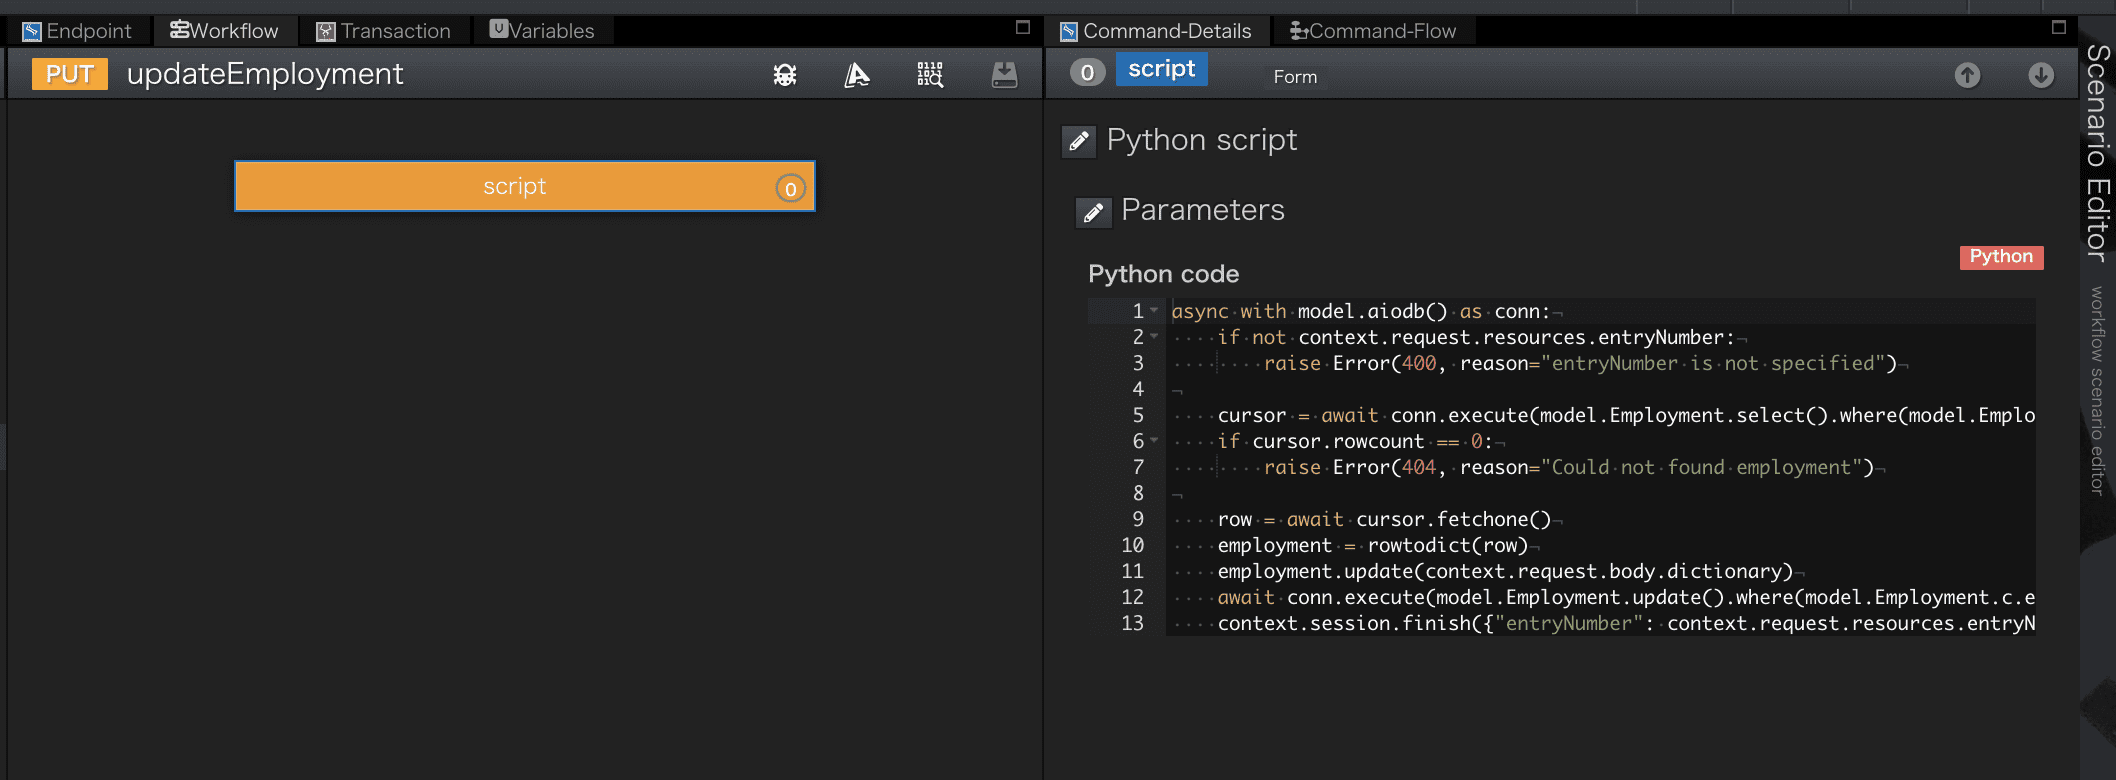
[Workflow-Script]
Scriptに設定されているPython Codeです。
python
async with model.aiodb() as conn:
    if not context.request.resources.entryNumber:
        raise Error(400, reason="entryNumber is not specified")

    cursor = await conn.execute(model.Employment.select().where(model.Employment.c.entryNumber==context.request.resources.entryNumber))
    if cursor.rowcount == 0:
        raise Error(404, reason="Could not found employment")

    row = await cursor.fetchone()
    employment = rowtodict(row)
    employment.update(context.request.body.dictionary)
    await conn.execute(model.Employment.update().where(model.Employment.c.entryNumber==context.request.resources.entryNumber).values(**employment))
    context.session.finish({"entryNumber": context.request.resources.entryNumber})
使用している組み込みオブジェクトの詳細
上記で使用したQmonusの組み込みオブジェクトについて、詳細を知りたい方は以下をご覧ください。
- model
- context.request (後述のcontext.sessionの章をご参照ください。)
- Error
- context.session
- rowtodict
| 行数 | 説明 |
|---|---|
| 5-11 | リクエストされた入力値でデータベースの更新を行います |
4. APIの呼び出し
シナリオエディタ画面中央上部にある[Try API Call]メニューを選択します。

-
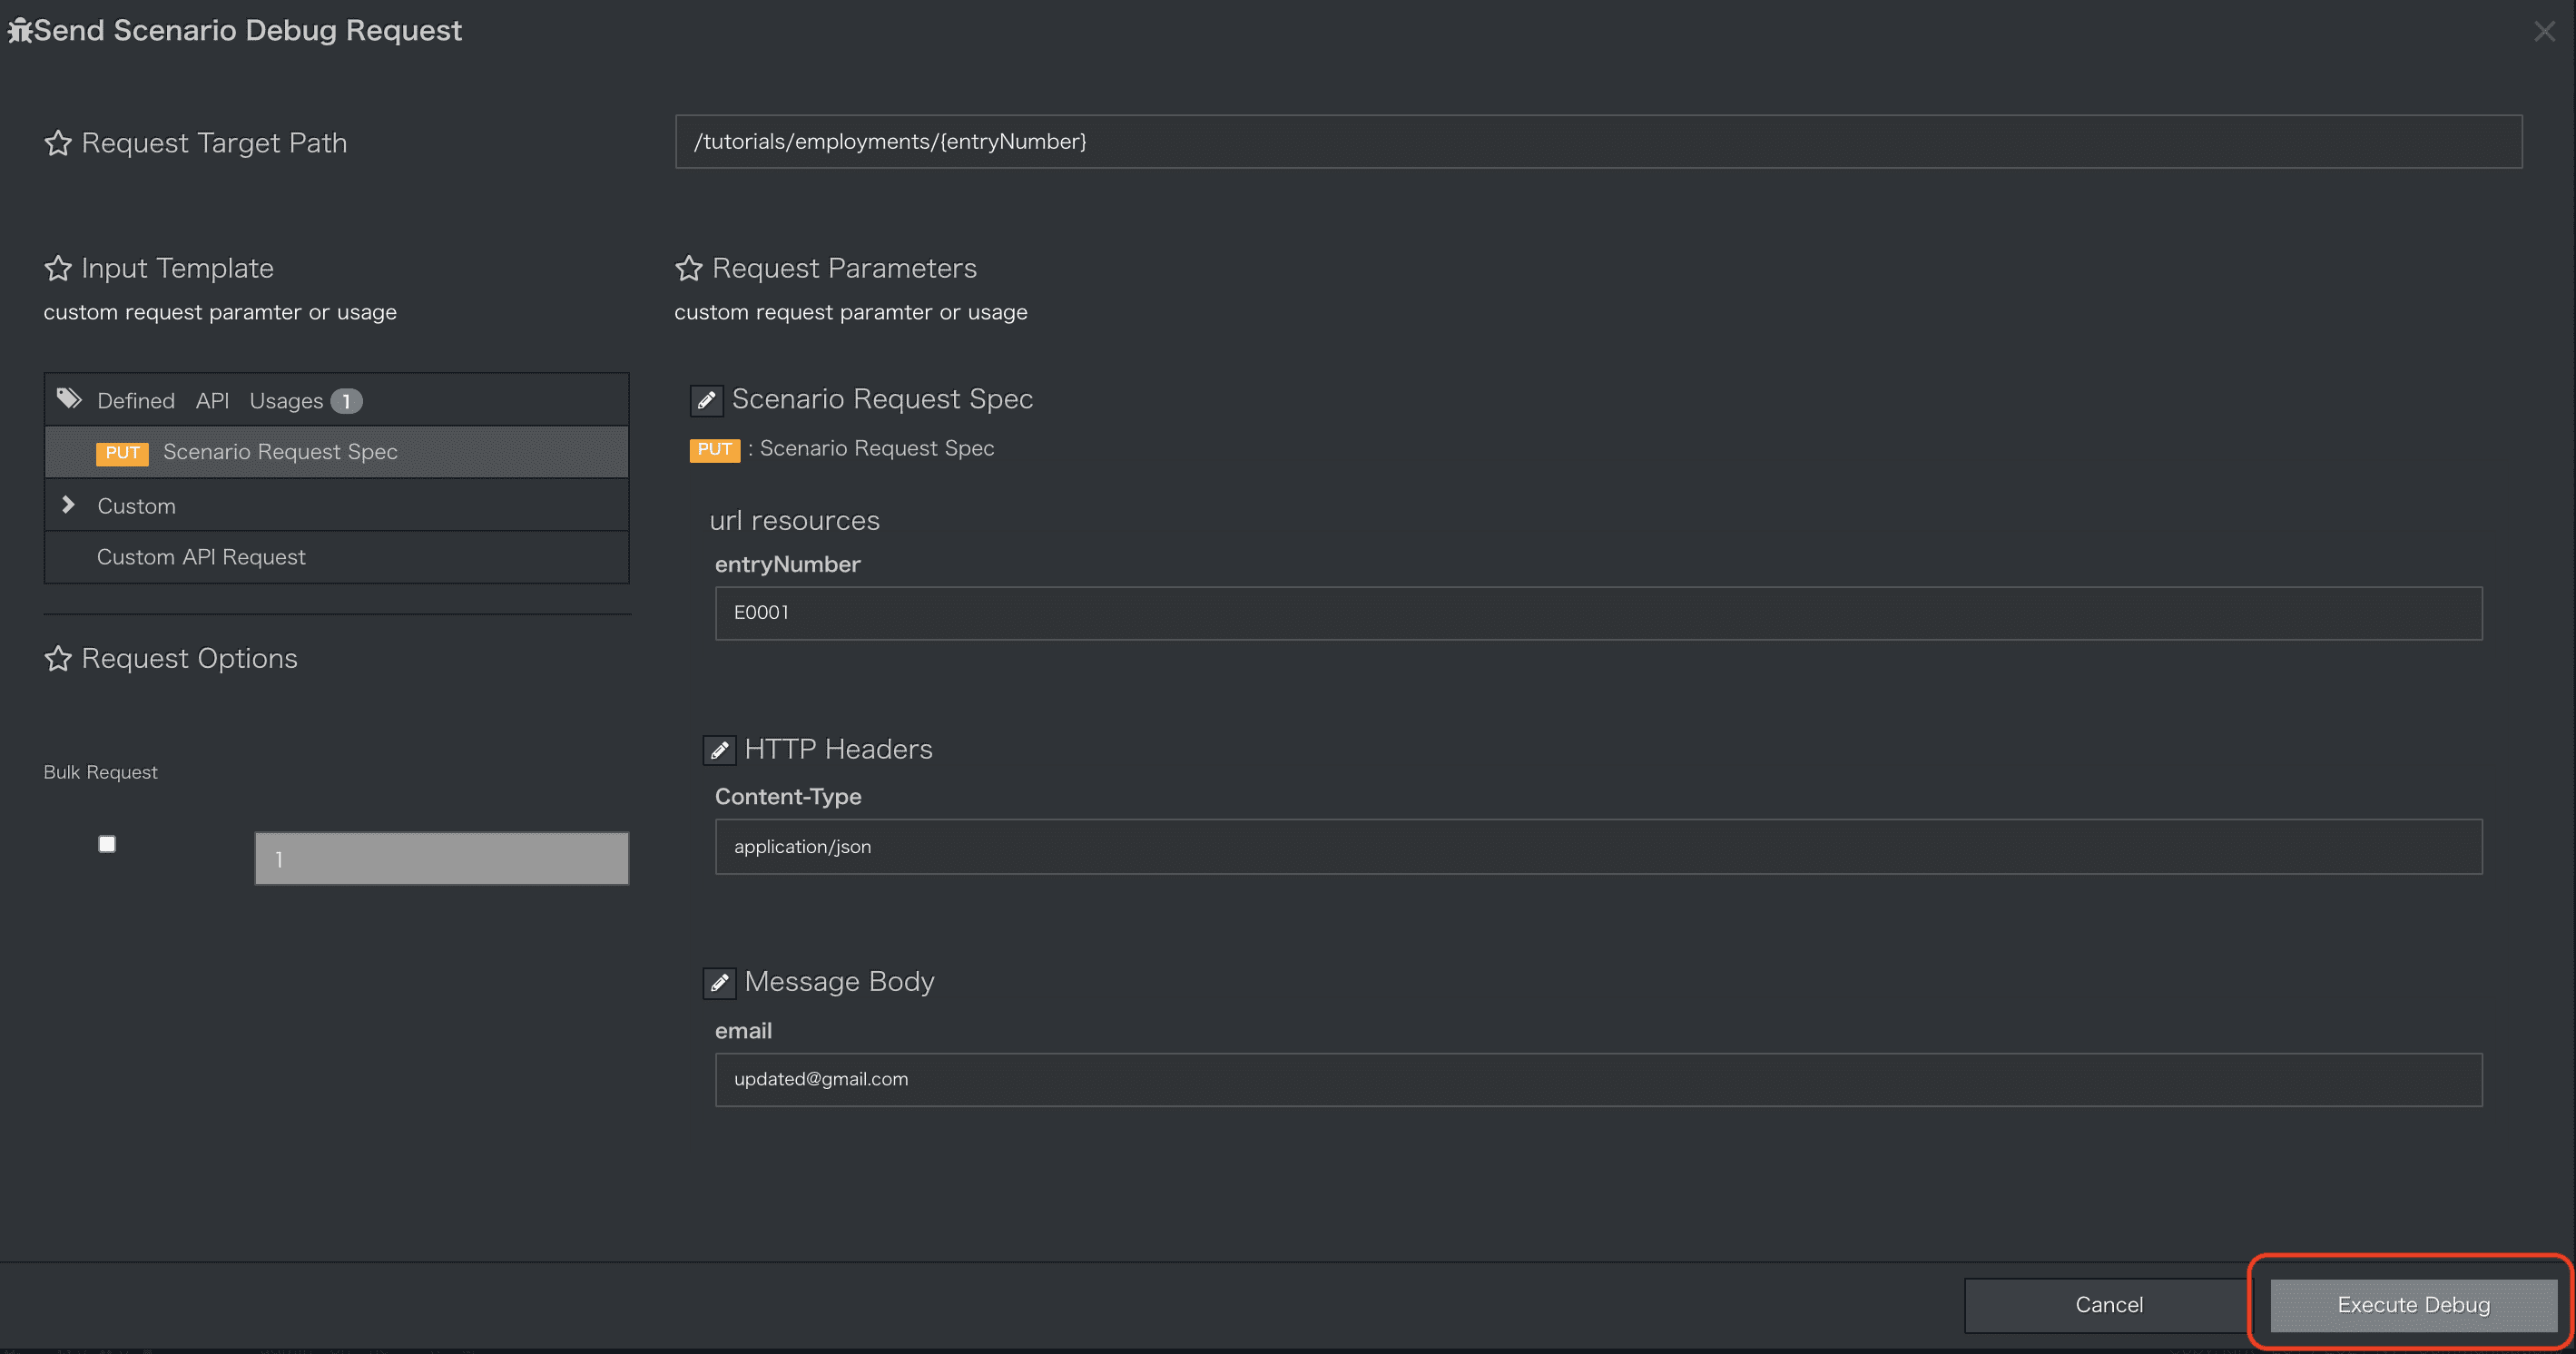
画面左部メニュー[PUT Scenario Request Spec]を選択します。
entryNumber項目に更新対象のentryNumber(E0001)とMessage Bodyには更新するデータを設定します。
ここではemailの更新(updated@gmail.com)を行います。
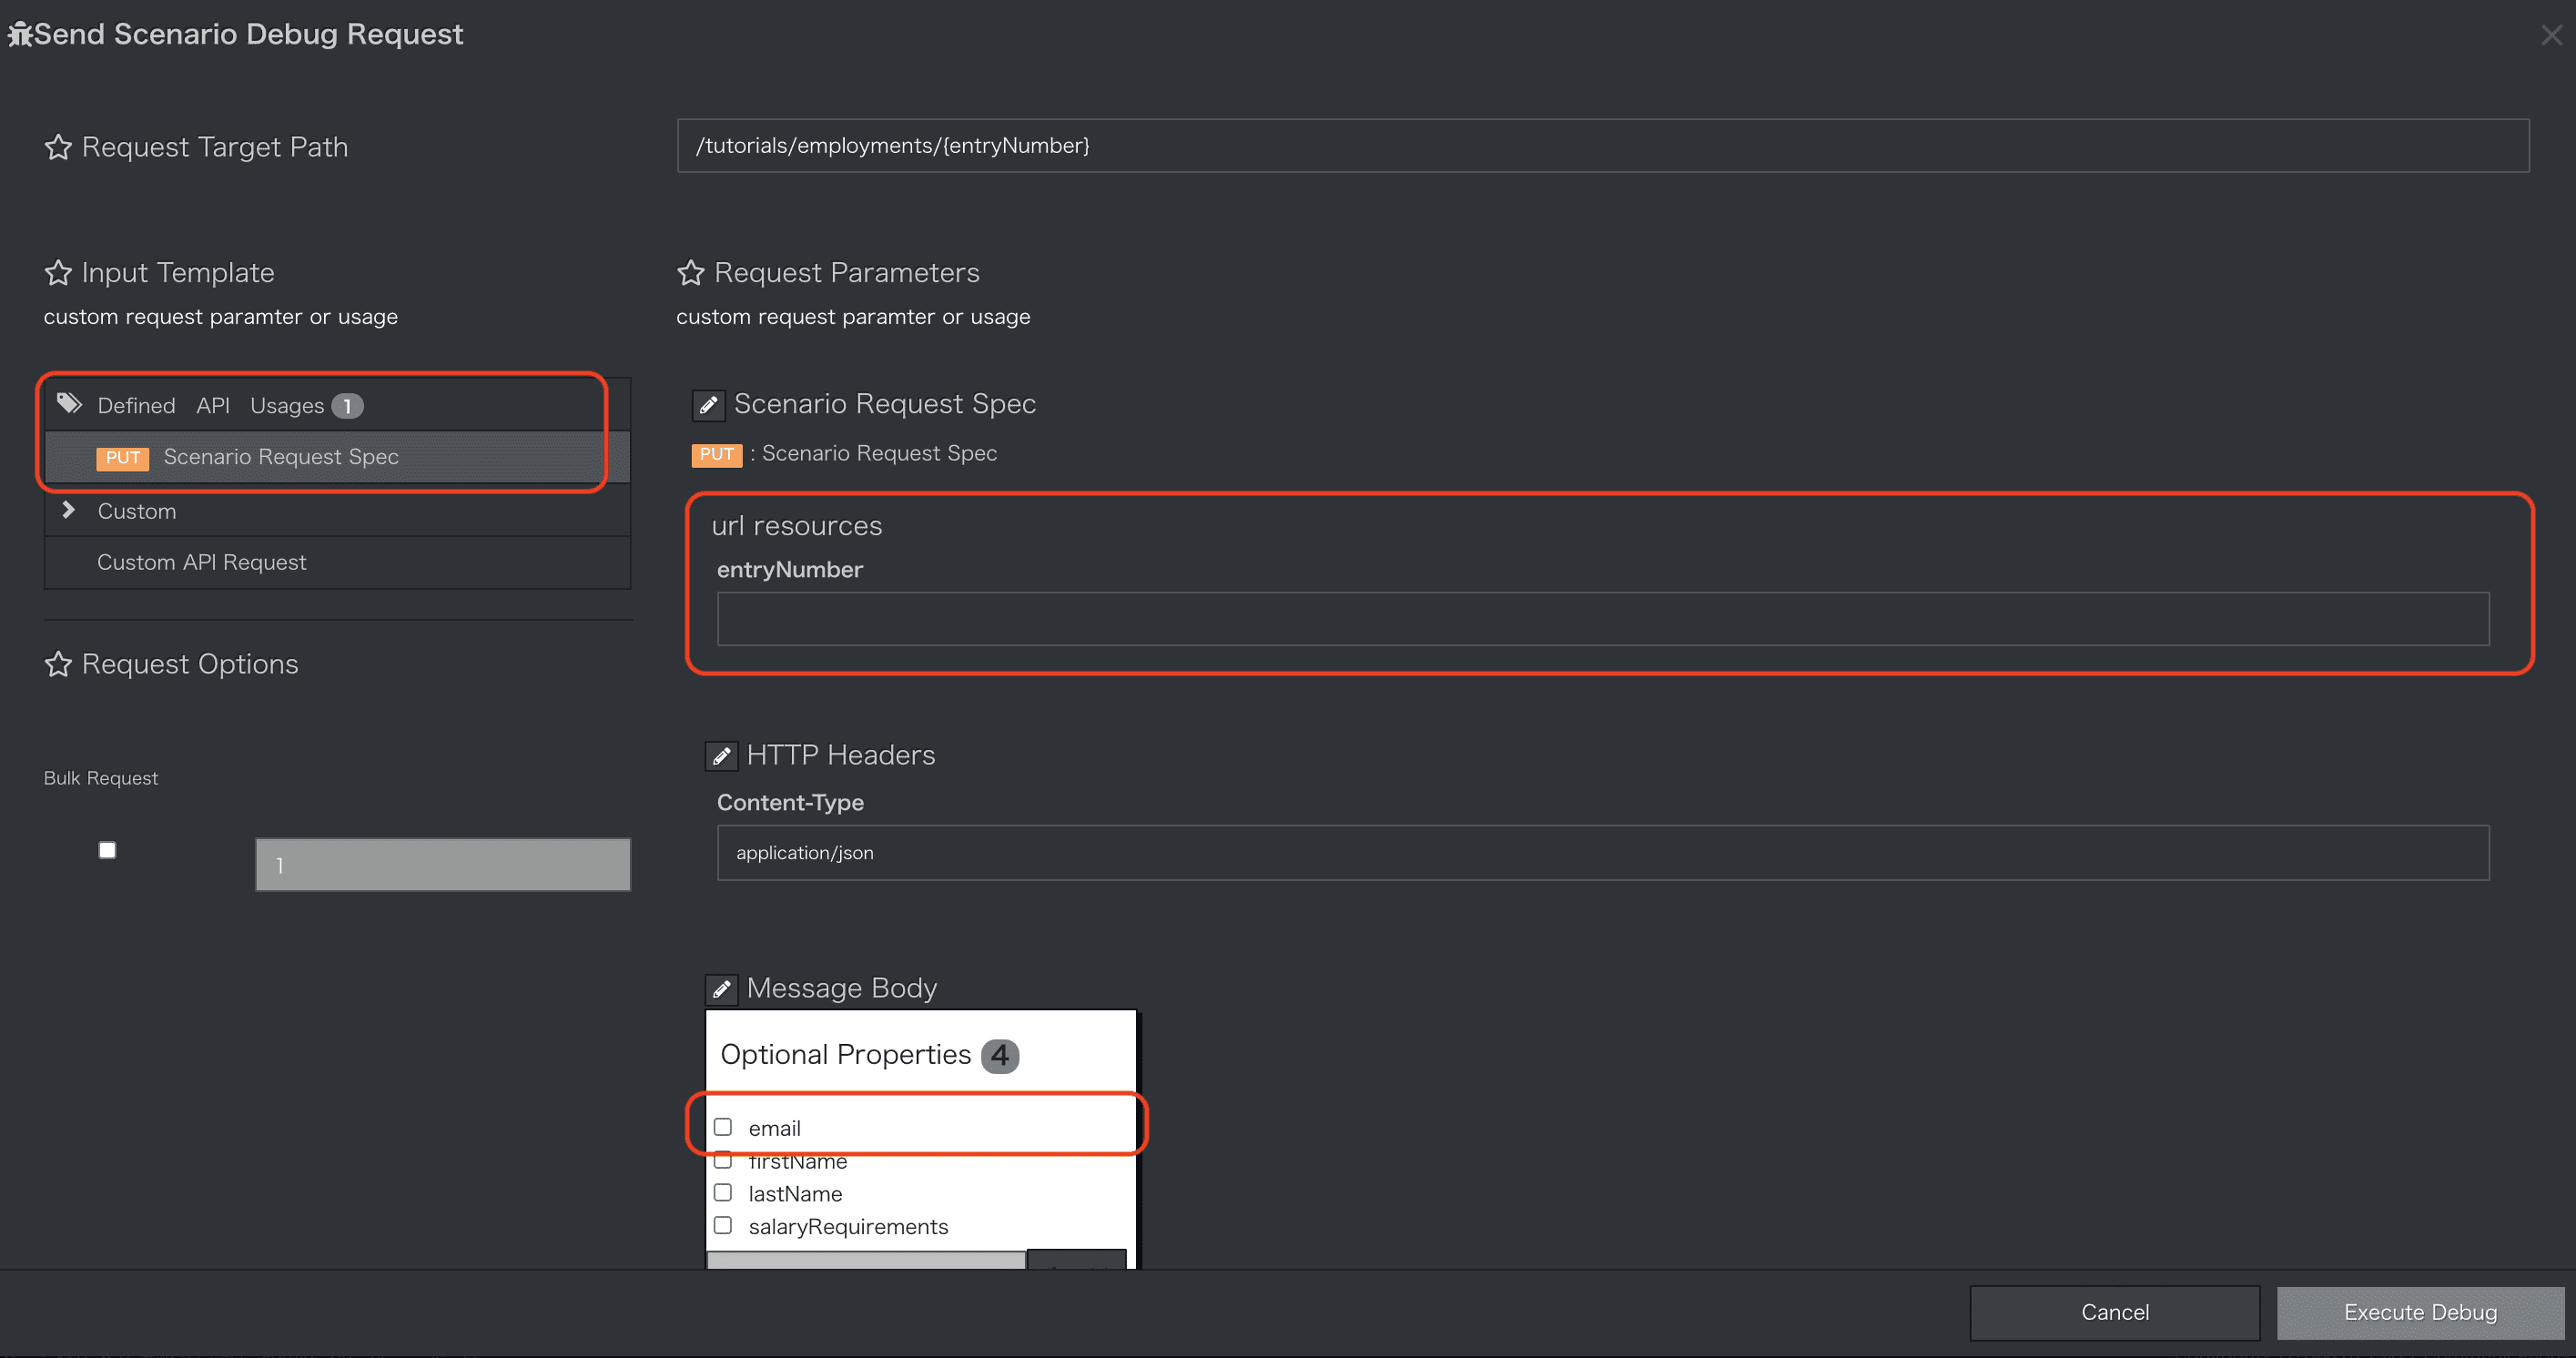
-
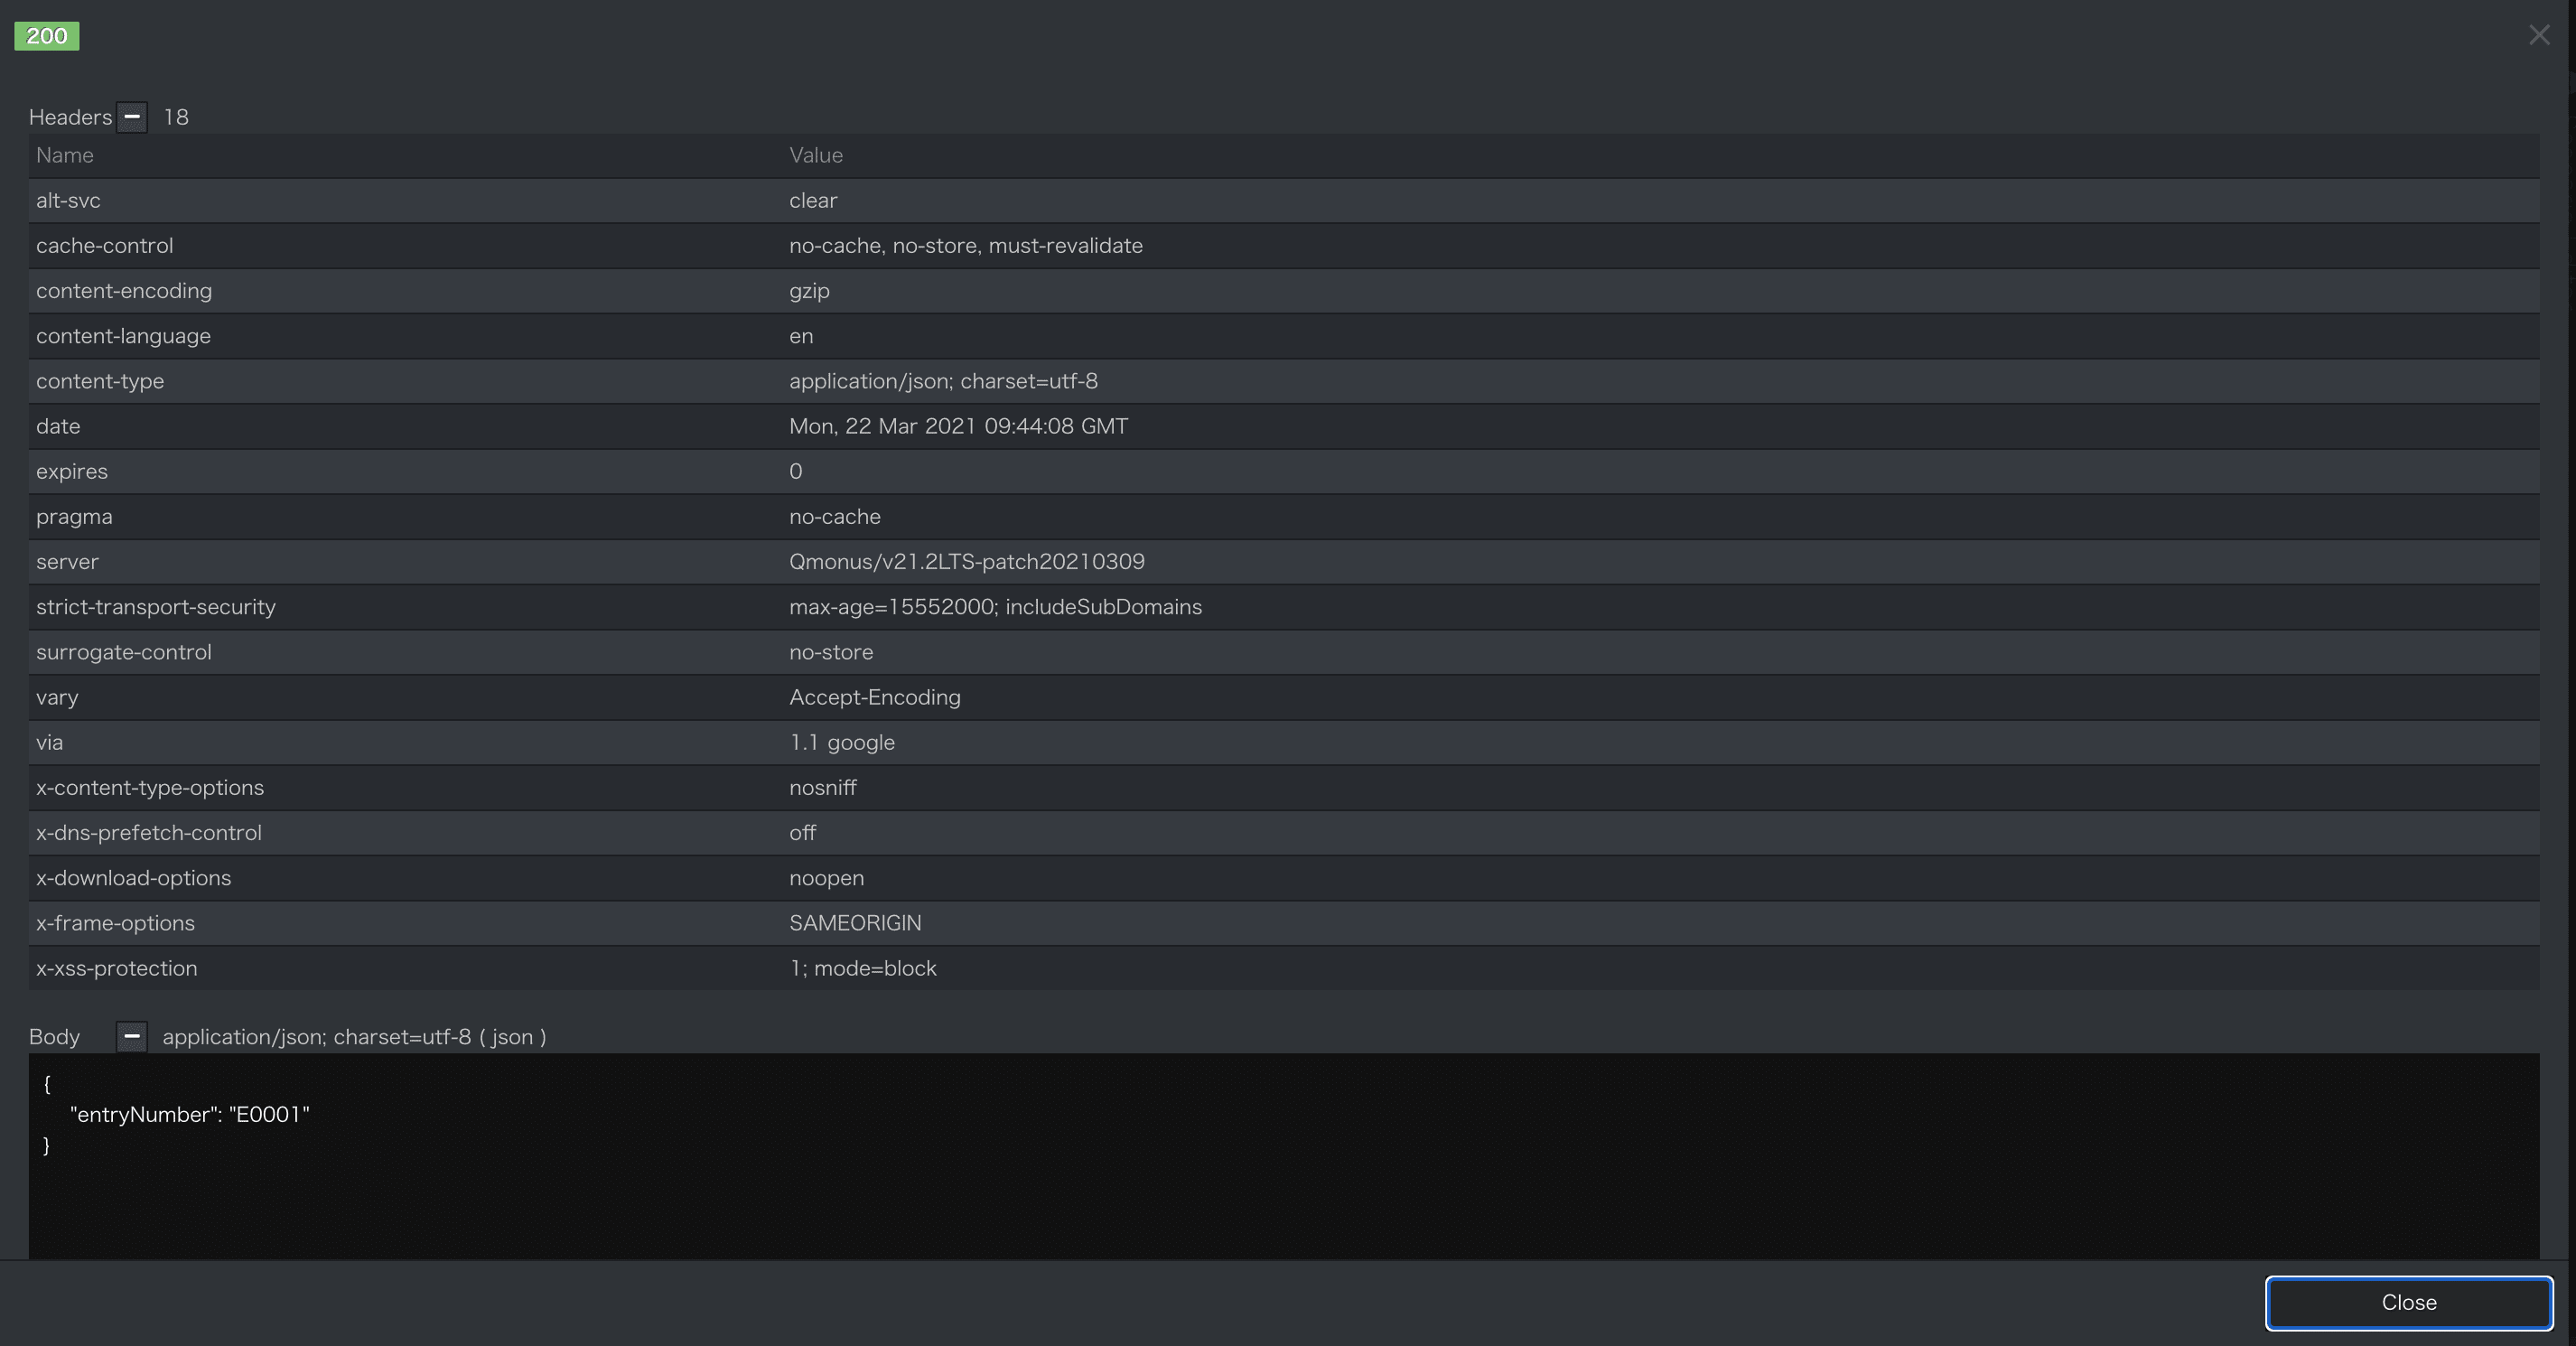
Execute Debugボタンを押下します。APIが実行され結果が表示されます。
-
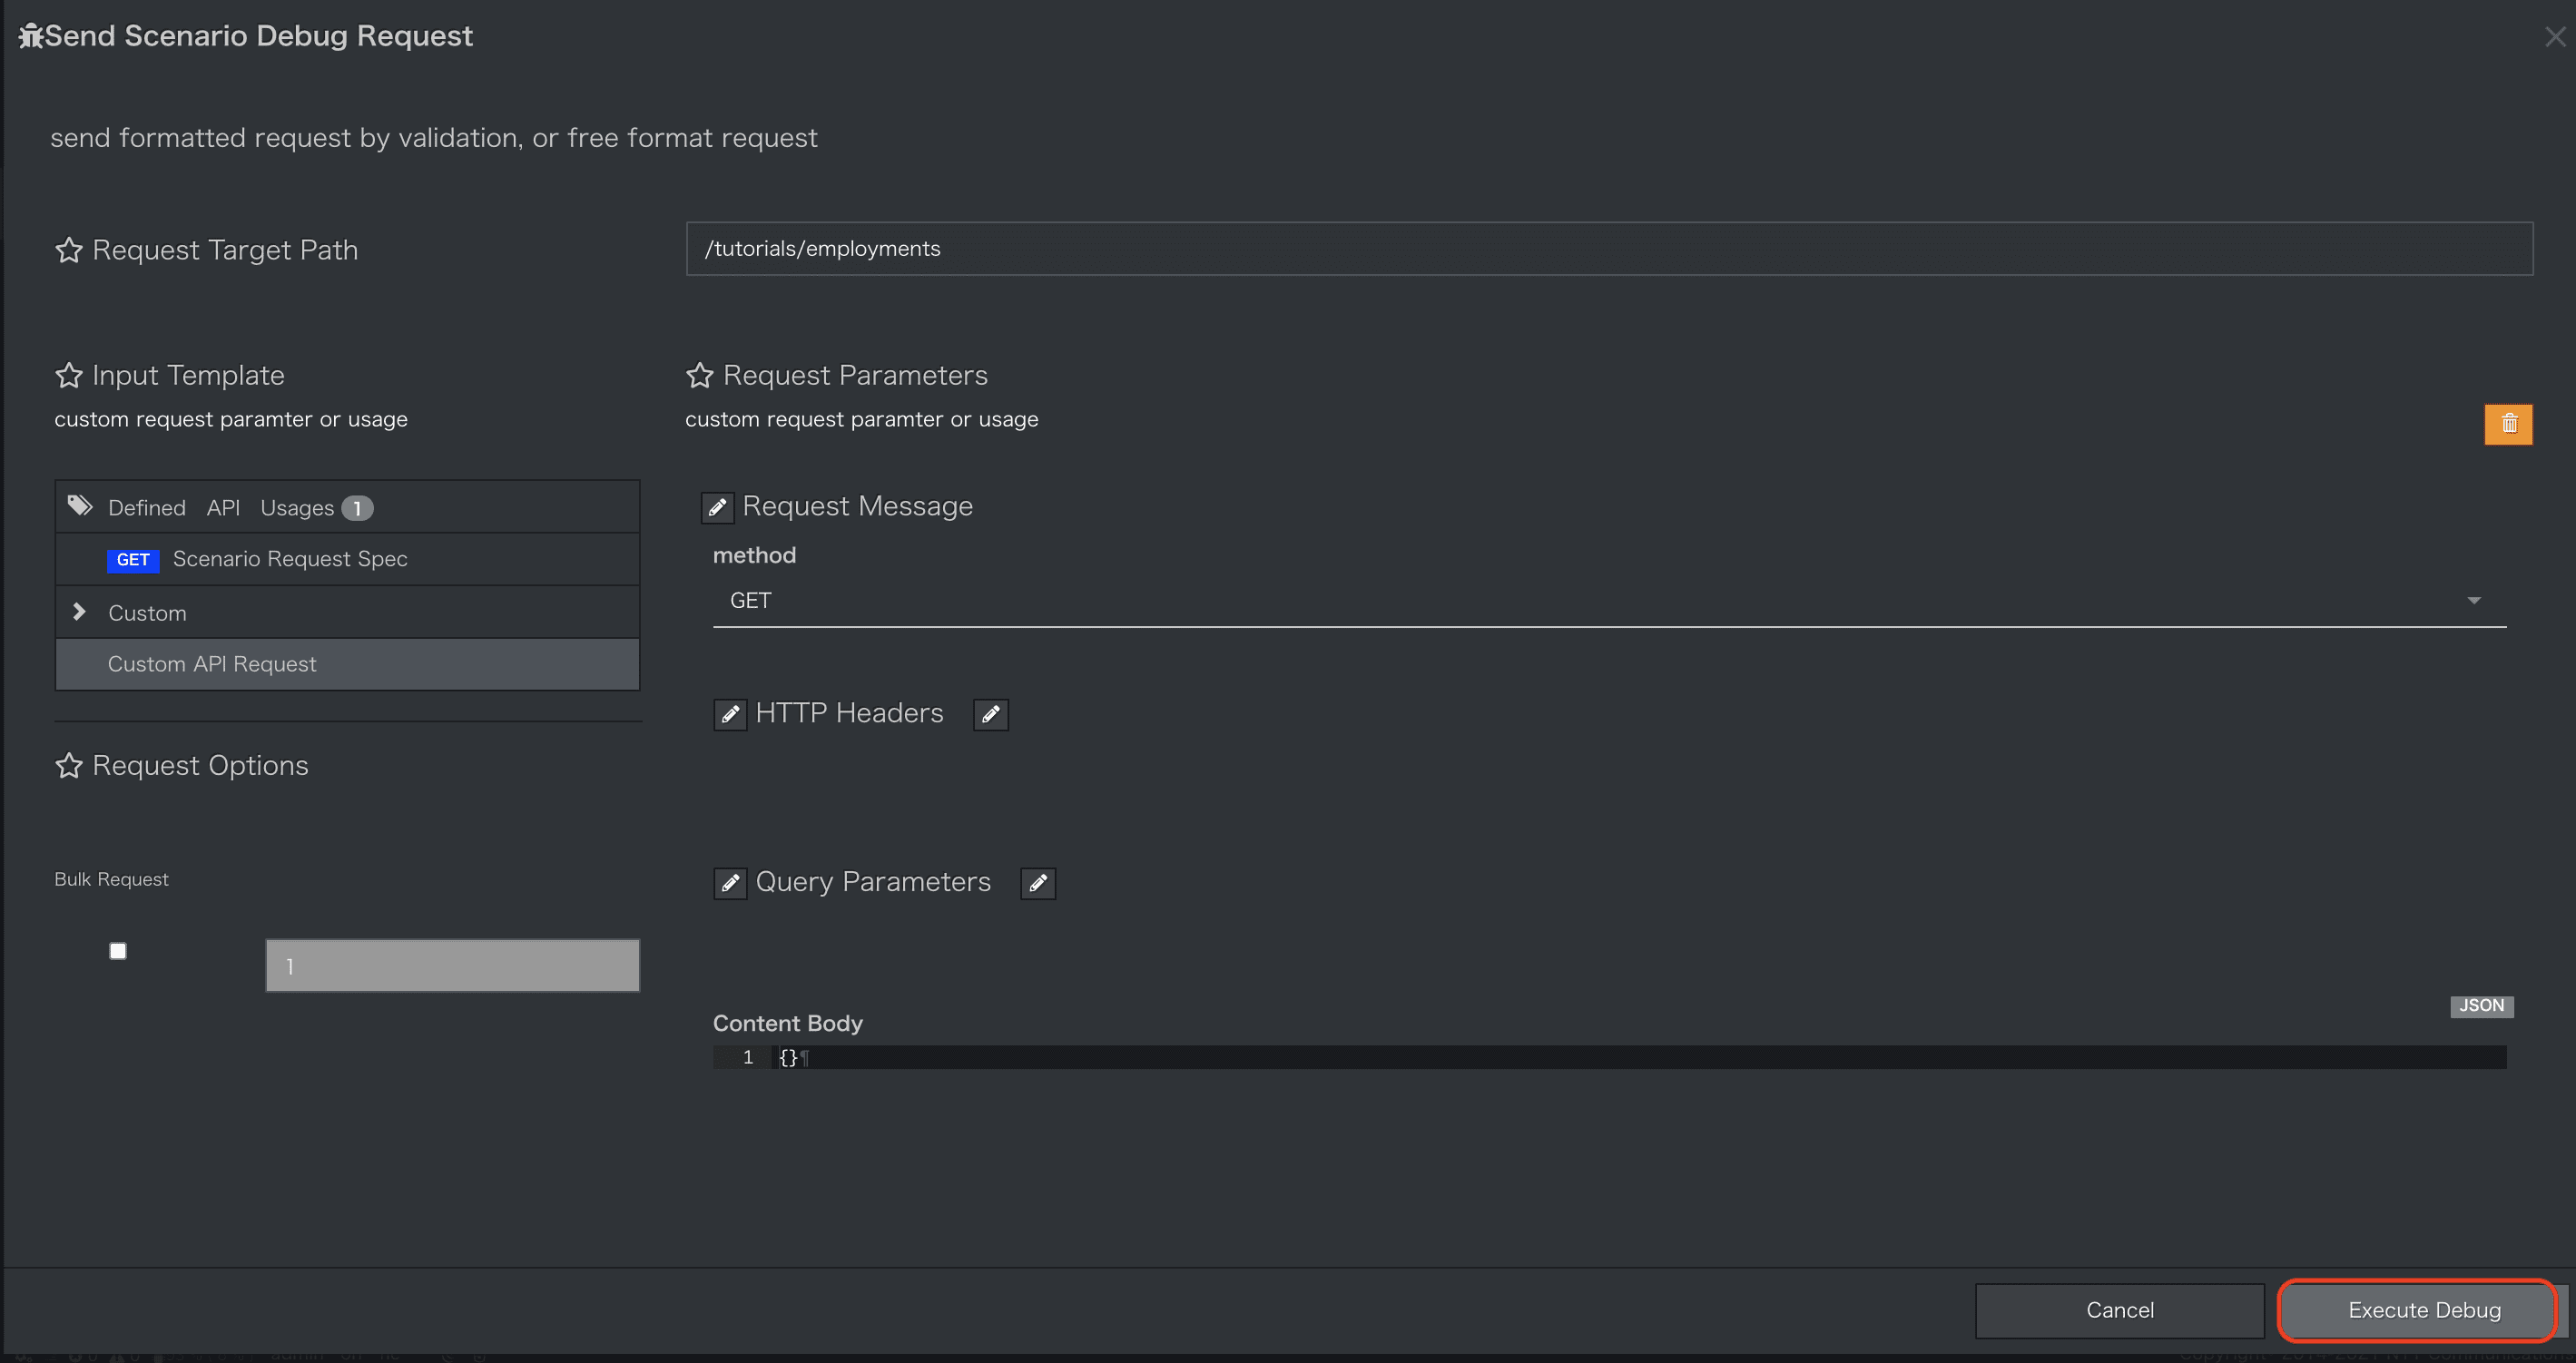
作成済みの検索シナリオ[GET API]を実行し
entryNumberがE0001のデータが更新されたことを確認してみましょう。
-
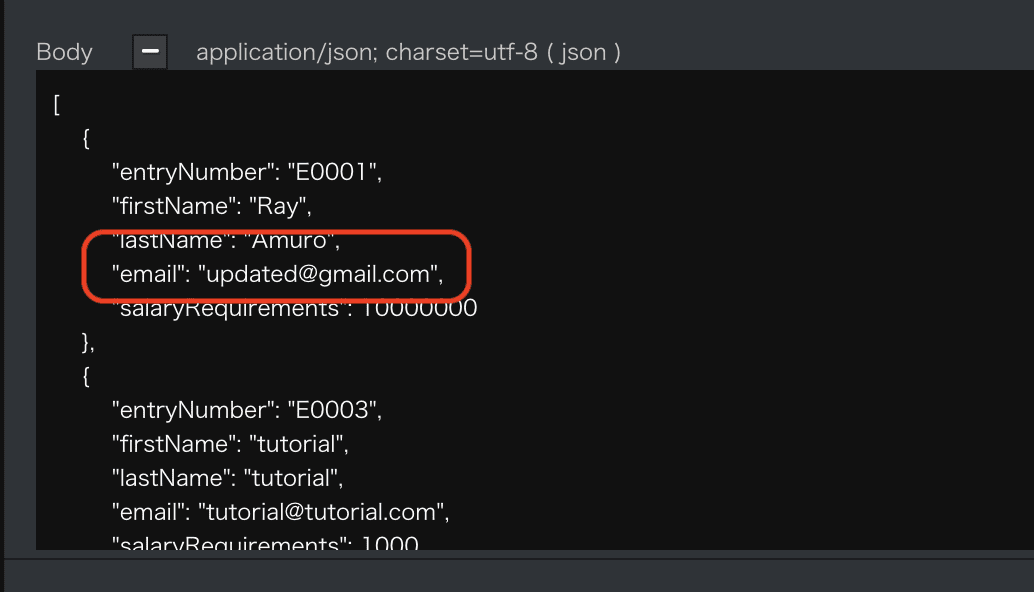
emailが更新されているとが確認できます。
削除シナリオの作成
1. 削除シナリオのImport
- deleteEmployment.ymlファイルをダウンロードしてください。
deleteEmployment.yml ダウンロード
yaml
category: Tutorial
name: deleteEmployment
uri: '/tutorials/employments/{entryNumber}'
method: DELETE
routing_auto_generation_mode: true
spec:
  response:
    normal:
      codes:
        - 200
  request:
    resources:
      type: object
      properties:
        entryNumber:
          type: string
      required:
        - entryNumber
commands:
  - command: script
    kwargs:
      code: |-
        async with model.aiodb() as conn:
            if not context.request.resources.entryNumber:
                raise Error(400, reason="entryNumber is not specified")

            cursor = await conn.execute(model.Employment.select().where(model.Employment.c.entryNumber==context.request.resources.entryNumber))
            if cursor.rowcount == 0:
                raise Error(404, reason="Could not found employment")

            await conn.execute(model.Employment.delete().where(model.Employment.c.entryNumber==context.request.resources.entryNumber))
            context.session.set_status(204)
            context.session.finish()
request_timeout: 60
connect_timeout: 60
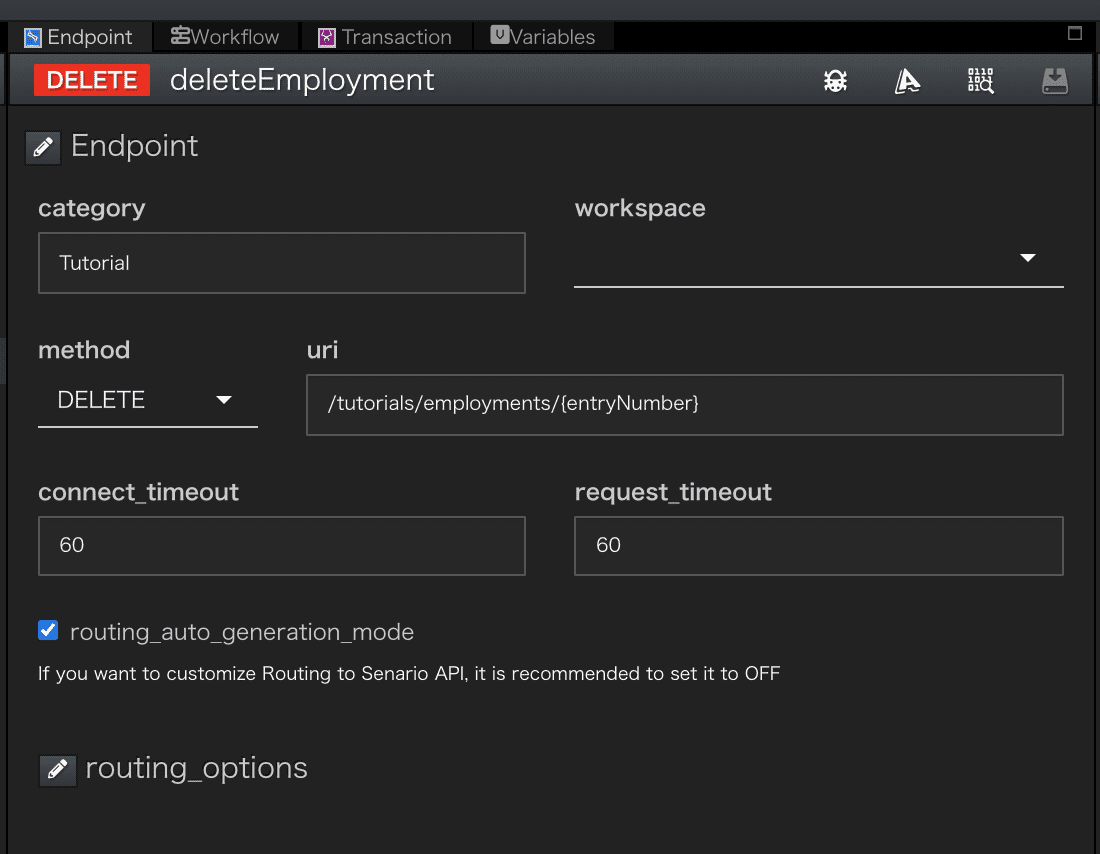
2. Endpoint設定
- 削除シナリオの
methodにはDELETEを指定しています
[Endpoint]
3. ワークフロー設定
[Workflow]

[Workflow-Script]
Scriptに設定されているPython Codeです。
python
async with model.aiodb() as conn:
    if not context.request.resources.entryNumber:
        raise Error(400, reason="entryNumber is not specified")

    cursor = await conn.execute(model.Employment.select().where(model.Employment.c.entryNumber==context.request.resources.entryNumber))
    if cursor.rowcount == 0:
        raise Error(404, reason="Could not found employment")

    await conn.execute(model.Employment.delete().where(model.Employment.c.entryNumber==context.request.resources.entryNumber))
    context.session.set_status(204)
    context.session.finish()
使用している組み込みオブジェクトの詳細
上記で使用したQmonusの組み込みオブジェクトについて、詳細を知りたい方は以下をご覧ください。
- model
- context.request (後述のcontext.sessionの章をご参照ください。)
- Error
- context.session
| 行数 | 説明 |
|---|---|
| 5-9 | リクエストされたentryNumberのデータをデータベースから削除します |
| 10 | responseのstatus codeを204に設定します |
4. APIの呼び出し
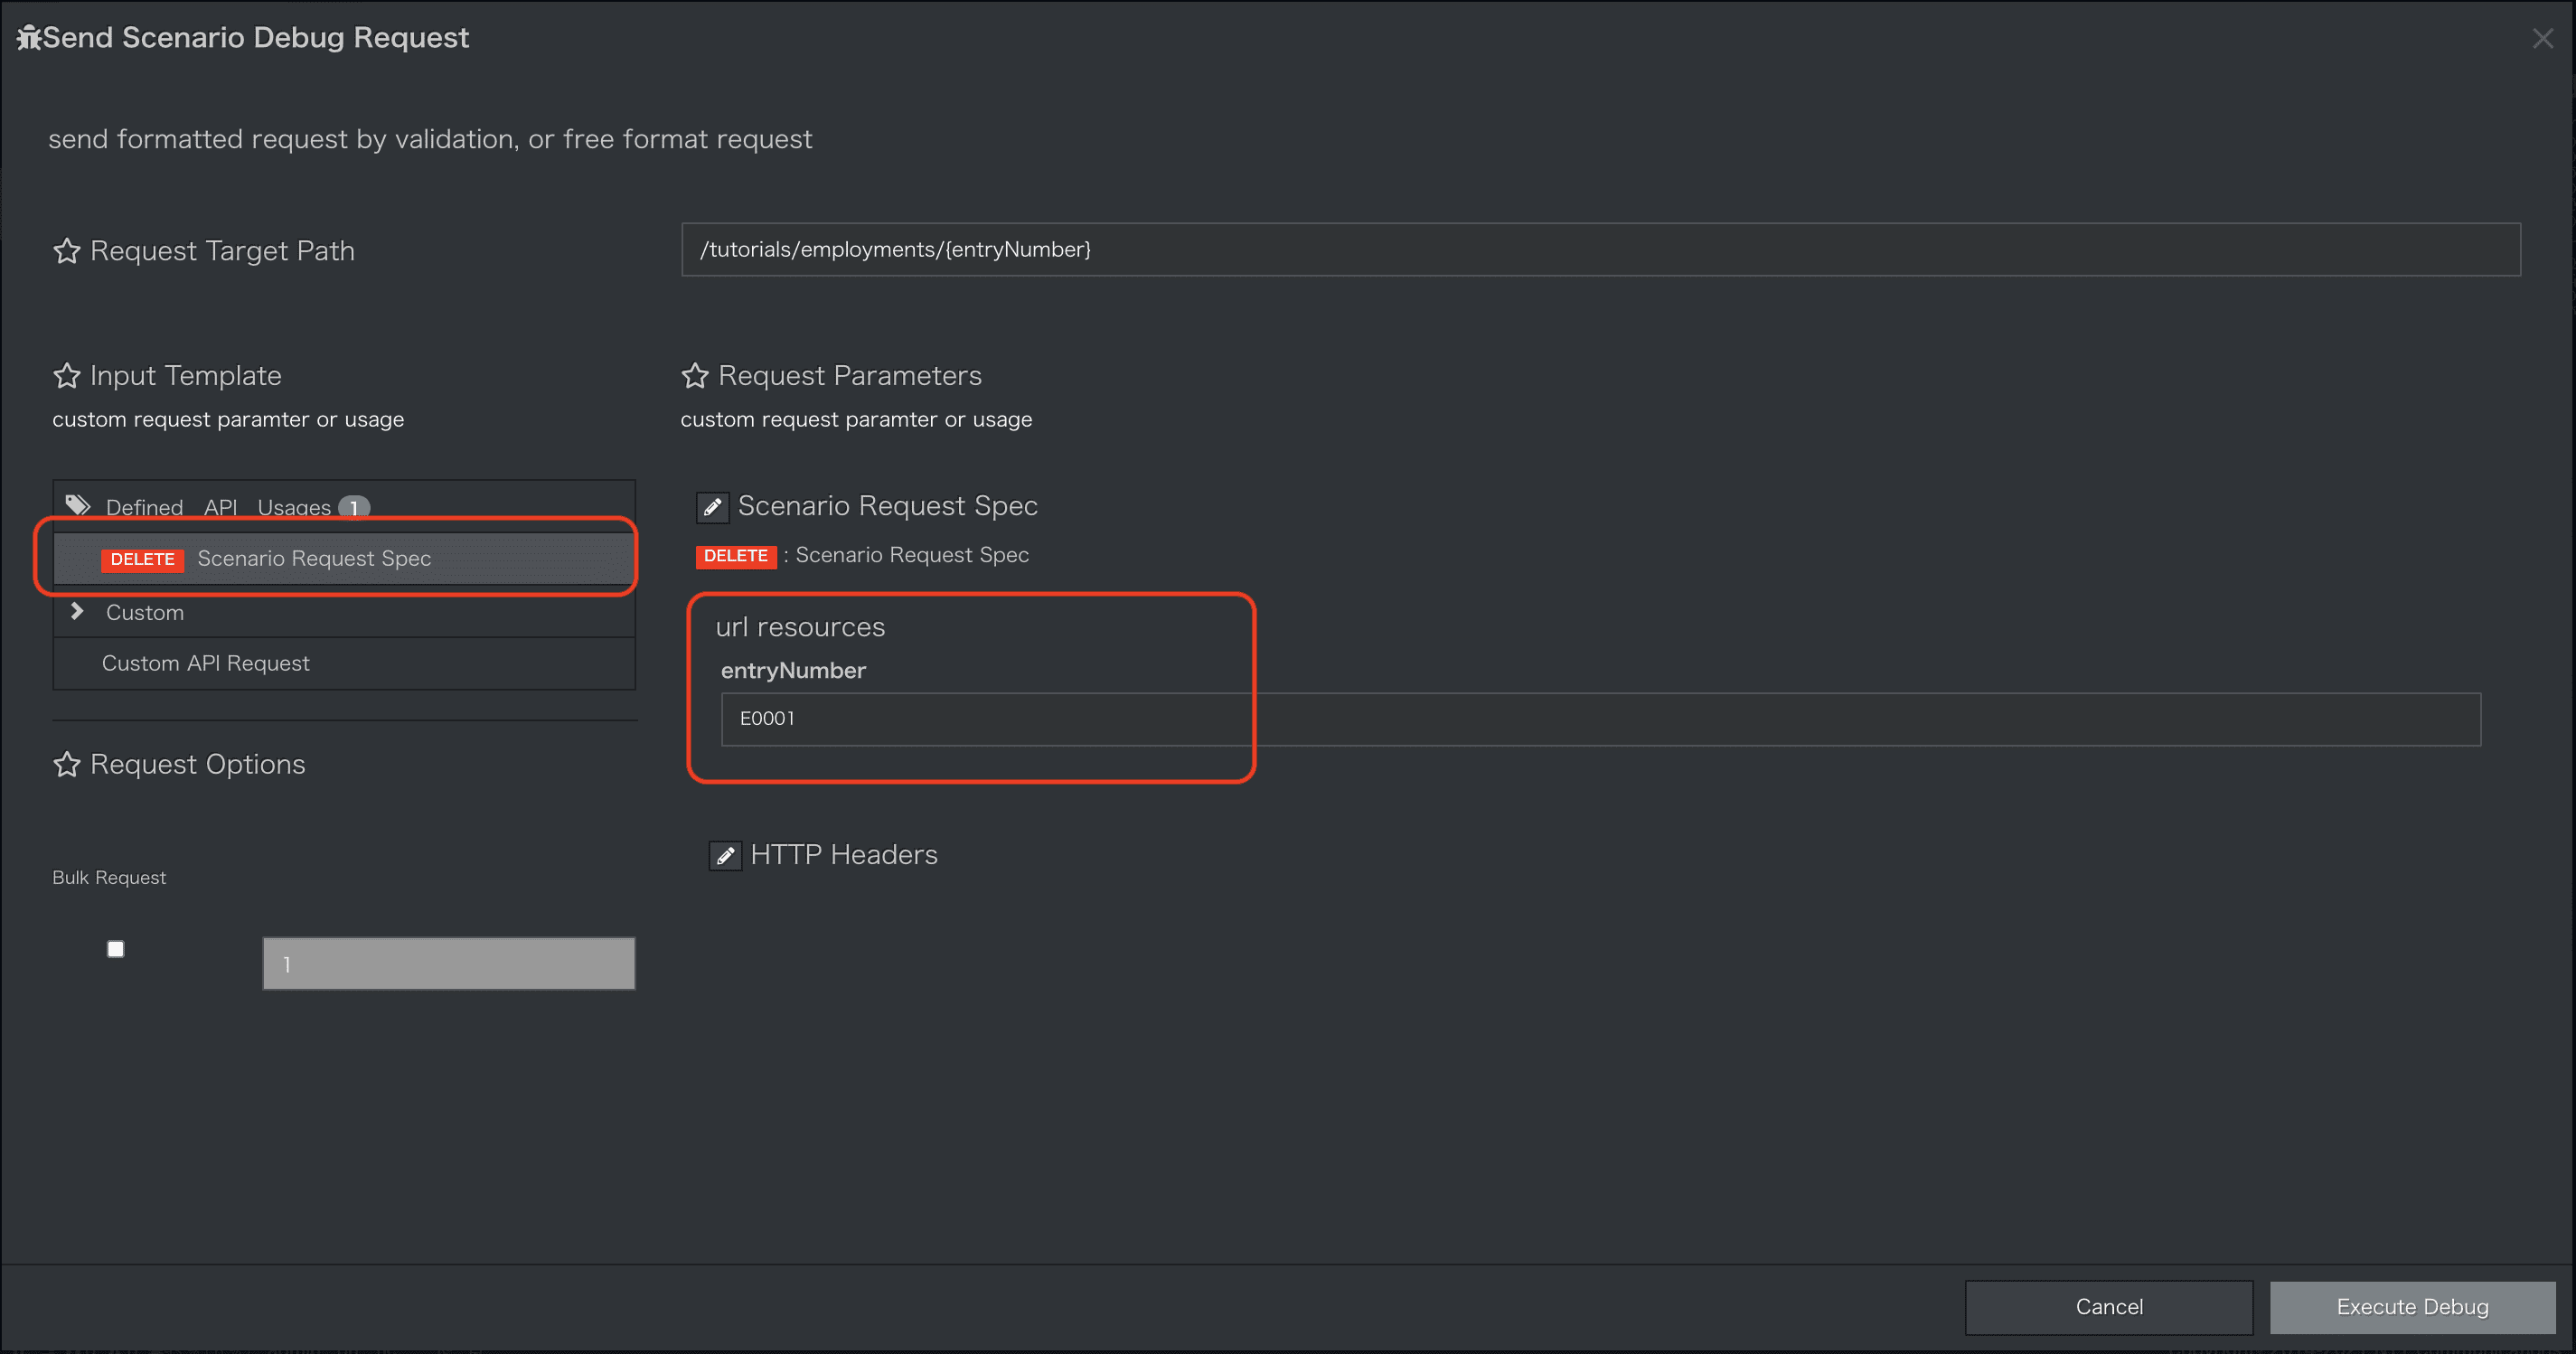
シナリオエディタ画面中央上部にある[Try API Call]メニューを選択します。

-
[DELETE Scenario Request Spec]を選択するとURIに指定する
entryNumberの入力蘭が表示されます。
削除対象のentryNumber(E0001)を入力しExecute Debugボタンを押下します。
-
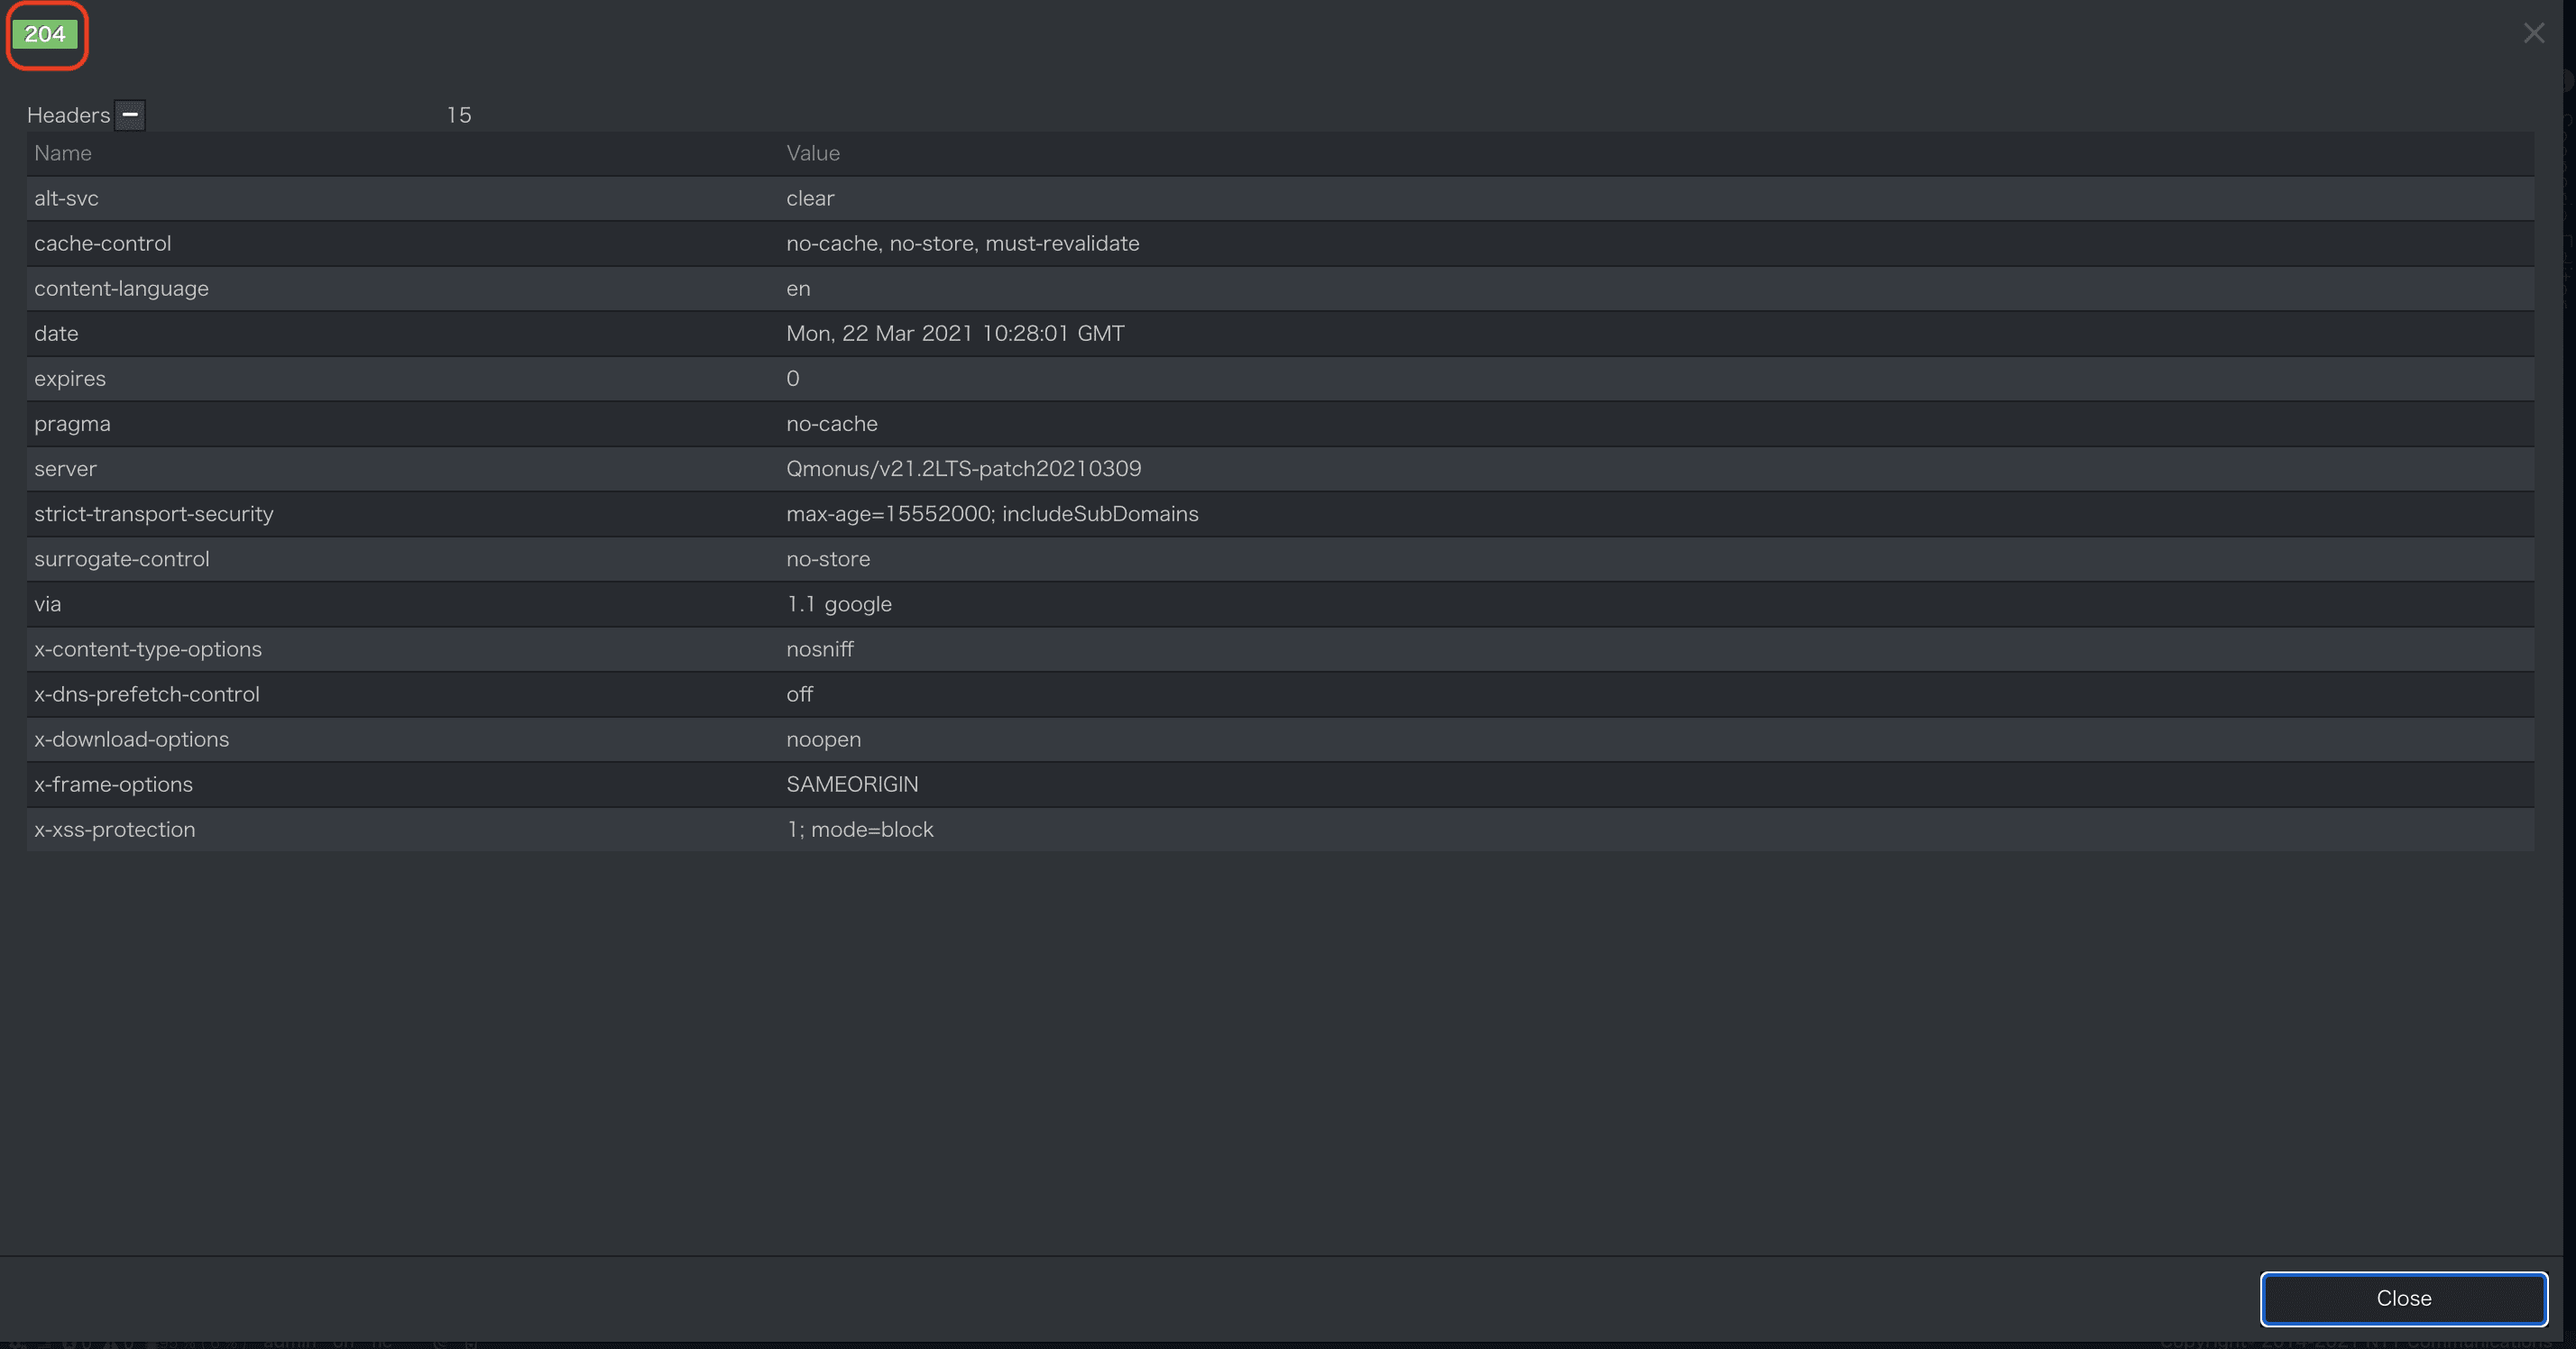
APIが実行され結果が表示されます。204応答が返却されていることが確認できます。
-
作成済みのGET APIを実行し
entryNumberがE0001のデータが削除されていることを確認してみましょう。
以上でSimple CRUD - シナリオ編のチュートリアルは完了です。
Simple CRUD - ATOM編
本チュートリアルでは、Simple CRUD - シナリオ編で作成したものと同じ内容をATOMで開発します。
作成したscenarioとmodelの削除
本チュートリアルはシナリオ編で作成したEmploymentデータモデルをCRUDするアプリケーションを作成します。
そのため、シナリオ編で作成した以下のリソースは必ず削除してから実施してください。
- Scenario
- createEmployment
- getEmployment
- updateEmployment
- deleteEmployment
- model
- Employment
リソースは右クリックした際に表示されるメニューのDeleteから削除できます。
ATOMの作成
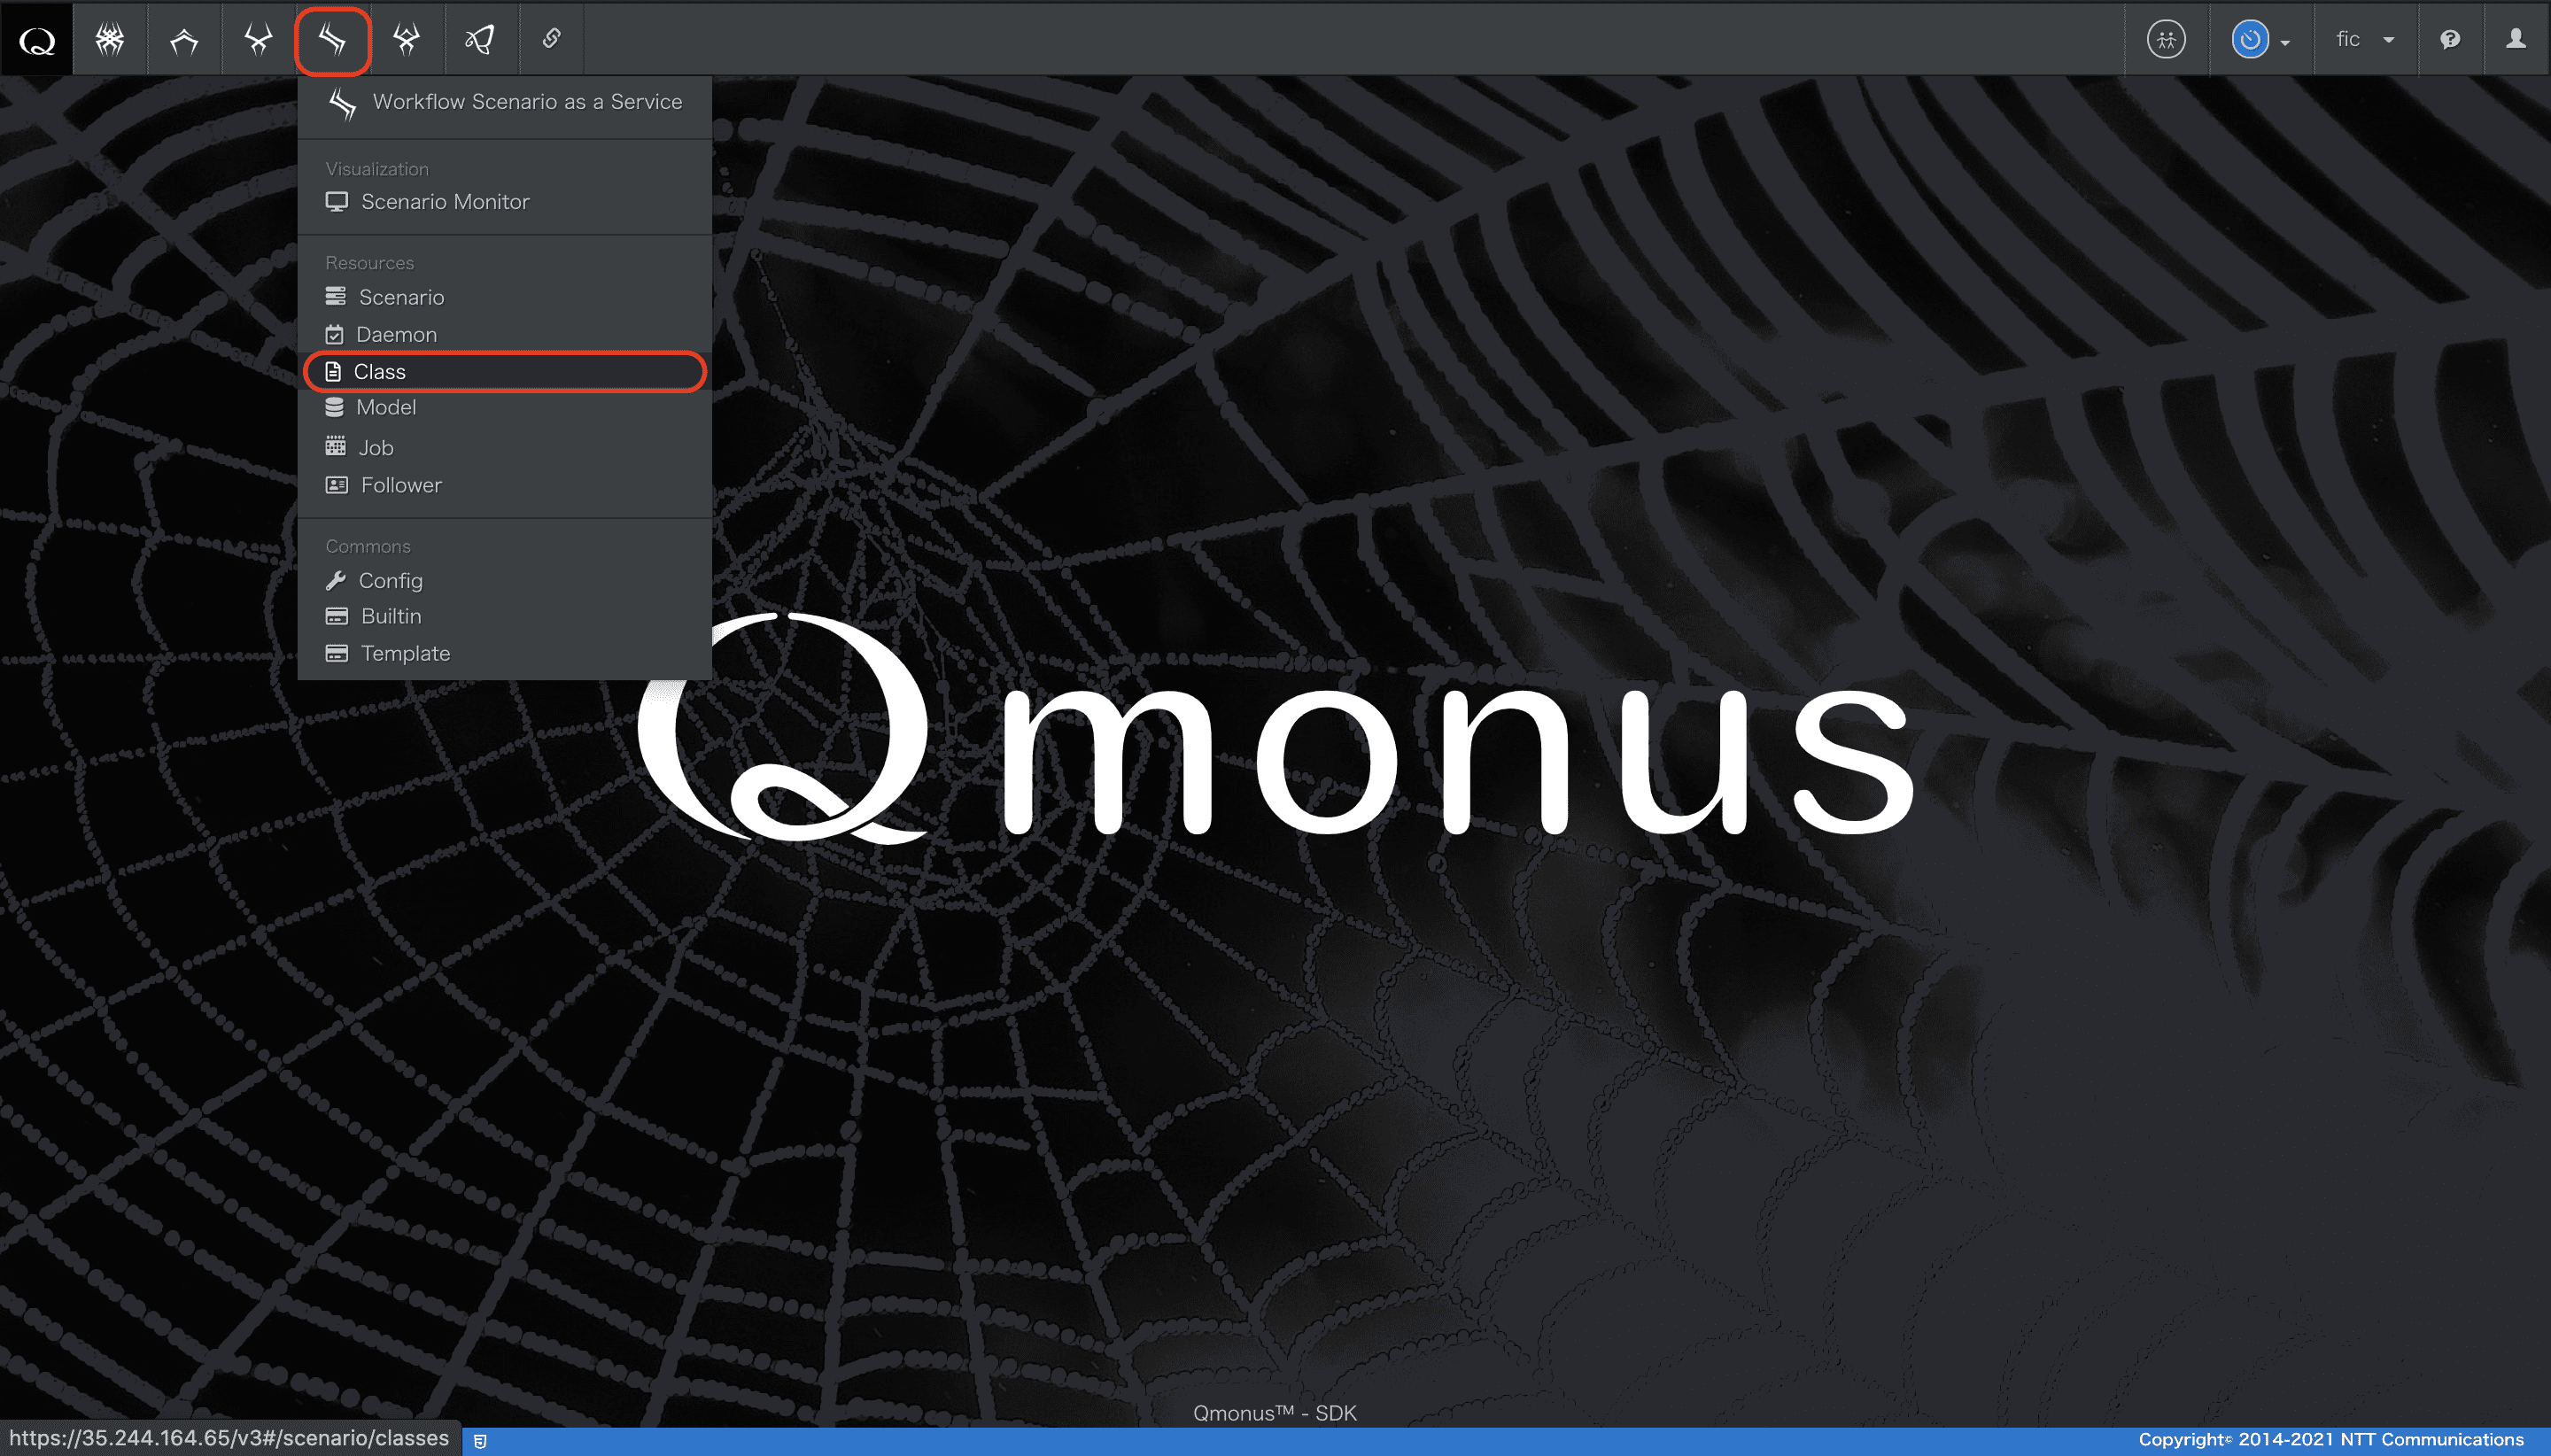
1. クラスエディタの表示
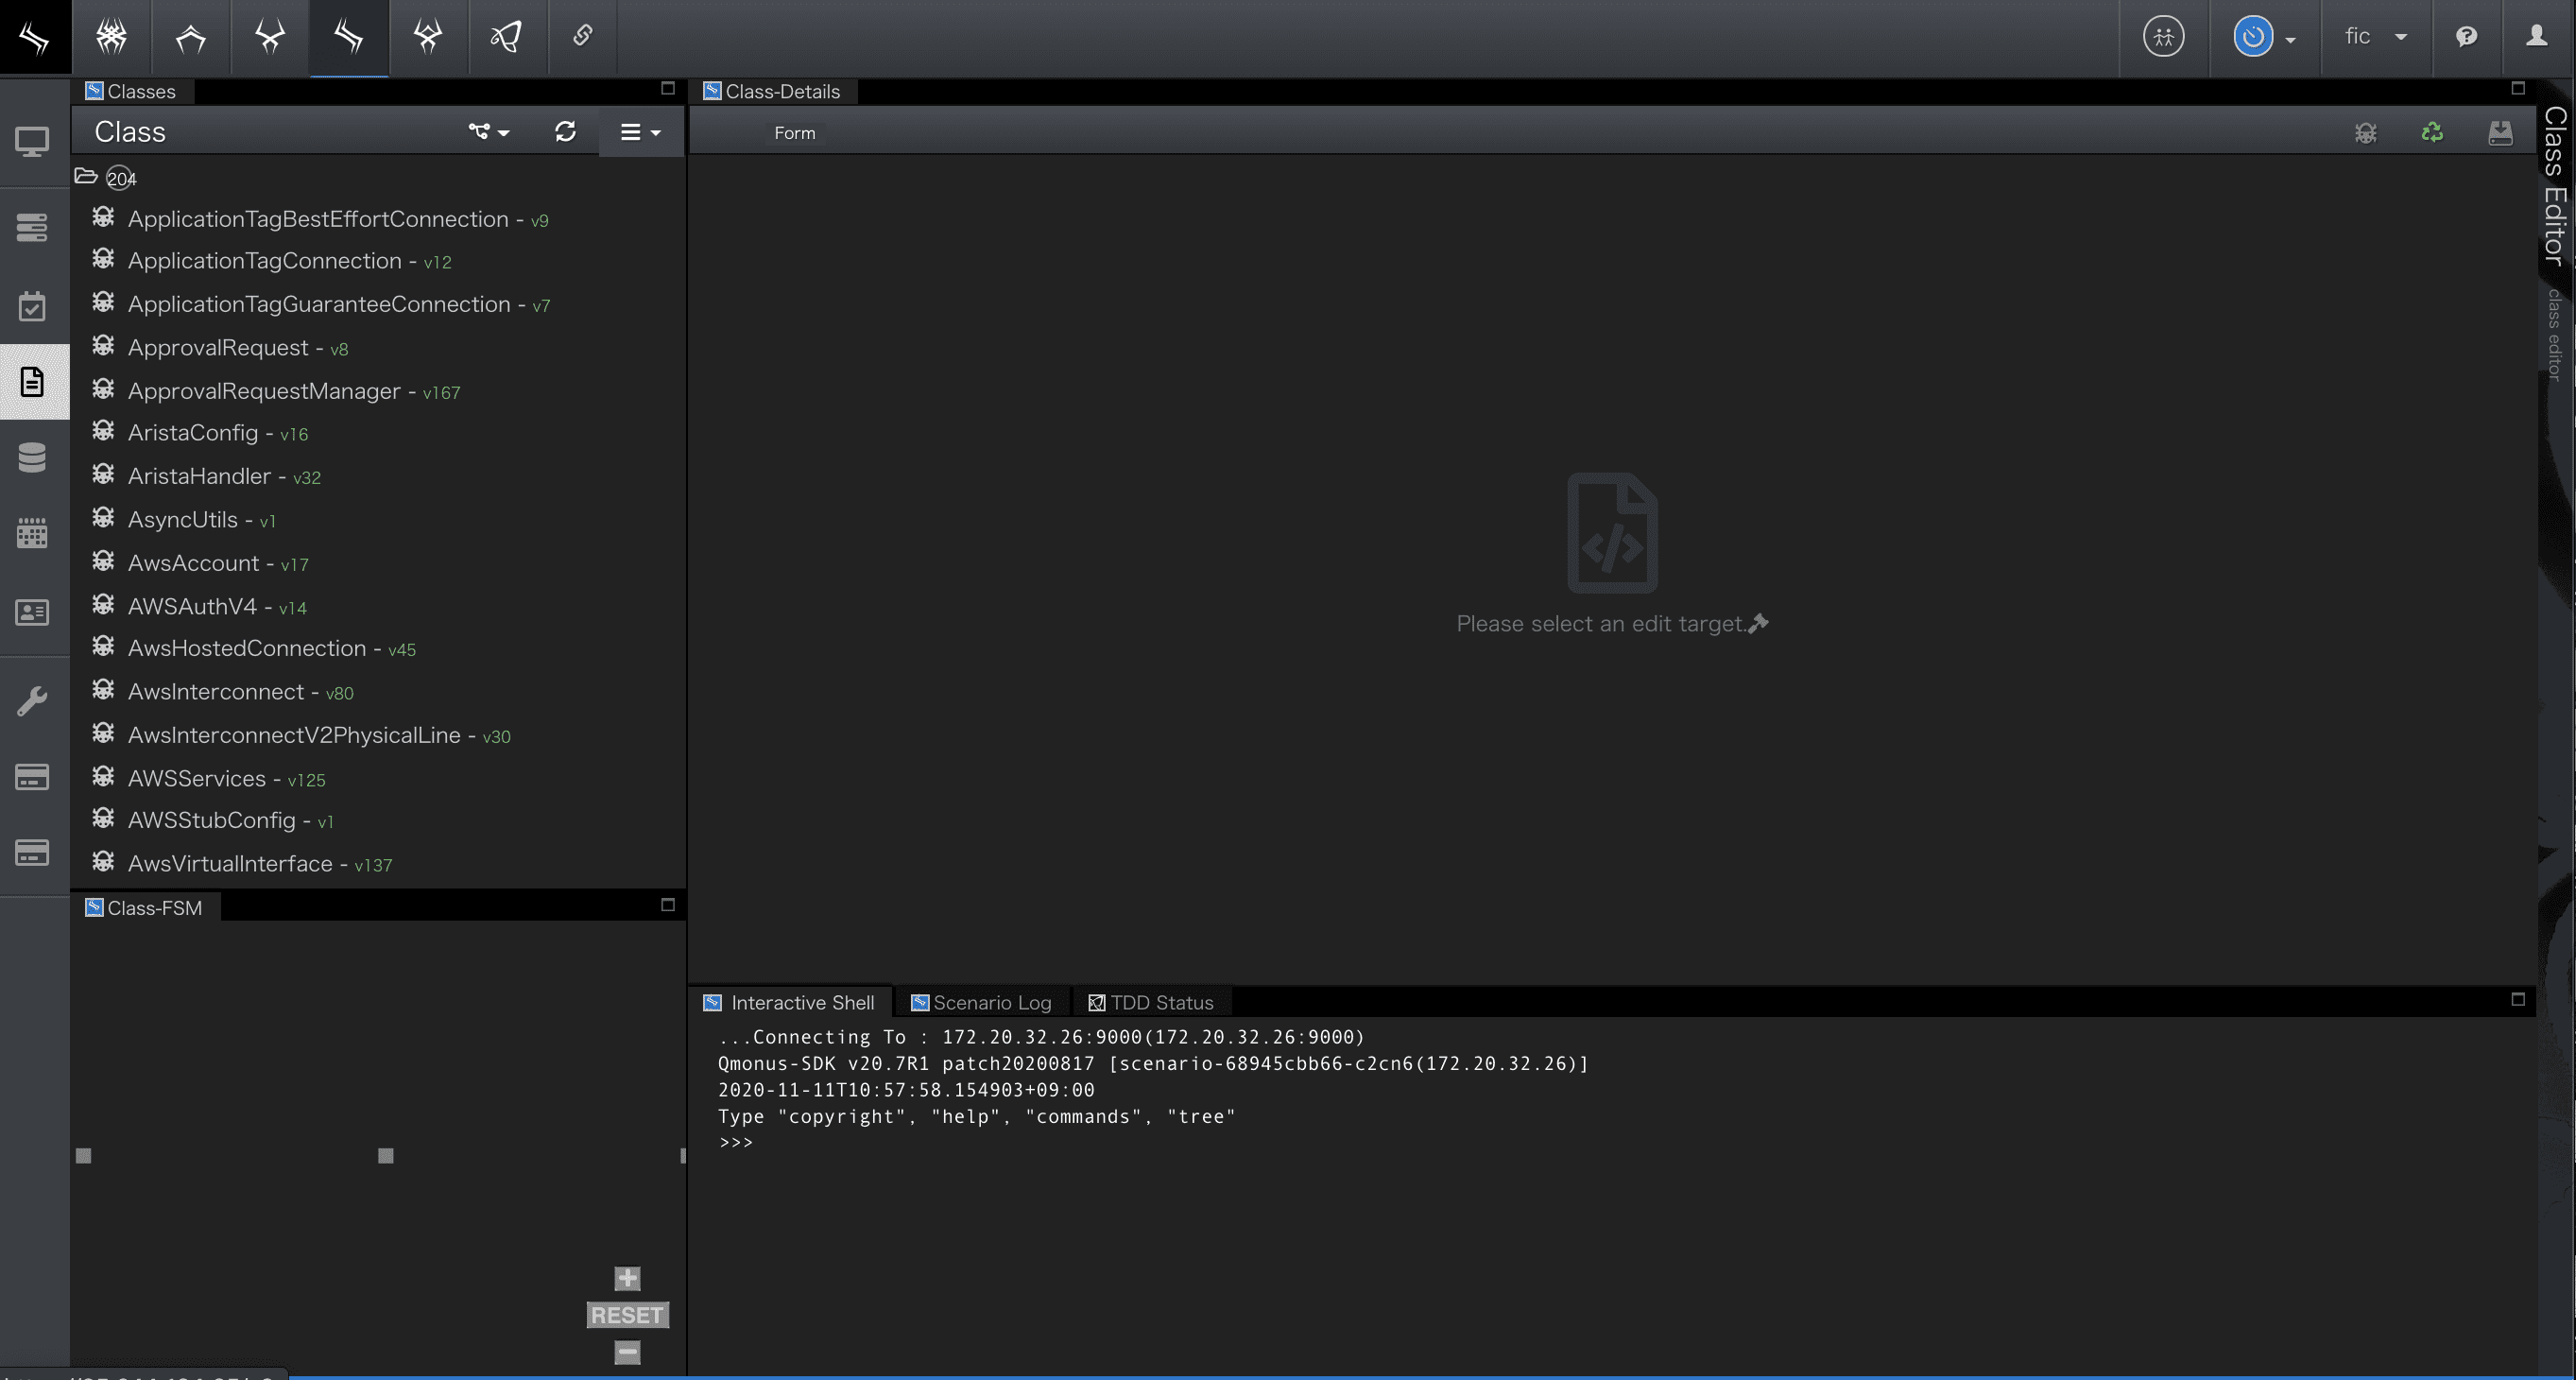
メインメニュー[Workflow Scenario as a Service]>[Class]を選択しクラスエディタを表示します。
[クラスエディタ]
2. ATOM-メタ情報定義
-
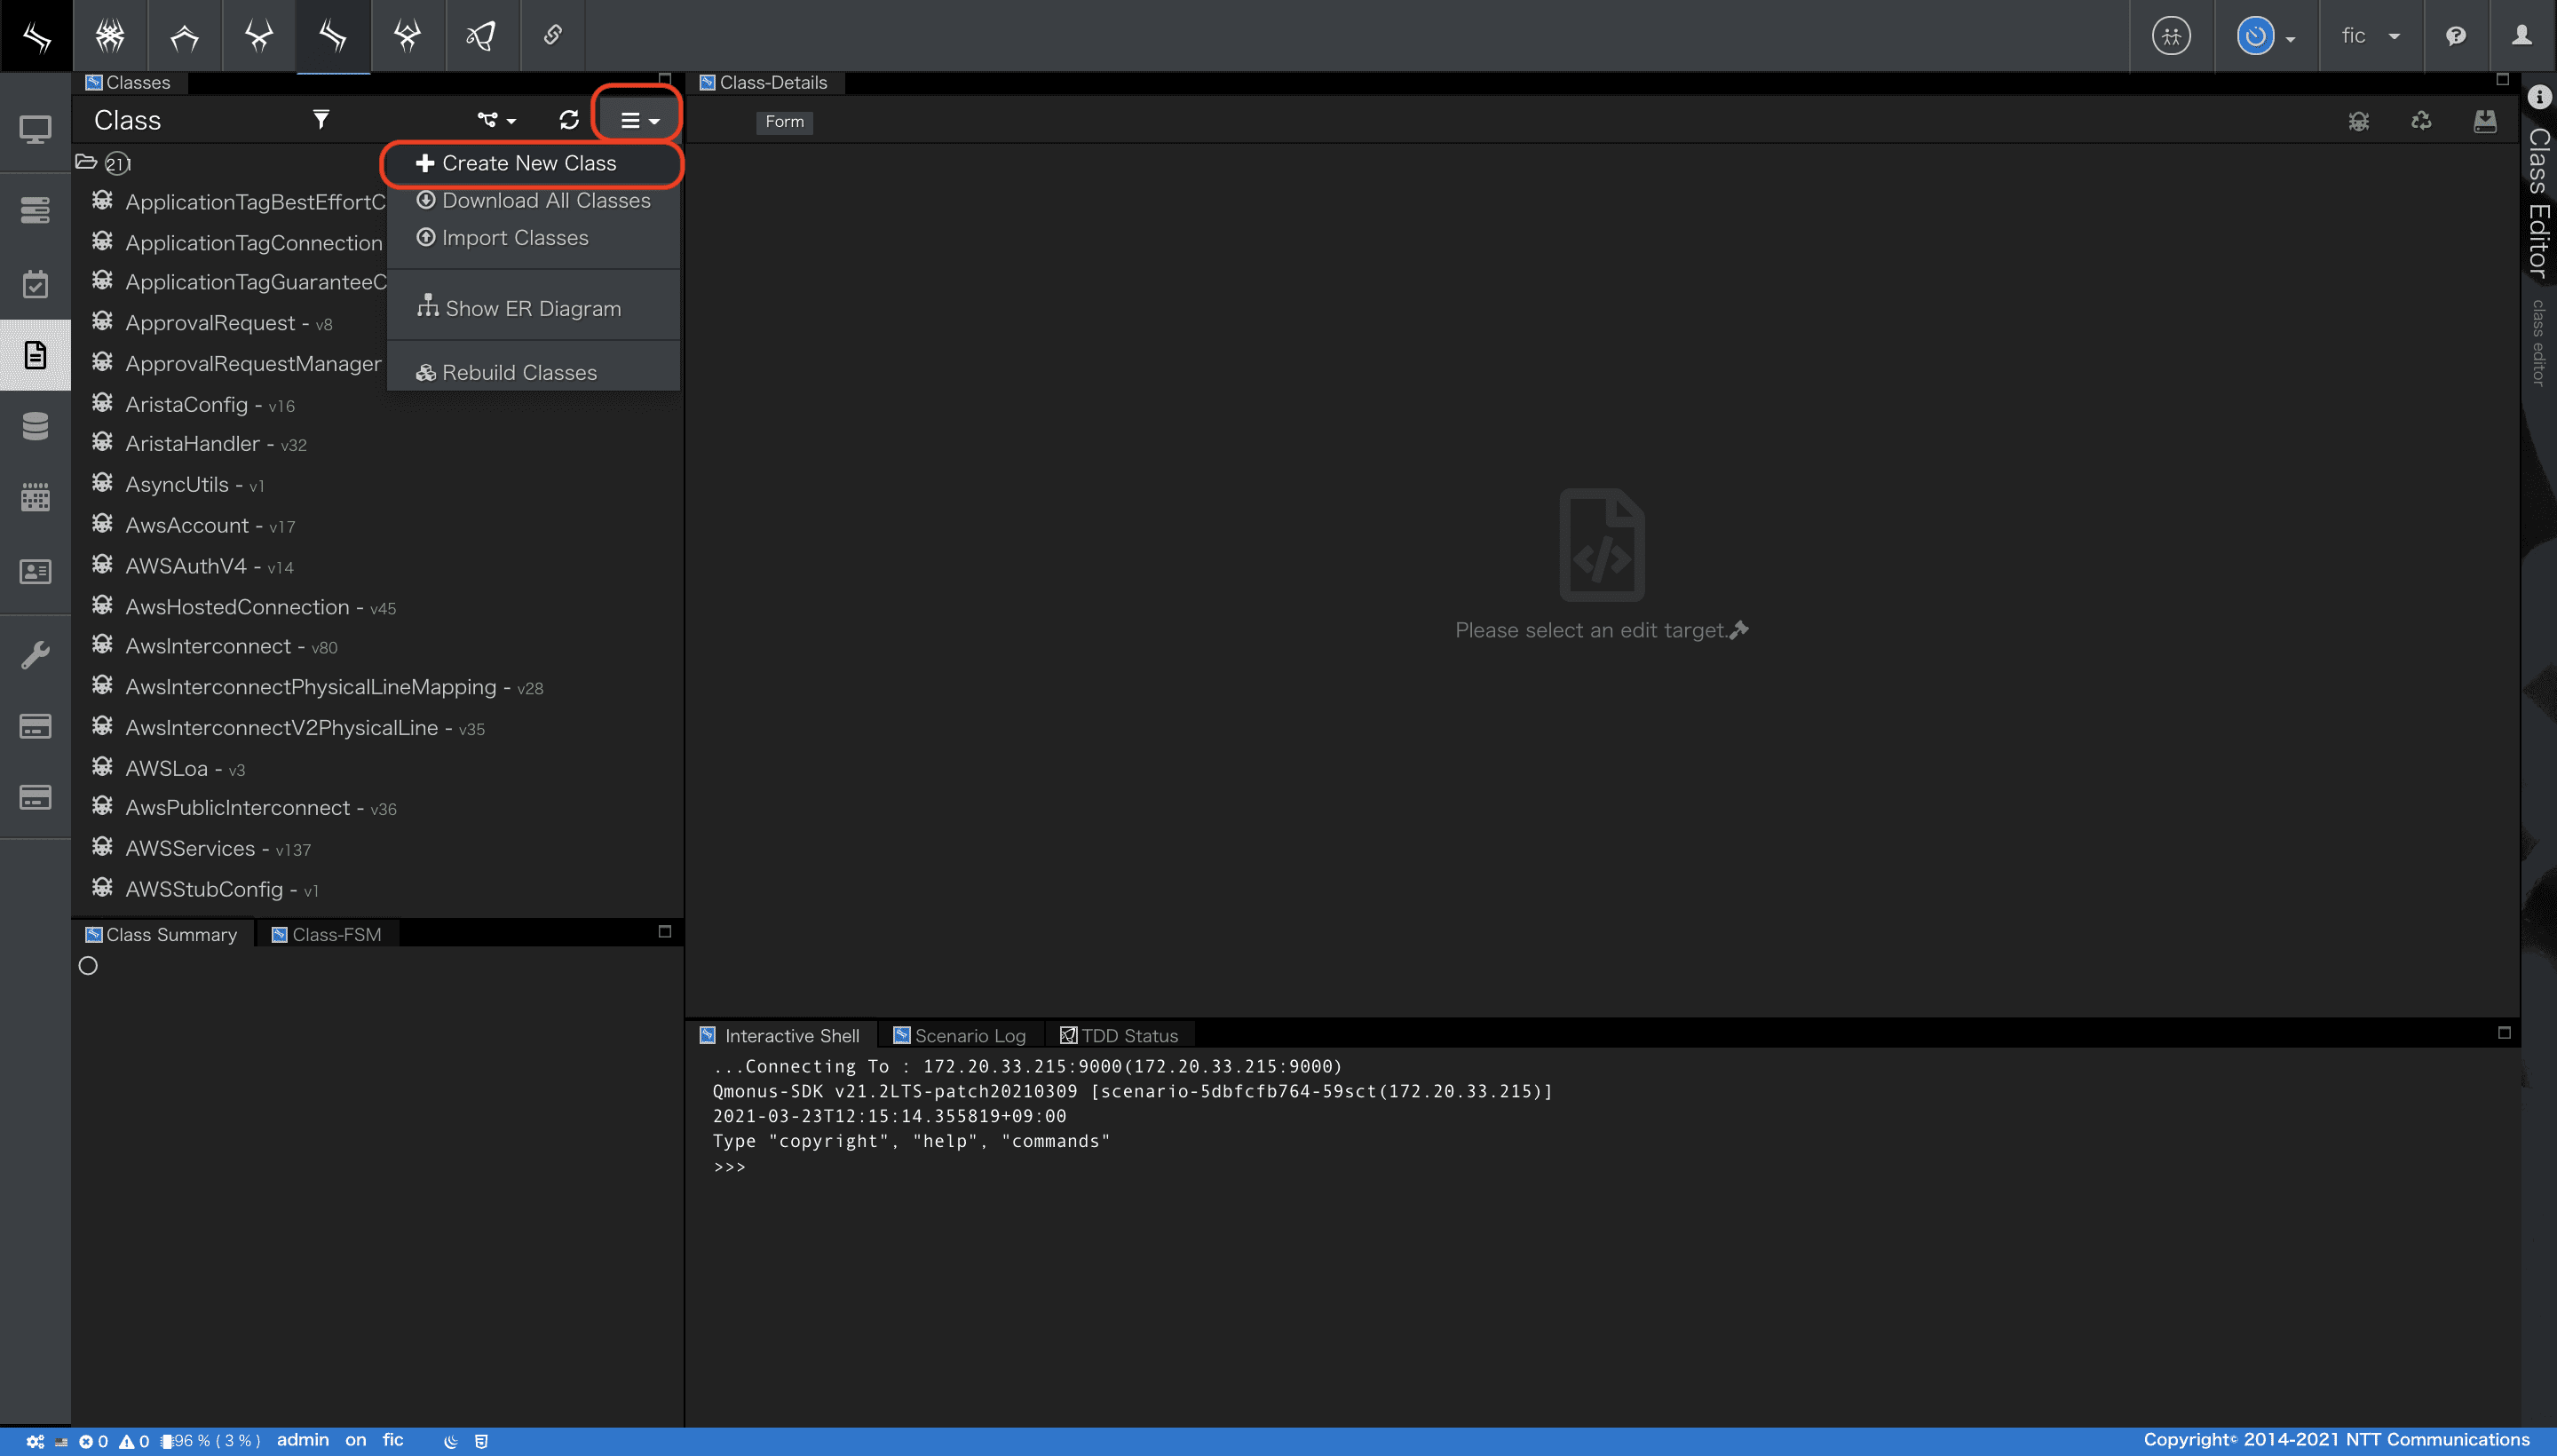
クラスエディタの画面左上部にあるメニューから「Create New Class」を選択します。
-
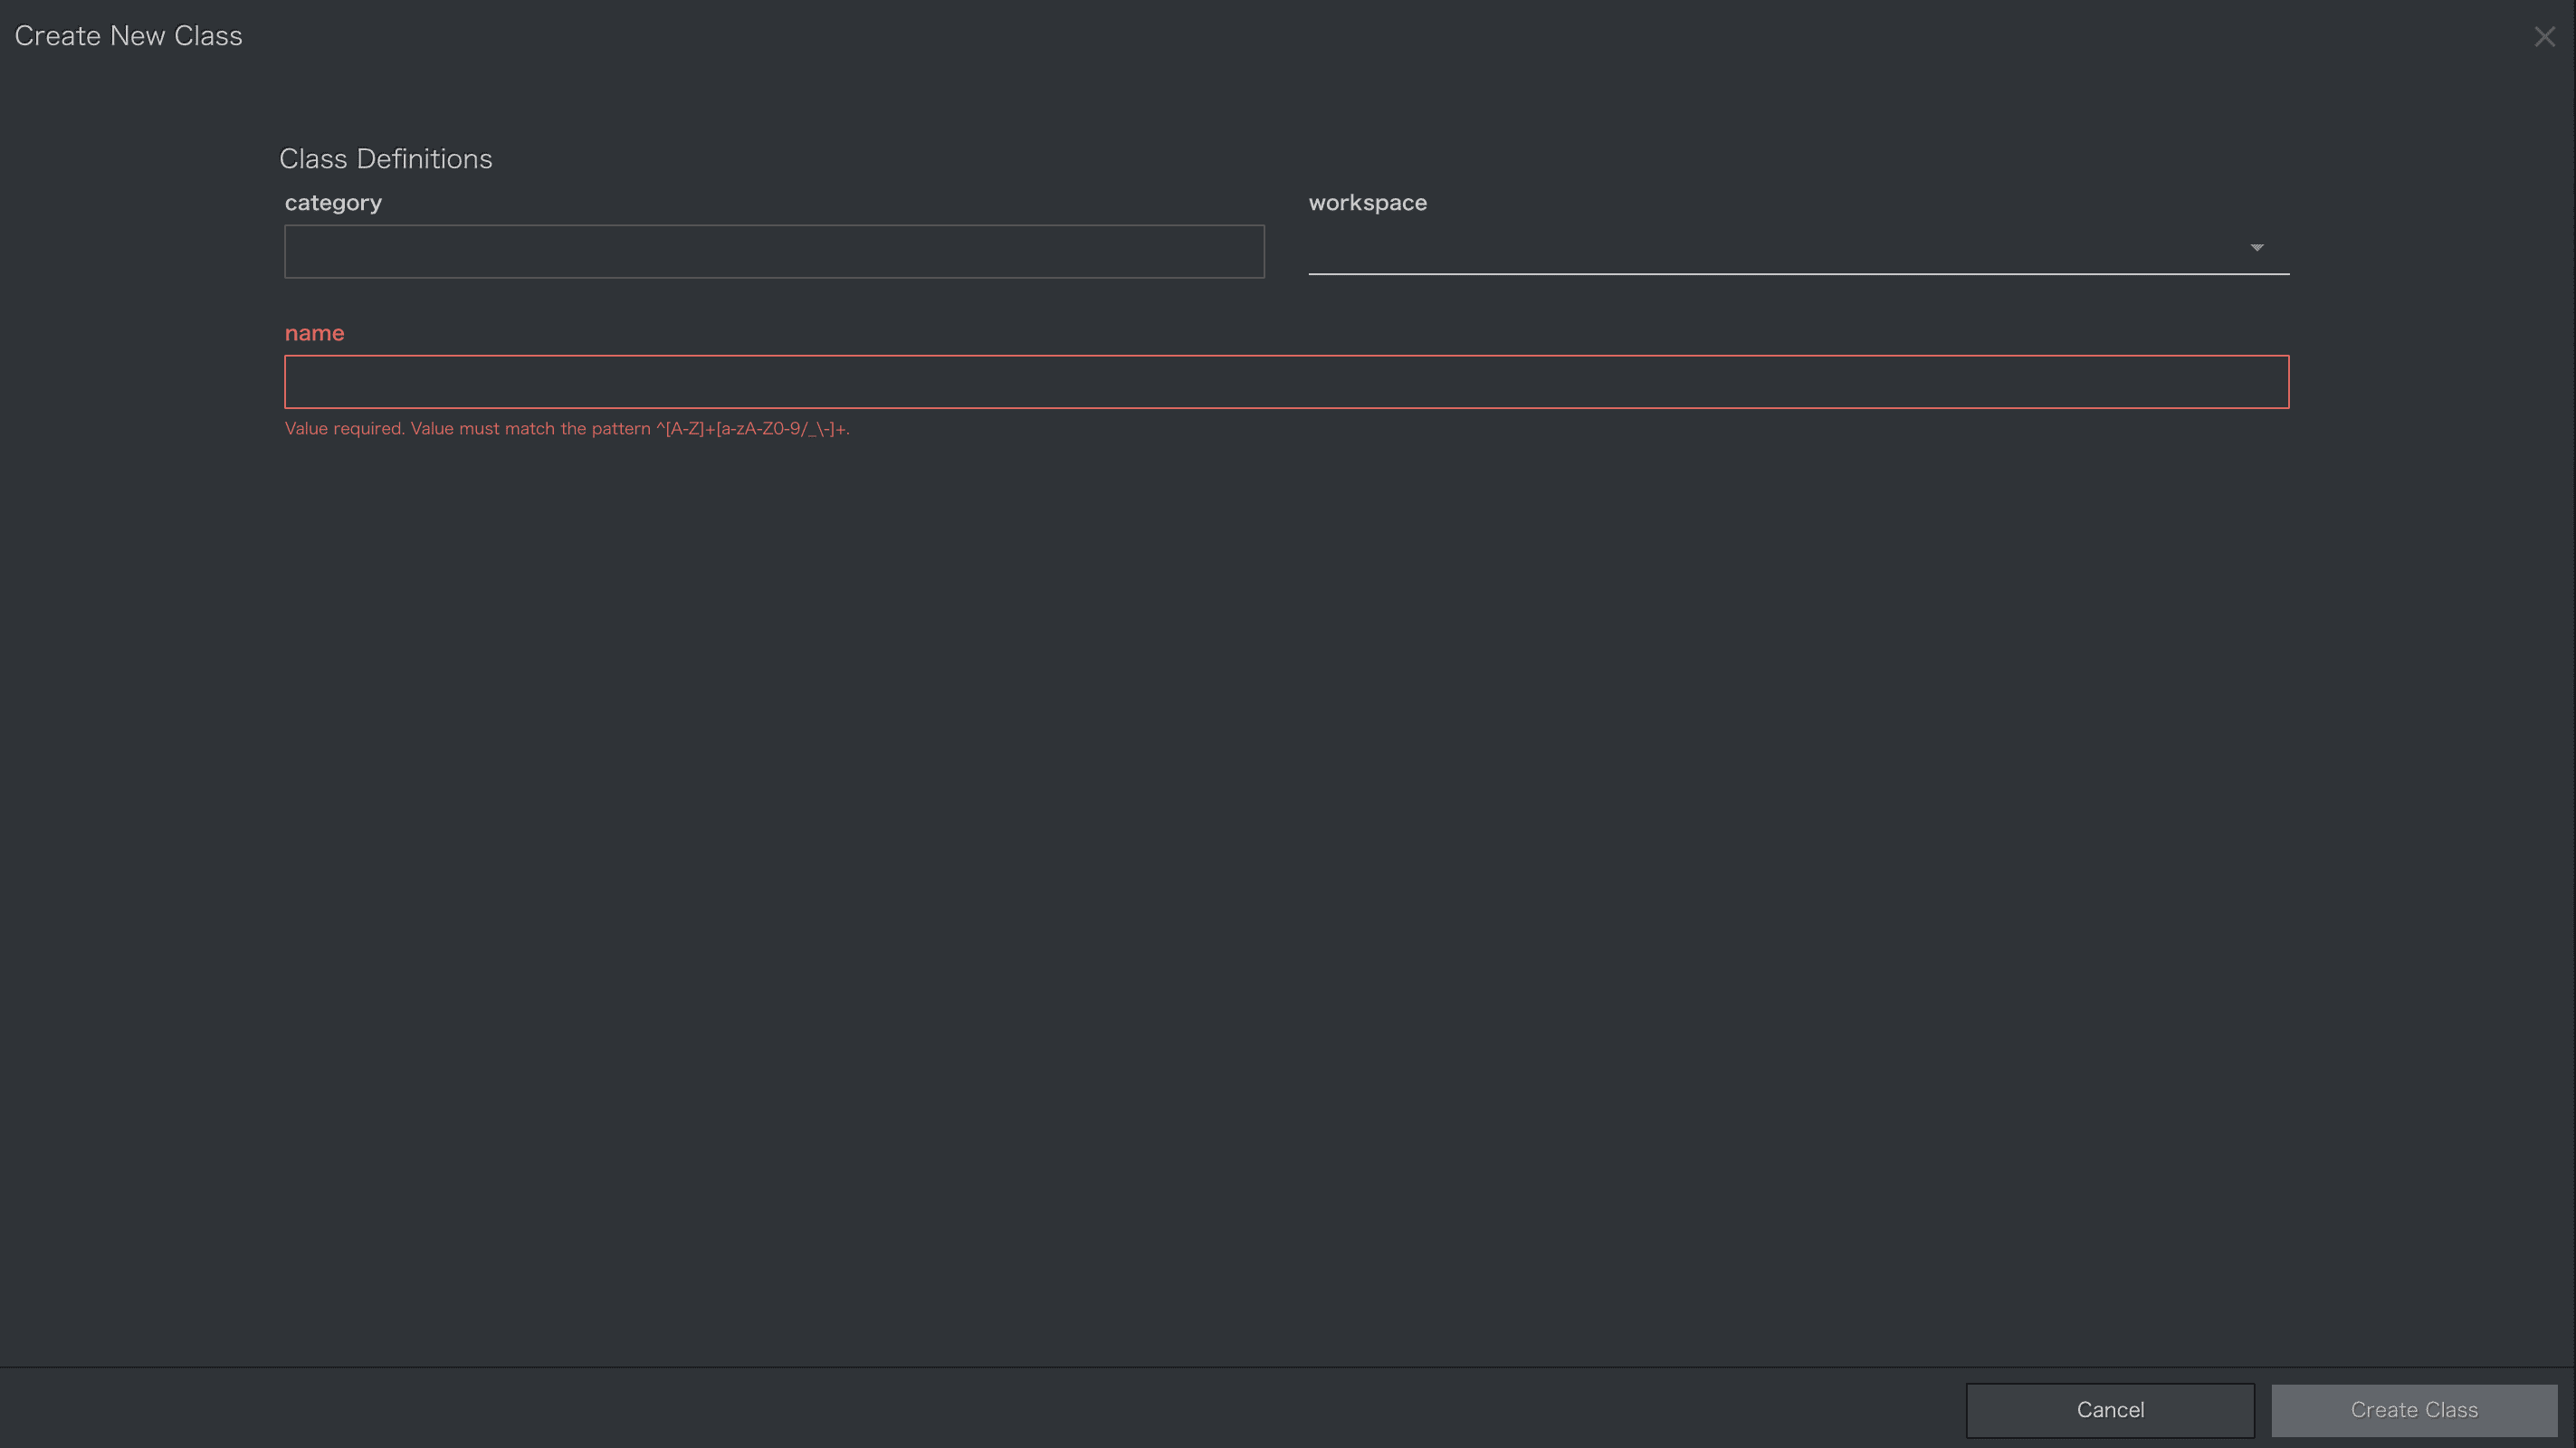
クラス定義画面が開きます。
-
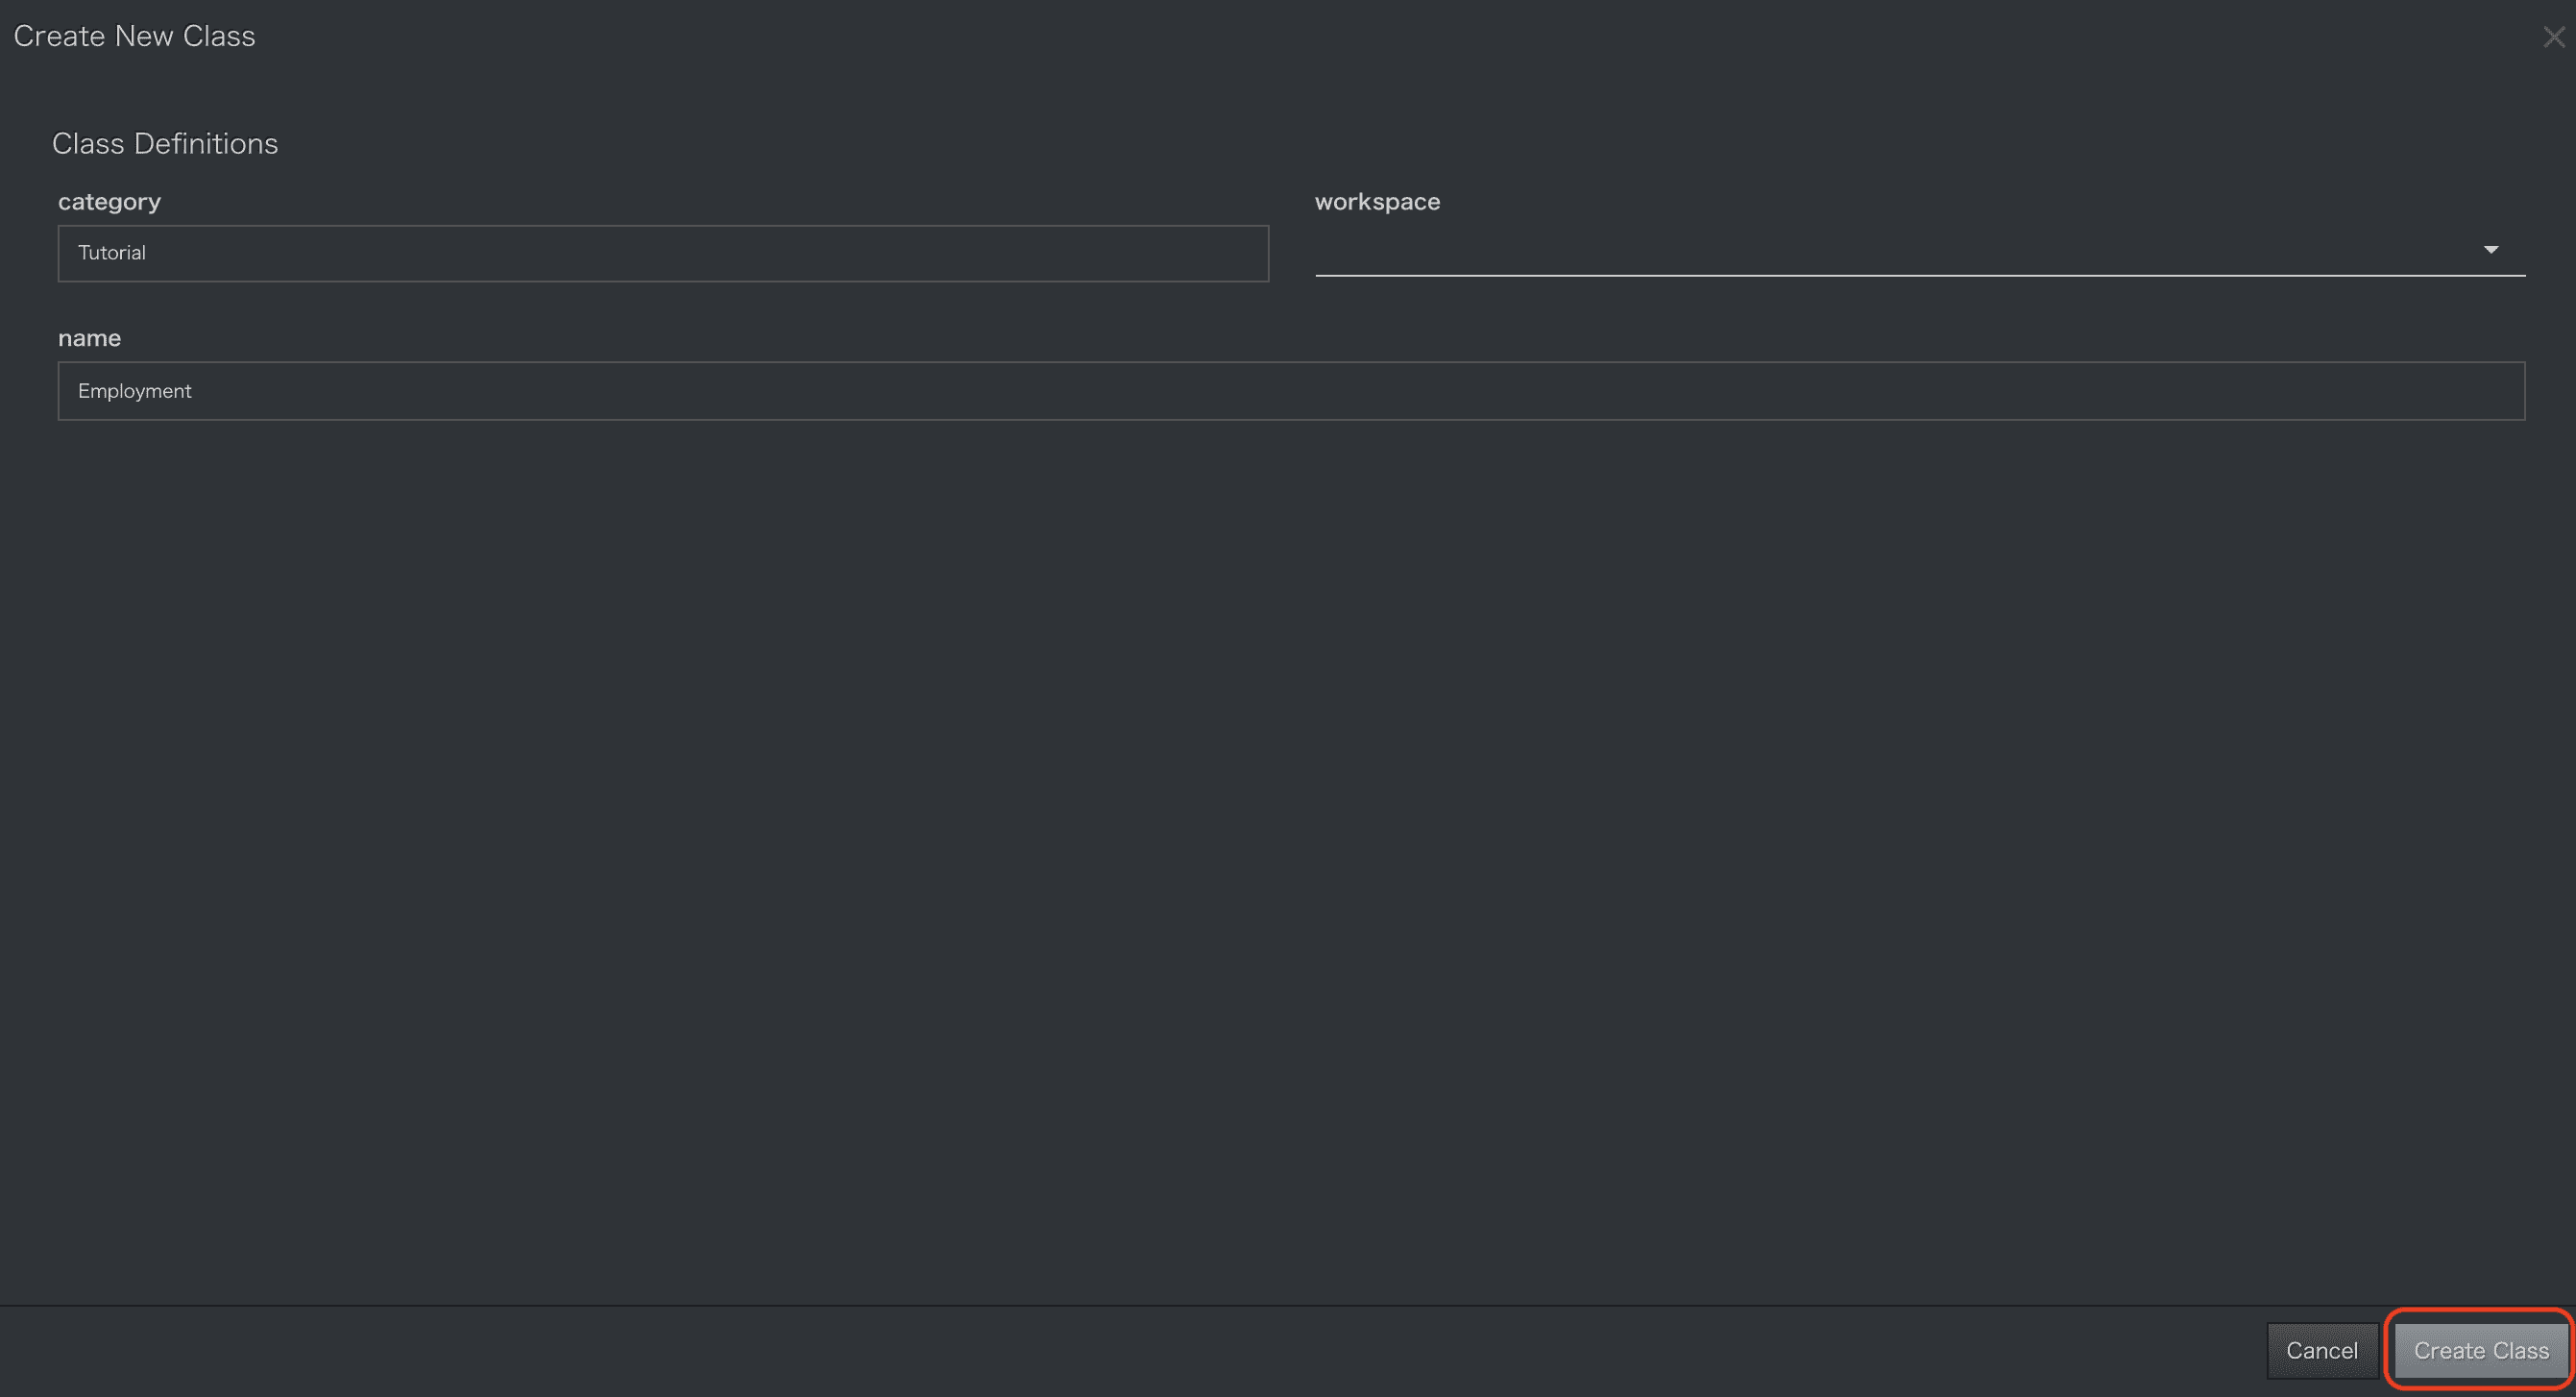
以下の項目を入力してください。
| 項番 | 項目 | 入力値 | 説明 |
|---|---|---|---|
| 1 | category | Tutorial | ATOMが属する分類を指定してください。この情報はクラスエディタでの階層表示のためのタグとしてのみ使用されます。 |
| 2 | workspace | 未指定 | ワークスペースを設定します。 |
| 3 | name | Employment | ATOMの名前を指定します(クラス名と同義)。ユニークである必要があります。 |
-
入力後、画面右下部にある[Create Class]ボタンを押下します。
-
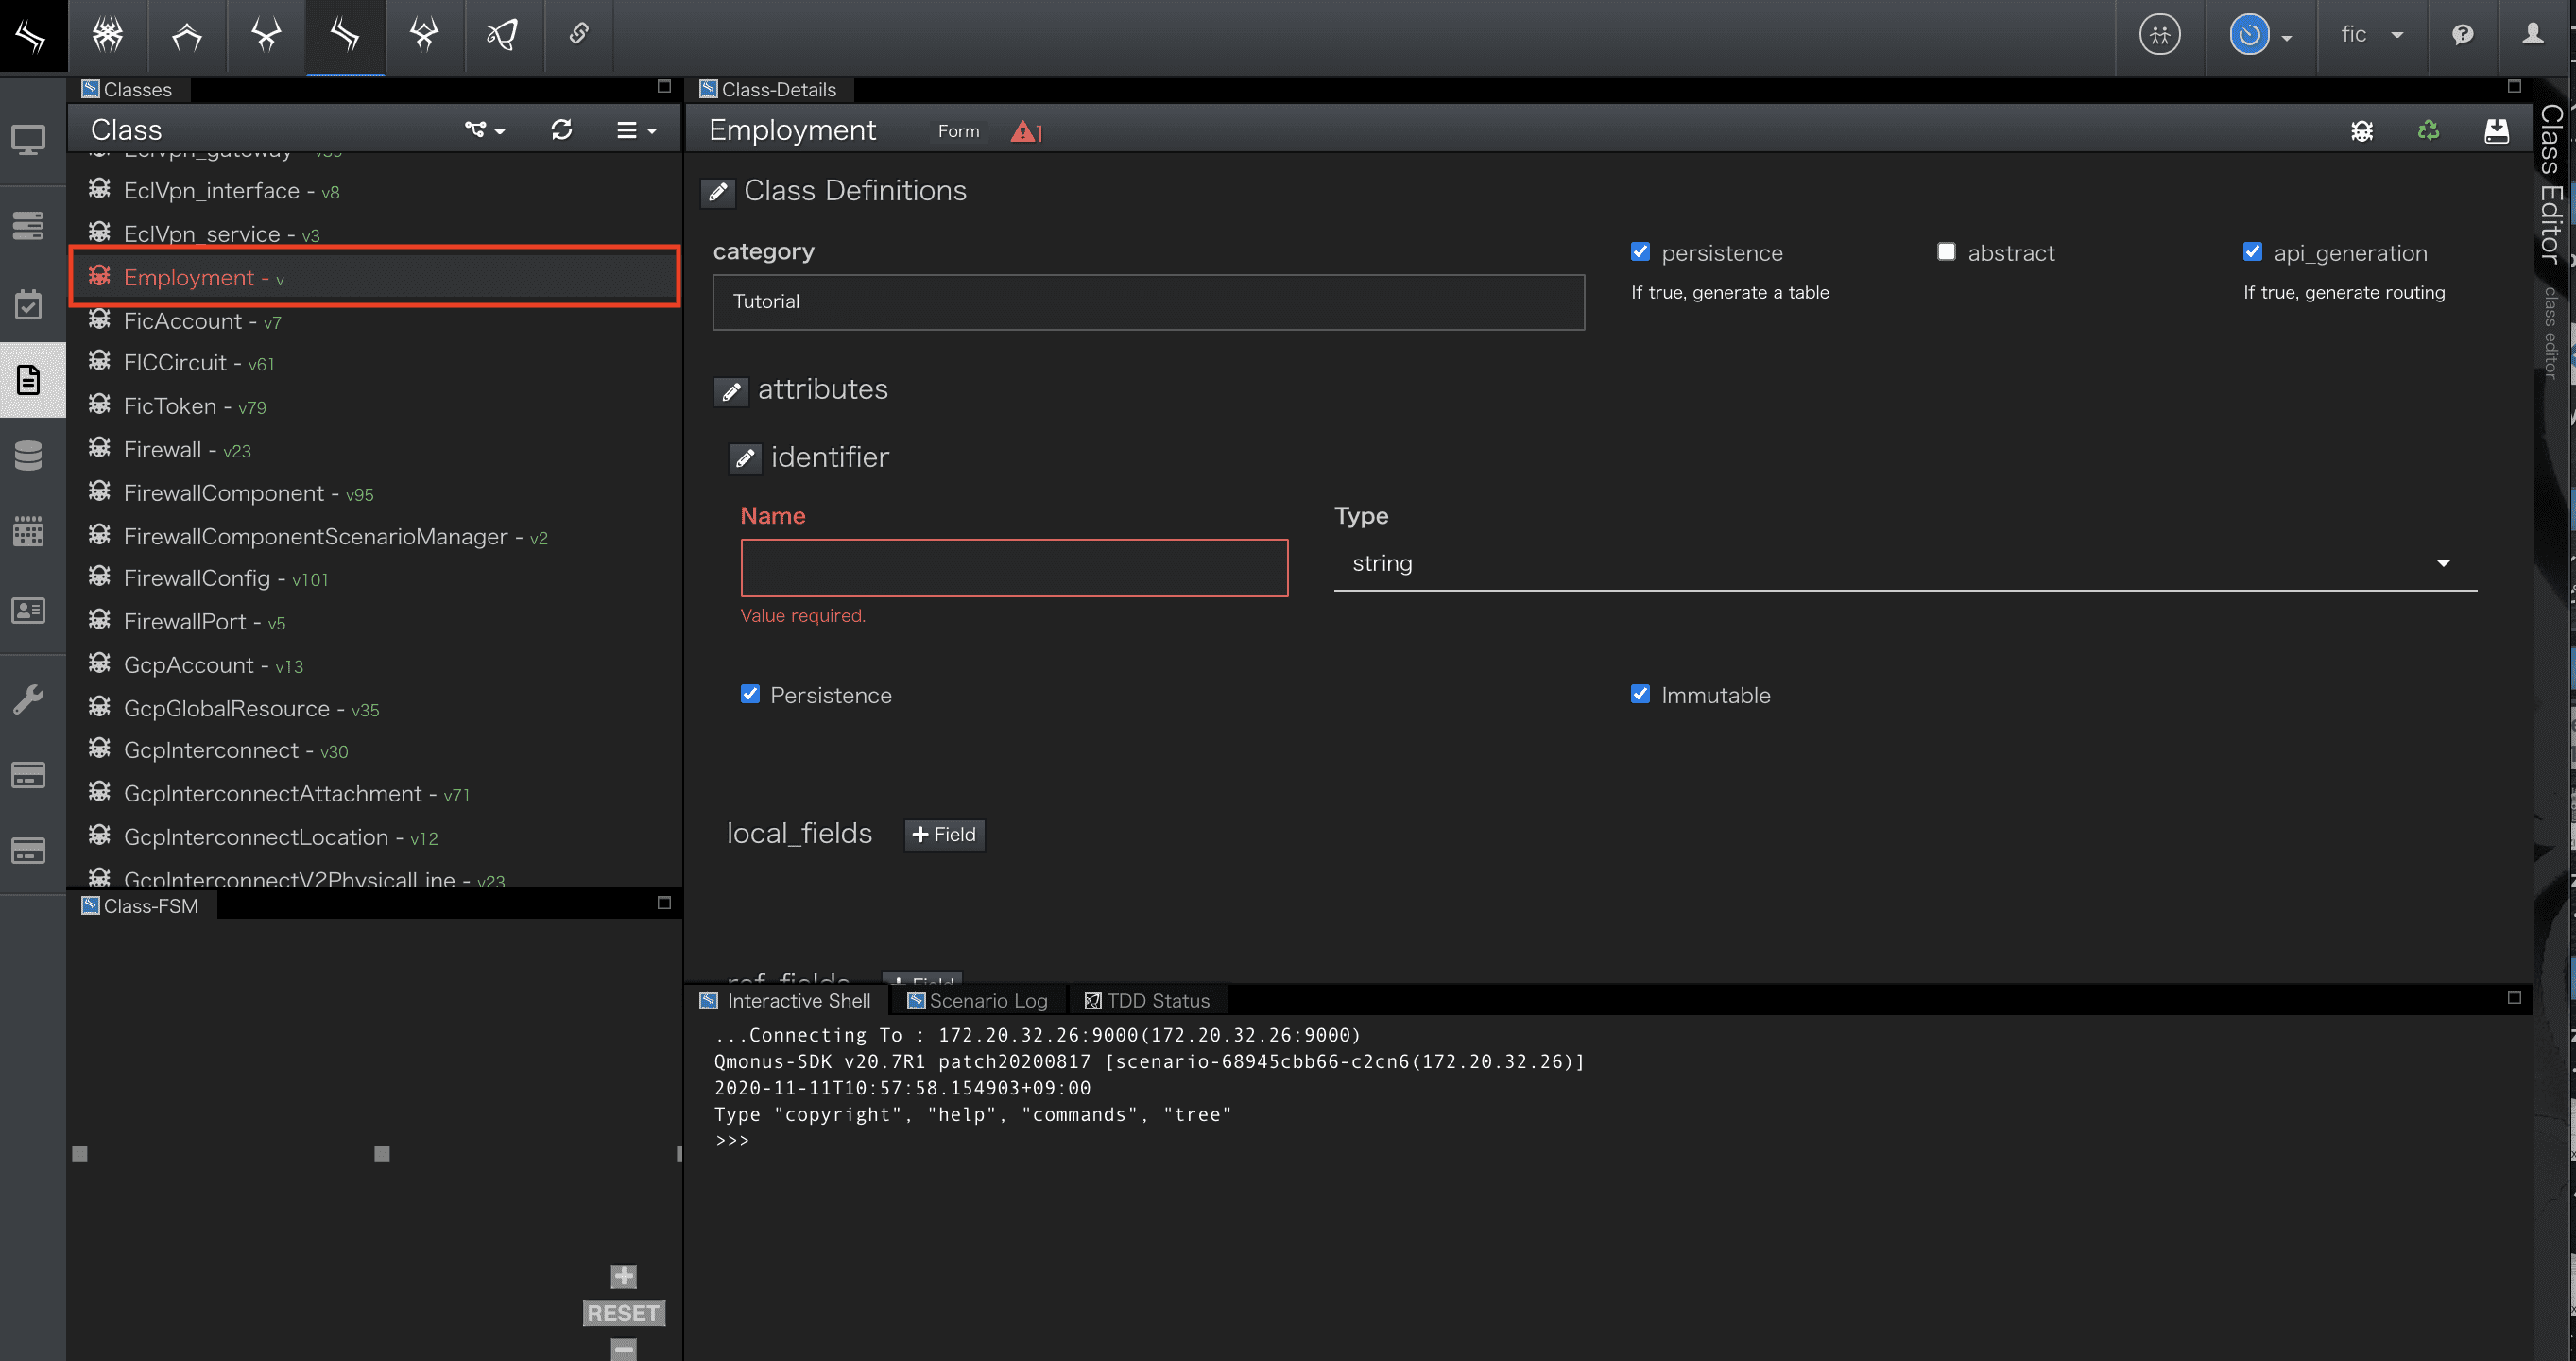
画面左部のクラス一覧に作成する
Employmentクラスが確認できます。
-
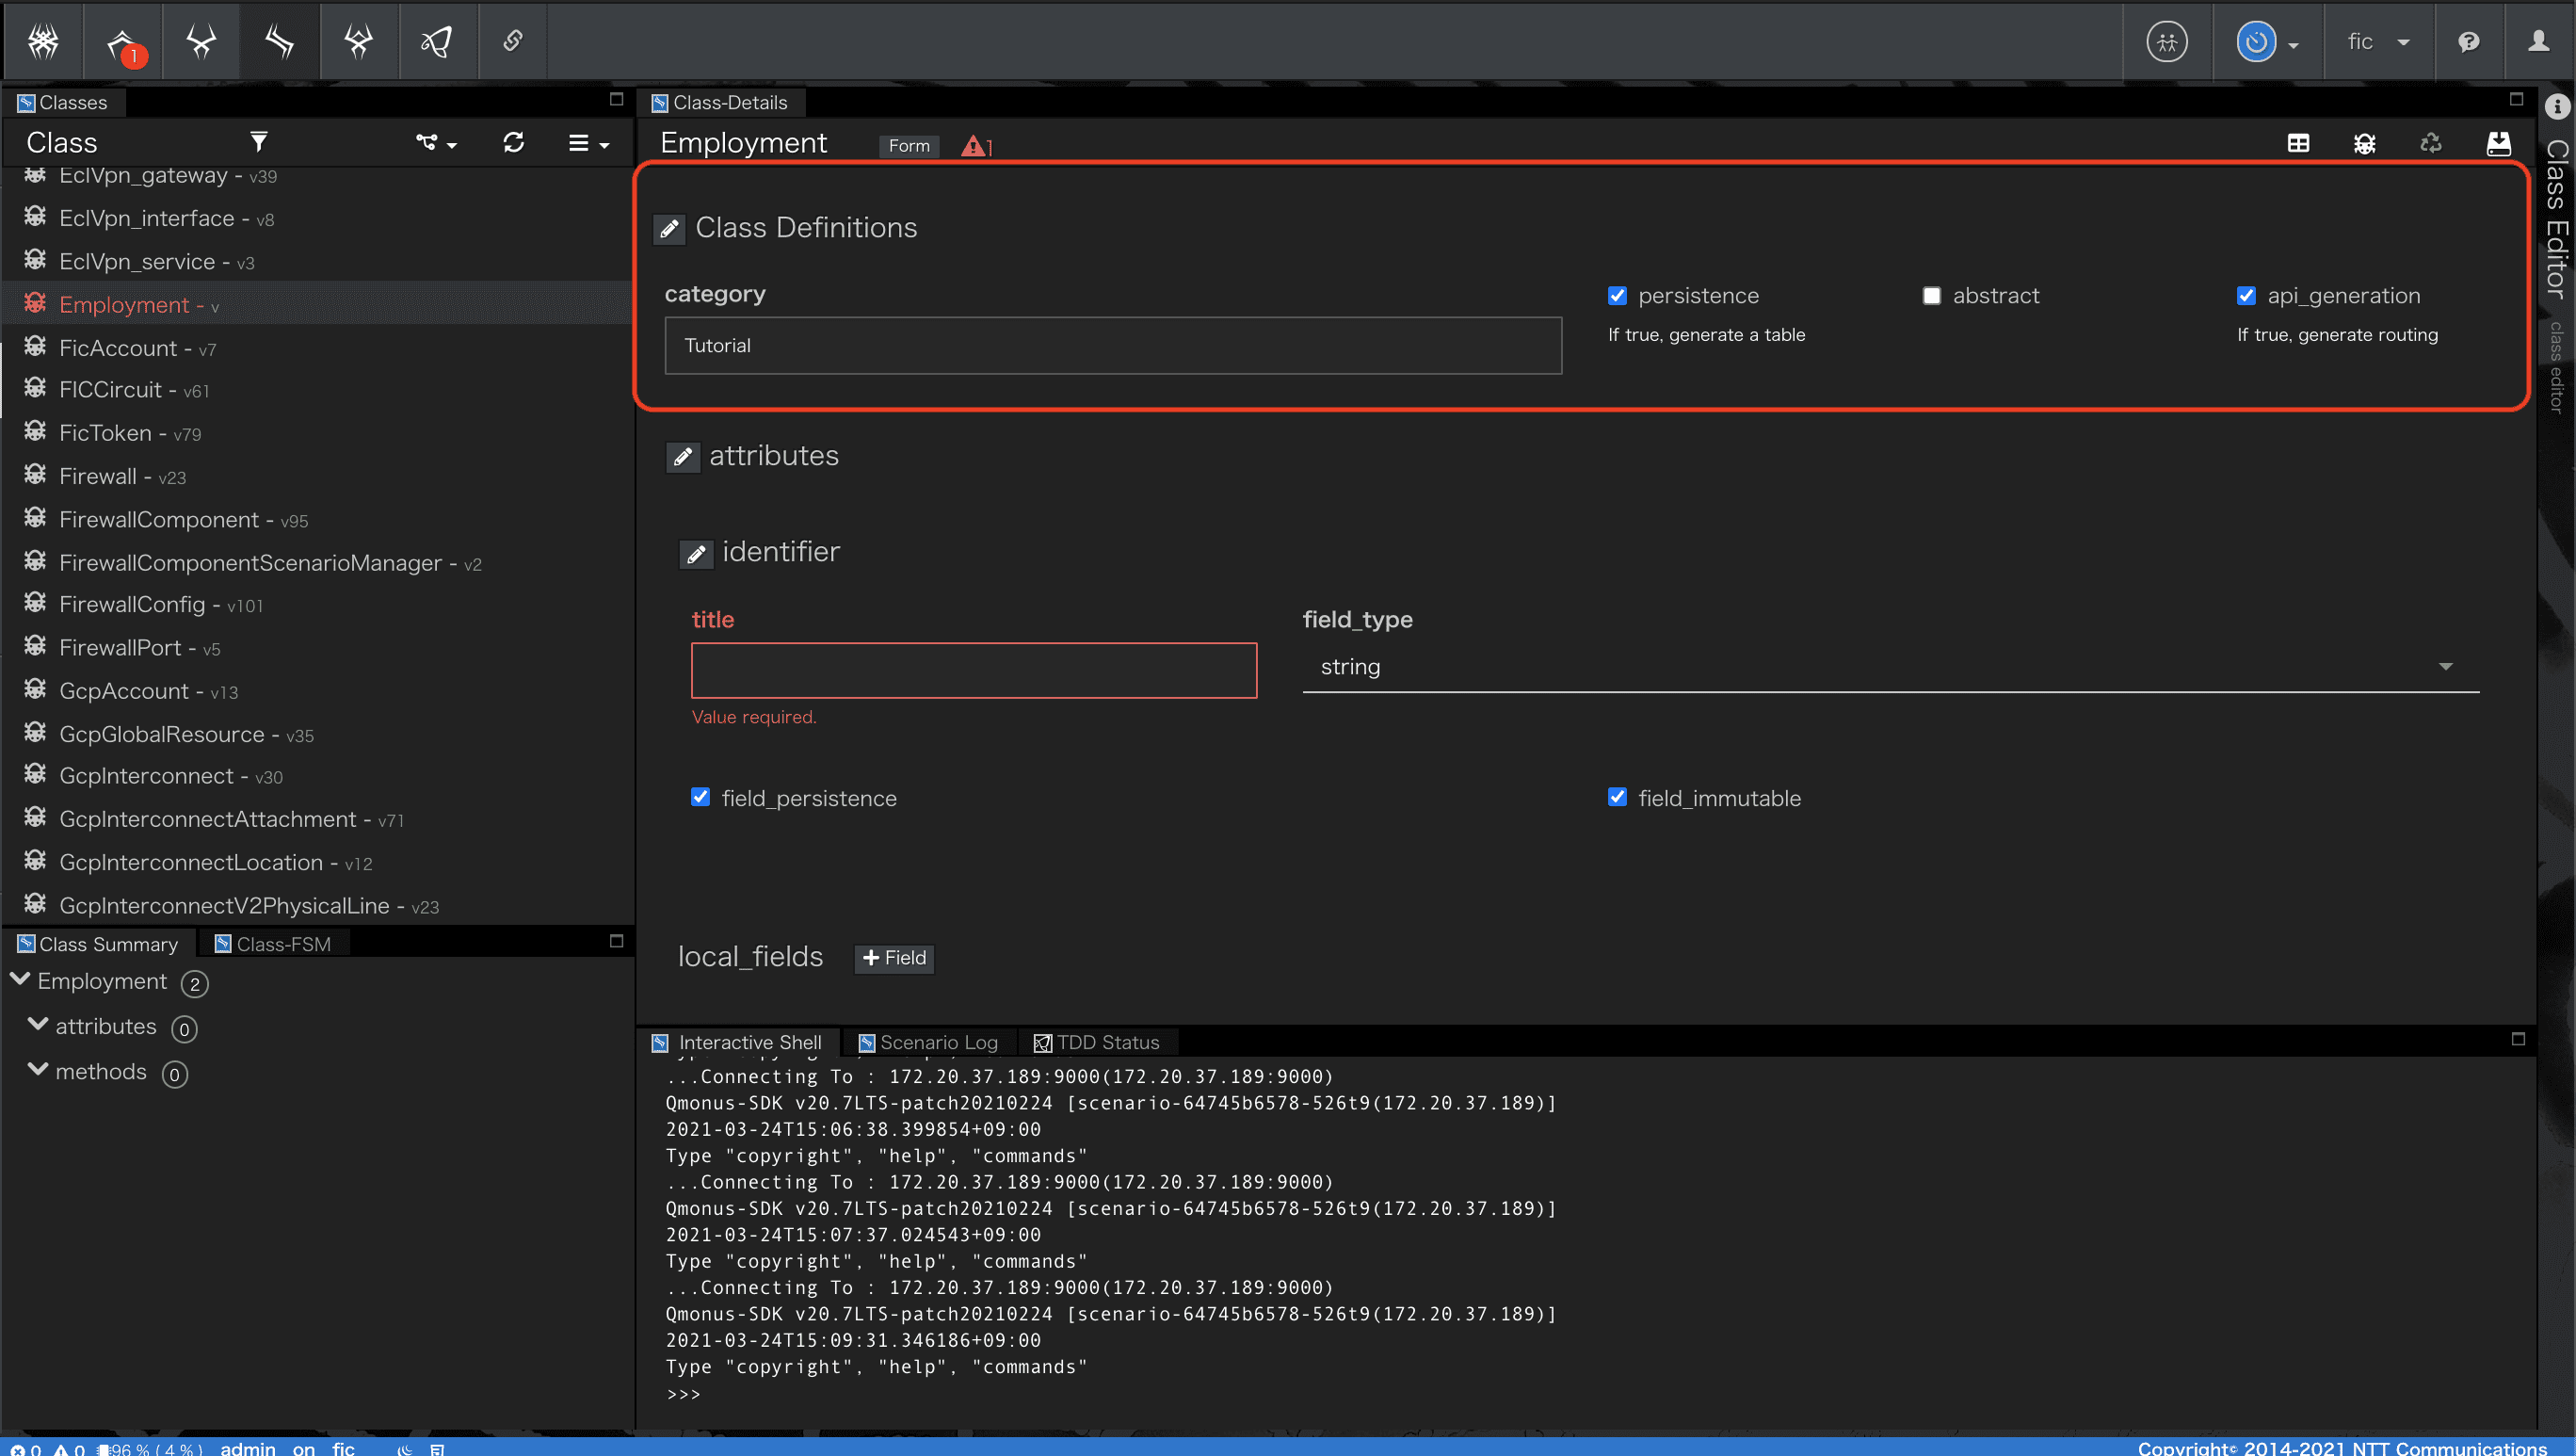
[Class Definitions]ではATOMクラス名や各種動作モードをのメタ情報を定義します。
-
defaultで設定されているメタ情報に加えて、
api_basepath項目を追加します。

-
api_basepath項目には/tutorialsを入力します。

-
persistence、abstract、api_generationなどのその他メタ情報はdefault値が設定されています。今回はdefaultの設定とします。
| 項番 | 項目 | 入力値 | 説明 |
|---|---|---|---|
| 1 | persistence | 選択(default) | 永続化モードを指定します。選択した場合、ATOM定義を保存するとクラス構造に対応するデータベーステーブルが自動的に生成され、データベースに対するCRUDの組込みメソッドが実装されます。 |
| 2 | abstract | 未選択(default) | 抽象クラスモードを指定します。 |
| 3 | api_generationme | 選択(default) | API自動生成モードを指定します。API自動生成モードでは、ATOMをCRUDするためのRestful APIが自動的に生成されます。 |
| 4 | api_basepath | /tutorials | API自動生成モードで生成されるAPIルーティングの基底パスを指定します。 |
ATOMで定義する情報の詳細は
Qmonus SDK Programming Guide » Scenario » ATOM
を参照してください。
3. ATOM-フィールド定義
次にATOMクラスEmploymentの属性定義を行います。
identifier fieldの定義
ATOMインスタンスを一意に識別するIDを定義するフィールドです。
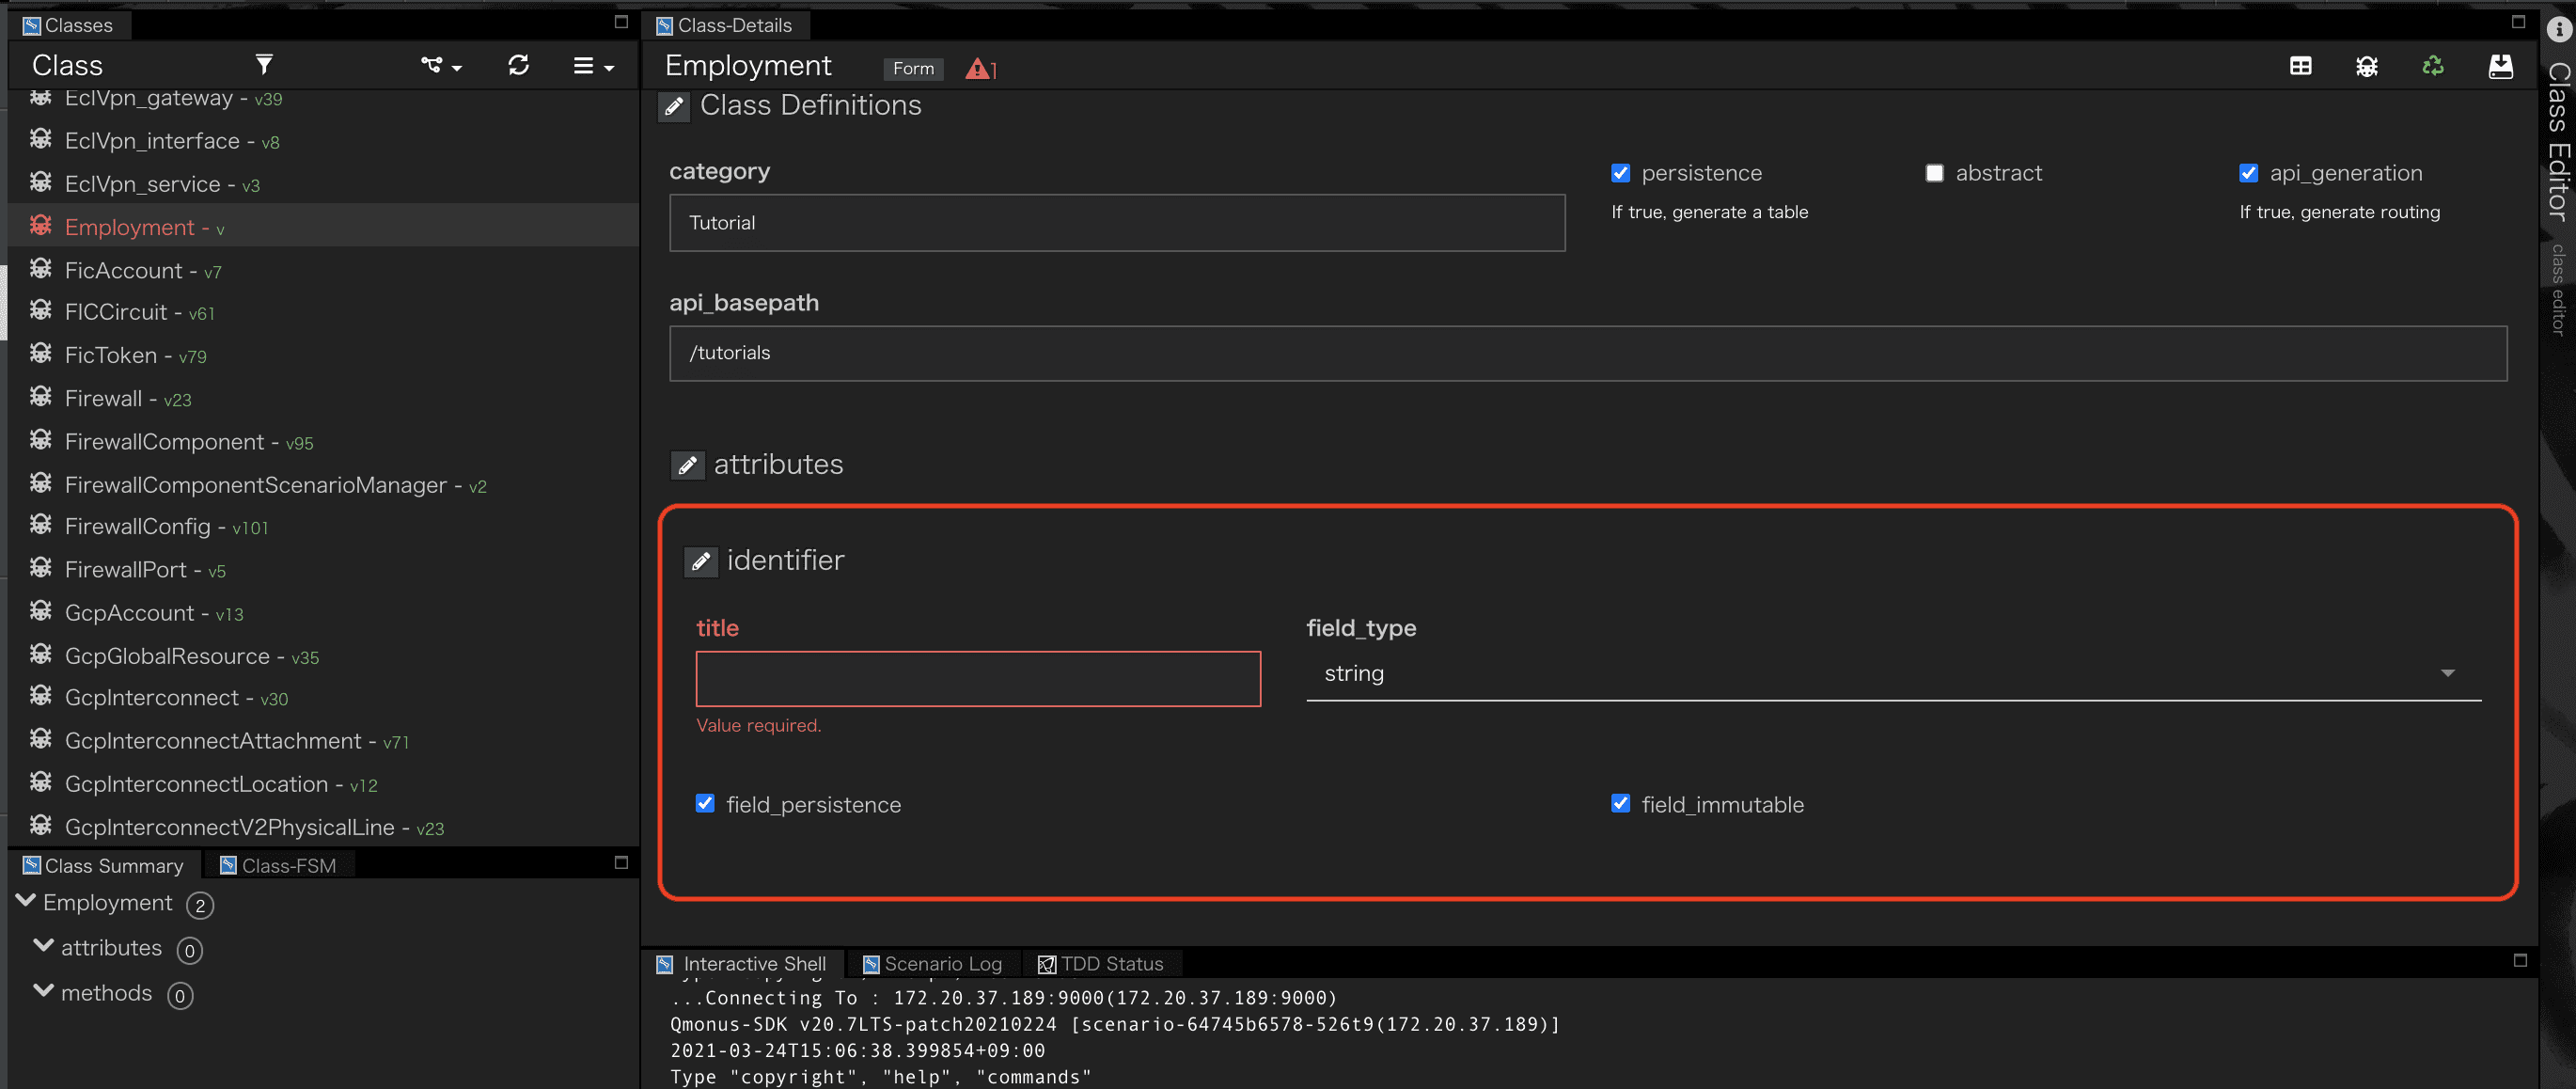
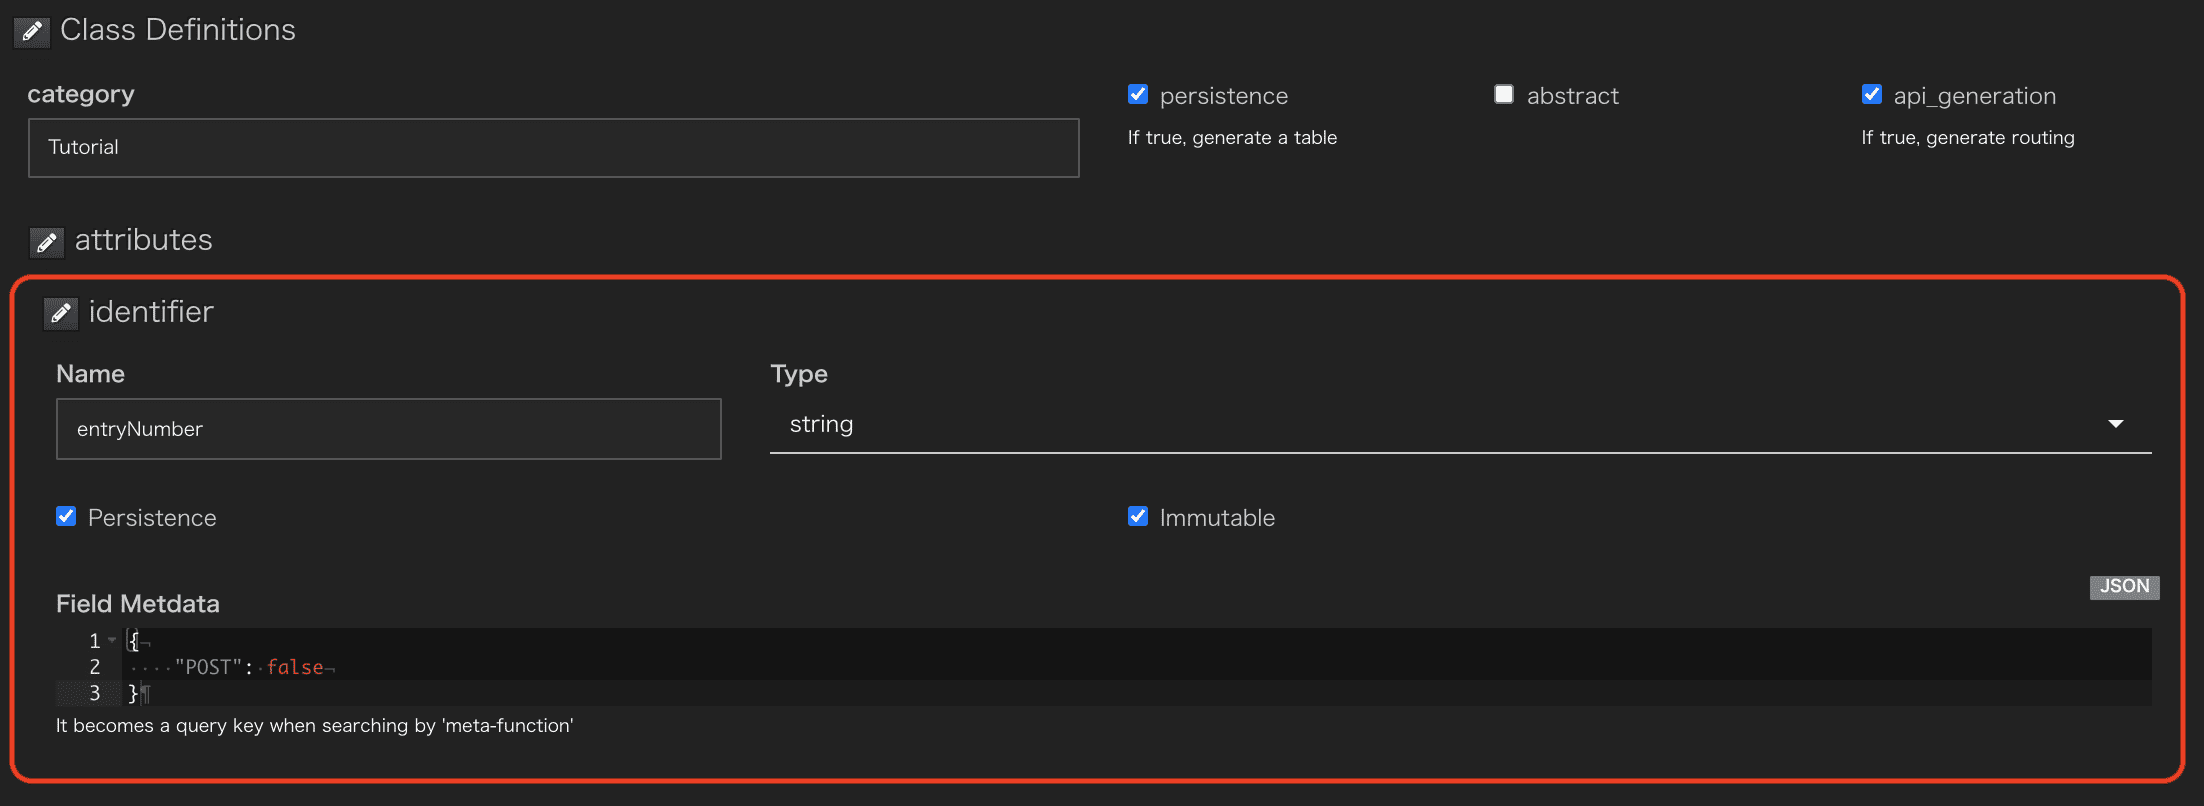
- [attributes]>[identifier]に以下を入力します。
| 項番 | 項目 | 入力値 | 説明 |
|---|---|---|---|
| 1 | field_name | entryNumber | フィールド名を指定します |
| 2 | field_type | [String]を選択(default) | フィールドの型を指定します。 |
| 3 | field_persistence | 選択(default) | フィールドの永続化モードを指定します。選択しない場合は本フィールドはデータベースカラムとして生成されません。 |
| 4 | field_immutable | 選択(default) | フィールドの値が不変かを指定します。選択した場合、本フィールドの値変更は許可されません。 |
| 5 | field_metadata* | {"POST": false} |
フィールドに任意のメタ情報を定義します。メタ情報はdict型のデータを設定してください。 |
* field_metadataの入力欄を表示するにはidentifierの横にある鉛筆マークから選択します。
local fieldsの定義
ATOMインスタンスが保持するローカルフィールドを定義していきます。
-
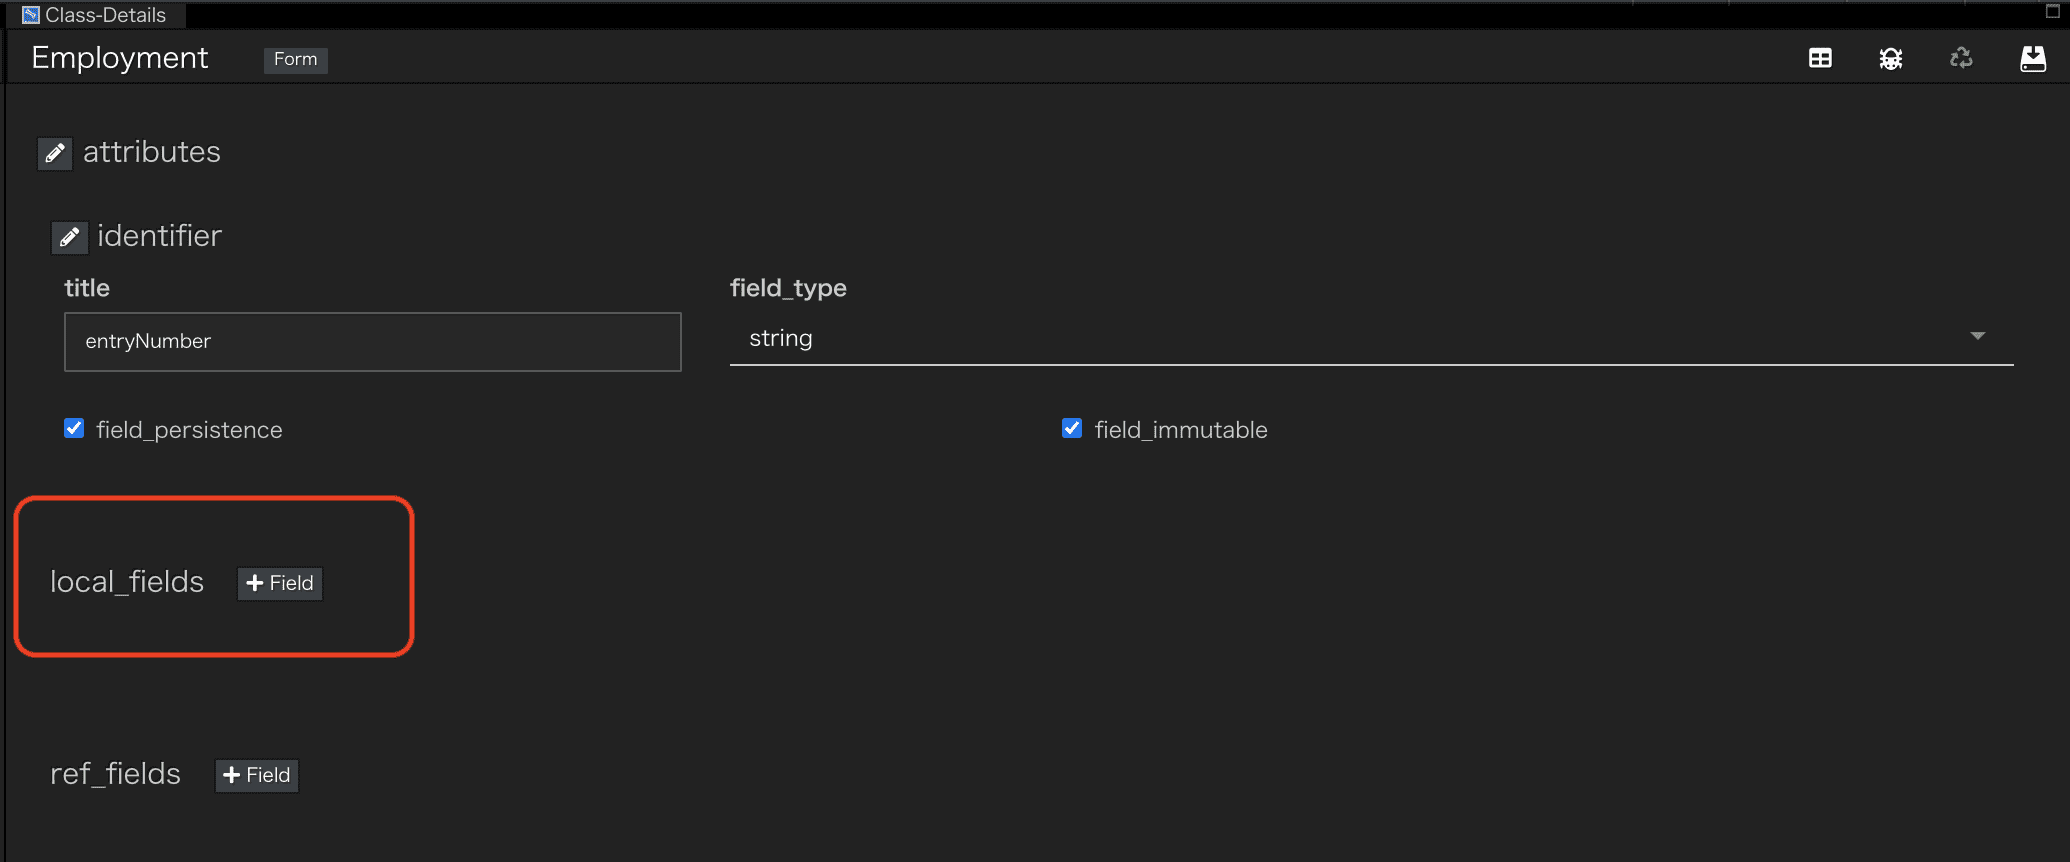
初期表示では
local fieldの入力欄がありません。
-
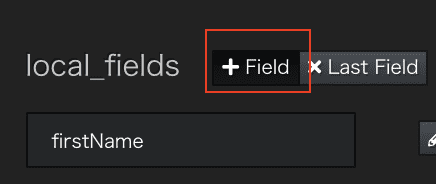
[attributes]-[local_fields]項目右にある[+Field]ボタンを押下することでfieldを追加できます。
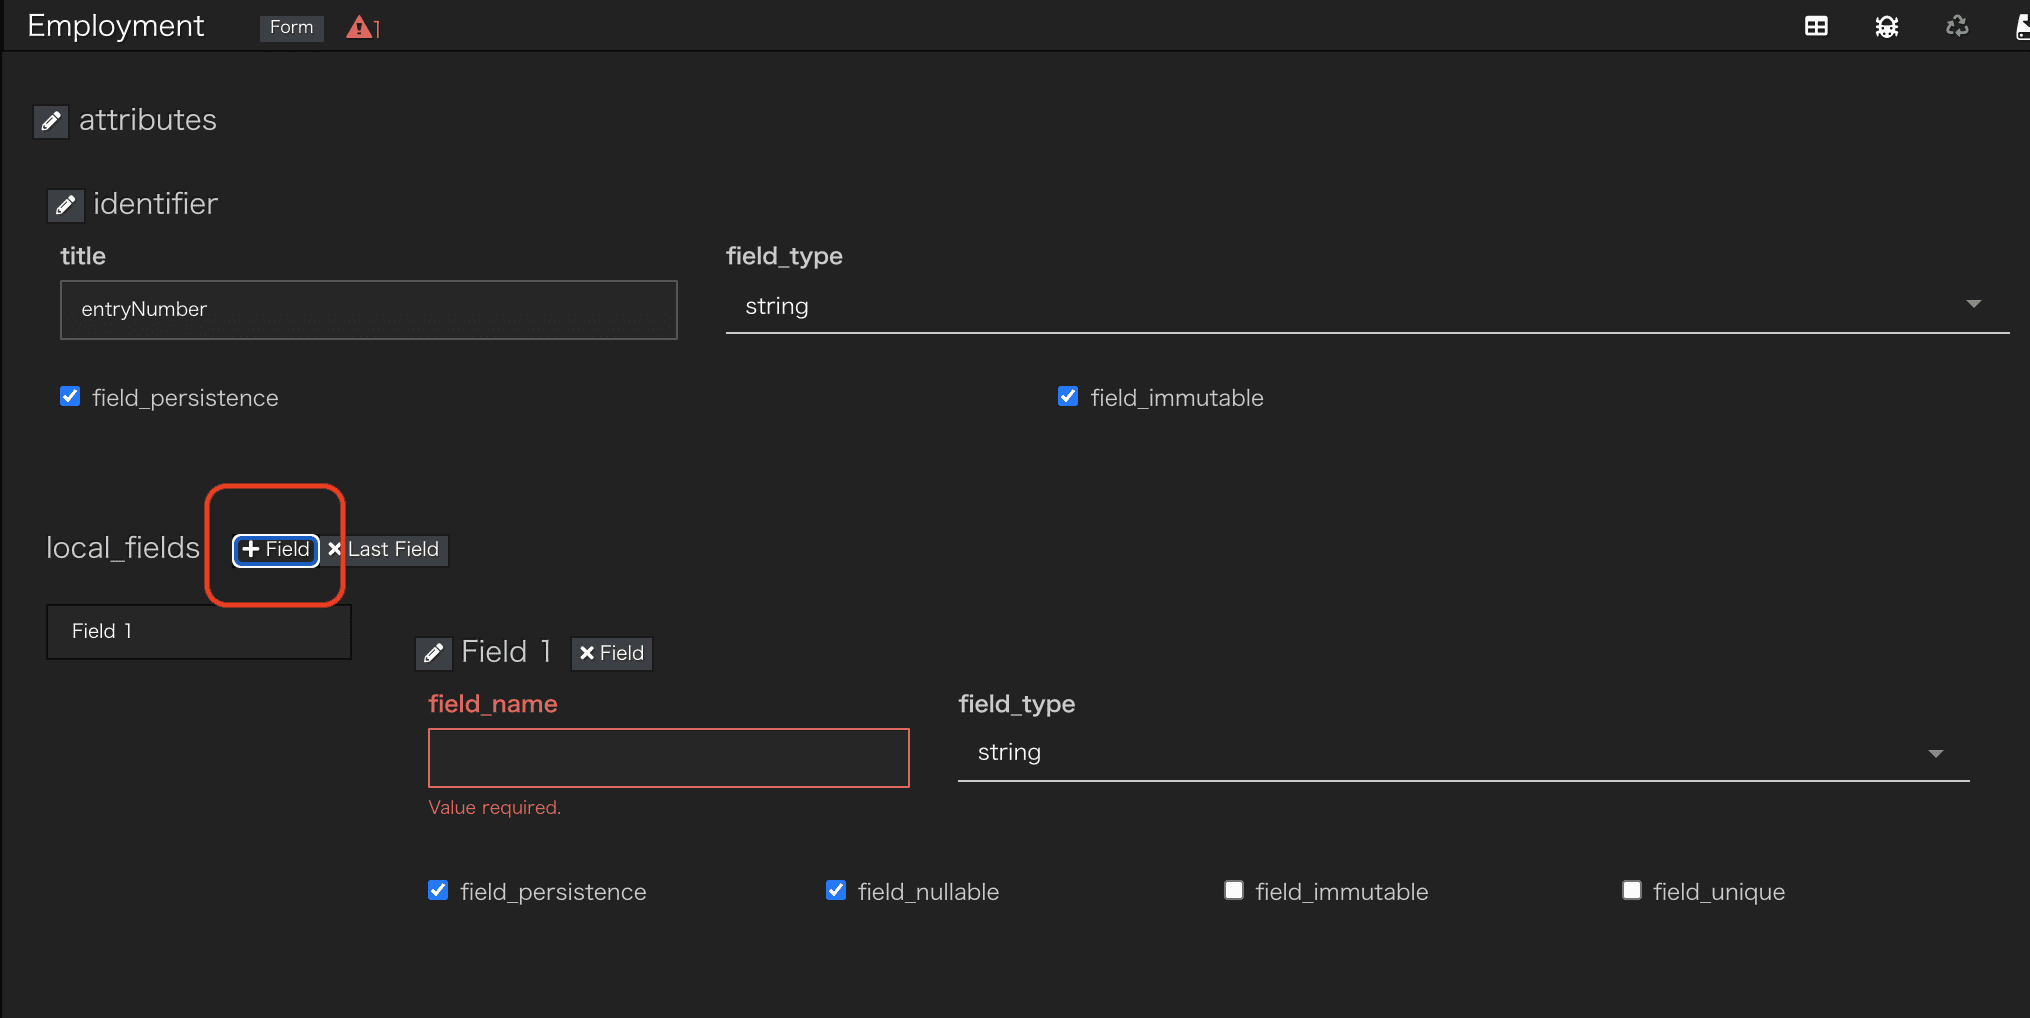
local_fieldsにfirstNameを設定します。
| 項番 | 項目 | 入力値 | 説明 |
|---|---|---|---|
| 1 | field_name | firstName | identifier field参照 |
| 2 | field_type | [String]を選択(default) | identifier field参照 |
| 3 | field_persistence | 選択(default) | identifier field参照 |
| 4 | field_nullable | 選択(default) | フィールドの値にNullを許容するかを指定します。 |
| 5 | field_immutable | 未選択(default) | identifier field参照 |
| 6 | field_unique | 未選択(default) | フィールドが複合ユニークインデックスの対象かを指定します。 |
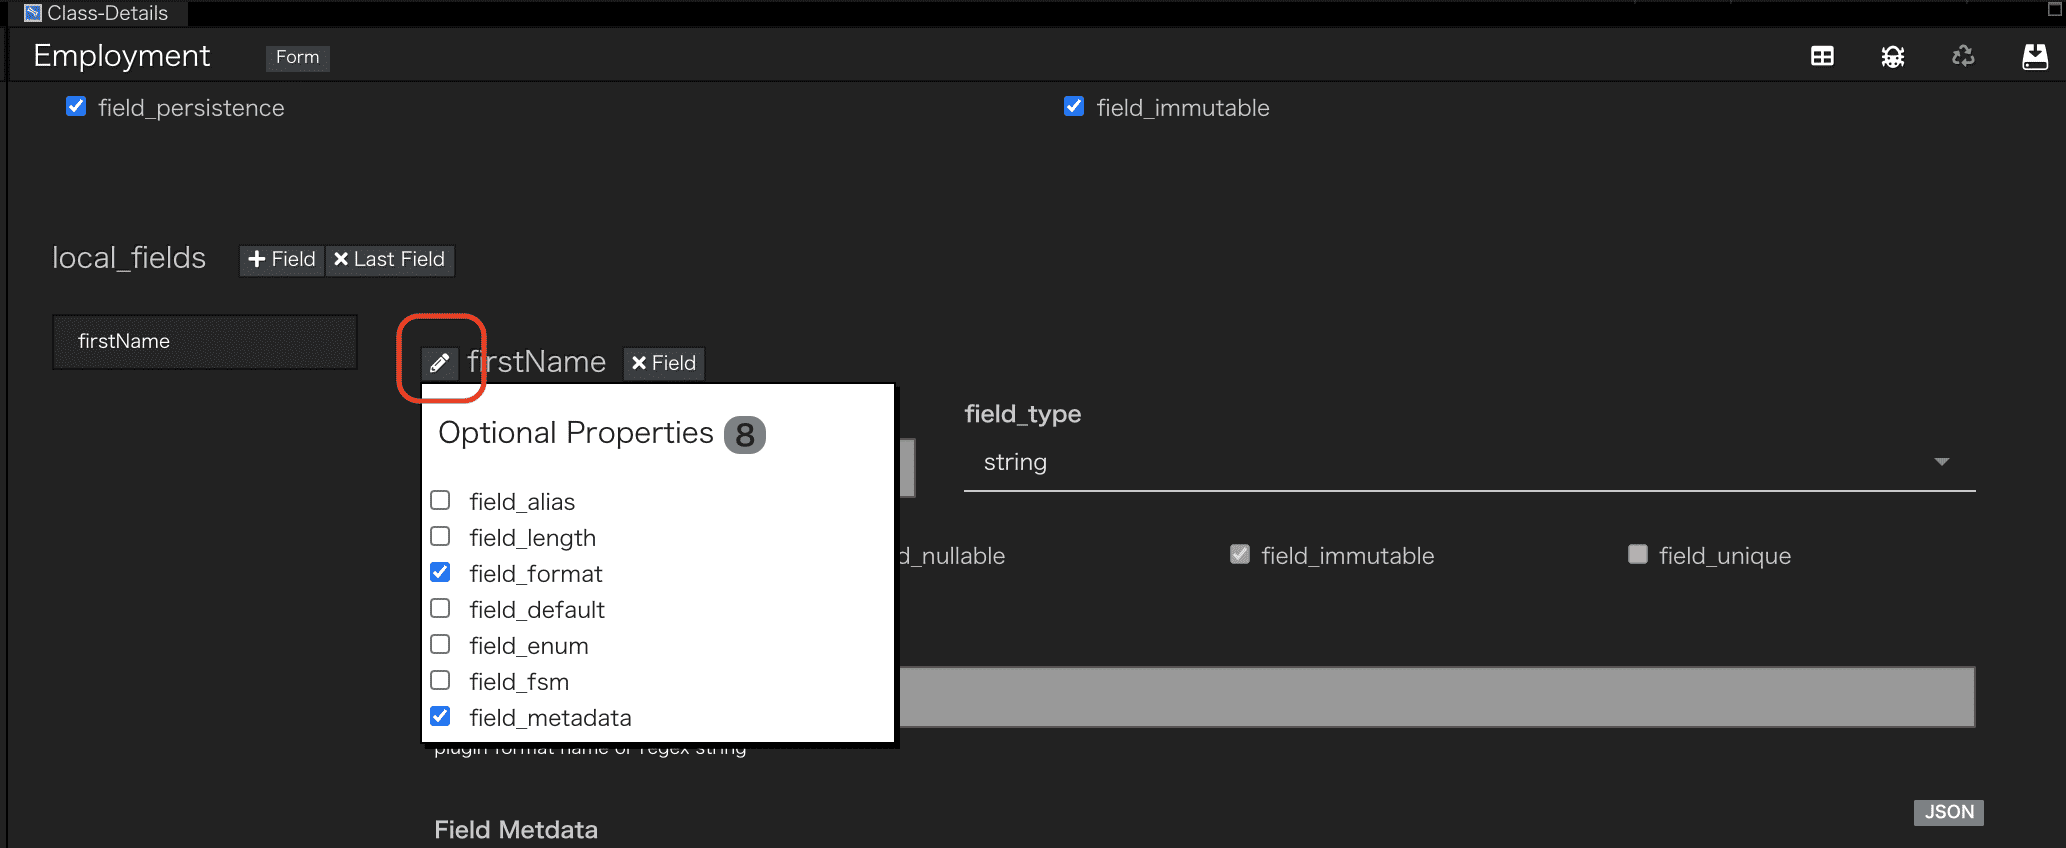
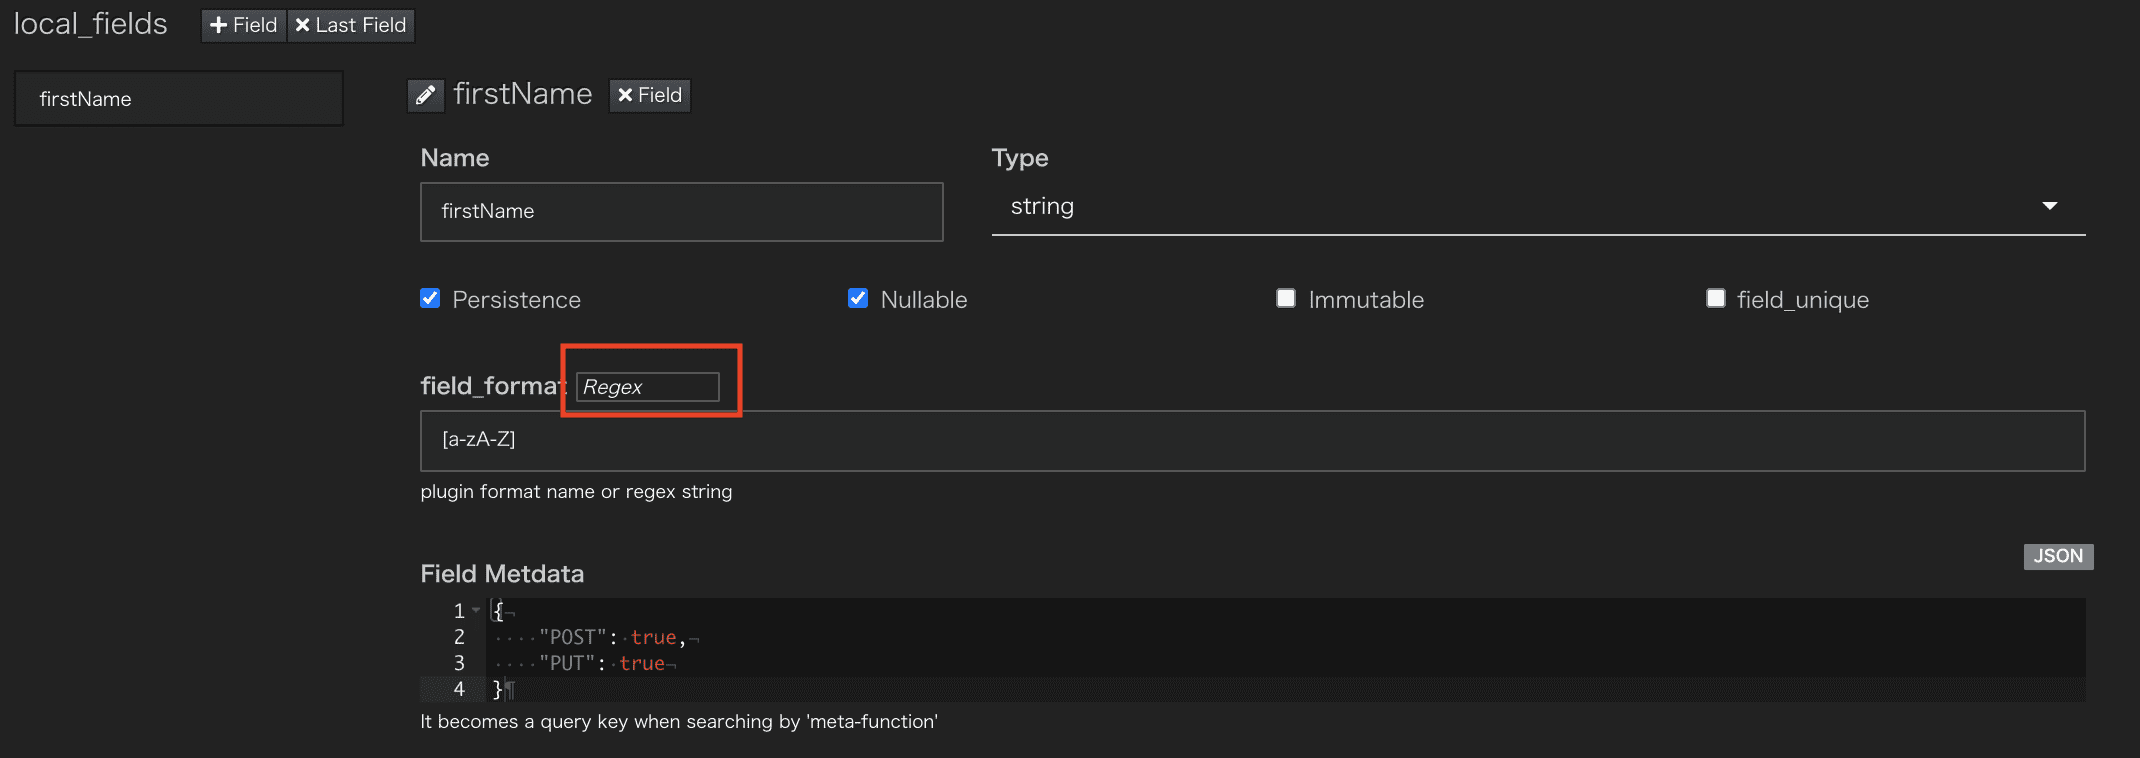
| 7 | field_format* | [a-zA-Z] | フィールドのフォーマットをjsonschemaもしくは正規表現で指定します。 |
| 8 | field_metadata* | {"POST": true,"PUT": true} |
identifier field参照 |
* field_formatとfield_metadataの入力欄を表示するにはOptional Propetiesから選択します。
- field_formatはJSON Schemaと正規表現での規定が選択できます。今回は正規表現で規定します。
以降、firstNameと同様にlocal_fieldsを追加し作成します。
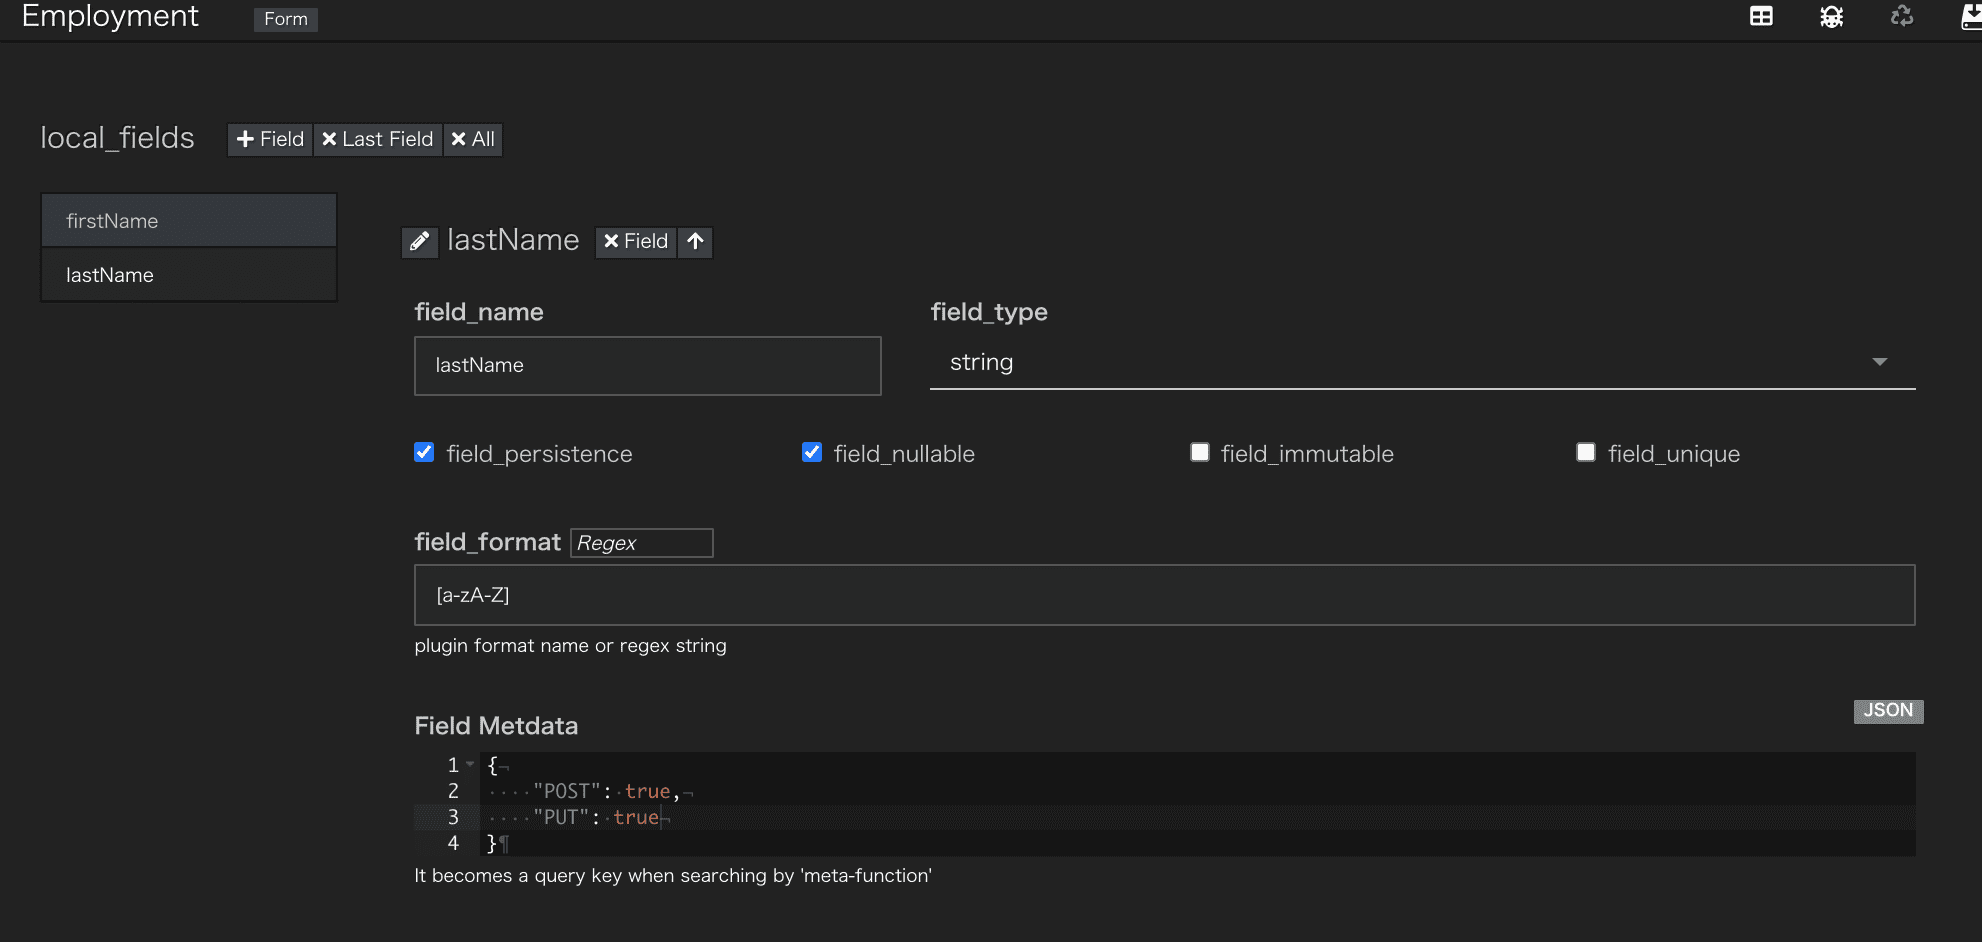
lastNameの設定をします。
| 項番 | 項目 | 入力値 |
|---|---|---|
| 1 | field_name | lastName |
| 2 | field_type | [String]を選択(default) |
| 3 | field_persistence | 選択(default) |
| 4 | field_nullable | 選択(default) |
| 5 | field_immutable | 未選択(default) |
| 6 | field_unique | 未選択(default) |
| 7 | field_format | [a-zA-Z] |
| 8 | field_metadata | {"POST": true,"PUT": true} |
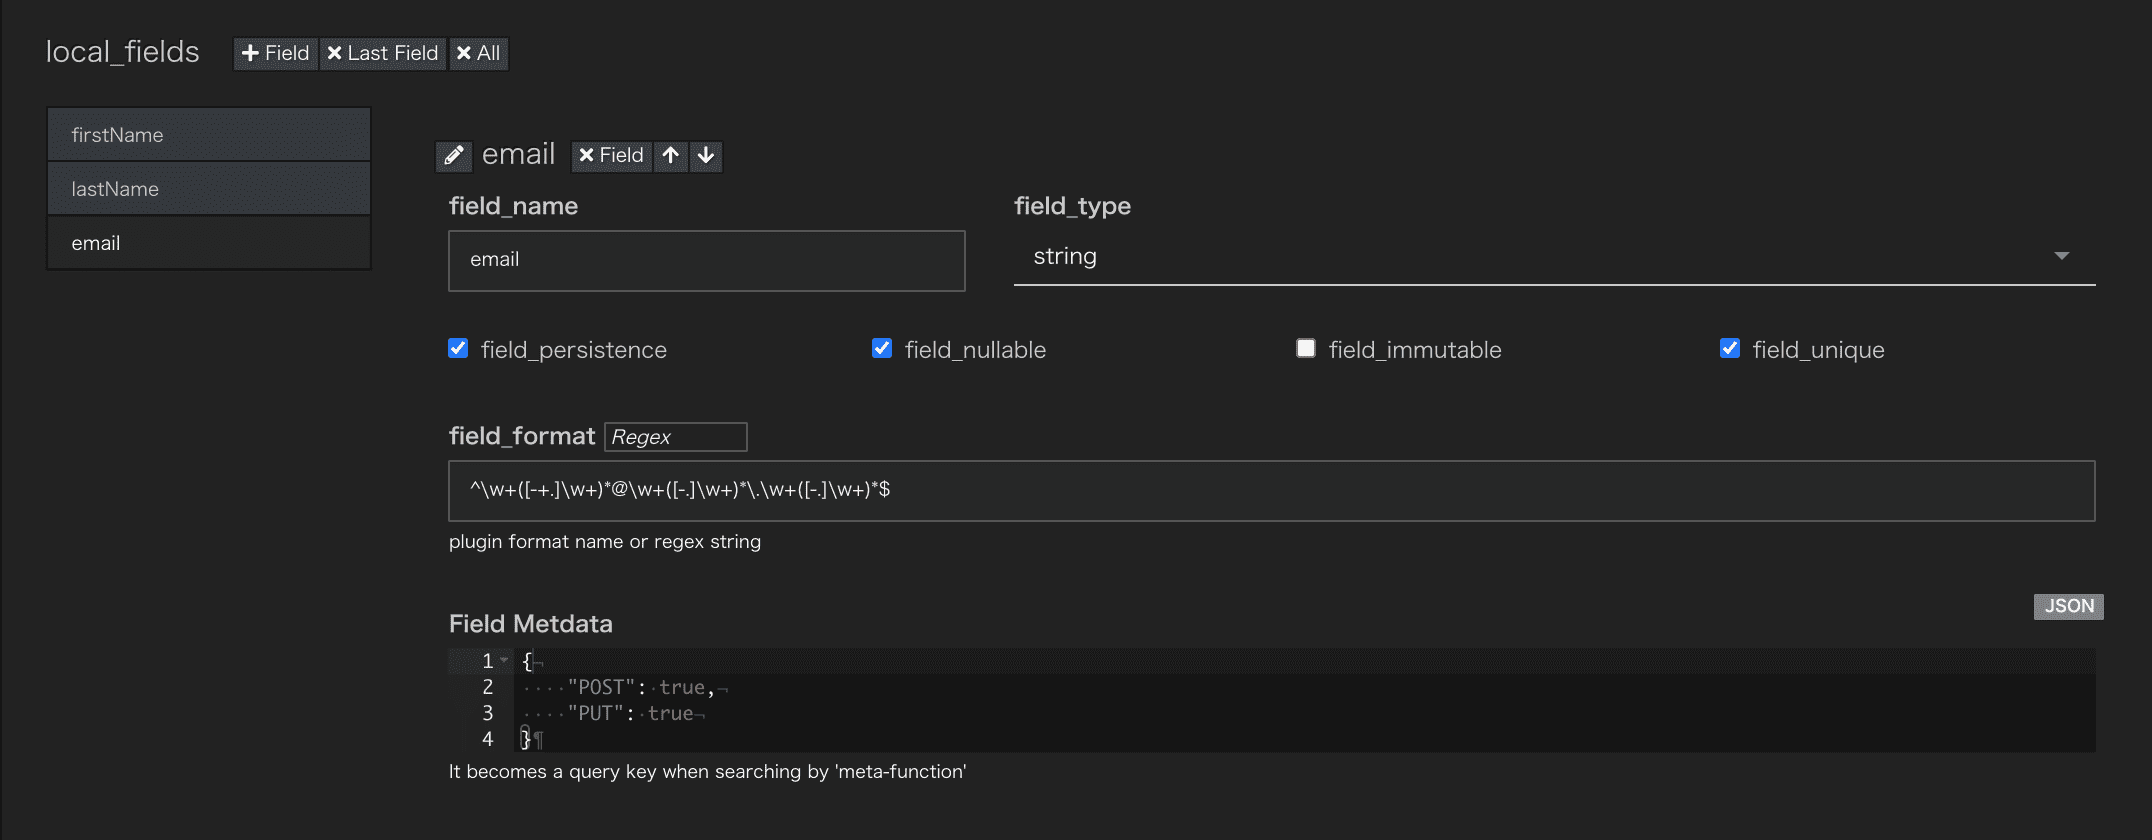
emailの設定をします。
| 項番 | 項目 | 入力値 |
|---|---|---|
| 1 | field_name | |
| 2 | field_type | [String]を選択(default) |
| 3 | field_persistence | 選択(default) |
| 4 | field_nullable | 選択(default) |
| 5 | field_immutable | 未選択(default) |
| 6 | field_unique | 選択 |
| 7 | field_format | ^\w+([-+.]\w+)*@\w+([-.]\w+)*\.\w+([-.]\w+)*$ |
| 8 | field_metadata | {"POST": true,"PUT": true} |
salaryRequirementsの設定をします。
| 項番 | 項目 | 入力値 |
|---|---|---|
| 1 | field_name | salaryRequirements |
| 2 | field_type | [integer]を選択 |
| 3 | field_persistence | 選択(default) |
| 4 | field_nullable | 選択(default) |
| 5 | field_immutable | 未選択(default) |
| 6 | field_unique | 未選択(default) |
| 7 | field_metadata | {"POST": true,"PUT": true} |

作成したATOMの名前を変更することはできません。もし誤って設定してしまった場合は削除し再作成する必要があります。
削除を行う前に、作成したATOMをダウンロードし、ファイル(ATOMの名前)を書き換えアップロードすることで作り直すことも可能です。
4. ATOM-メソッド定義
instance_methodsの定義
initializeメソッドを追加します。

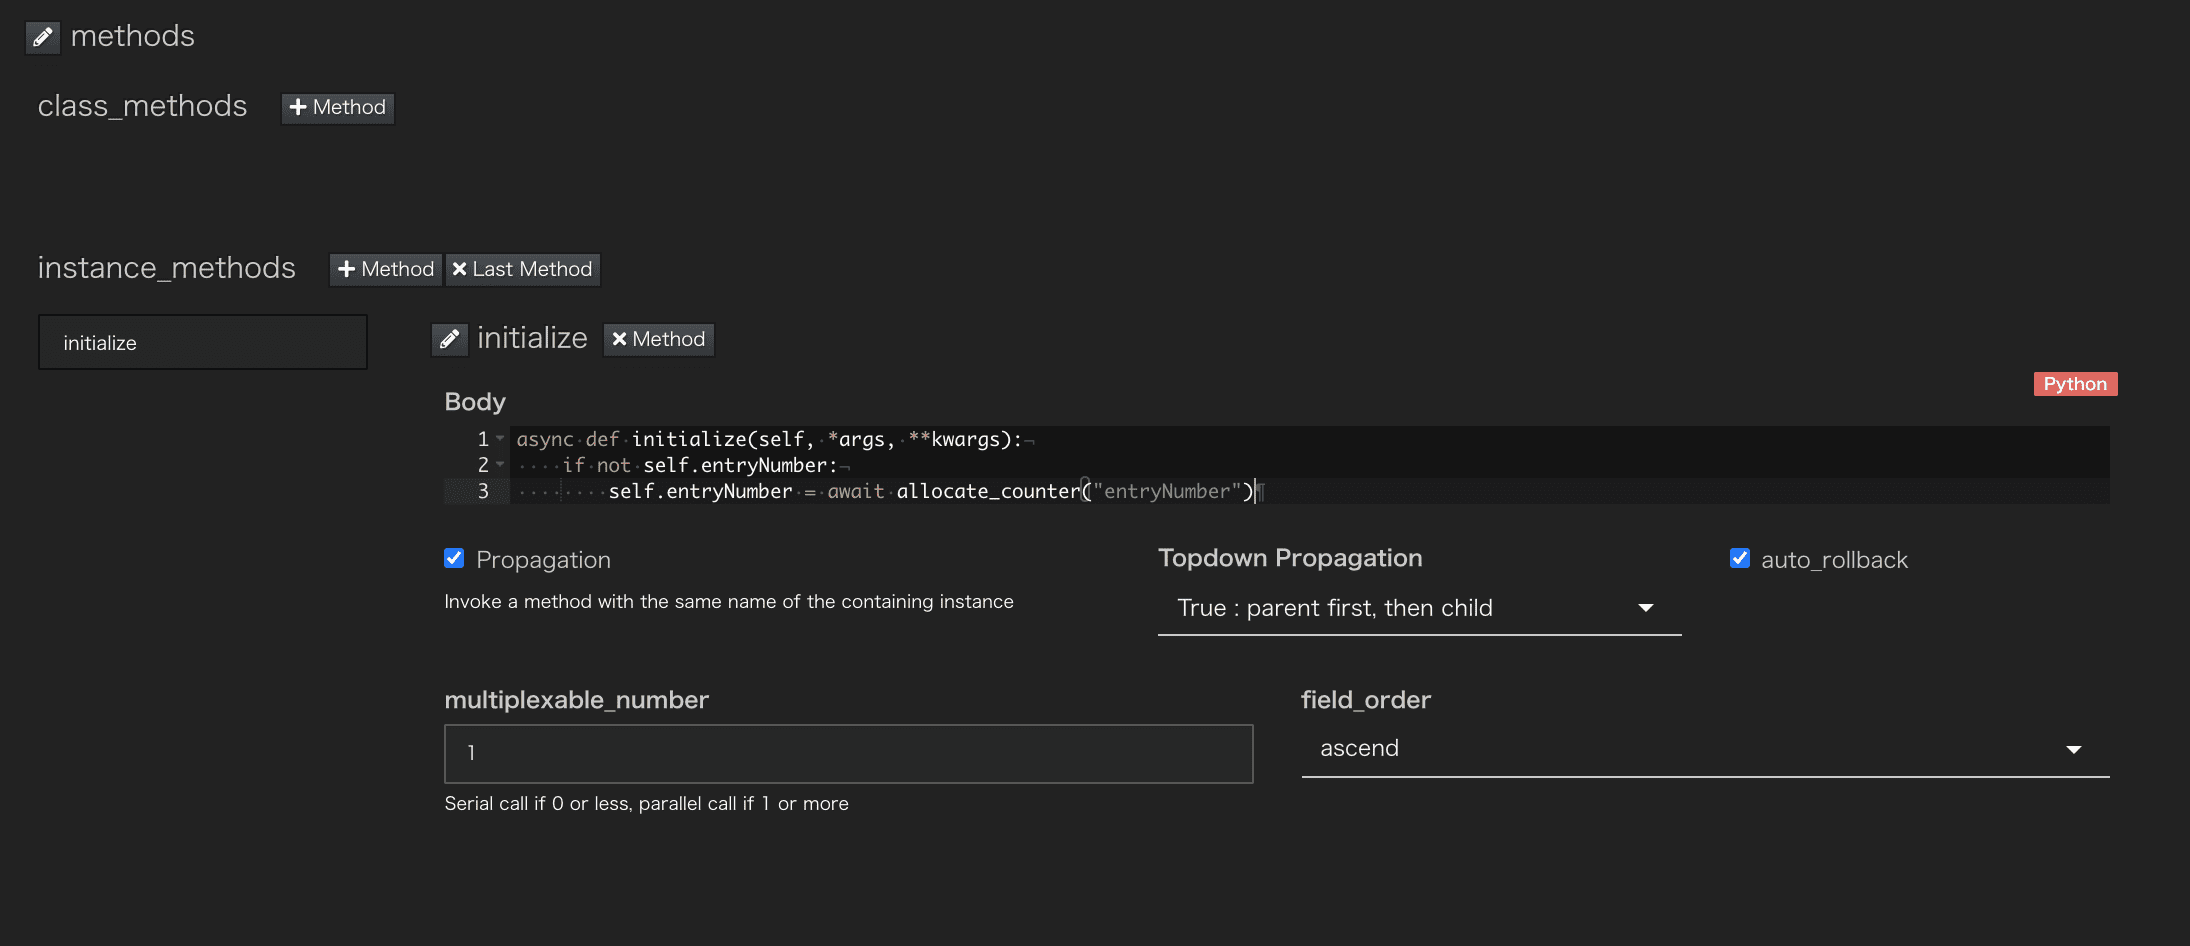
インスタンス化時にカウンタサービスから"entryNumber"を払い出す以下のPython CodeをBody項目に記述します。
python
async def initialize(self, *args, **kwargs):
    if not self.entryNumber:
        self.entryNumber = await Counter.allocate("entryNumber")
クラスエディタ画面右上の[SAVE]アイコンを押下しクラスを保存します。
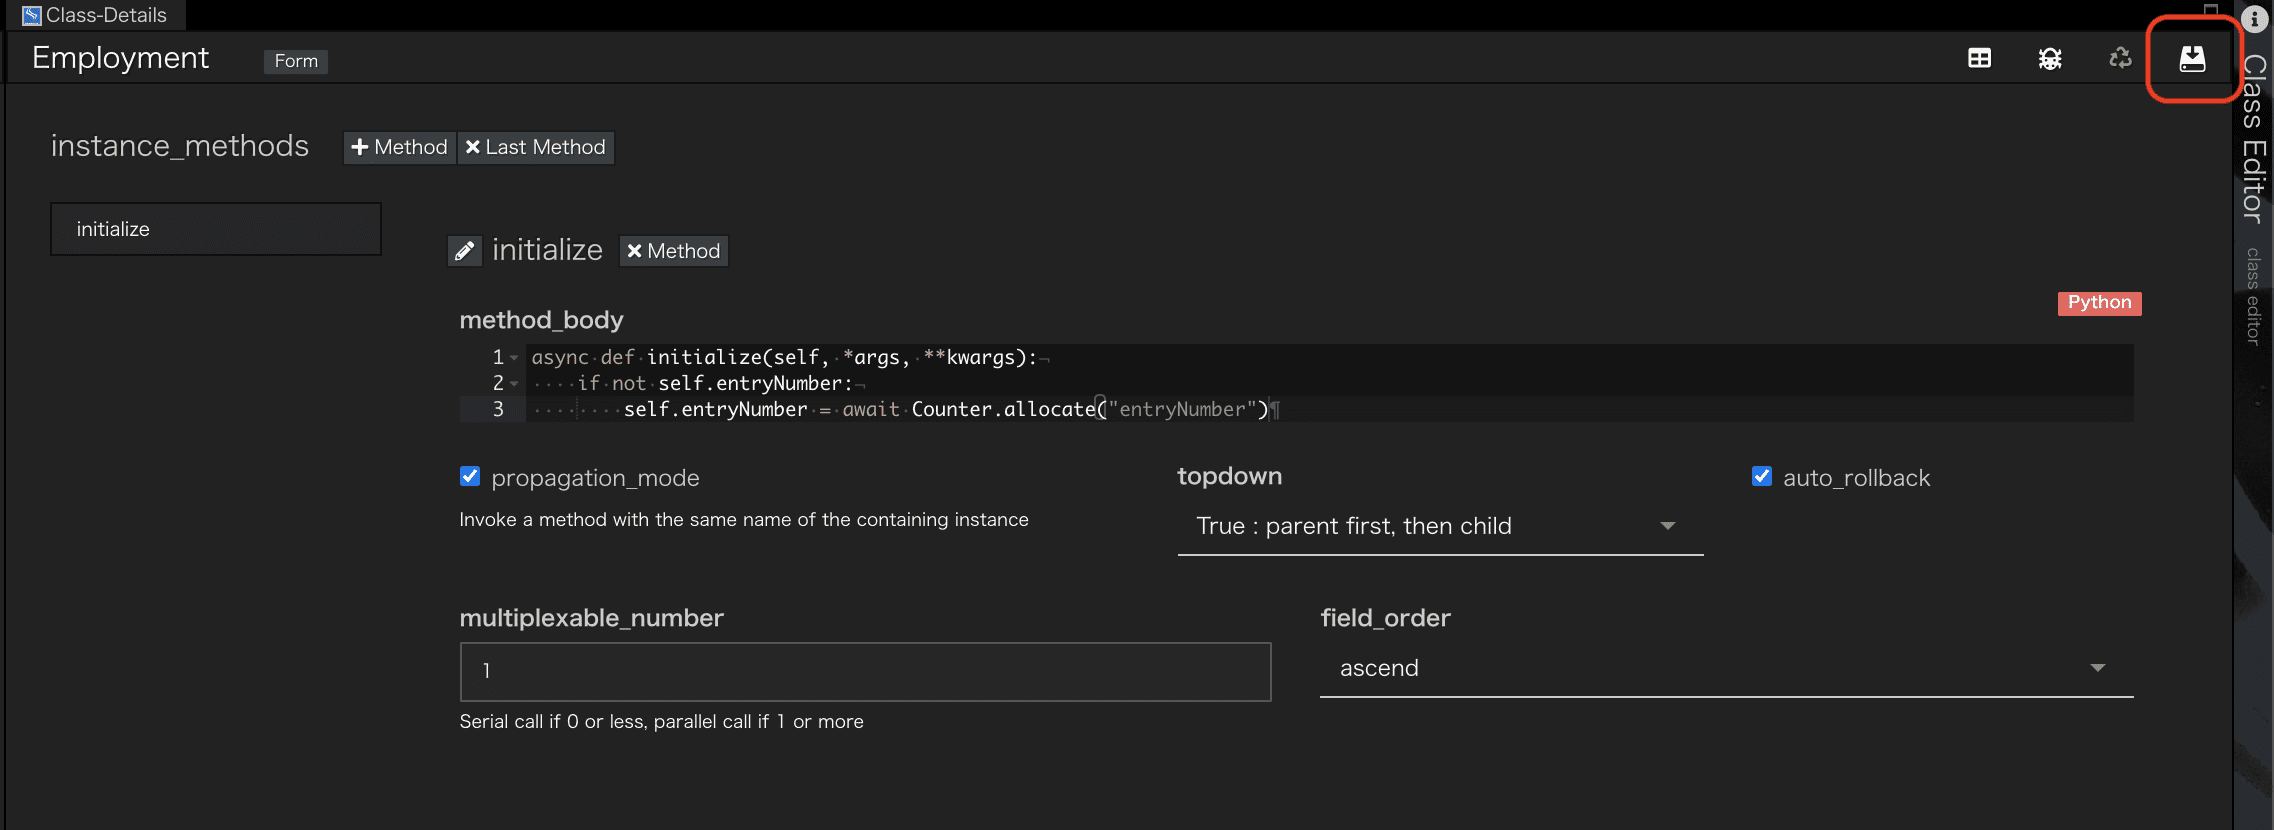
initializeメソッドは、オブジェクトの初期化動作をプラグイン開発者がカスタマイズするためのもので、ATOMインスタンス化時に暗黙的に呼び出されます。
ATOMについての詳細は
Qmonus SDK Programming Guide » Scenario » ATOM
を参照してください。
ATOMの操作
ATOMを作成するとEmploymentデータモデル、ATOMクラス、APIがすべて自動的に生成されています。
Interactive Shellを使い、生成されたATOMを操作してみましょう。
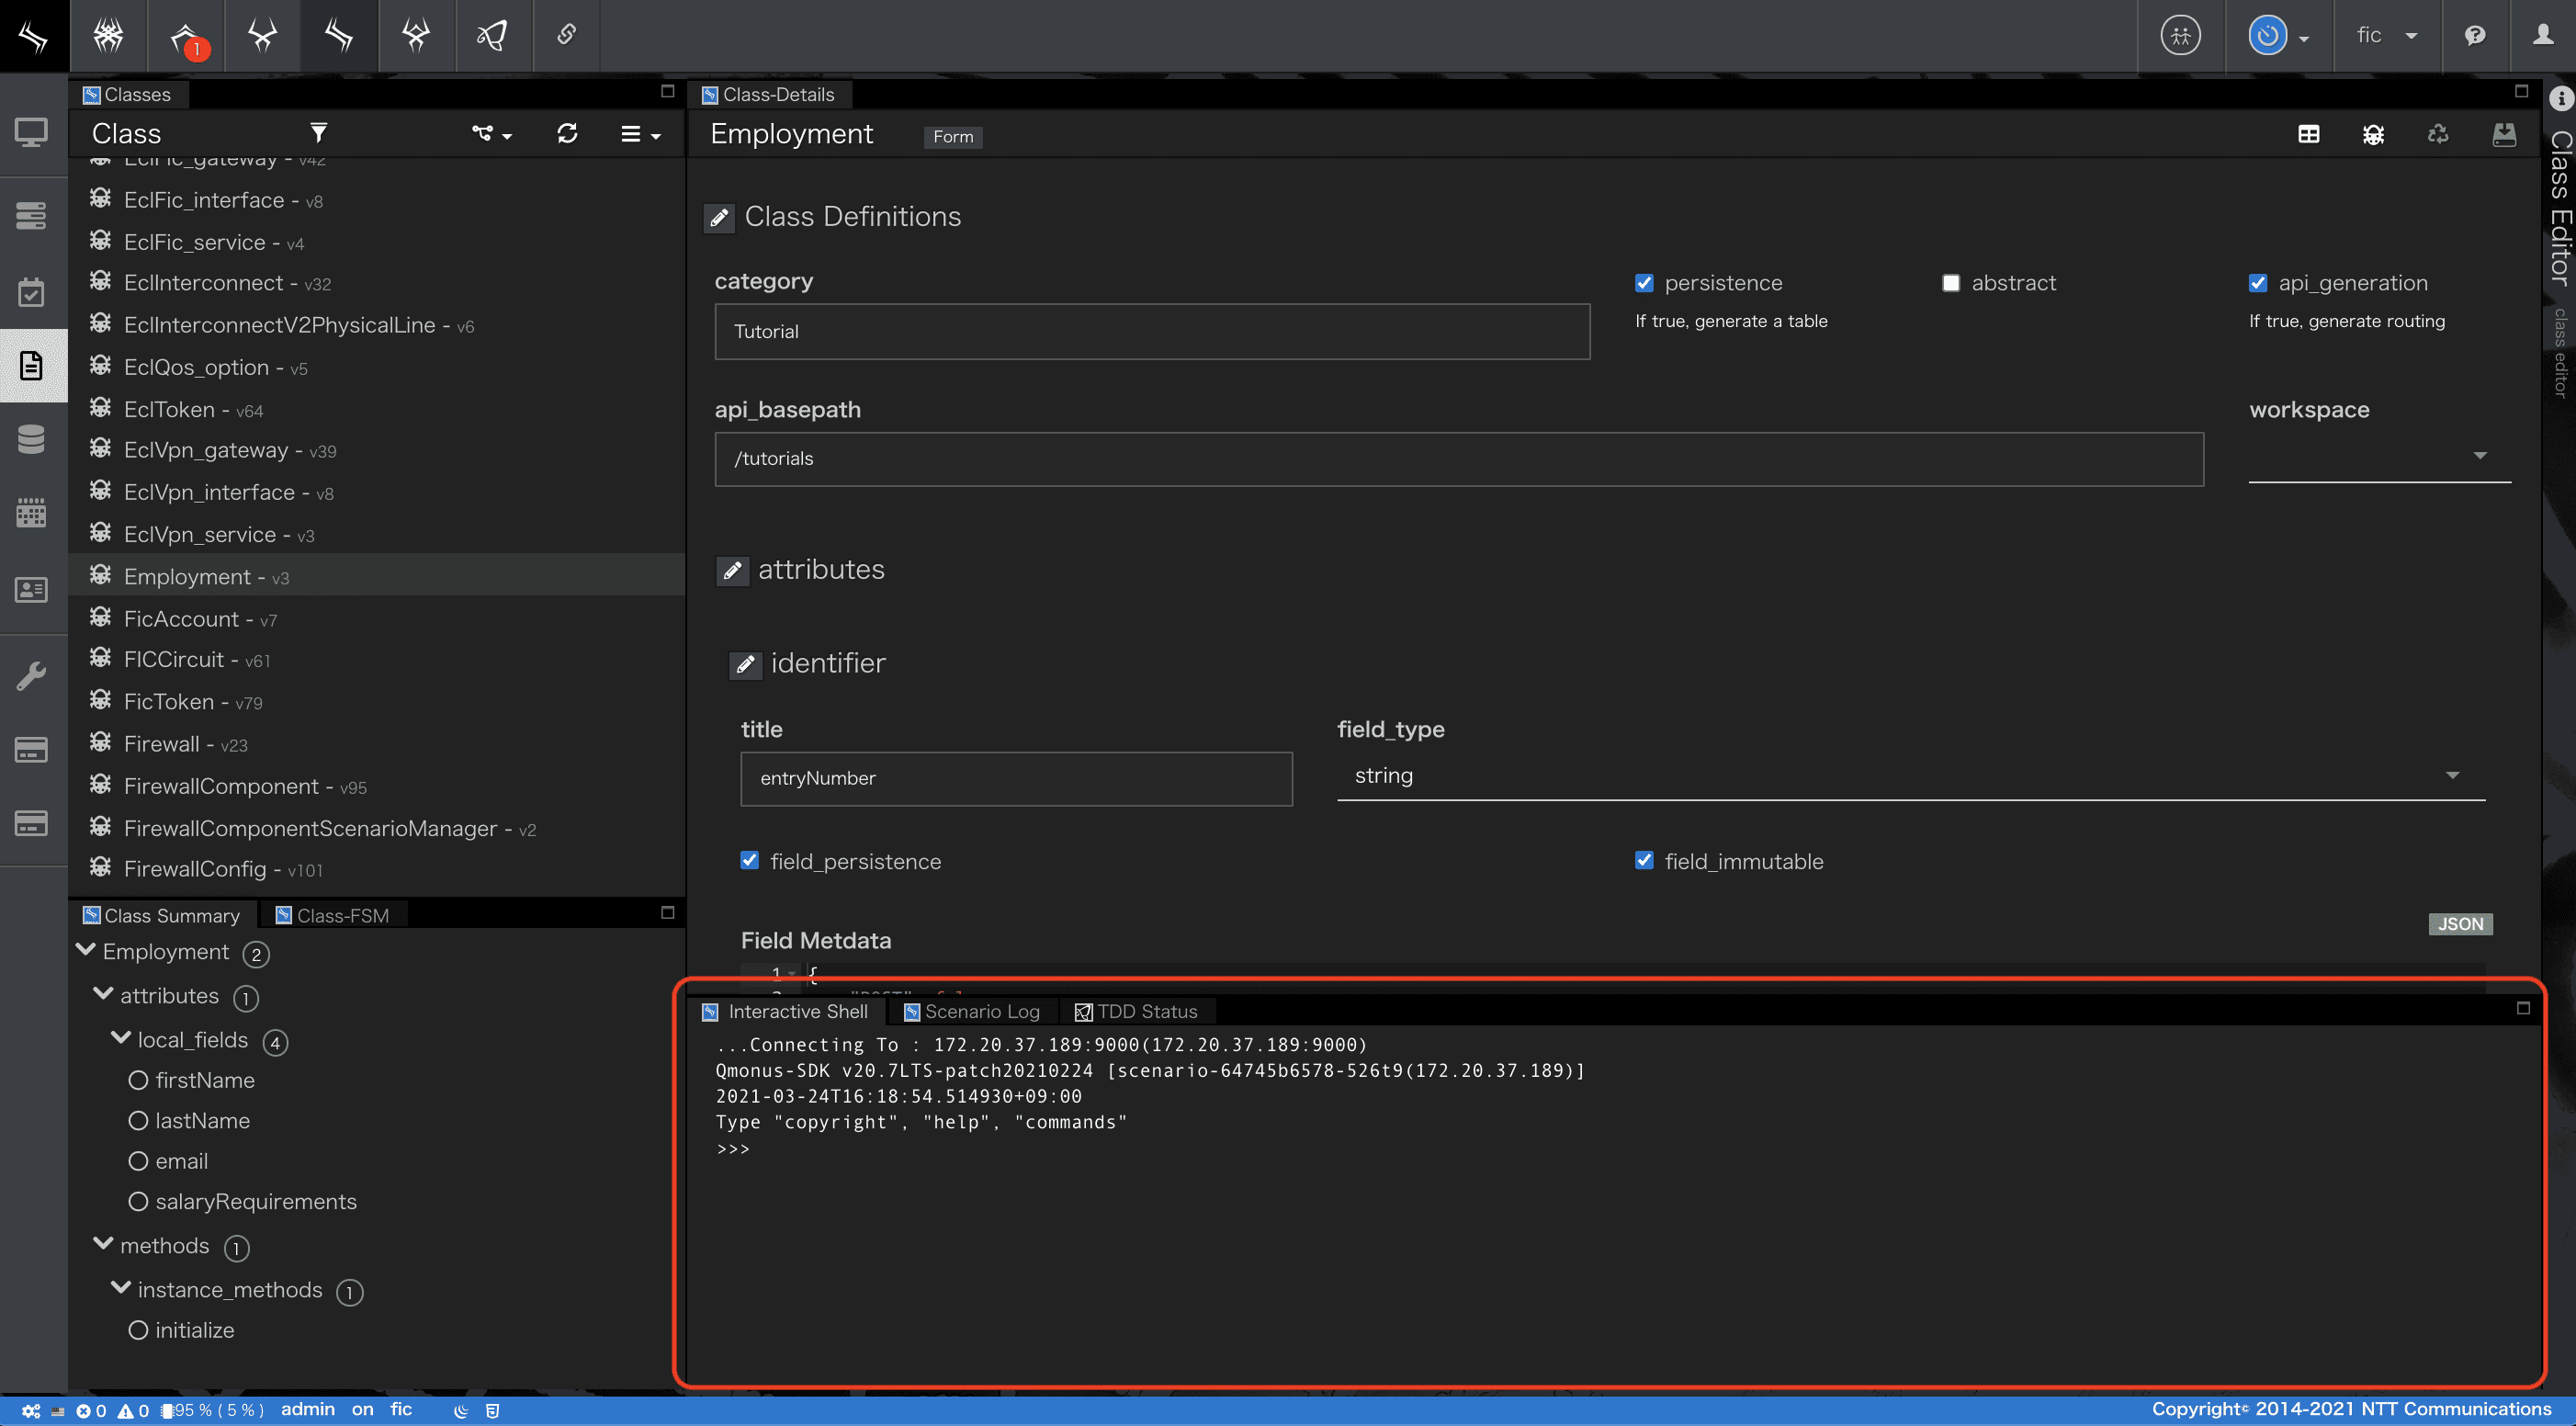
Interactive Shellの詳細については
Qmonus SDK Programming Guide »» リファレンス » REPL
を参照してください。
Employmentインスタンスを作成し保存します。
>>> amuroray = await atom.Employment(firstName="Ray", lastName="Amuro", email="amuroray@uc.com", salaryRequirements=10000000)↵
... print(amuroray.entryNumber)↵
... ↵
E0007↵
↵
>>> await amuroray.save()↵
... ↵
- インスタンスをデータベースから検索しロードします。
>>> employments = await atom.Employment.retrieve()↵
... print(employments)↵
... ↵
[Employment(instance='RW1wbG95bWVudDo1NjAzMzZkNDY2MzExMWU5ODBmMTAwMGMyOWRkODI1MA==', xid=None, xname=None, entryNumber='E0007', firstName='Ray', lastName='Amuro', email='amuroray@uc.com', salaryRequirements=10000000)]↵
↵
- インスタンスが保持している
emailの値を変更し、結果を確認します。
>>> await employments[0].save(email="updated@gmail.com")↵
... ↵
... amuroray = await atom.Employment.load("E0007")↵
... print(amuroray.email)↵
... ↵
updated@gmail.com↵
↵
- インスタンスをデータベースから削除します
>>> await amuroray.destroy()↵
... ↵
... employments = await atom.Employment.retrieve()↵
... print(employments)↵
... ↵
[]↵
↵
- 最後に
callout組込みオブジェクトを使って生成されたAPIをテストしてみましょう。
[CREATE API実行]
>>> r = await callout(path="/tutorials/employments", method="POST", body=dict(Employment=dict(firstName="Ray", lastName="Amuro", email="amuroray@uc.com", salaryRequirements=10000000)))↵
... print(json.dumps(json.loads(r.body), indent=4))↵
... ↵
{
    "Employment": {
        "instance": "RW1wbG95bWVudDpjNDFjMWZiMjY2MzMxMWU5ODBmMTAwMGMyOWRkODI1MA==",
        "entryNumber": "E0008",
        "firstName": "Ray",
        "lastName": "Amuro",
        "email": "amuroray@uc.com",
        "salaryRequirements": 10000000
    }
}↵
↵`
[GET API実行(クエリ指定)]
>>> r = await callout(path="/tutorials/employments?firstName=Ray")↵
... print(json.dumps(json.loads(r.body), indent=4))↵
... ↵
[
    {
        "Employment": {
            "instance": "RW1wbG95bWVudDpjNDFjMWZiMjY2MzMxMWU5ODBmMTAwMGMyOWRkODI1MA==",
            "entryNumber": "E0008",
            "firstName": "Ray",
            "lastName": "Amuro",
            "email": "amuroray@uc.com",
            "salaryRequirements": 10000000
        }
    }
]↵
↵
[UPDATE API実行]
>>> r = await callout(path="/tutorials/employments/E0008", method="PUT", body=dict(Employment=dict(email="updated@gmail.com")))↵
... print(json.dumps(json.loads(r.body), indent=4))↵
... ↵
{
    "Employment": {
        "instance": "RW1wbG95bWVudDpjNDFjMWZiMjY2MzMxMWU5ODBmMTAwMGMyOWRkODI1MA==",
        "entryNumber": "E0008",
        "firstName": "Ray",
        "lastName": "Amuro",
        "email": "updated@gmail.com",
        "salaryRequirements": 10000000
    }
}↵
↵
-
作成されたInstanceの確認
作成されたInstanceはClass画面からも確認することができます。
メインメニューから [Workflow Scenario as a Service] > [Class] を選択し、該当のATOM右クリックします。表示された[Serch Instance]を選択することでインスタンスの一覧を確認することができます。
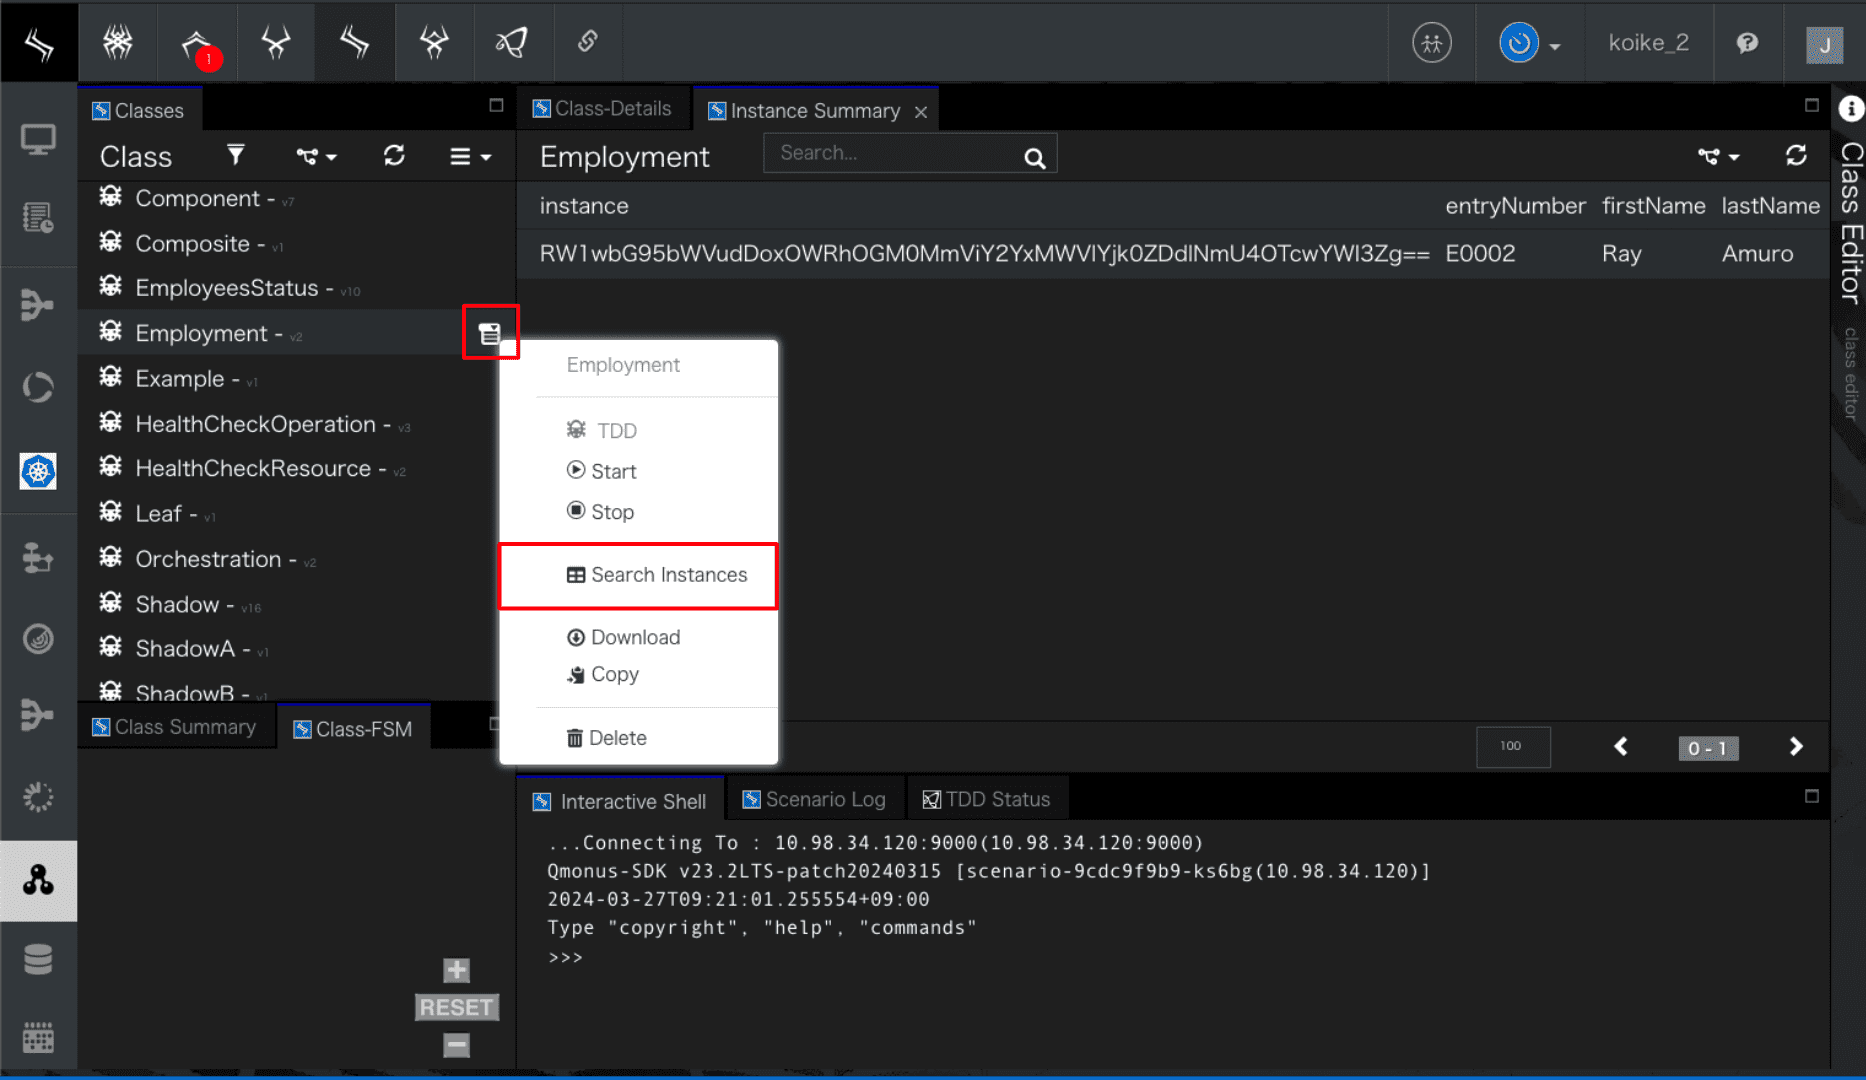
本チュートリアルで作成されたインスタンスを確認する場合はEmploymentから[Serch Instance]を選択してください。 -
Search機能
インスタンスは画面上部のSearch欄から検索することができます。目的のインスタンスに素早くアクセスすることが可能ですが、画面に一覧表示されているインスタンスをフィルターするという仕様上、100件を超えるインスタンスがある場合目的のインスタンスが表示されない場合があります。そういった場合は画面右下から設定できる表示件数などで調整し対処してください。
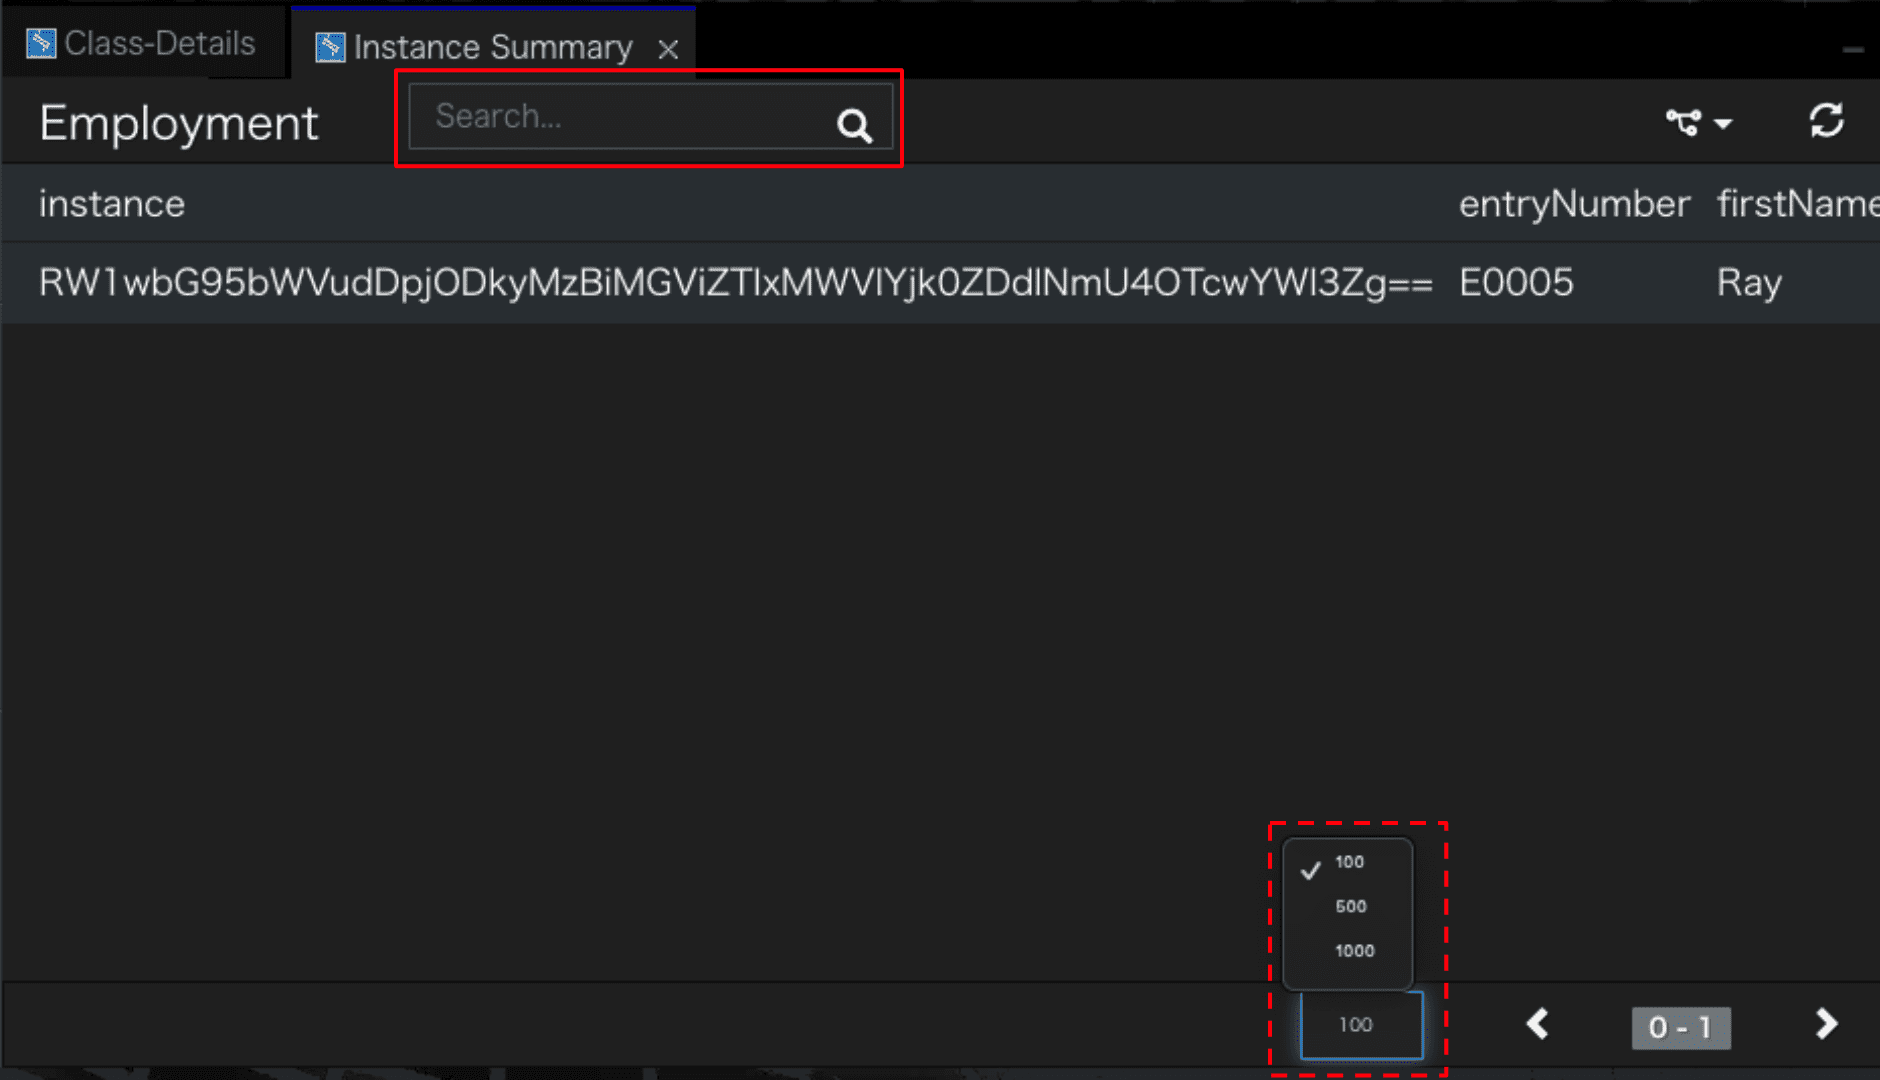
[DELETE API実行]
>>> r = await callout(path="/tutorials/employments/E0008", method="DELETE")↵
... print(r.code)↵
... ↵
204↵
↵
>>> r = await callout(path="/tutorials/employments")↵
... print(json.dumps(json.loads(r.body), indent=4))↵
... ↵
[]↵
↵
以上でSimple CRUD - ATOM編のチュートリアルは完了です。
シナリオ編で紹介したModelを作成する方法では、データベーススキーマをjsonschemaで定義する作業やデータアクセスのためのSQL文の組み立てなど煩わしく、
ATOMを利用することでそれらが簡潔に解決できることを理解できたのではないでしょうか。
Simple Transaction
本チュートリアルでは、トランザクションを使用したアプリケーション開発について学習します。
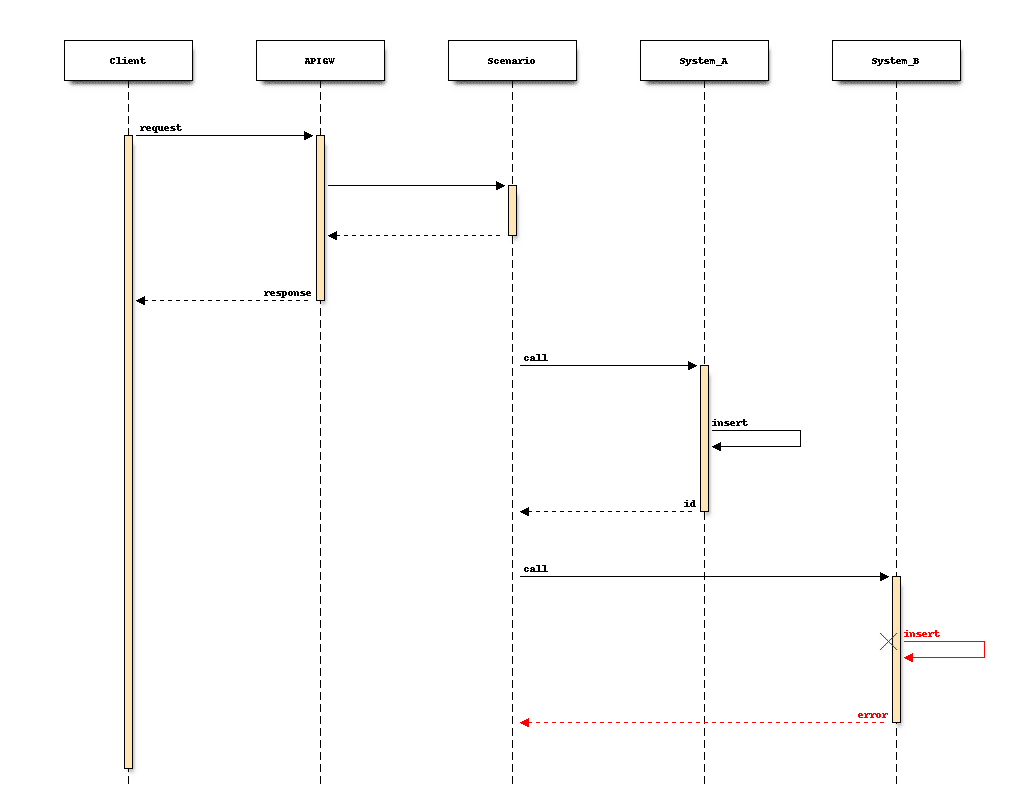
次のシーケンスで、Qmonus SDKのプラグインアプリケーションは、2つの異なるエンドポイントのAPIサービスを呼び出します。最初の呼び出しで、システムAはリソースデータを作成します。システムBも2回目の呼び出しでリソースデータを作成しますが、これが失敗した場合は、システムAのデータを削除する必要があるようなケースを想定します。
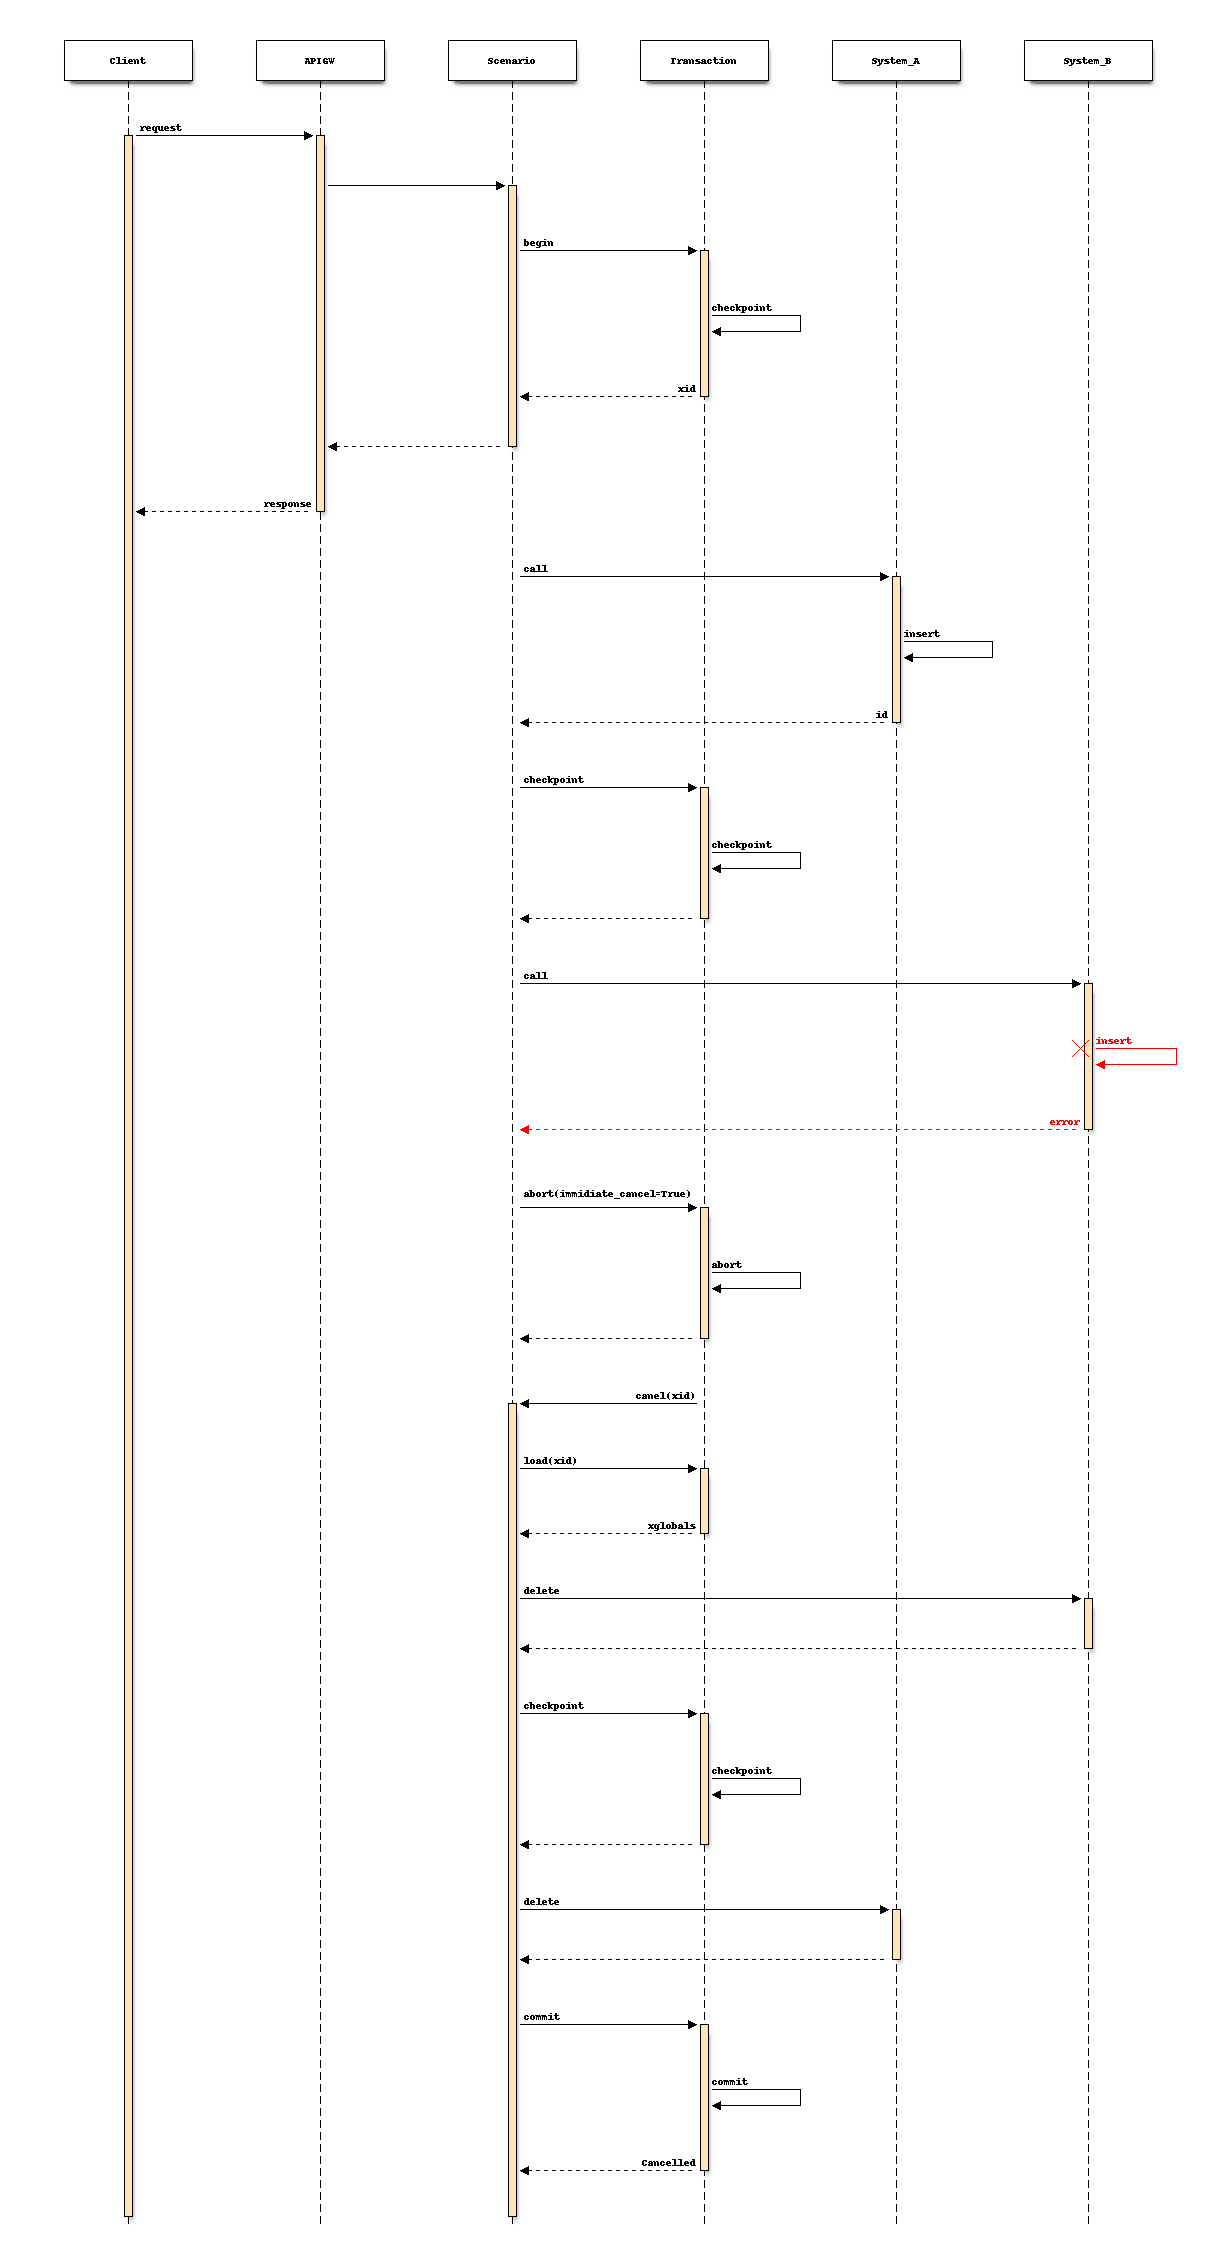
アプリケーションが外界に与えた変化をデータベースに逐次蓄積し、ワークフローの進行を管理しながら、失敗に備える実装はかなり面倒です。Qmonus SDKのトランザクションアシストを利用することで以下のようなステートフルなワークフロー実装を簡潔に記述できます。
事前準備
トランザクションアシストされたアプリケーションを作成する前準備として、システムAとBのモックを作成しておきます。モックは、データのCRUDができれば何でも良いので今回は、ATOMを使用して簡単なデータモデルとAPIを自動生成しておくと良いでしょう。 以下の定義で2つのATOMを作成してください。
用意するシステムA, システムBのモック ダウンロード
yml
- category: Tutorial
  name: SystemA
  persistence: true
  api_generation: true
  abstract: false
  attributes:
    local_fields:
      - field_name: name
        field_type: string
        field_persistence: true
        field_nullable: true
        field_immutable: false
        field_unique: false
      - field_name: description
        field_type: string
        field_persistence: true
        field_nullable: true
        field_immutable: false
        field_unique: false
    ref_fields: []
  methods:
    class_methods: []
    instance_methods: []
- category: Tutorial
  name: SystemB
  persistence: true
  api_generation: true
  abstract: false
  attributes:
    local_fields:
      - field_name: name
        field_type: string
        field_persistence: true
        field_nullable: true
        field_immutable: false
        field_unique: false
      - field_name: description
        field_type: string
        field_persistence: true
        field_nullable: true
        field_immutable: false
        field_unique: false
    ref_fields: []
  methods:
    class_methods: []
    instance_methods: []
-
上記の
モックファイルを用意する -
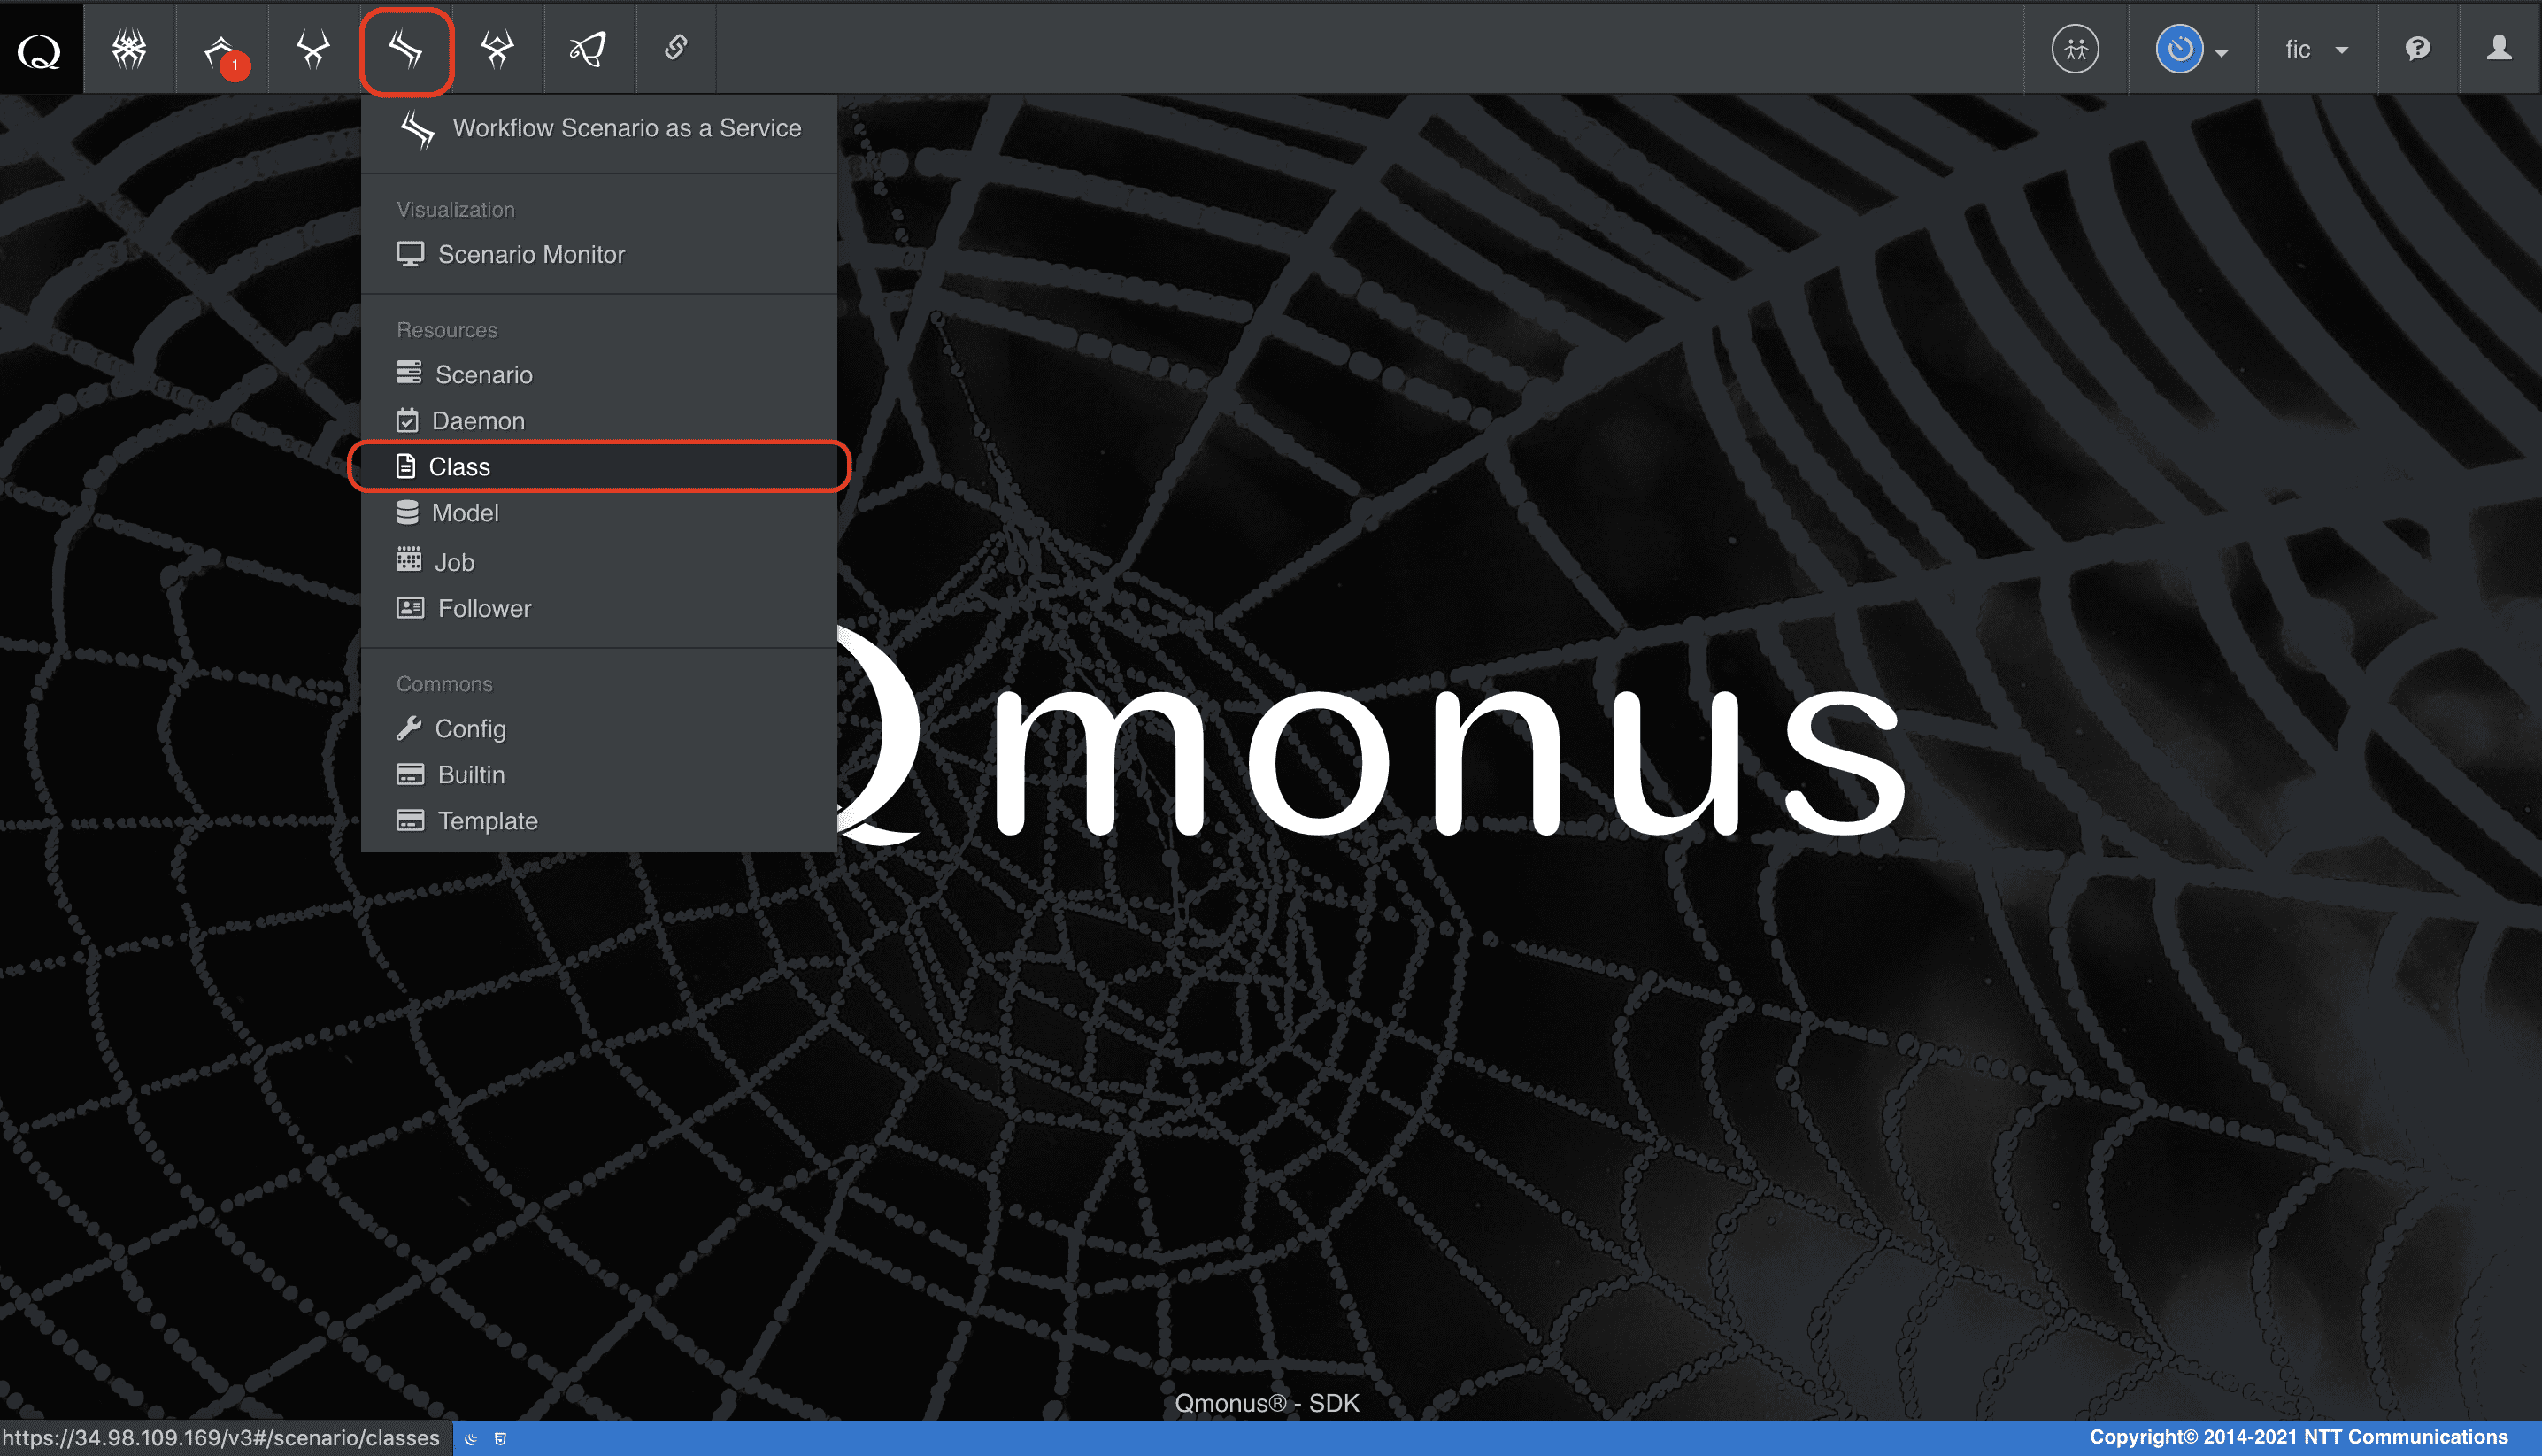
メインメニューから [Workflow Scenario as a Service] > [Class] を選択
-
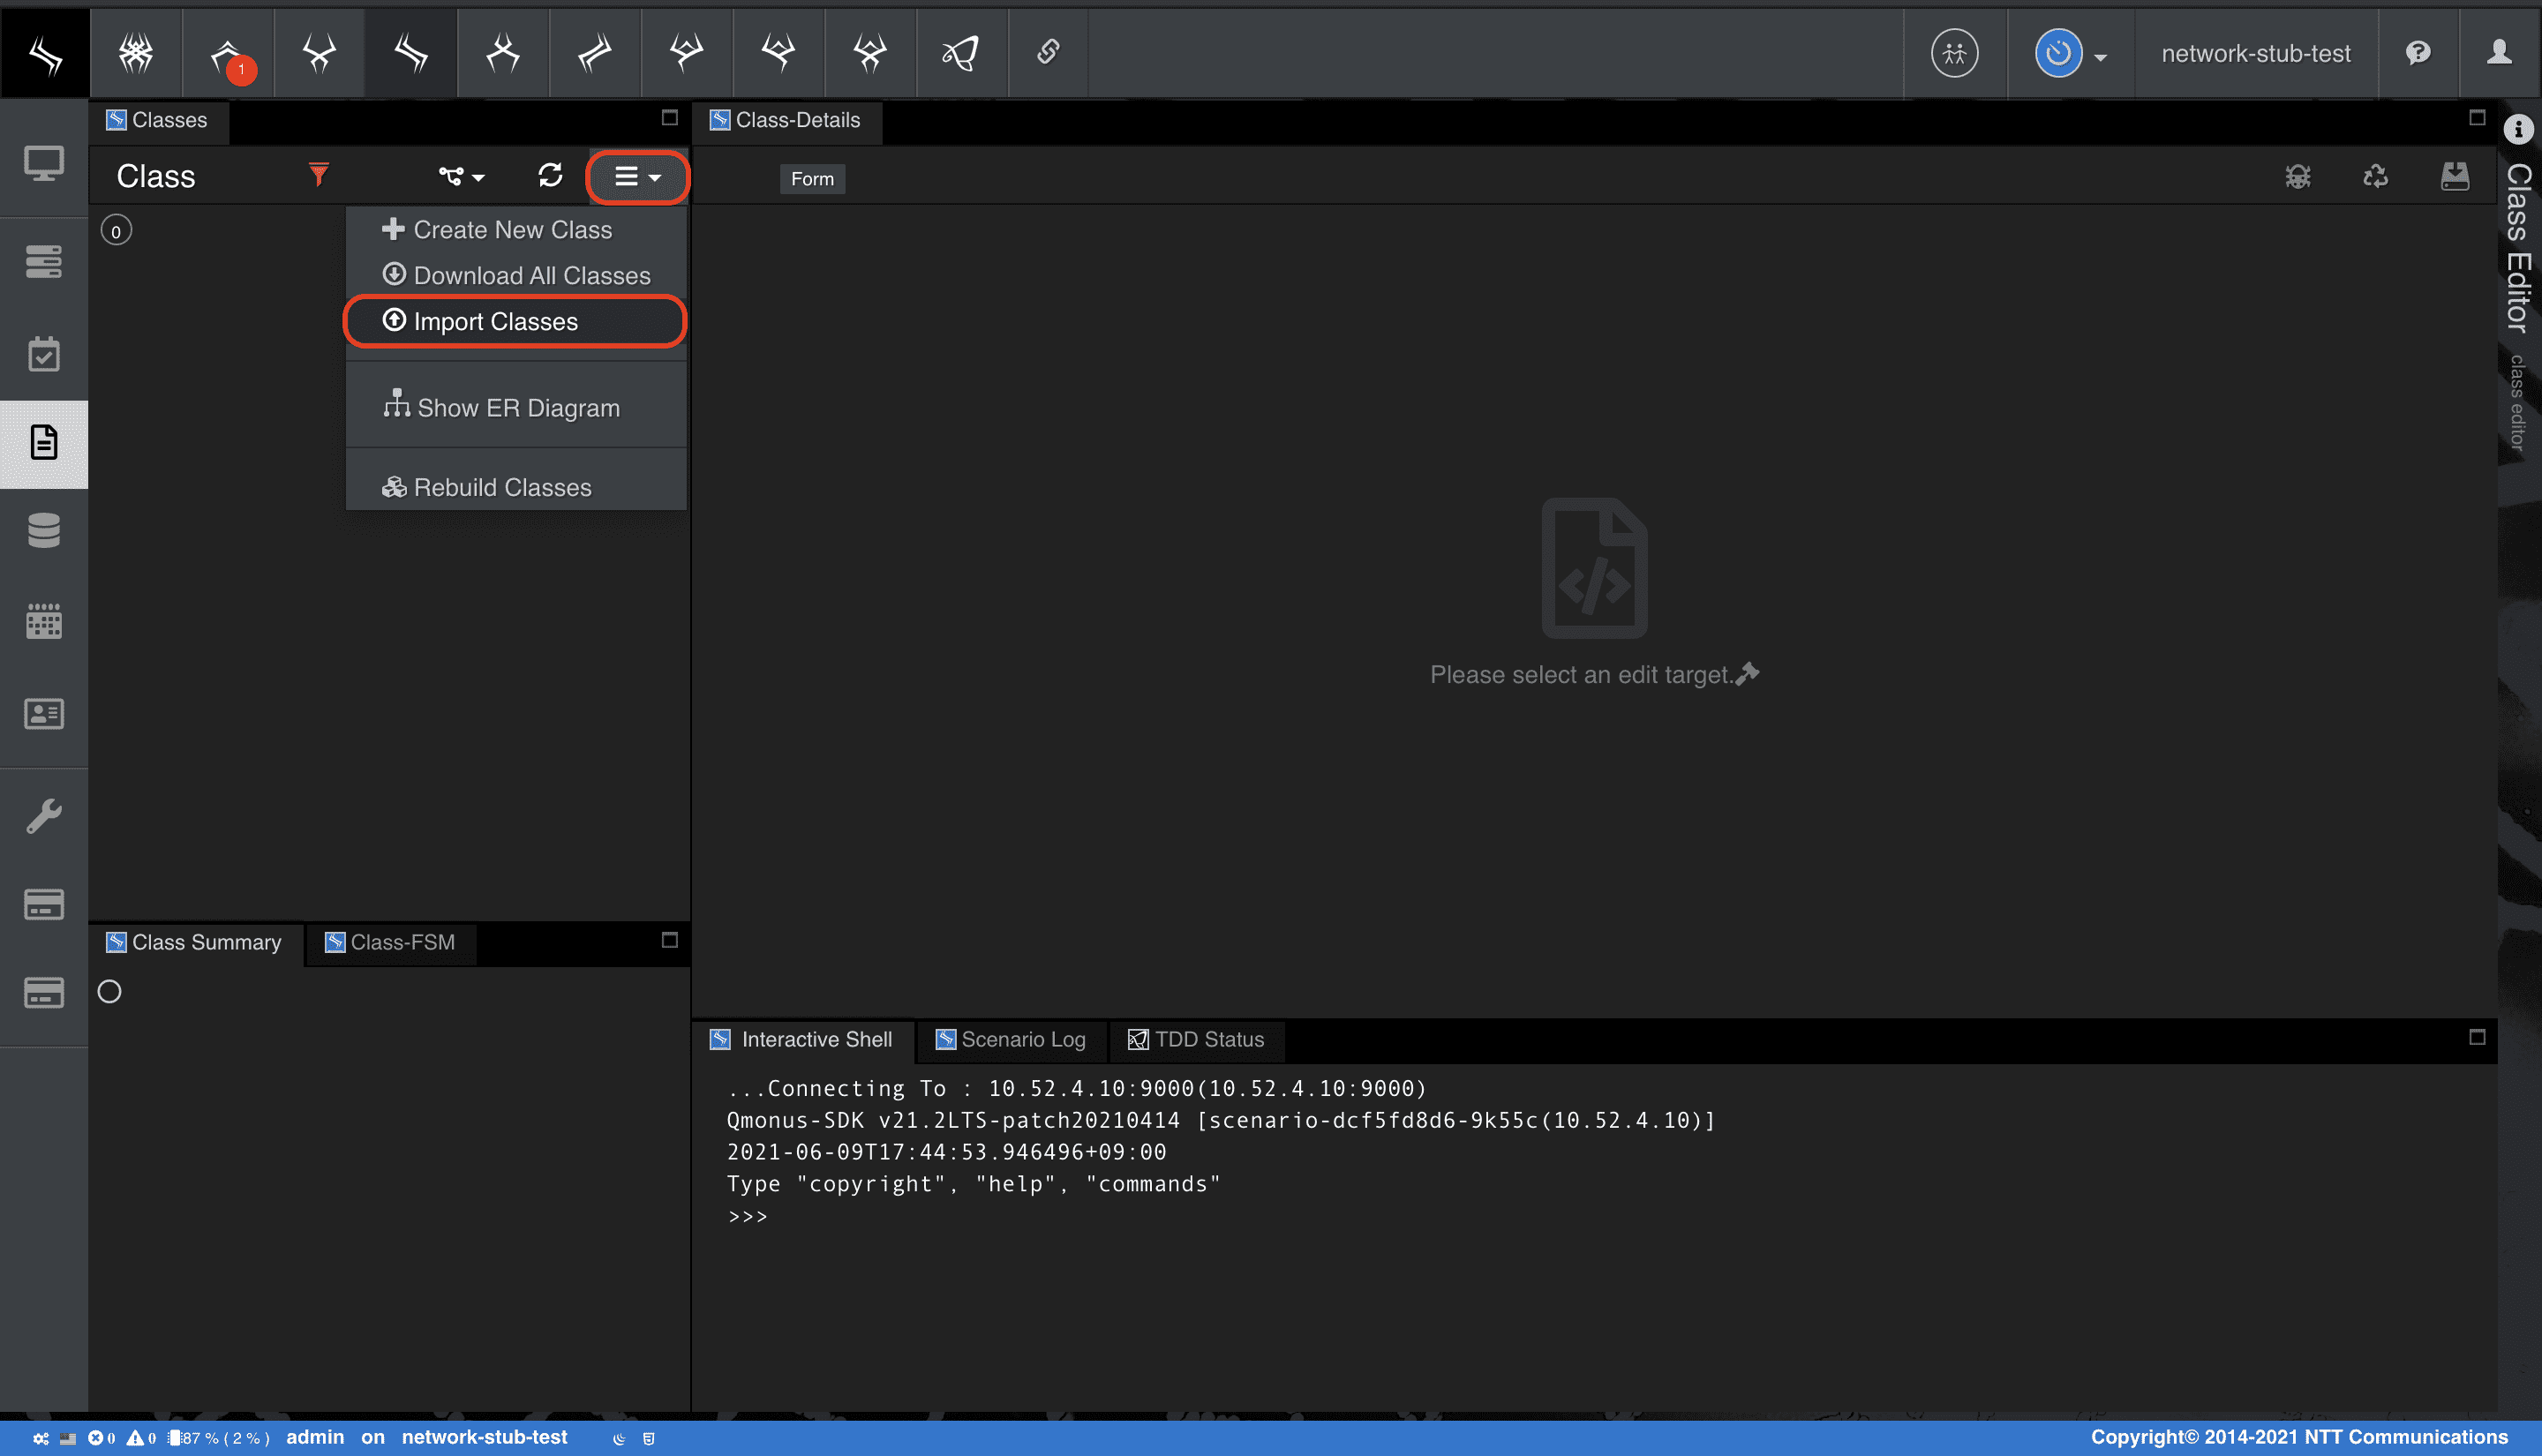
クラスメニューの [Import Classes] を選択
-
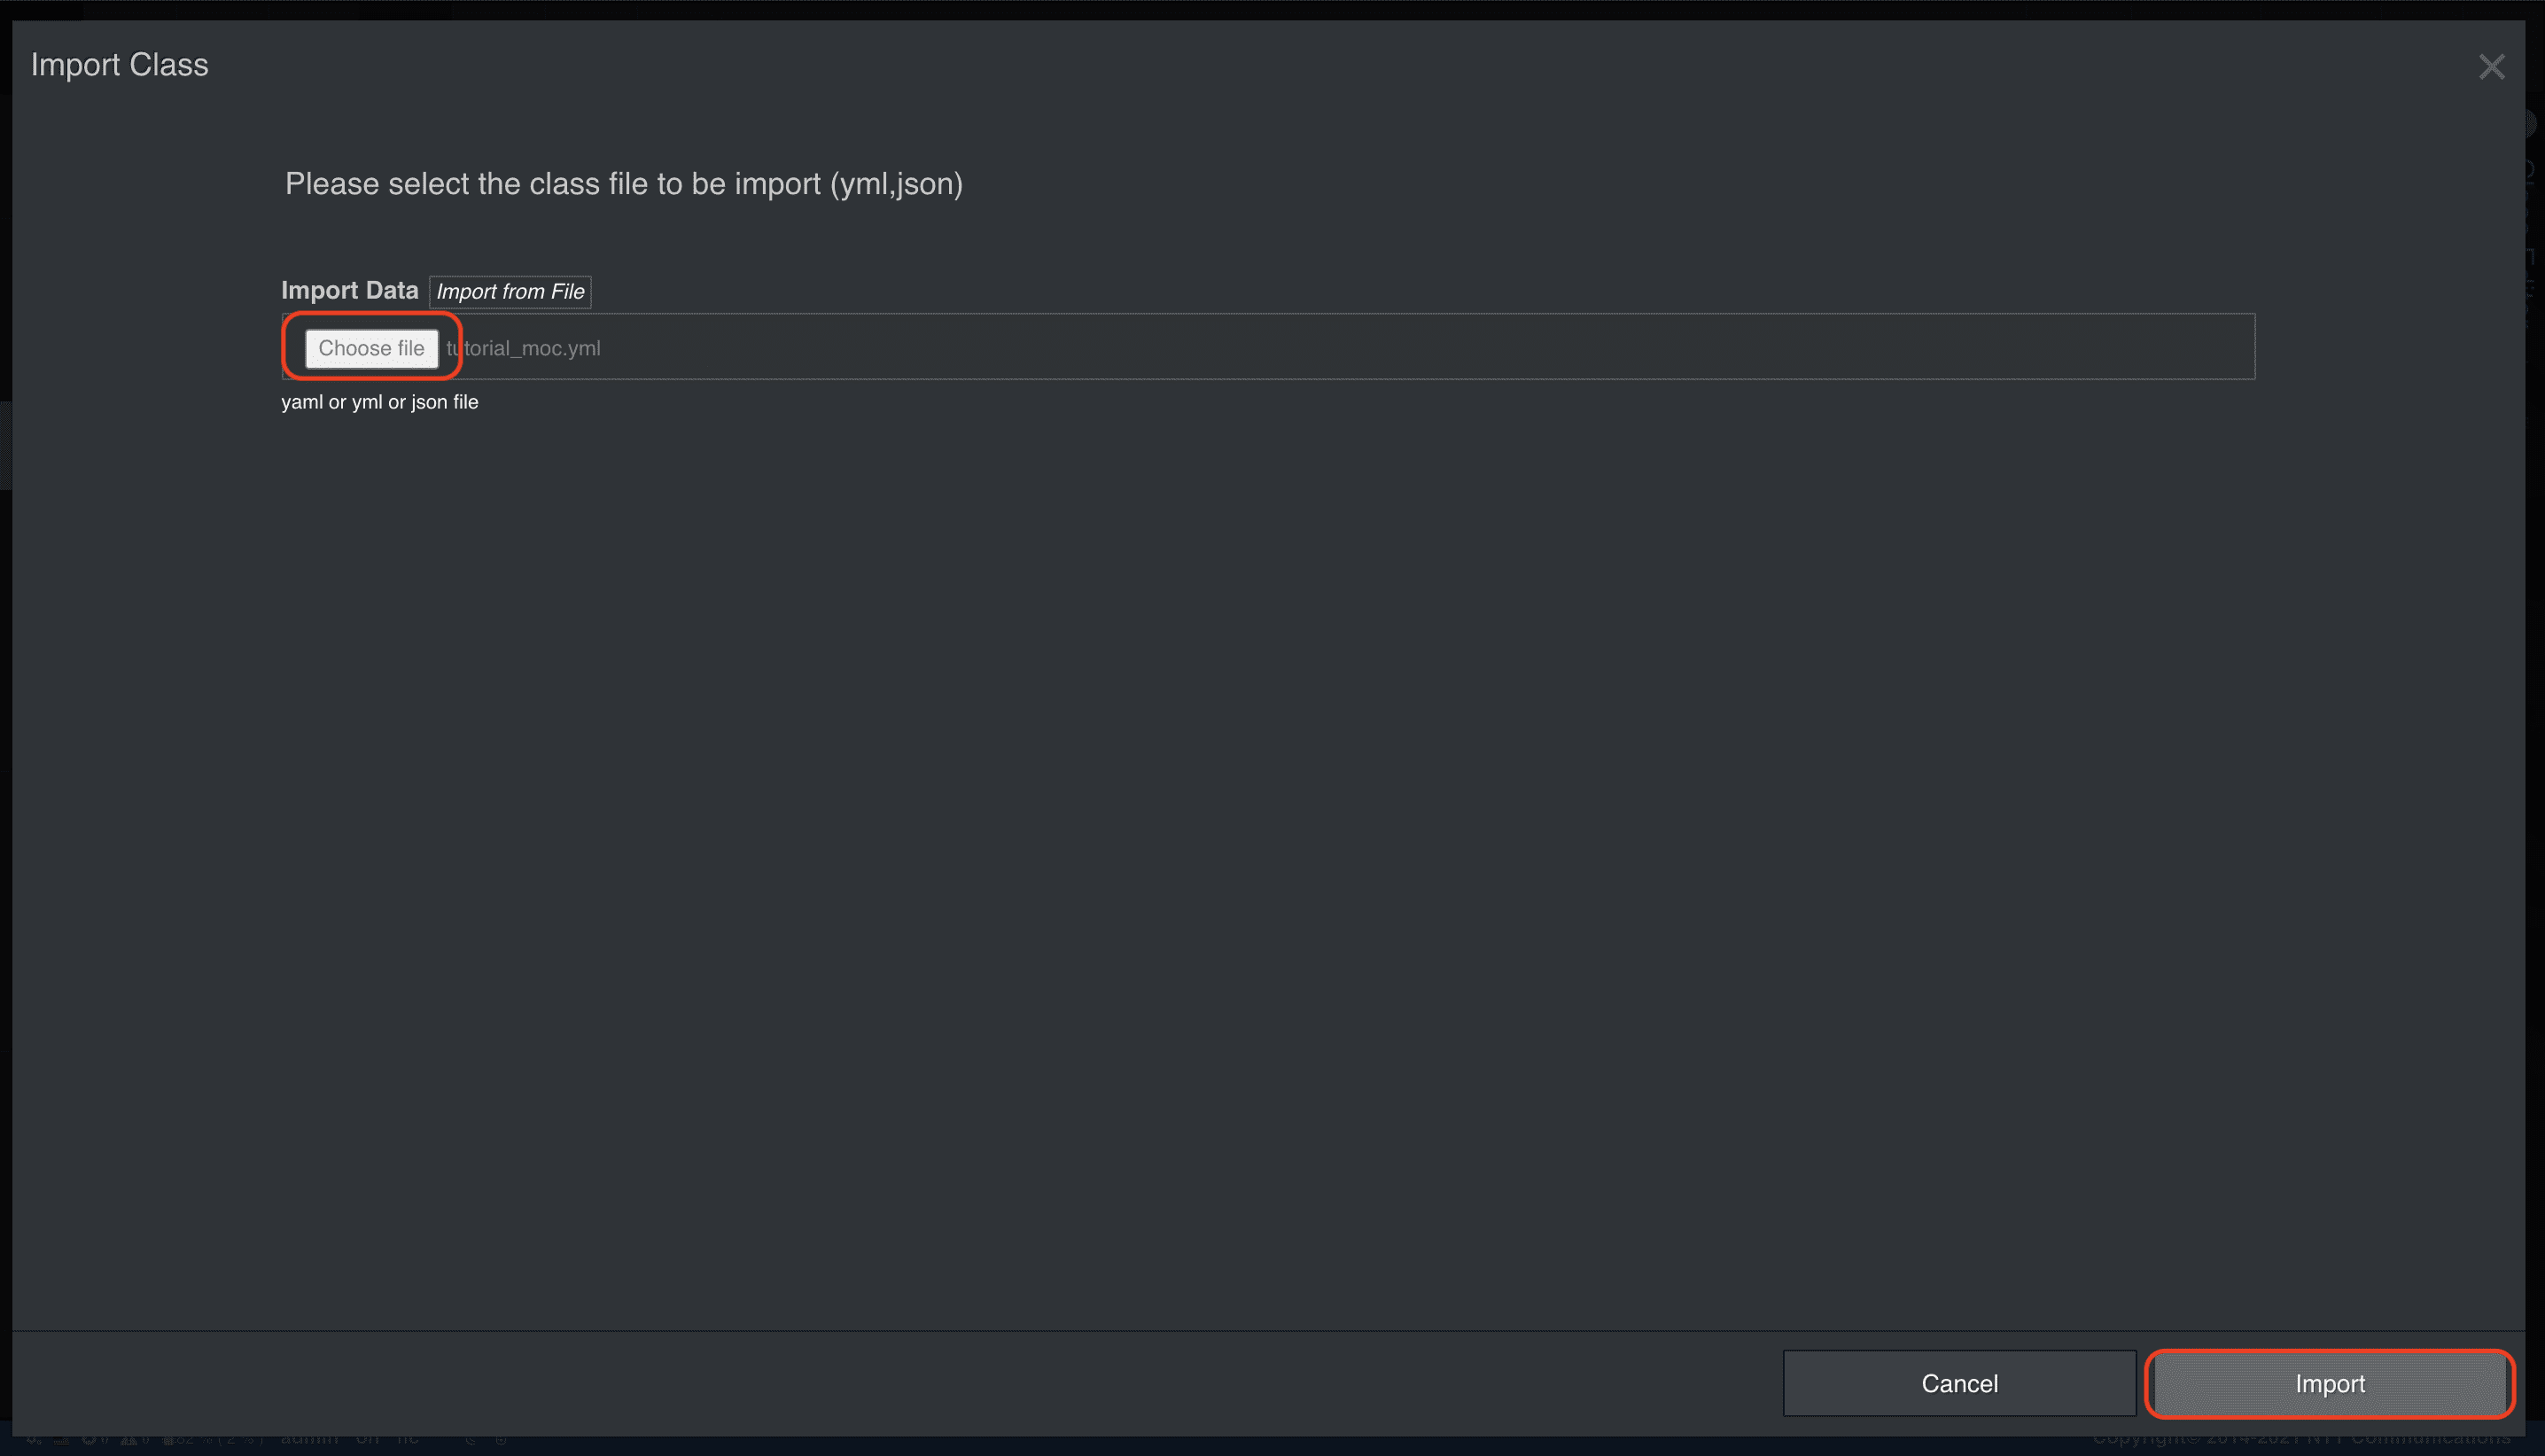
[Choose file] で上記の定義ファイルを指定後、[Import] を選択
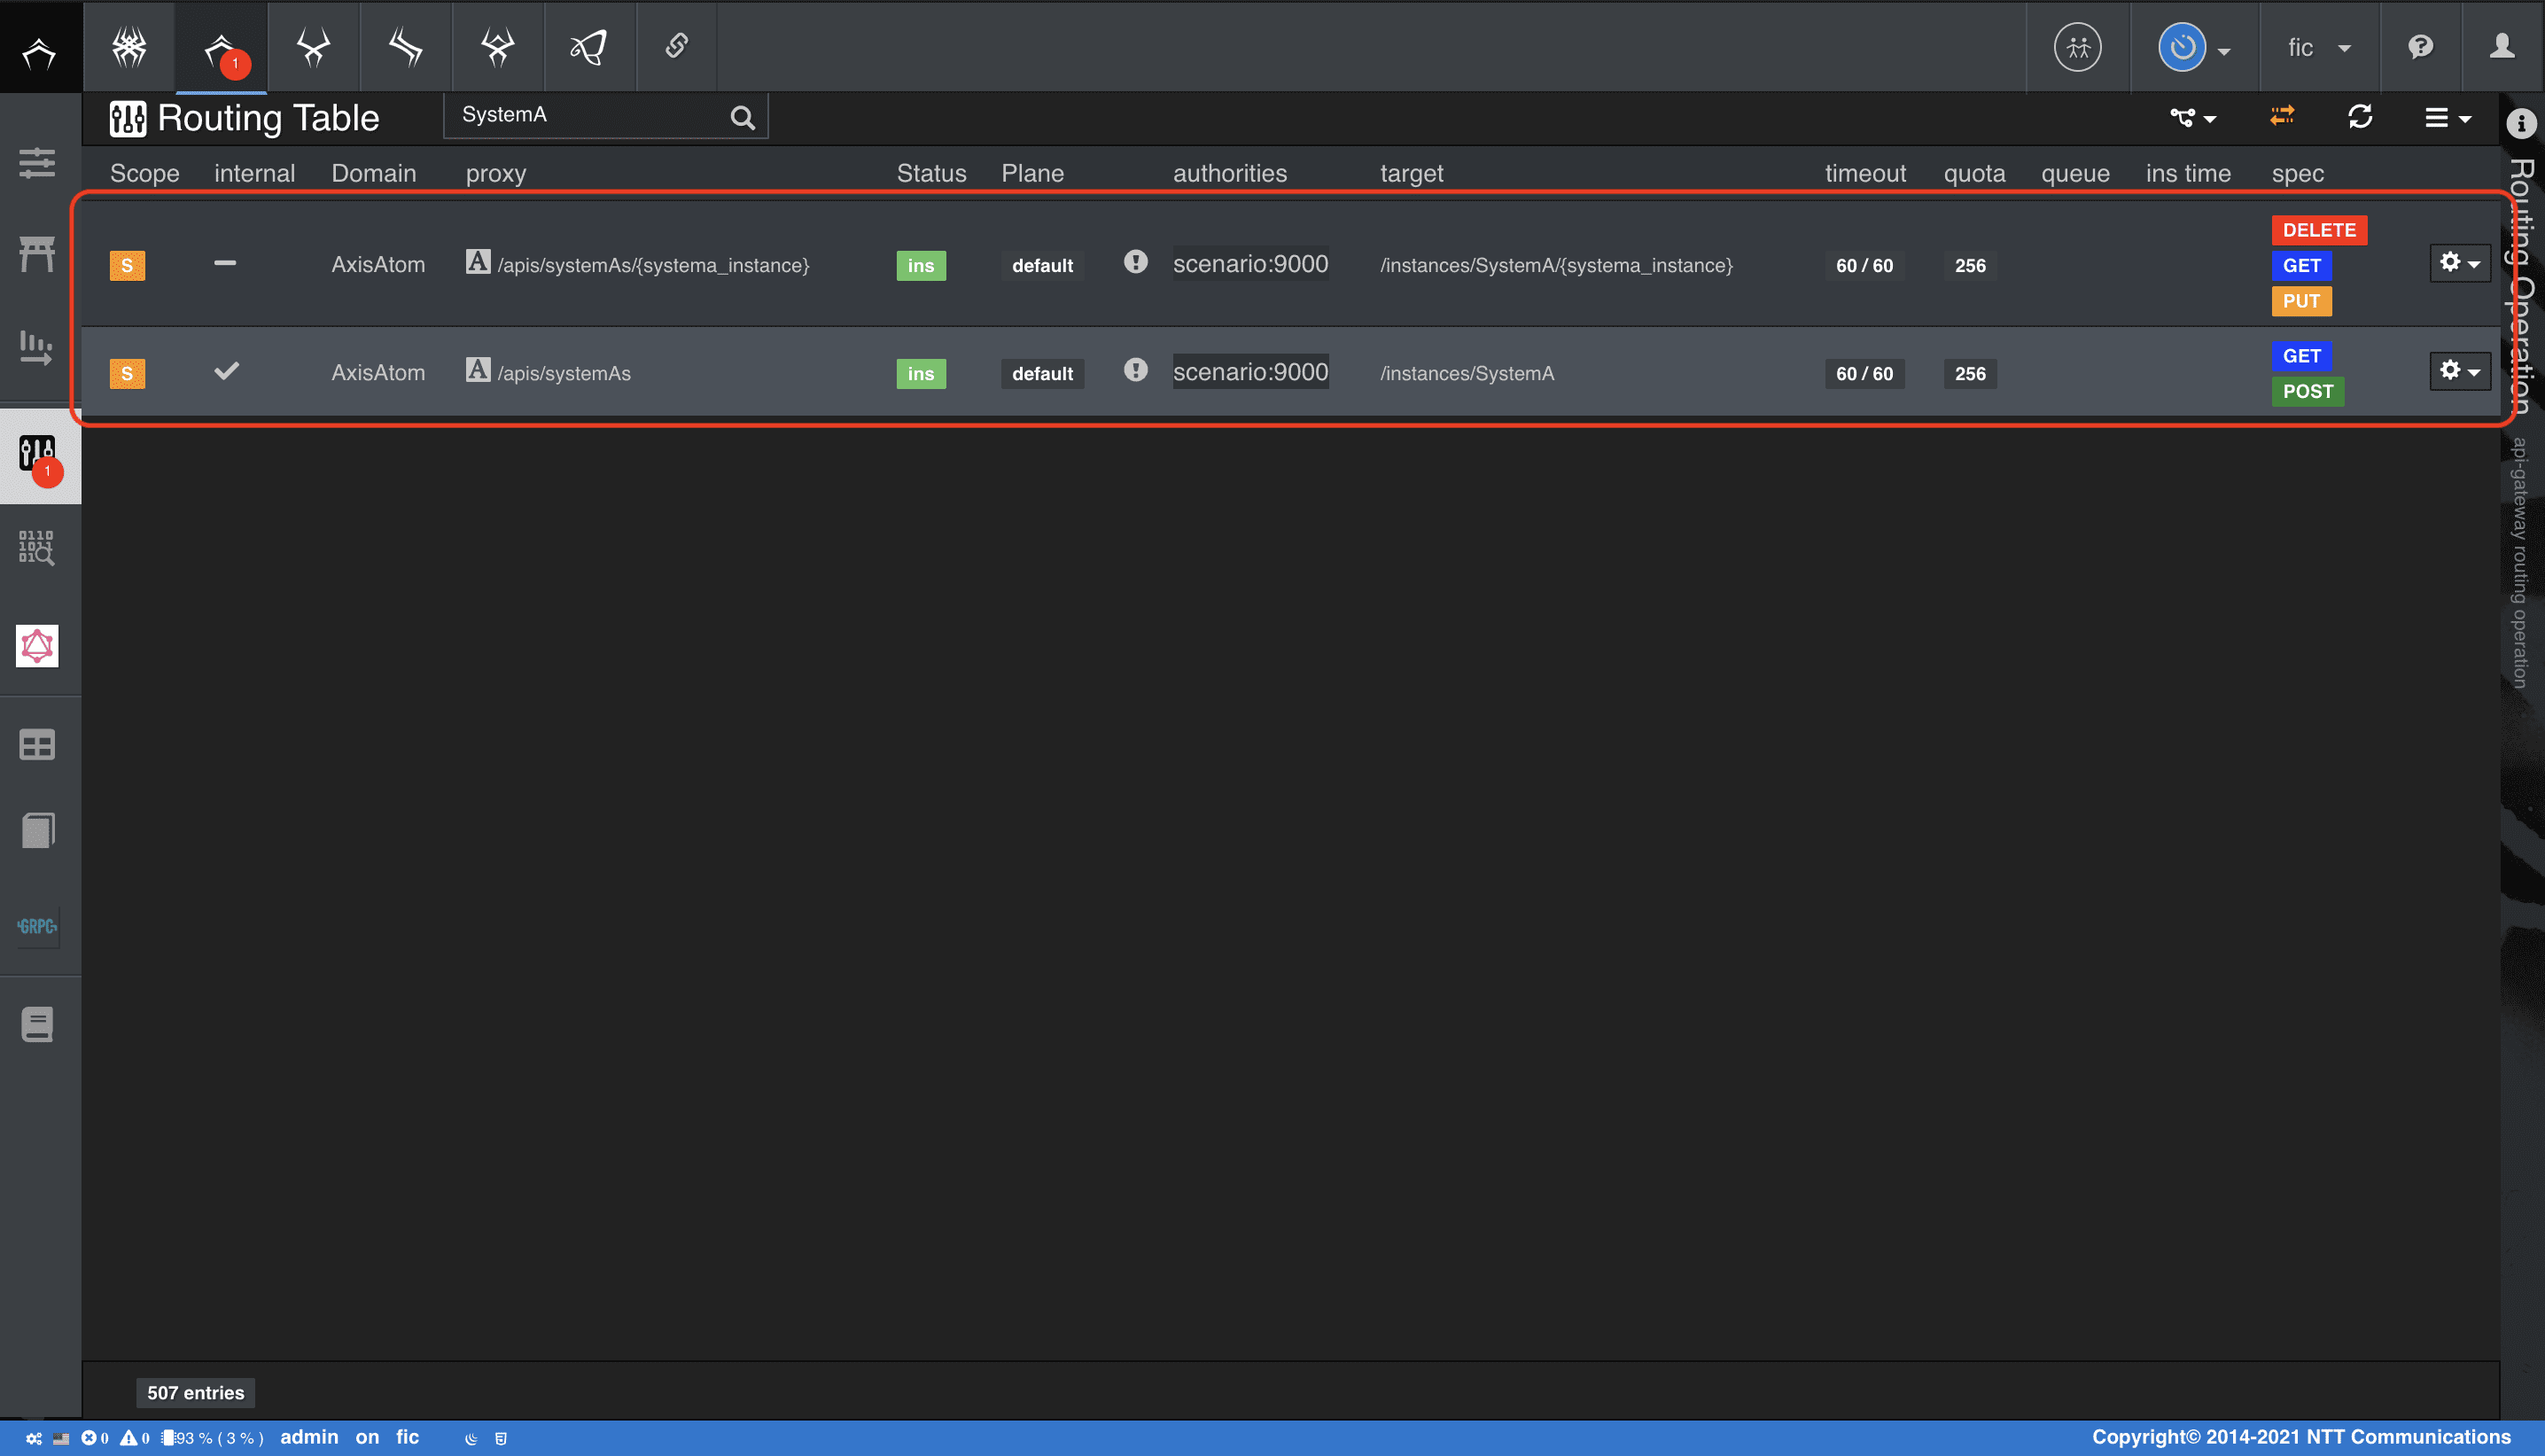
ATOMを作成したら、生成されたAPIを確認しておきましょう。上記のATOM定義では、api_basepathは指定していないので生成されるAPIは/apis/systemAsのようなリクエストパスで定義されているはずです。
-
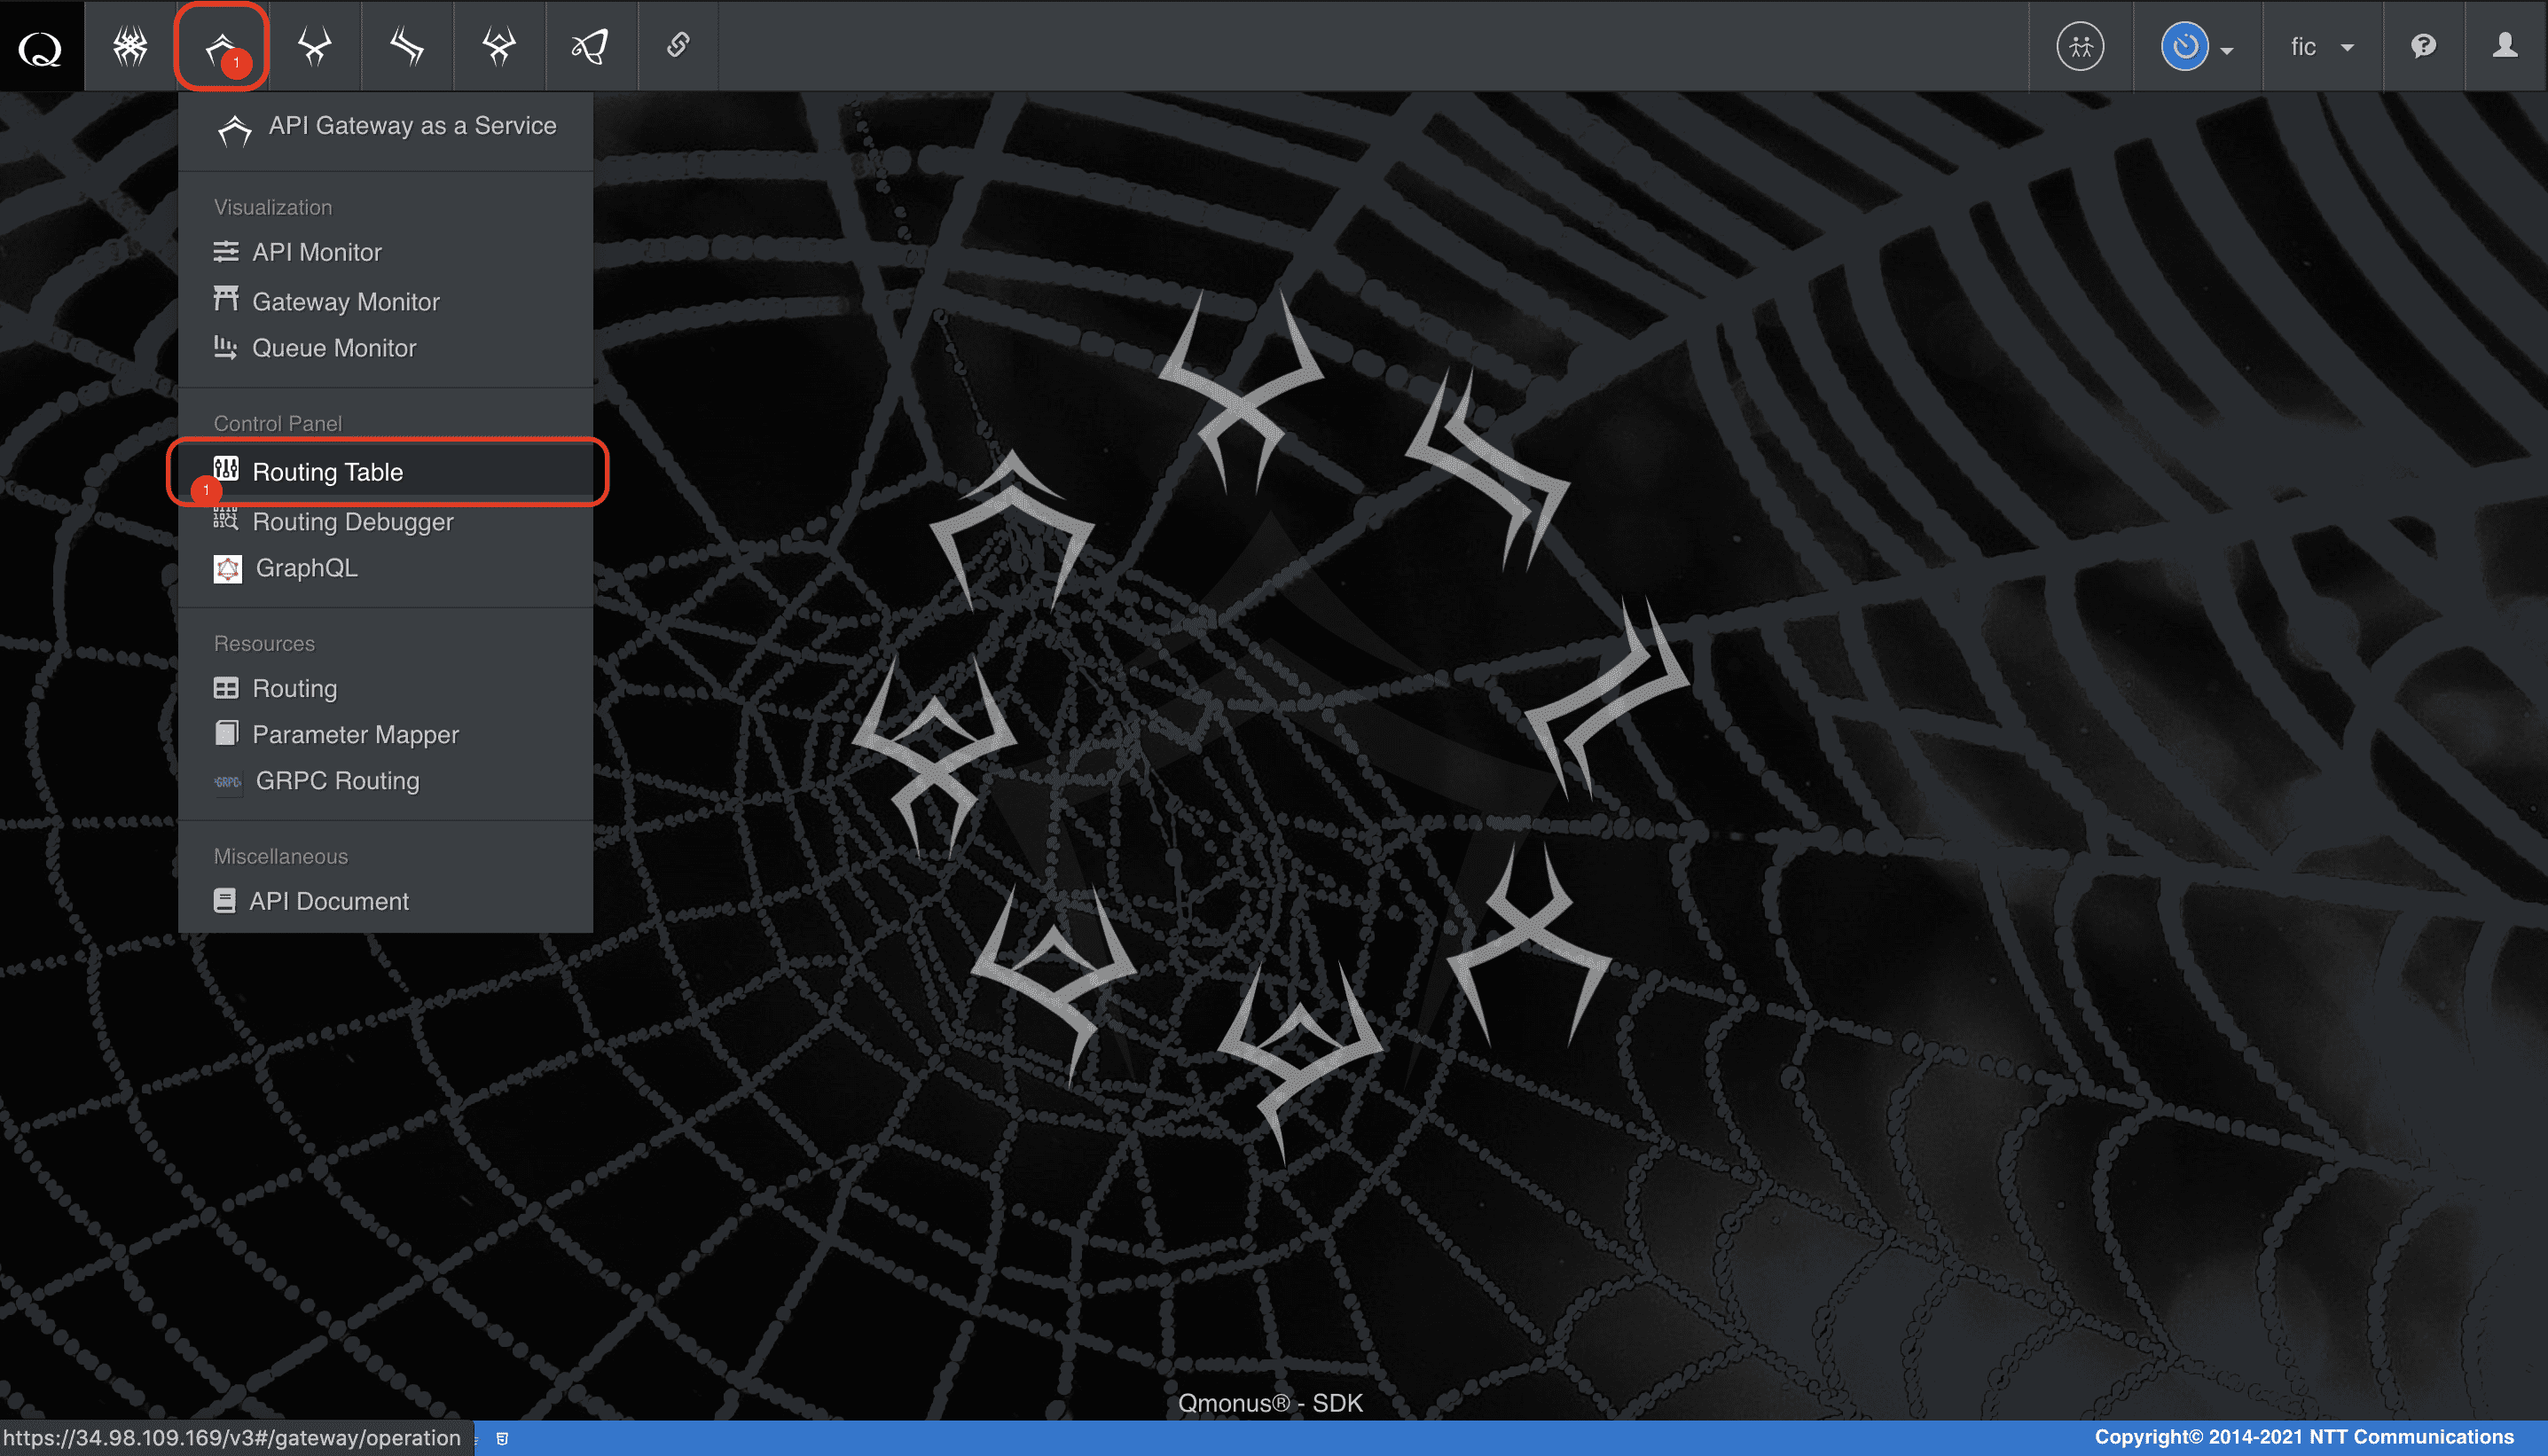
メインメニューから [API Gateway as a Service] > [Routing Table] を選択
-
リクエストパス
/apis/systemAsのルーティングを確認
シナリオで実装する
事前準備が完了したら、シナリオを作成しましょう。次のyaml定義でシナリオを作成してください。このシナリオでは、データをシステムAとBに順番に送信します。シナリオの最後にブレークポイントを設定して、完全なロールバックが達成できることを確認します。ブレークポイントは強制的にワークフローの進行を中断し、即時キャンセルが呼び出されるため、ロールバックの動作を確認できます。
1. シナリオを作成する
シナリオ ダウンロード
python
category: Tutorial
name: SimpleTransaction
uri: /simpleTransactions
method: POST
commands:
  - command: script
    kwargs:
      code: |-
        r = await callout(path="/apis/systemAs",
                          method="POST",
                          body=dict(SystemA=dict(name=context.request.body.systemA.name,
                                                 description=context.request.body.systemA.description)))
        if r.error:
            raise Error(r.code, reason=r.error.__str__())
        a = json.loads(r.body)
      cancellation:
        cancellable: true
        actions:
          - action_type: script
            code: |-
              if not a:
                  r = await callout(path="/apis/systemAs?name={}".format(context.request.body.systemA.name))
                  if r.error:
                      await context.qmonus.abort()
                      return
                  a = json.loads(r.body)

              r = await callout(path="/apis/systemAs/{}".format(a["SystemA"]["instance"]), method="DELETE")
              if r.error:
                  await context.qmonus.abort()
    label: SystemA
  - command: script
    kwargs:
      code: |-
        r = await callout(path="/apis/systemBs",
                          method="POST",
                          body=dict(SystemB=dict(name=context.request.body.systemB.name,
                                                 description=context.request.body.systemB.description)))
        if r.error:
            raise Error(r.code, reason=r.error.__str__())
        b = json.loads(r.body)
      cancellation:
        cancellable: true
        actions:
          - action_type: script
            code: |-
              if not b:
                  r = await callout(path="/apis/systemBs?name={}".format(context.request.body.systemB.name))
                  if r.error:
                      await context.qmonus.abort()
                      return
                  b = json.loads(r.body)

              r = await callout(path="/apis/systemBs/{}".format(b["SystemB"]["instance"]), method="DELETE")
              if r.error:
                  await context.qmonus.abort()
    label: SystemB
  - command: breakpoint
    kwargs:
      abort: true
      immediate_cancel: true
request_timeout: 60
connect_timeout: 60
spec:
  response:
    normal:
      codes:
        - 200
  request:
    body:
      type: object
      required:
        - systemA
        - systemB
      properties:
        systemA:
          type: object
          properties:
            name:
              type: string
            description:
              type: string
          required:
            - name
        systemB:
          type: object
          properties:
            name:
              type: string
            description:
              type: string
          required:
            - name
transaction:
  enable: true
  async: true
  xname_use_counter: false
  auto_begin: true
  auto_response: true
  xname: ''
  lock:
    lock_keys:
      - context.request.body.systemA.name
      - context.request.body.systemB.name
    retry_count: 3
    retry_interval: 1
  callback_options:
    url: ''
  xdomain: Tutorial
  xtype: Two-Phase Commit
  auto_rollback: true
routing_auto_generation_mode: true
global_variables:
  a:
    initial: null
    description: SystemA Instance variable
  b:
    initial: null
    description: SystemB Instance variable
-
上記の
シナリオファイルを用意する -
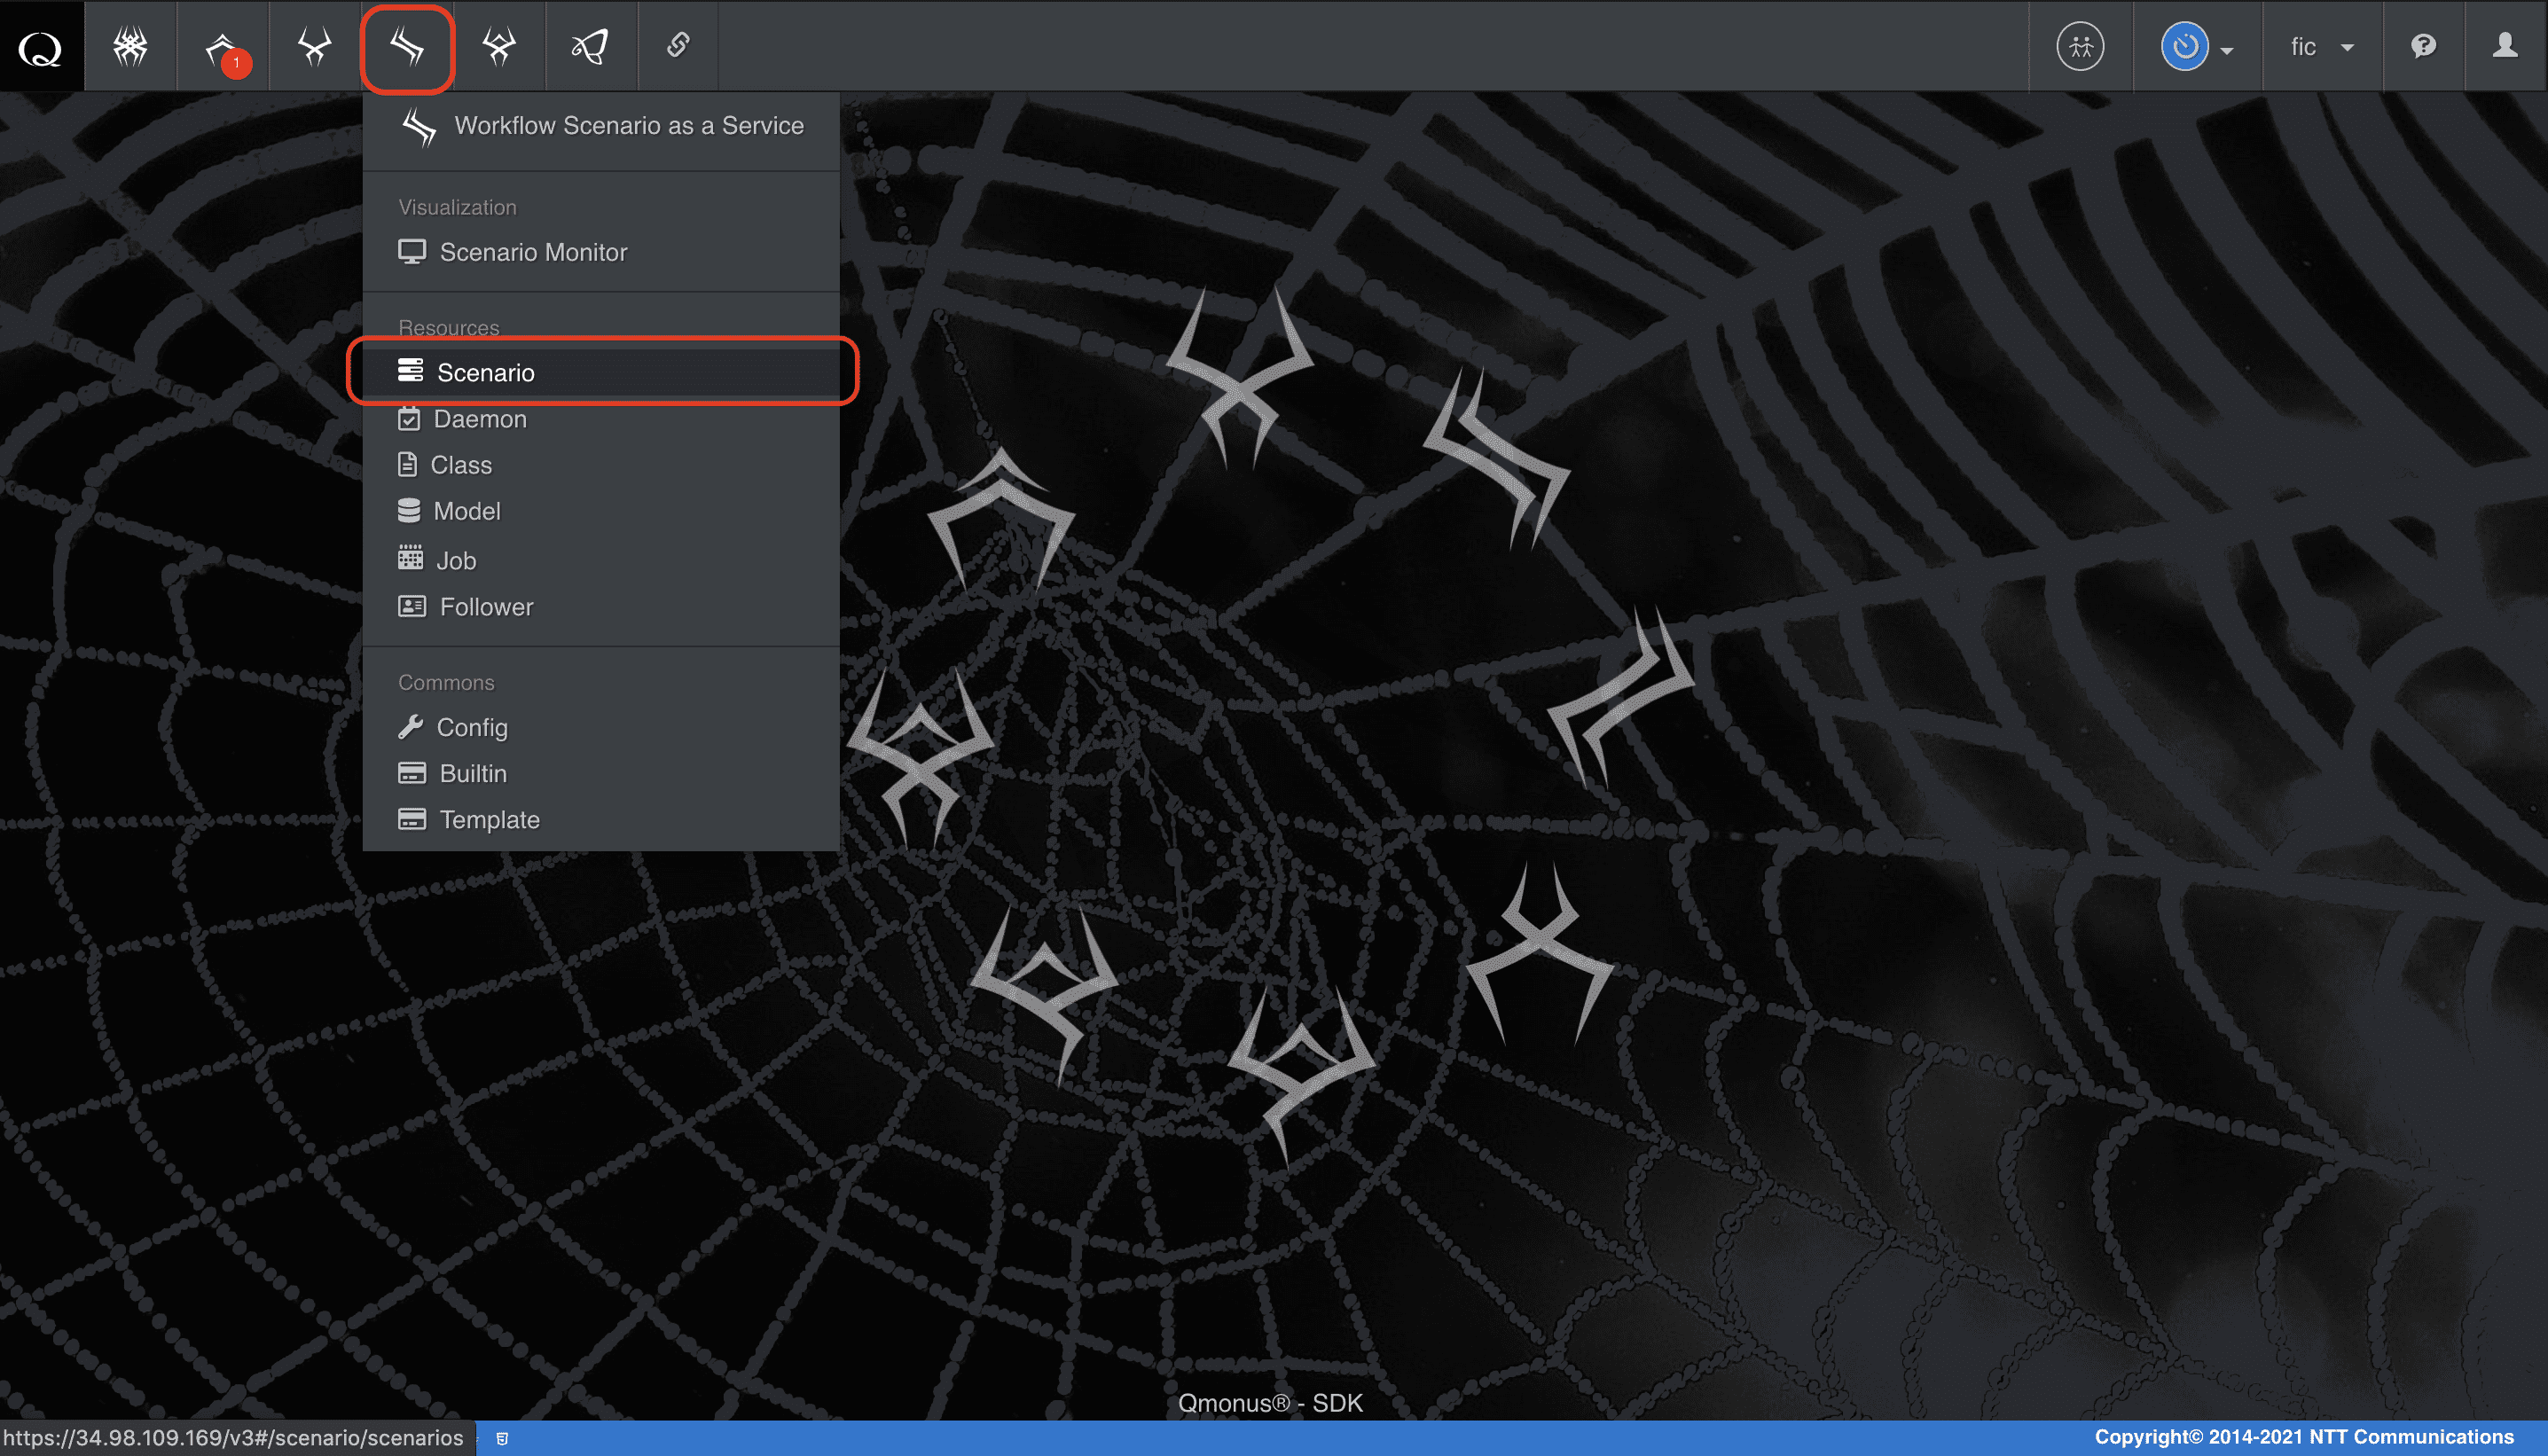
メインメニューから [Workflow Scenario as a Service] > [Scenario] を選択
-
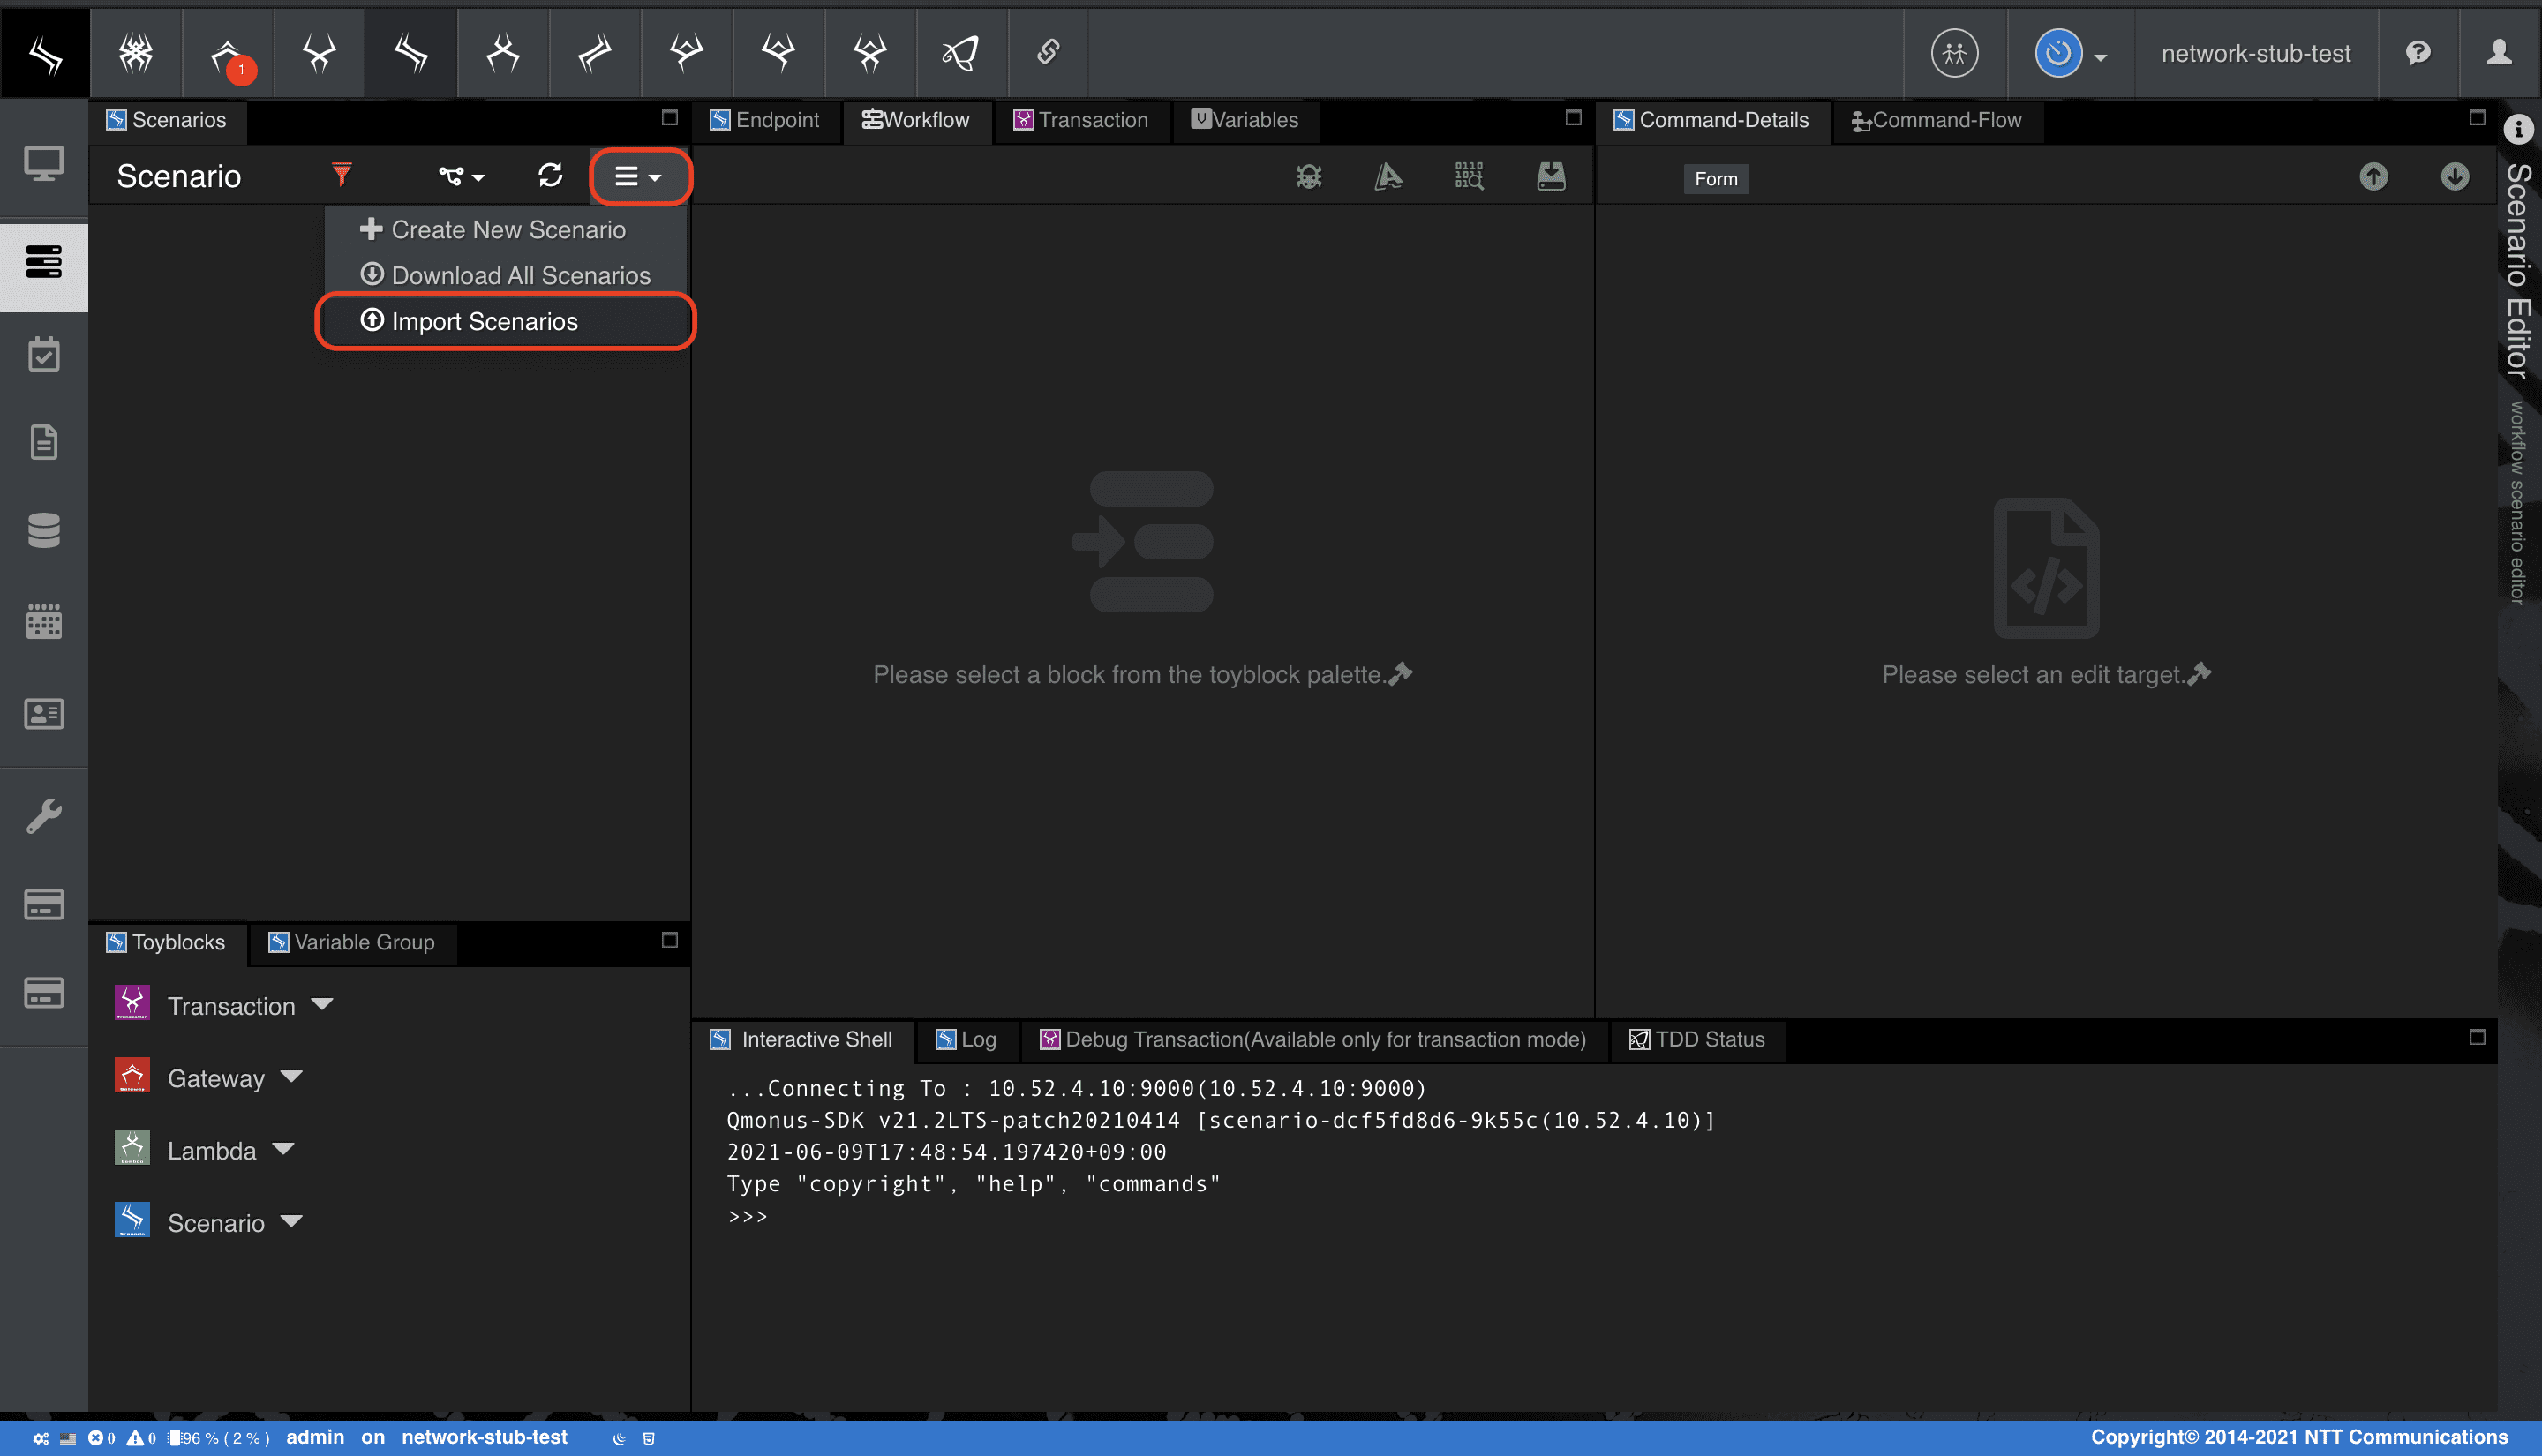
シナリオメニューの [Import Scenarios] を選択
-
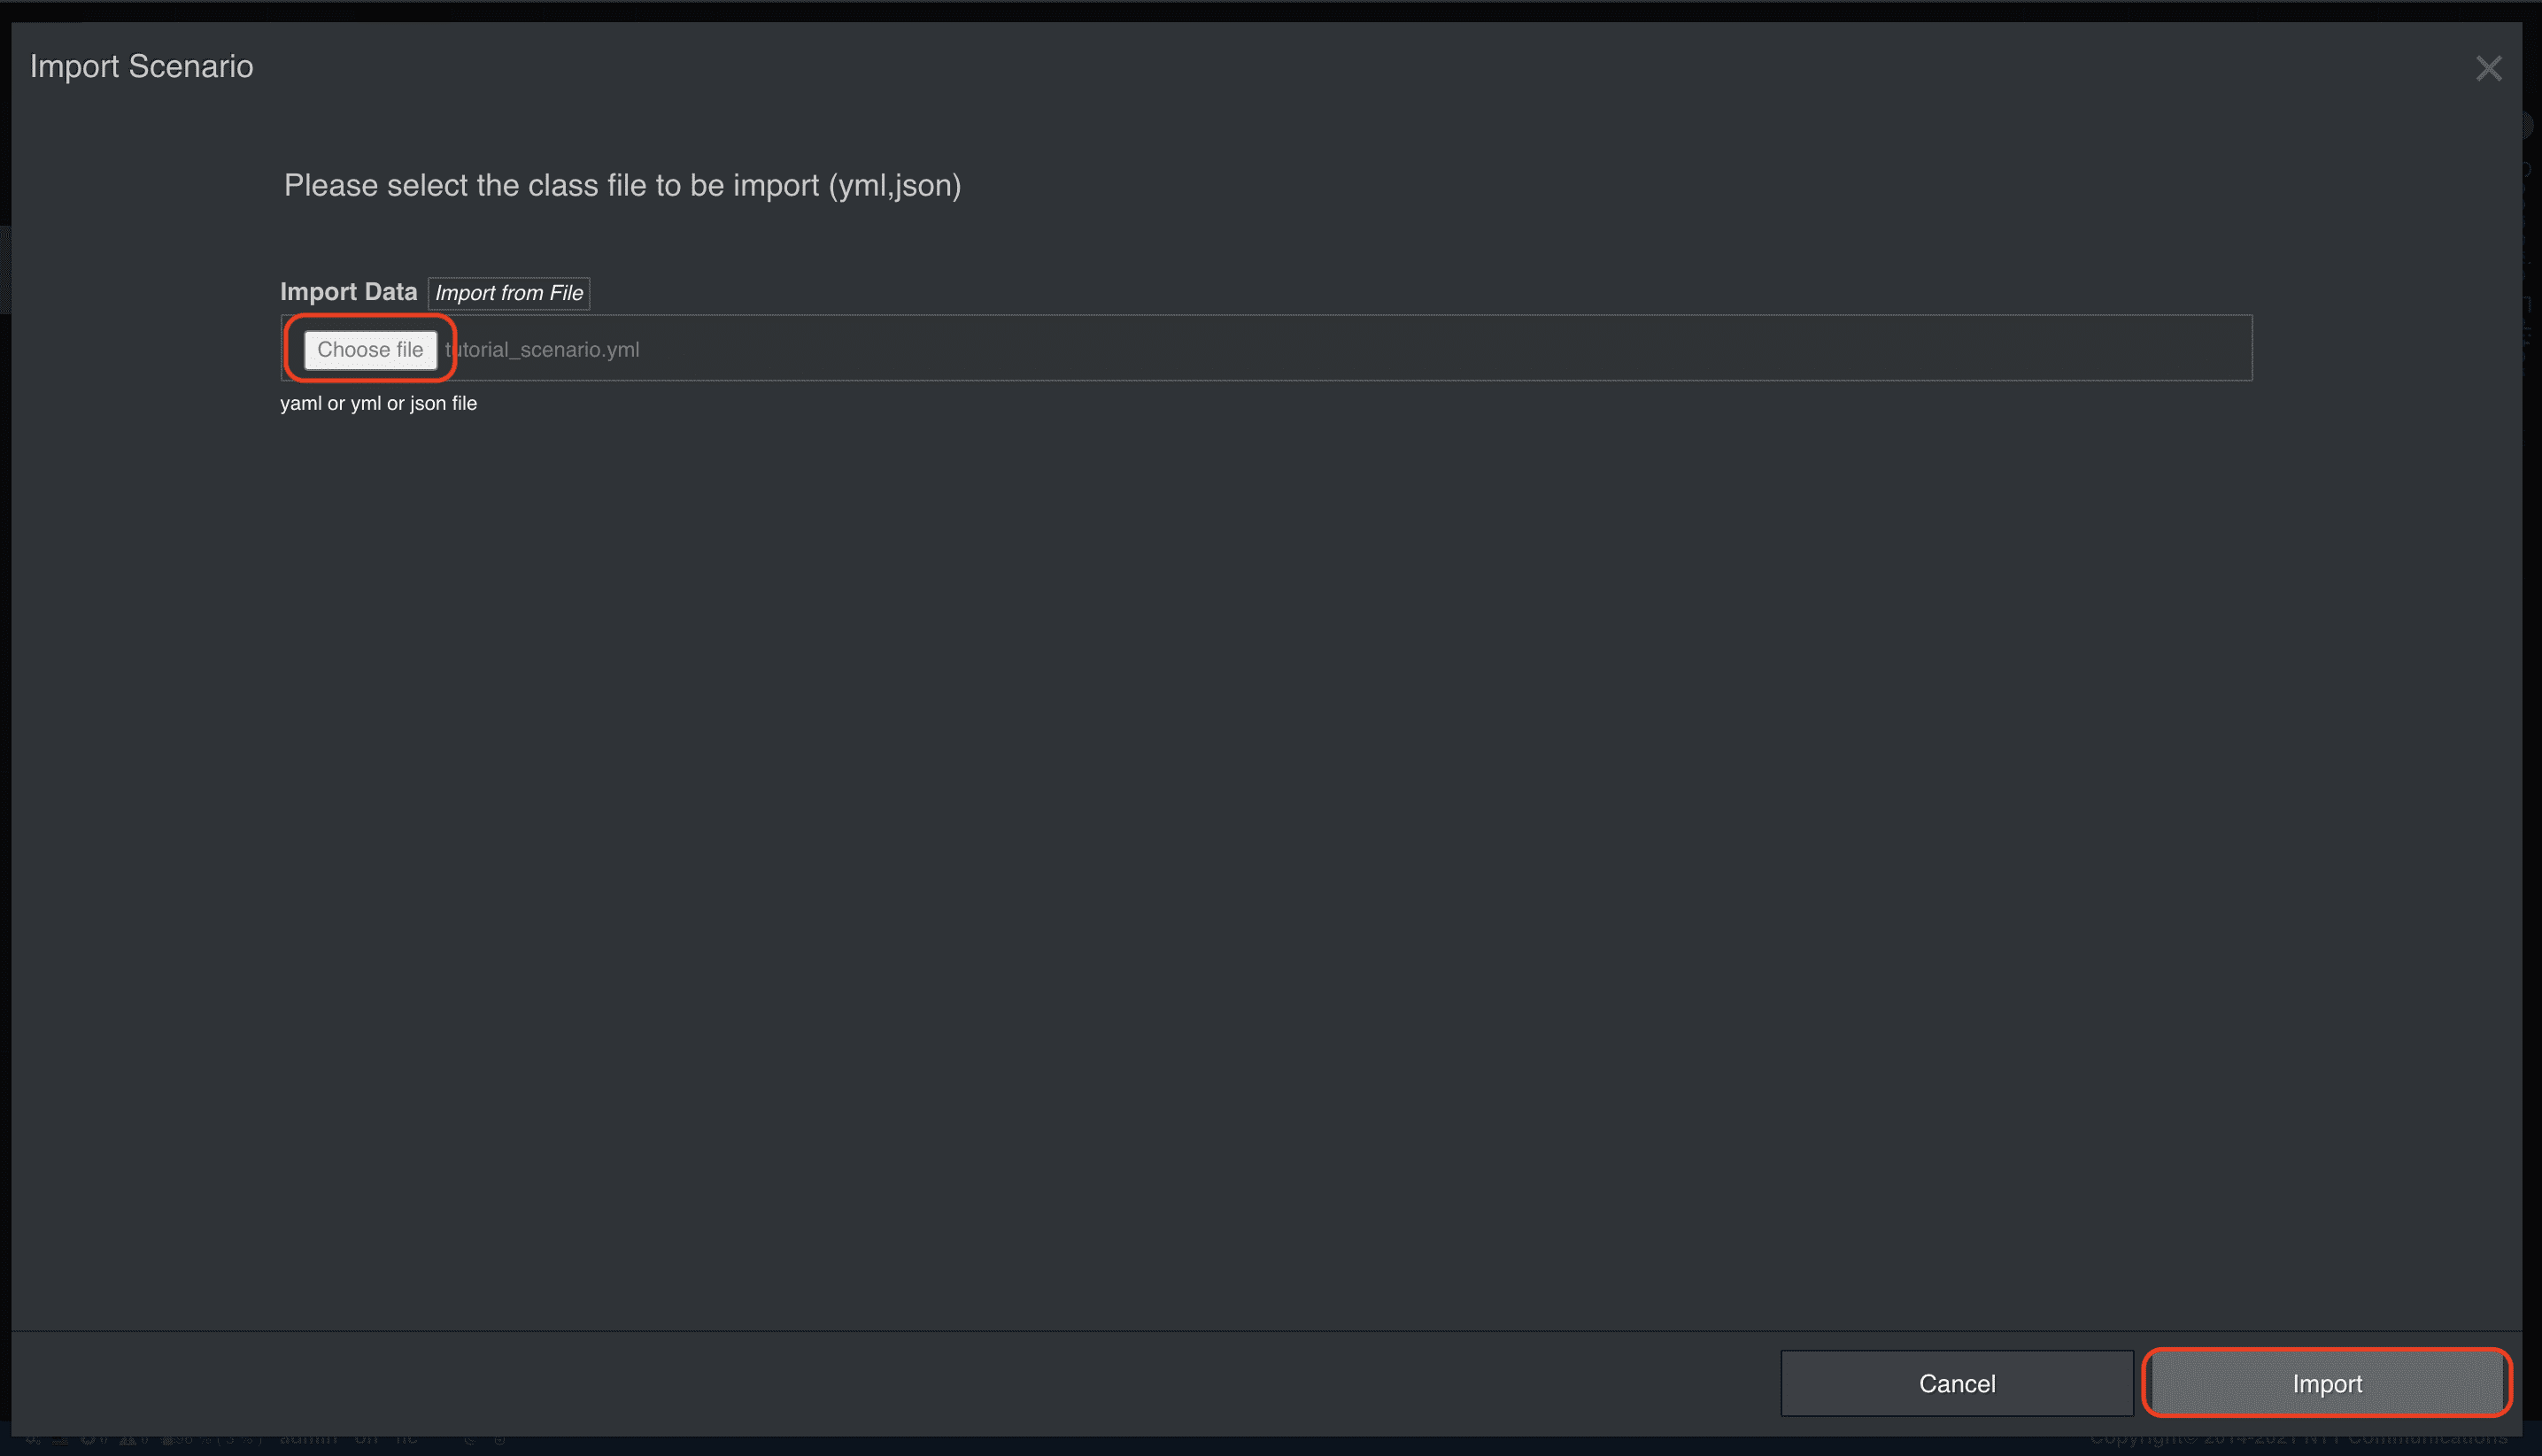
[Choose file] でファイルを指定後、[Import] を選択
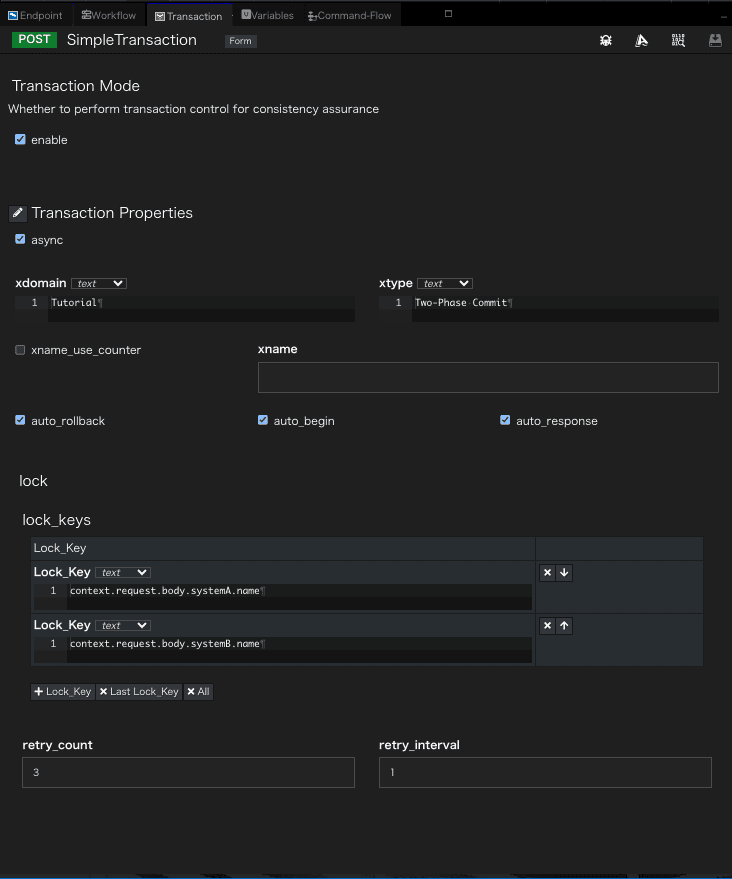
本チュートリアルで扱うシナリオはTransactionタブ内でいくつかの設定を行っています。
それぞれの設定値詳細は
Qmonus SDK Programming Guide » Transaction » トランザクション
を参照してください。
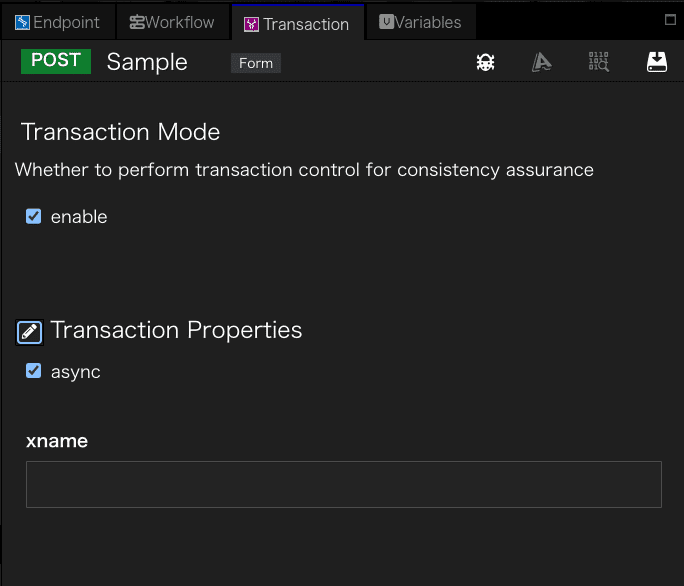
トランザクションは[Transaction as a Service]内にリソースとして作成されます。
シナリオに紐づいて作成されるトランザクションは同シナリオのTransactionタブ内で設定を行うことができます。
シナリオを新規作成した場合、Transactionタブ内は以下の画像のように必要最低限の設定項目のみが表示されます。今回のように追加で設定が必要な場合は[Transaction Propaties]の横にある鉛筆マークを選択し、必要な設定項目にチェックを入れて表示してください。
2. シナリオを実行する
-
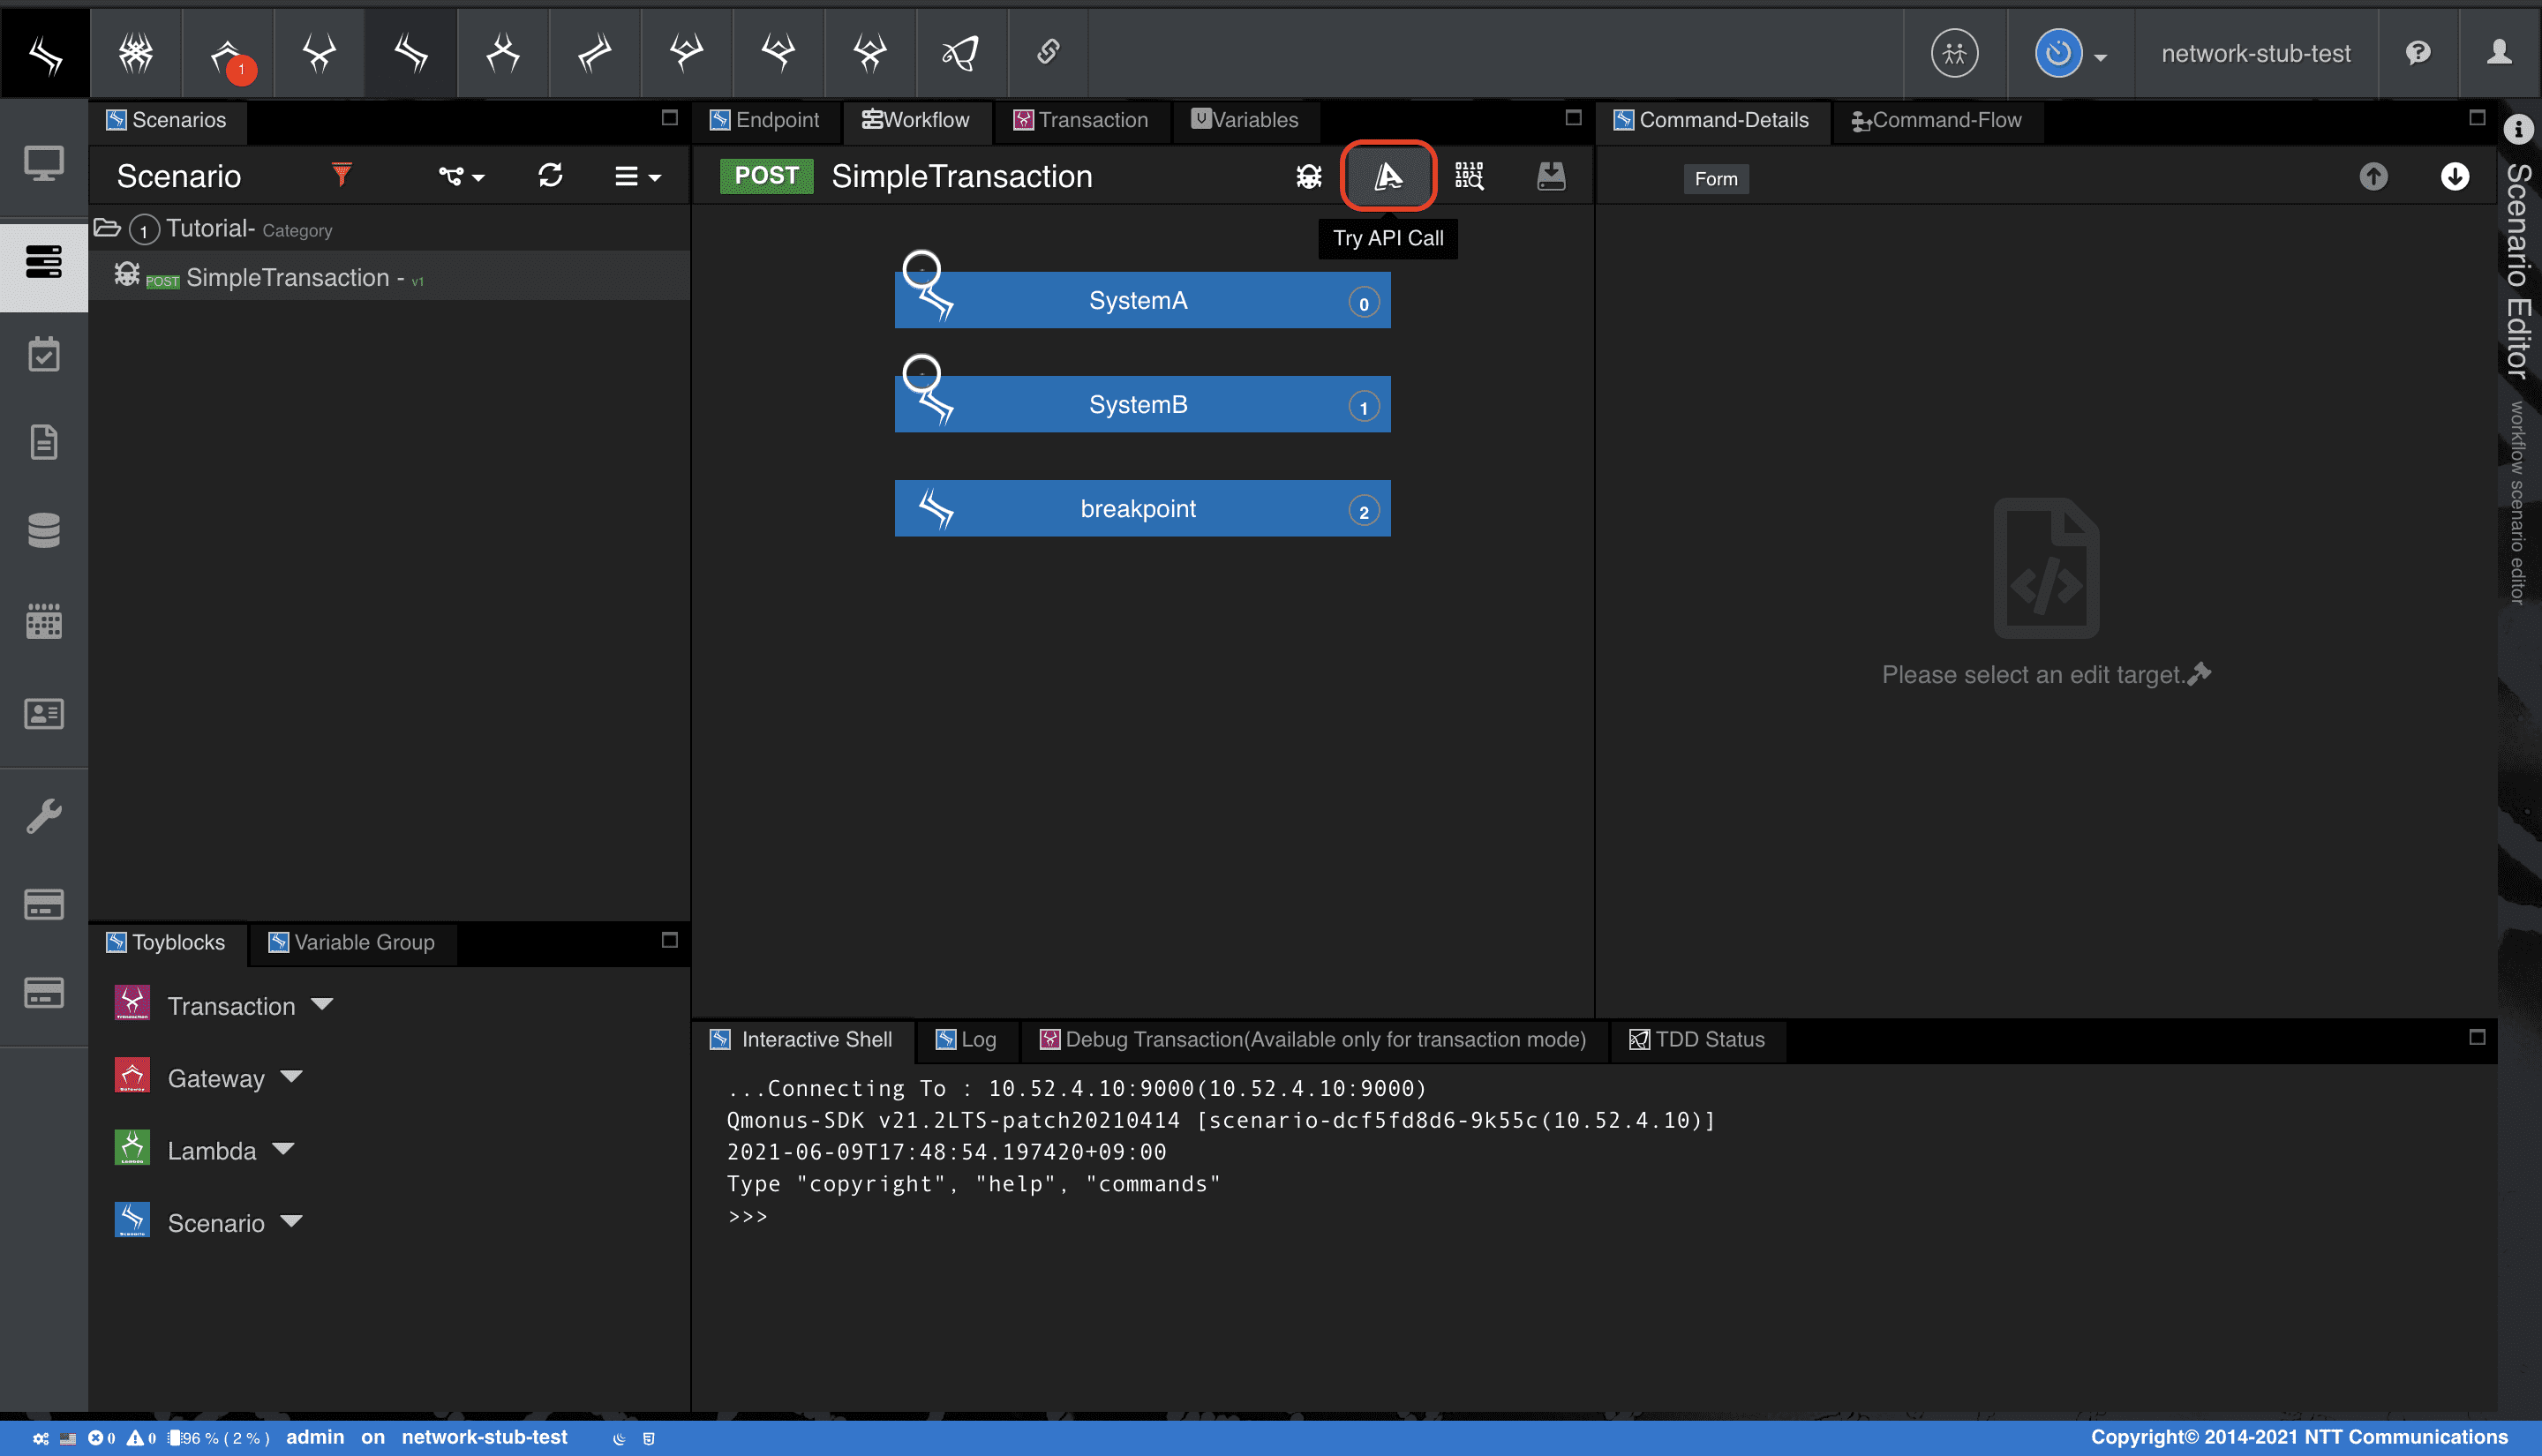
シナリオの一覧から、インポートしたシナリオ > シナリオメニューの [Try API Call] を選択
-
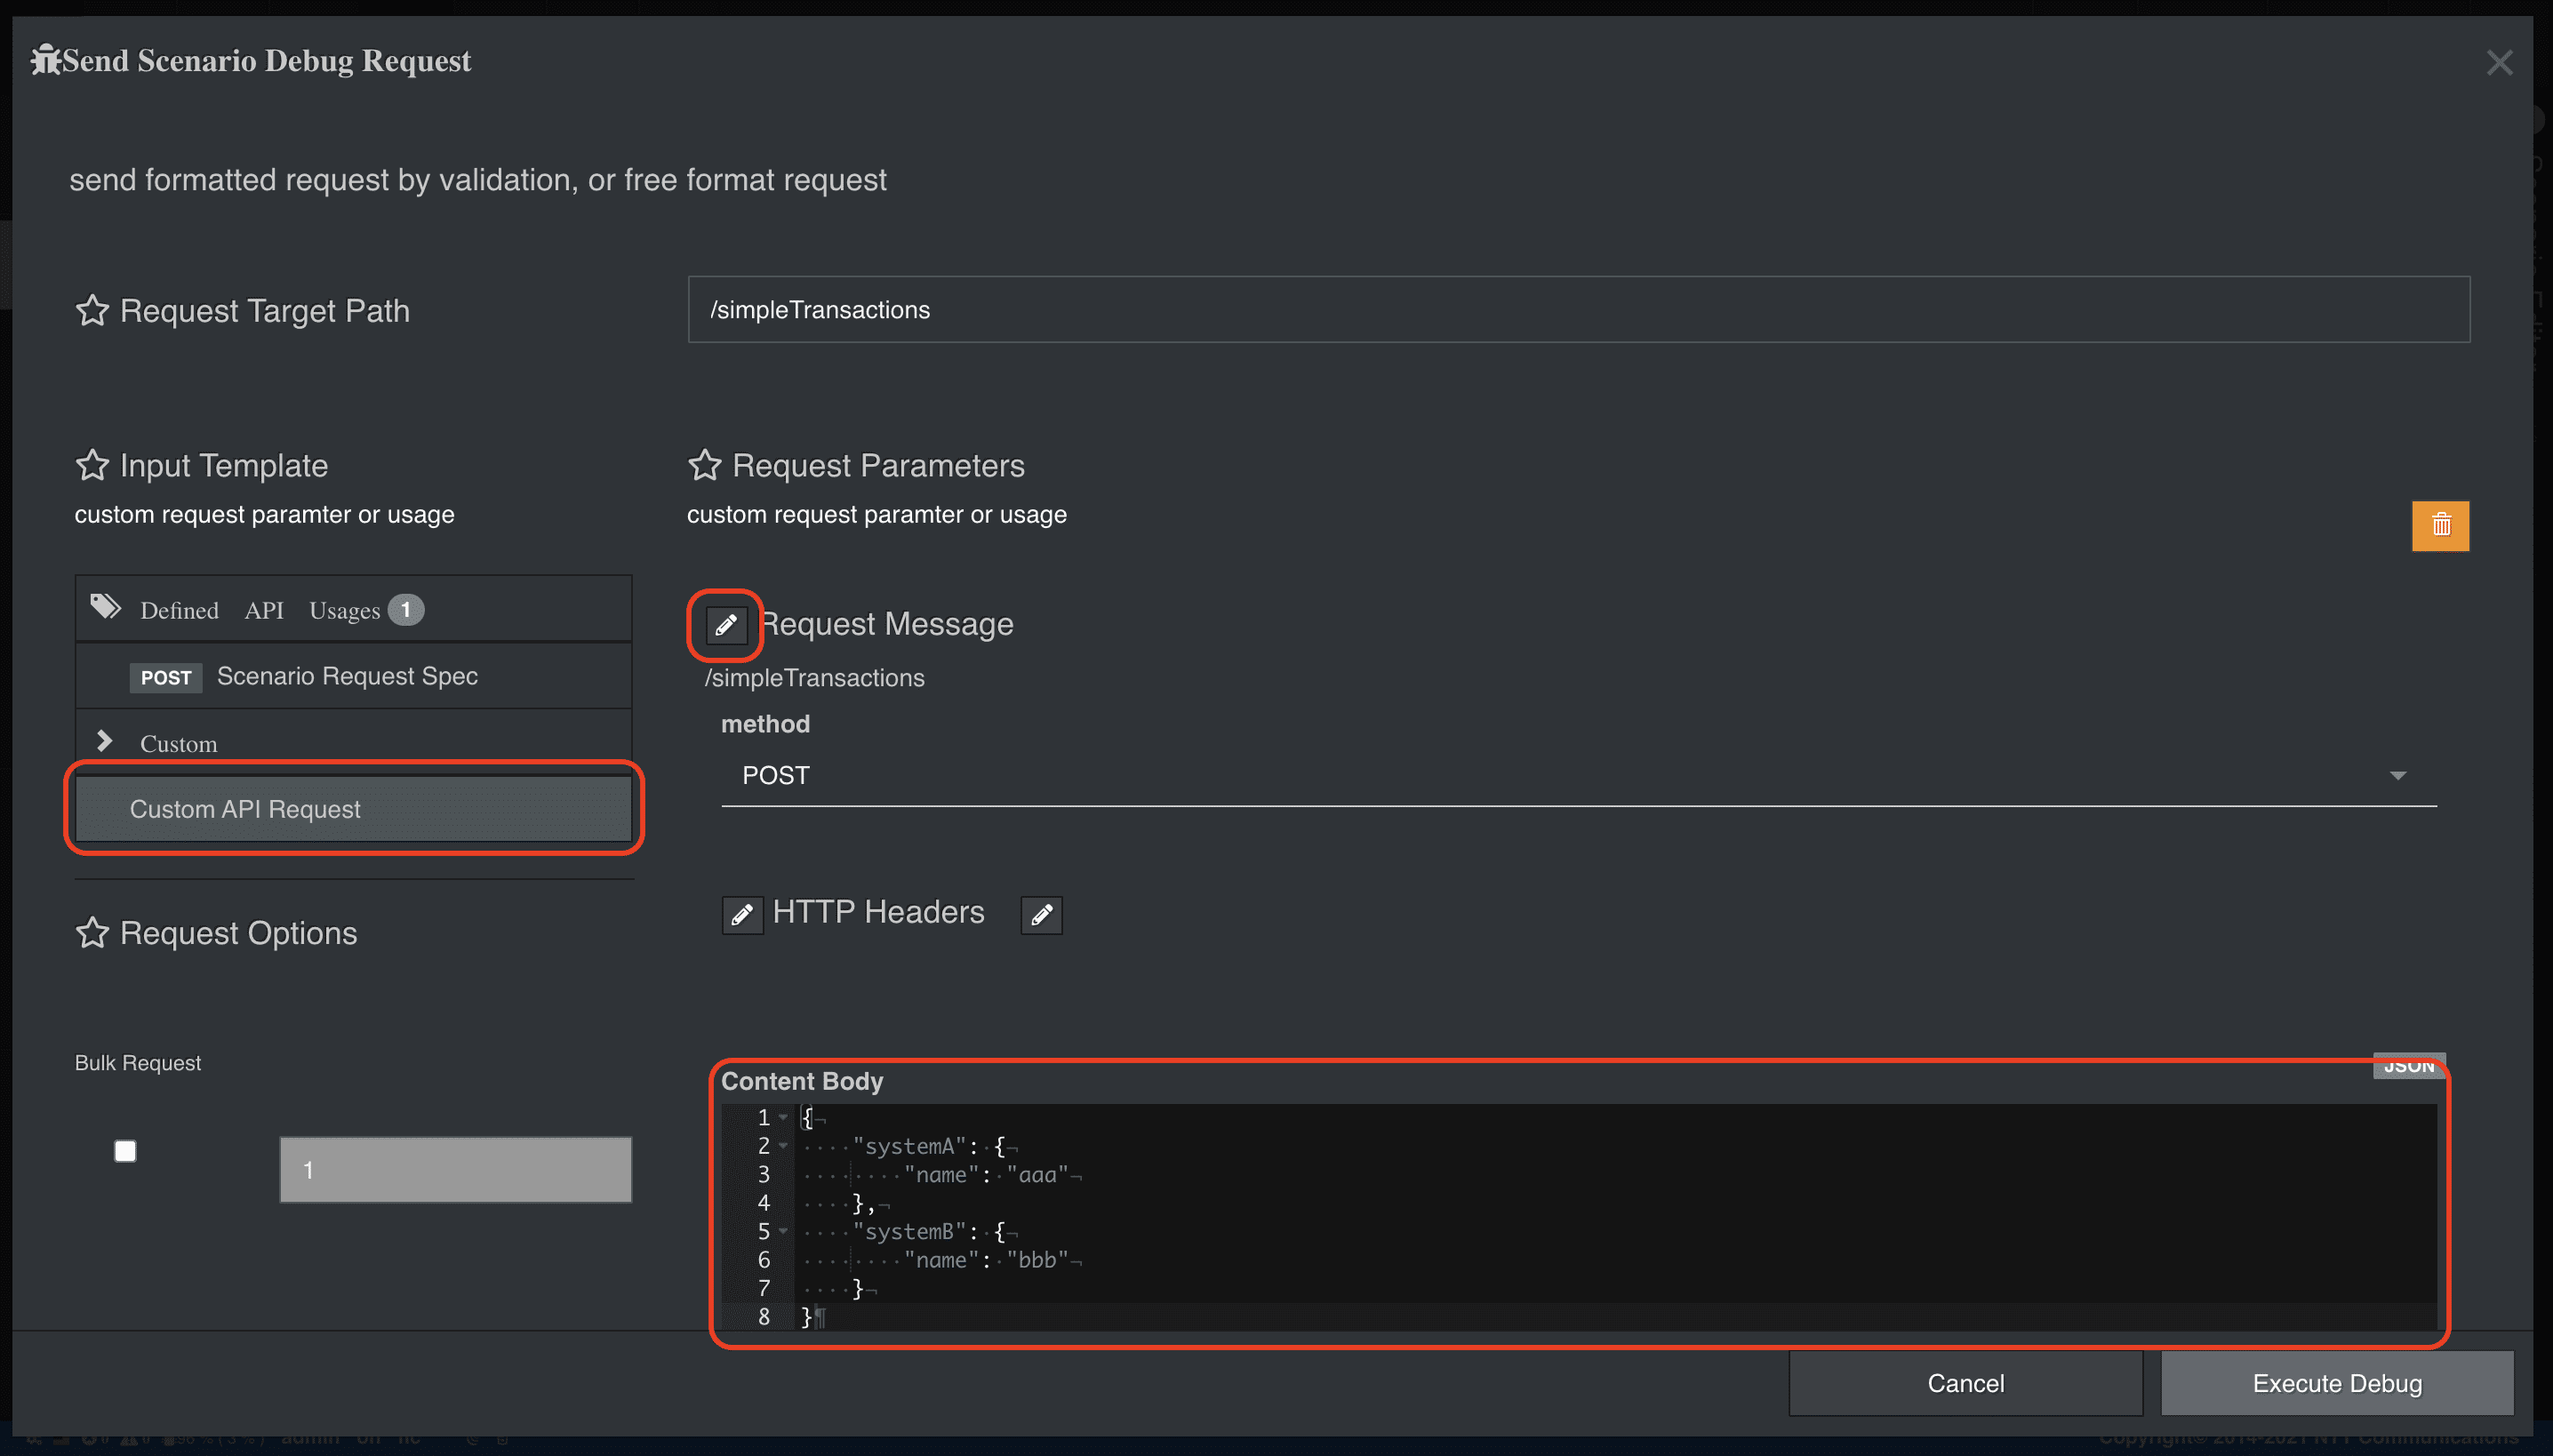
Input Templateメニューの [Custom API Request] 、Request Parametersメニューの [Request Message] 鉛筆マーク > [Content Body] を選択し、以下等の適当なリクエストボディを設定し、[Execute Debug] でデバッグ
json
{
    "systemA": {
        "name": "aaa"
    },
    "systemB": {
        "name": "bbb"
    }
}
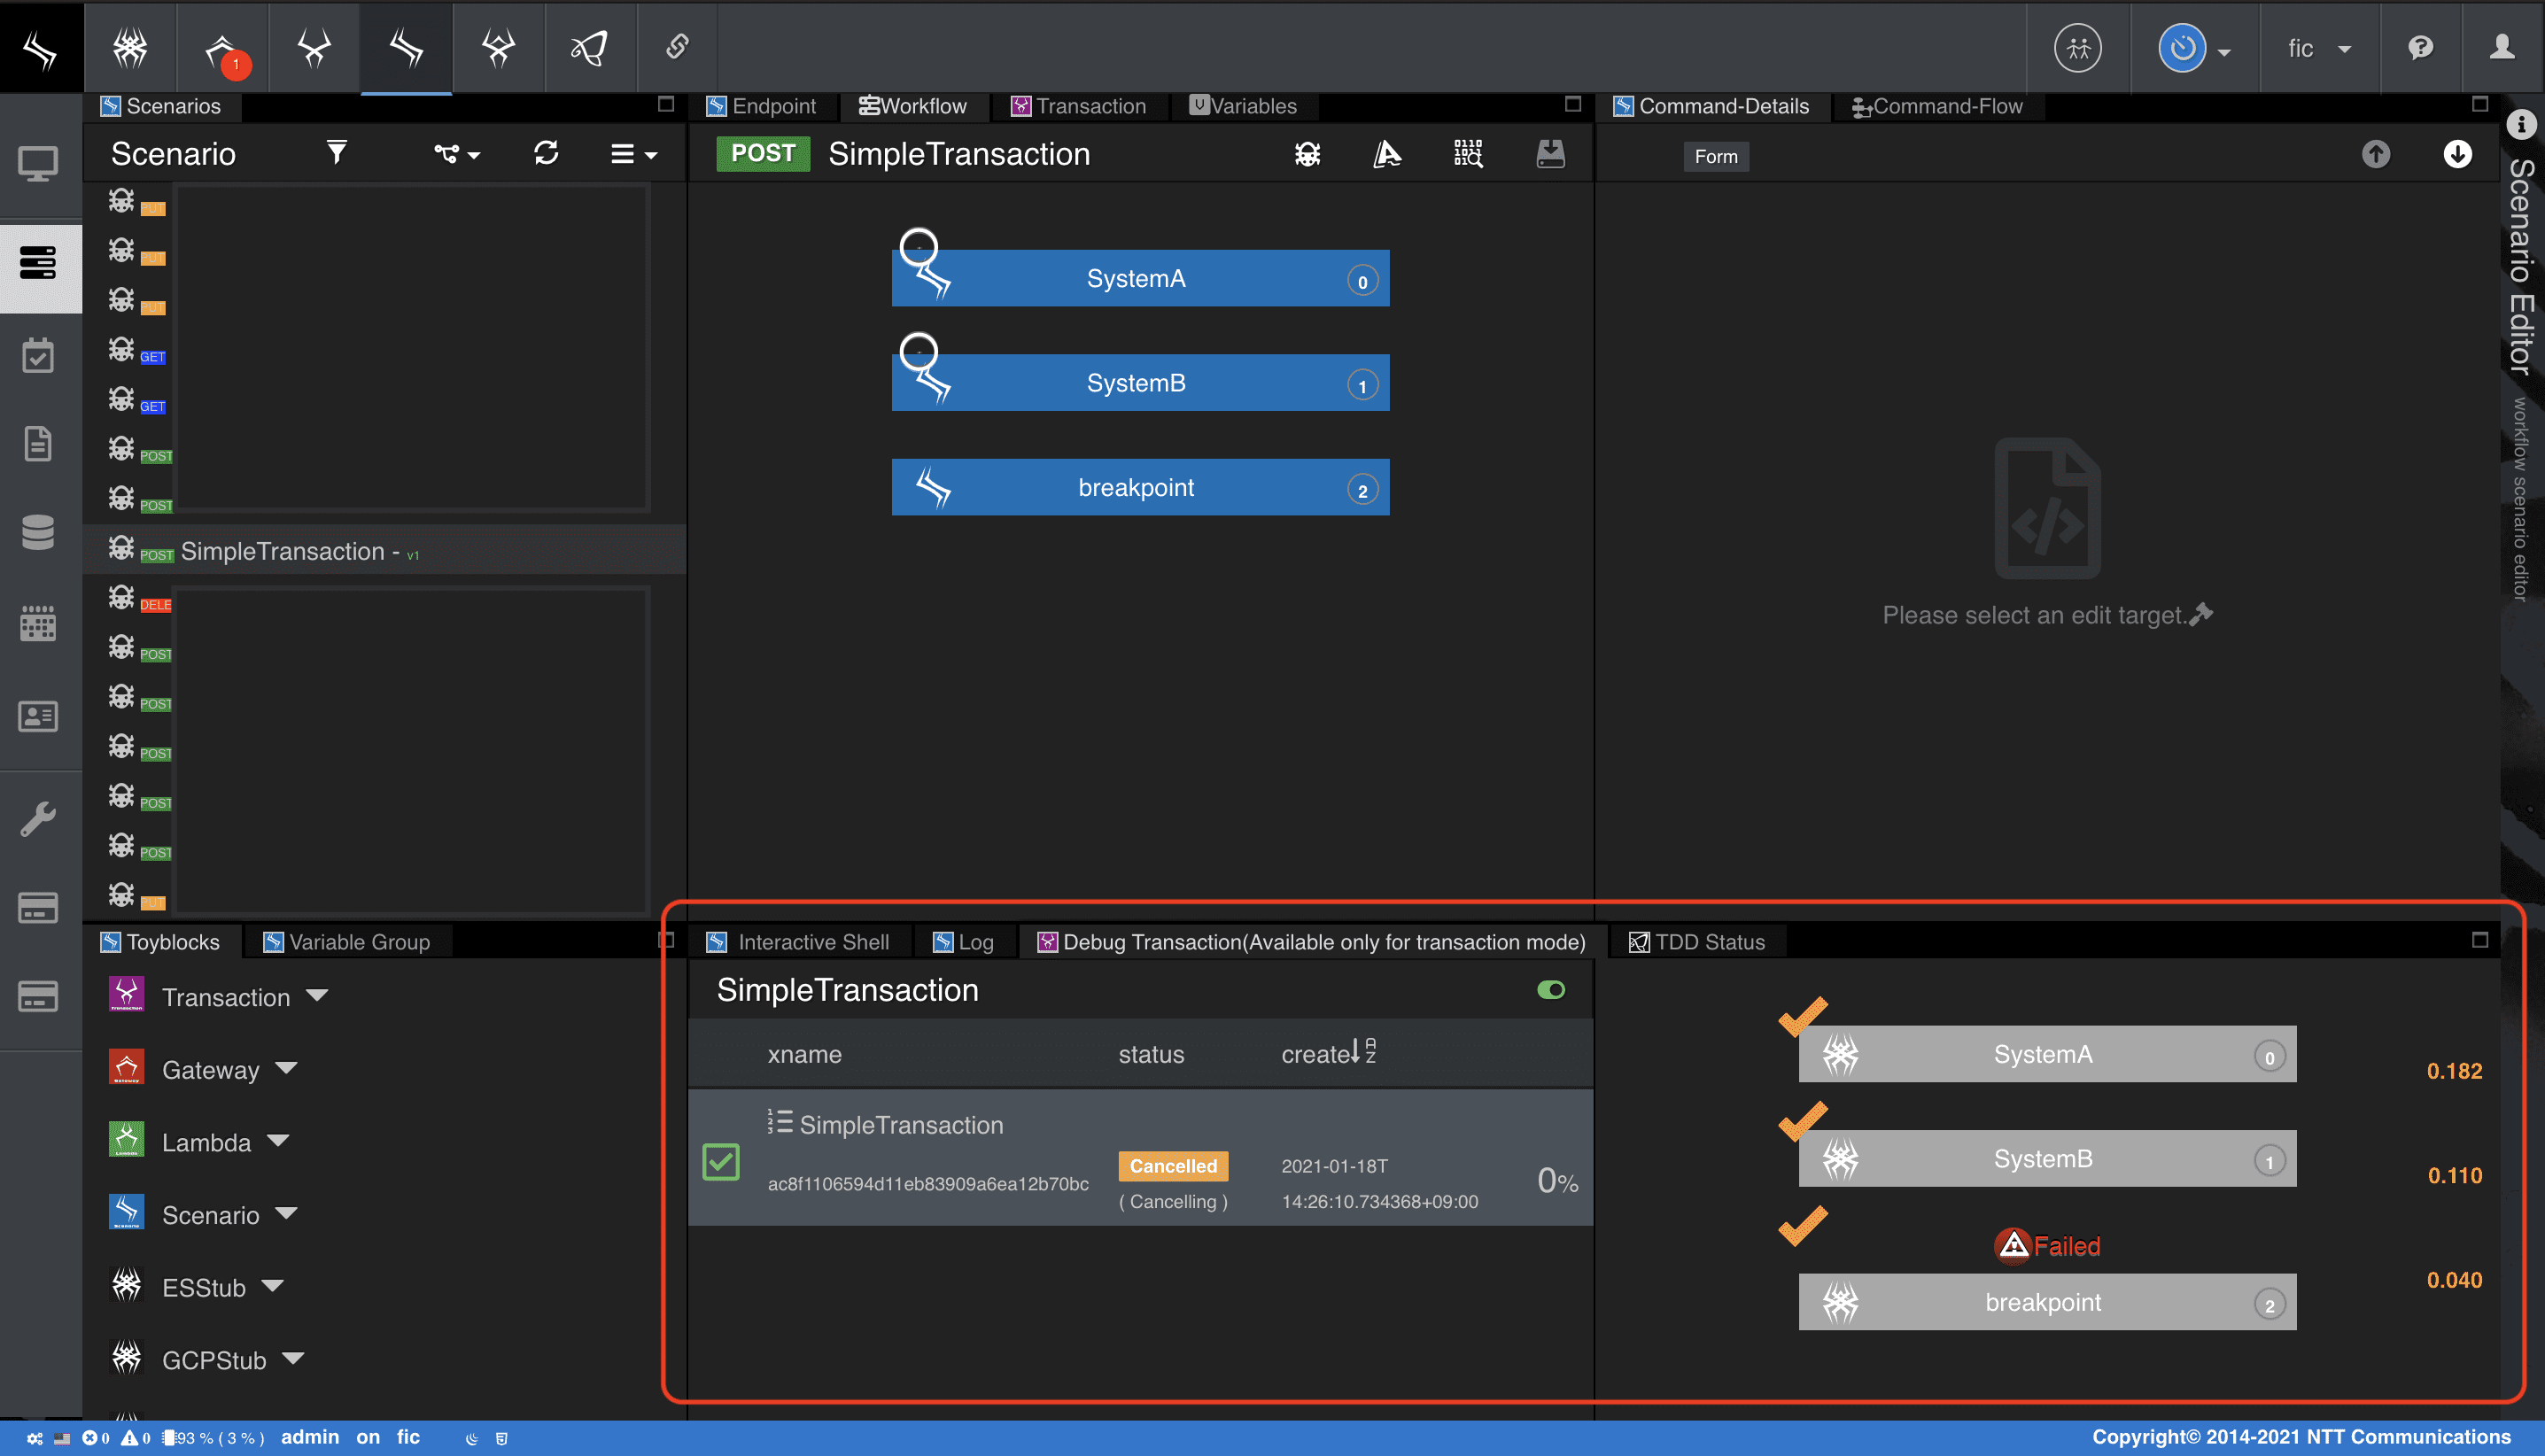
- トランザクション状態を確認
3. キャンセルモードを変更する
ロールバックが確認できたら、キャンセルモードを変更し、再度実行してみましょう。
-
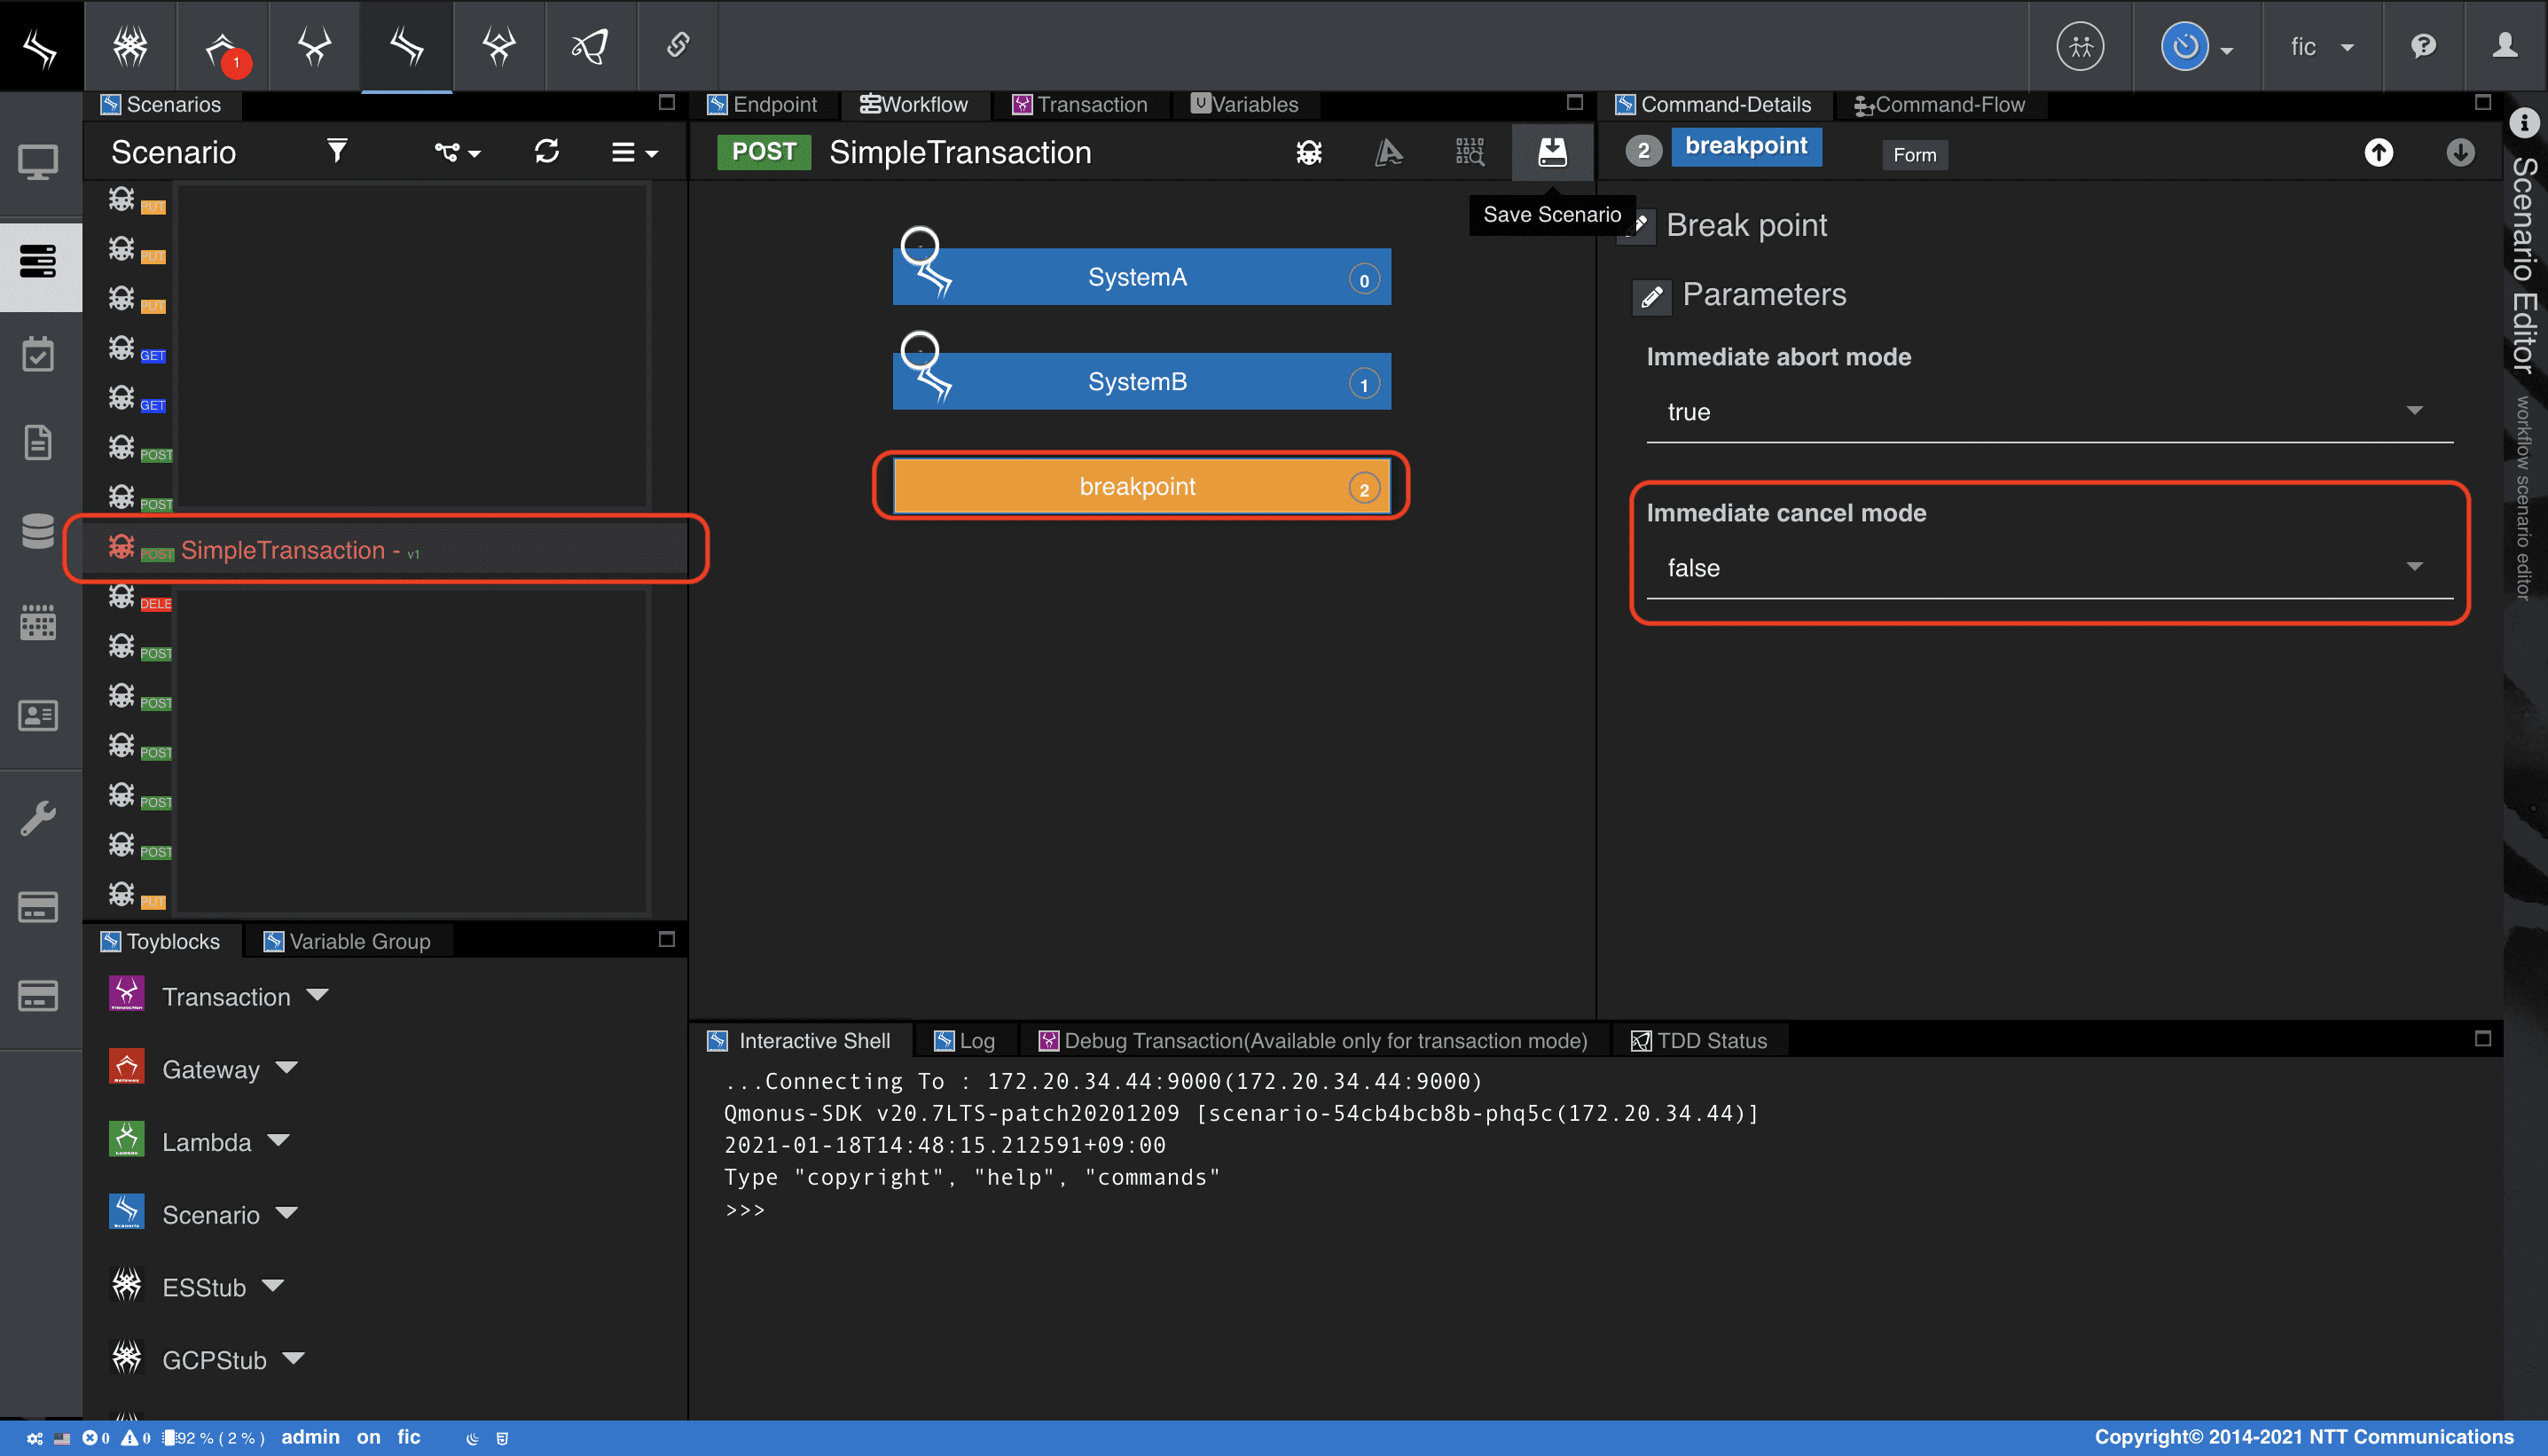
[Workflow] タブ > [breakpoint] ブロック、
[Immediate cancel mode] を [false] に変更して、[Save Scenario] を選択
-
[Execute Debug] でシナリオ変更前と同様に [Try API Call]ボタン からデバッグ、ワークフローが中断することを確認
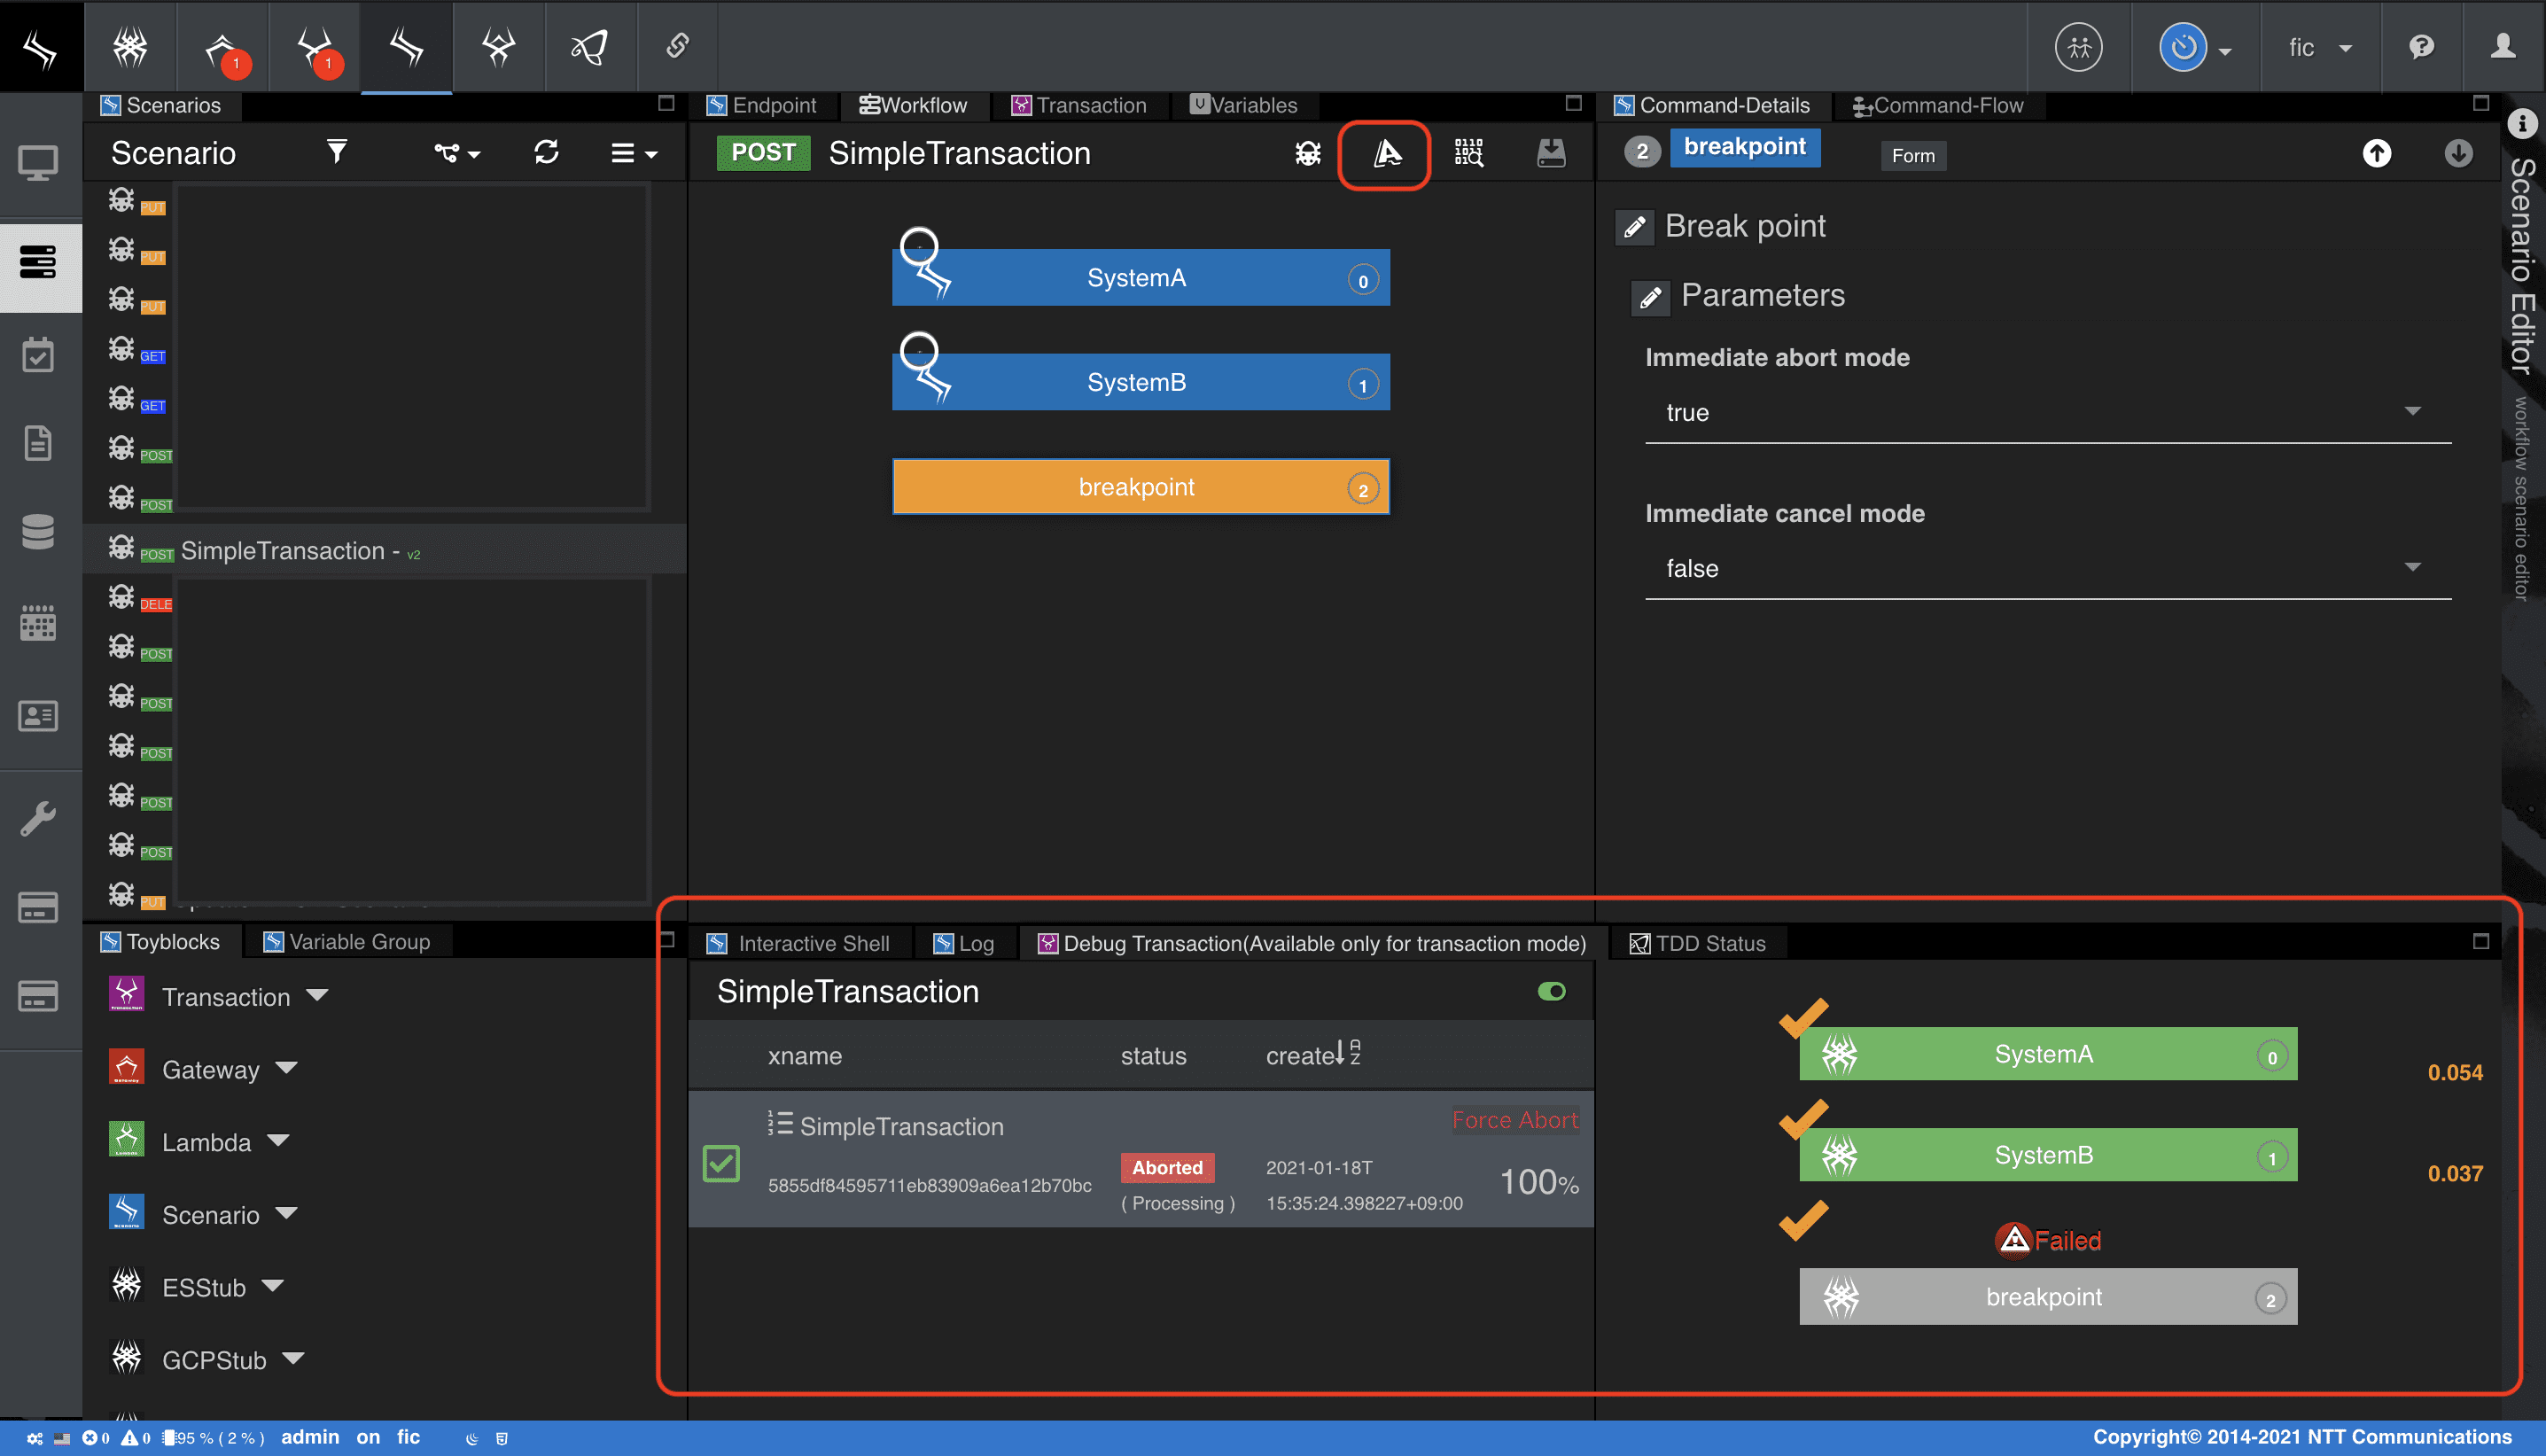
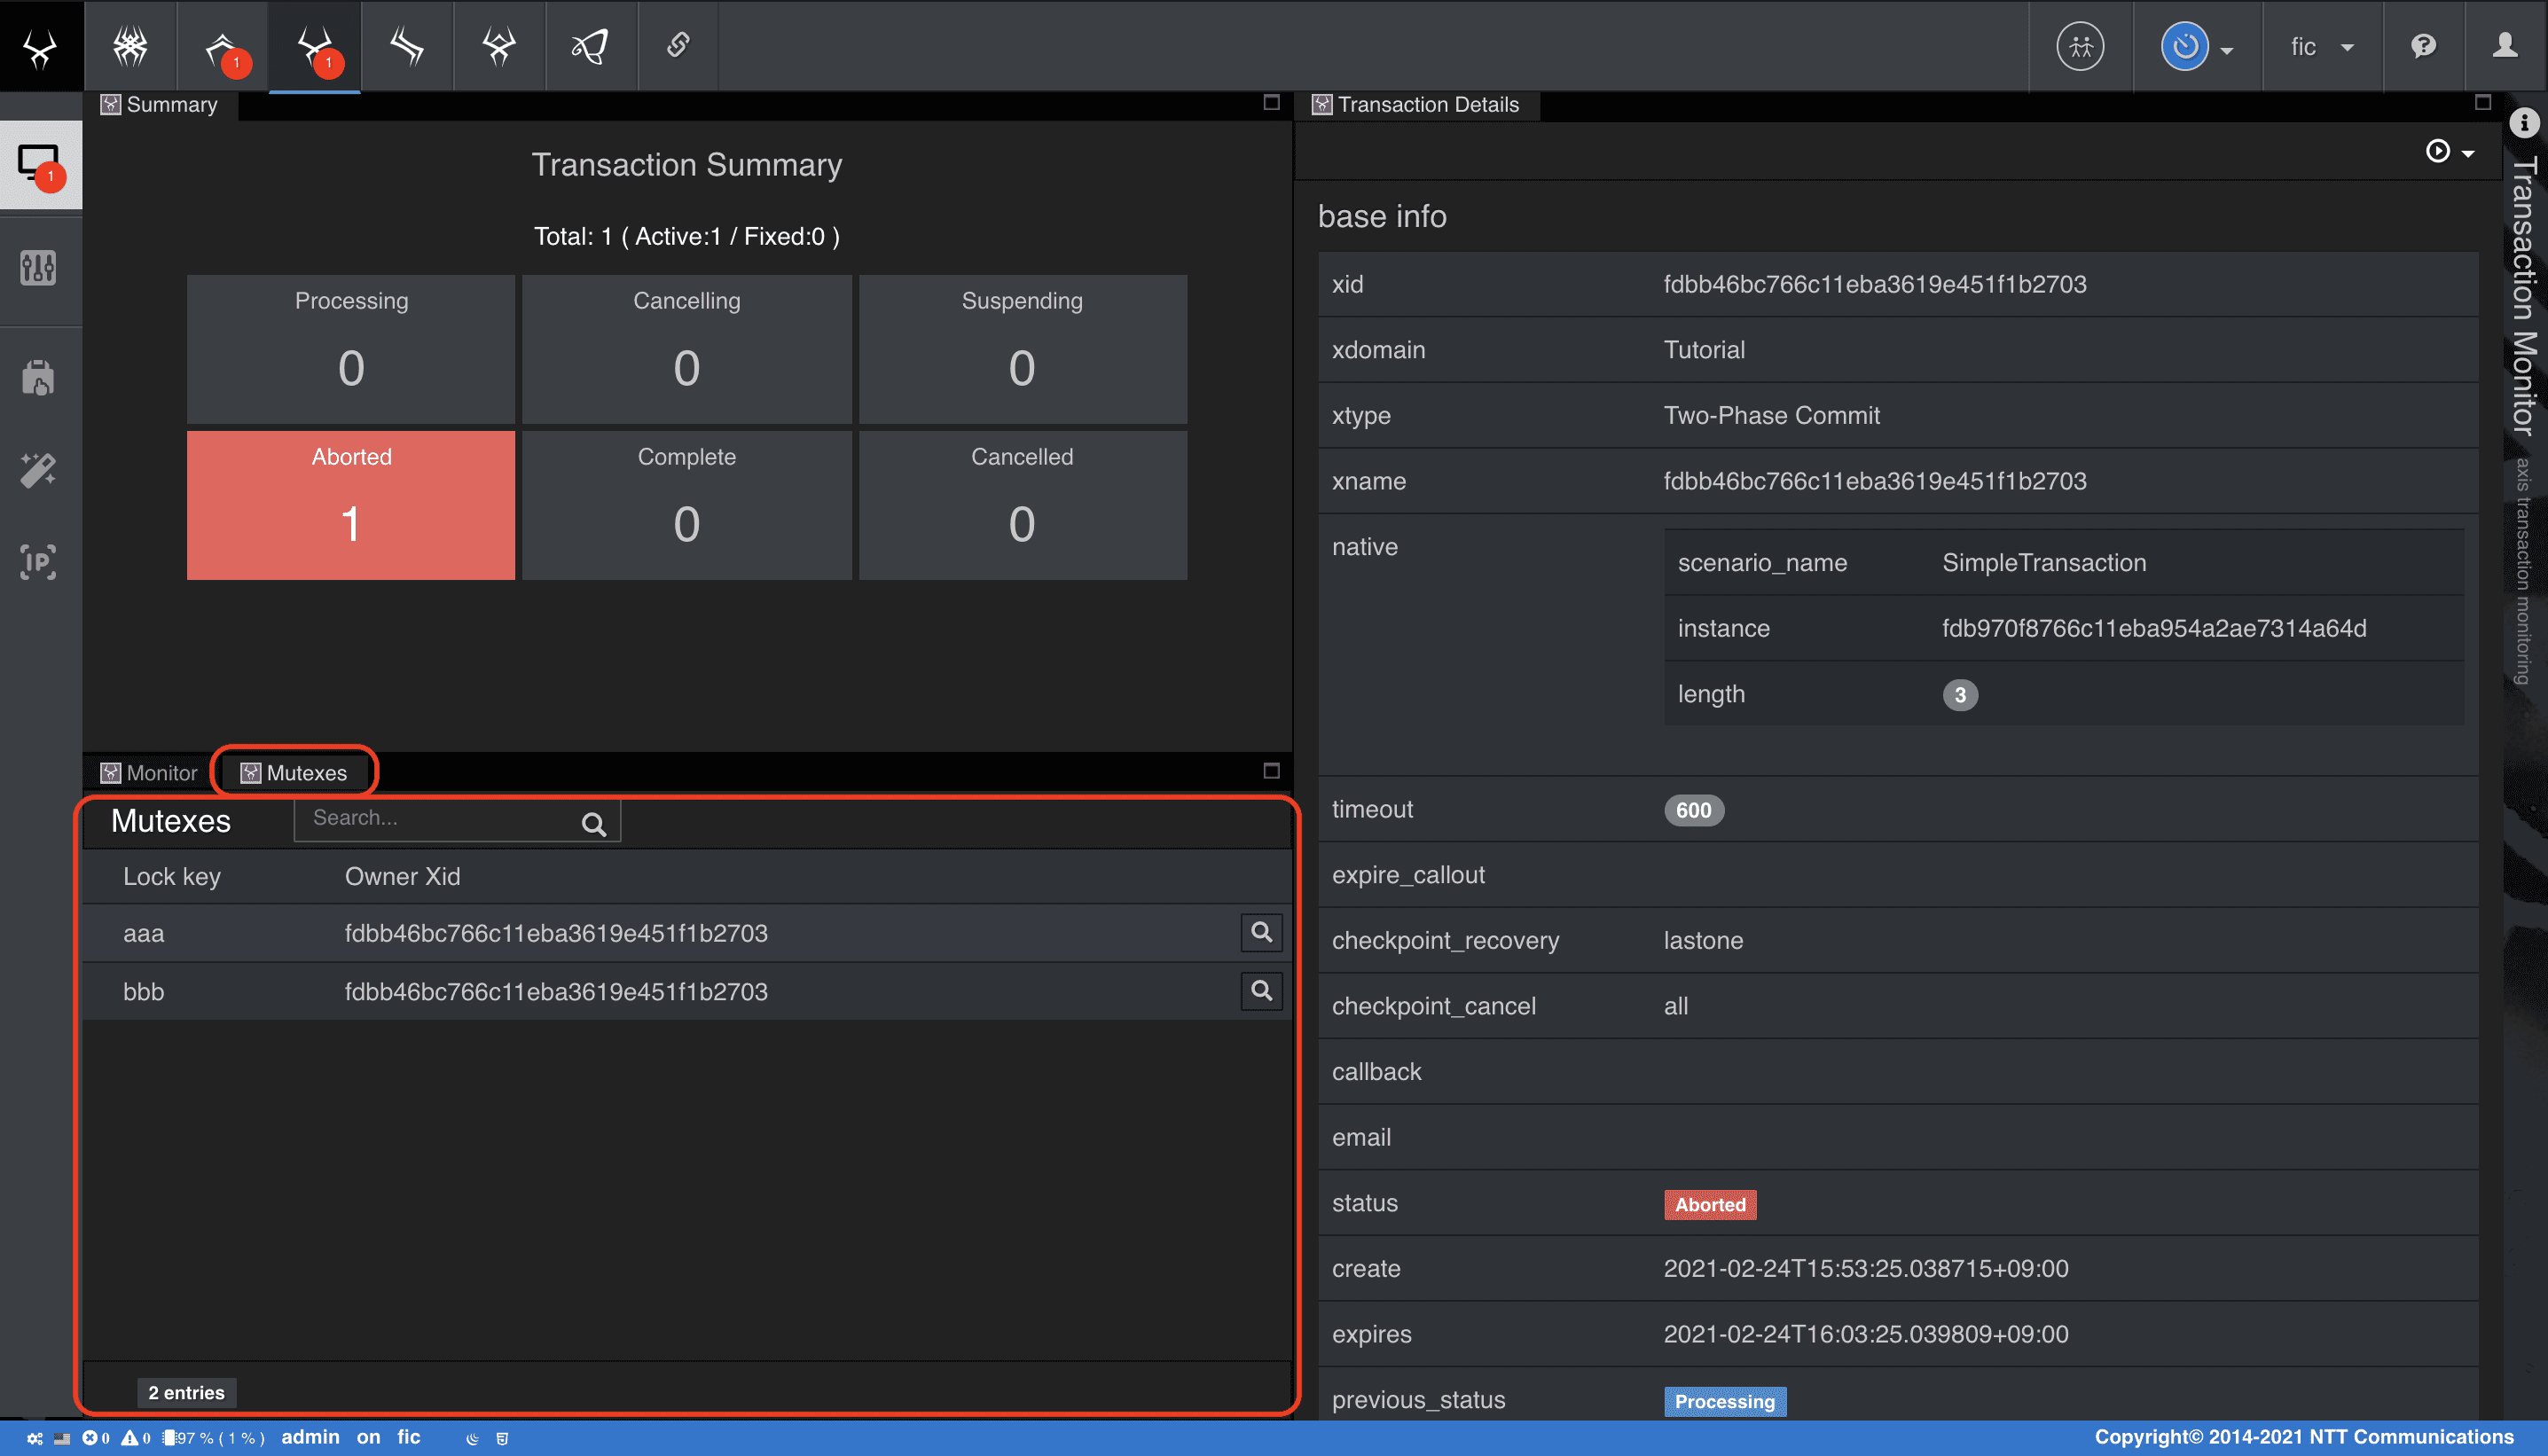
ワークフローが中断された状態で、ロックが残っていることを確認することができます。
ロックは、Transaction MonitorのMutexesタブから確認します。
-
メインメニューから [Transaction as a Service] > [Transaction Monitor] を選択
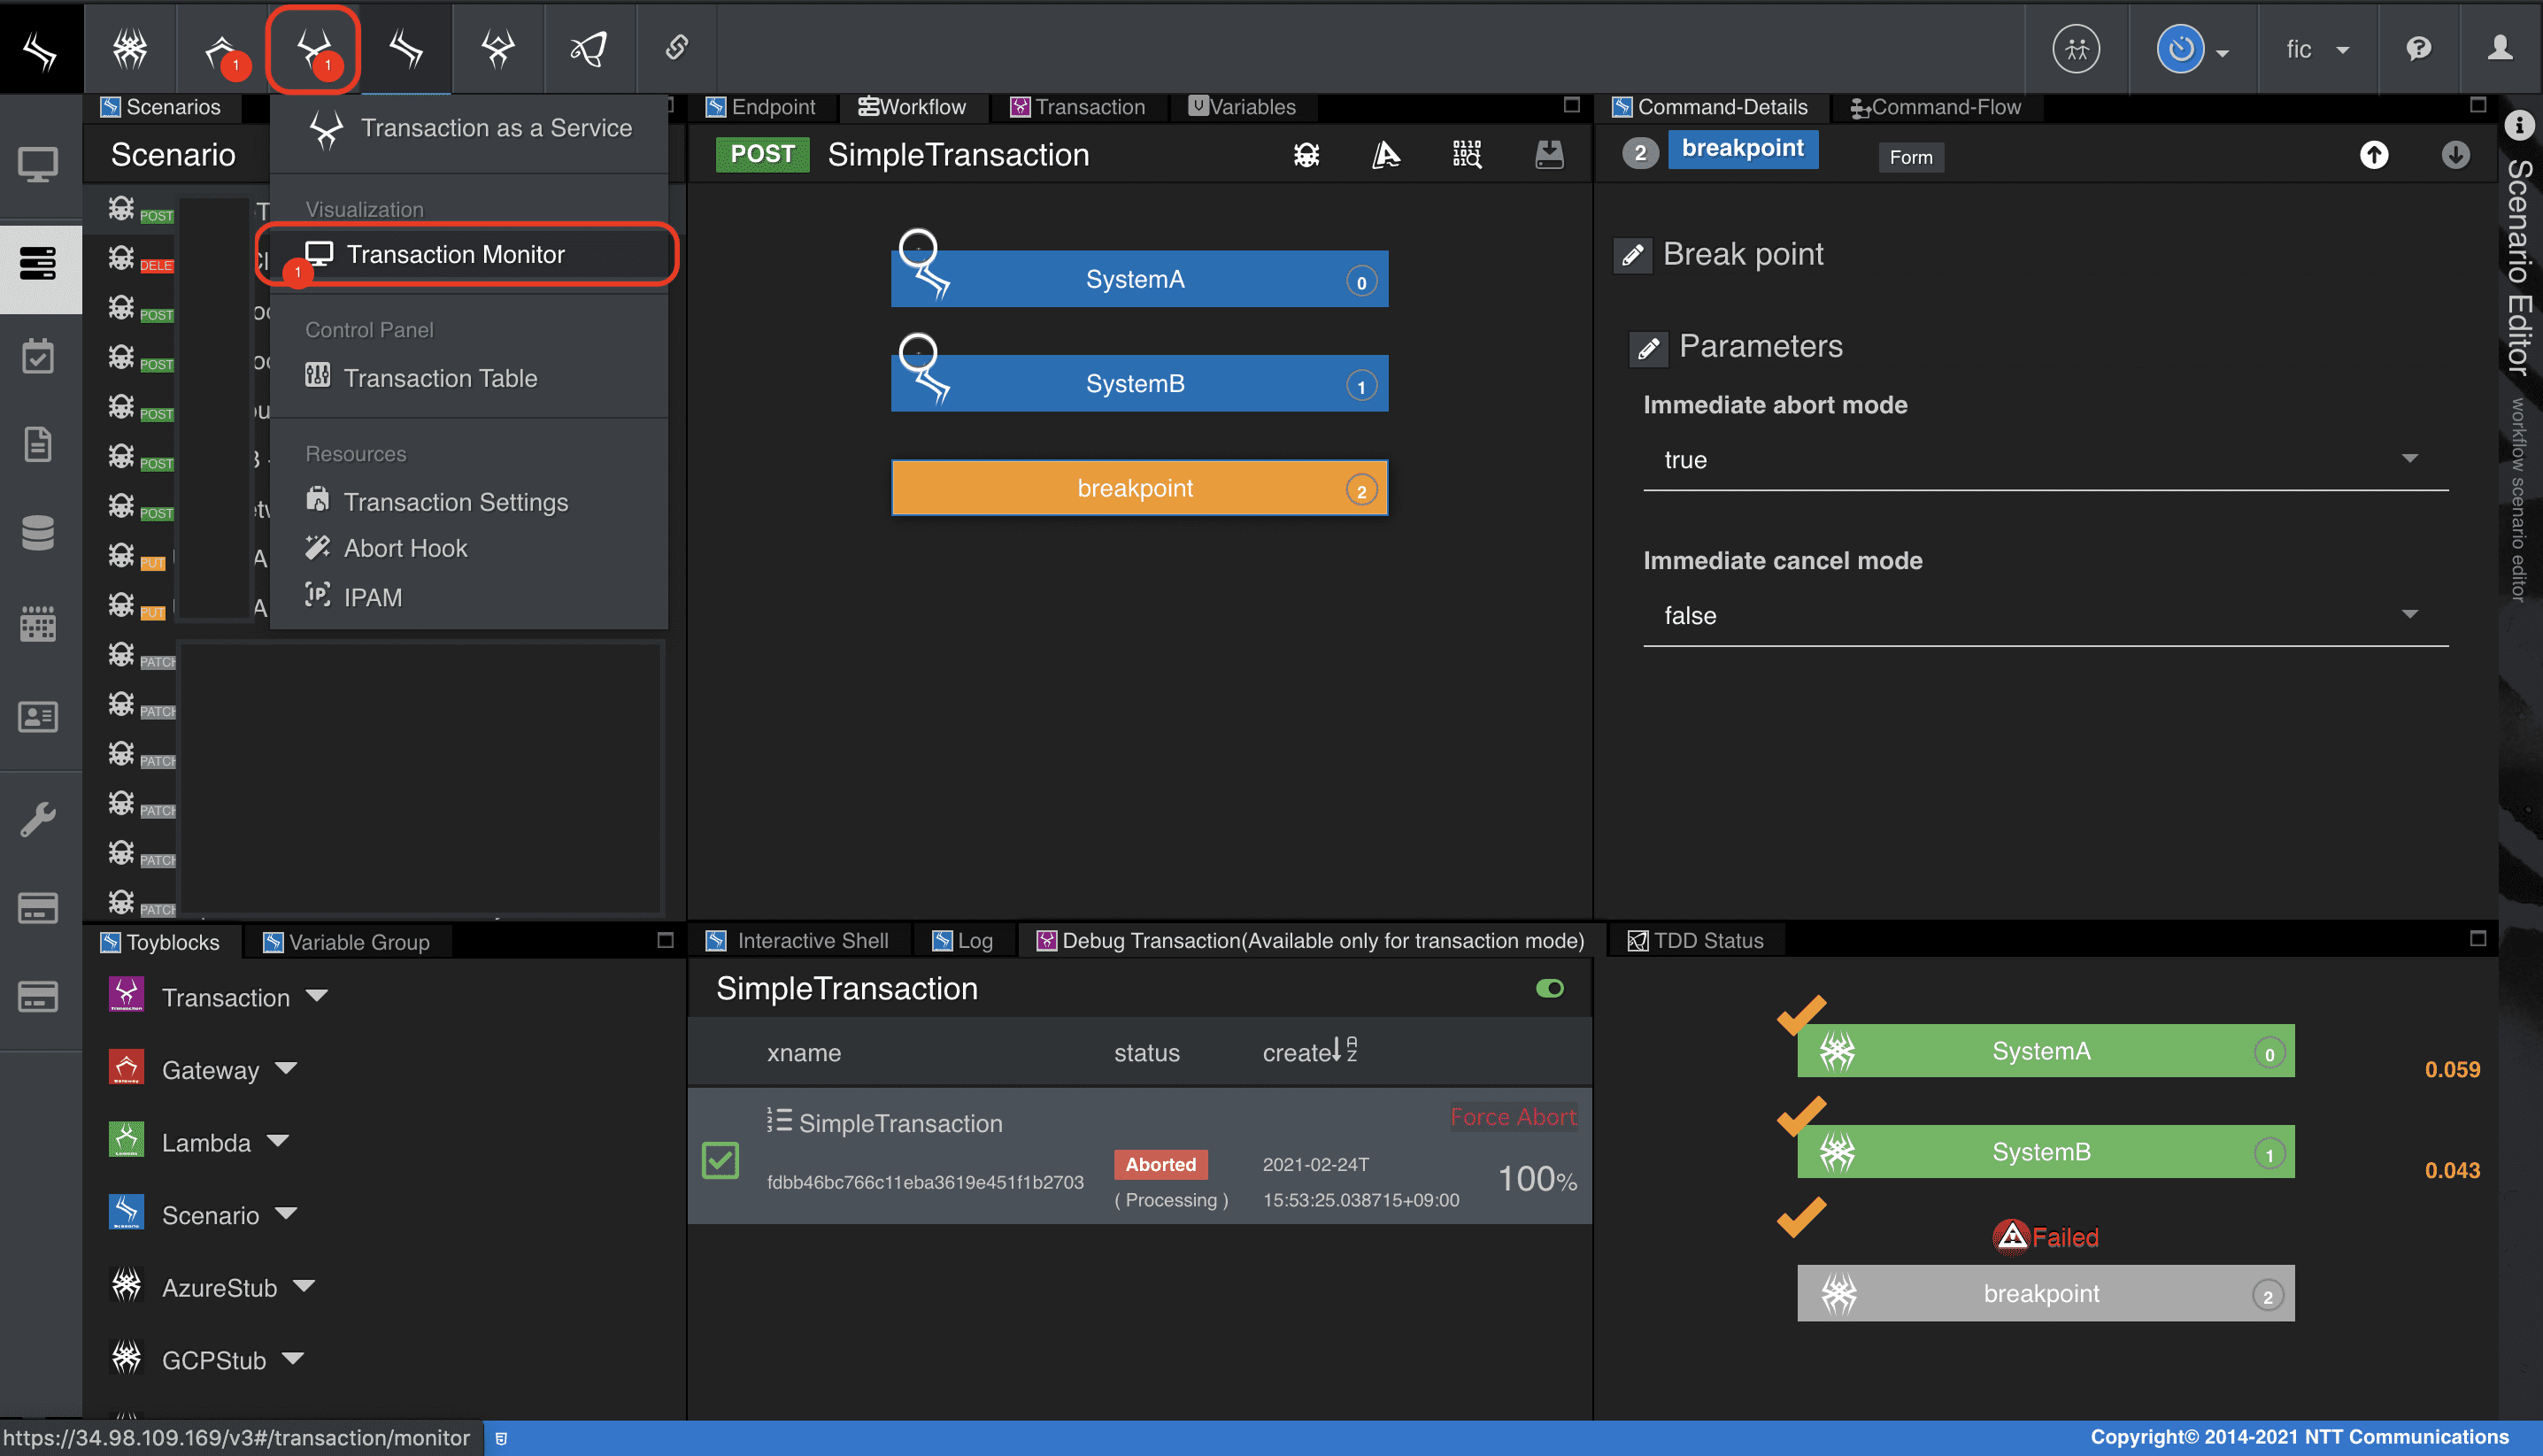
-
[Mutexes] タブを選択し、ロックされているキーの一覧を確認
トランザクション管理から処理をキャンセルします。
-
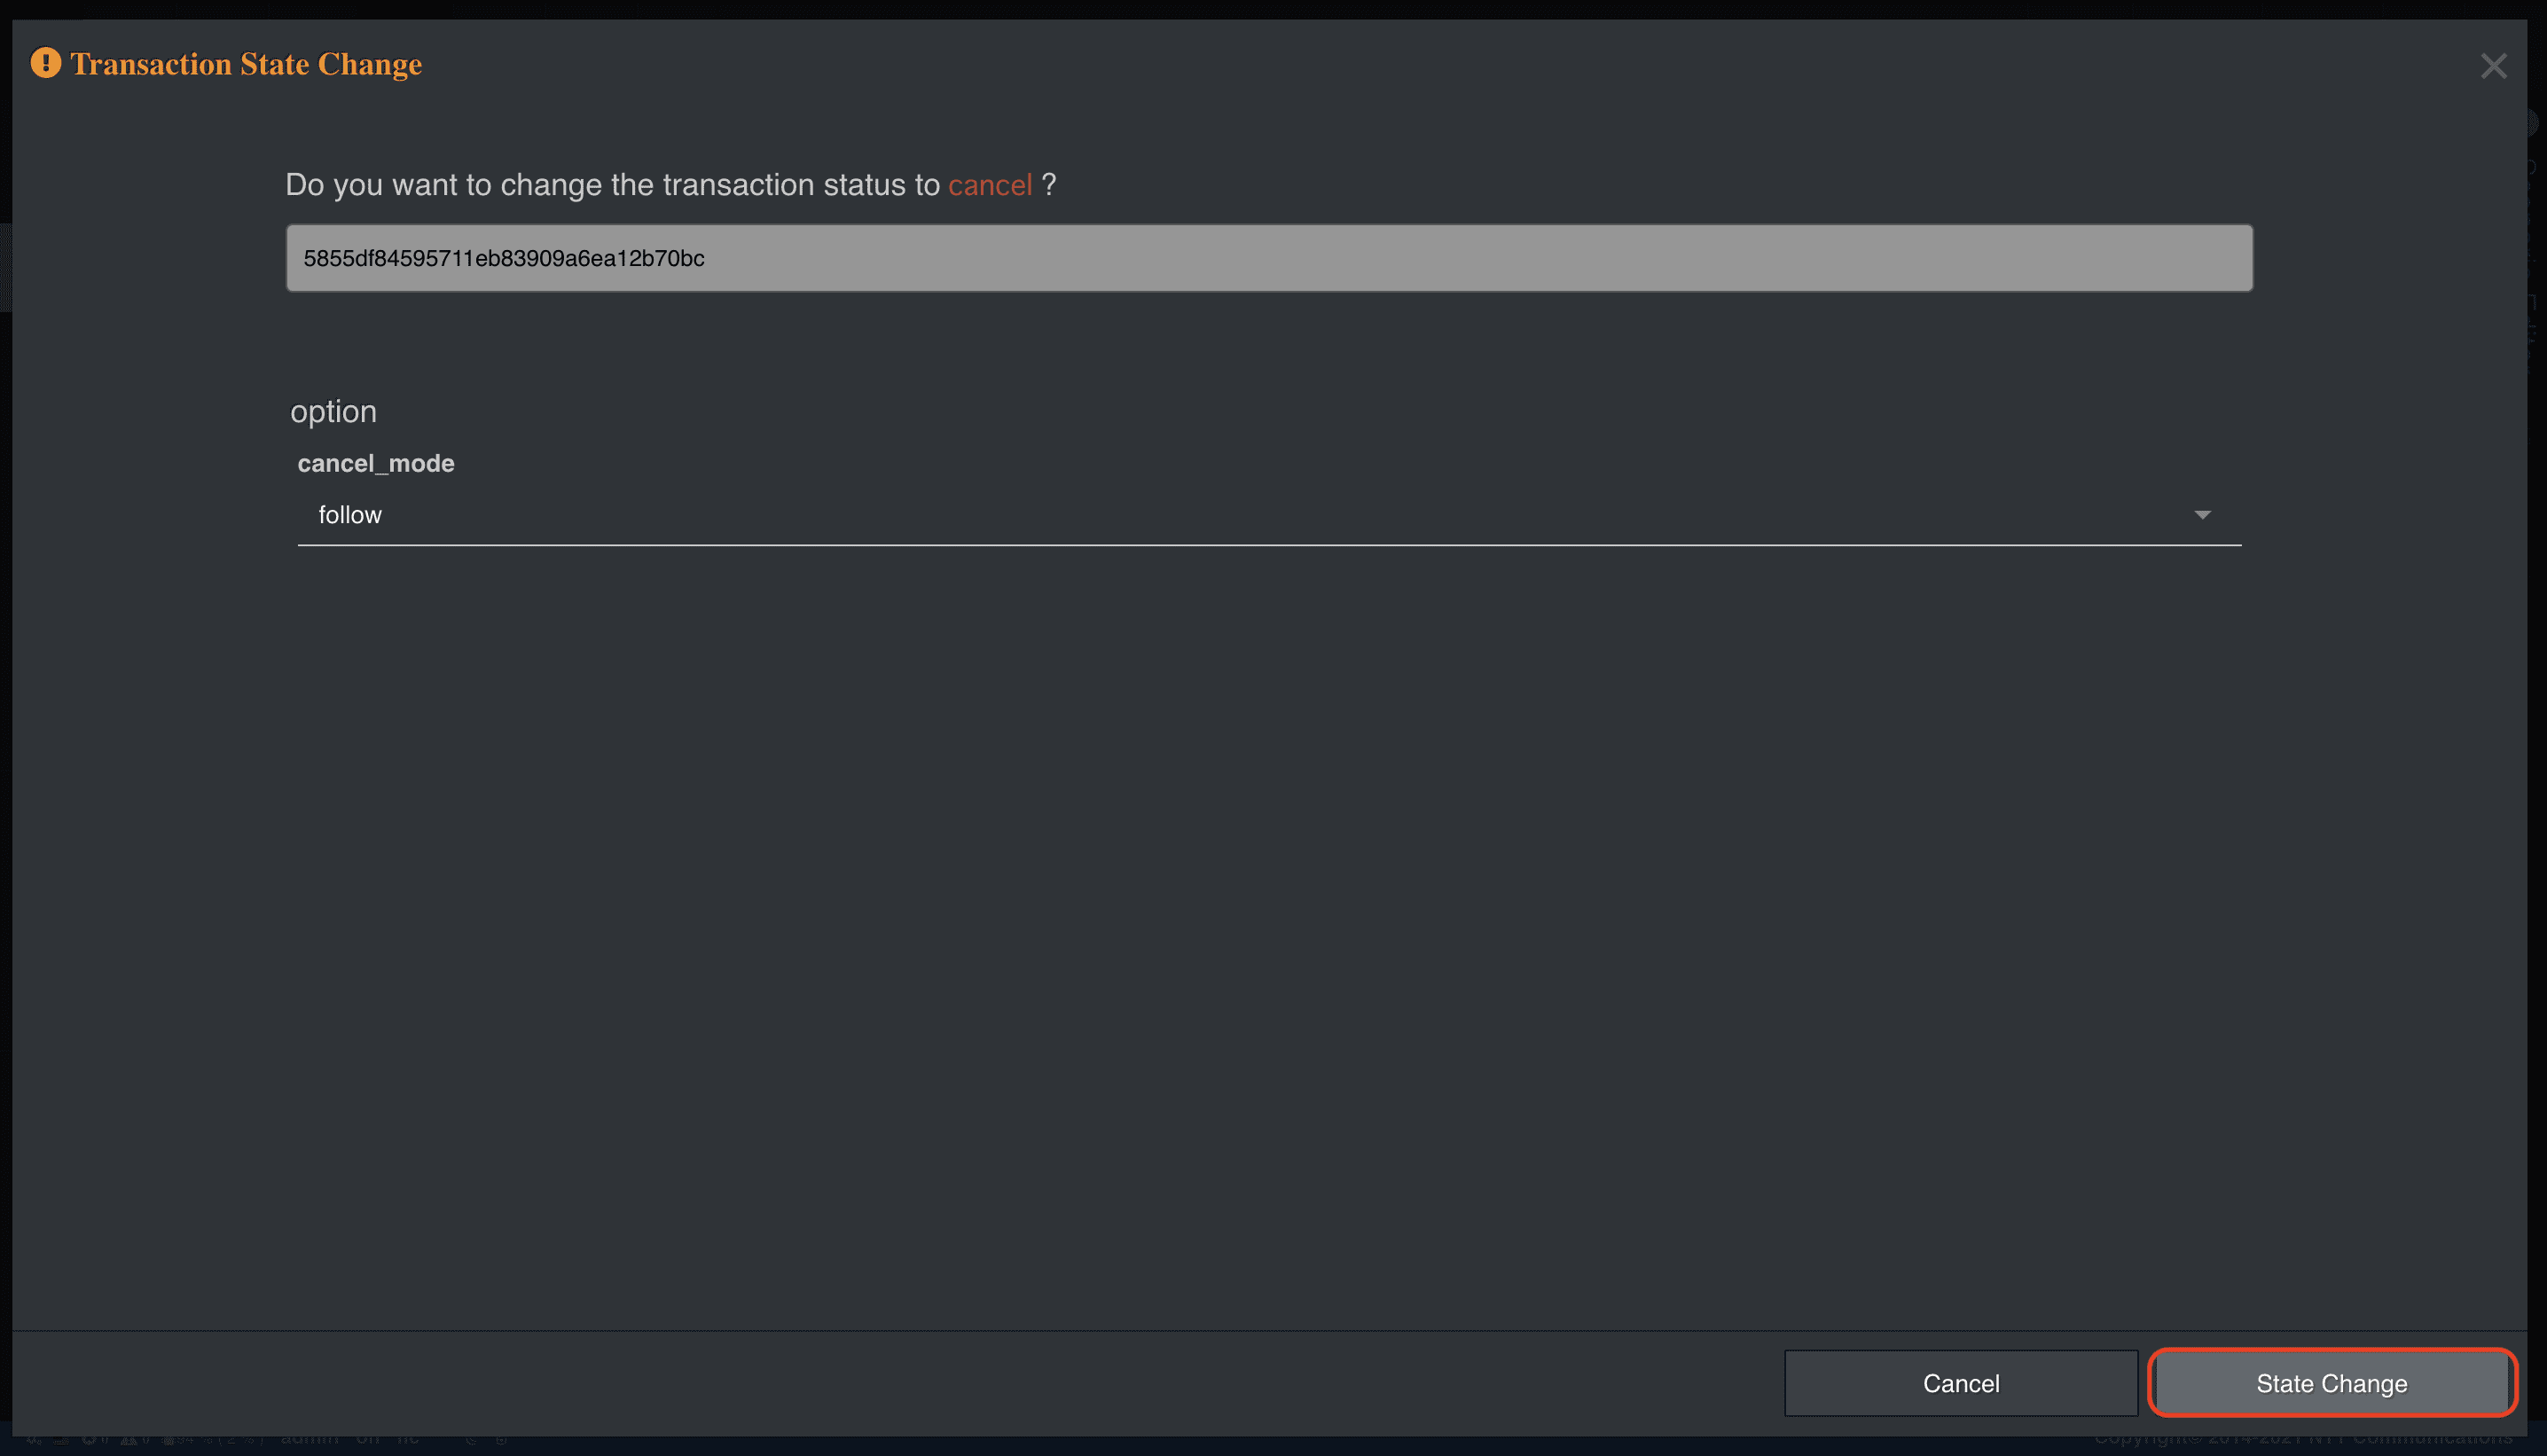
[Debug Transaction] タブ > [Aborted] 右クリック > [Cancel] を選択
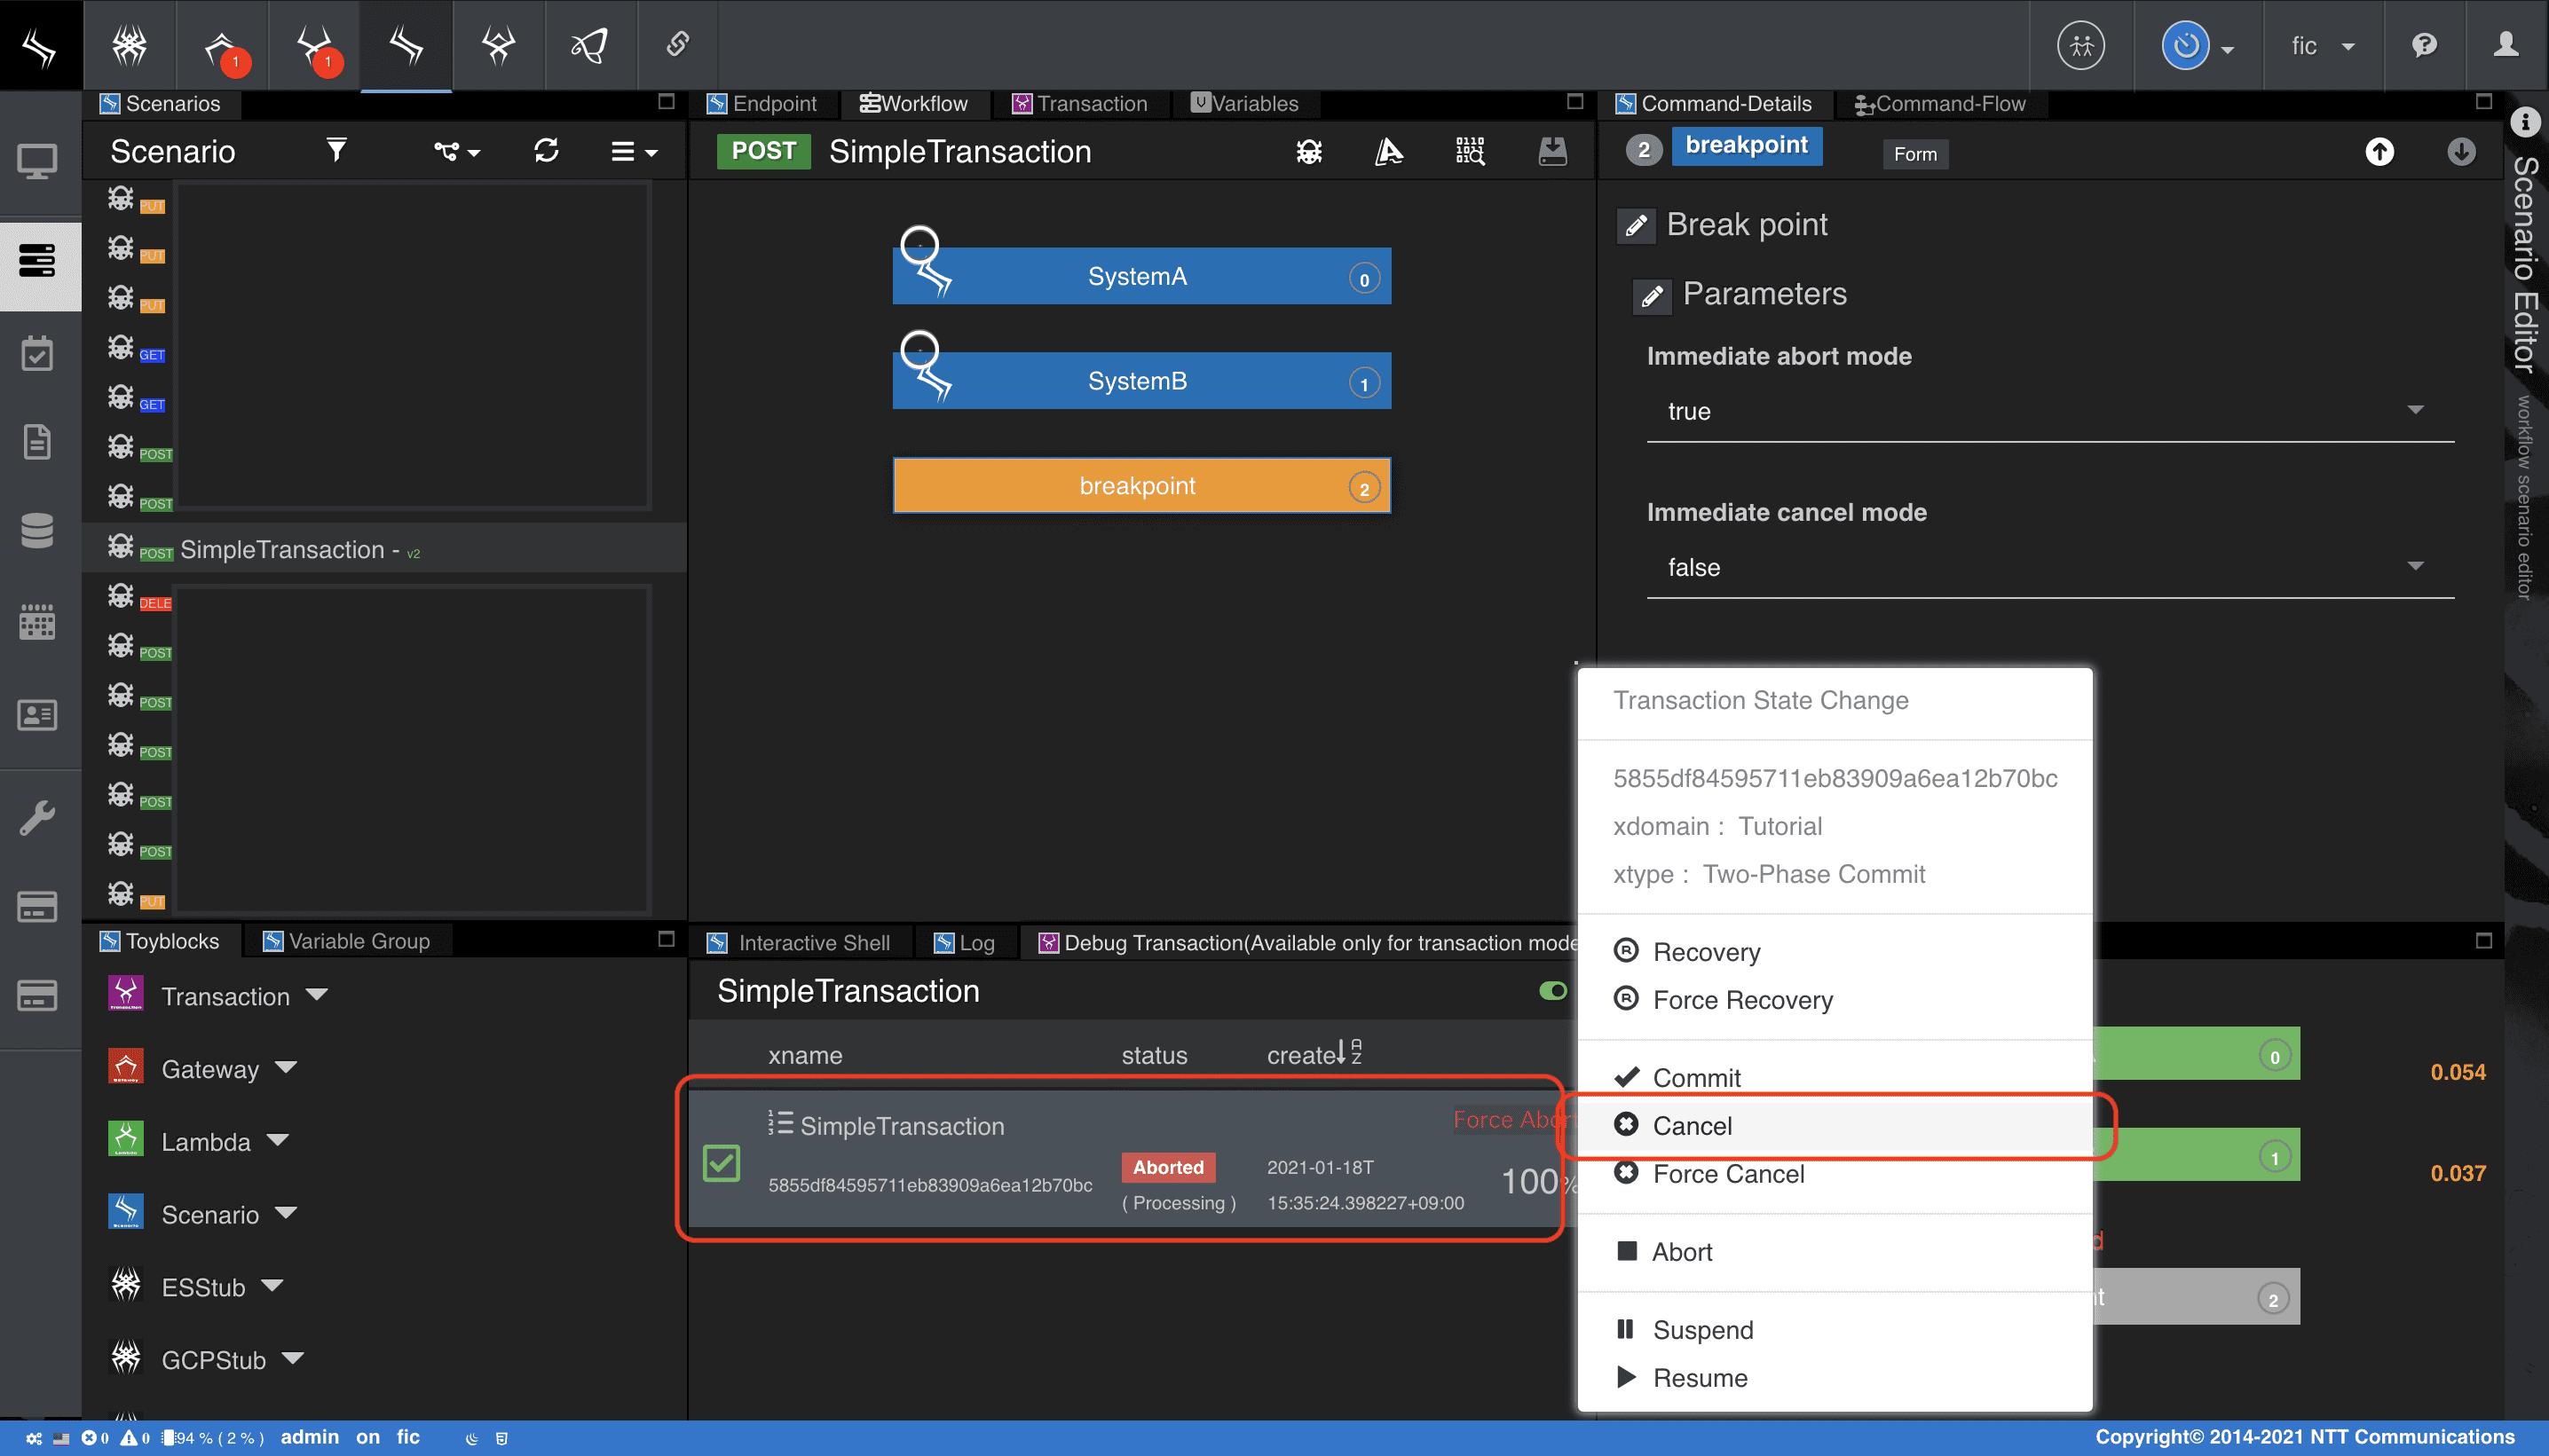
-
[State Change] を選択
-
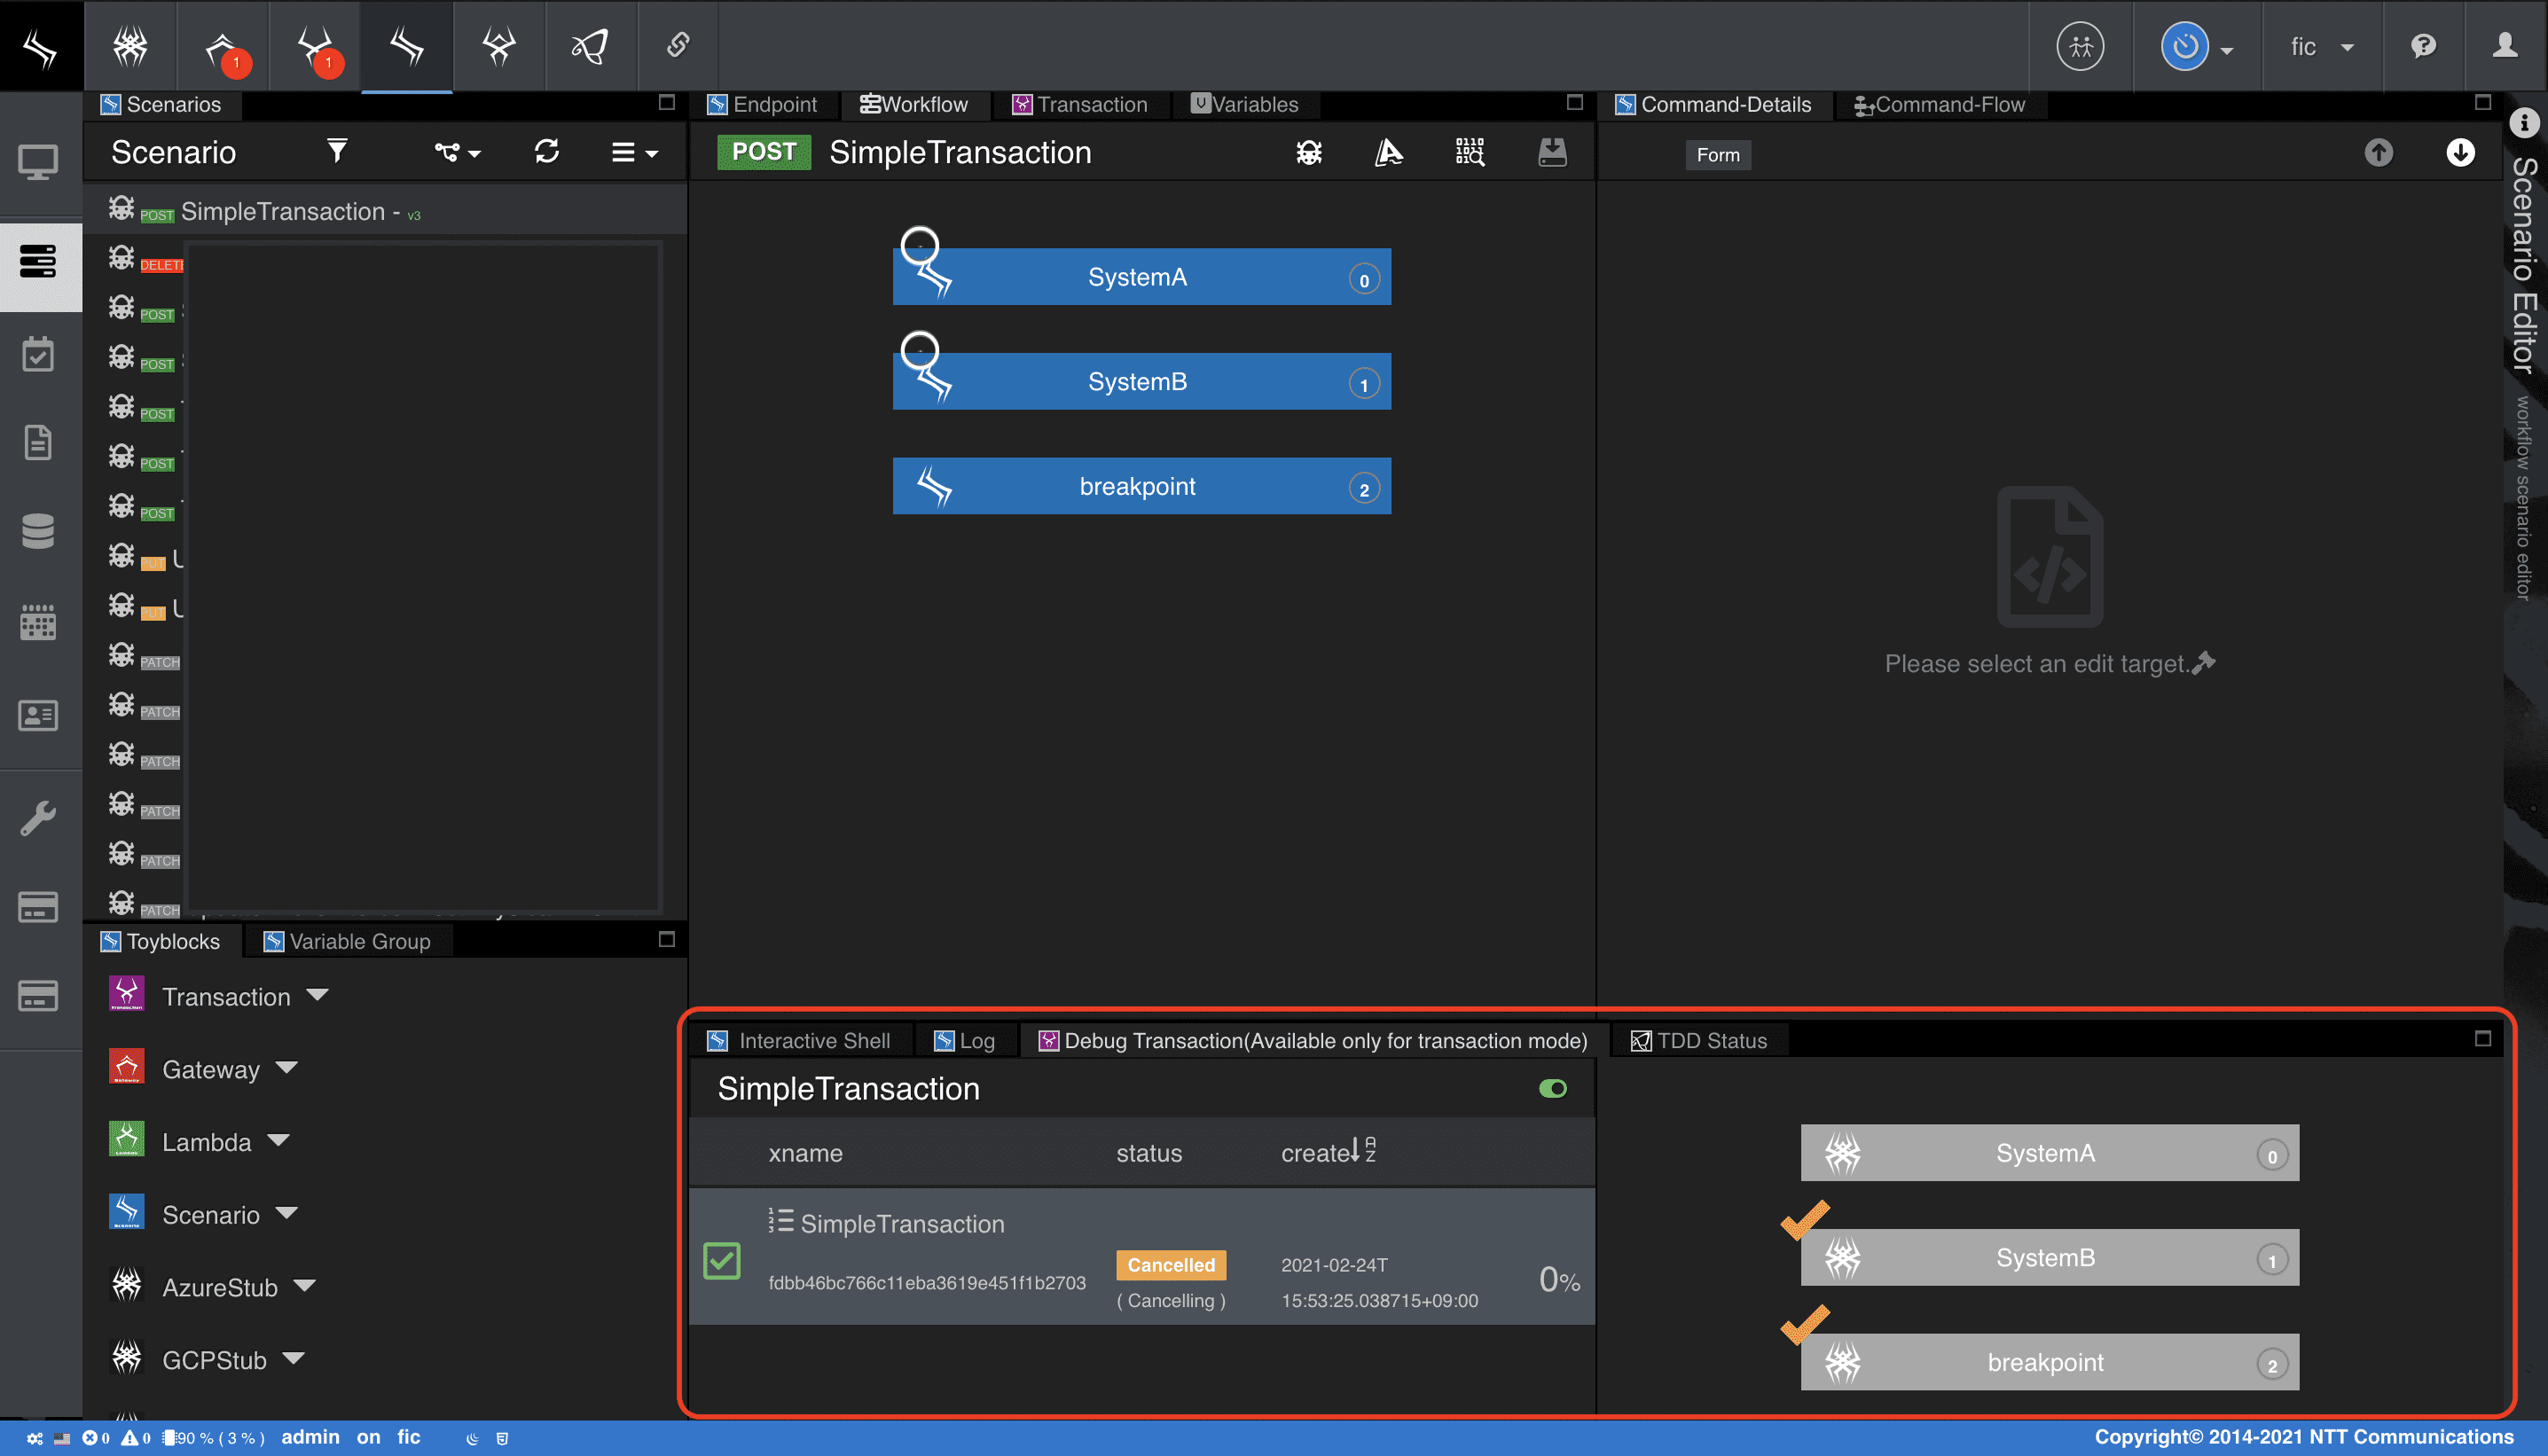
ステータスが [Cancelled] になっていることを確認
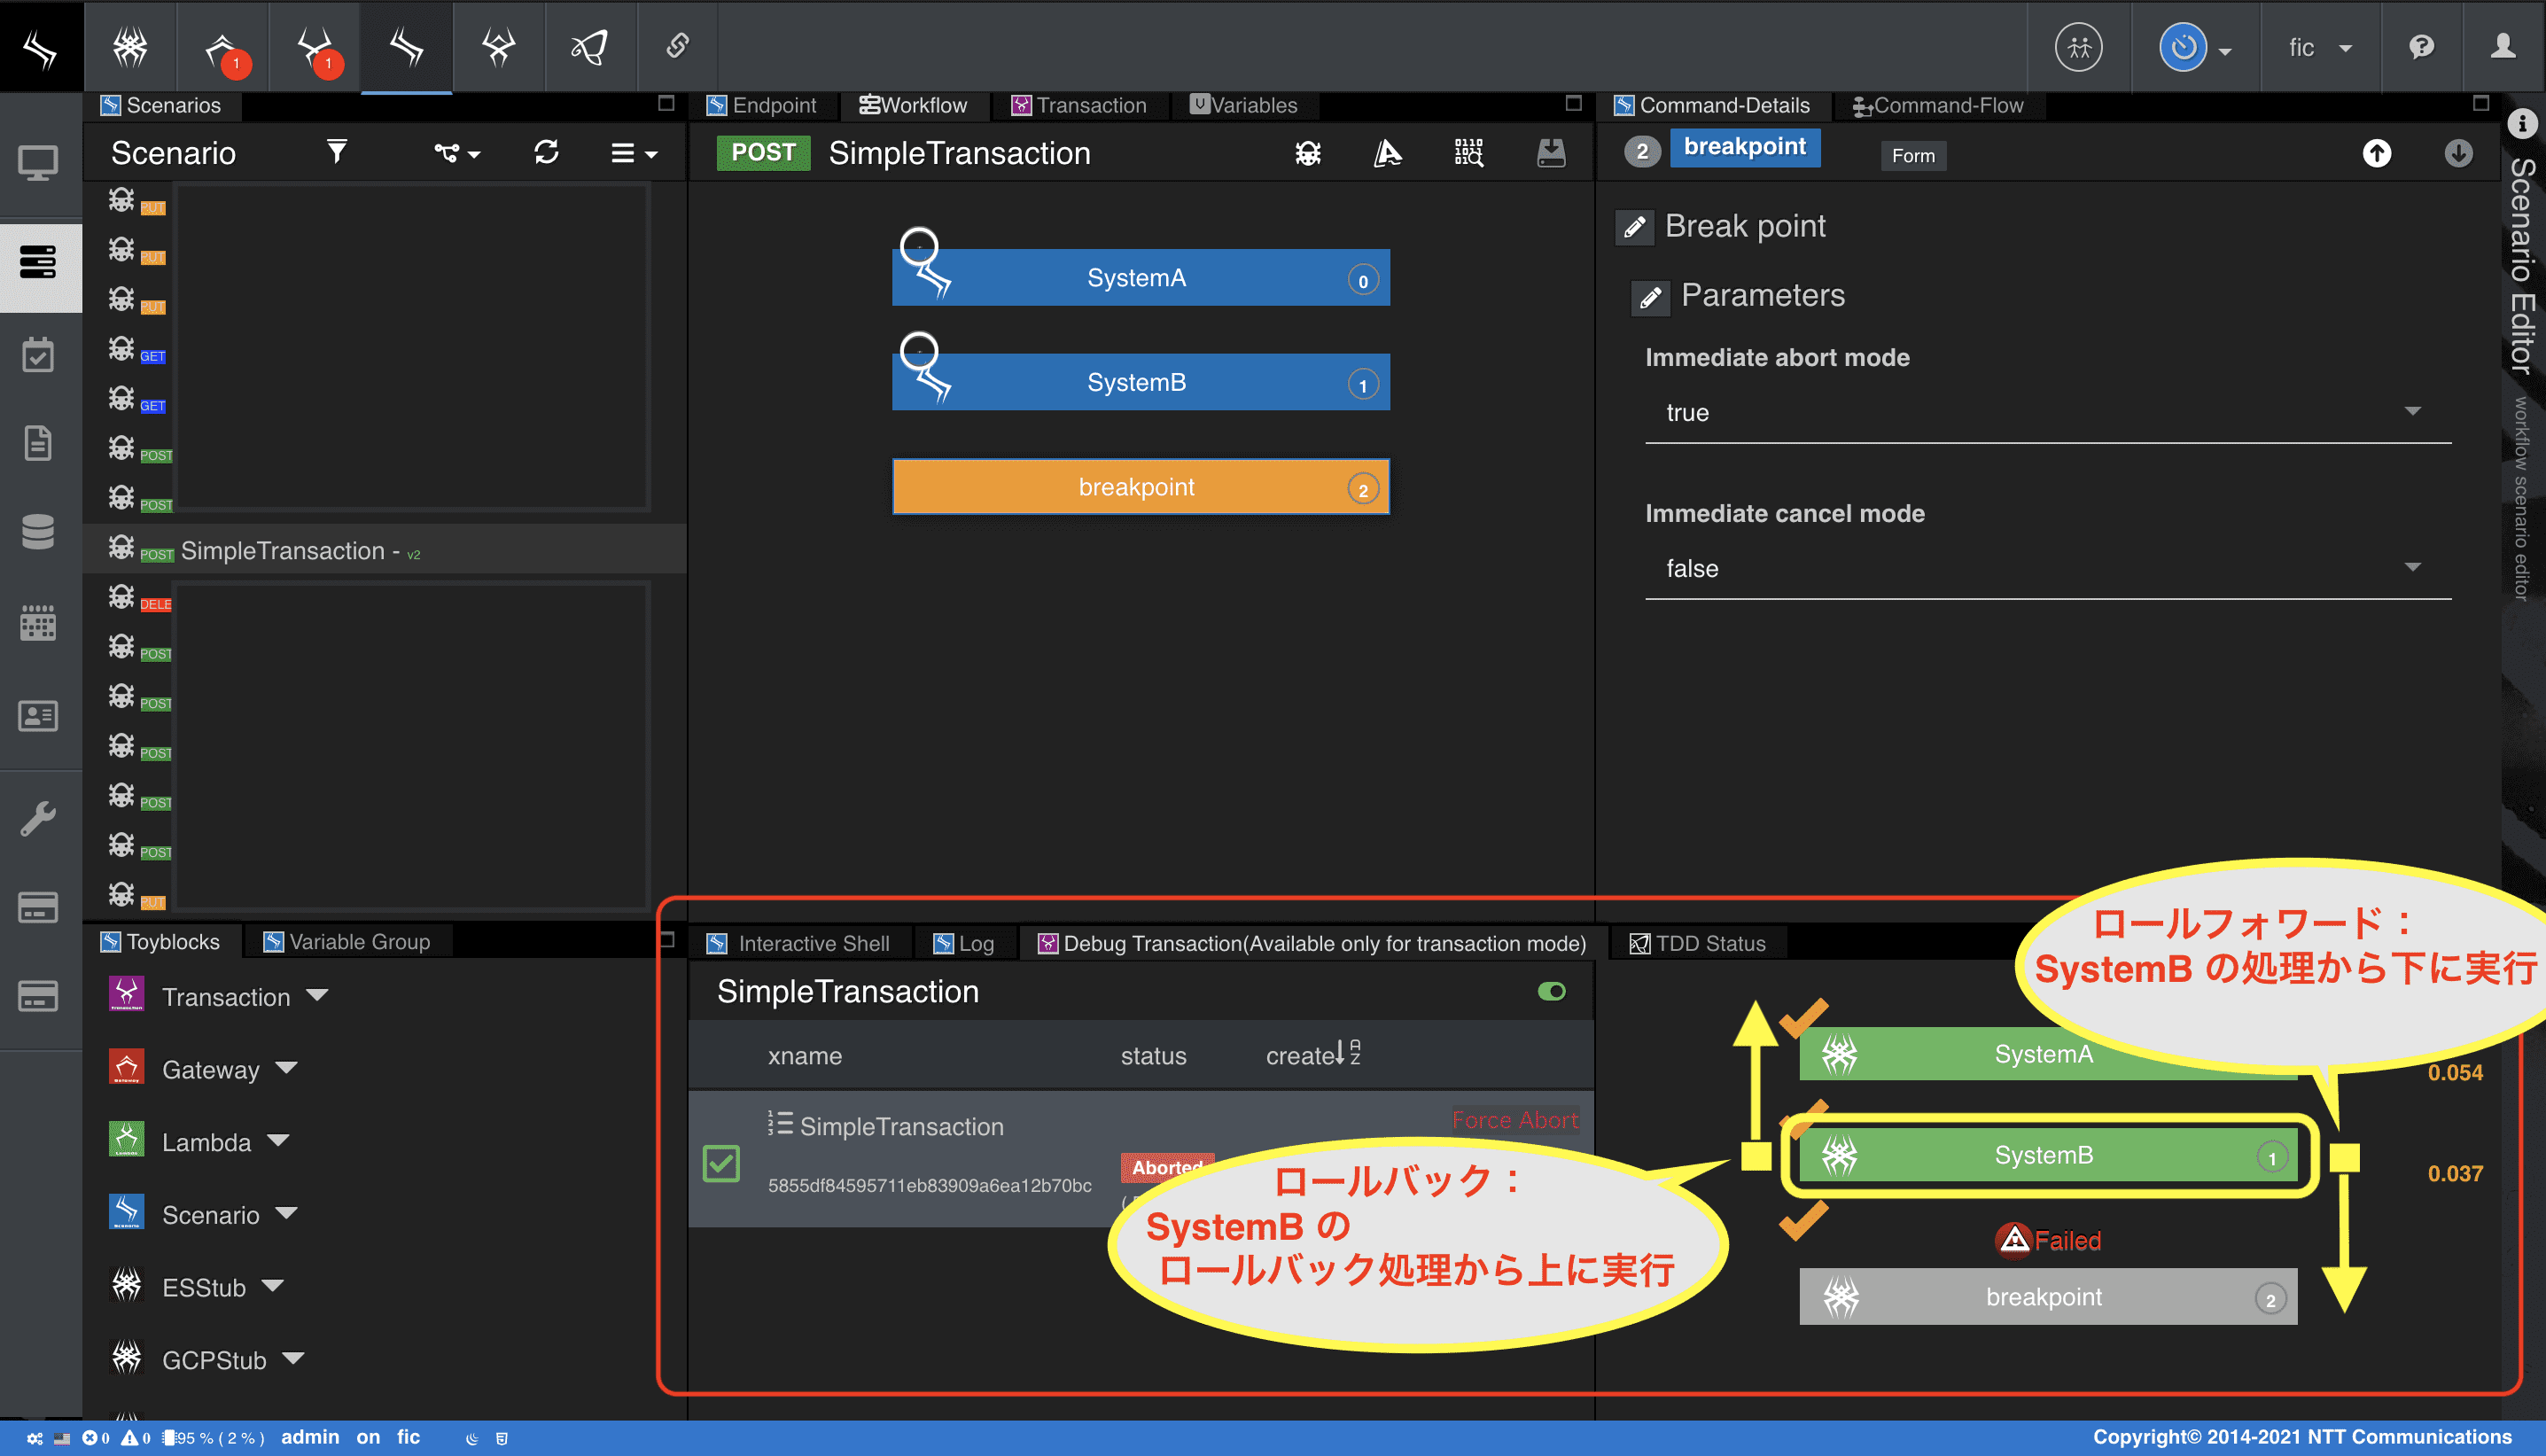
トランザクションがAbortした場合は、シナリオワークフローの中断した箇所から処理が再開します。
本章のケースにおいて、SystemBで処理が中断したため、トランザクションをキャンセル(ロールバック)する場合はSystemBから上にロールバック処理が実行、
リカバリ(ロールフォワード)する場合はSystemBから下に処理が実行されます。
ATOMで実装する
オブジェクト指向の知識と経験が少し必要ですが、前述したシナリオと同等の処理をATOMを使用してオブジェクト指向で開発することもできます。
シナリオでは処理の流れを意識してワークフローを作成しました。これをオブジェクト指向で表現する場合、ワークフローをオブジェクトの状態遷移に置き換えて考えると、イメージしやすくなります。
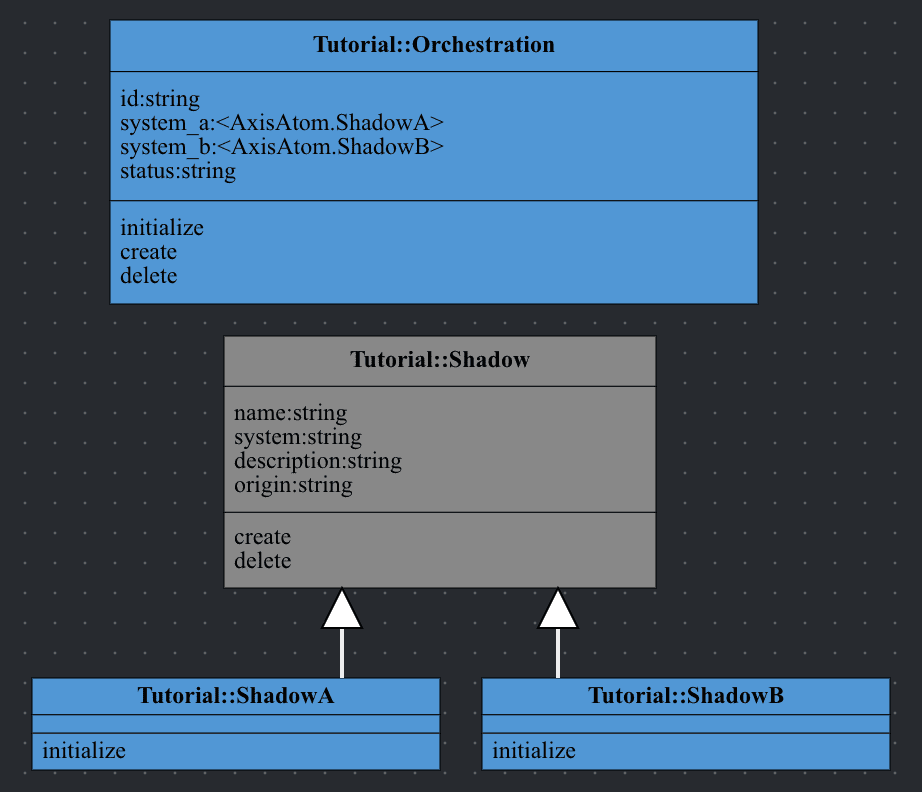
モデリングとして、Orchestrationという概念をオブジェクト化してみます。
Orchestrationは、システムAとBをセットにした概念として捉え、本オブジェクトが持つステートマシンでワークフローを表現します。
システムAおよびBのCRUD-APIは、ShadowというATOMでラップします。
システムAもBもこのチュートリアルではエンドポイントが異なるだけですので振る舞いは、スーパークラスに実装して抽象化します。
OrchestrationにはAとB2つのATOMを包含させます。
またATOMには、トランザクション自動アシスト機能が備わっており、ATOMのインスタンスメソッドを実行した際、トランザクションが暗黙的に発行されています。
ATOMのトランザクション自動アシスト機能については
Qmonus SDK Programming Guide » Scenario » ATOM
を参照してください。
1. ATOMを作成する
以下のyaml定義に従ってATOMを作成します。
クラスの依存関係があるため、上から順にインポートしてください。
Shadow ダウンロード
yml
category: Tutorial
name: Shadow
persistence: false
api_generation: false
abstract: true
attributes:
  local_fields:
    - field_name: system
      field_type: string
      field_persistence: true
      field_nullable: true
      field_immutable: false
      field_unique: false
      field_enum:
        - A
        - B
      field_metadata:
        ignore: true
    - field_name: description
      field_type: string
      field_persistence: true
      field_nullable: true
      field_immutable: false
      field_unique: false
      field_metadata:
        ignore: false
    - field_name: origin
      field_type: string
      field_persistence: true
      field_nullable: true
      field_immutable: false
      field_unique: false
      field_metadata:
        ignore: true
  ref_fields: []
  identifier:
    field_name: name
    field_type: string
    field_persistence: true
    field_immutable: true
    field_metadata:
      ignore: false
methods:
  class_methods: []
  instance_methods:
    - method_body: |-
        async def create(self, *args, **kwargs):
            print("作成中...%s" % self.system)
            r = await callout(path="/apis/system{}s".format(self.system),
                              method=POST,
                              body={"System{}".format(self.system): self.localfields(ignore=False)})
            if r.error:
                print("作成失敗...%s" % self.system)
                raise Error(r.code, reason=r.error.__str__())
            self.origin = json.loads(r.body)["System{}".format(self.system)]["instance"]
            print("作成完了...%s" % self.system)
      propagation_mode: true
      topdown: true
      auto_rollback: true
      multiplexable_number: 1
      field_order: ascend
    - method_body: |-
        async def delete(self, *args, **kwargs):
            print("削除要否判定...%s" % self.system)
            if not self.origin:
                r = await callout(path="/apis/system{}s?name={}".format(self.system, self.name))
                if r.error:
                    print("削除要否判定失敗...%s" % self.system)
                    raise Error(r.code, reason=r.error.__str__())
                payload = json.loads(r.body)
                if len(payload)==0:
                    print("削除不要...%s" % self.system)
                    return
                self.origin = payload[0]["System{}".format(self.system)]["instance"]

            print("削除中...%s" % self.system)
            r = await callout(path="/apis/system{}s/{}".format(self.system, self.origin), method=DELETE)
            if r.error:
                print("削除失敗...%s" % self.system)
                raise Error(r.code, reason=r.error.__str__())
            print("削除完了...%s" % self.system)
      propagation_mode: true
      topdown: true
      auto_rollback: true
      multiplexable_number: 1
      field_order: ascend
ShadowA and ShadowB ダウンロード
yml
- category: Tutorial
  name: ShadowA
  persistence: true
  api_generation: false
  abstract: false
  extends:
    - Shadow
  attributes:
    local_fields: []
    ref_fields: []
  methods:
    class_methods: []
    instance_methods:
      - method_body: |-
          def initialize(self, *args, **kwargs):
              self.system = "A"
        propagation_mode: true
        topdown: true
        auto_rollback: true
        multiplexable_number: 1
        field_order: ascend
- category: Tutorial
  name: ShadowB
  persistence: true
  api_generation: false
  abstract: false
  extends:
    - Shadow
  attributes:
    local_fields: []
    ref_fields: []
  methods:
    class_methods: []
    instance_methods:
      - method_body: |-
          def initialize(self, *args, **kwargs):
              self.system = "B"
        propagation_mode: true
        topdown: true
        auto_rollback: true
        multiplexable_number: 1
        field_order: ascend
Orchestration ダウンロード
yml
category: Tutorial
name: Orchestration
persistence: true
api_generation: true
abstract: false
attributes:
  local_fields:
    - field_name: systemA
      field_type: <AxisAtom.ShadowA>
      field_persistence: true
      field_nullable: false
      field_immutable: false
      field_unique: false
      field_default: atom.ShadowA(name=uuid.uuid1().hex)
    - field_name: systemB
      field_type: <AxisAtom.ShadowB>
      field_persistence: true
      field_nullable: false
      field_immutable: false
      field_unique: false
      field_default: atom.ShadowB(name=uuid.uuid1().hex)
    - field_name: status
      field_type: string
      field_persistence: true
      field_nullable: true
      field_immutable: false
      field_unique: false
      field_fsm:
        created:
          execution_method: create
          failure_transition: deleted
        deleted:
          execution_method: delete
      field_metadata:
        POST: false
        PUT: false
  ref_fields: []
  identifier:
    field_name: id
    field_type: string
    field_persistence: true
    field_immutable: true
    field_metadata:
      POST: false
      PUT: false
methods:
  class_methods: []
  instance_methods:
    - method_body: |-
        def initialize(self, *args, **kwargs):
            if not self.id:
                self.id = uuid.uuid1().hex
      propagation_mode: false
      topdown: true
      auto_rollback: true
      multiplexable_number: 1
      field_order: ascend
    - method_body: |-
        async def create(self, *args, **kwargs):
            pass
      propagation_mode: true
      topdown: true
      auto_rollback: true
      multiplexable_number: 1
      field_order: ascend
    - method_body: |-
        async def delete(self, *args, **kwargs):
            pass
      propagation_mode: true
      topdown: false
      auto_rollback: true
      multiplexable_number: 1
      field_order: descend
-
上記のATOMファイルを用意する
-
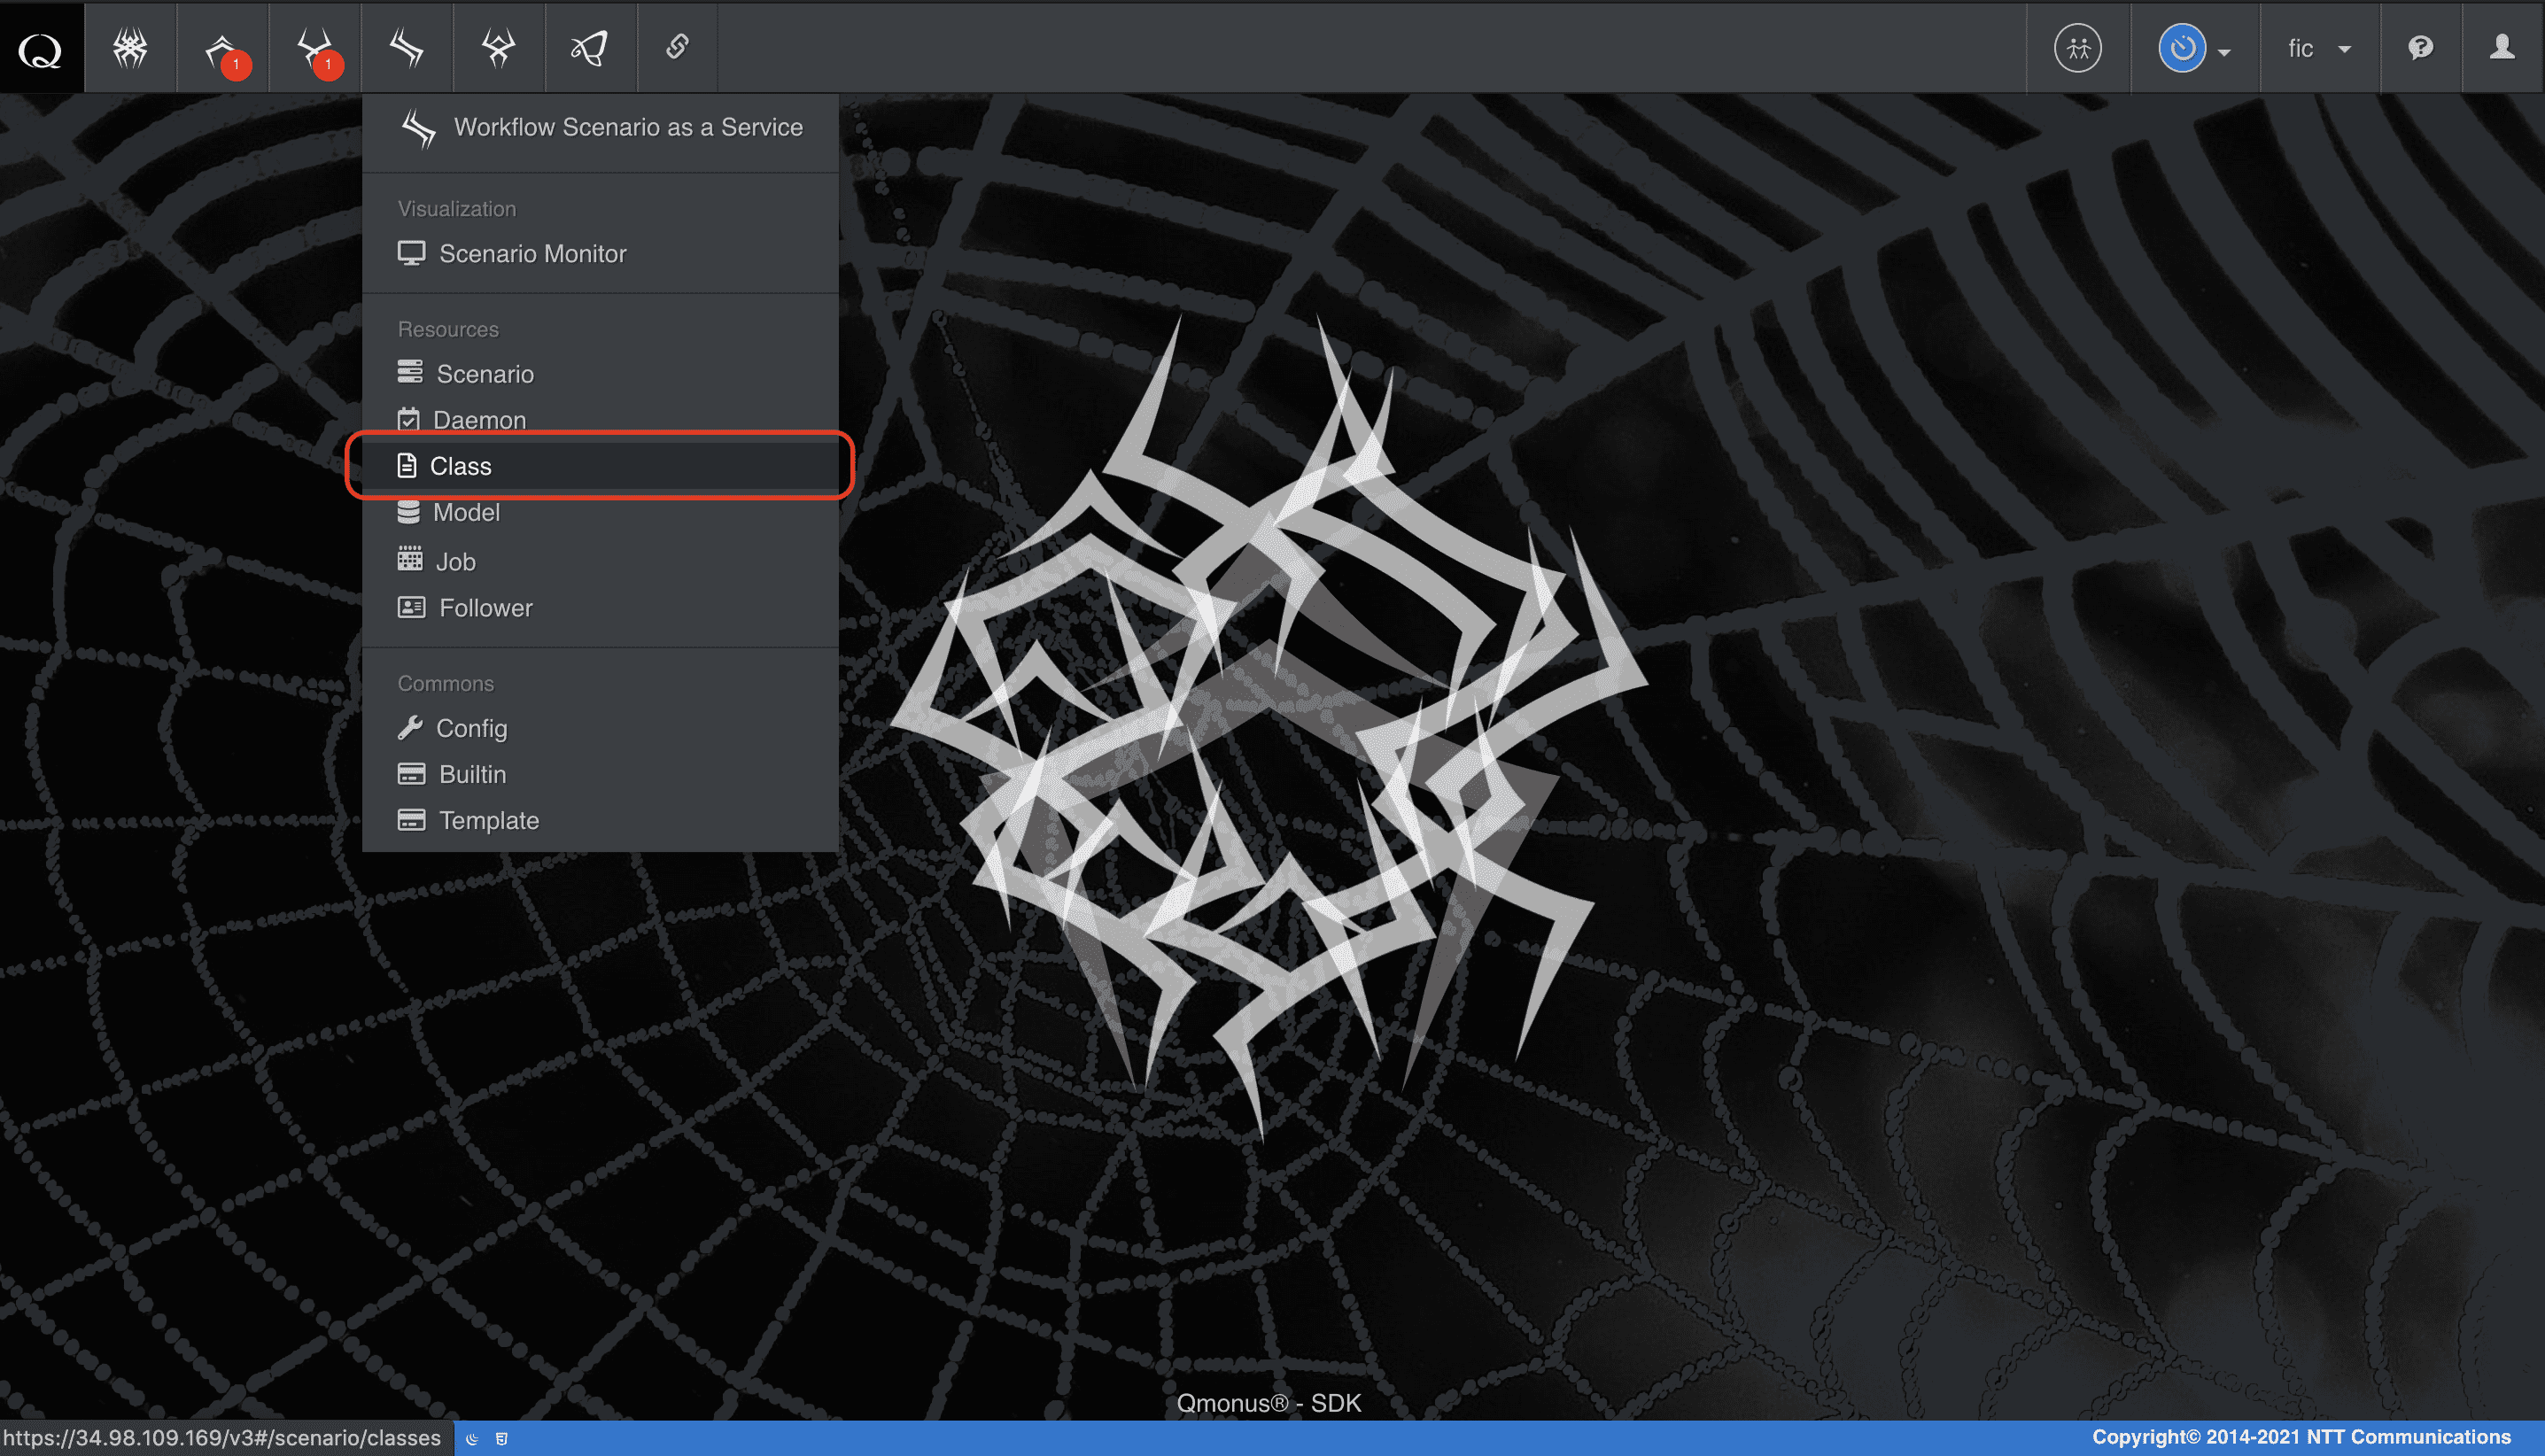
メインメニューから [Workflow Scenario as a Service] > [Class] を選択
-
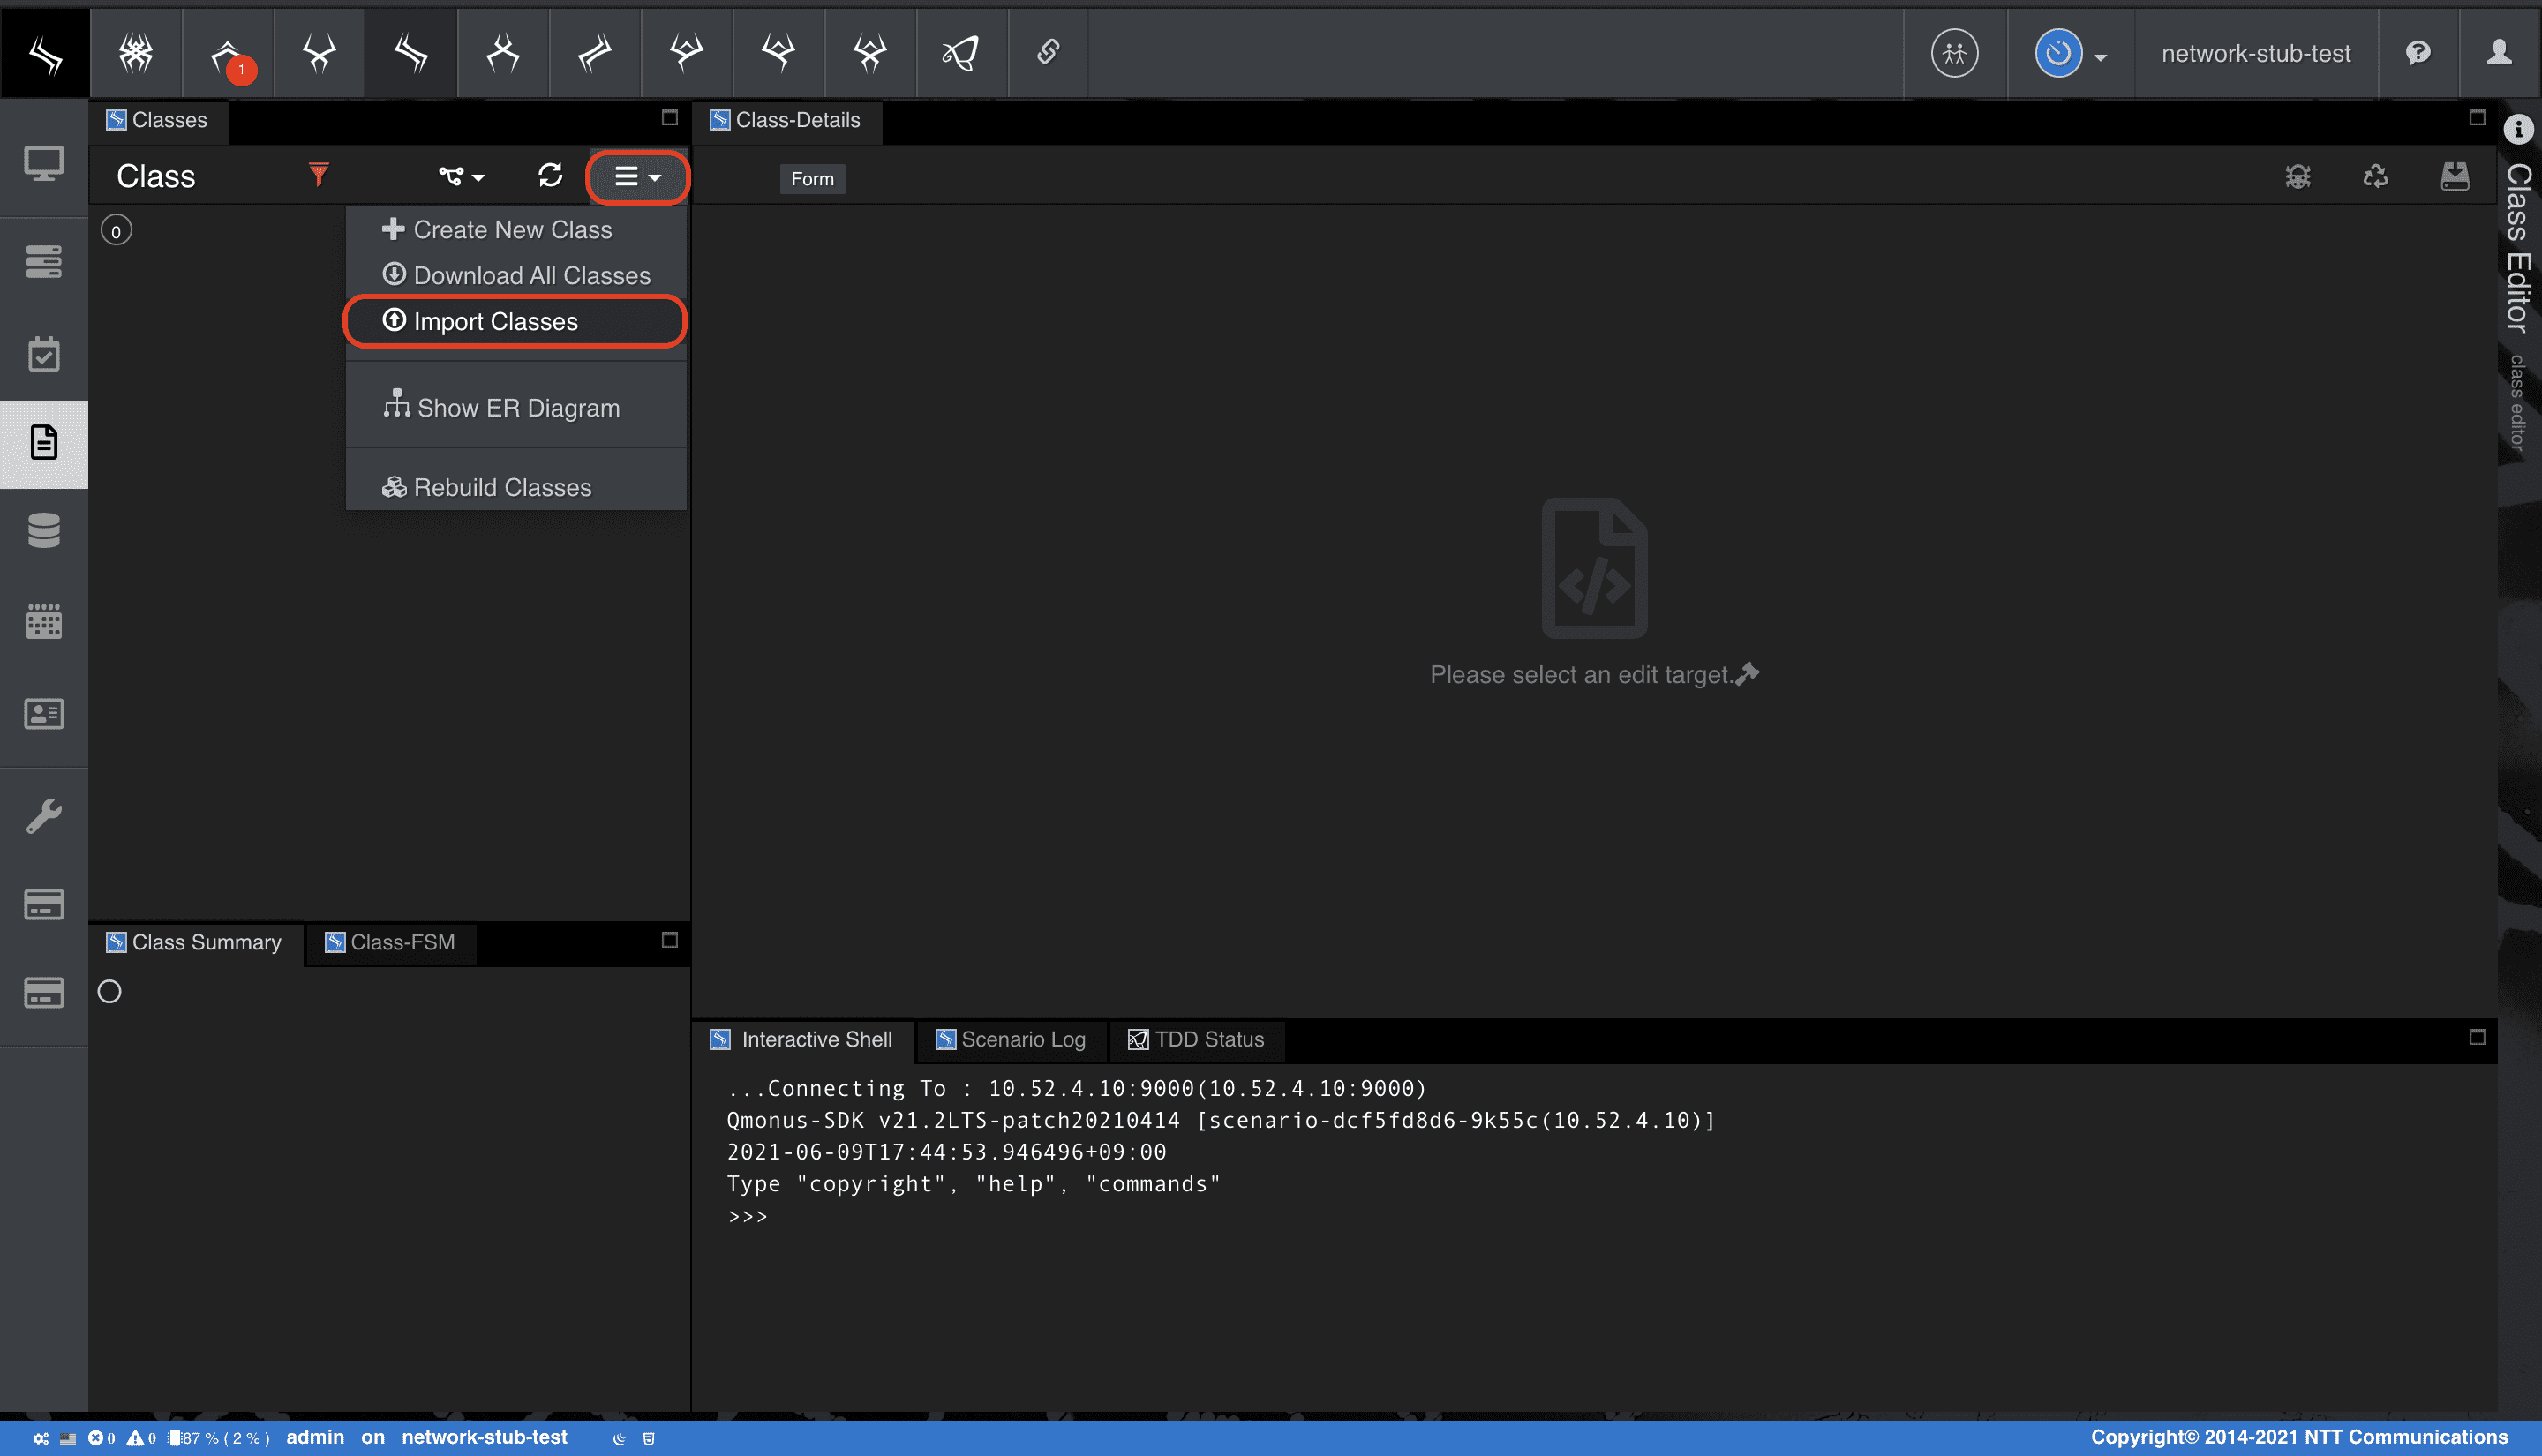
クラスメニューの [Import Classes] を選択
-
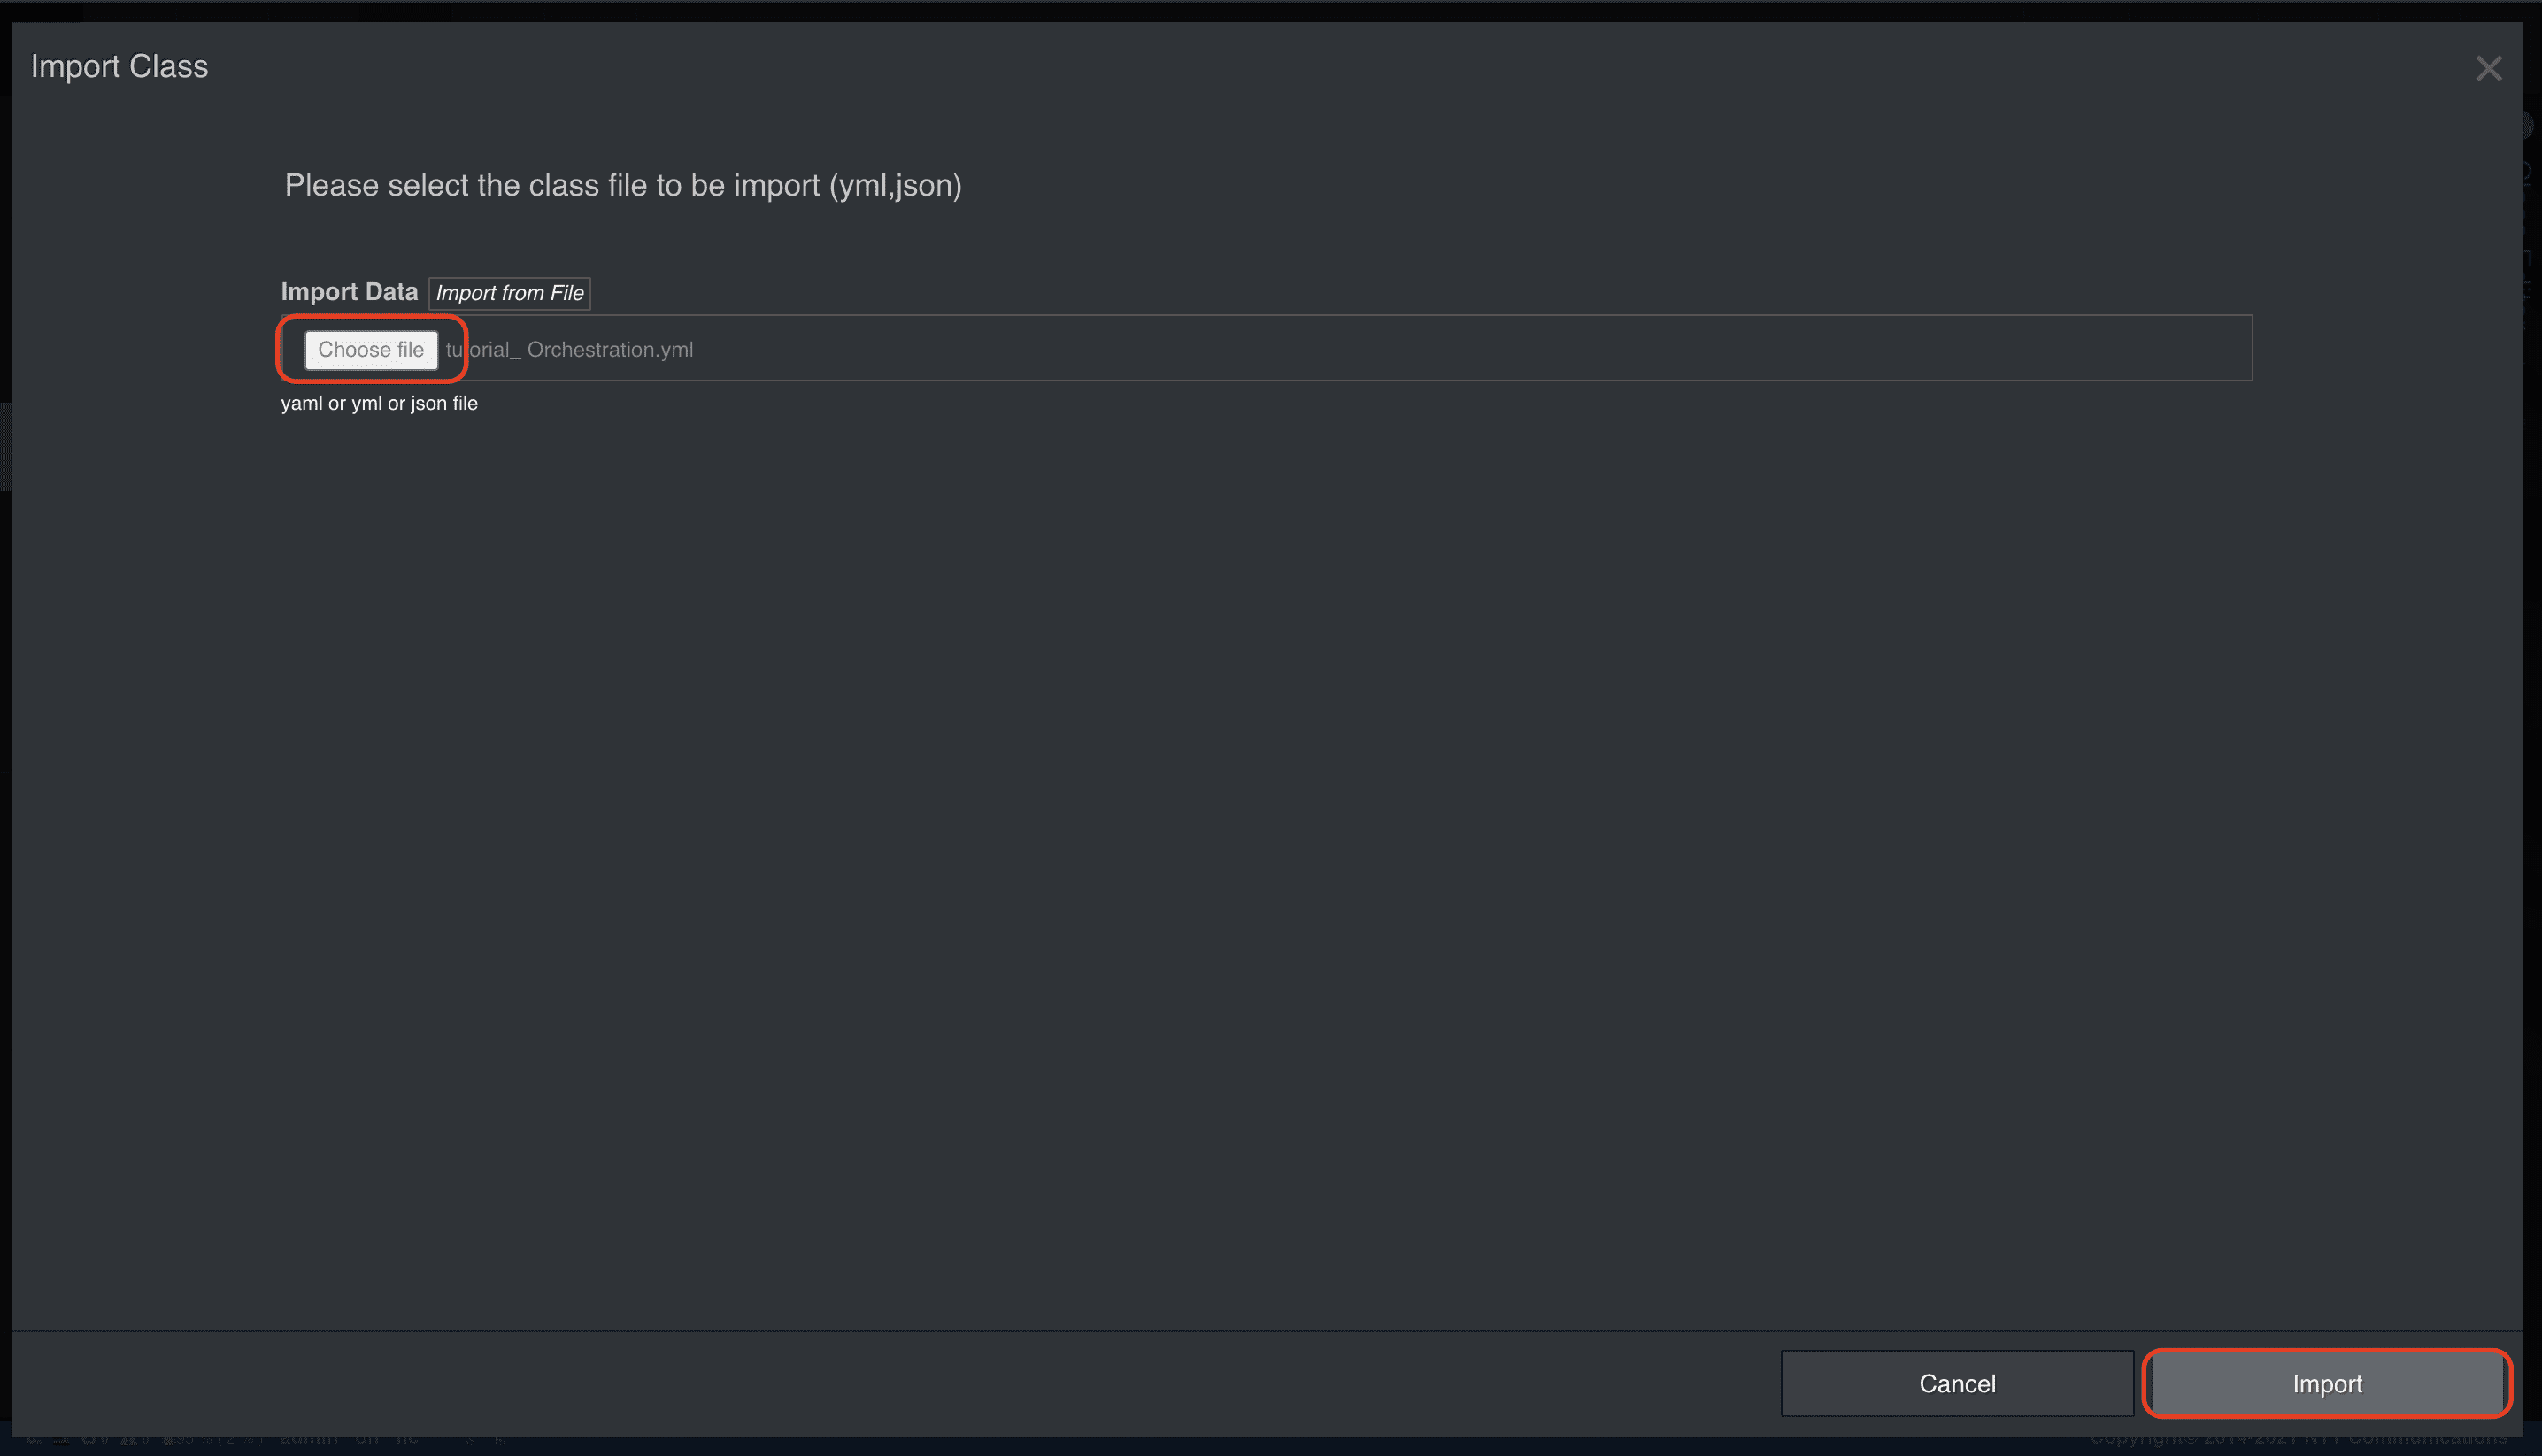
[Choose file] でファイルを指定後、[Import] を選択
2. ATOMを実行する
ATOMの作成が完了したら、REPLでOrchestrationインスタンスを作成し、createメソッドとdeleteメソッドをテストしましょう。
-
[Interactive Shell] タブにて以下命令を入力、Enterで実行する
python
o = atom.Orchestration()
await o.create()
↵
python
await o.delete() ↵ -
各命令実行後
メソッドの各ポイントには動作状況が把握しやすいようデバッグプリント文を挿入してあるため以下のような緑字の出力が確認できます。
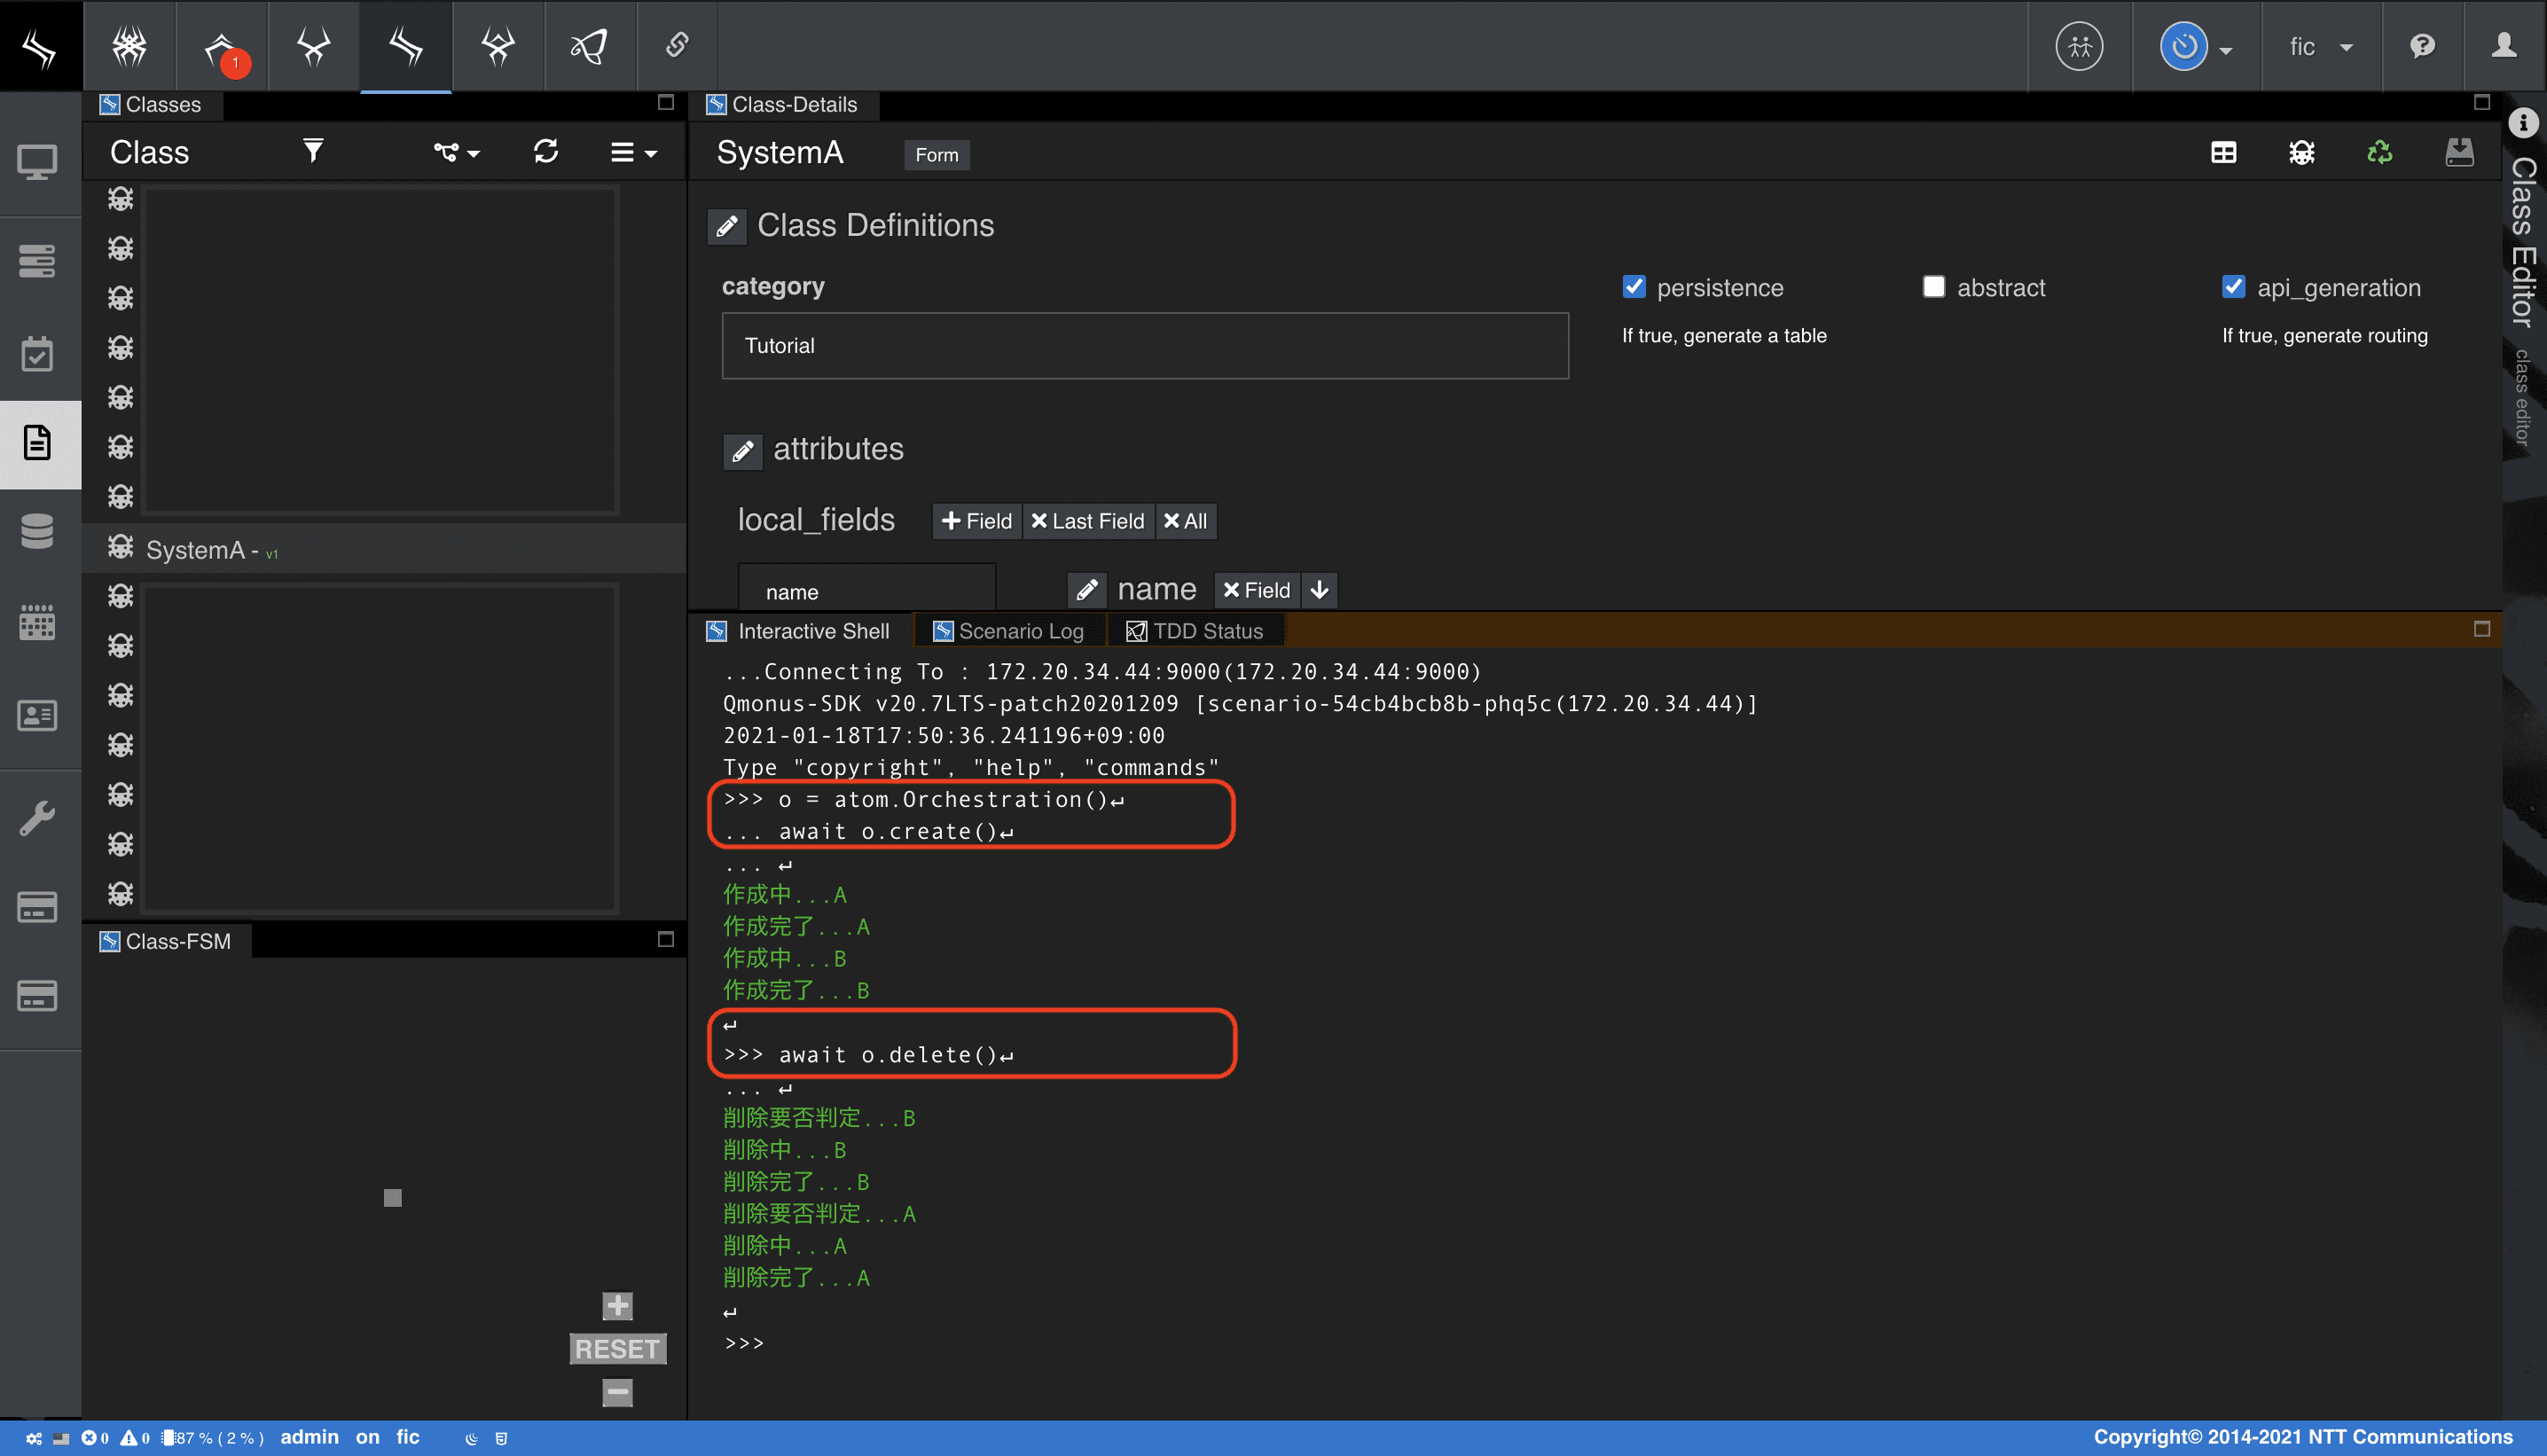
ATOMに備わっているメソッド伝搬によってOrchestrationのcreateメソッド呼び出しが包含されているオブジェクトに対して伝搬されていることが確認できます。
本チュートリアルで扱うOrchestrationは以下の画像で示すfield_orderにて伝搬する順序を決定しています。
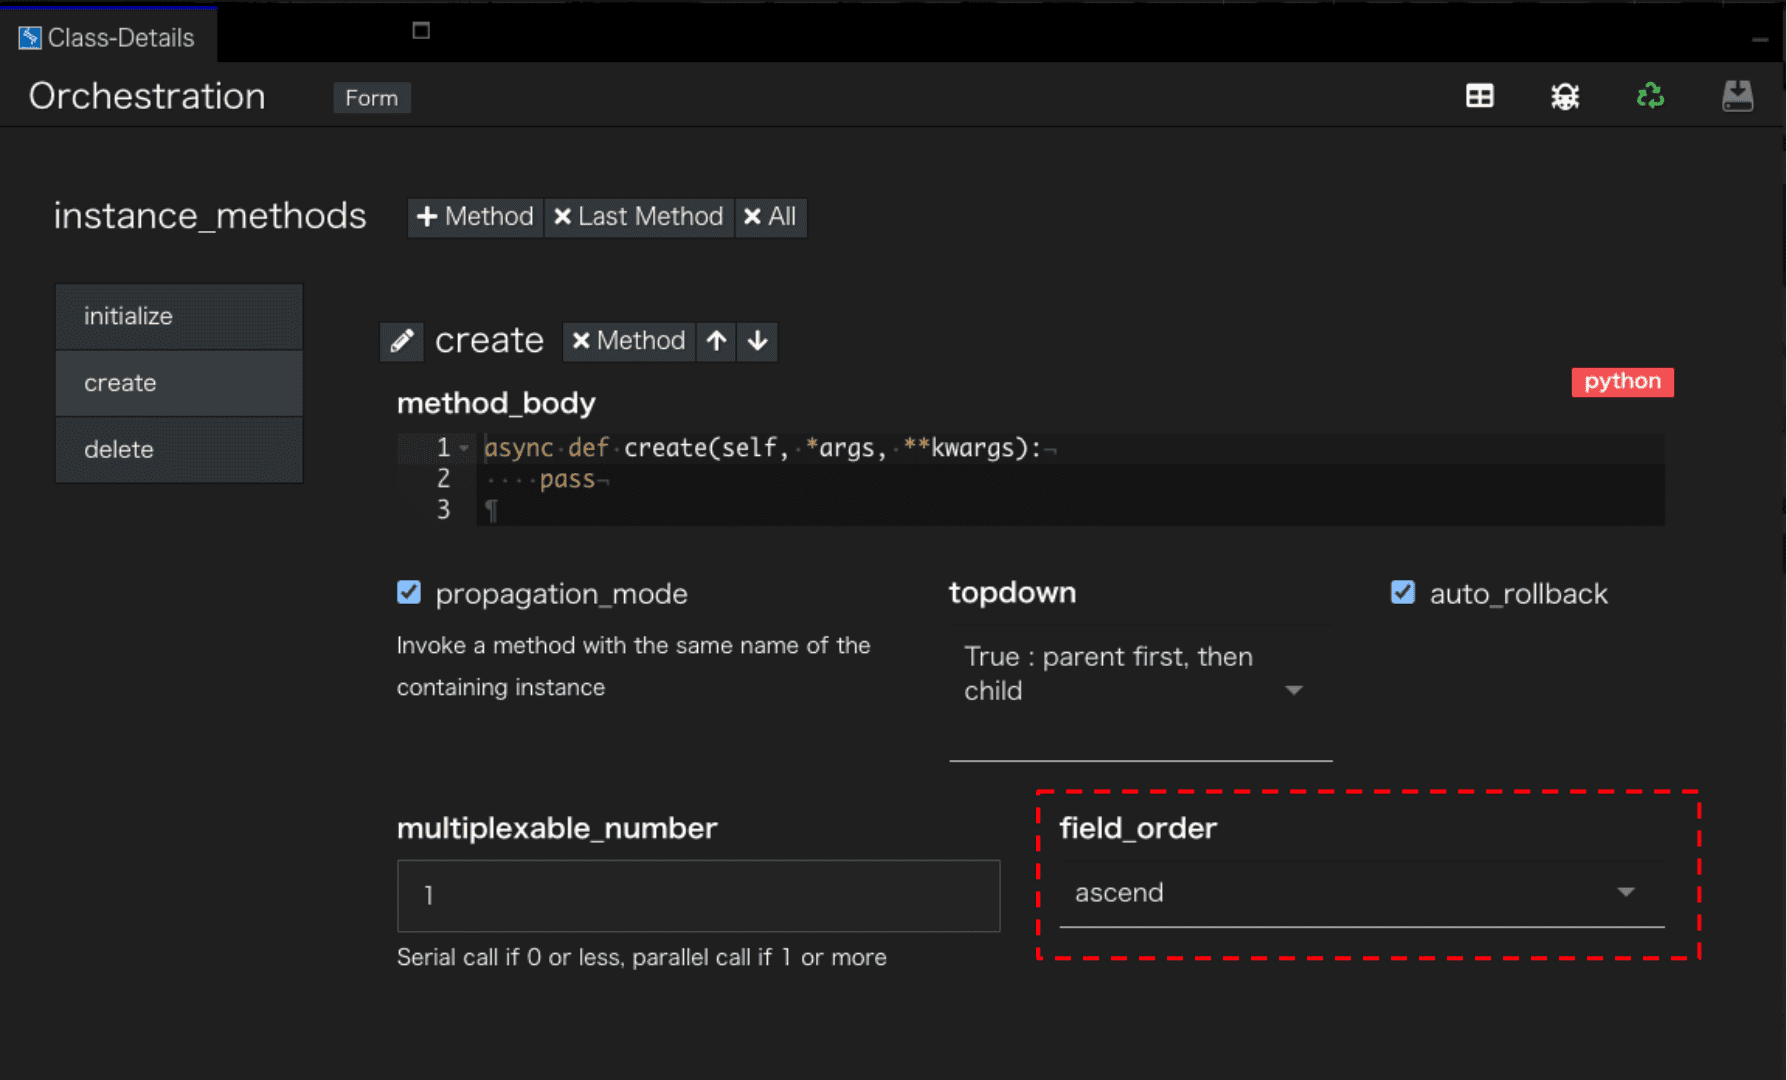
create時の伝搬は包含フィールドの昇順(ascend)に設定していますのでAからBの順に伝搬します。delete時の伝搬は降順(descend)に設定していますのでBからAの順に伝搬します。
ATOMの設定値の詳細は
Qmonus SDK Programming Guide » Scenario » ATOM
を参照してください。
3. ロールバックを確認する
ロールバックをテストする場合は、API Gatewayで/apis/systemBsのAPIルーティングを閉塞してからcreateメソッドを実行すると良いでしょう。
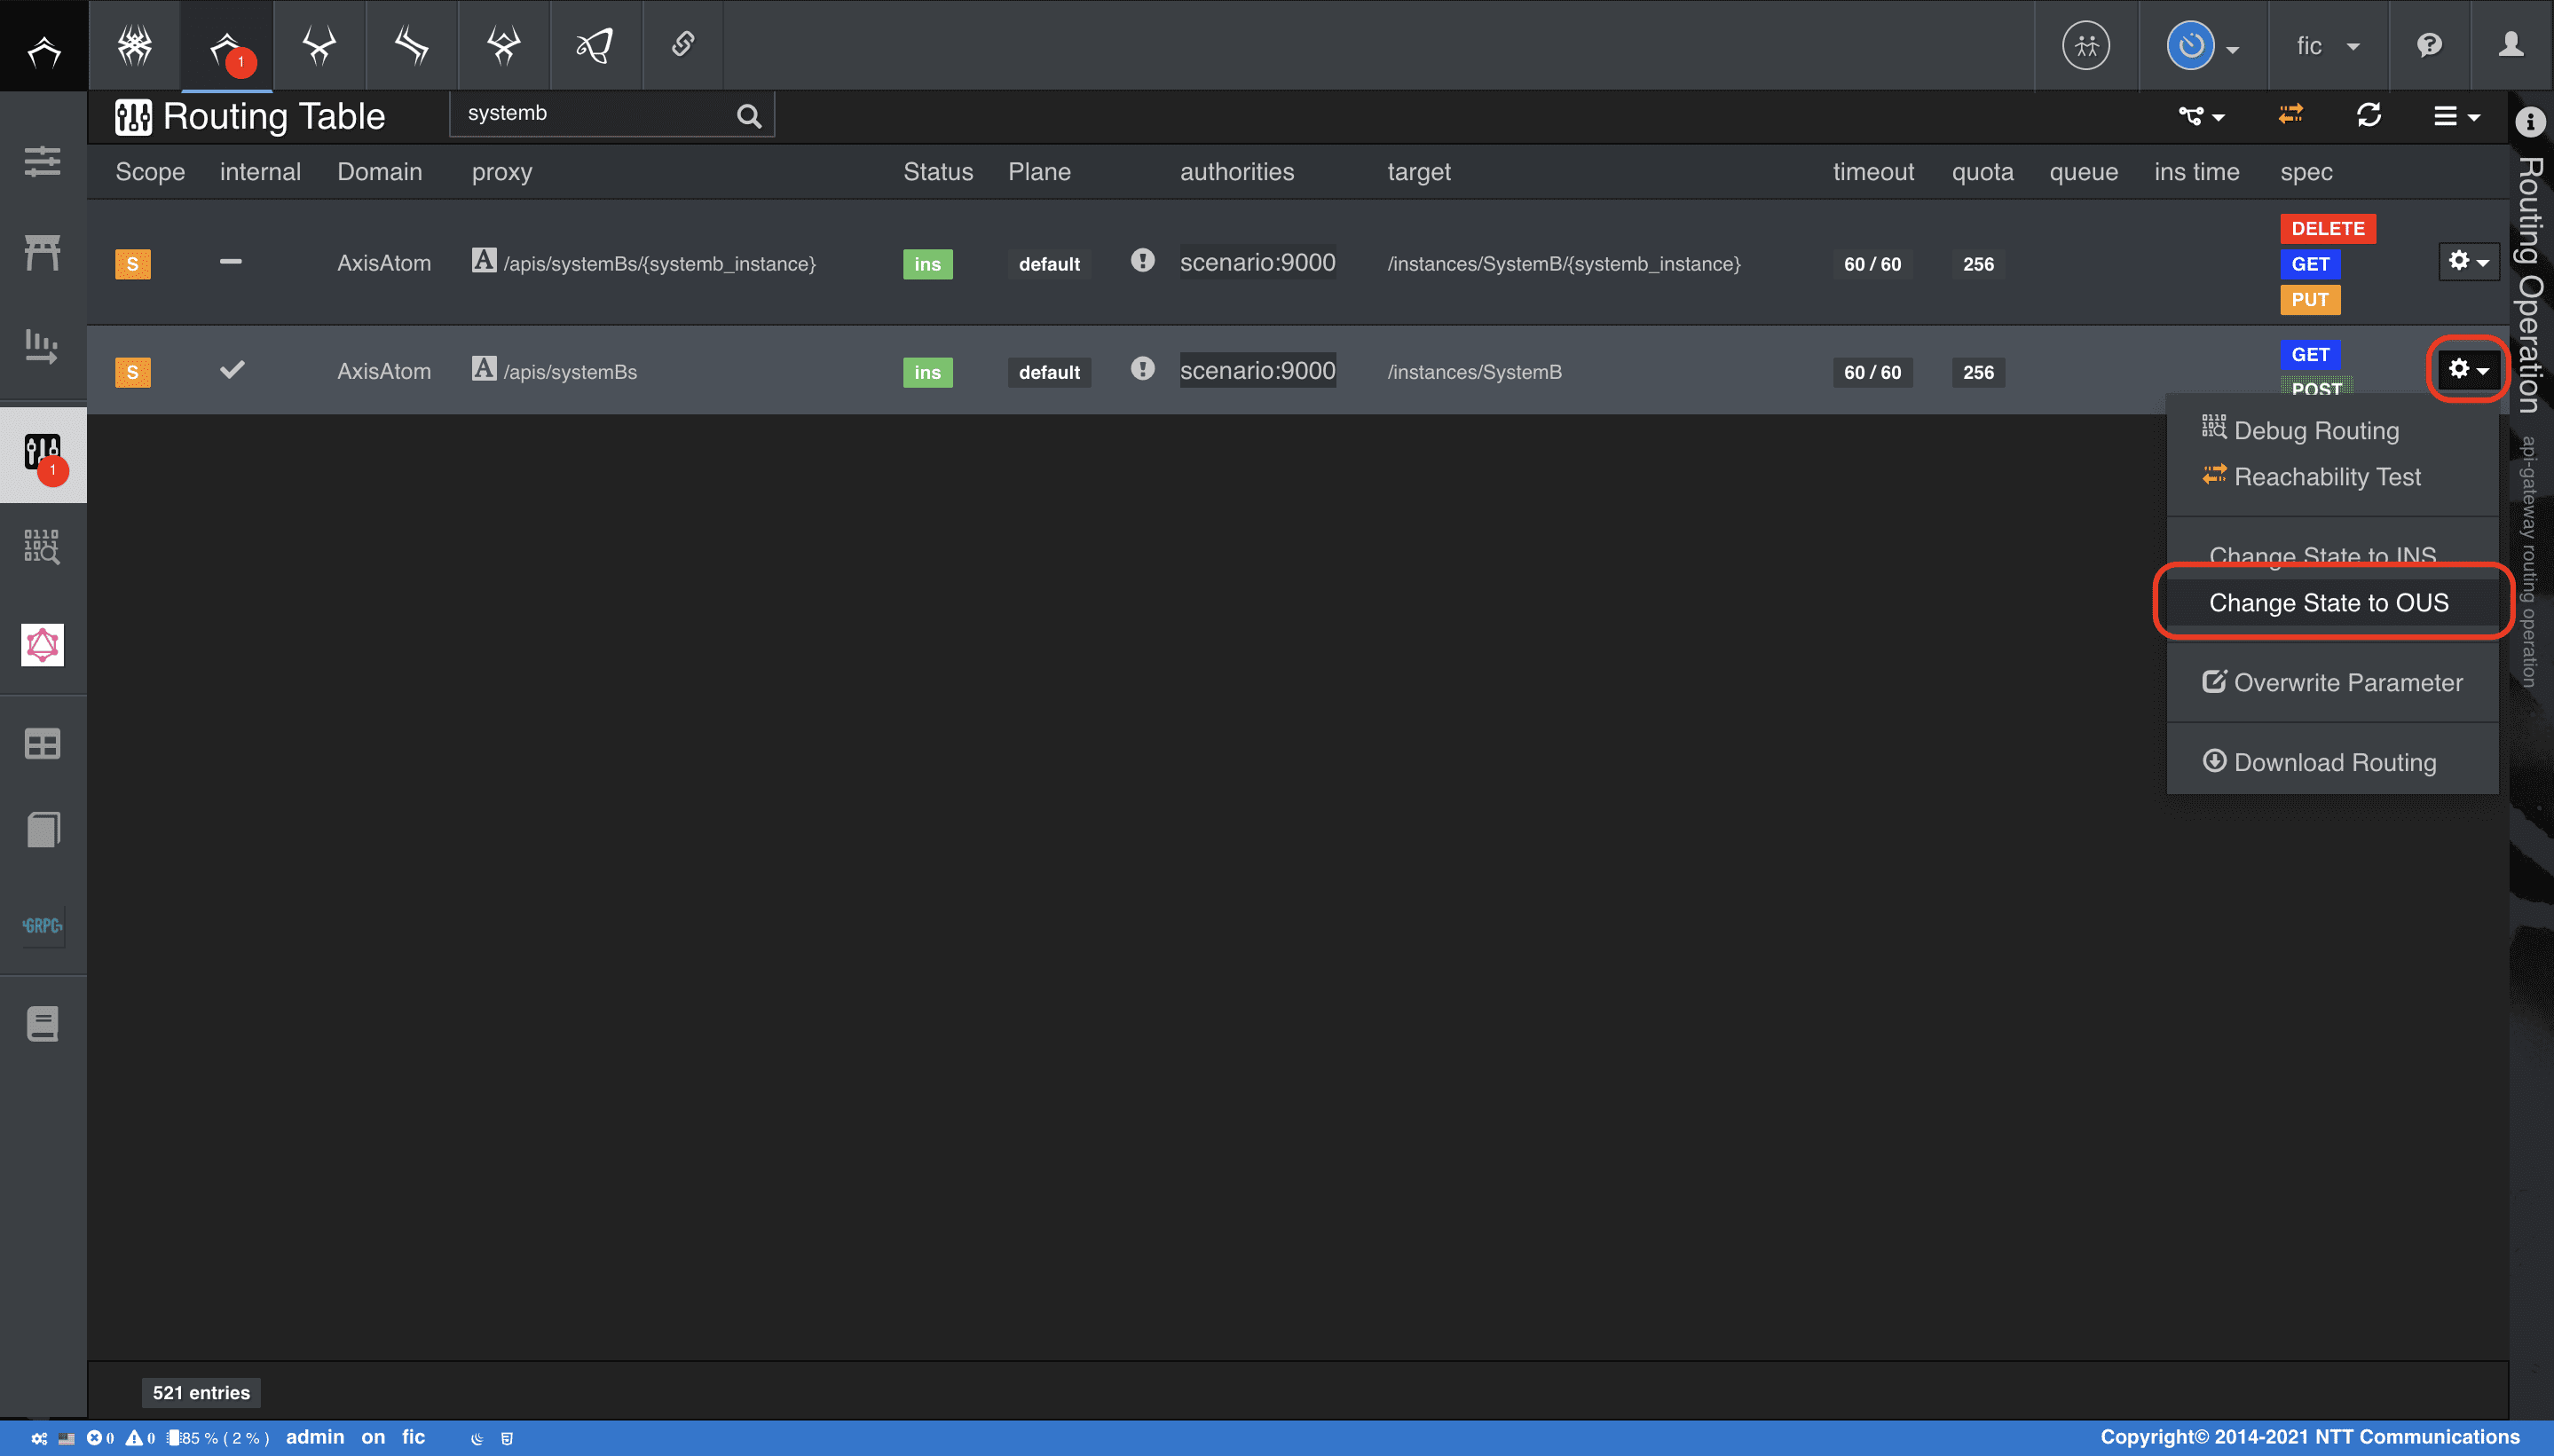
Routing Table画面で該当のルーティングに対してChange State to OUSを選択することで閉塞できます。
-
メインメニューから [API Gateway as a Service] > [Routing Table] を選択
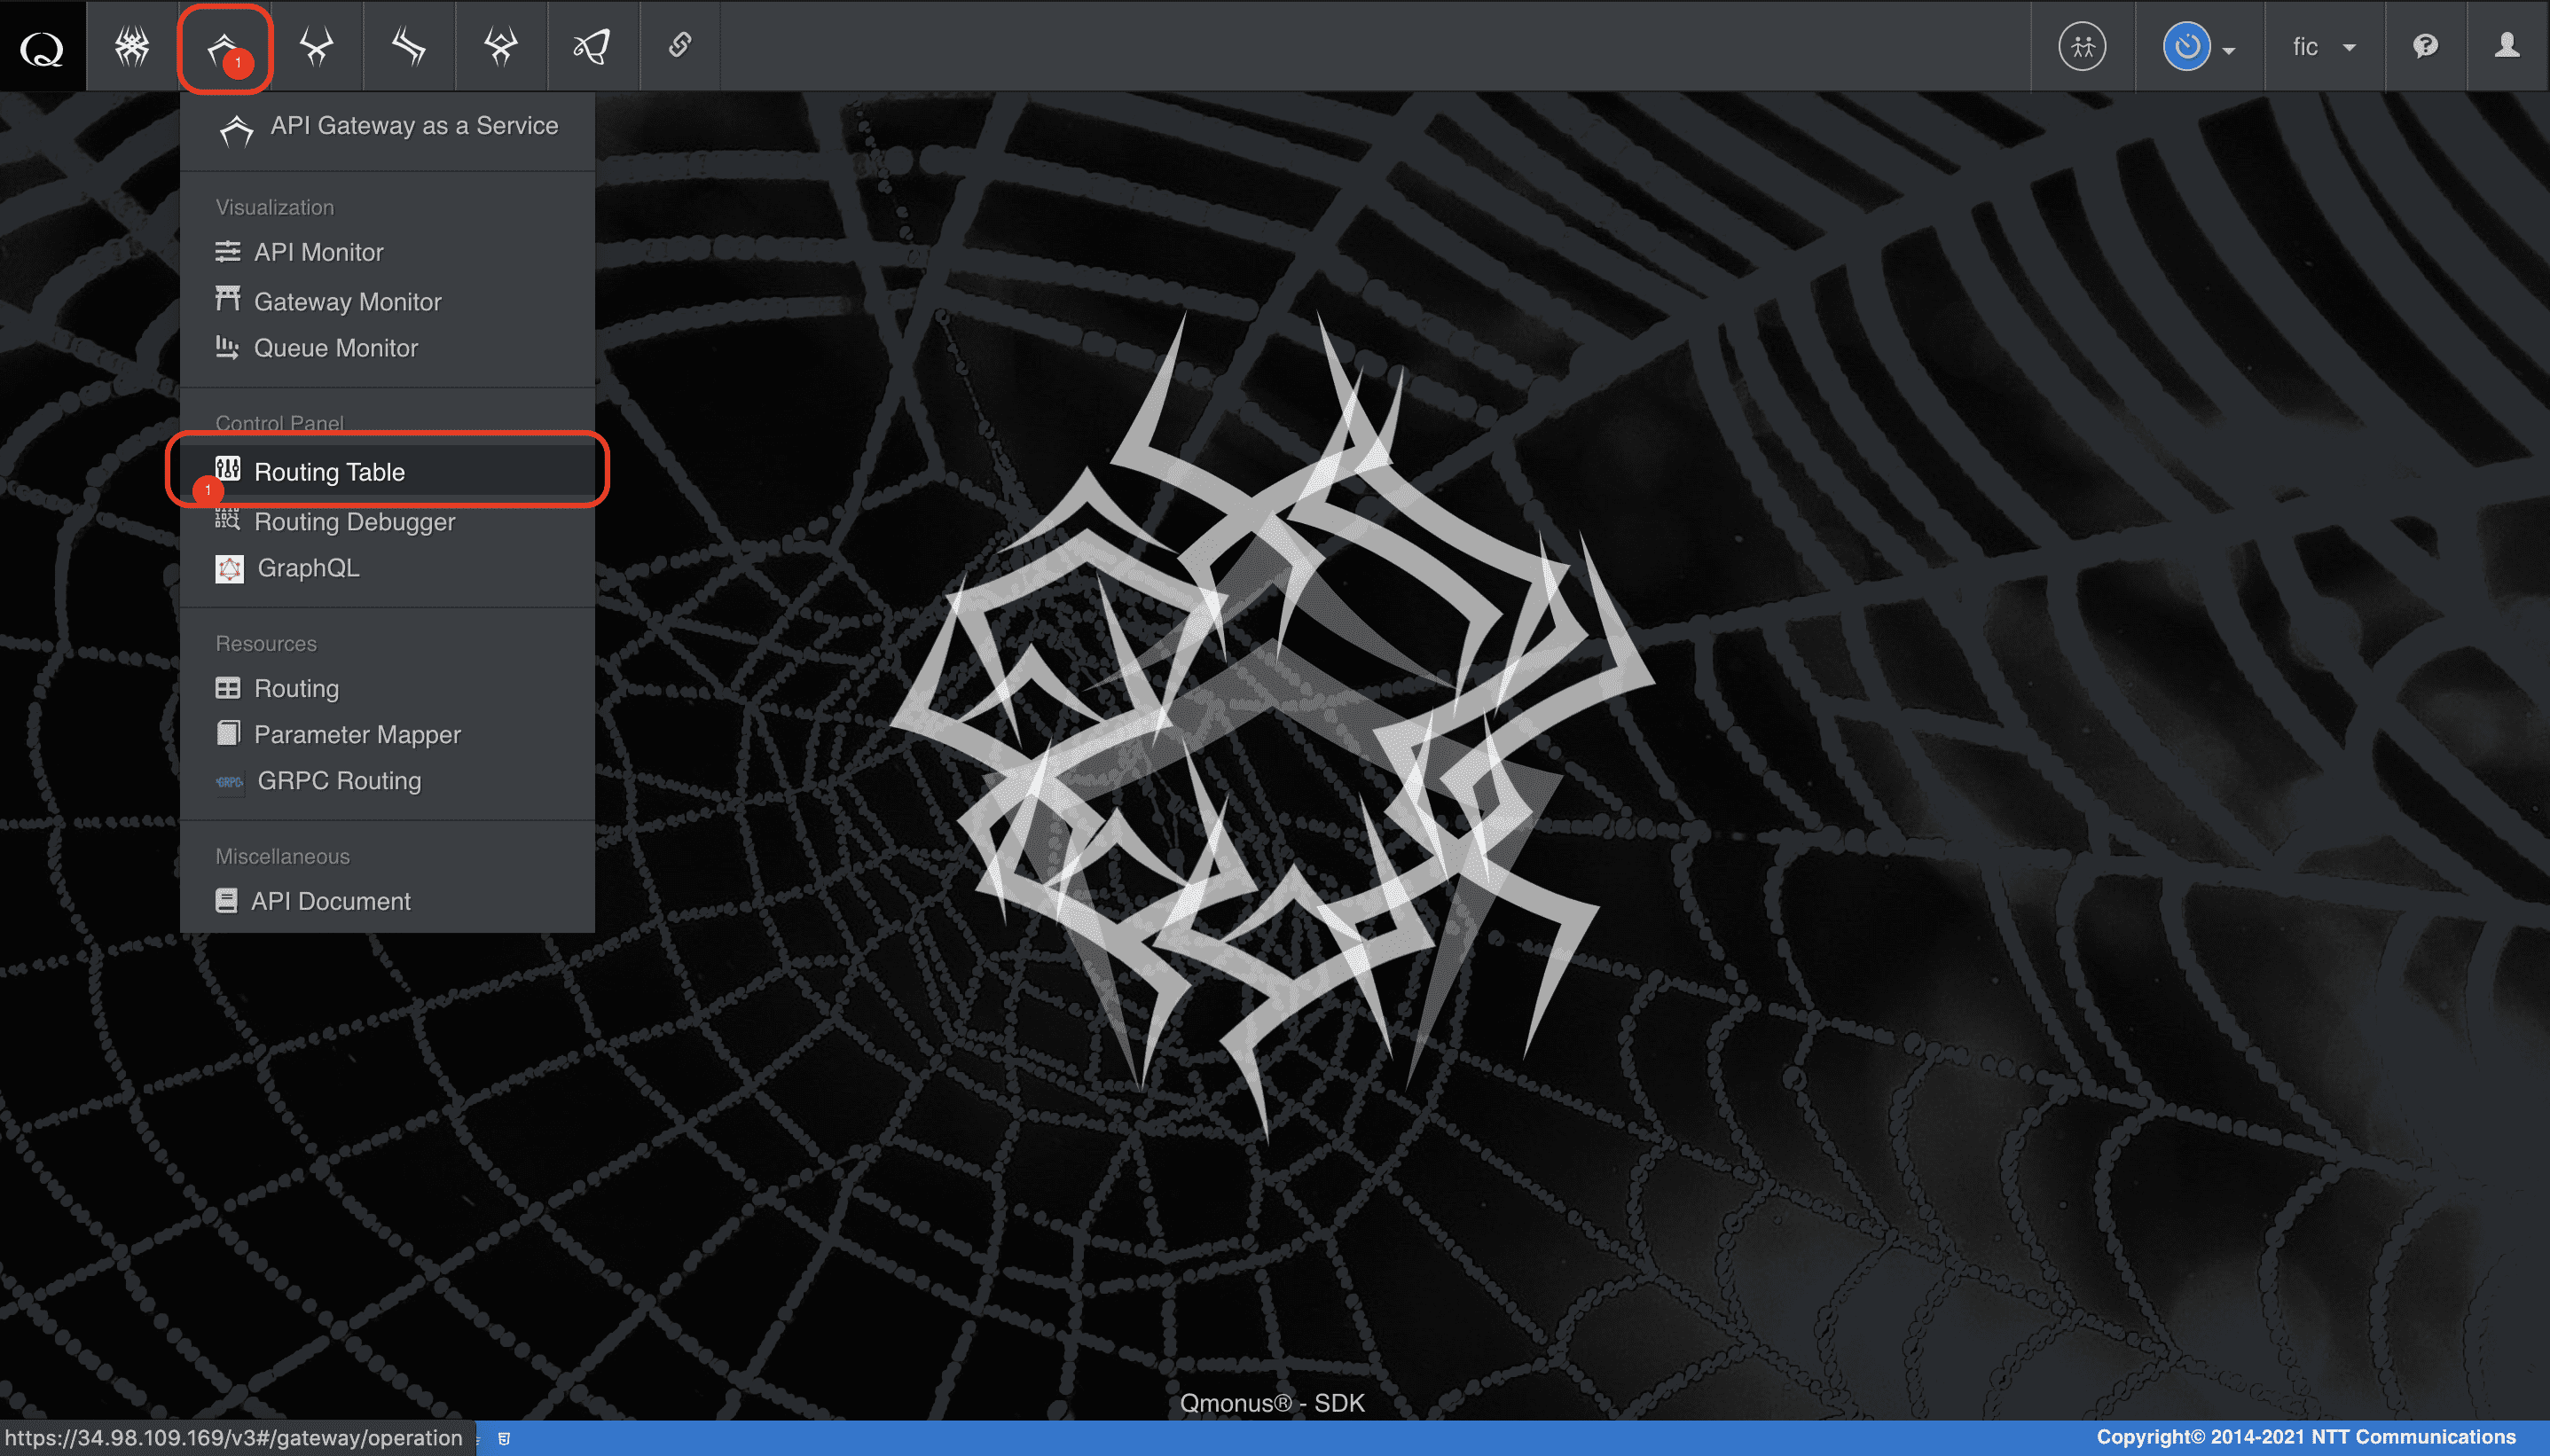
-
該当ルーティングのメニュー > [Change State to OUS] を選択
-
SystemBsのAPIが閉塞状態で先程と同様にcreateを実行すると、以下のように出力されます。
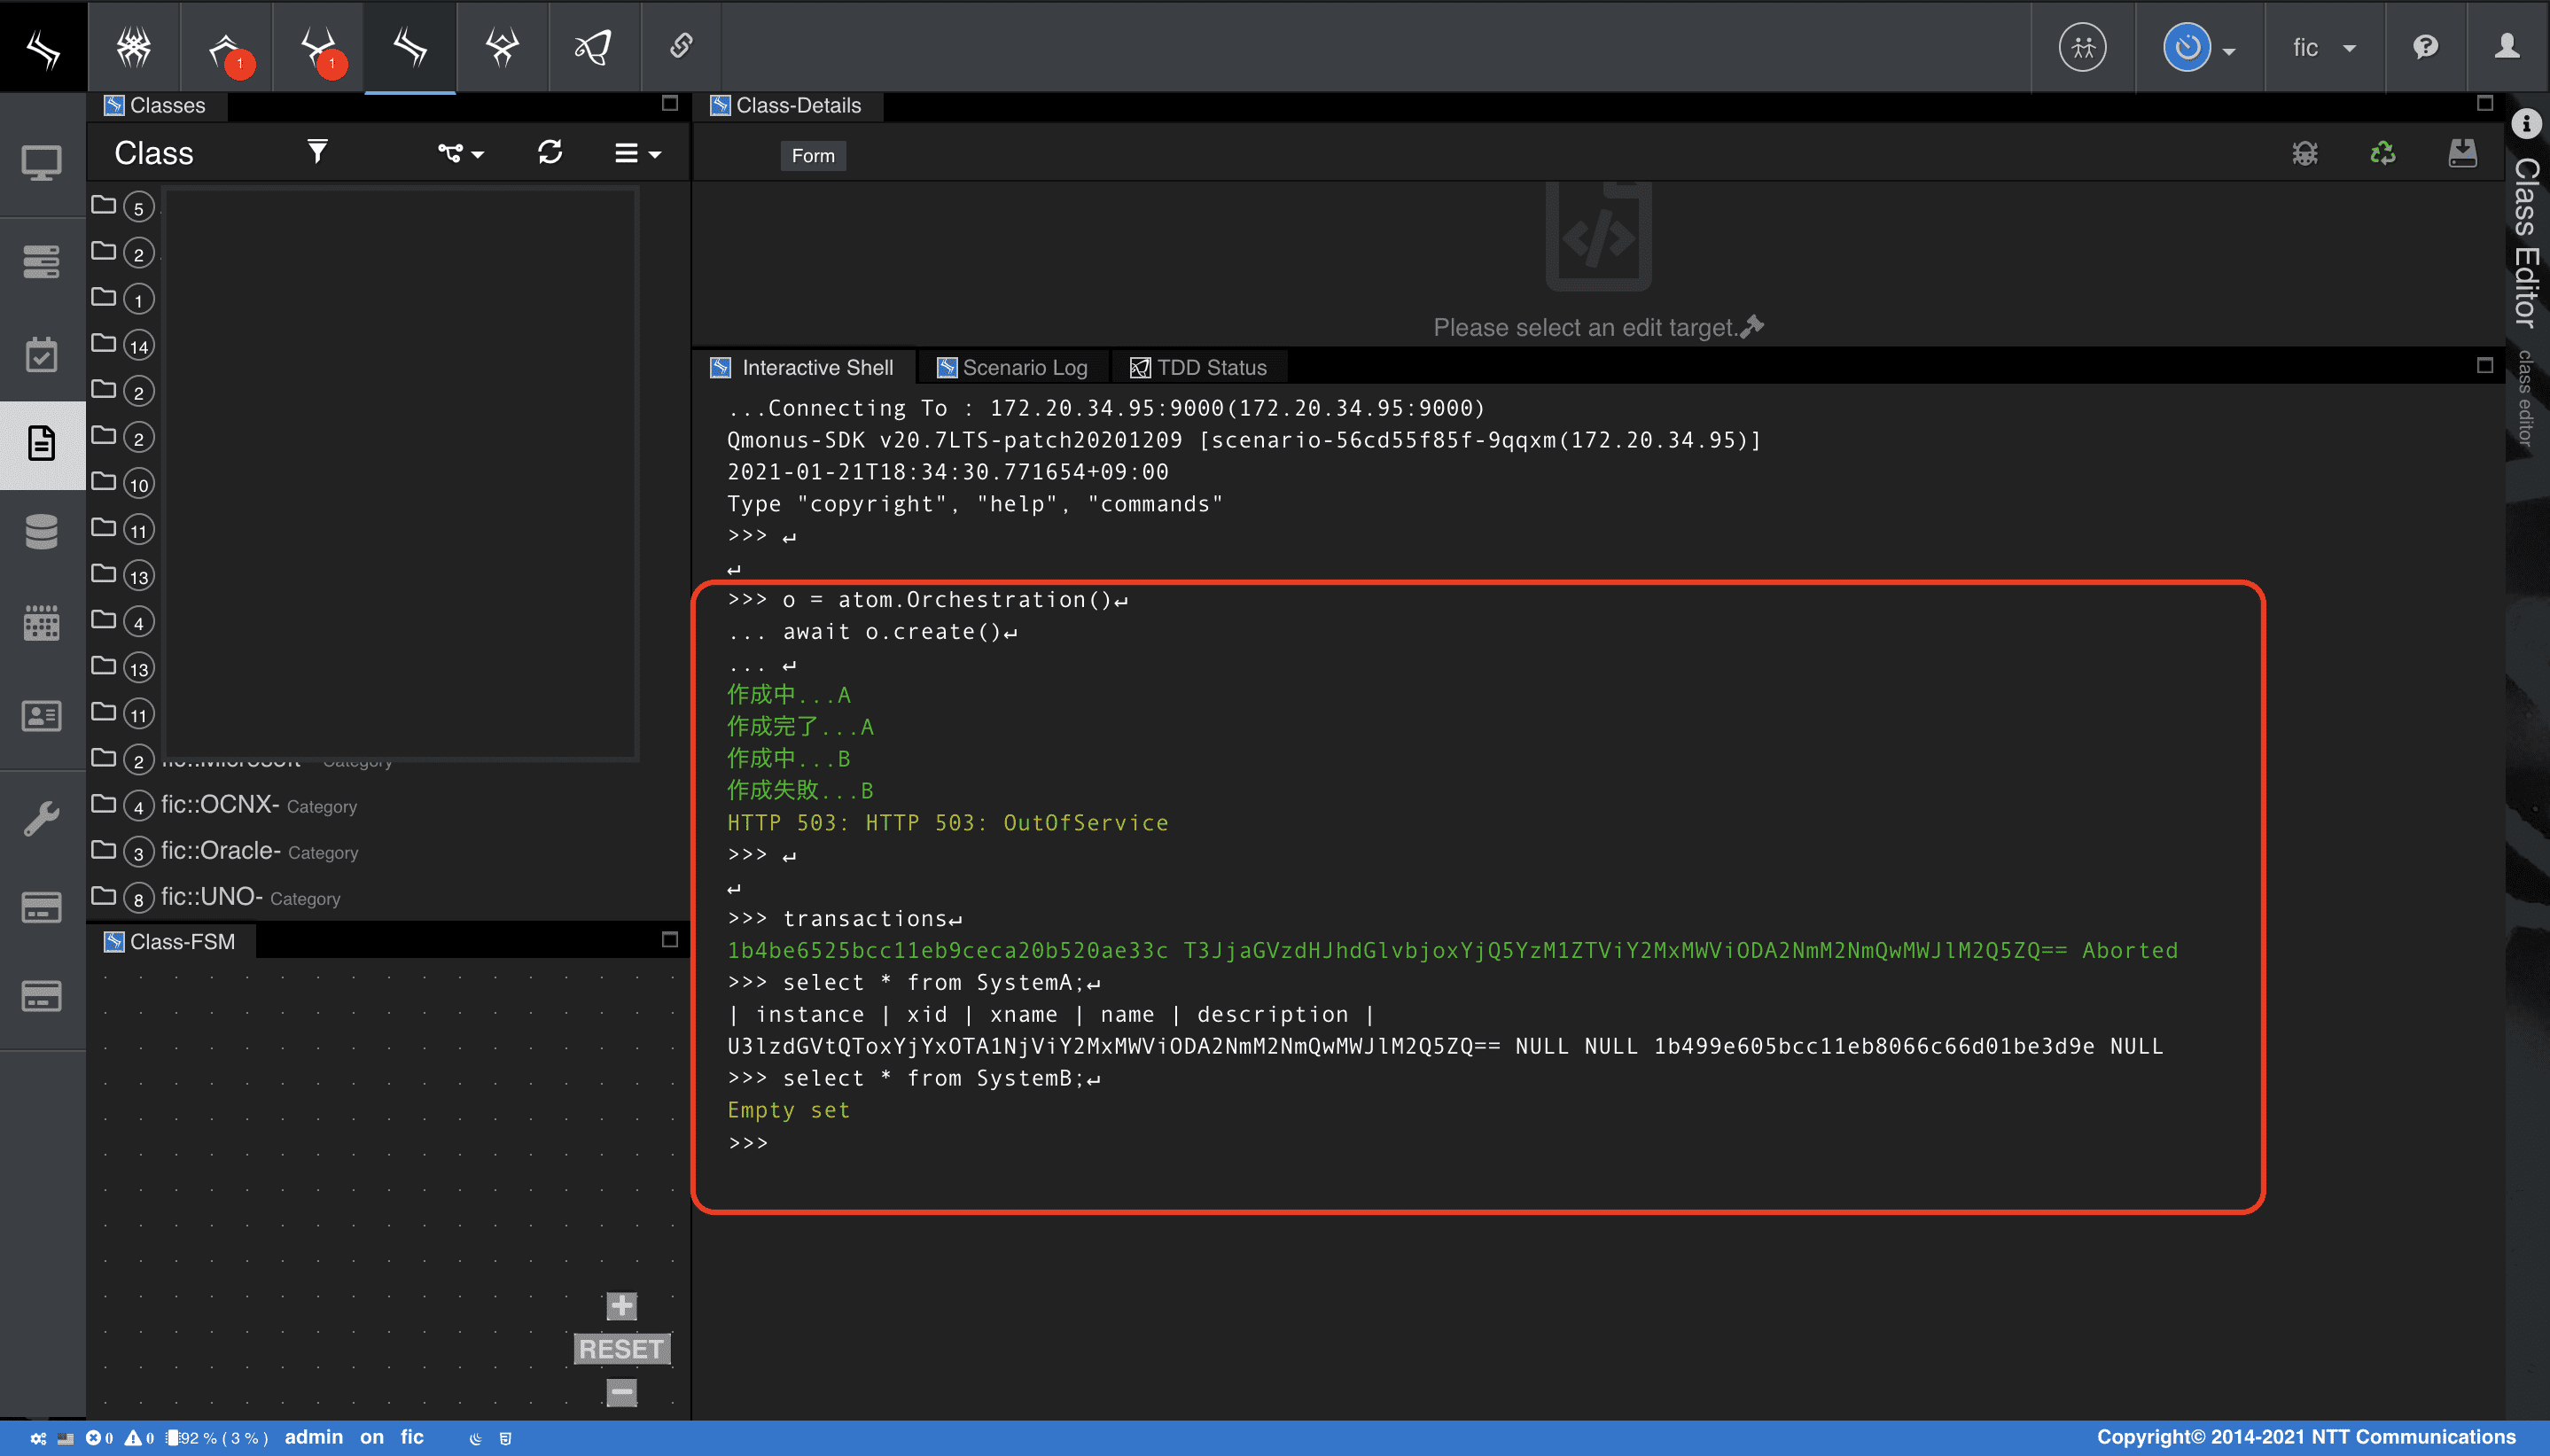
>>> o = atom.Orchestration()↵
... await o.create()↵
... ↵
作成中...A
作成完了...A
作成中...B
作成失敗...B
HTTP 503: HTTP 503: OutOfService
- この状態で
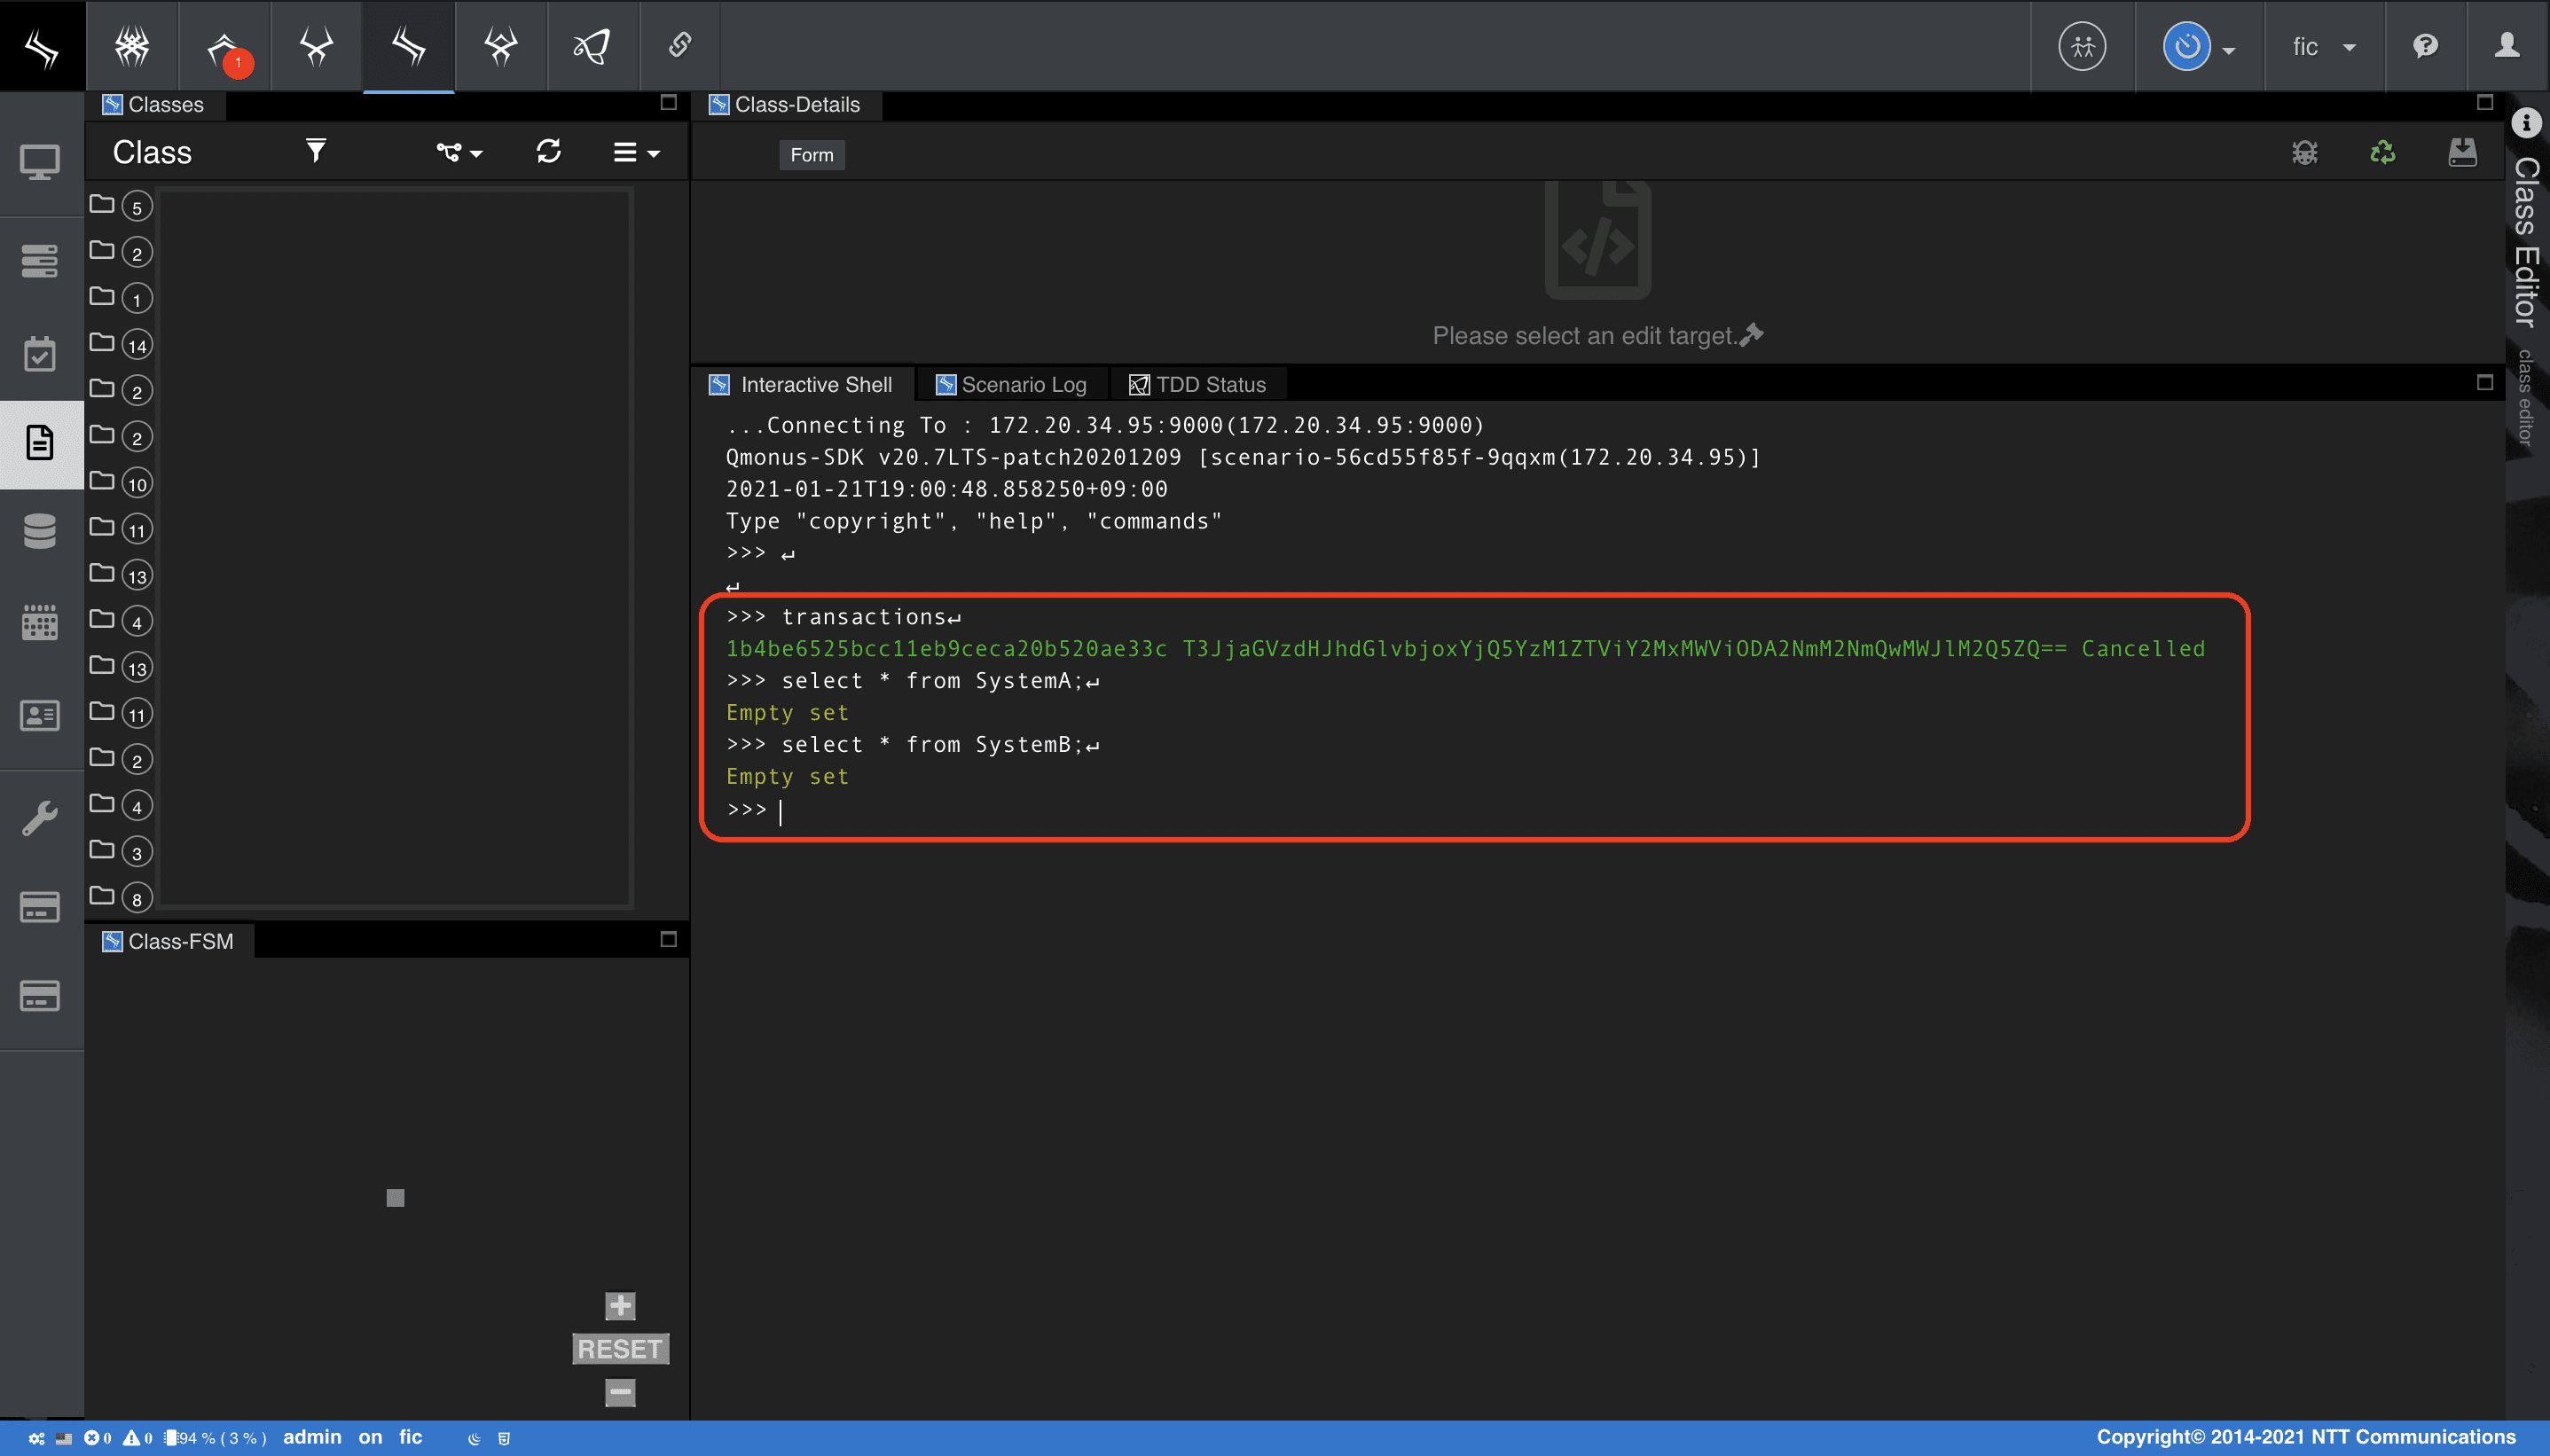
transactionsコマンドを打つと現在の一覧が出力され、createしようとしたトランザクションがAbortしていることがわかります。また、以下のSELECT文を入力することでSystemAのみデータが投入されていることもわかりました。
>>> transactions↵
029bfac0ece711ee8f2fb6fbe06d1129 T3JjaGVzdHJhdGlvbjowMjhjZDg2MGVjZTcxMWVlYmQwMGM2ZDNmZmY1ZGQ2Zg== Aborted

>>> select * from SystemA;↵
| instance | xid | xname | name | description |
U3lzdGVtQTowMzJmOWE4Y2VjZTcxMWVlYmQwMGM2ZDNmZmY1ZGQ2Zg== NULL NULL 028c17d6ece711eebd00c6d3fff5dd6f NULL
1 rows in set
>>>

>>> select * from SystemB;↵
Empty set
このようにトランザクションがAbortした状態で、Routing Table画面で該当のルーティングに対してChange State to INSを選択することでSystemBsのAPI閉塞を解除します。
- 該当ルーティングのメニュー > [Change State to INS] を選択
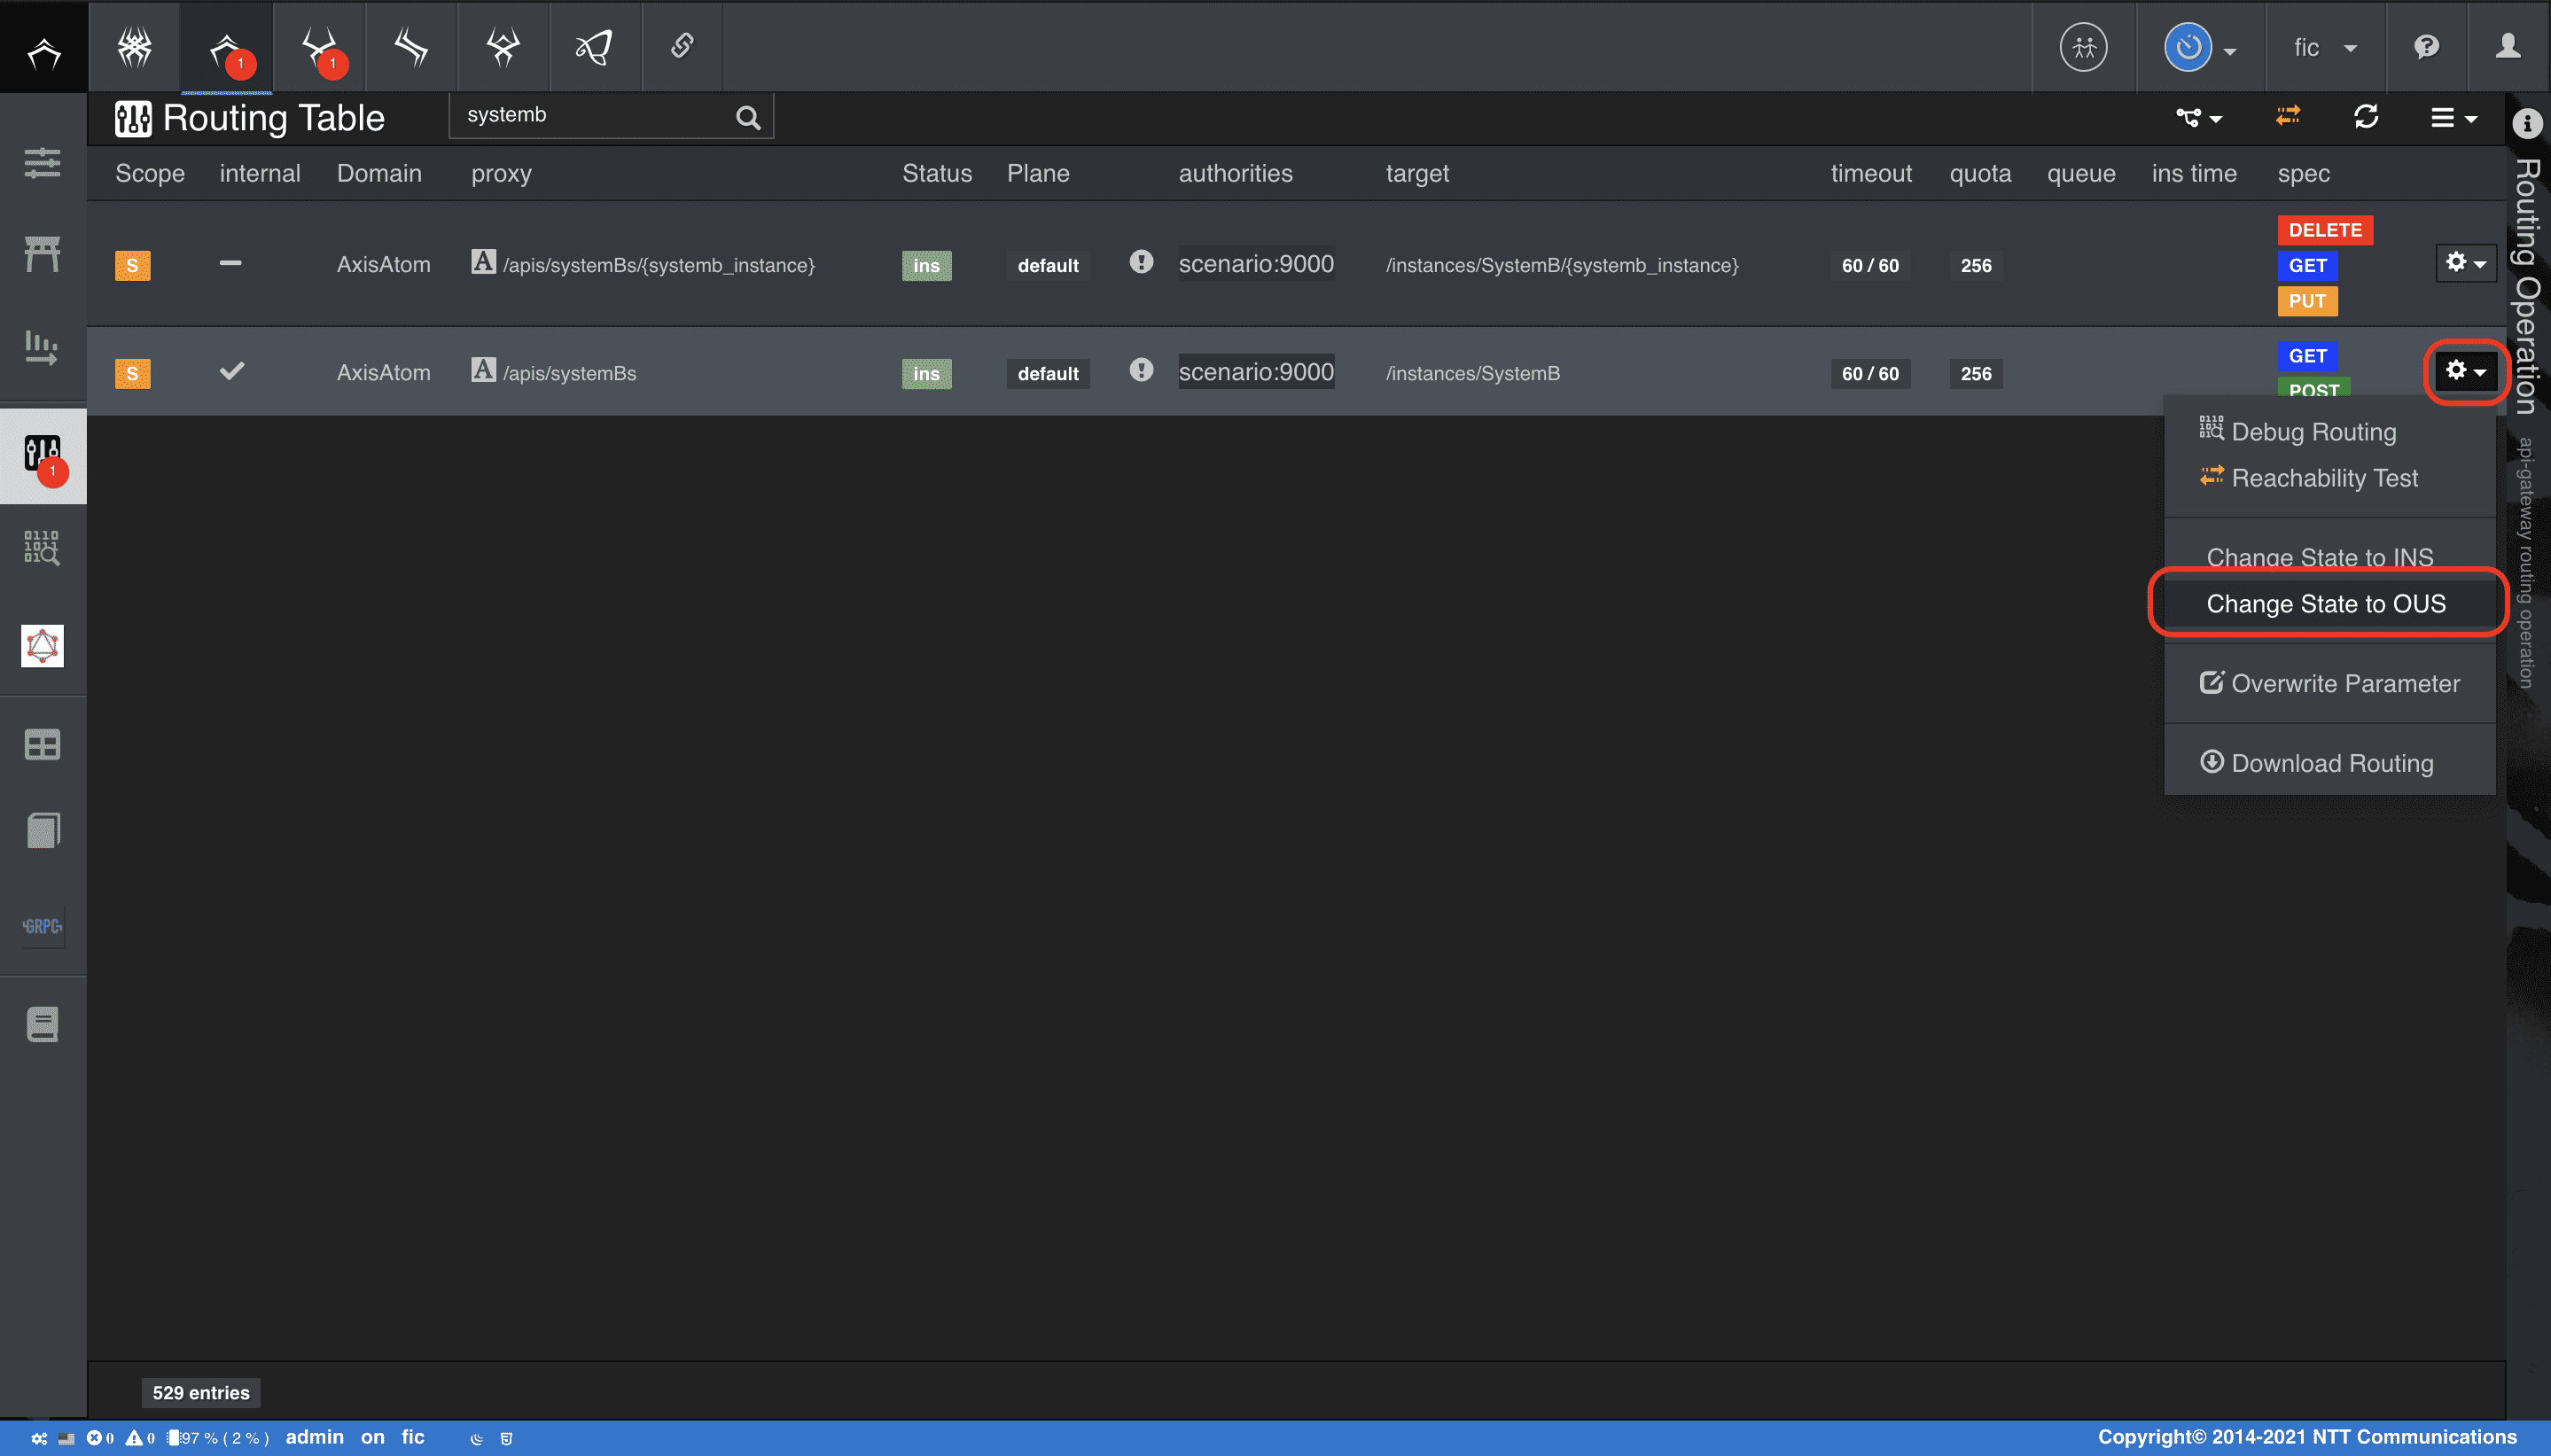
API閉塞を解除したら、Transaction Table画面でAbortedとなっている該当トランザクションをcancelしてください。
-
メインメニューから [Transaction as a Service] > [Transaction Table] を選択
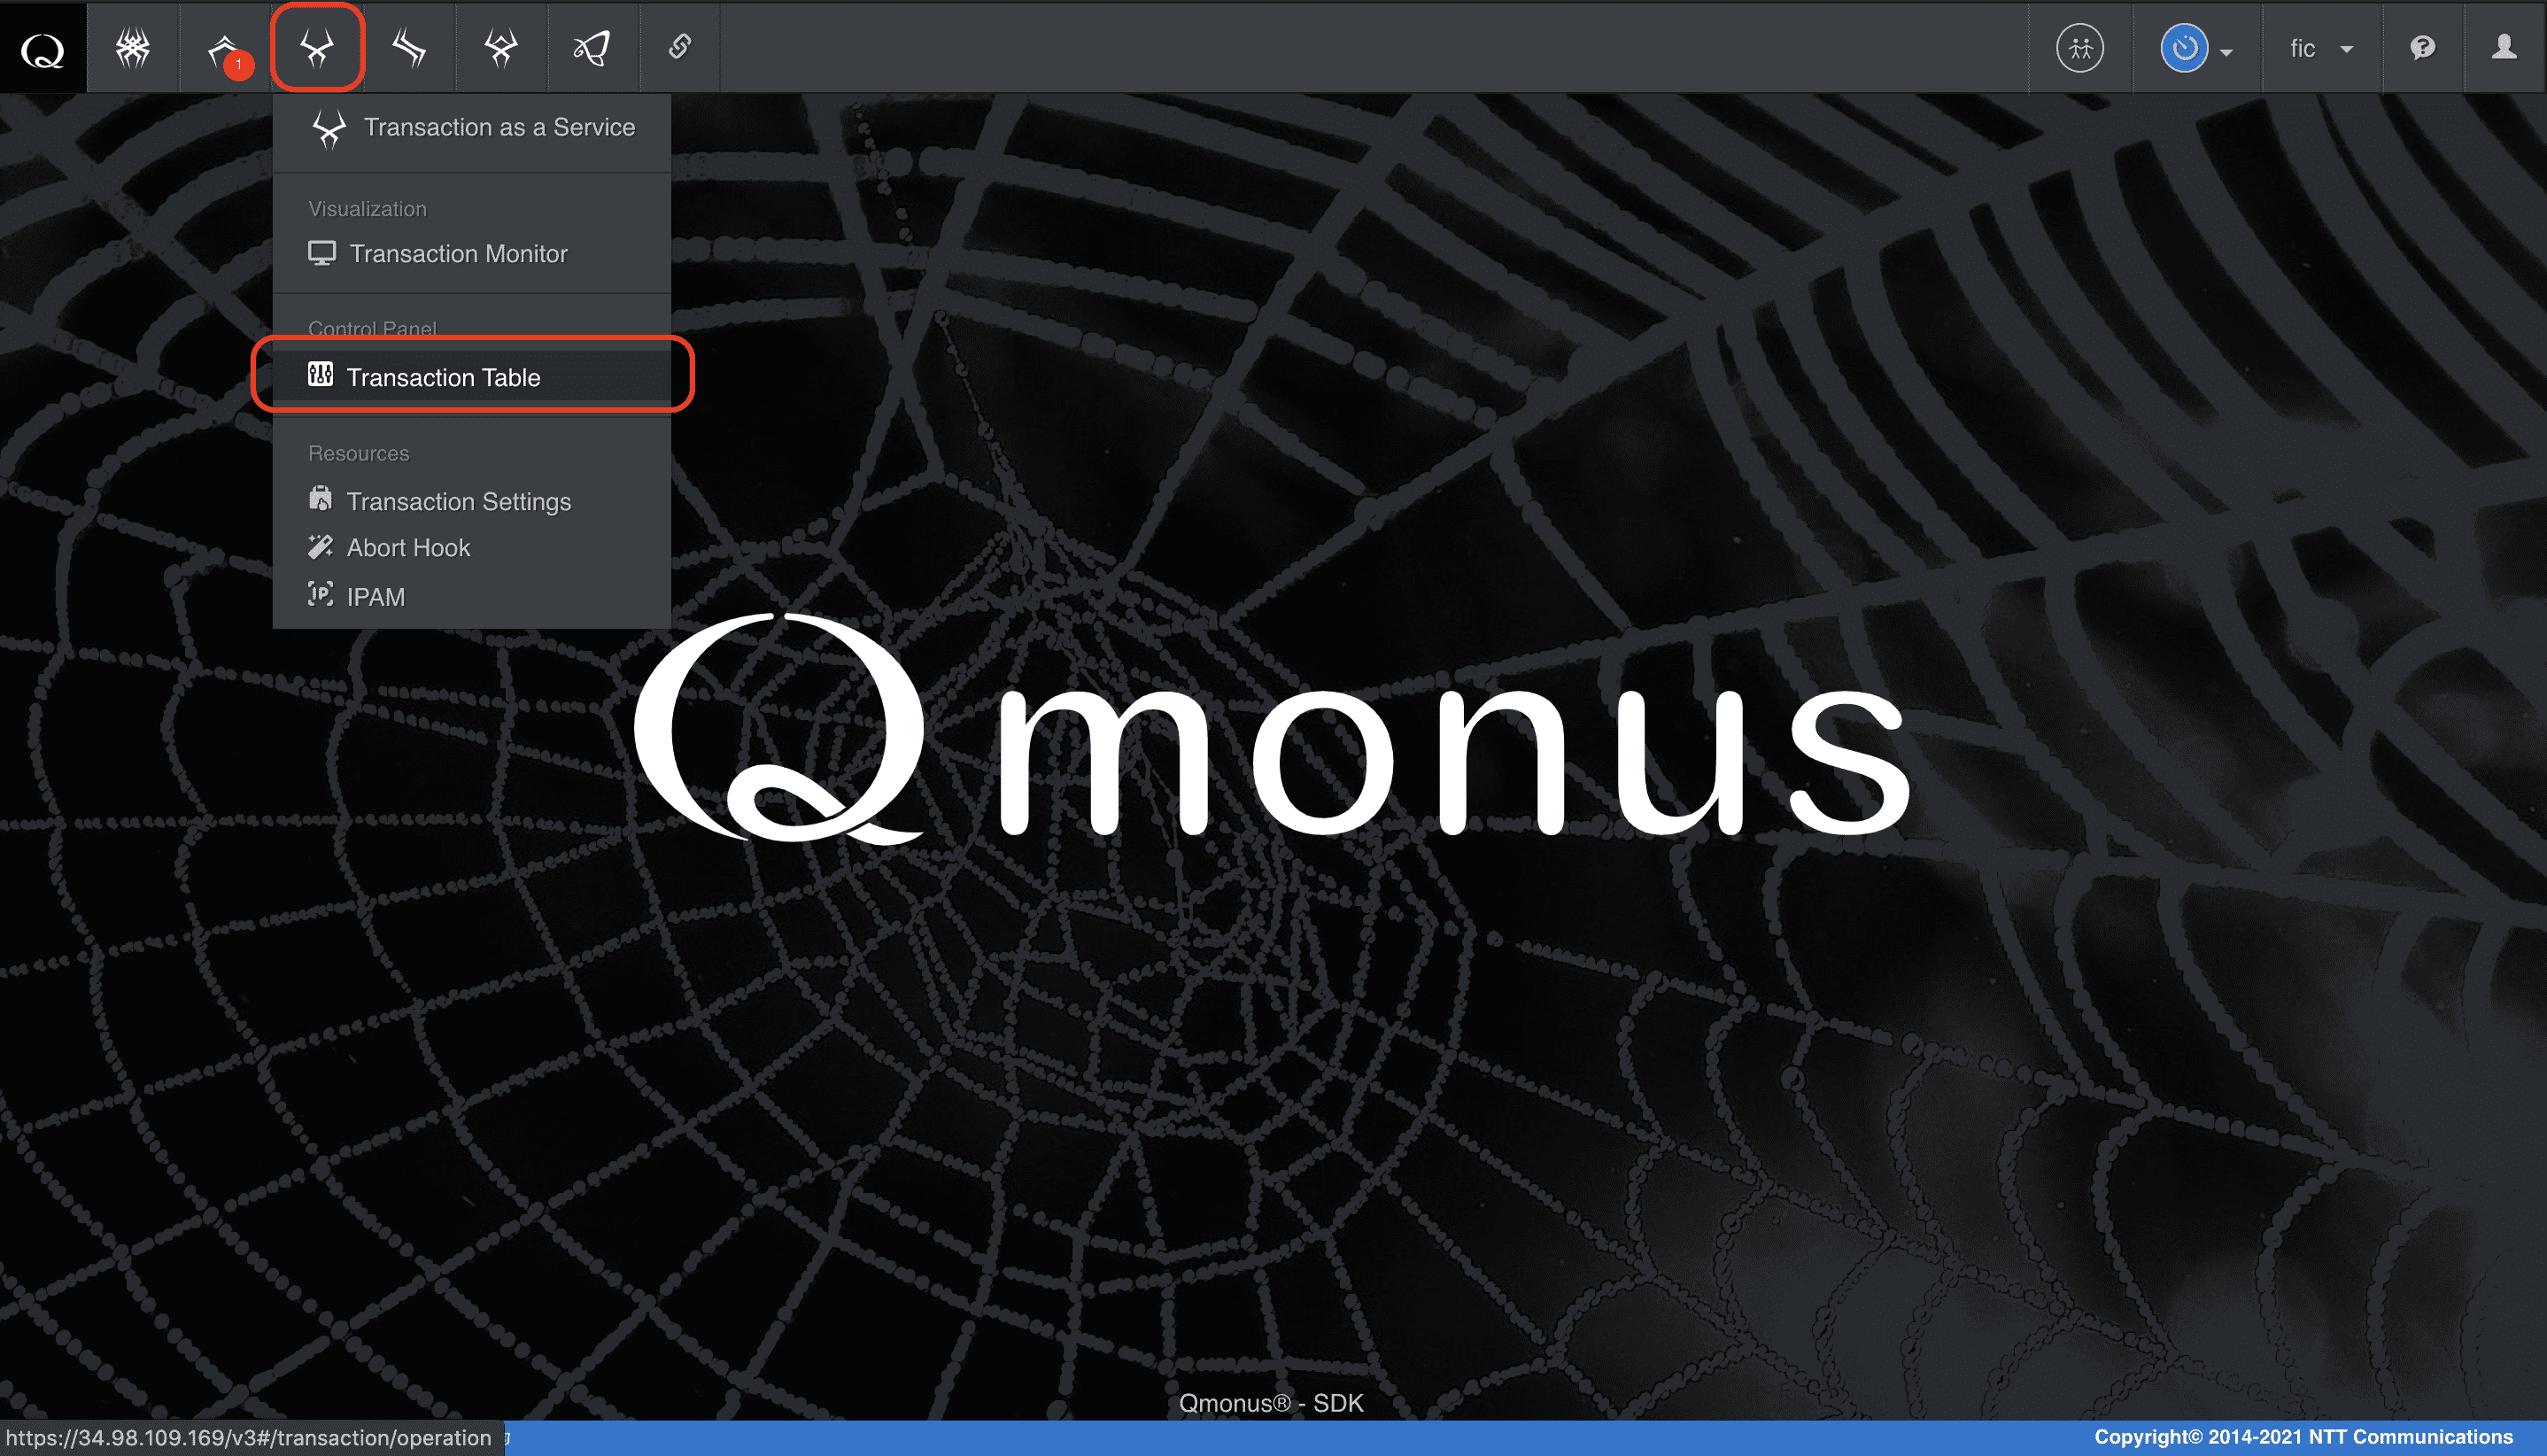
-
ステータスがAbortedになっている該当ルーティングメニュー > [Cancel] を選択
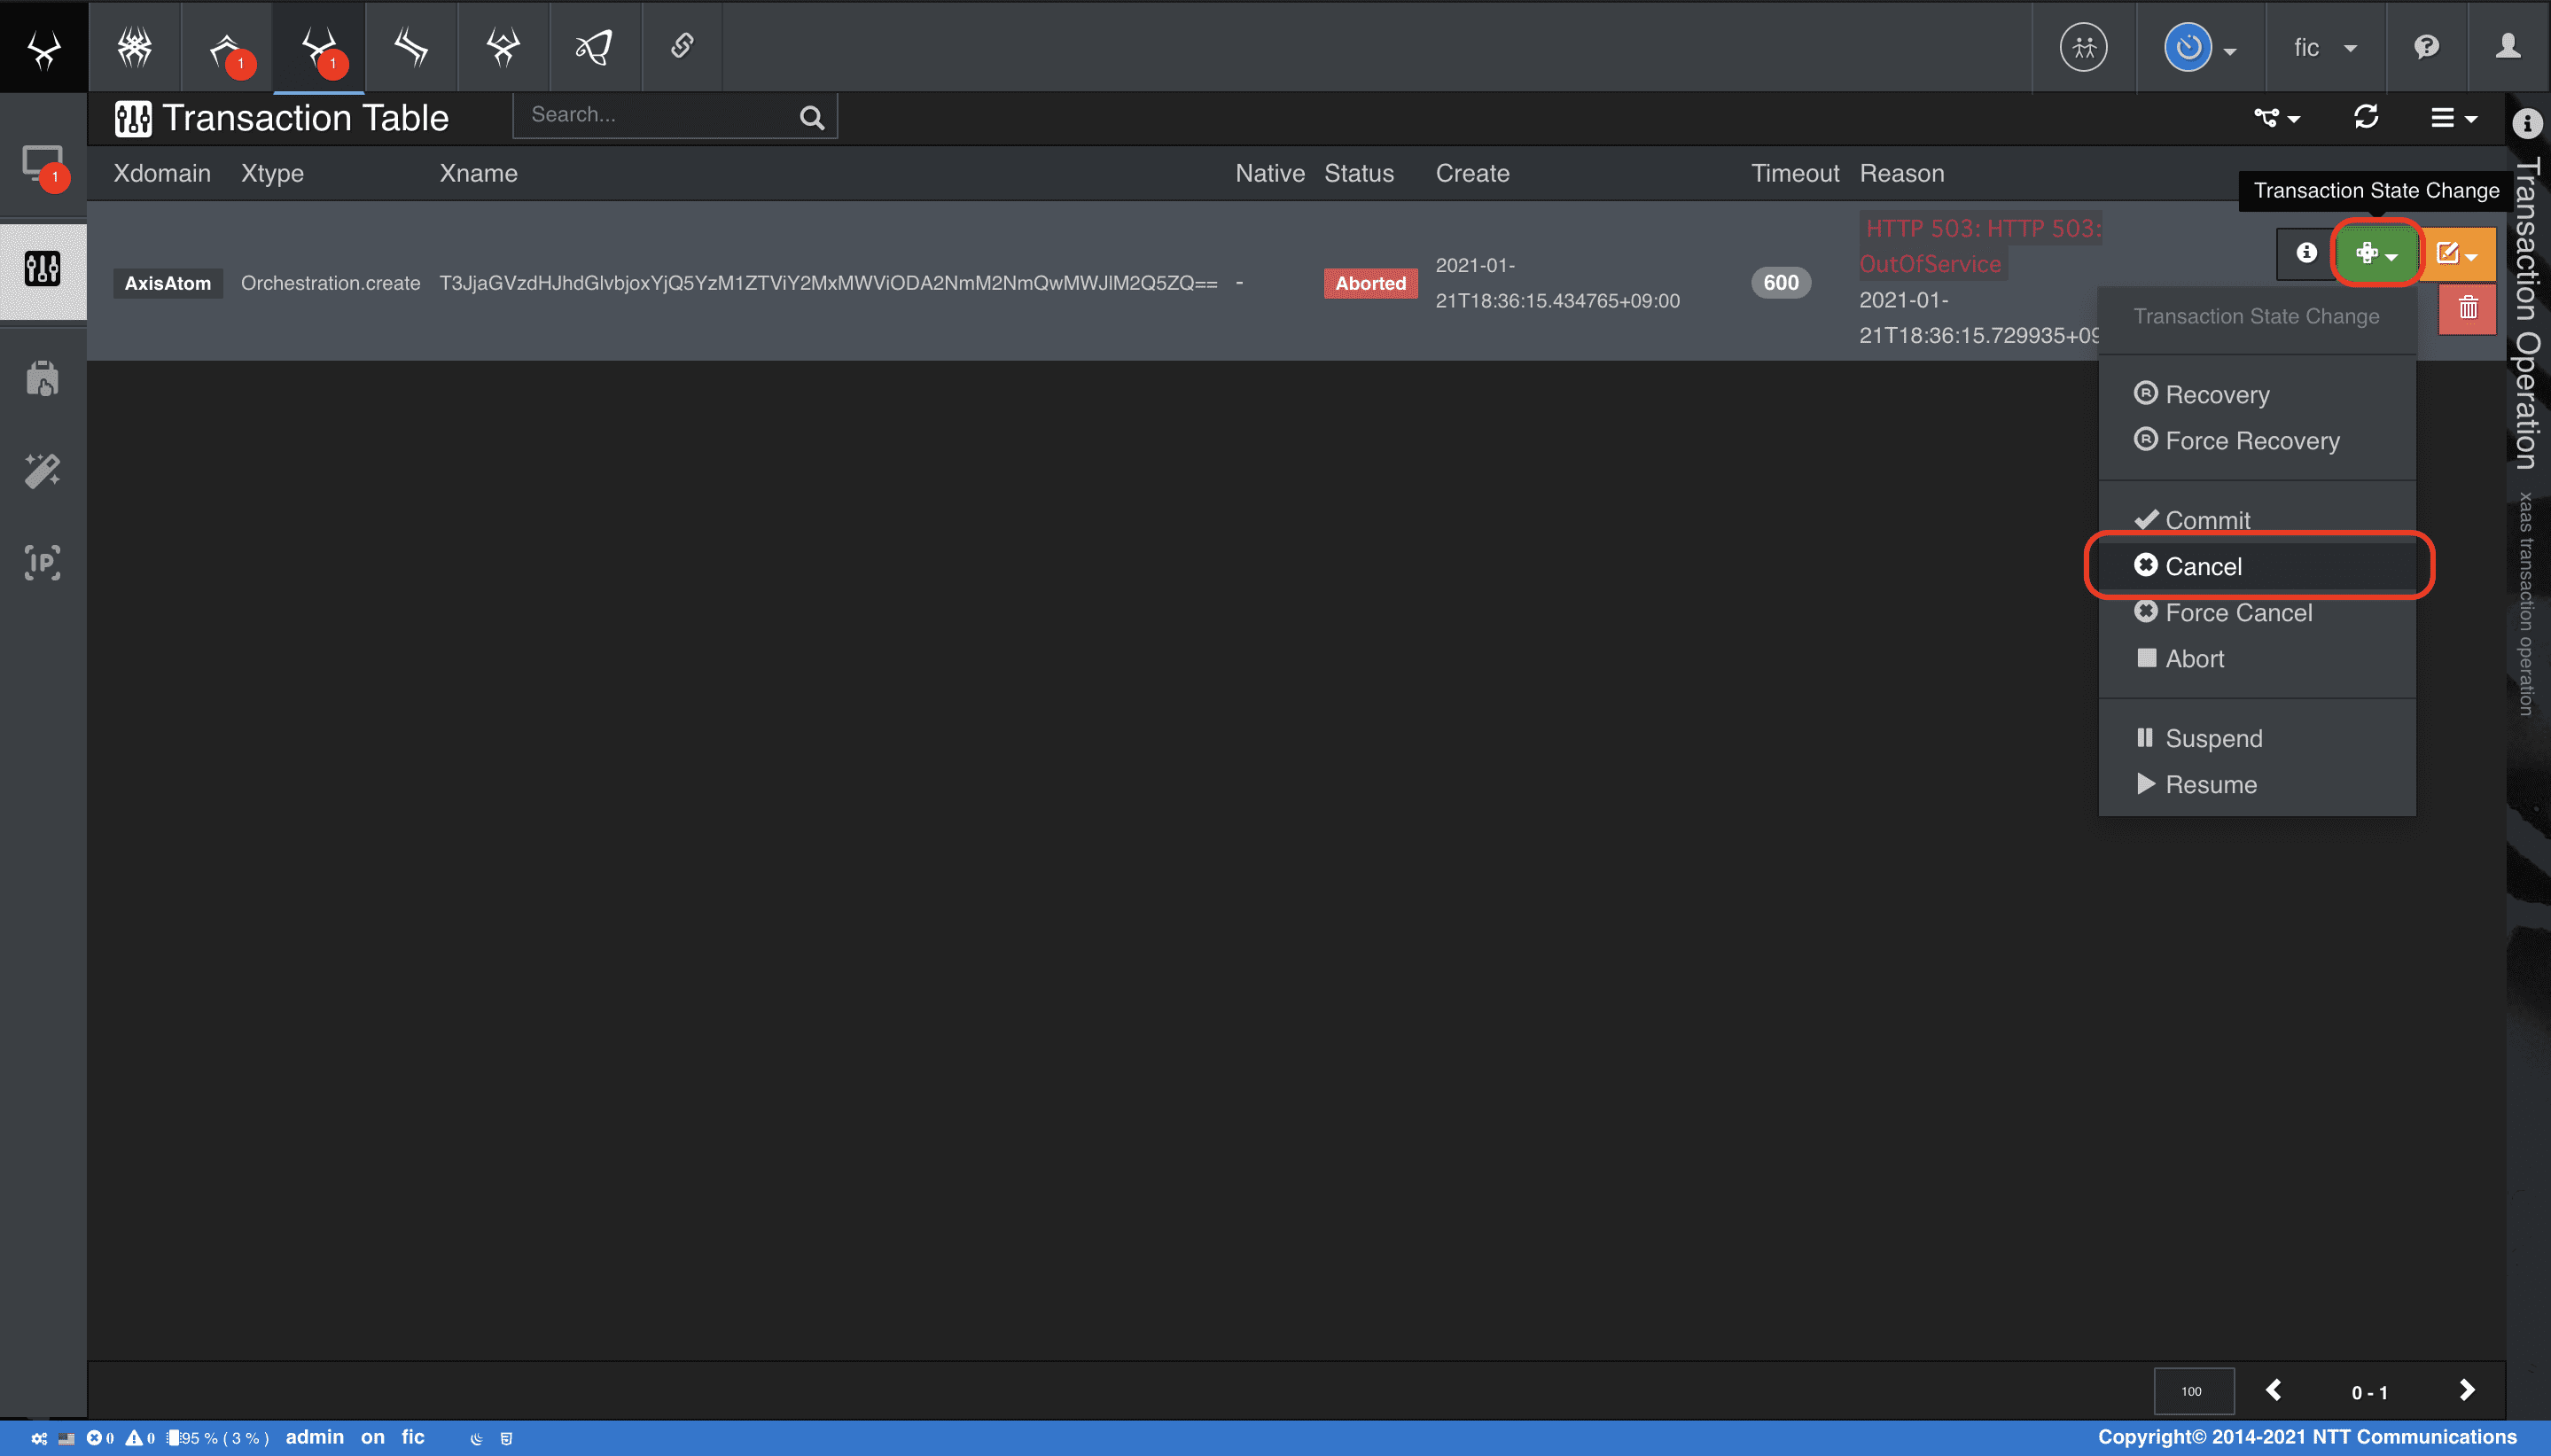
-
確認画面にて [State Change] を選択
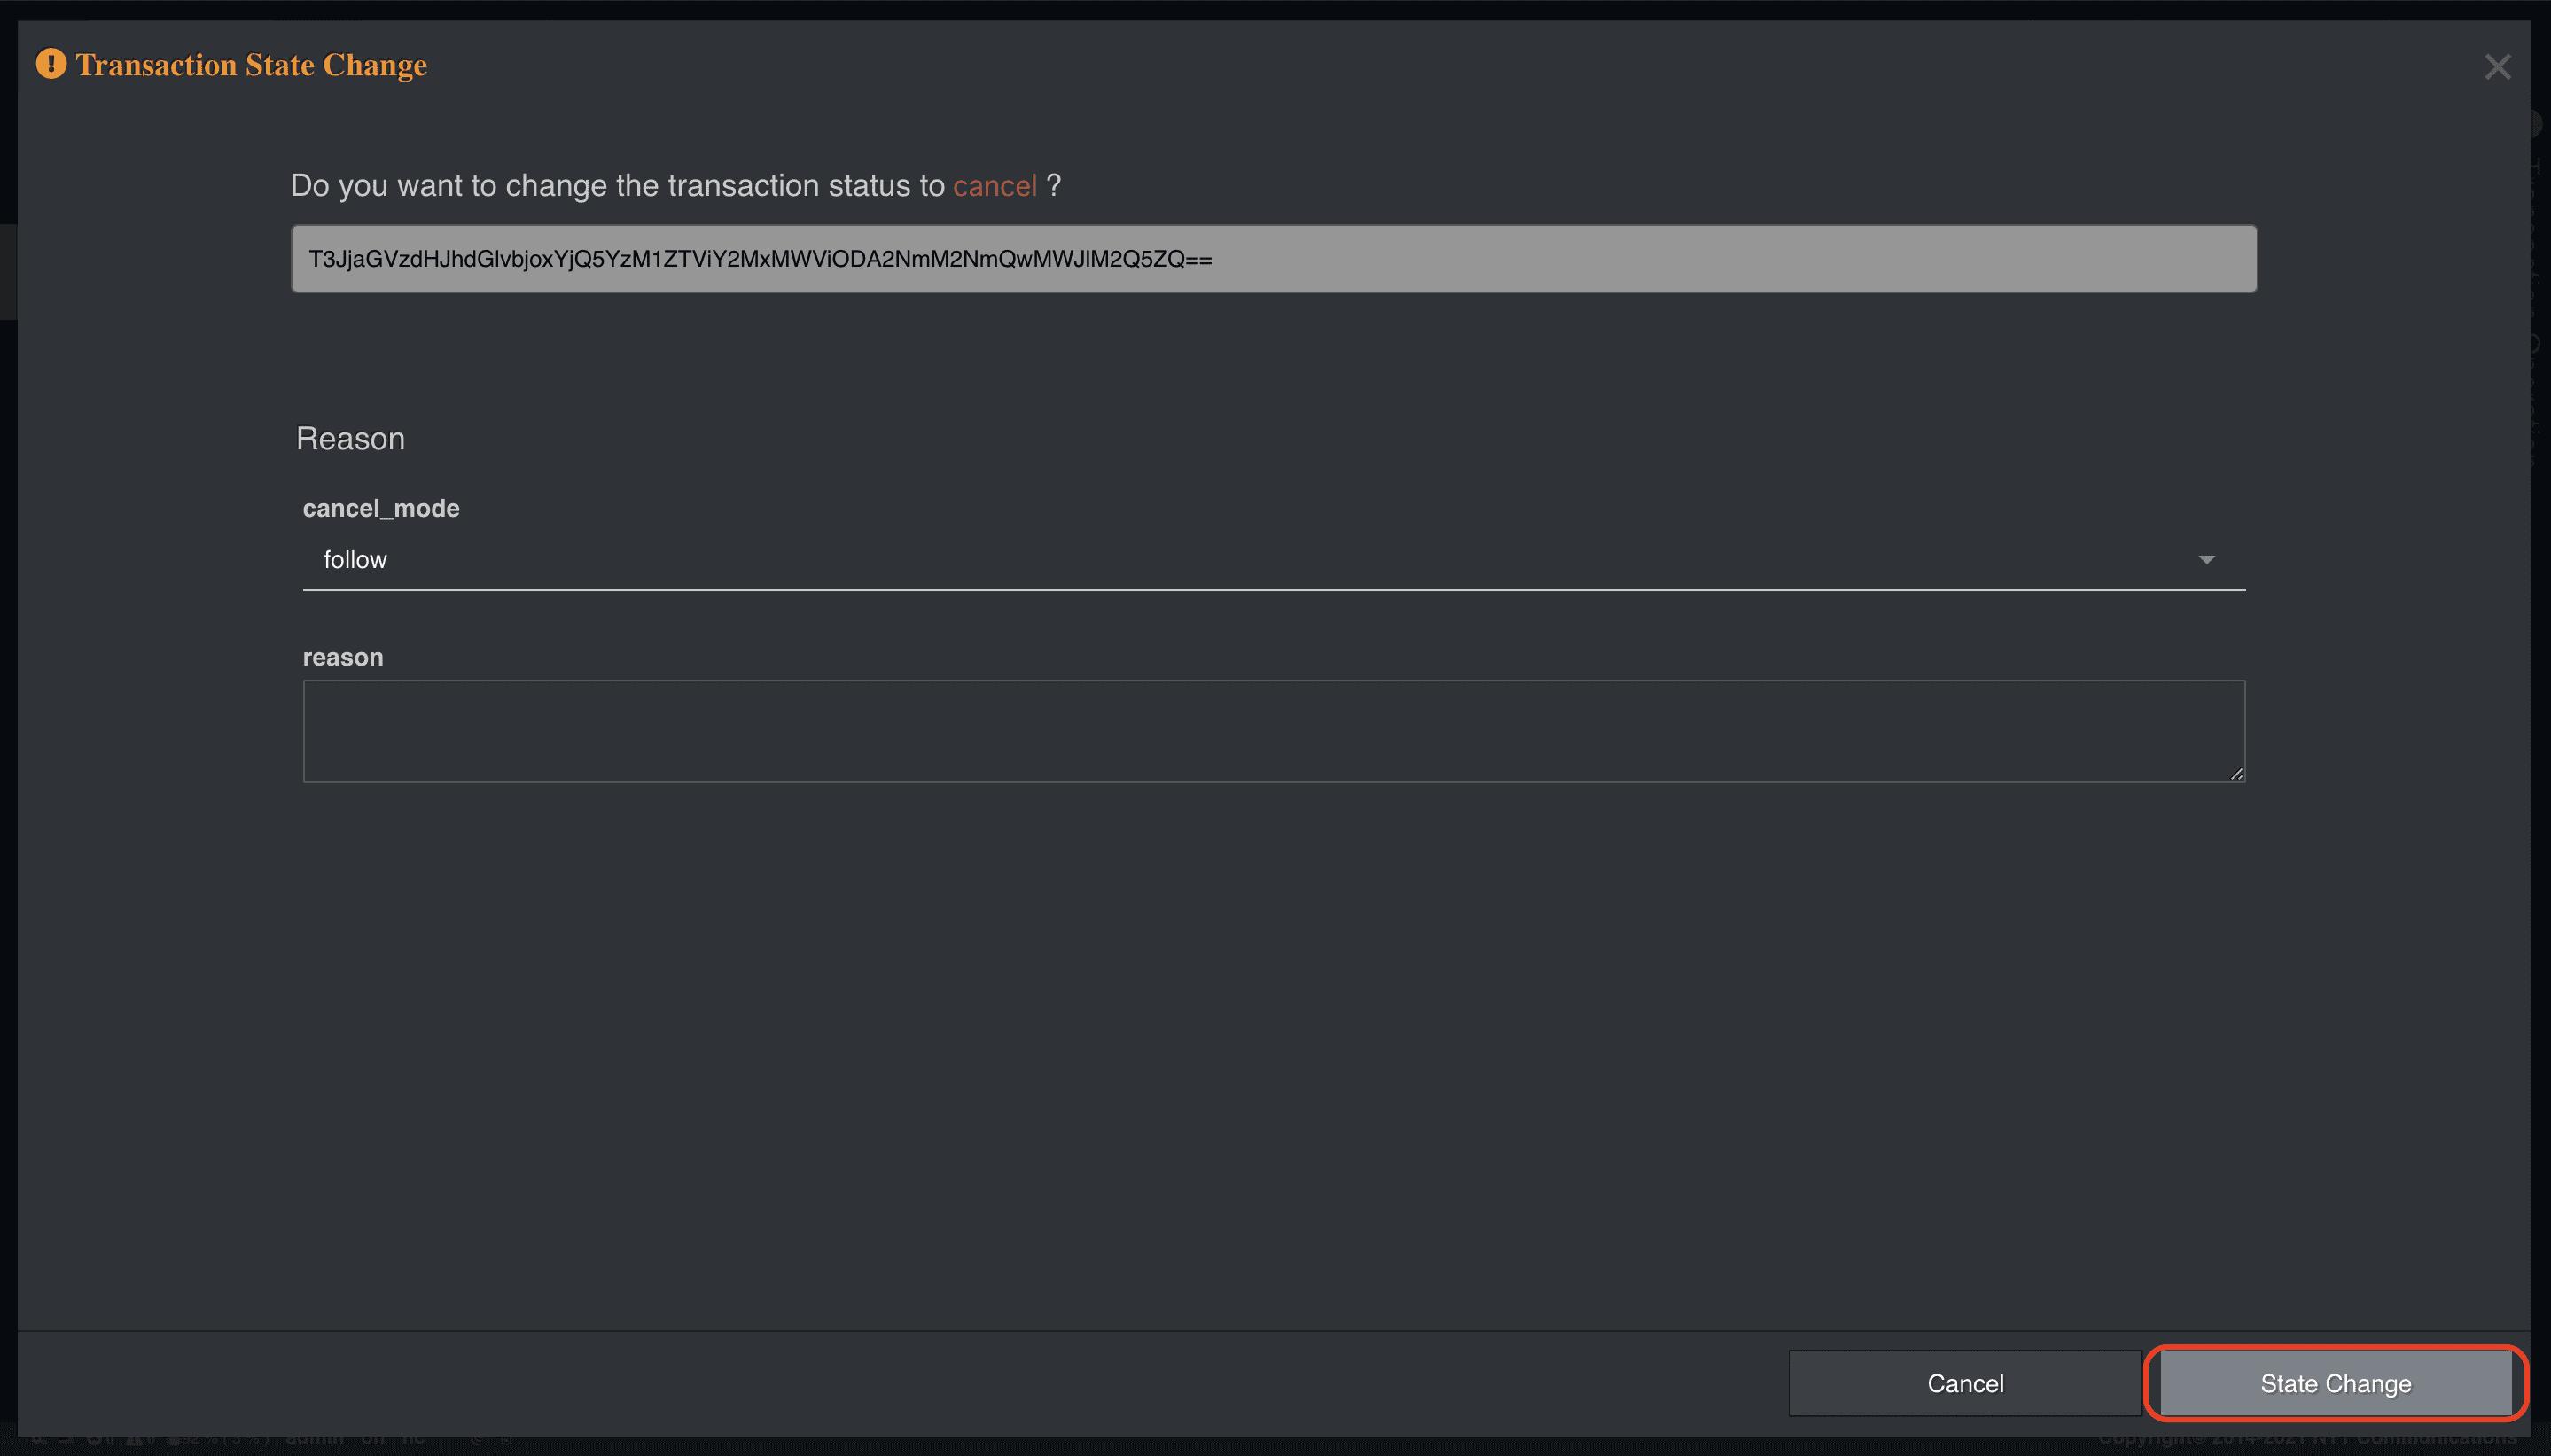
再度transactionsコマンドを打つと以下のようにトランザクションステータスがCancelledに変わり、SystemAもデータが削除されて、ロールバックされていることが確認できます。
Compound Transaction
本チュートリアルでは、複数のシナリオを連携させるユースケースを紹介します。
アプリケーションによっては、メインシナリオとサブシナリオに分割してそれぞれでトランザクション管理を行うような実装が必要になる特殊なケースがあります。
Qmonus SDKのTransactionサービスは、コミット時に任意のURLにコールバックを送信するオプションを提供しています。
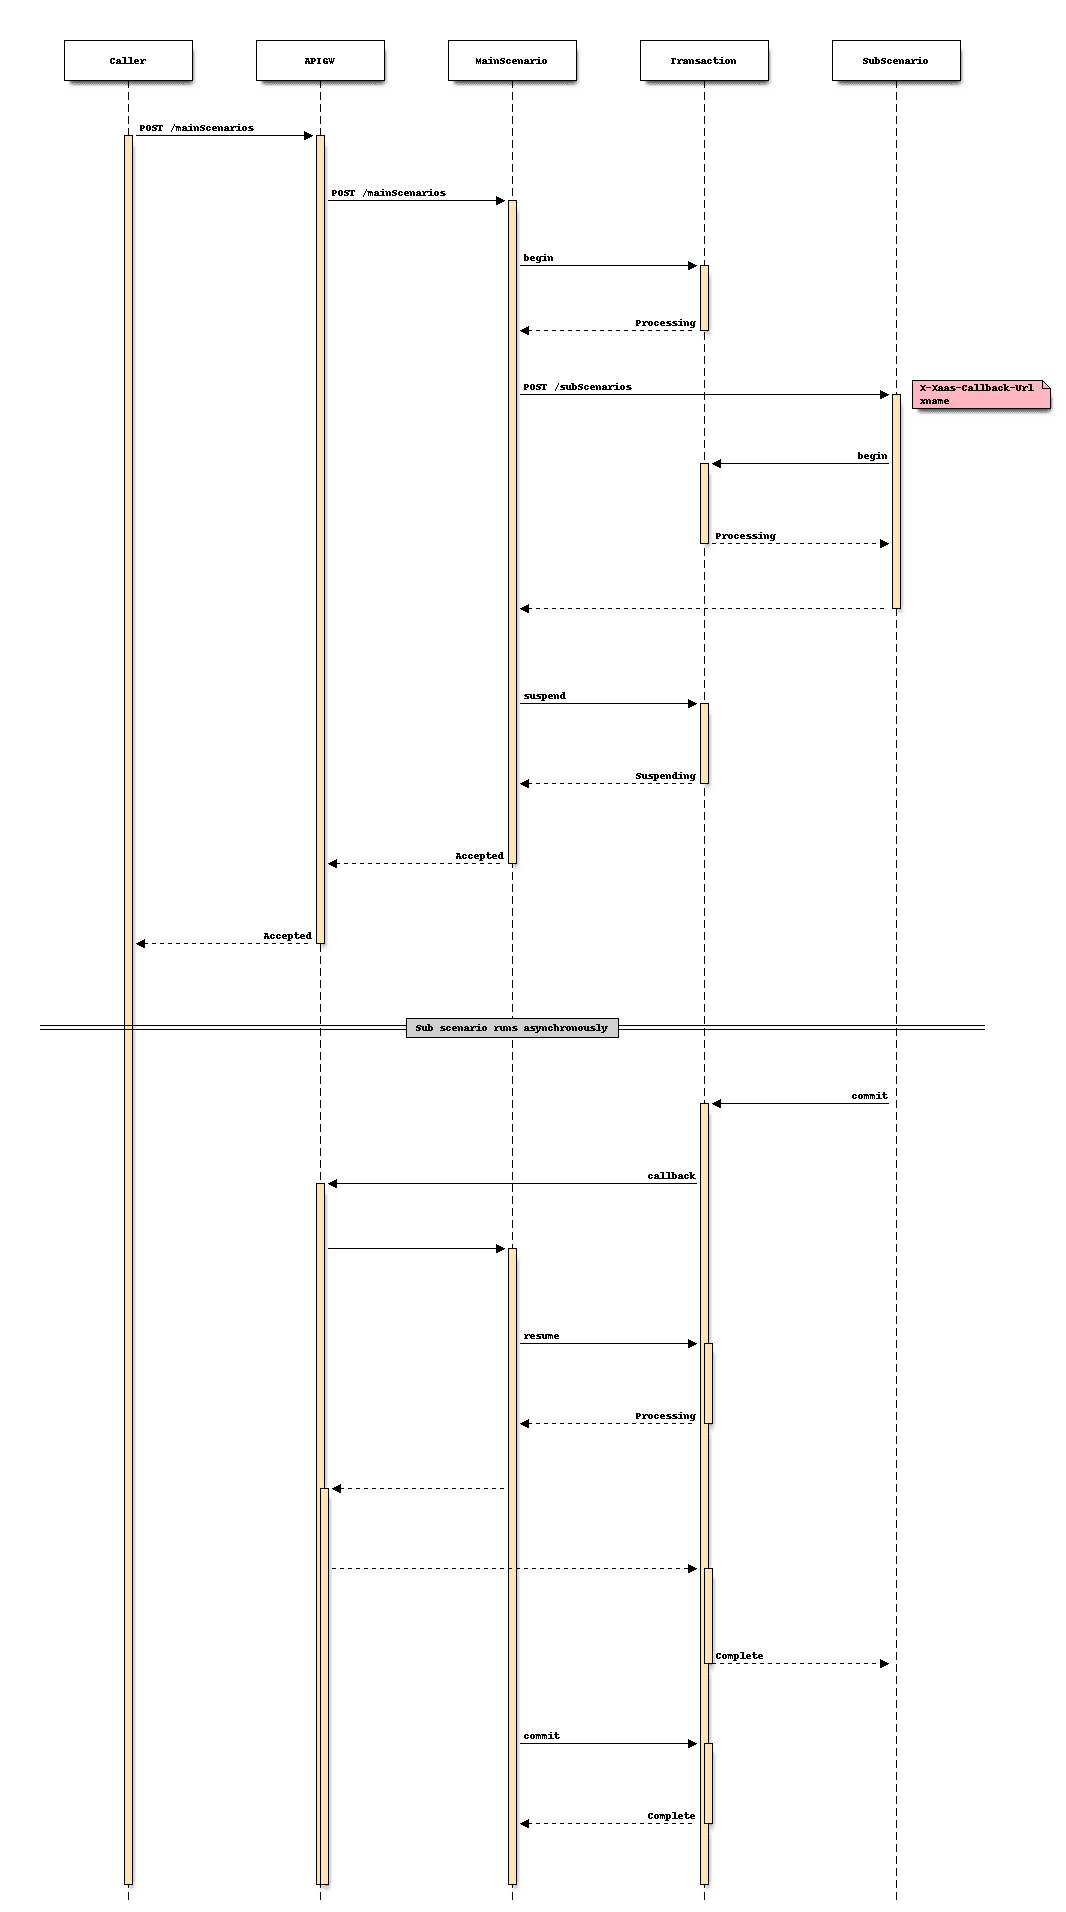
以下のシーケンスのように、メインシナリオにおけるトランザクションの途中でサブシナリオを呼び出し、メイントランザクションをサスペンドさせ、サブシナリオ側でのトランザクションコミットを待ち受けてコールバックが来たらメイントランザクションをレジュームさせて処理継続させるといった連携が可能になります。
事前準備
メインシナリオとサブシナリオの両方のトランザクション名を生成するカウンターを作成します。
yml
counter_name: sequenceNo
counter_type: number
counter_format: $
max_num: 999999
min_num: 1
padding: true
-
上記のカウンタファイル (.yaml) を用意する
-
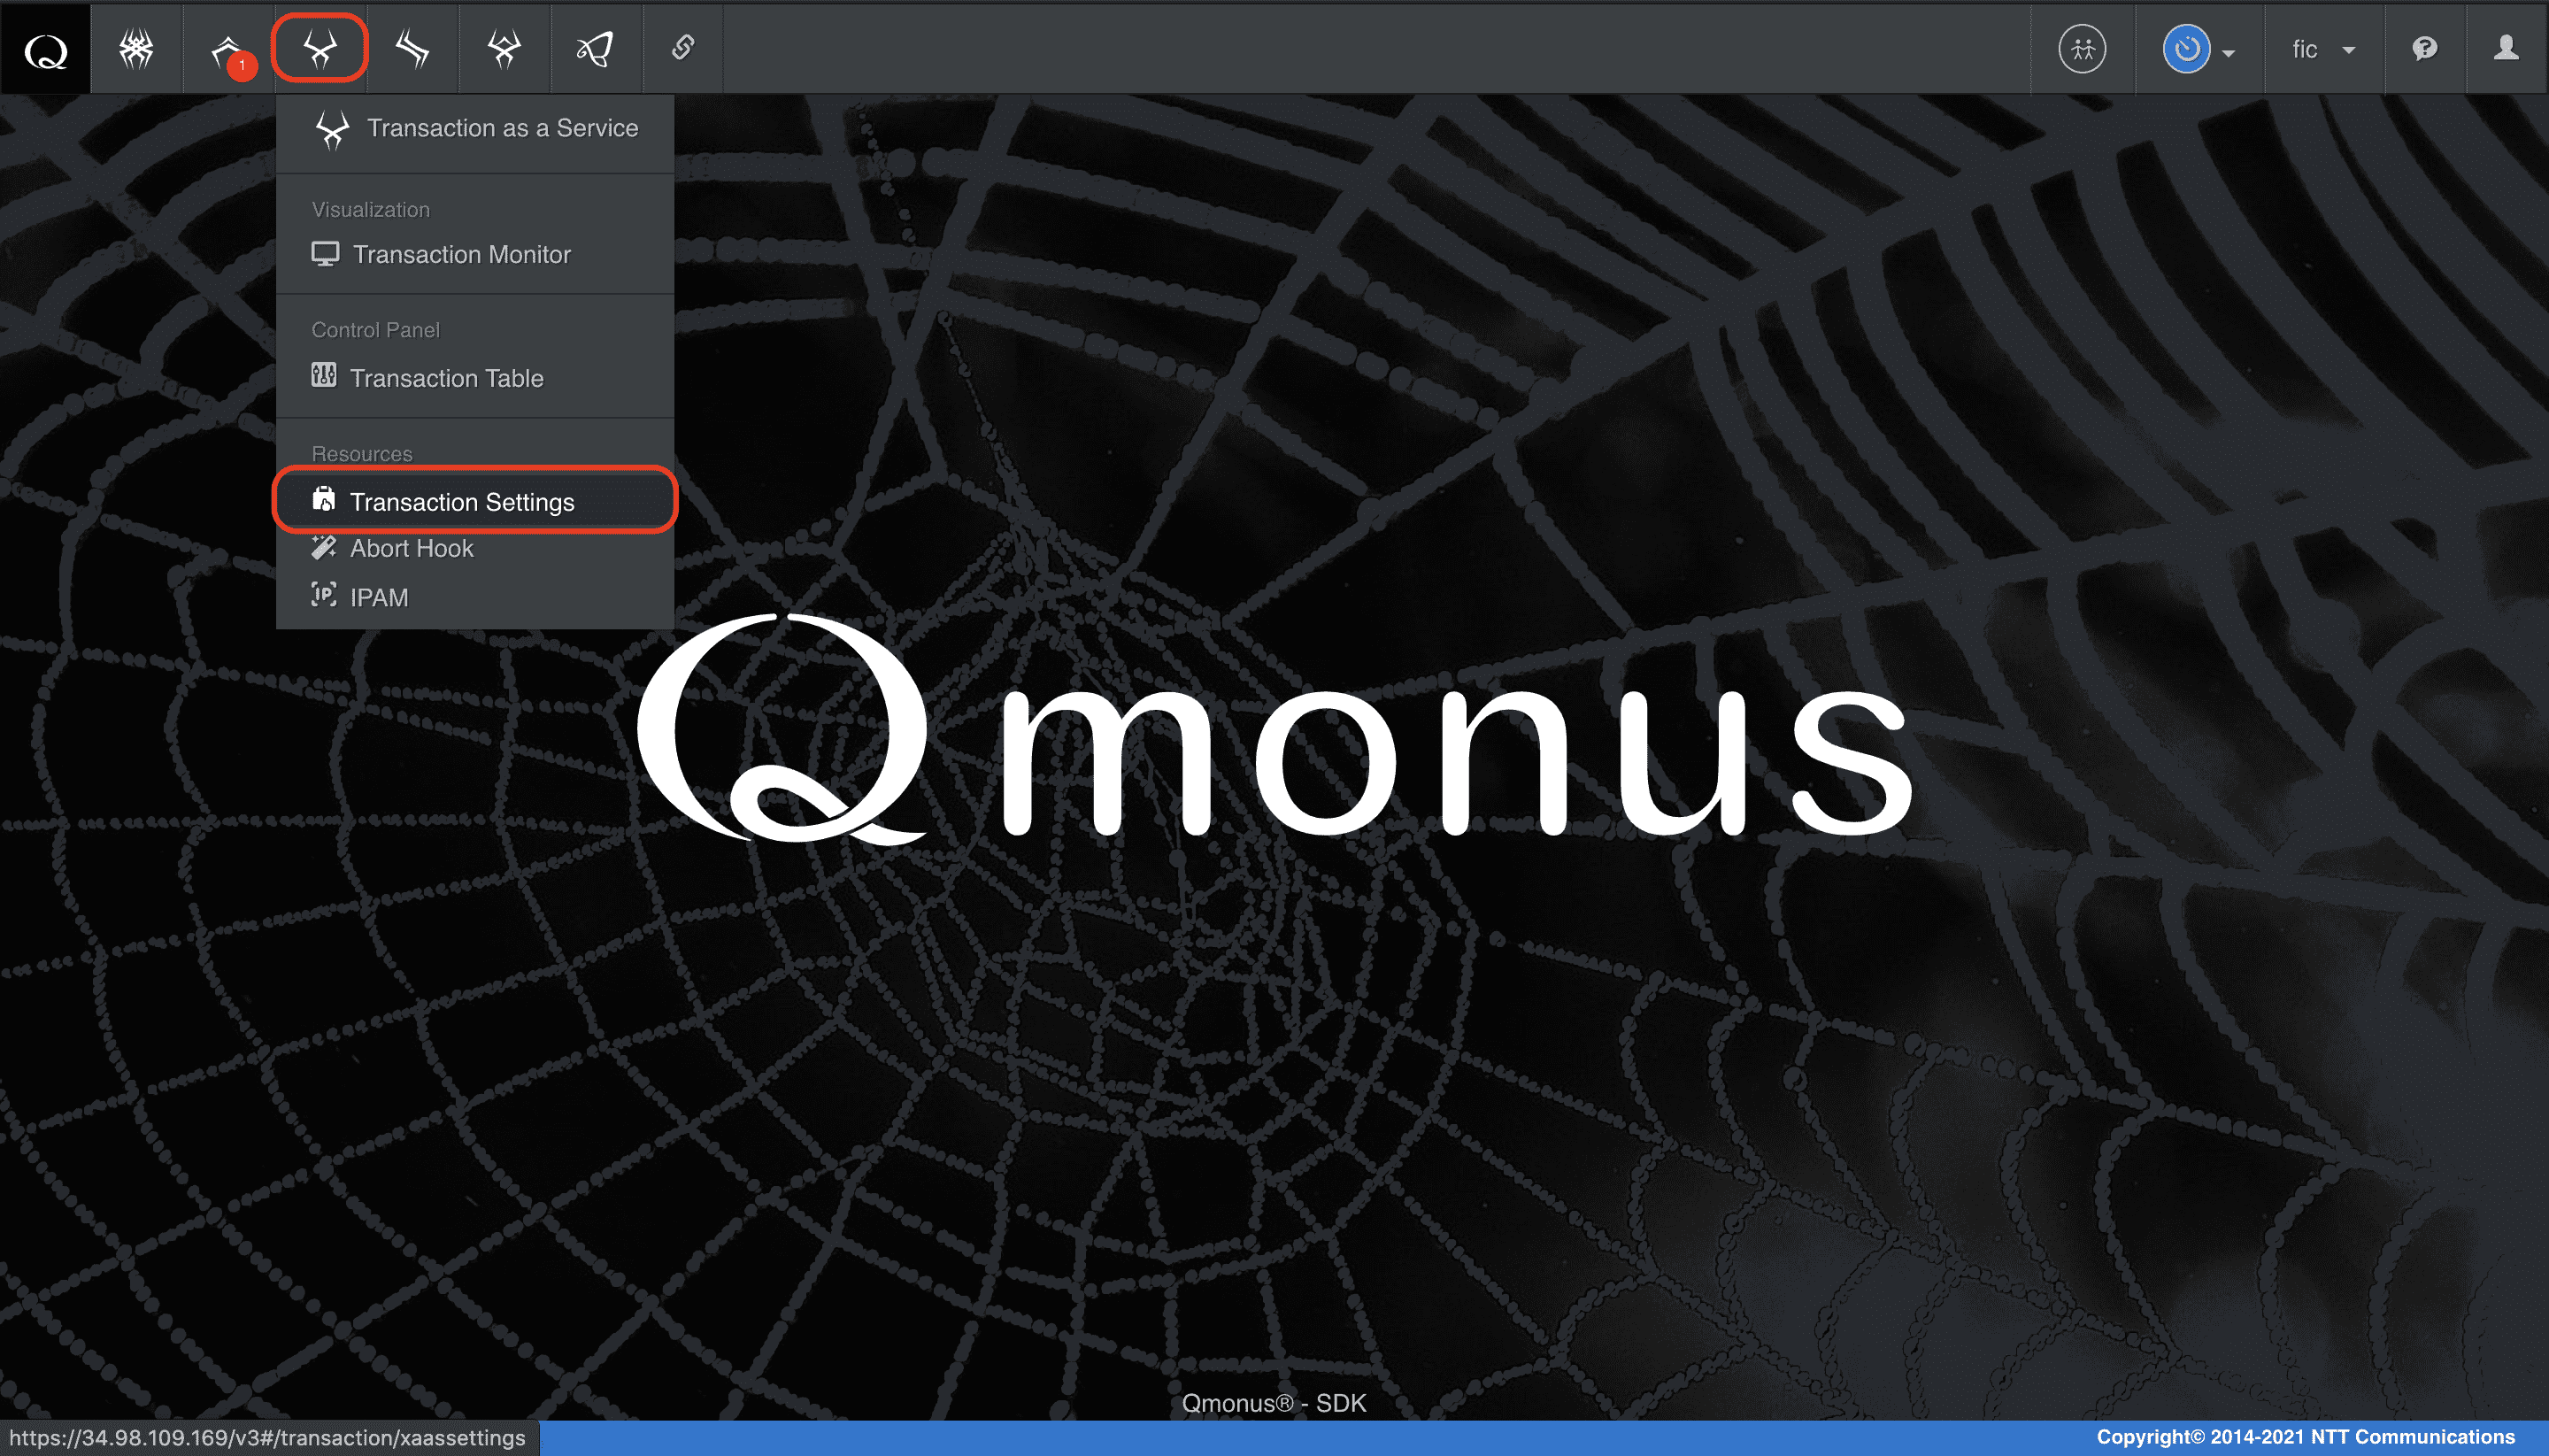
メインメニューから [Workflow Transaction as a Service] > [Transaction Settings] を選択
-
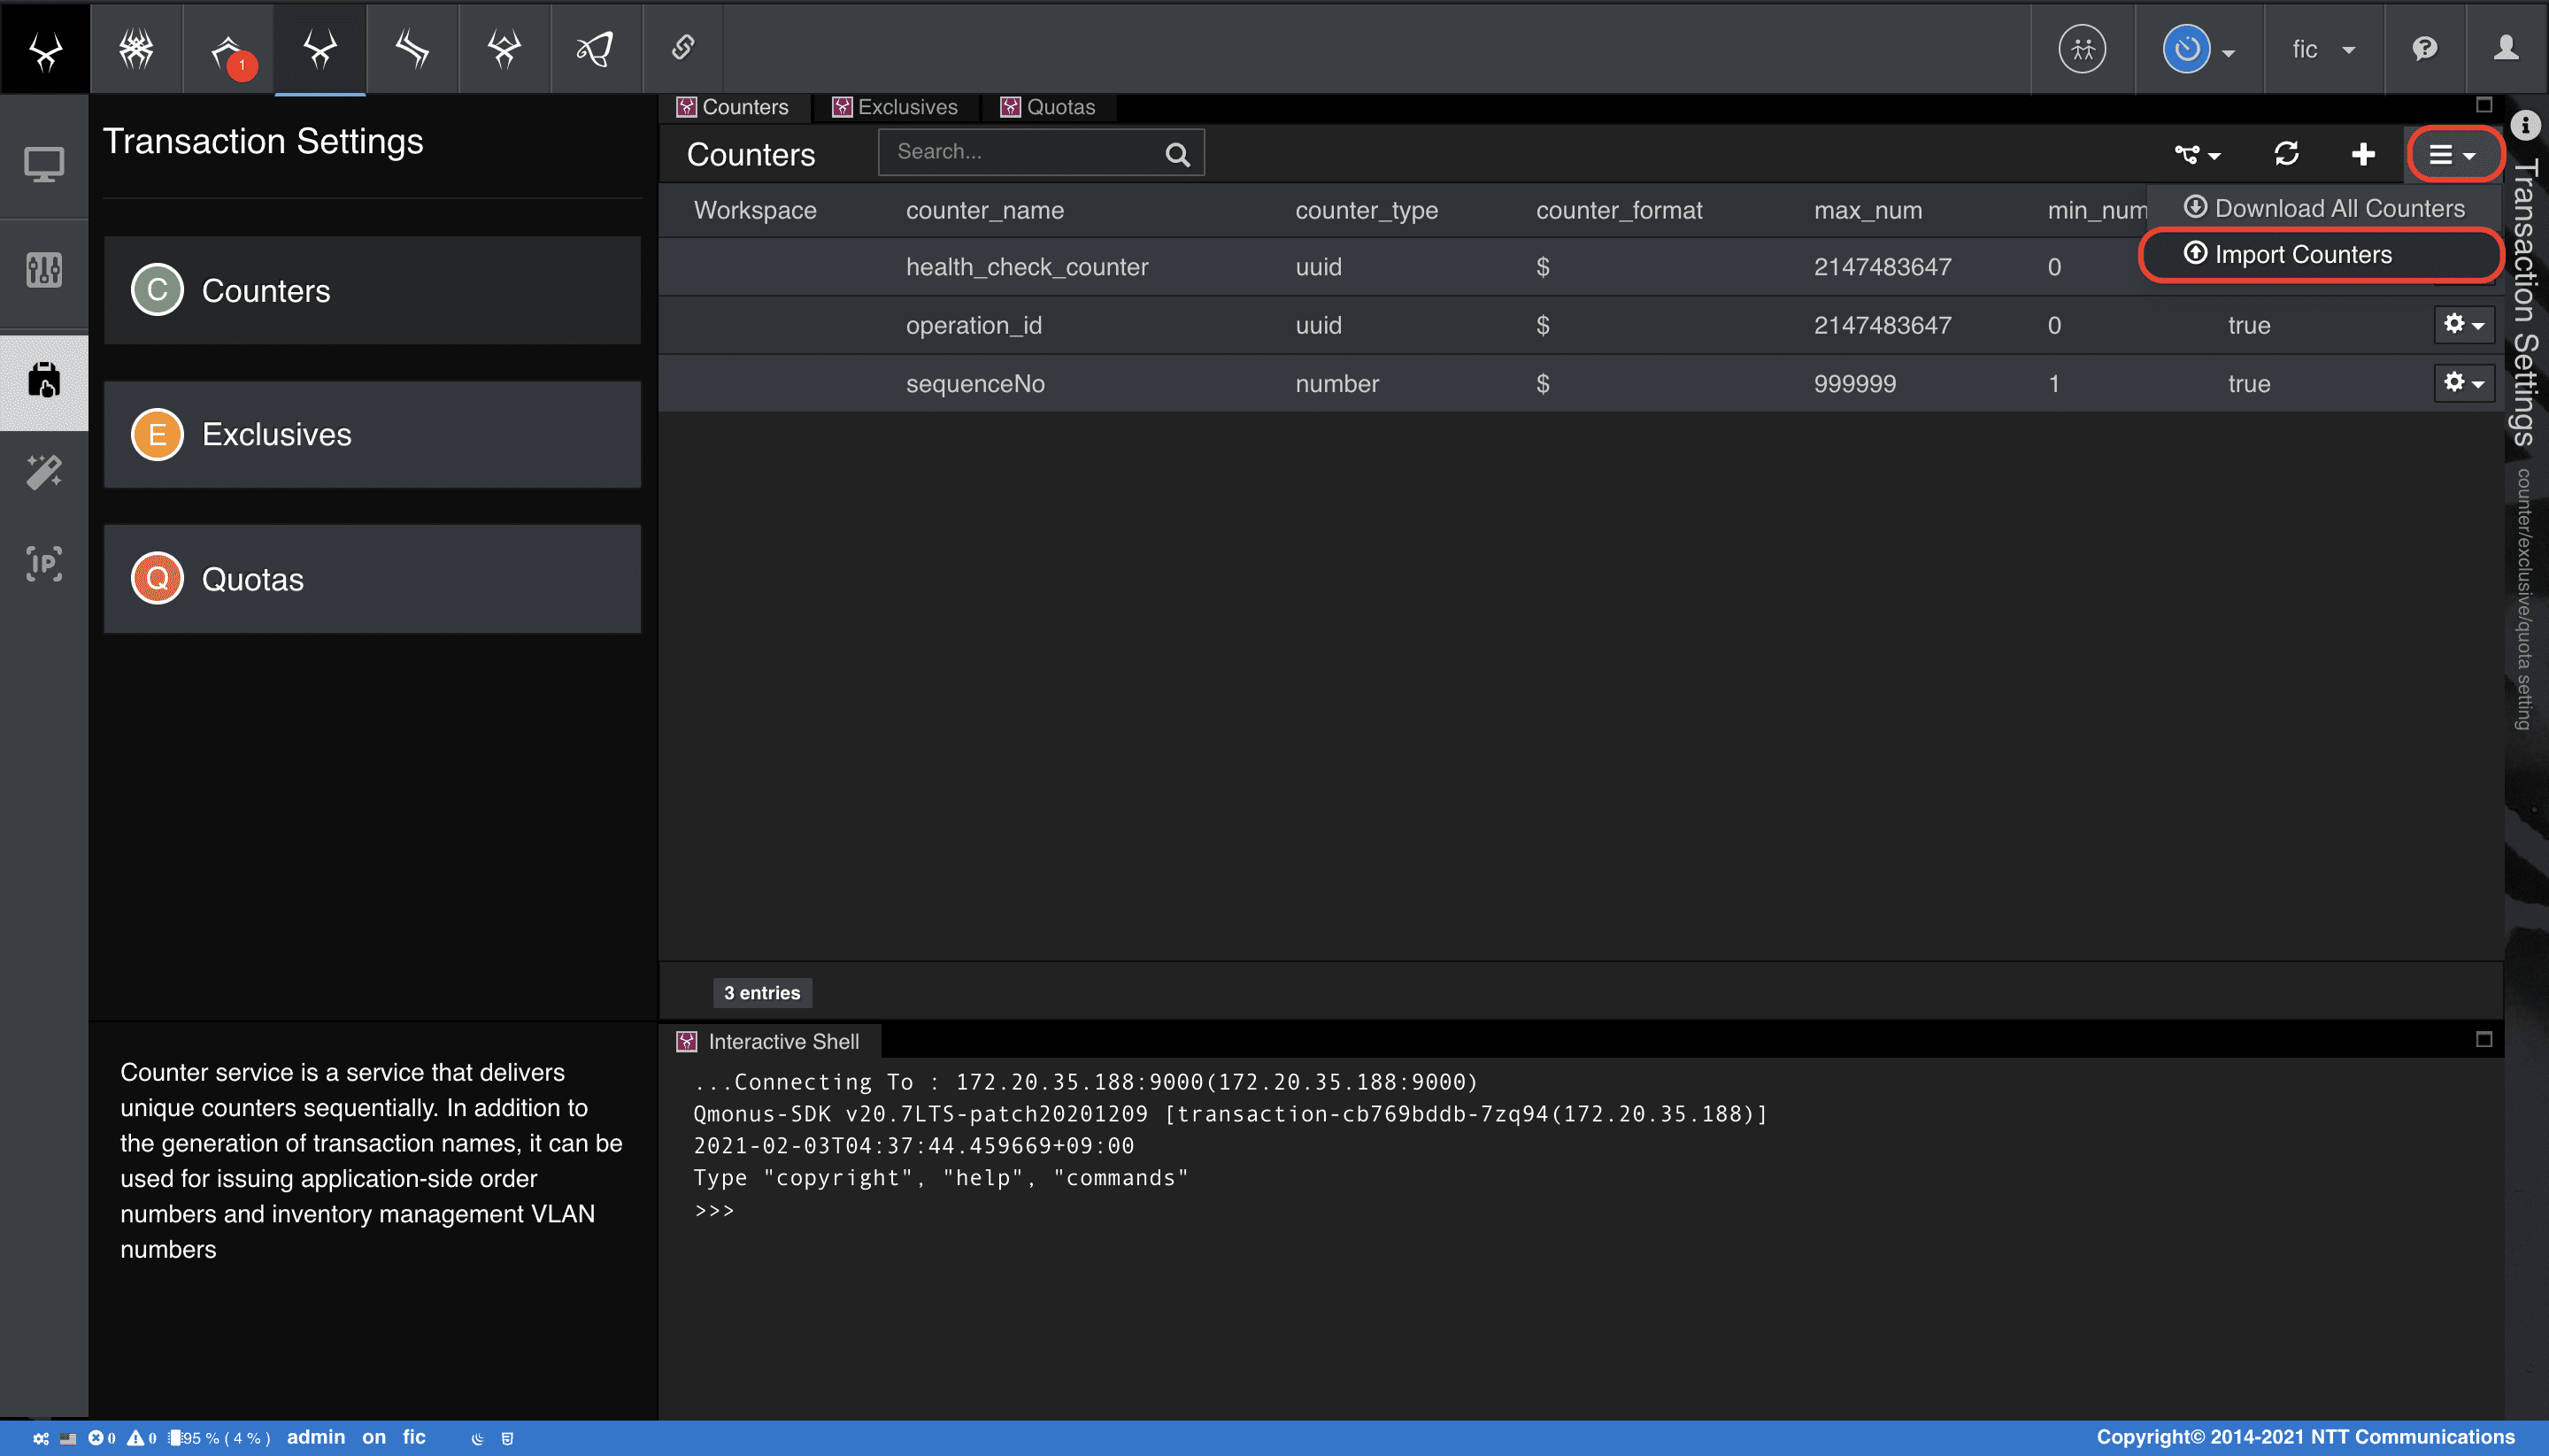
カウンタメニューの [Import Counters] を選択し、上記のファイルをインポート
メインシナリオの作成
メインシナリオでは、サブシナリオへの呼び出しとサブシナリオの処理結果待ち受けを行います。
サブシナリオの処理結果待ち受けは、serveブロックを使用する必要があります。
serveブロックは、コールバックを受け付ける任意のHTTPリクエストメソッドとHTTPリクエストパスを設定します。
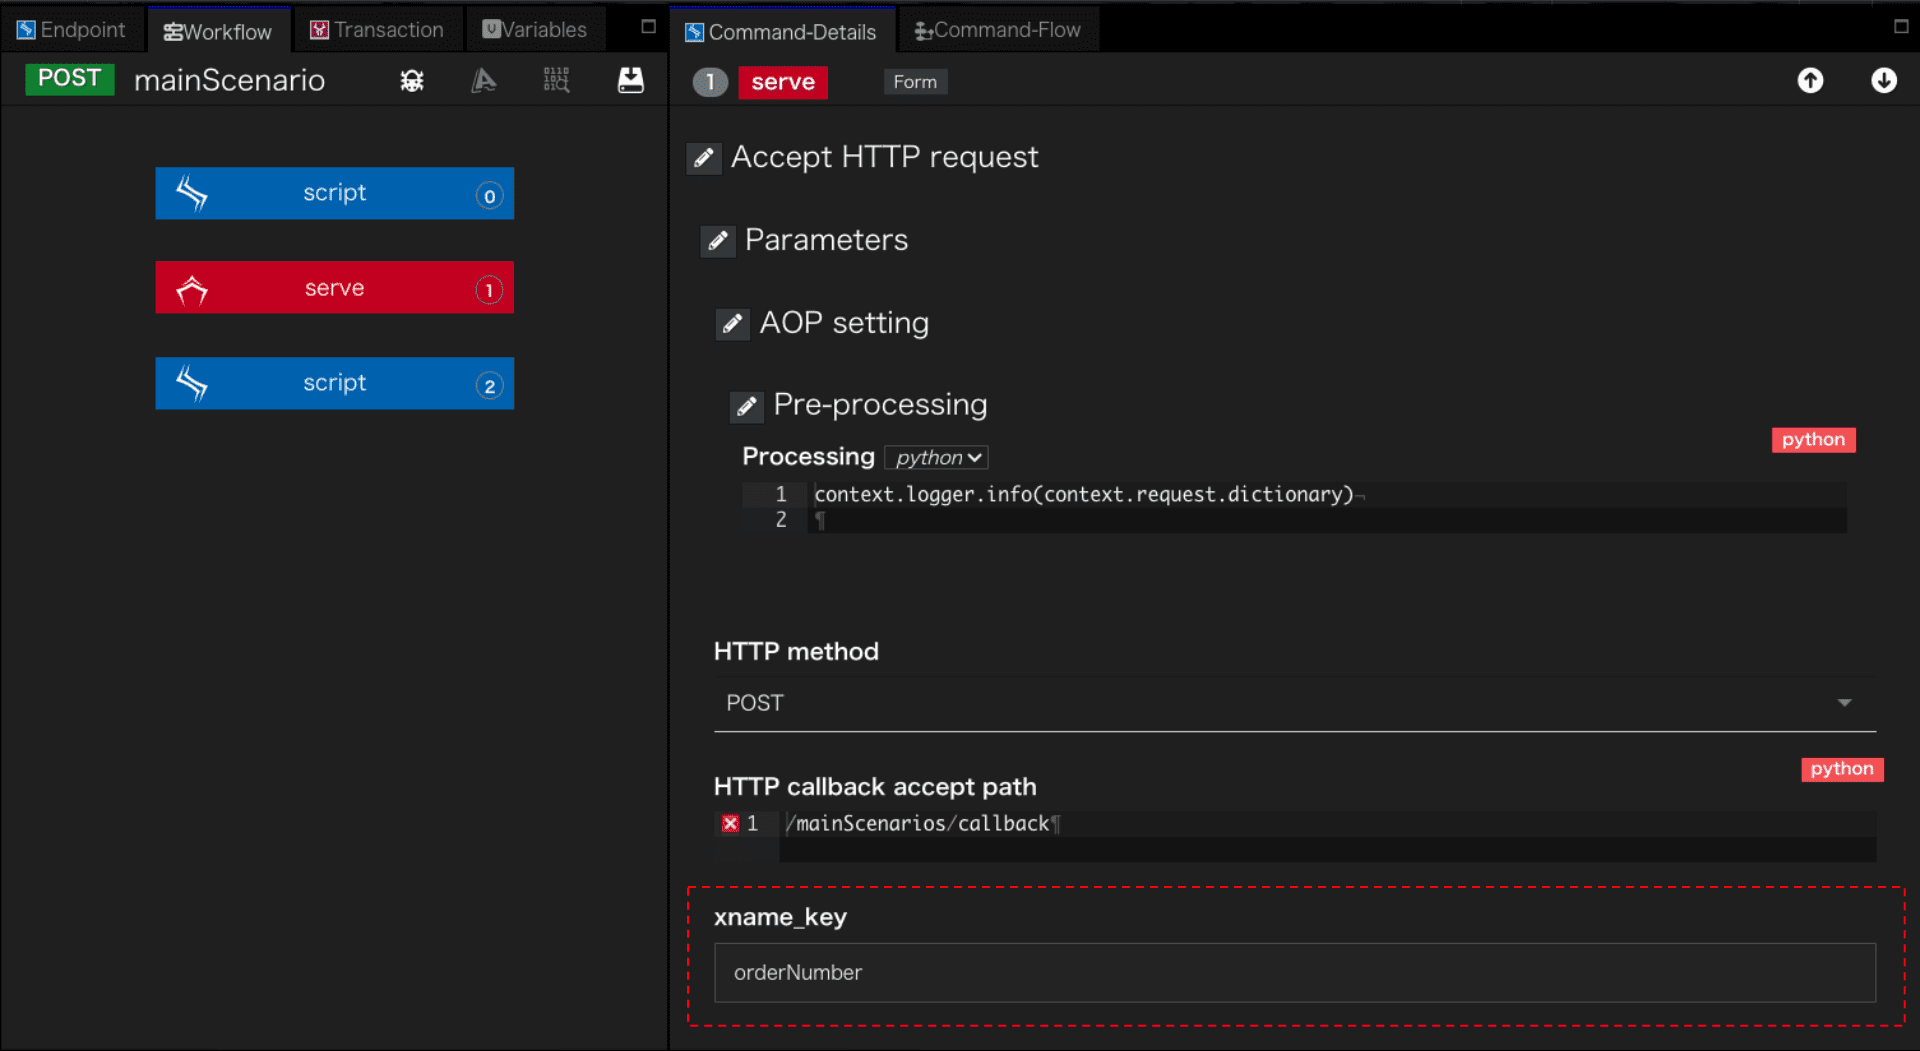
そして重要なのは、xname_keyです。
コールバックによってレジュームするトランザクションを特定するため、コールバック要求にはトランザクション名が含まれている必要があります。
コールバックを受信したserveブロックは、コールバック要求のリクエストボディーもしくはリクエストヘッダからxname_keyにマッチするキーをサーチしてその値をレジューム対象のトランザクション名と判断し、サスペンドしている該当トランザクションをロードしてシナリオのグローバルメモリを復元し、処理を再開します。
今回メインシナリオのserveブロックでは、xname_keyにorderNumberを設定しています。
これは、サブシナリオが完了し、トランザクションサーバからのコールバック要求のボディーにorderNumberというキーで自身のトランザクション名が格納されているという前提に基づく設定です。
ここでは、メインシナリオからサブシナリオのHTTP呼び出し要求ボディーにメインシナリオのトランザクション名をセットしておきます。
また、serveブロックの待ち受けは、POST /mainScenarios/callbackをセットしておきます。
ここで紹介しているコールバック連携は、Qmonus SDKのシナリオ相互だけの利用ではなく、異なるシステムとのインタラクションにおいてコールバック連携するケースにも対応できます。Qmonus SDKの外界との連携データには必ずその要求を一意に識別する情報が存在するため、その情報からトランザクションを特定できるように設計することでコールバック連携が可能になります。
以下のyaml定義でメインシナリオを作成してください。
メインシナリオ ダウンロード
python
category: Tutorial
name: mainScenario
uri: /mainScenarios
method: POST
commands:
  - command: script
    kwargs:
      code: |-
        context.logger.info("Start Main")
        response = await callout(path="/subScenarios", method="POST", body={"orderNumber": context.qmonus.xname})
  - command: serve
    kwargs:
      path: /mainScenarios/callback
      method: POST
      xname_key: orderNumber
      aspect_options:
        pre:
          process: context.logger.info(context.request.dictionary)
  - command: script
    kwargs:
      code: context.logger.info("End Main")
request_timeout: 60
connect_timeout: 60
spec:
  response:
    normal:
      codes:
        - 200
transaction:
  enable: true
  async: true
  xname_use_counter: true
  auto_begin: true
  auto_response: true
  xname: sequenceNo
  xdomain: Tutorial
  xtype: main
additional_paths: []
routing_auto_generation_mode: true
global_variables: {}
variable_groups: []
routing_options:
  scope: local
-
上記の
メインシナリオファイルを用意する -
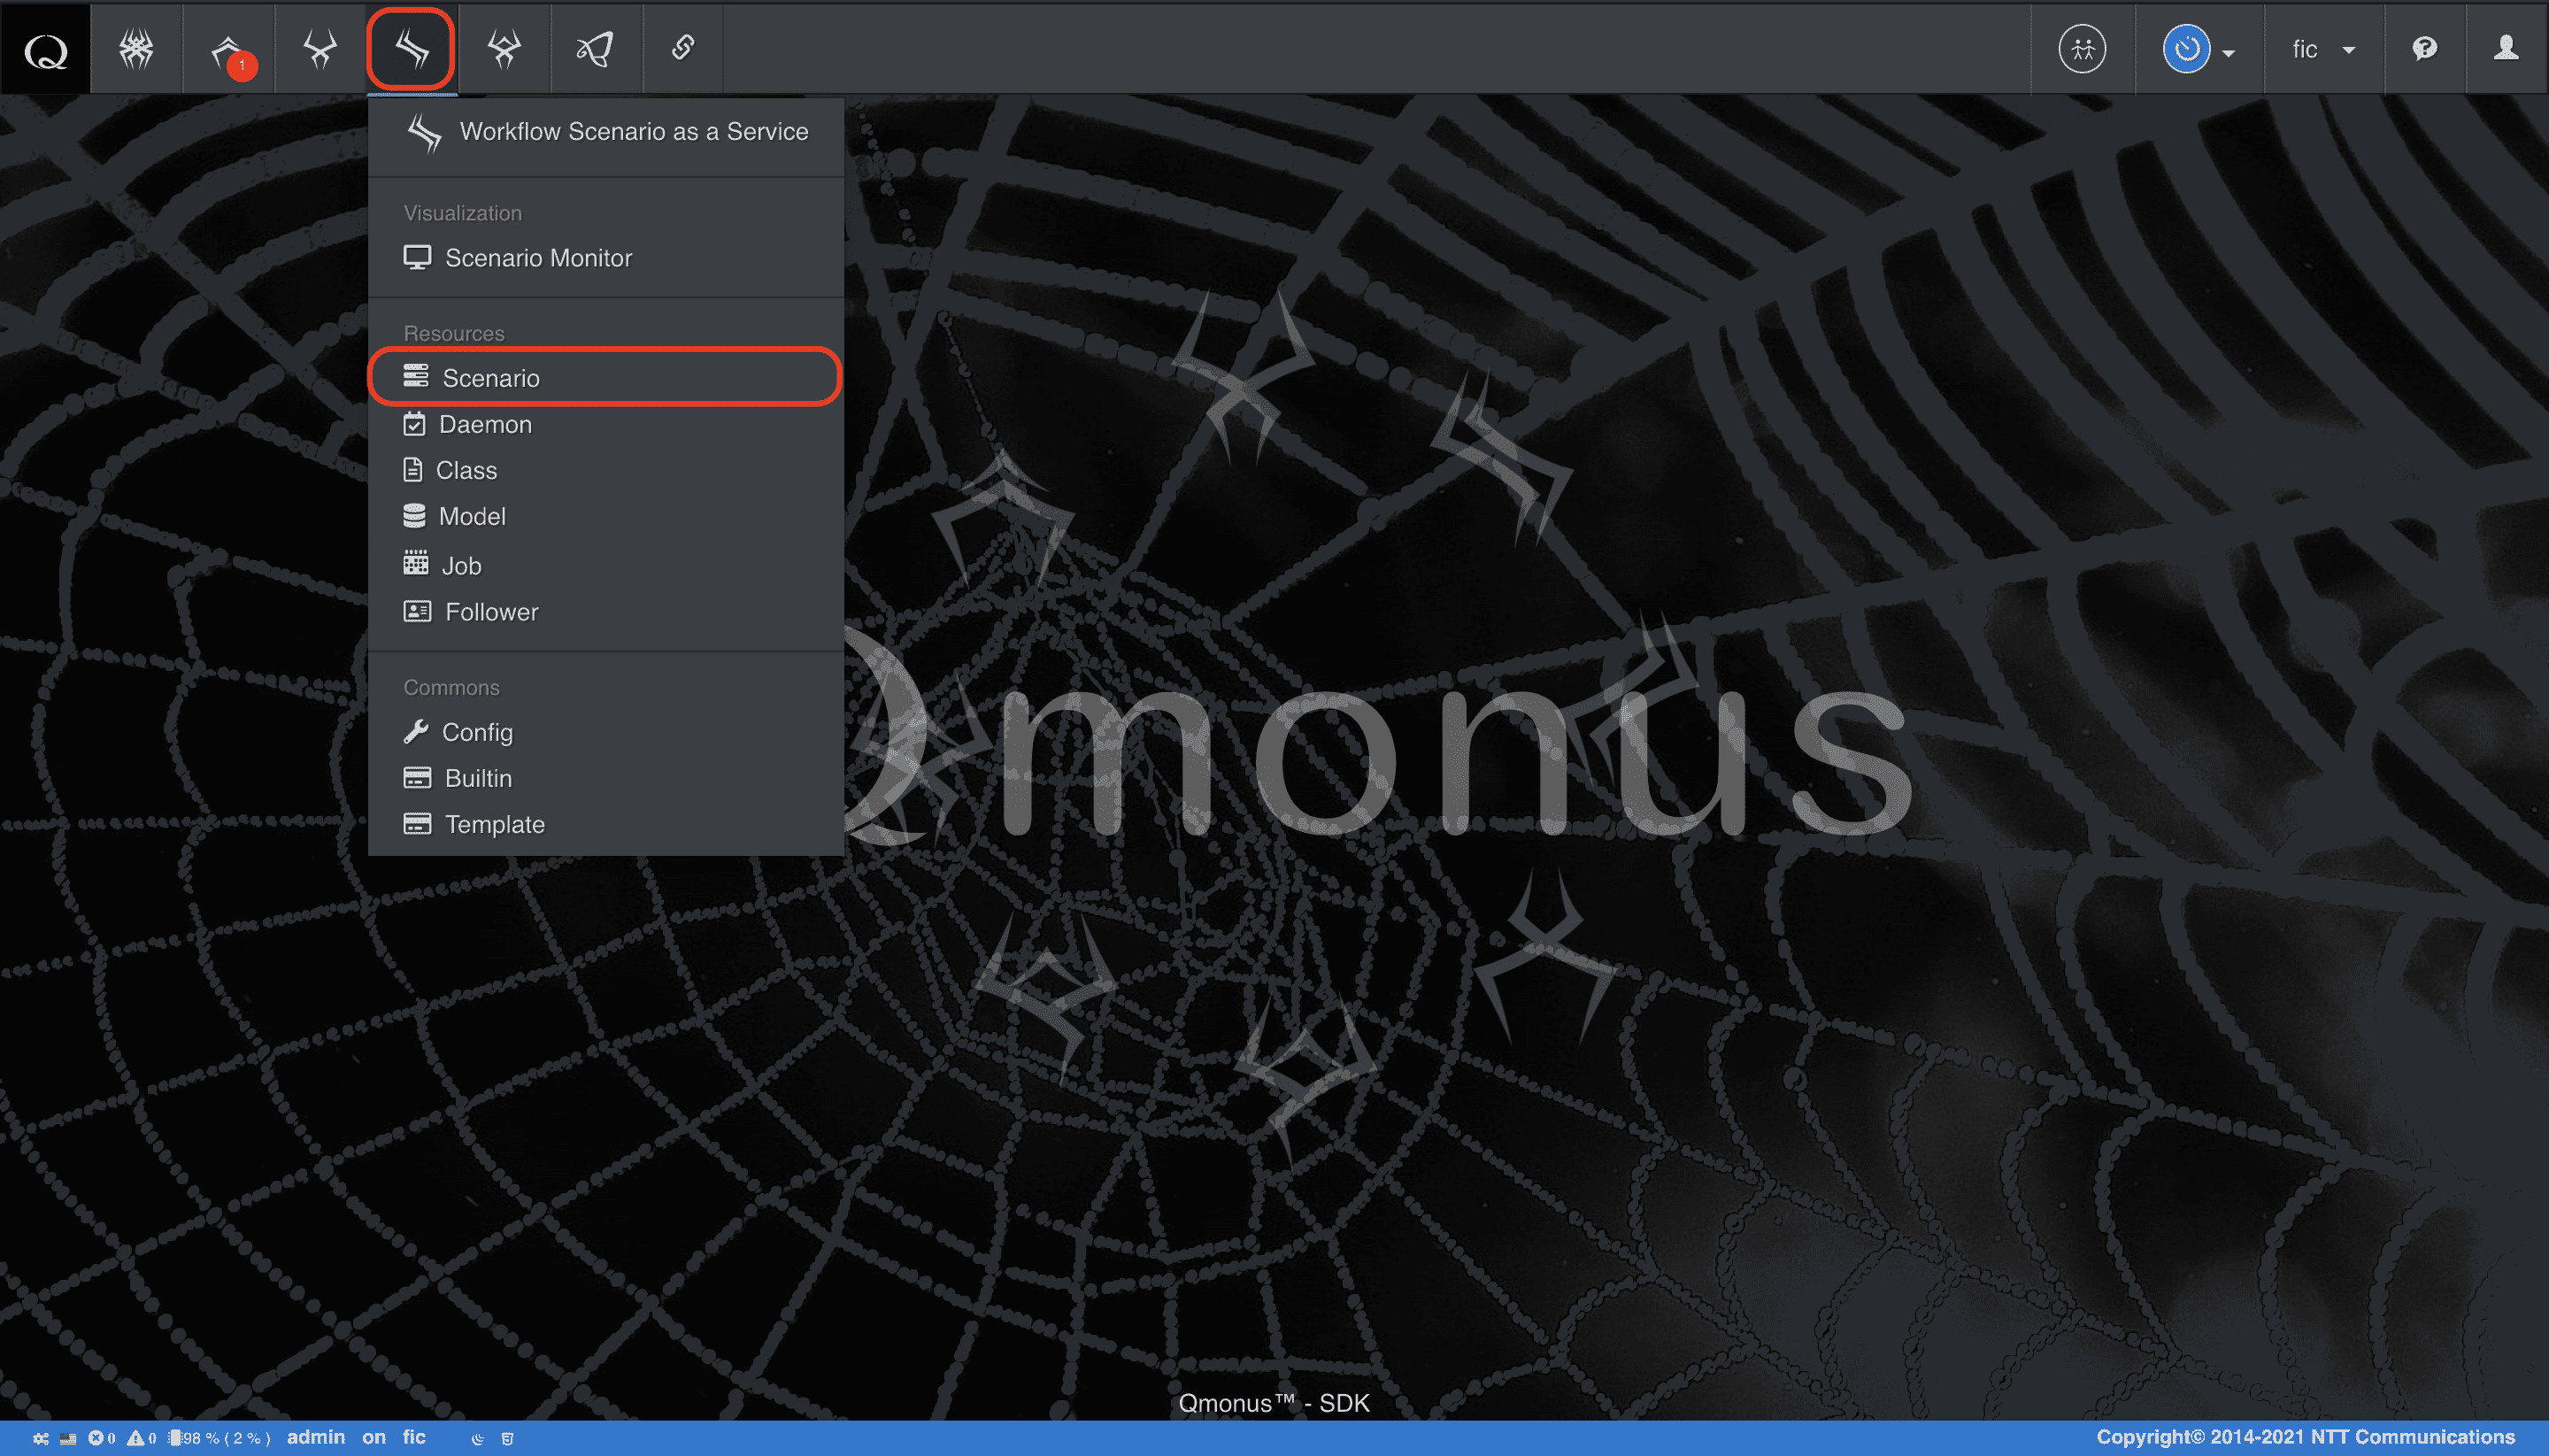
メインメニューから [Workflow Scenario as a Service] > [Scenario] を選択
-
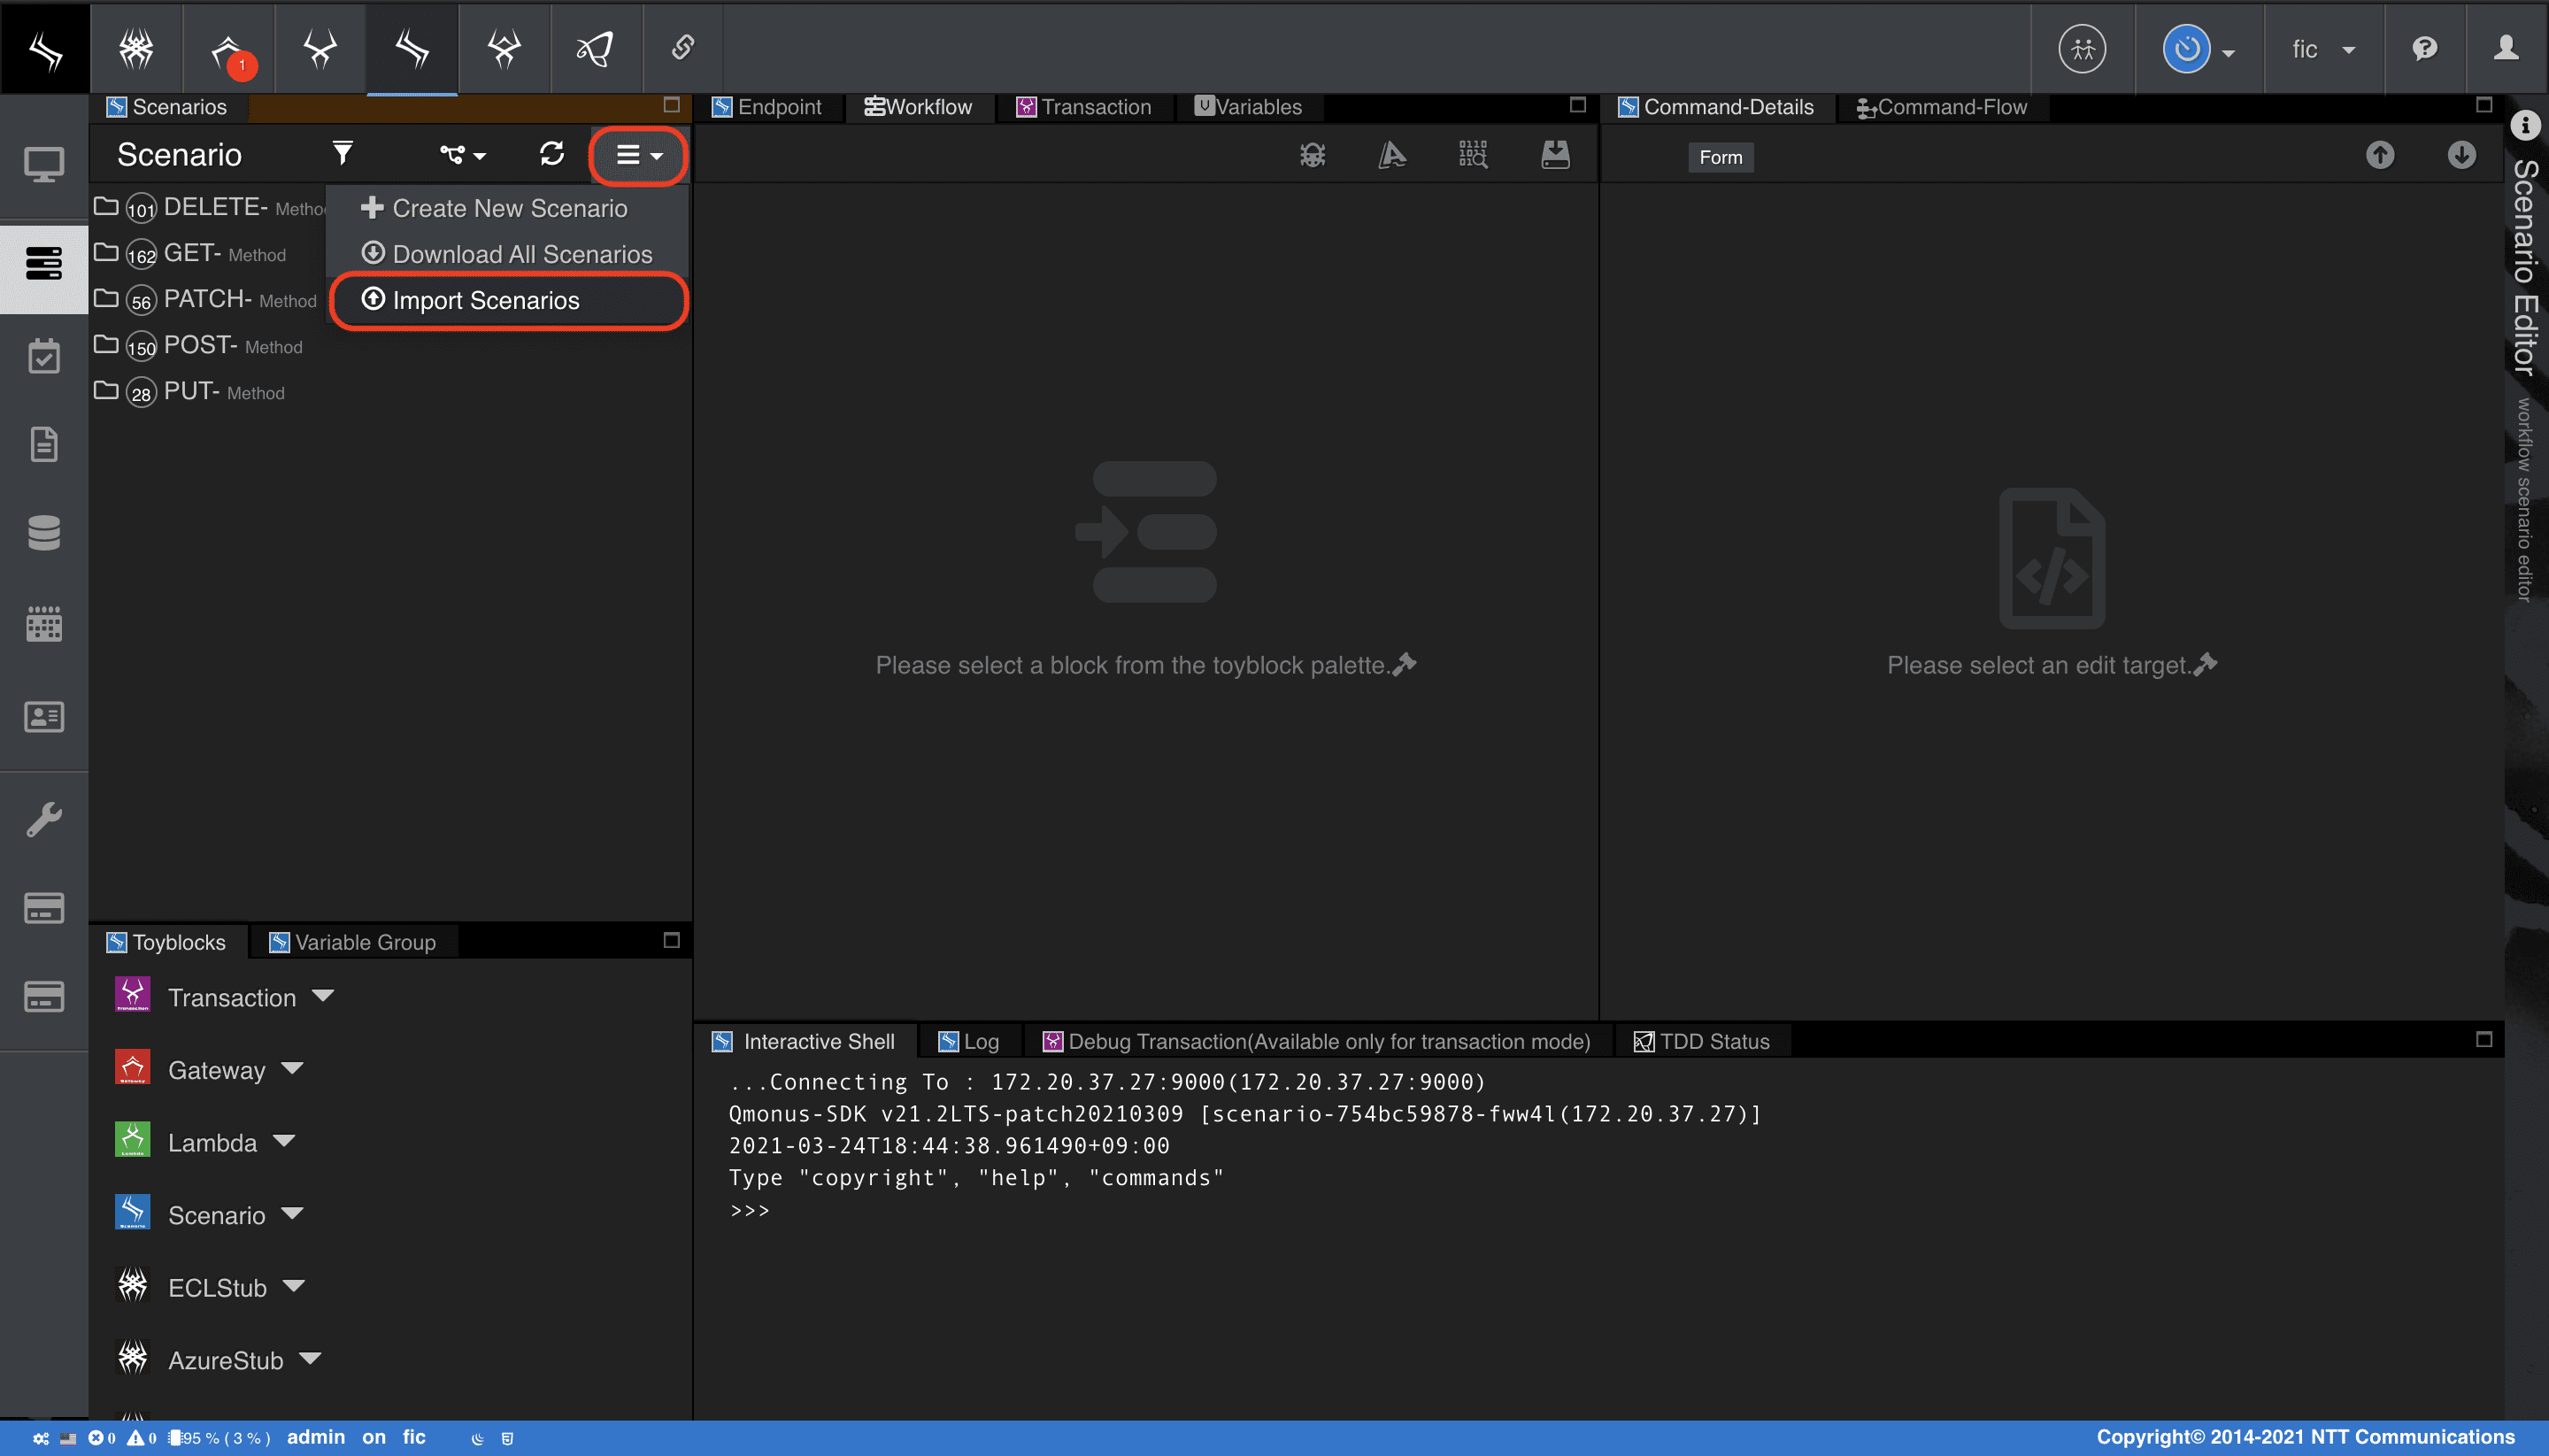
シナリオメニューの [Import Scenarios] を選択
-
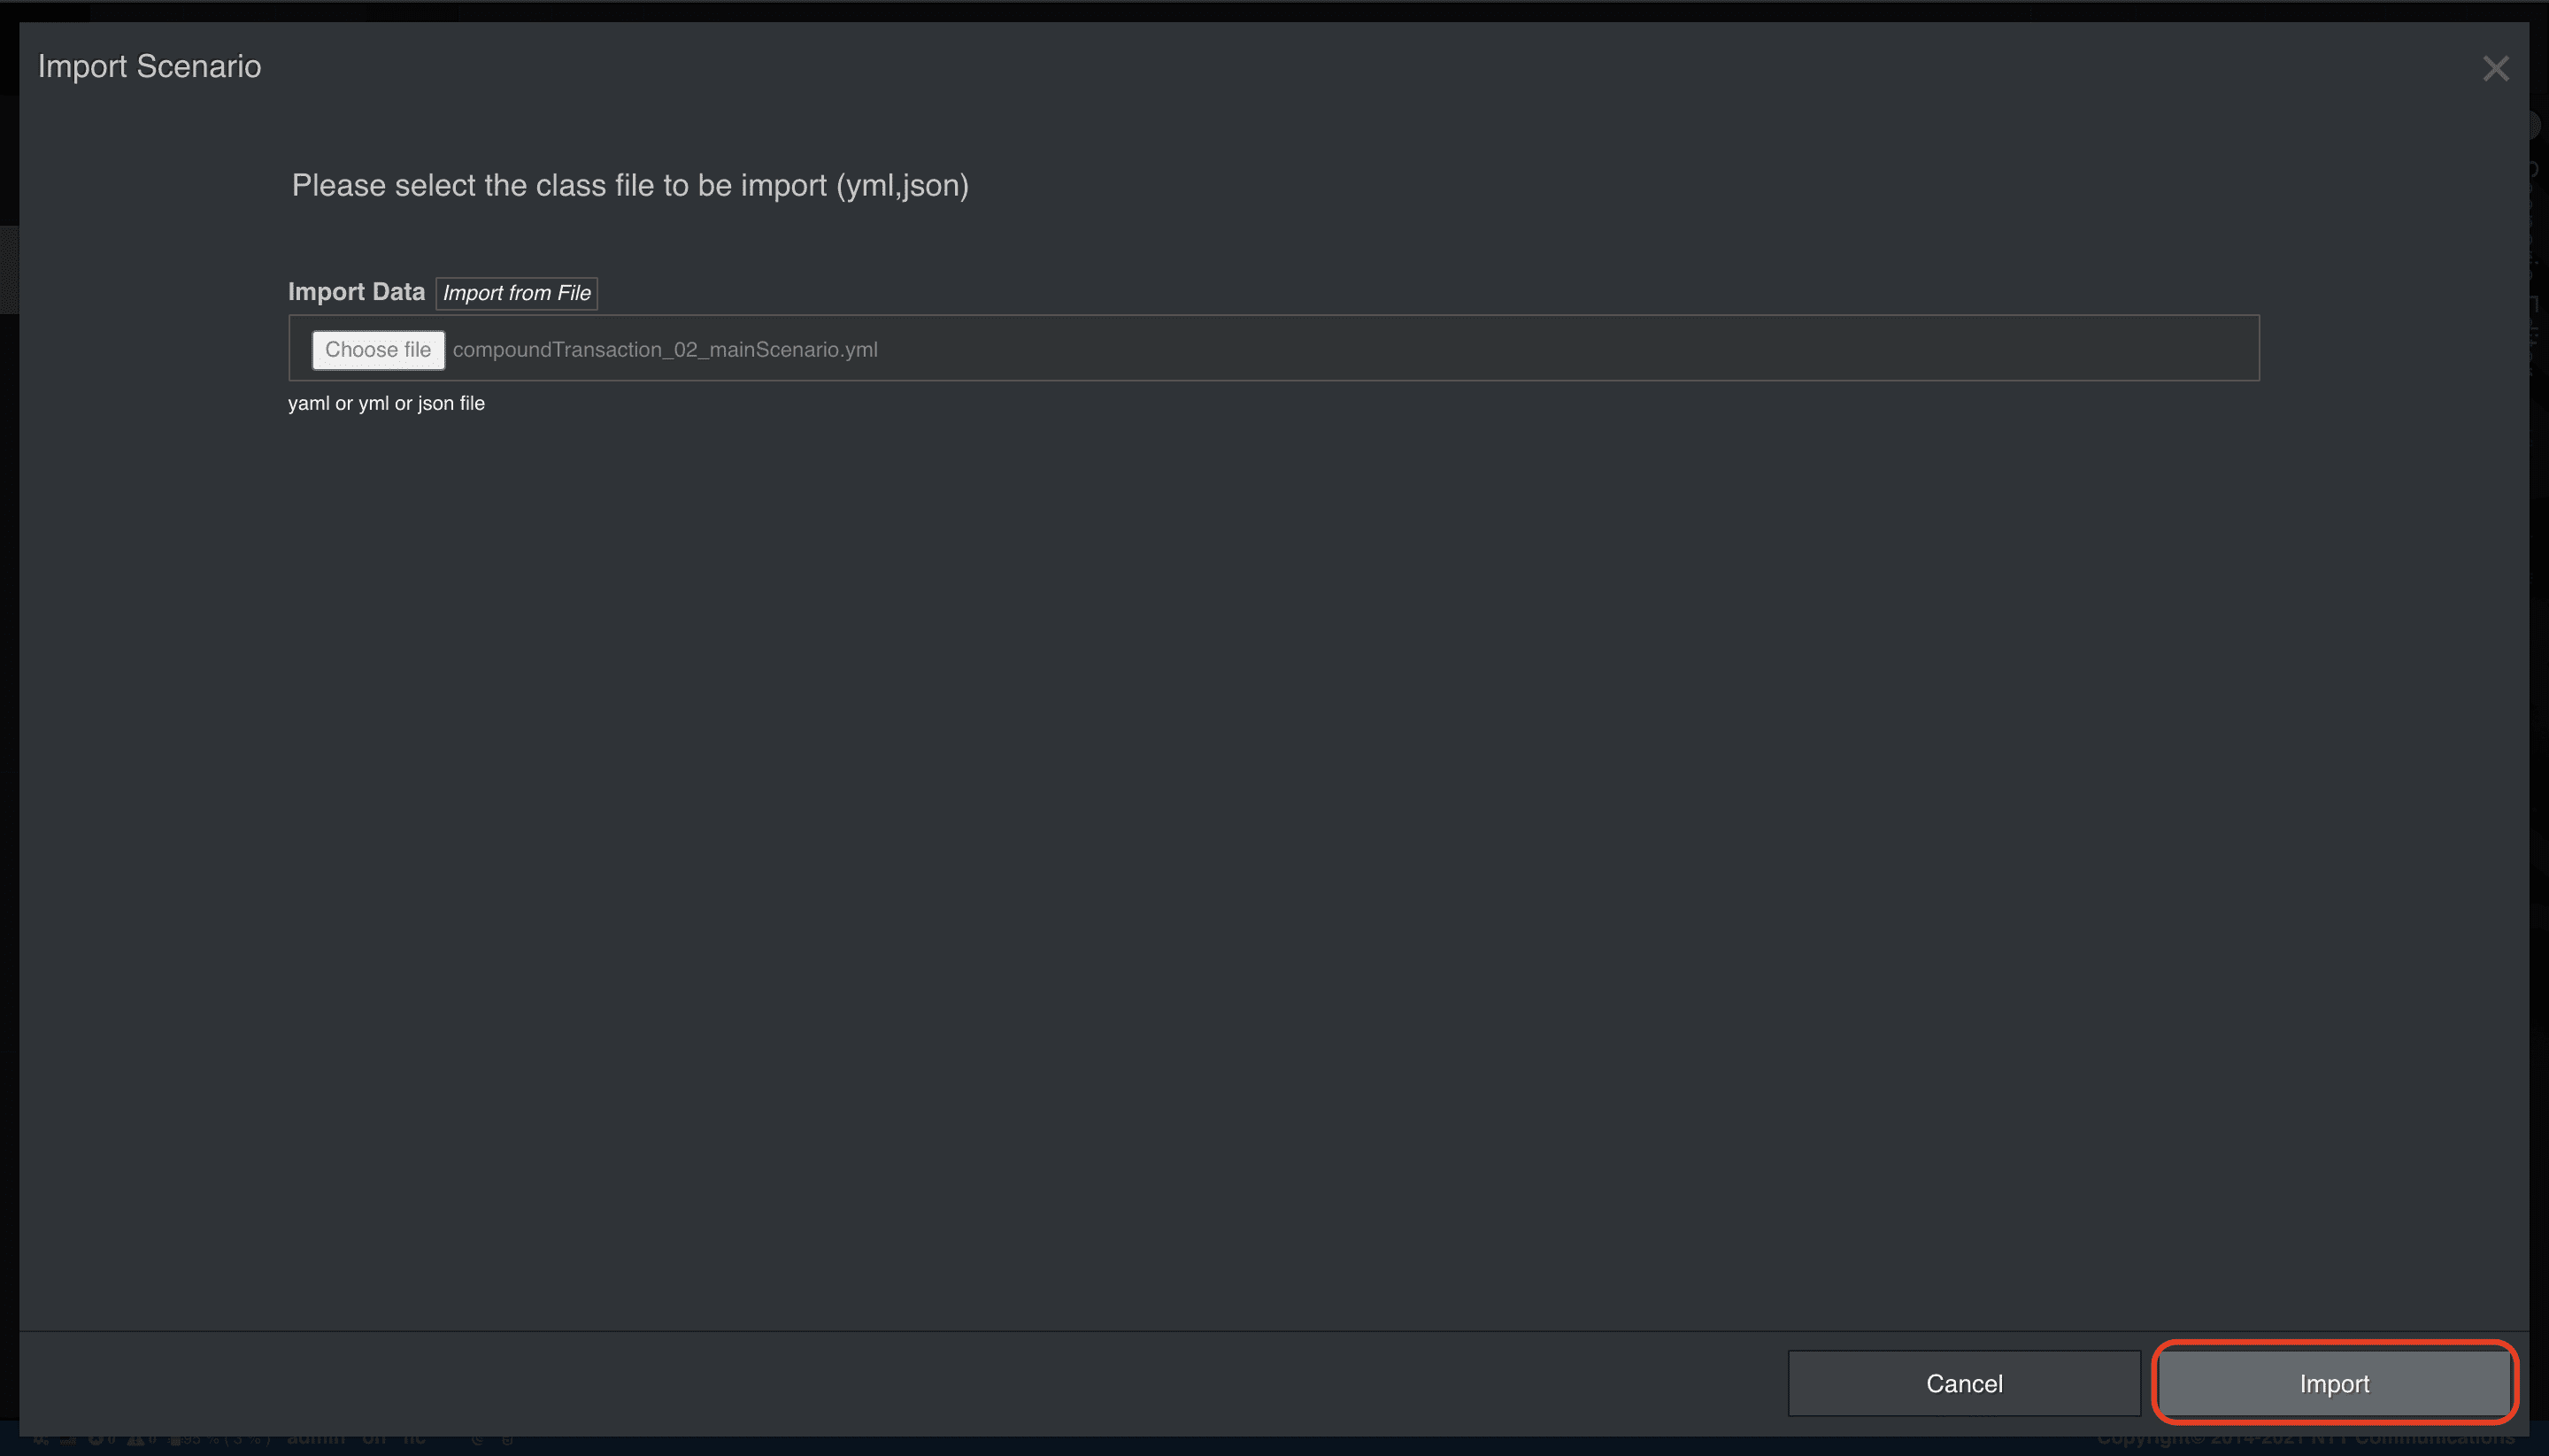
[Choose file] で上記の定義ファイルを指定後、[Import] を選択
実装したメインシナリオの最初のscriptブロックでは、前述の通りサブシナリオのHTTP呼び出し要求ボディーに自身のトランザクション名を格納しています。
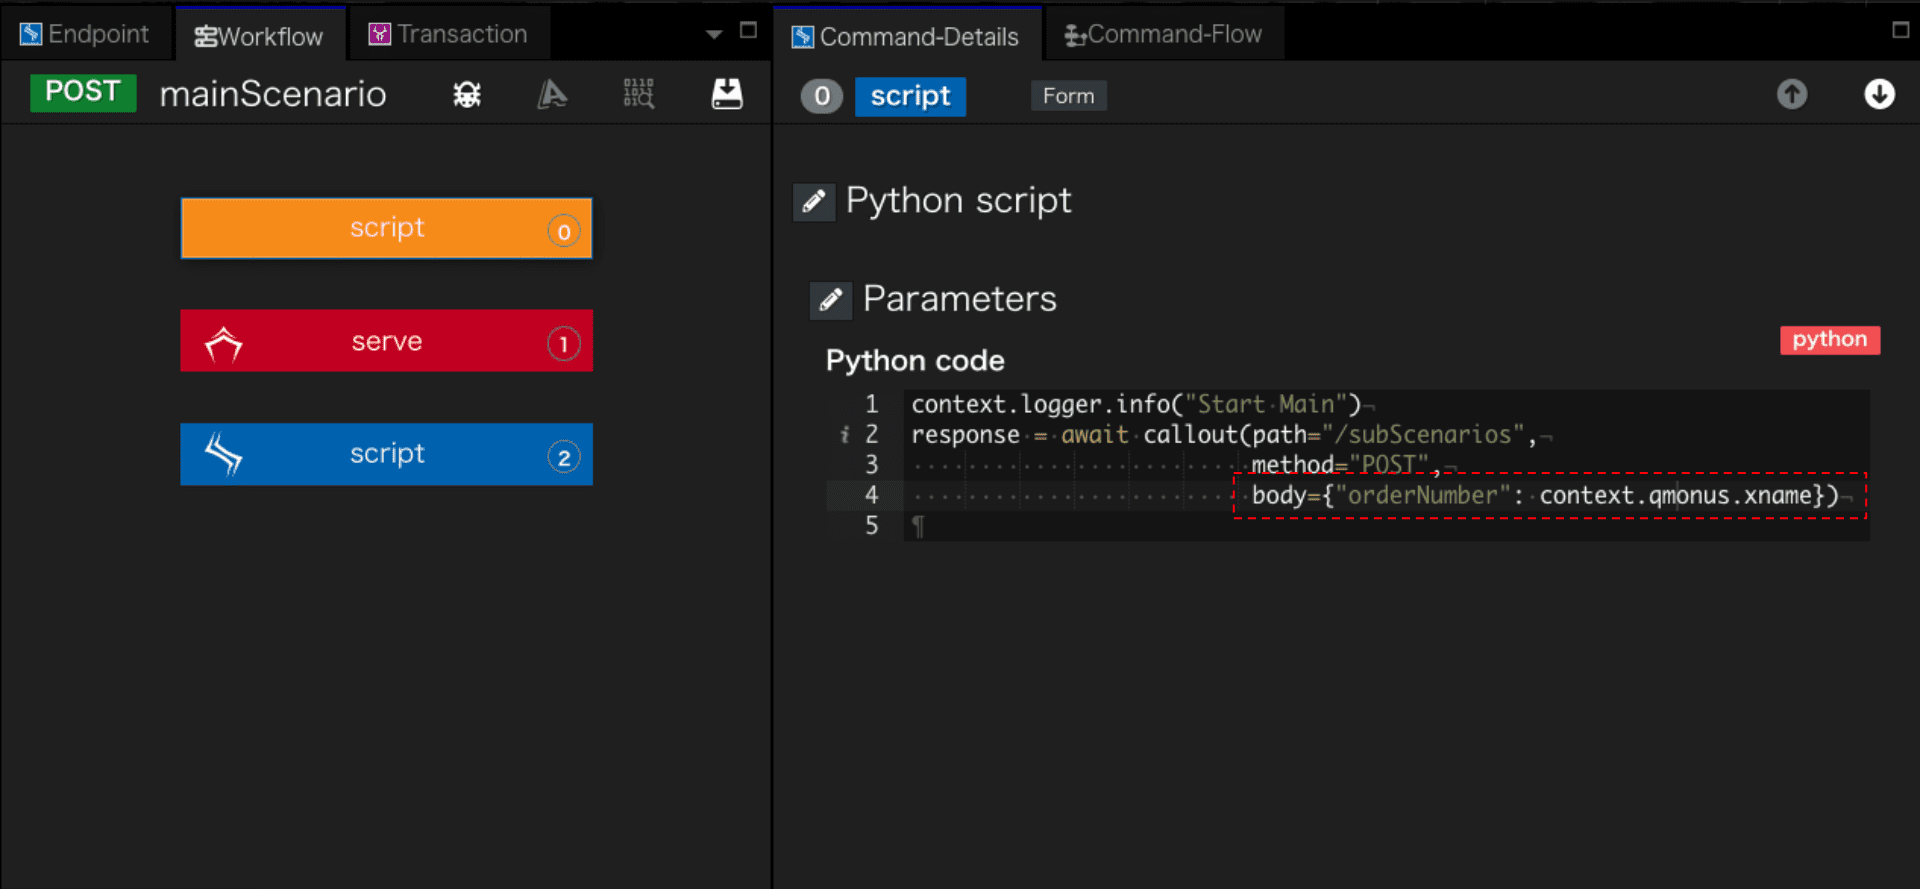
context.qmonusの詳細はQmonus SDK Programming Guide » リファレンス » 名前空間 » Scenarioにおけるプログラミング
を参照してください。
また、xname_keyはserveブロックにて設定されていることが確認できます。
サブシナリオの作成
サブシナリオでは、トランザクションコールバックオプションでメインシナリオが待ち受けているエンドポイントを設定します。
また、xglobals_only_bodyオプションをTrueにすることでサブシナリオのグローバル変数のみをコールバックボディーにセットします。
Falseの場合は、サブシナリオのトランザクション情報もボディーに混入しますがここでは不要なので除去しておきます。
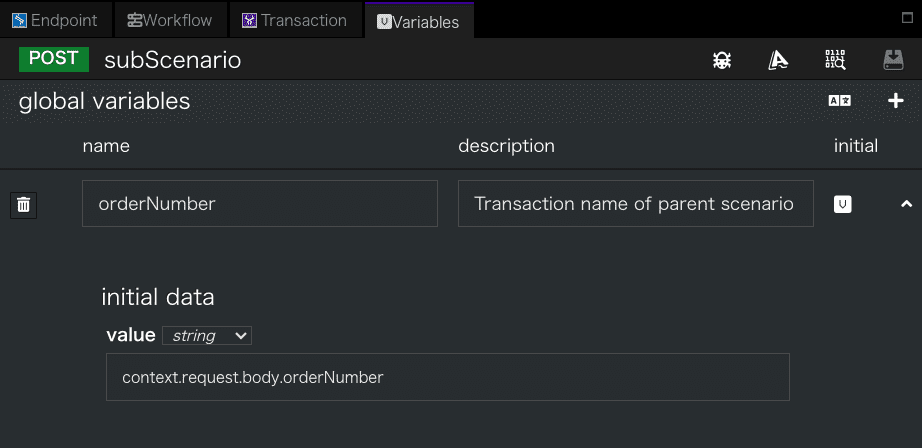
サブシナリオのグローバル変数設定でメインから受け取ったリクエストボディーのorderNumber値をグローバル変数に格納する設定を入れておくことで自動的にコールバックされます。
メインシナリオと同様に、以下のyaml定義でサブシナリオを作成してください。
サブシナリオ ダウンロード
yaml
category: Tutorial
name: subScenario
uri: /subScenarios
method: POST
commands:
  - command: script
    kwargs:
      code: context.logger.info("Start Sub")
  - command: sleep
    kwargs:
      seconds: '3'
  - command: script
    kwargs:
      code: context.logger.info("End Sub")
request_timeout: 60
connect_timeout: 60
spec:
  response:
    normal:
      codes:
        - 200
  request:
    body:
      type: object
      properties:
        orderNumber:
          type: string
      required:
        - orderNumber
transaction:
  enable: true
  async: true
  xname_use_counter: true
  auto_begin: true
  auto_response: true
  xname: sequenceNo
  callback_options:
    method: POST
    url: /mainScenarios/callback
    xglobals_only_body: true
  xdomain: Tutorial
  xtype: sub
routing_auto_generation_mode: true
global_variables:
  orderNumber:
    initial: context.request.body.orderNumber
    description: Transaction name of parent scenario
routing_options:
  scope: local
-
上記の
サブシナリオファイルを用意する -
メインシナリオのときと同様にファイルをインポートする
グローバル変数設定は画面上部のVariablesタブから確認できます。
メインシナリオからのcalloutで拡張ヘッダにX-Xaas-Callback-Url: /mainScenarios/callbackを設定した場合、サブシナリオのトランザクションコールバックオプションは省略できます。
コールバックが多重で送信されてくるような特殊なケースでは、同時に同じトランザクションをロードし、競合する可能性があります。その場合は、APIGWのコールバック用のルーティングにシリアルキューを設定することで要求を順次処理させることができます。
ルーティングの作成
サブシナリオからメインシナリオへのコールバックはAPIGWを経由しますので以下のようにコールバックパスへのルーティングを追加する必要があります。
以下の定義でコールバックのルーティングを追加します。
Routing ダウンロード
python
scope: secure
proxy:
  scheme: 'http:'
  path: /mainScenarios/callback
  authorization:
    auth_mode: axis
target:
  scheme: 'http:'
  path: /mainScenarios/callback
authorities:
  - 'scenario:9000'
connect_timeout: 60
request_timeout: 60
-
上記の
Routingファイルを用意する -
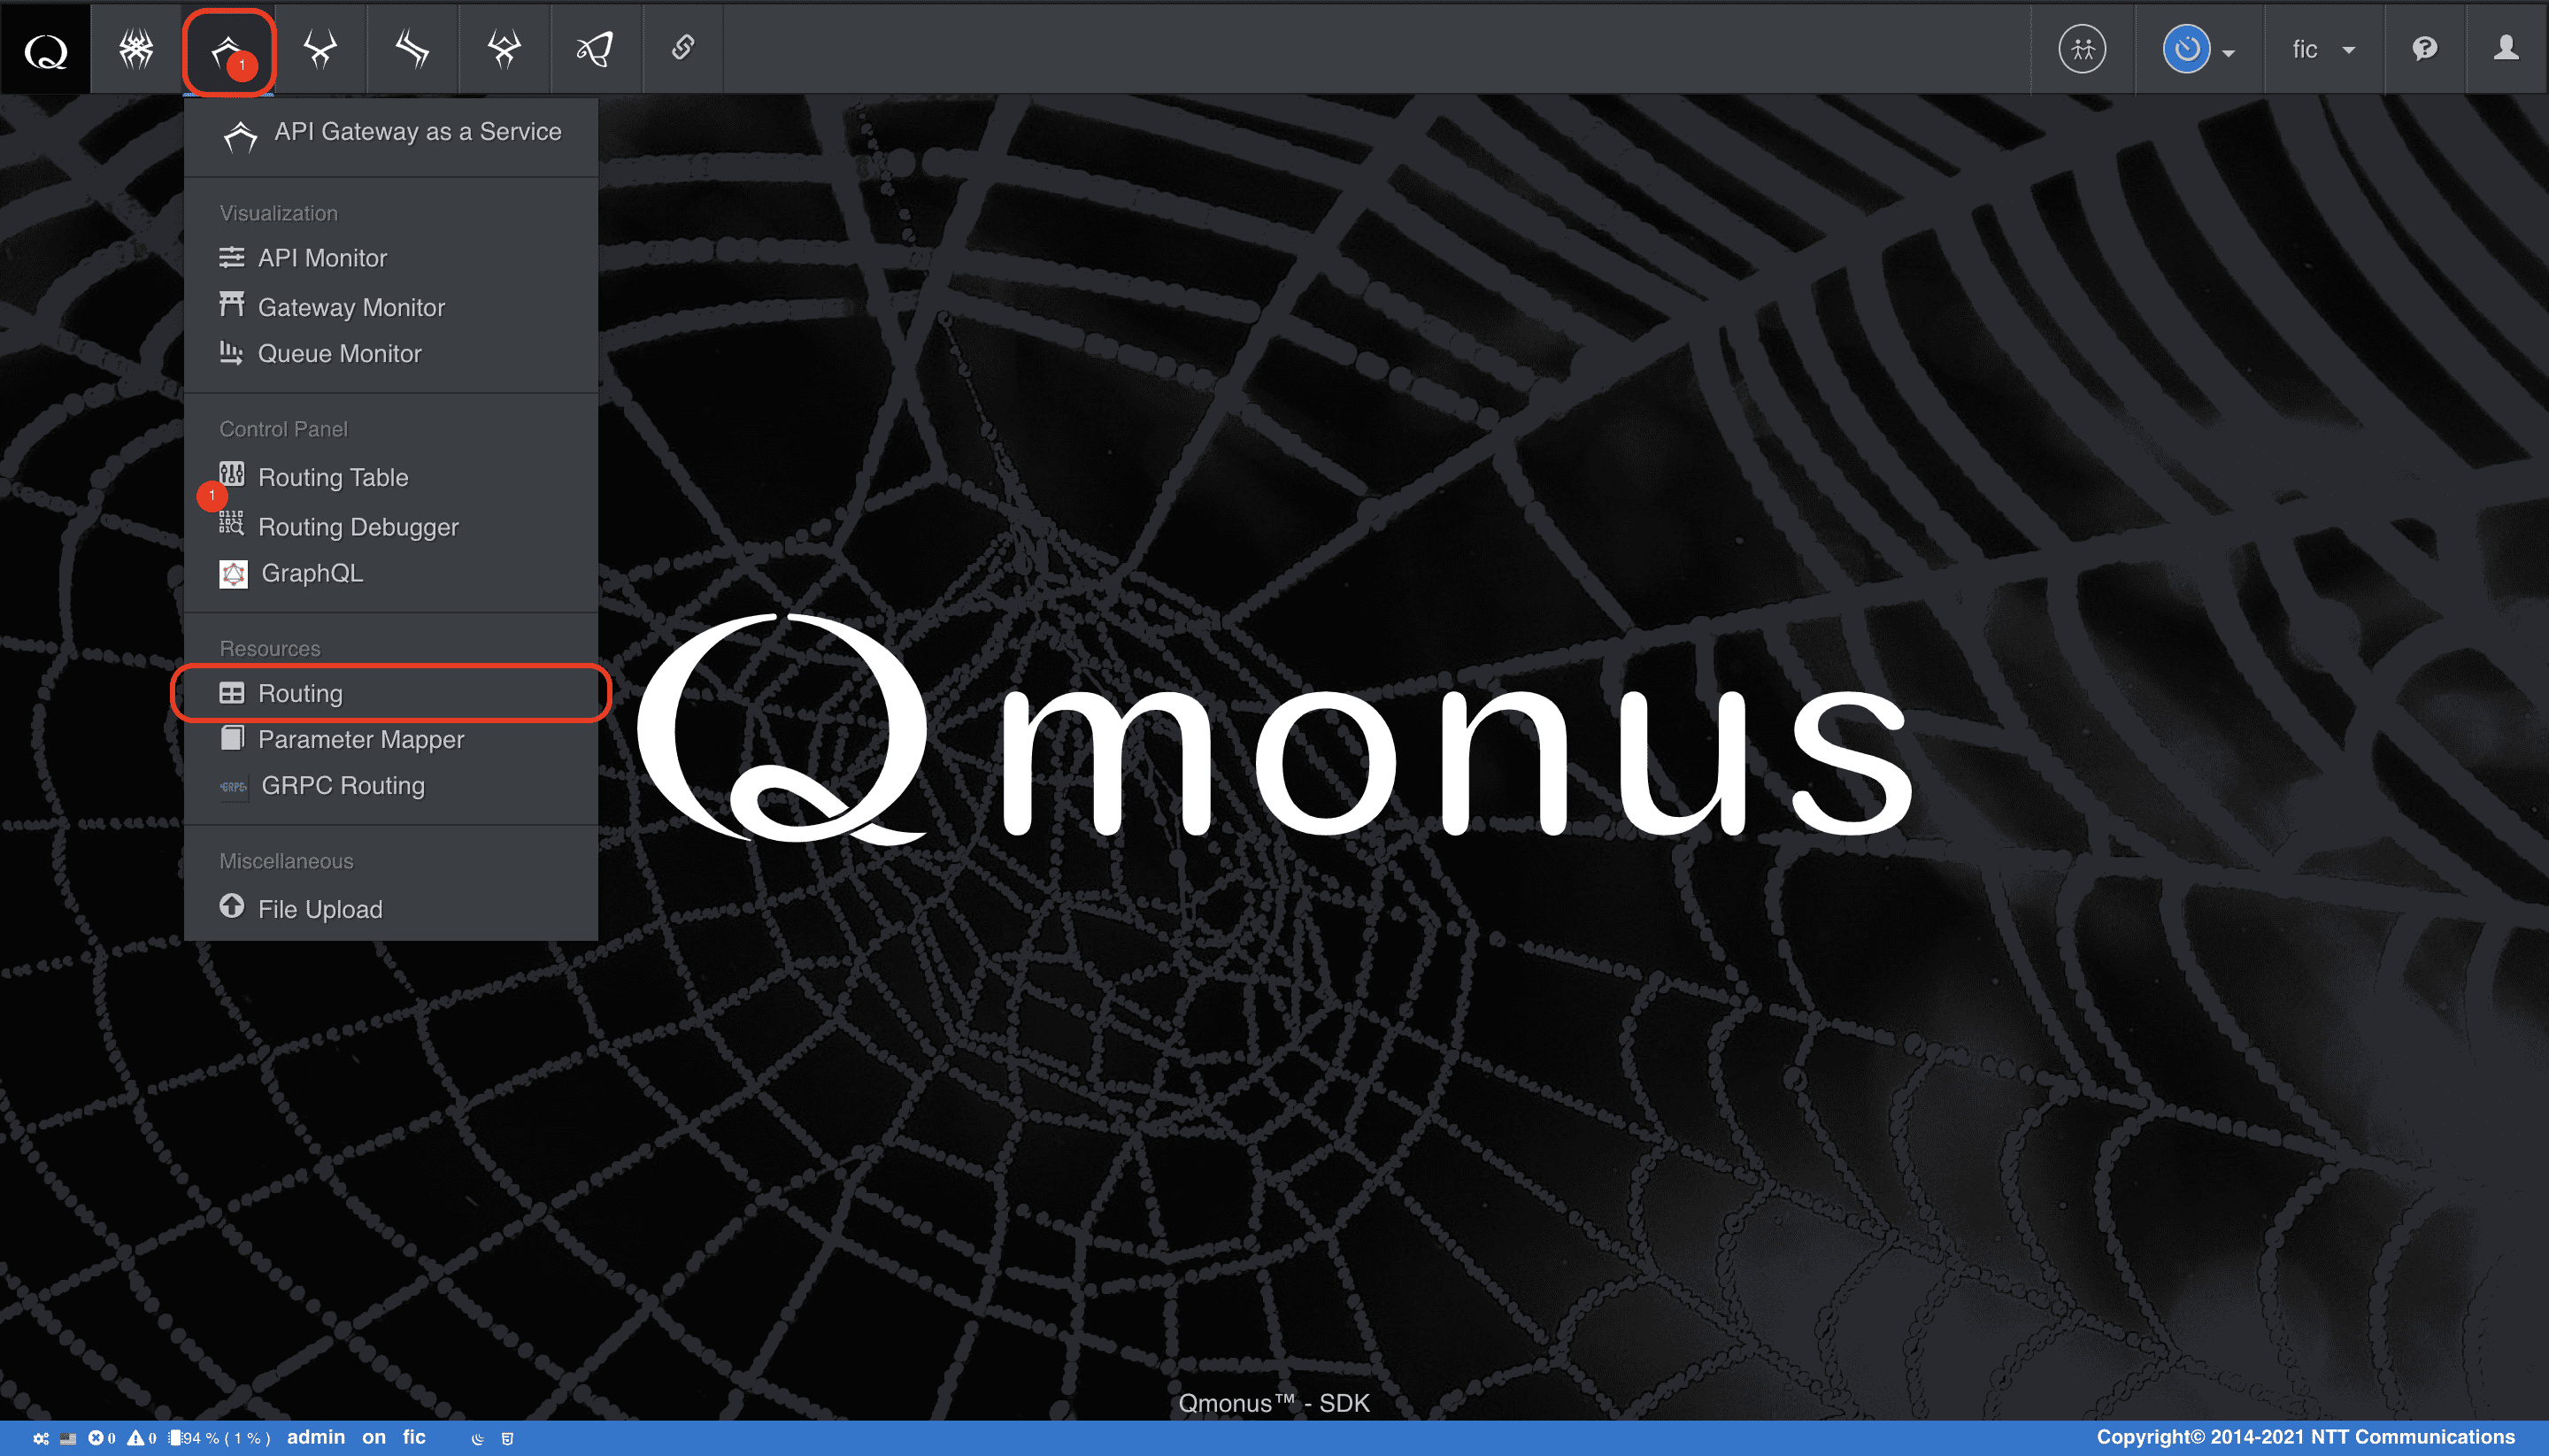
メインメニューから [API Gateway as a Service] > [Routing] を選択
-
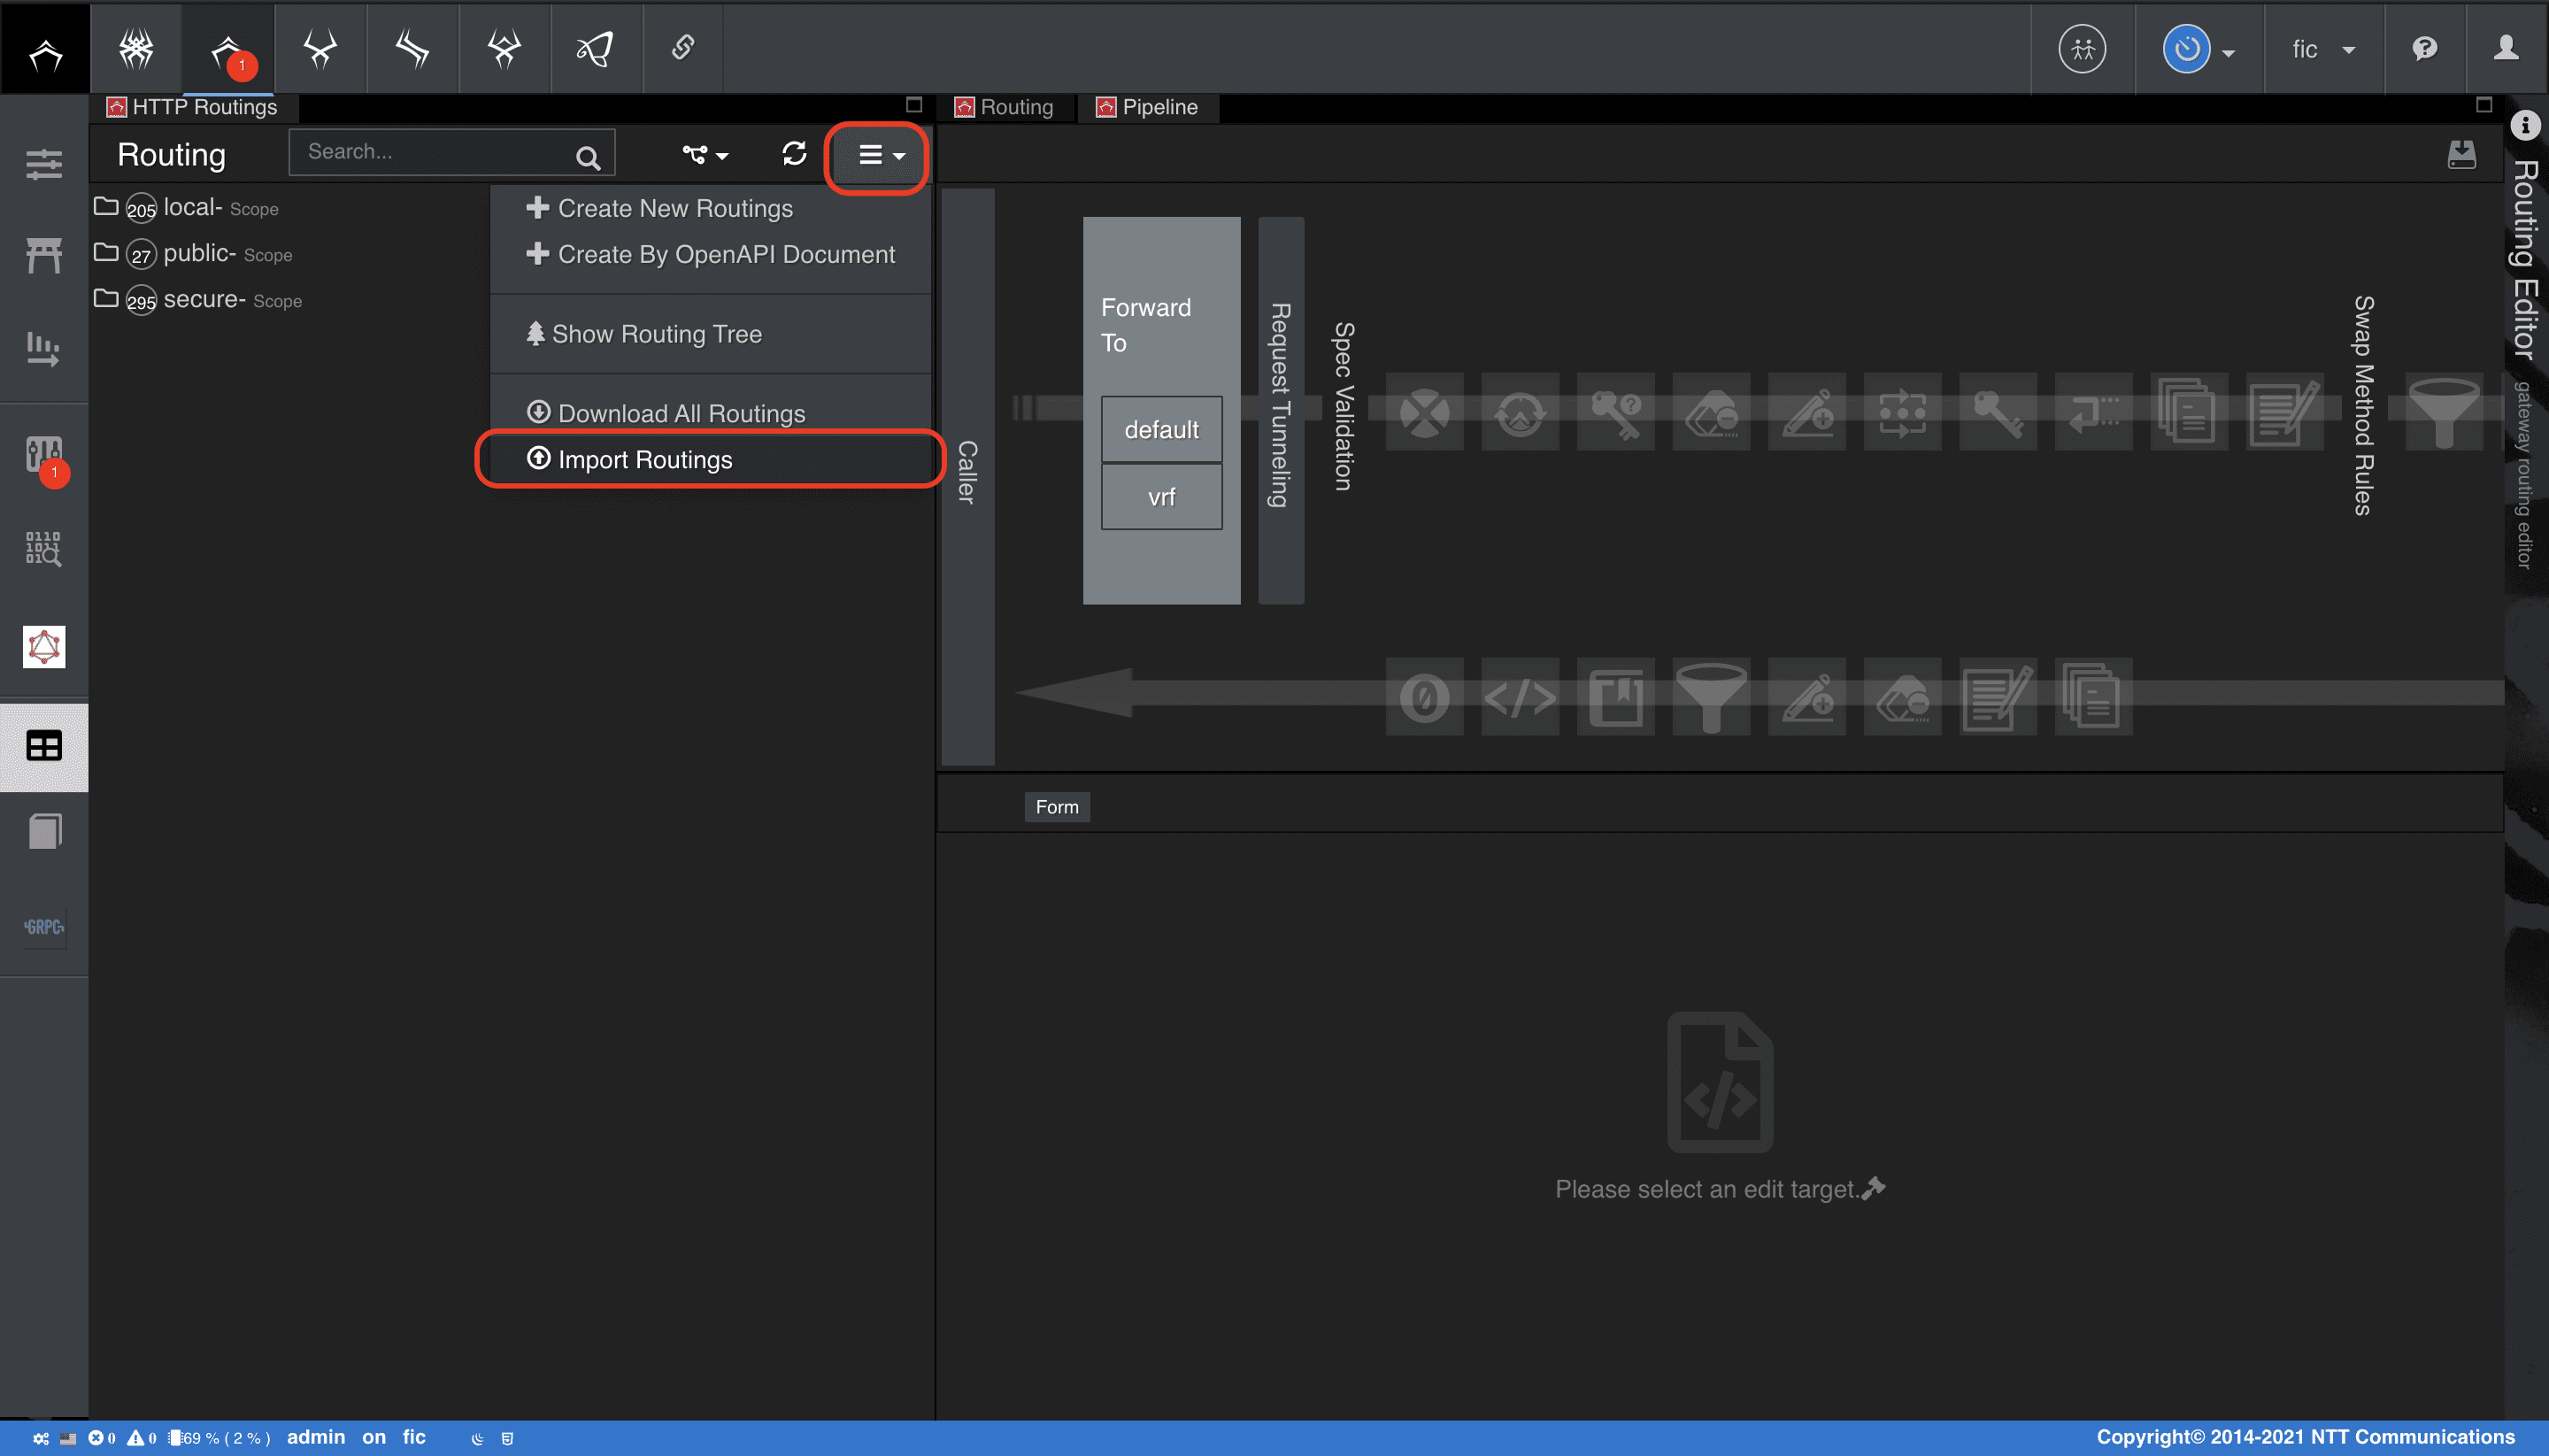
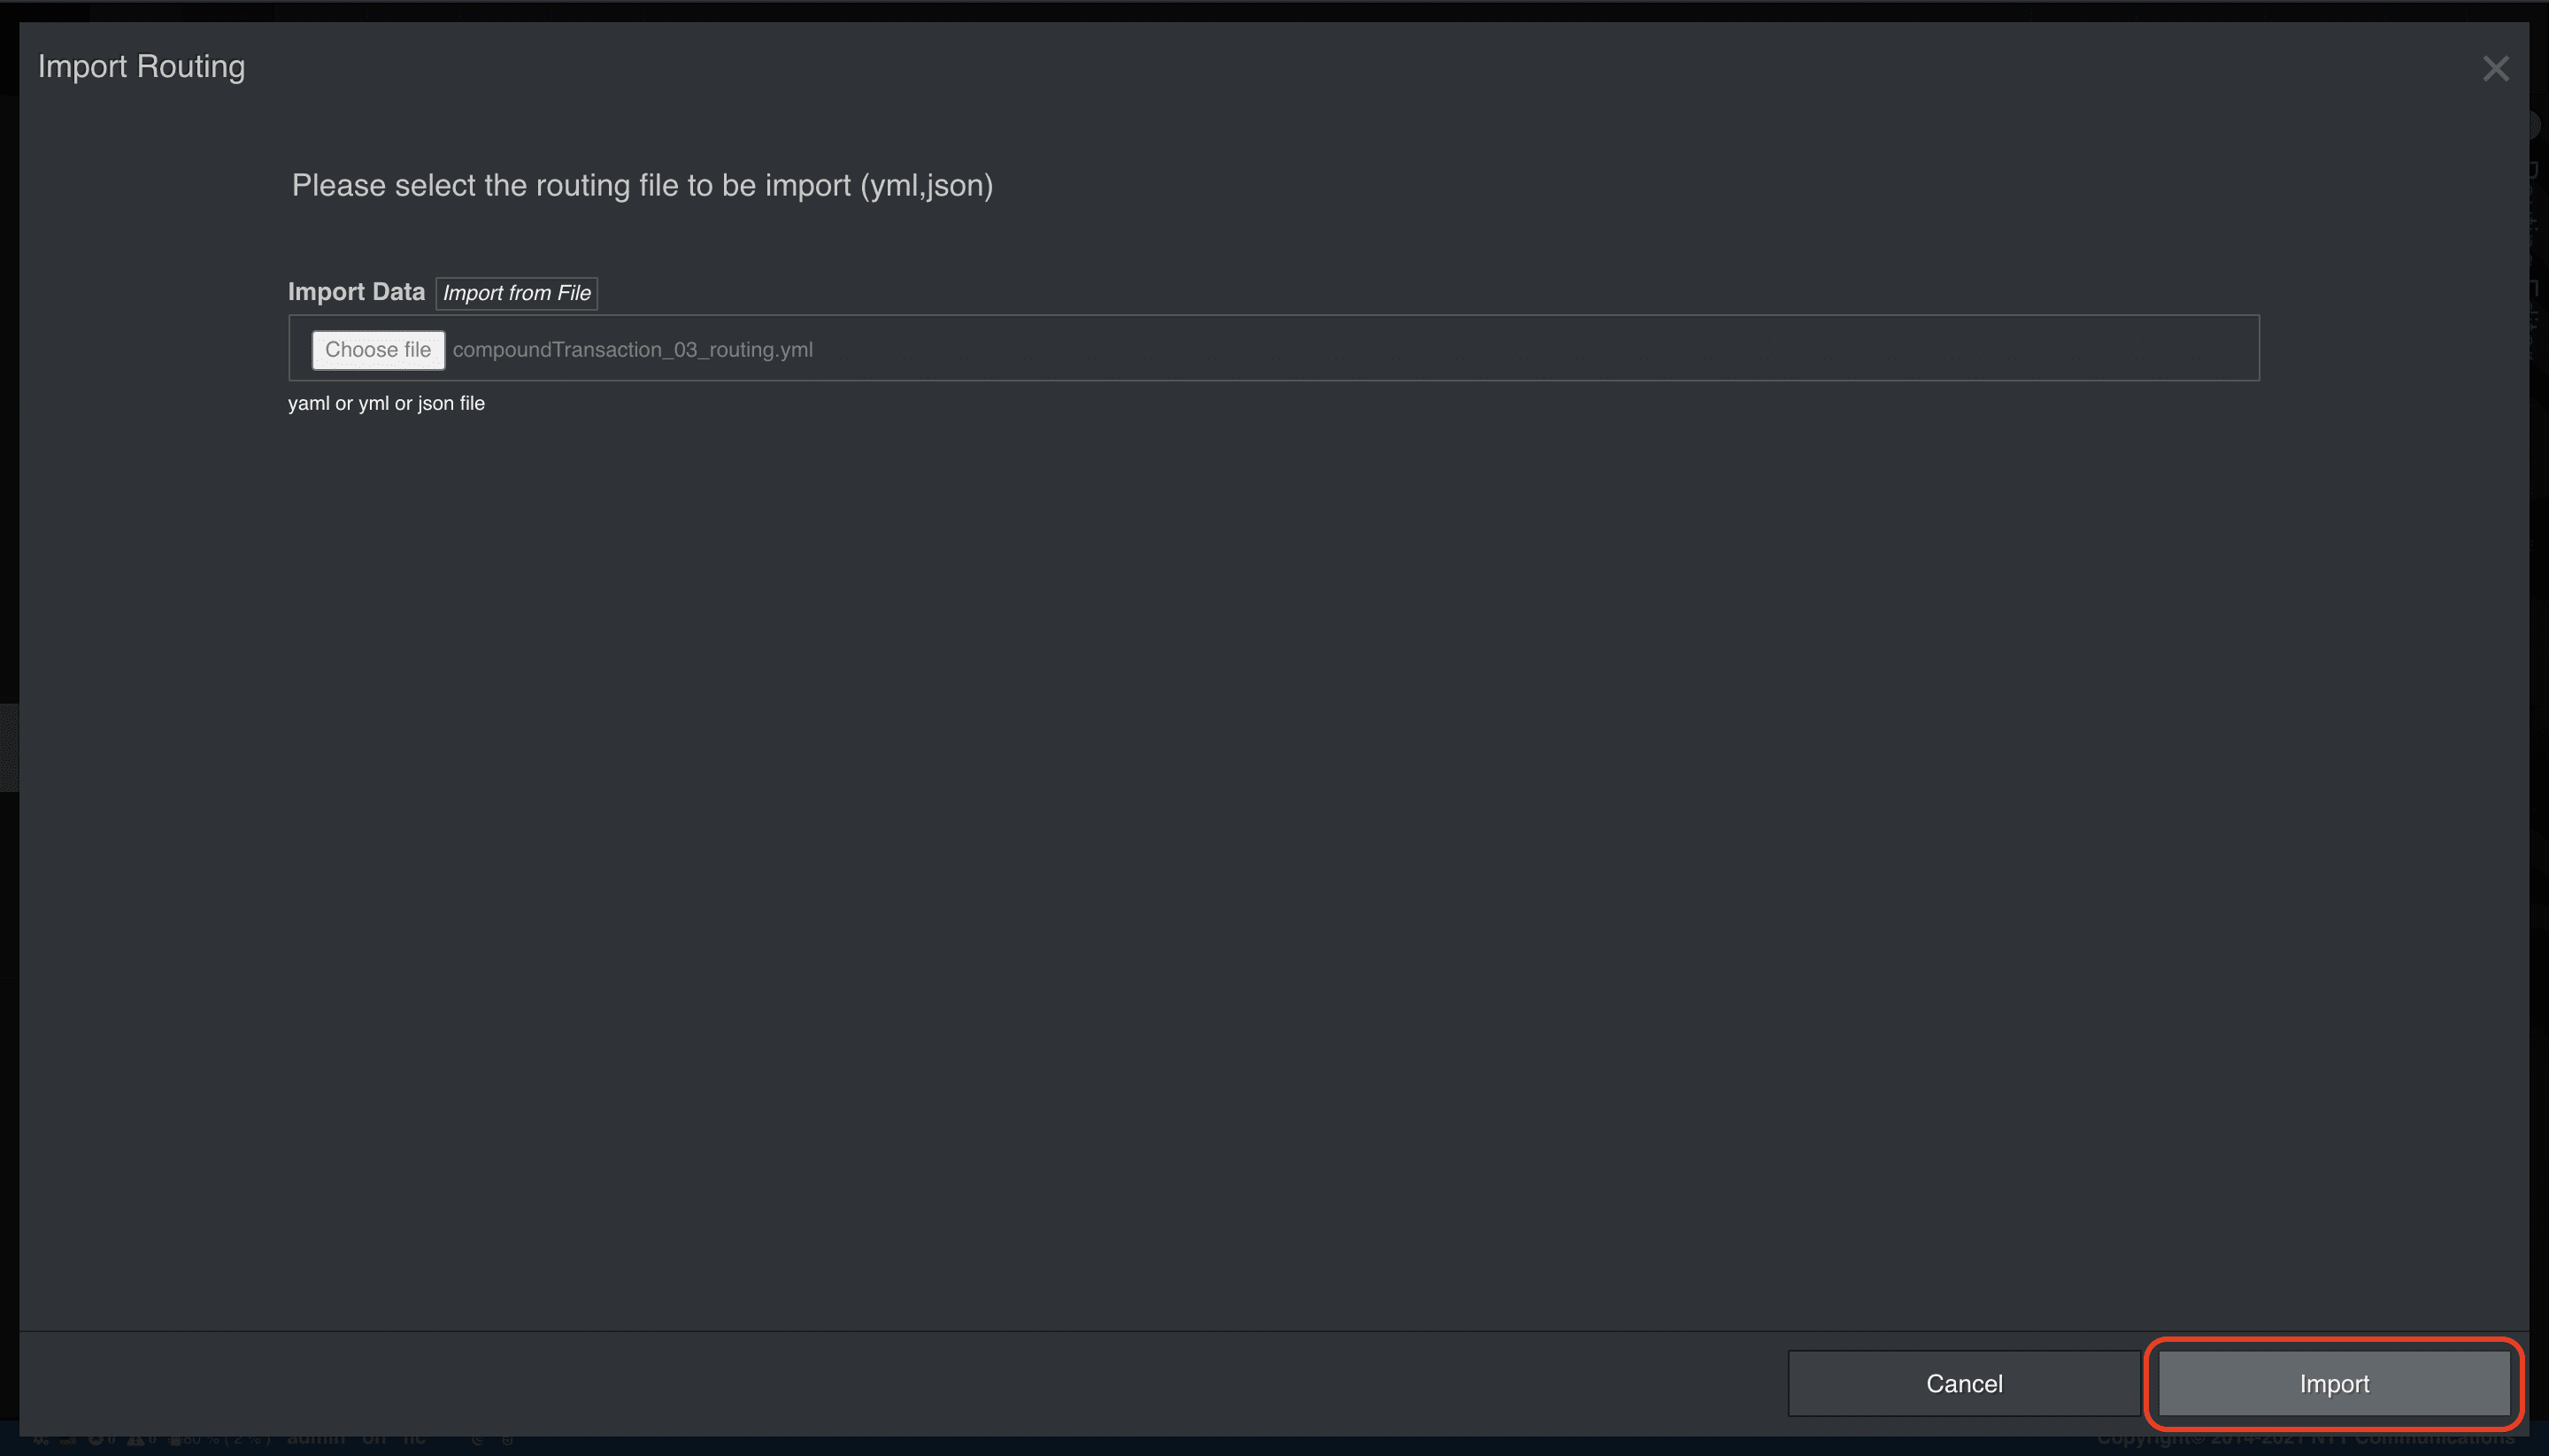
クラスメニューの [Import Routings] を選択
-
[Choose file] で上記の定義ファイルを指定後、[Import] を選択
メインシナリオの動作確認
メインシナリオ、サブシナリオ、ルーティングの作成が完了したら、APIモニタでメインシナリオのAPIコール結果を確認してみましょう。
-
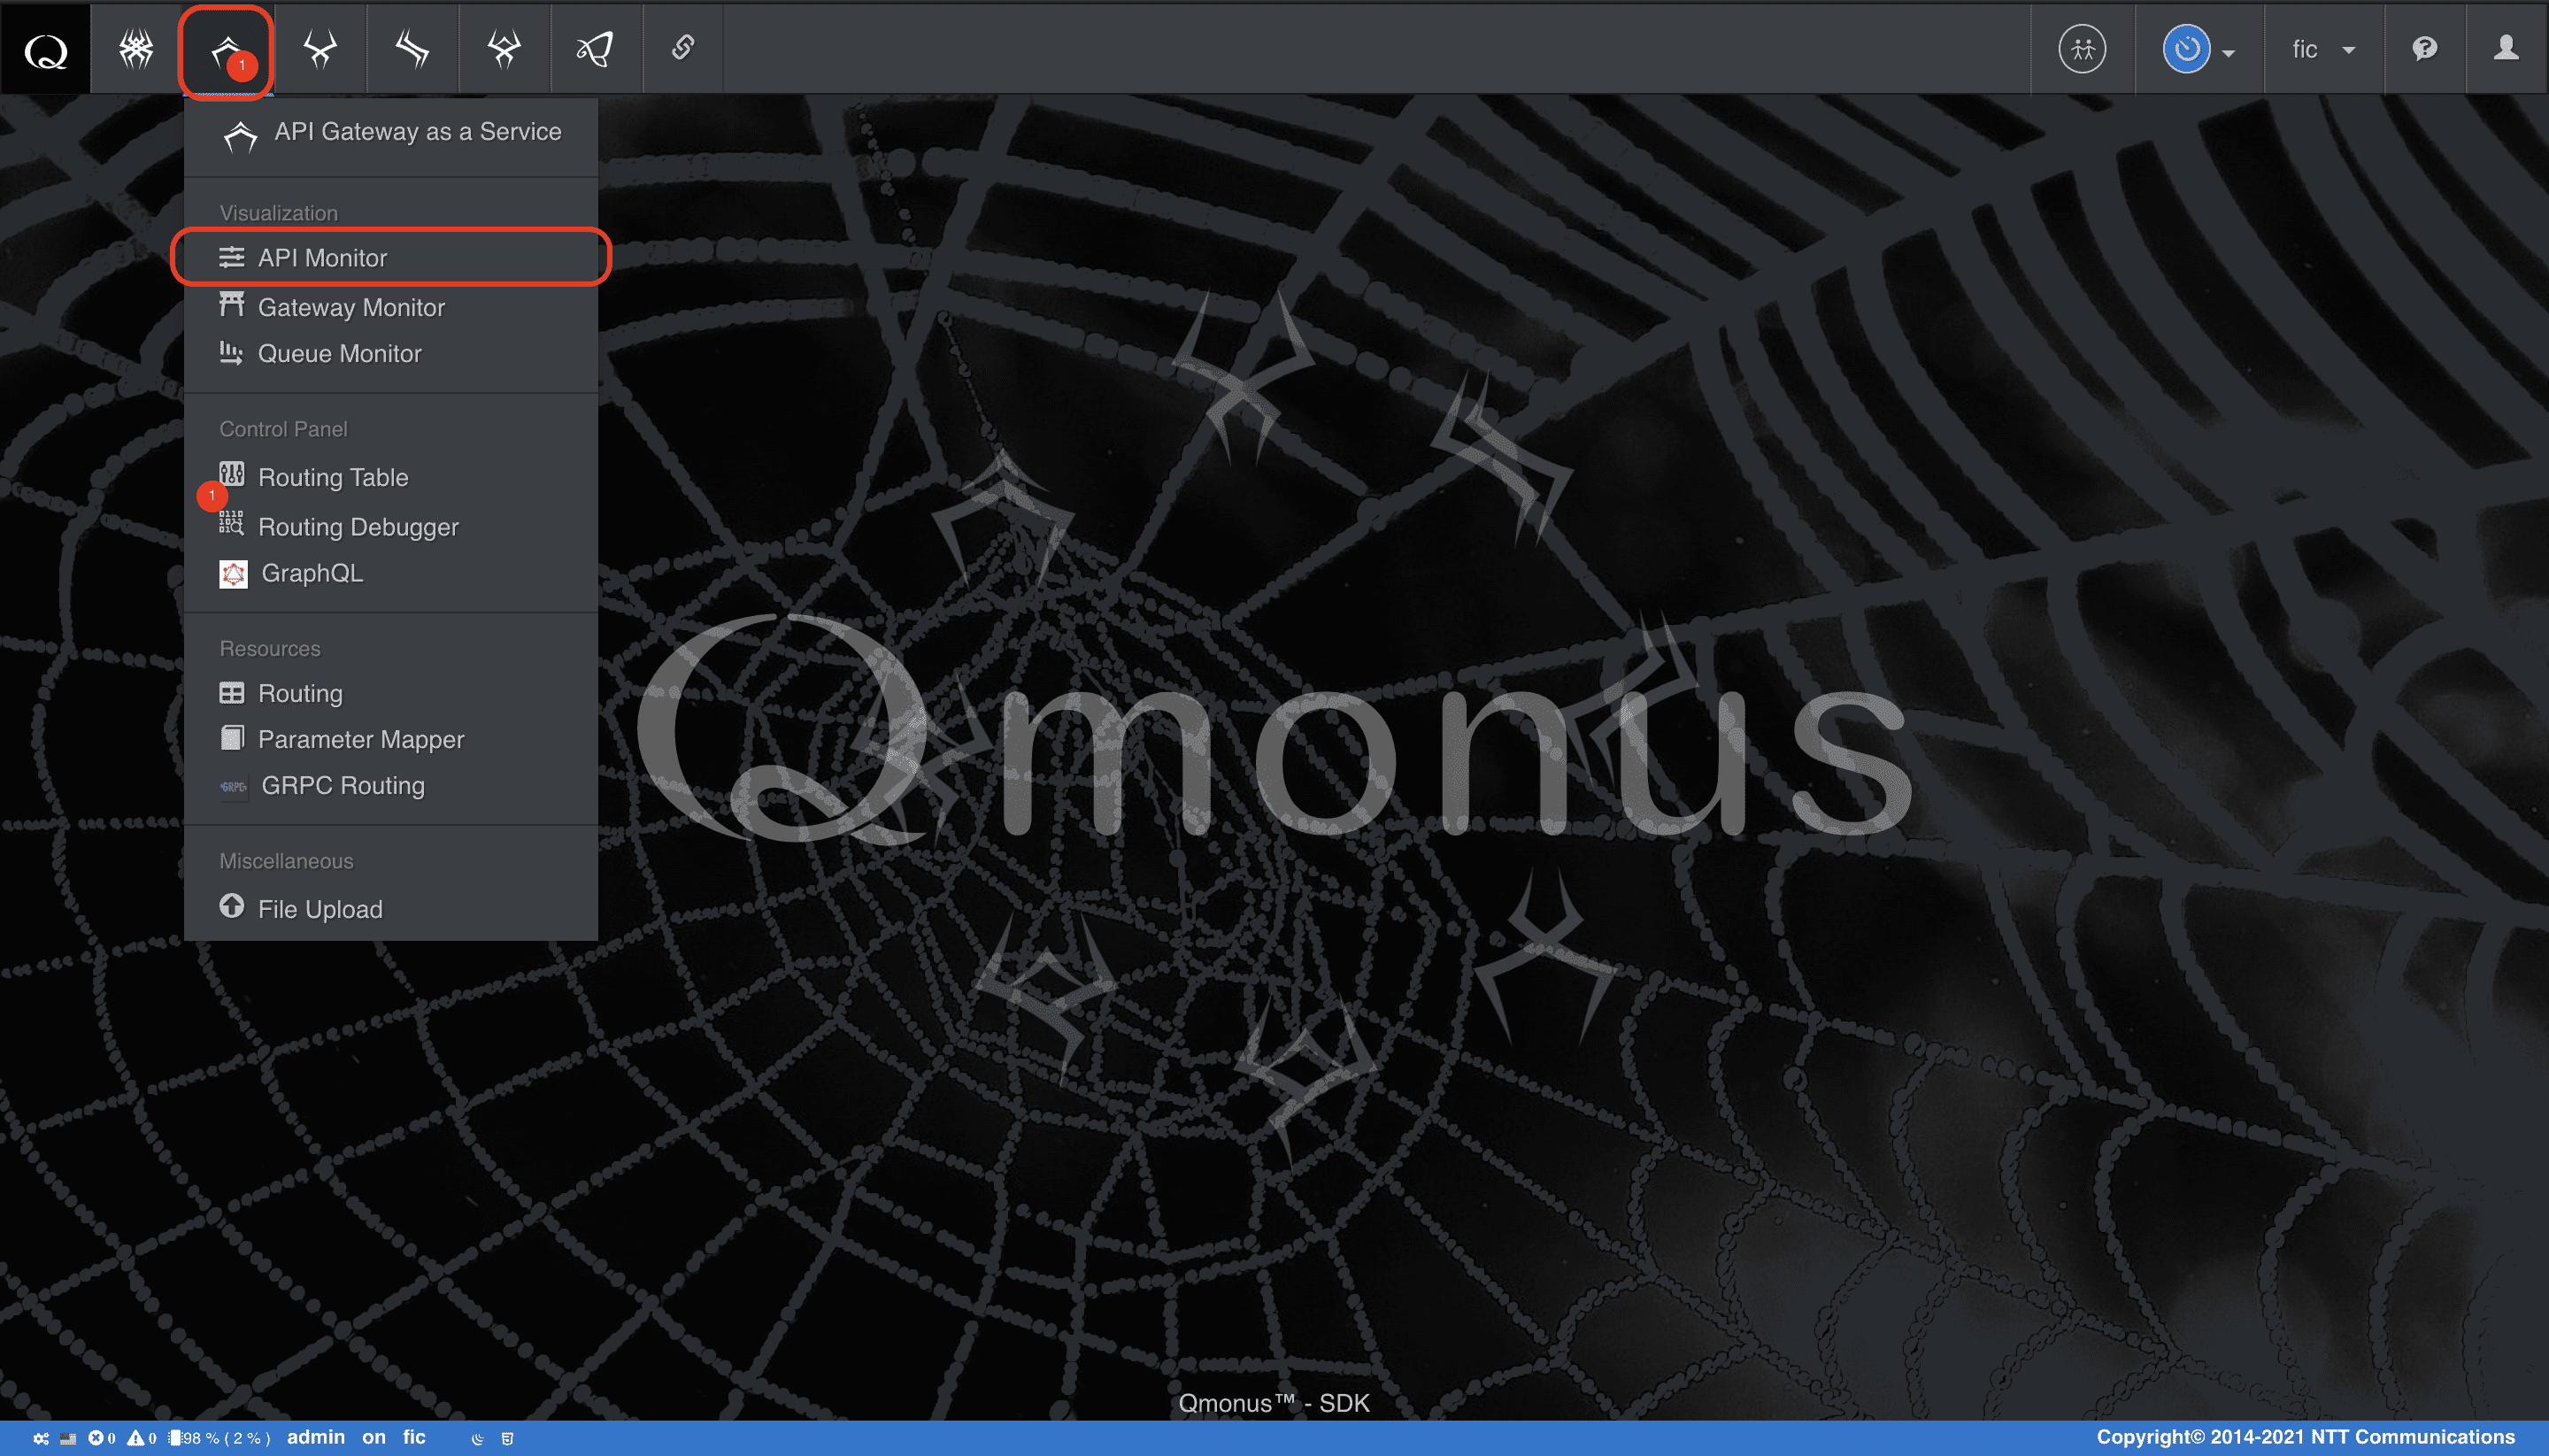
あらかじめシナリオ画面とは別に、APIモニタを別のウィンドウで表示しておく(メインメニューから [API Gateway as a Service] > [API Monitor] を選択)
-
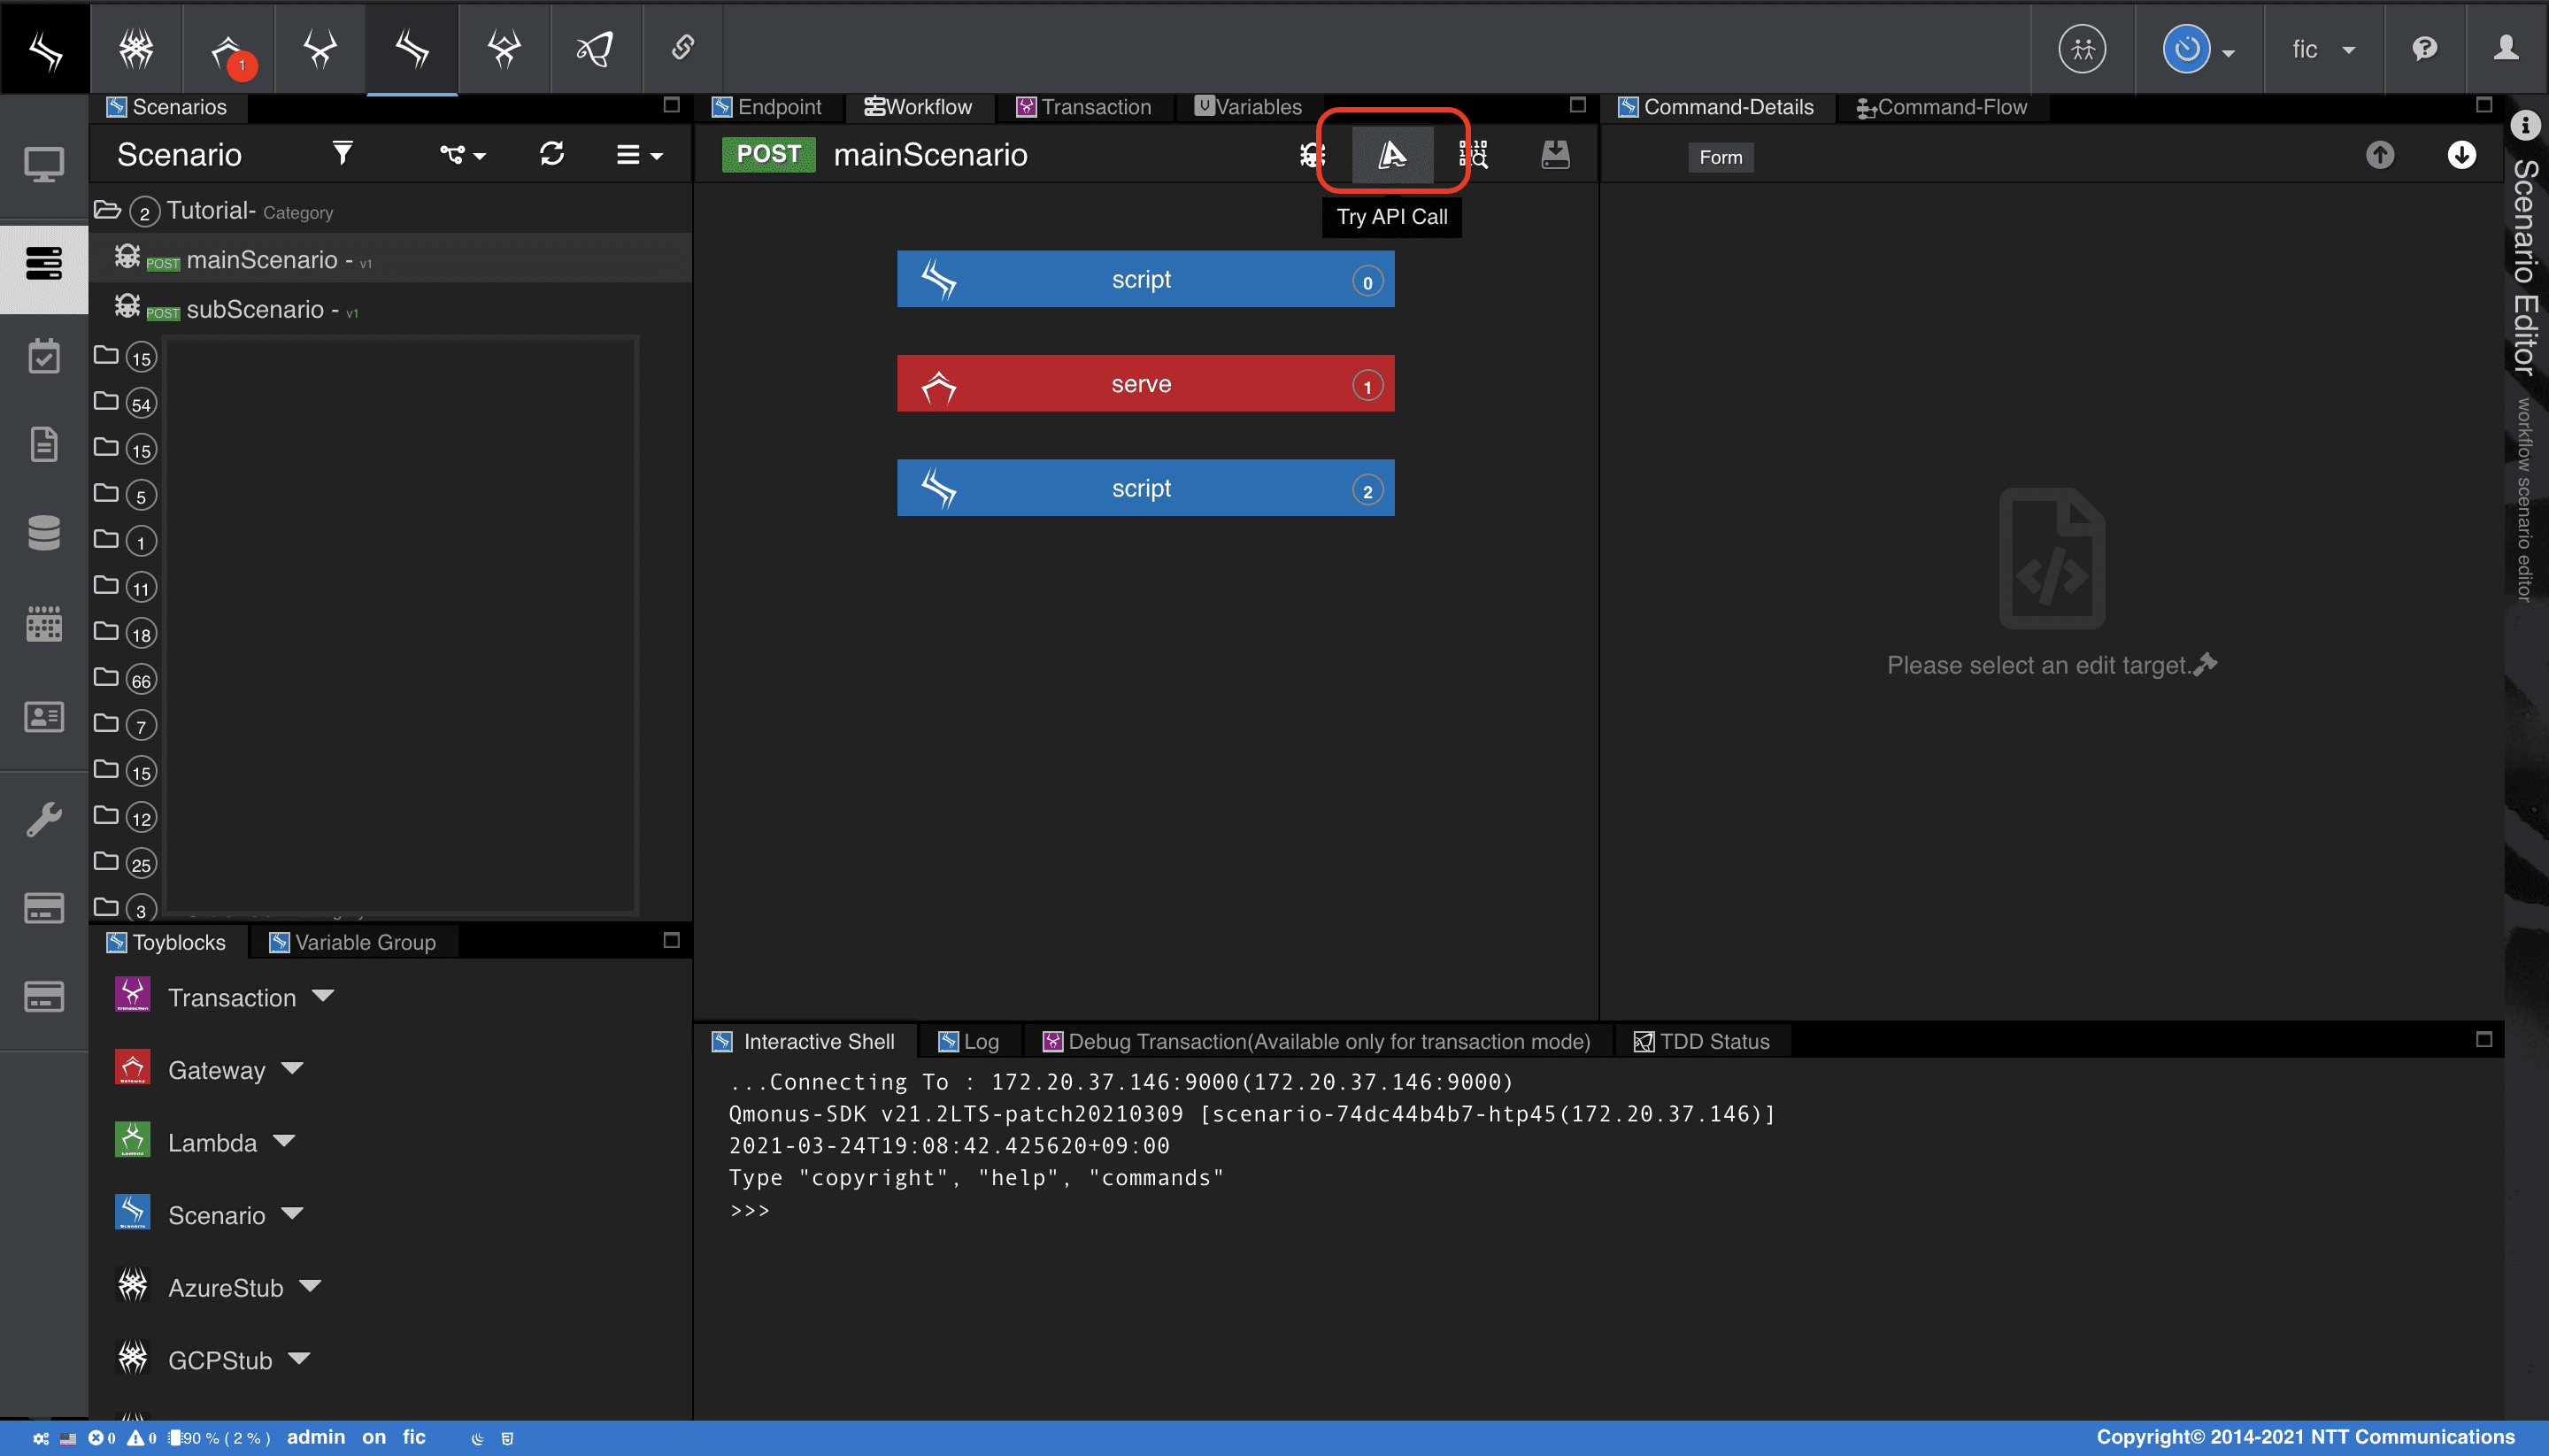
メインシナリオの編集画面に戻り、シナリオメニューの [Try API Call] を選択
-
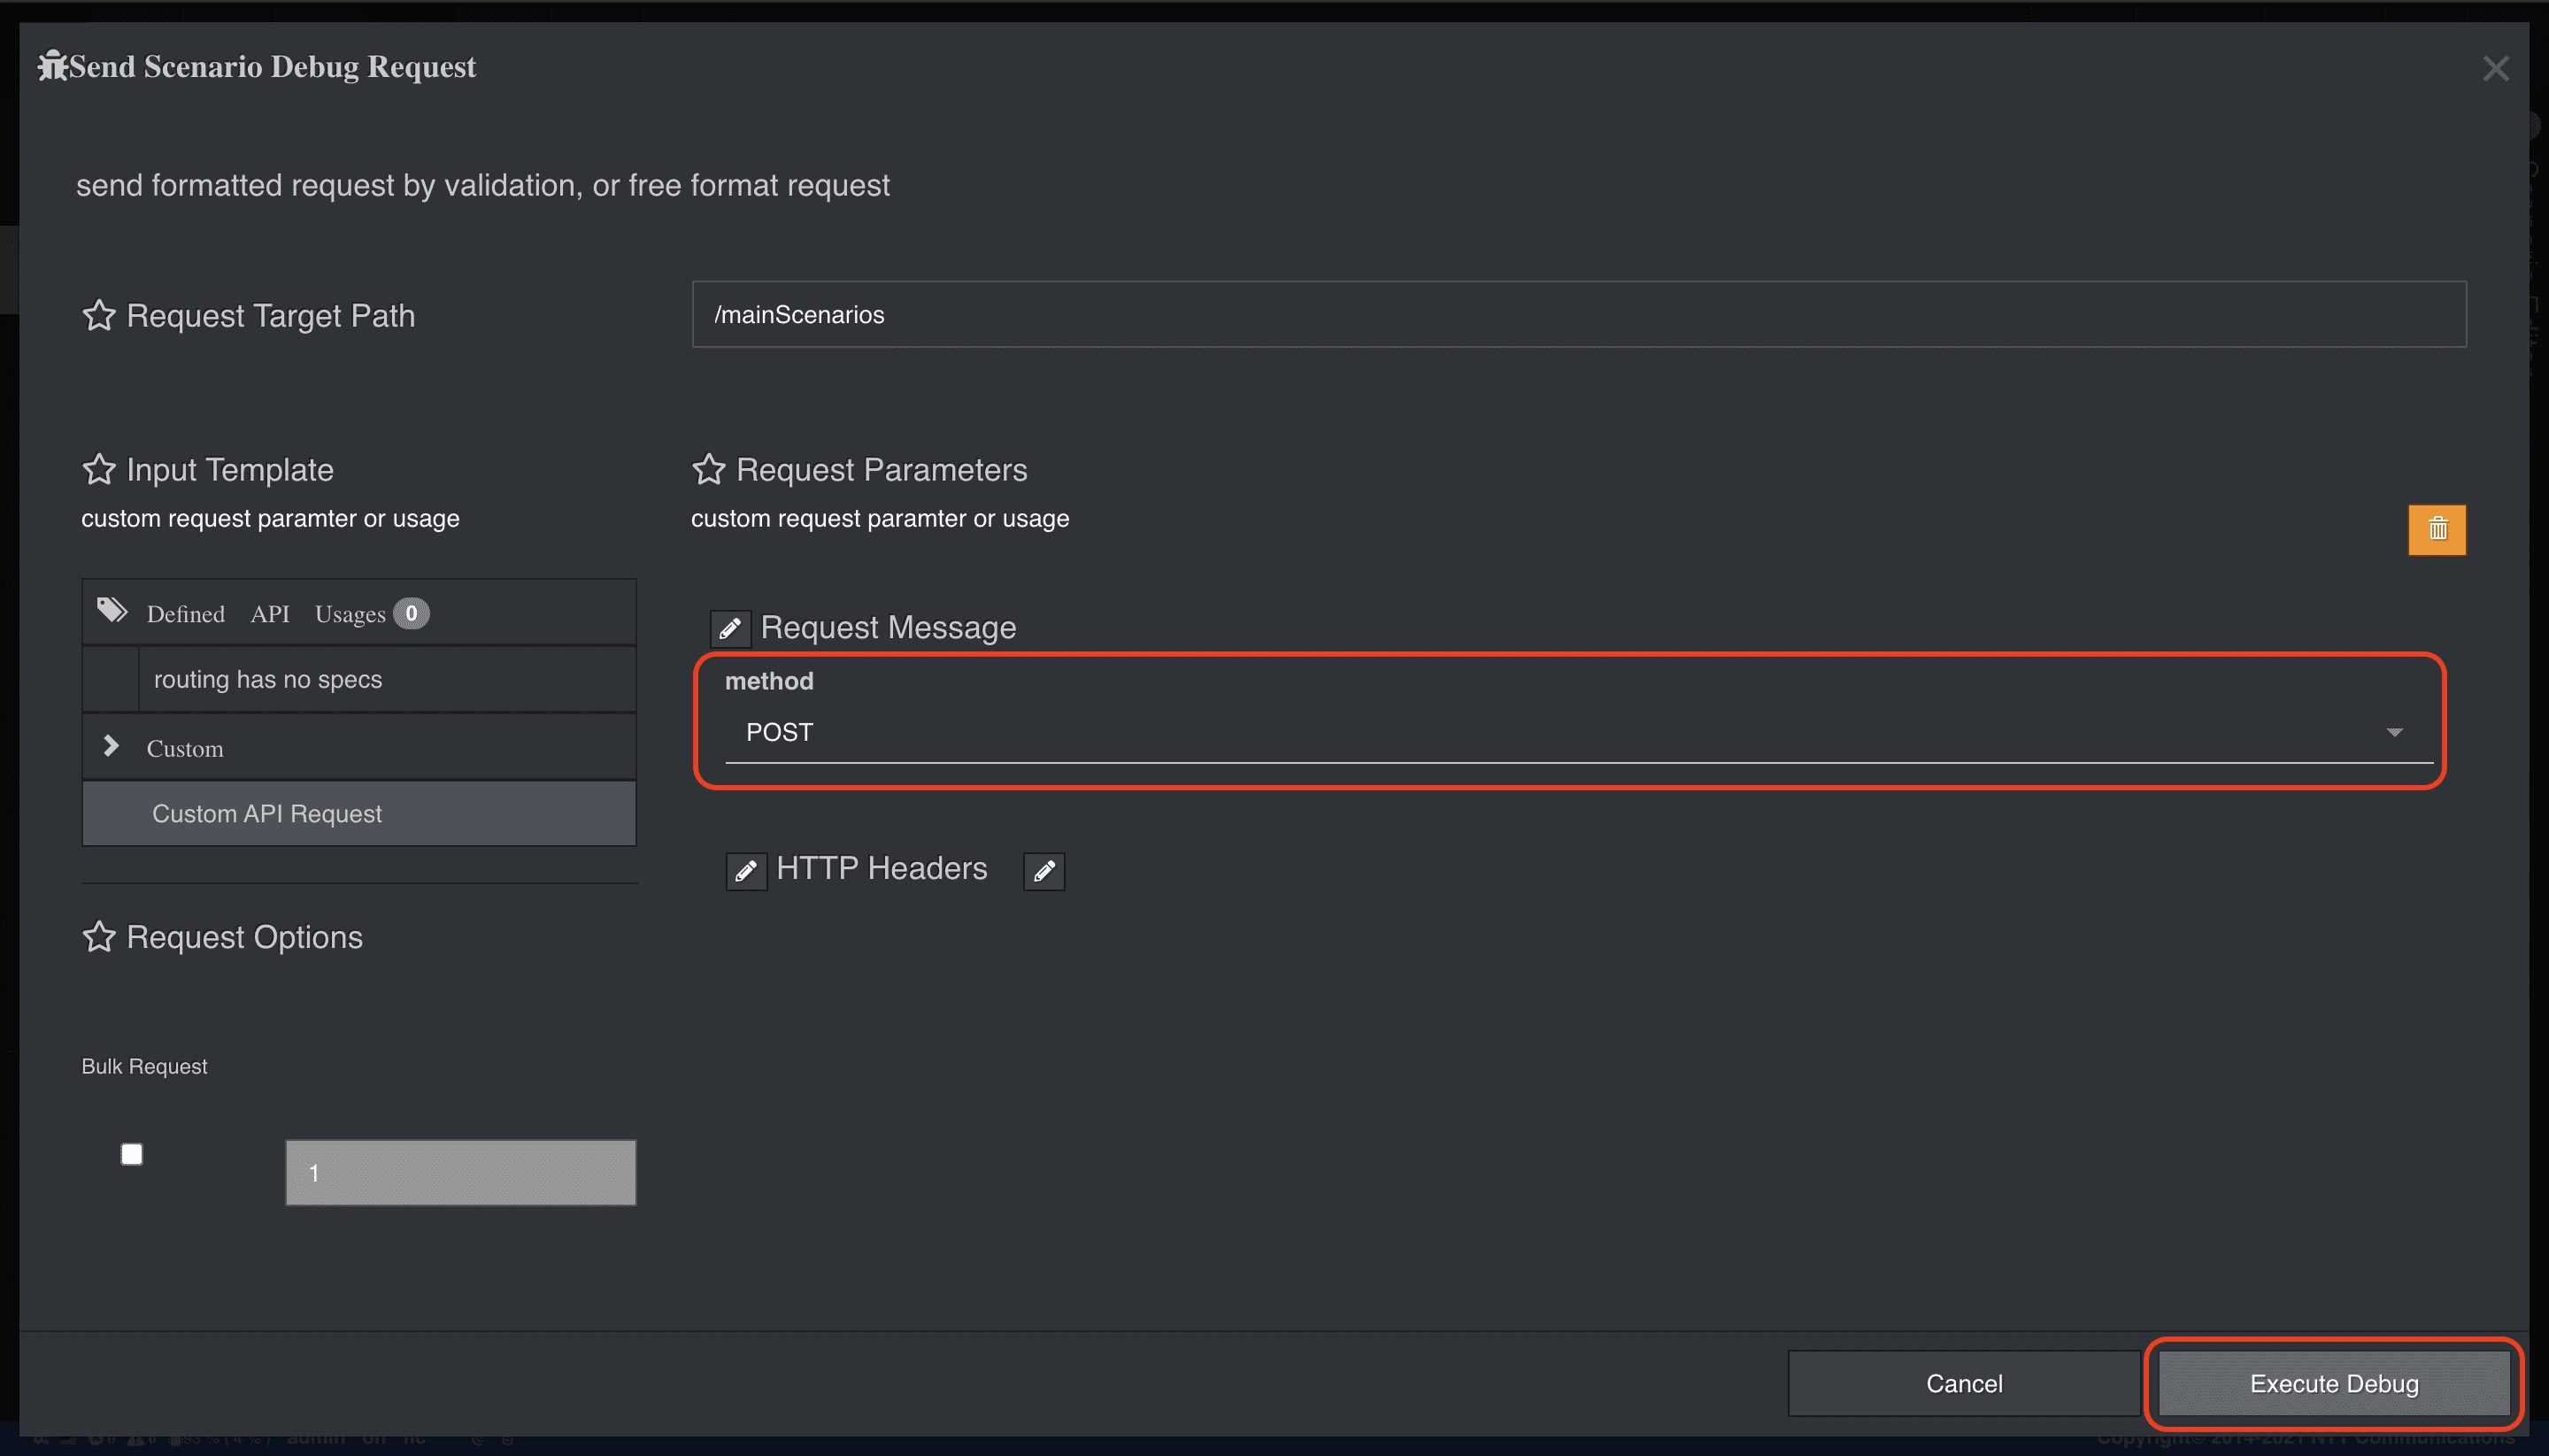
[method] が
POSTである状態で [Execute Debug] を選択し、メインシナリオAPIをコールする
-
別のウィンドウのAPIモニタ画面に戻って確認
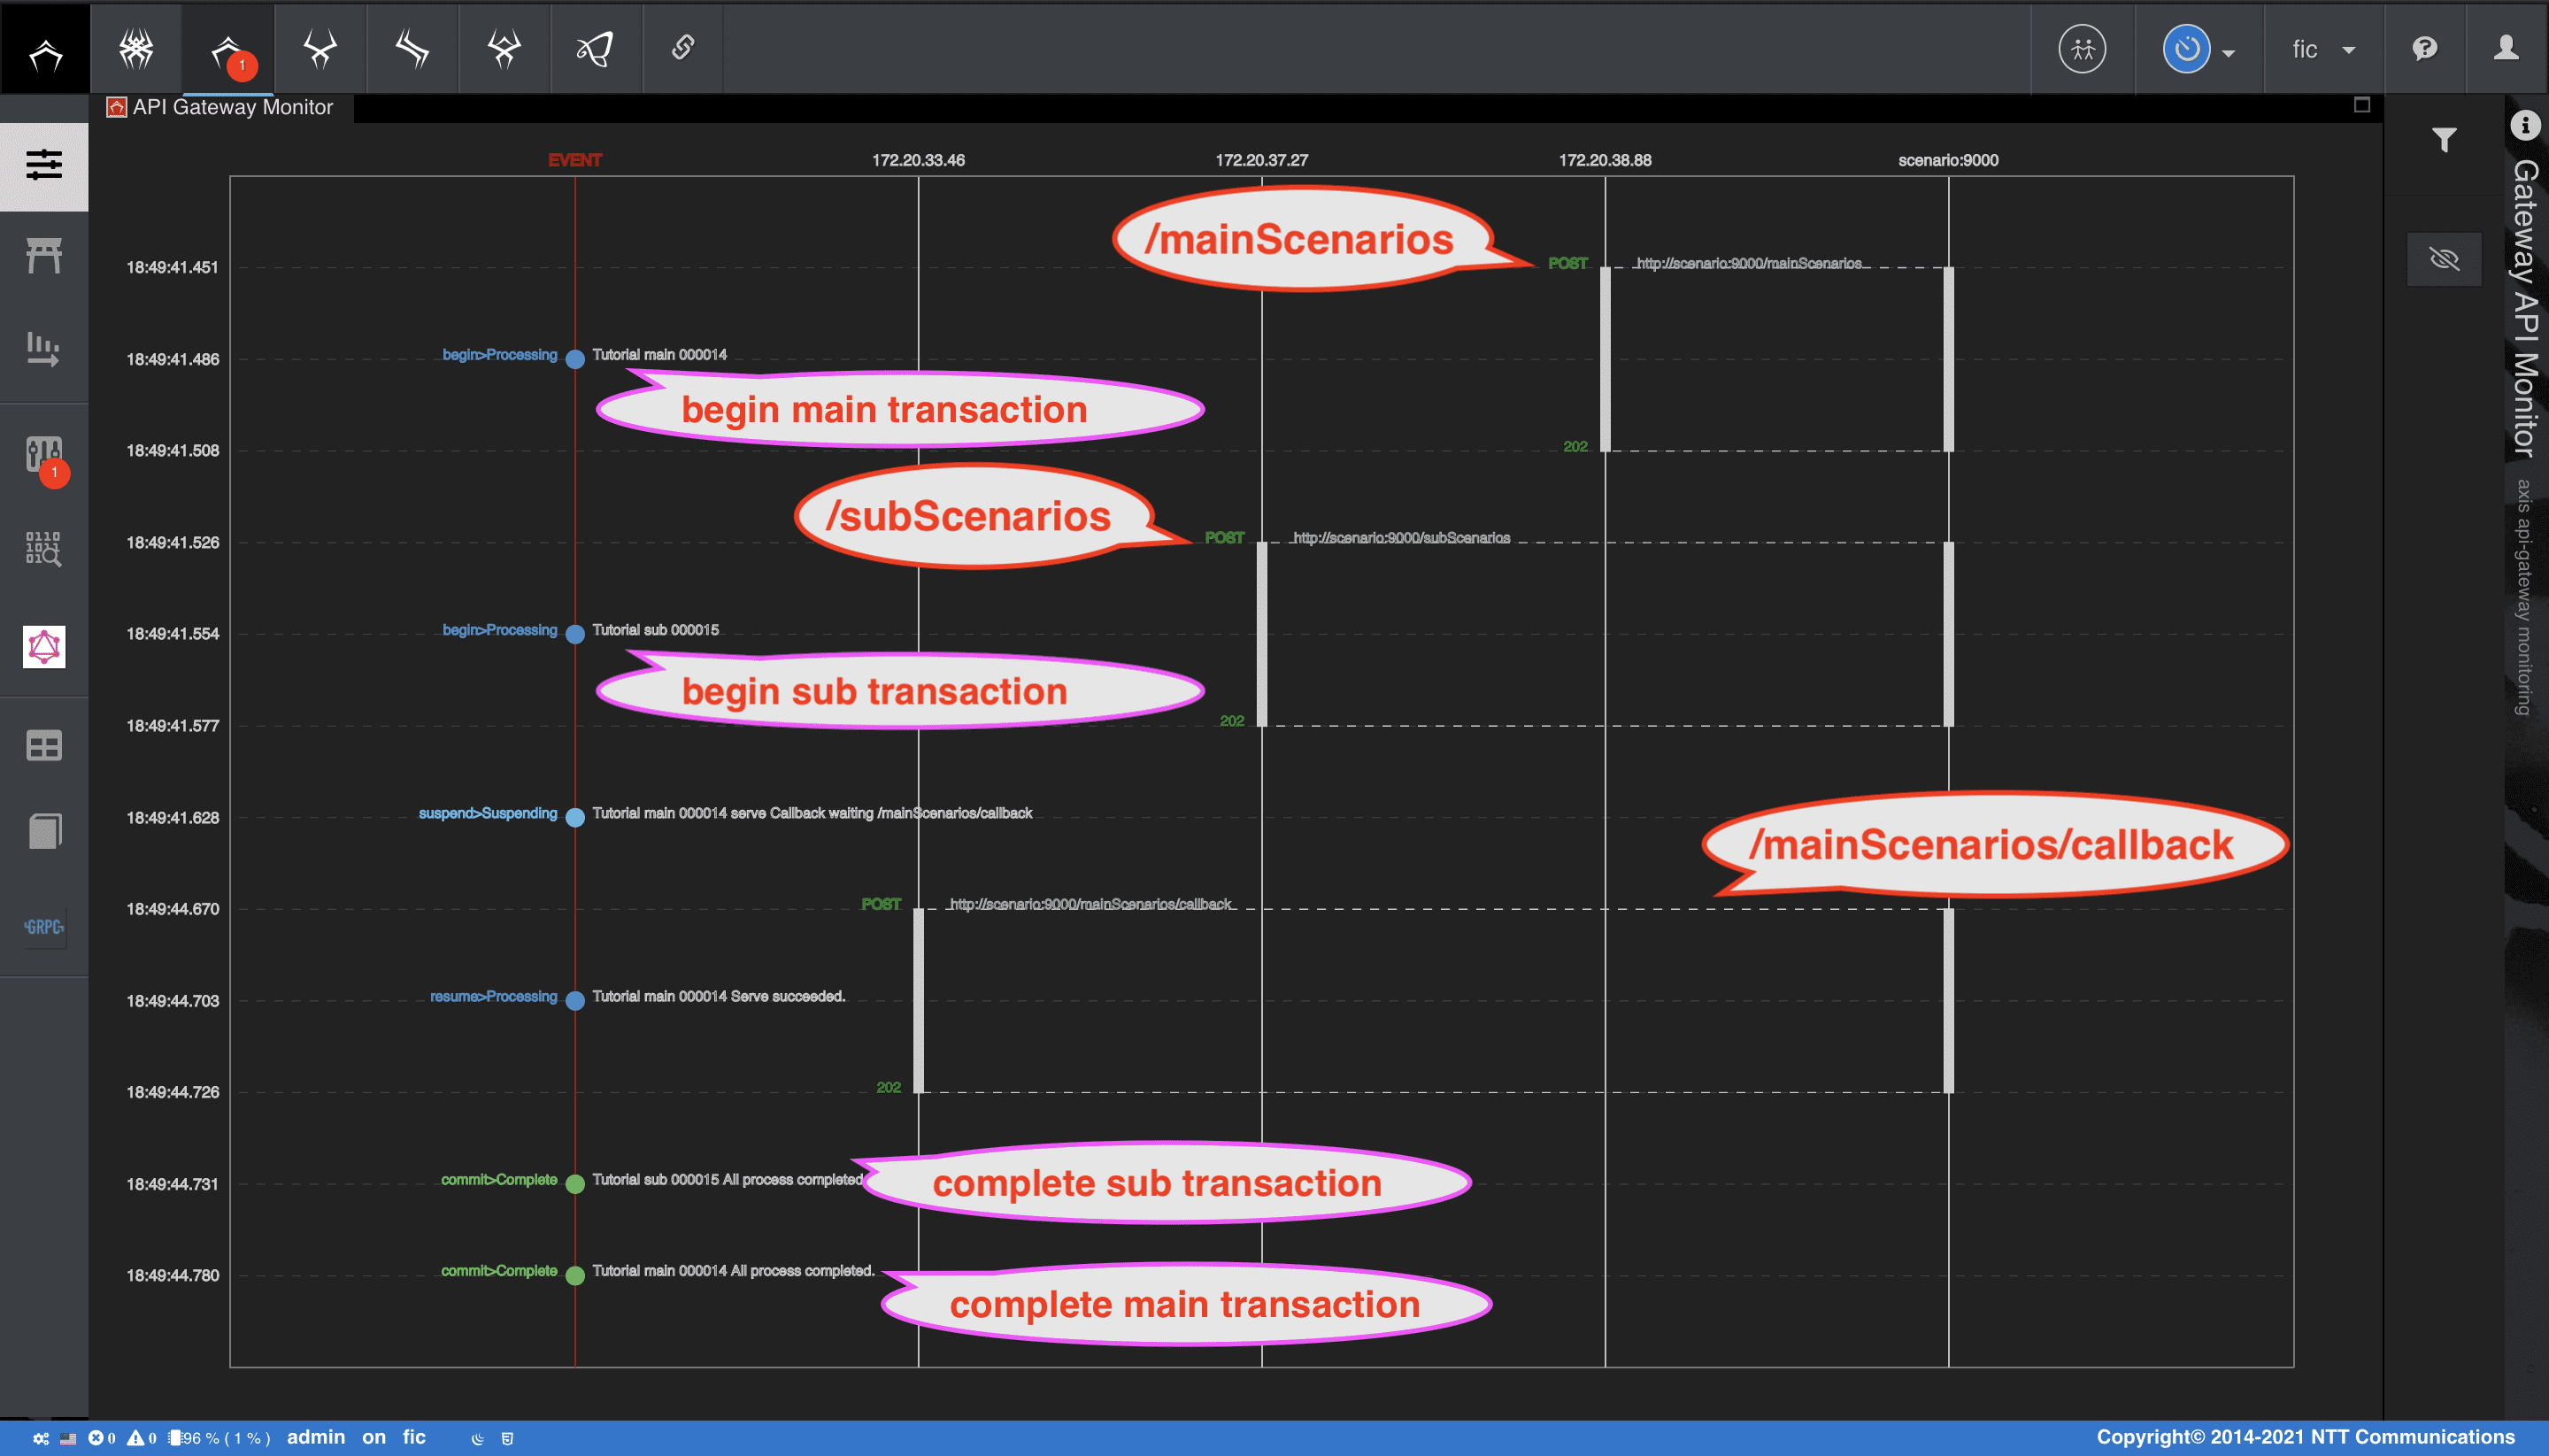
サブシナリオの呼び出し後、サブシナリオからメインシナリオへのコールバックが成功し、各トランザクションの状態がCompleteに遷移する様子を確認することができます。
ATOM Transaction
本チュートリアルでは、ATOMのメソッド伝搬及び自律遷移について紹介します。ATOMは、任意の状態属性を定義することができ、状態属性に対して任意の状態遷移を定義することができます。遷移トリガーは、メソッド呼び出しの完了、失敗として定義できます。ATOMの詳細は、Qmonus SDK Programming Guide » Scenario » ATOMを参考にしてください。
チュートリアルの題材として、GoFのデザインパターンにおけるCompositeパターンを取り上げます。以下は、Compositeパターンにおけるクラスダイアグラムです。
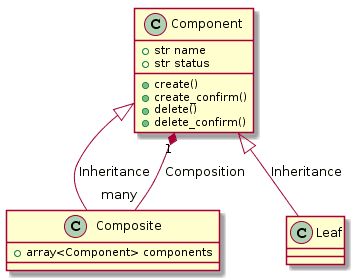
Componentクラスを作成する
最初に作成するATOMは、Component抽象クラスです。チュートリアルでは、CompositeやLeafの生成、削除の振る舞いや状態管理を上位クラスであるComponentに実装しています。
状態マシンは、以下の図のように振舞う設計です。
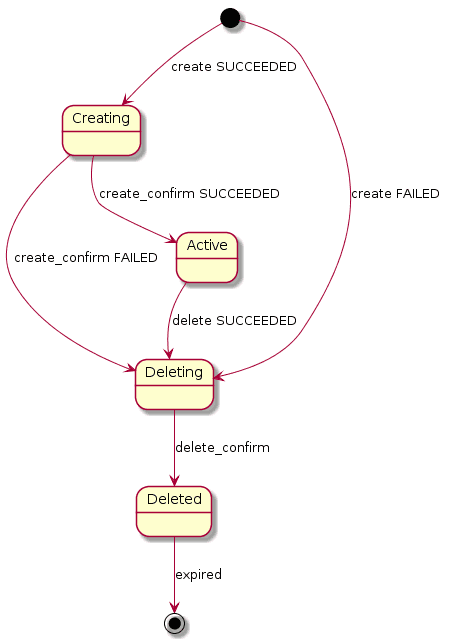
Component抽象クラスは、以下のような定義になります。
各メソッドの実装は、クラウドリソースをコントロールするようにカスタマイズするとより理解を深められるでしょう。
Componentクラス ダウンロード
yaml
category: Tutorial
name: Component
attributes:
  identifier:
    field_name: name
    field_type: string
    field_persistence: true
    field_immutable: true
  local_fields:
    - field_name: state
      field_type: string
      field_persistence: true
      field_nullable: true
      field_immutable: false
      field_unique: false
      field_fsm:
        Creating:
          execution_method: create
          success_transition: Active
          failure_transition: Deleting
          status_type: Initial
        Active:
          execution_method: create_confirm
          failure_transition: Deleting
          status_type: Steady
        Deleting:
          execution_method: delete
          success_transition: Deleted
        Deleted:
          execution_method: delete_confirm
          status_type: Terminate
  ref_fields: []
methods:
  class_methods: []
  instance_methods:
    - method_body: |-
        async def create(self, *args, **kwargs):
            print("{}.{}.create()".format(self.__class__.__name__, self.instance))
      propagation_mode: true
      topdown: true
      auto_rollback: true
      multiplexable_number: 1
      field_order: ascend
    - method_body: |-
        async def create_confirm(self, *args, **kwargs):
            for i in range(1, 4):
                print("{}.{} create confirming...{}".format(self.__class__.__name__, self.instance, i))
                await asyncio.sleep(1)
            print("{}.{} create done.".format(self.__class__.__name__, self.instance))
      propagation_mode: true
      topdown: true
      auto_rollback: true
      multiplexable_number: 1
      field_order: ascend
    - method_body: |-
        async def delete(self, *args, **kwargs):
            print("{}.{}.delete()".format(self.__class__.__name__, self.instance))
      propagation_mode: true
      topdown: false
      auto_rollback: true
      multiplexable_number: 1
      field_order: ascend
    - method_body: |-
        async def delete_confirm(self, *args, **kwargs):
            for i in range(1, 4):
                print("{}.{} delete confirming...{}".format(self.__class__.__name__, self.instance, i))
                await asyncio.sleep(1)
            await self.destroy()
      propagation_mode: true
      topdown: false
      auto_rollback: true
      multiplexable_number: 1
      field_order: ascend
persistence: false
abstract: true
api_generation: false
-
上記の
Componentクラスファイルを用意する -
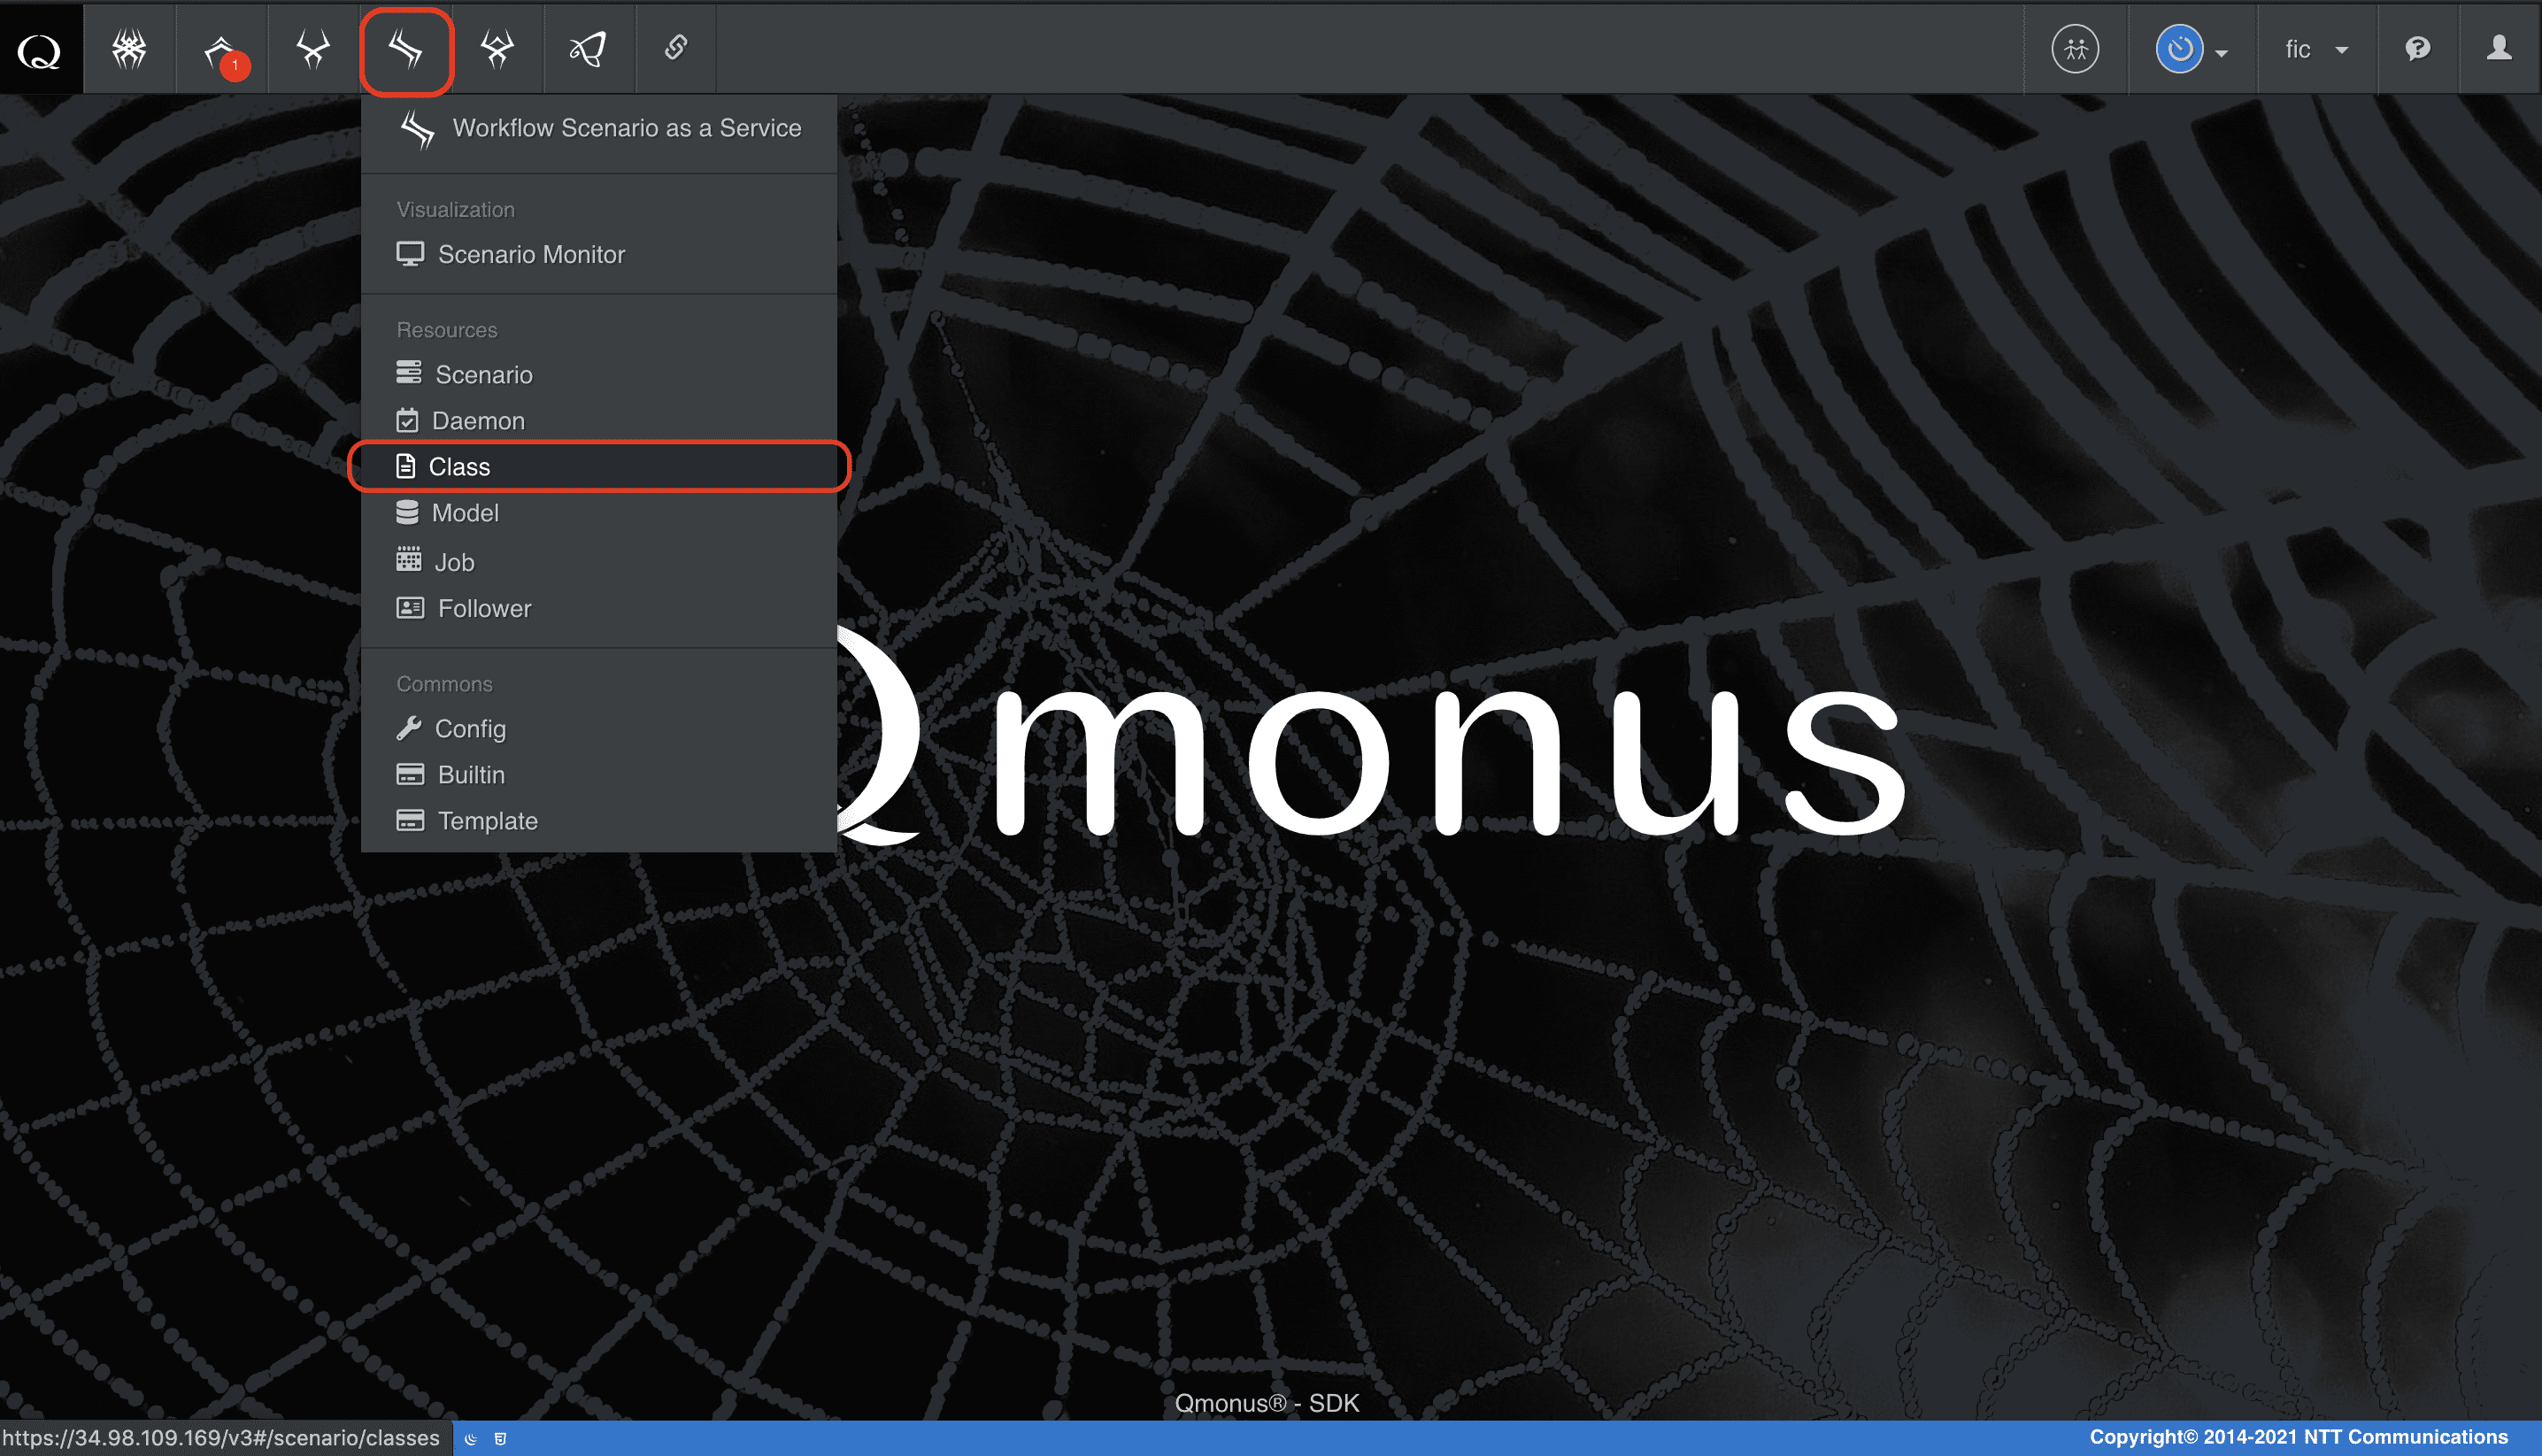
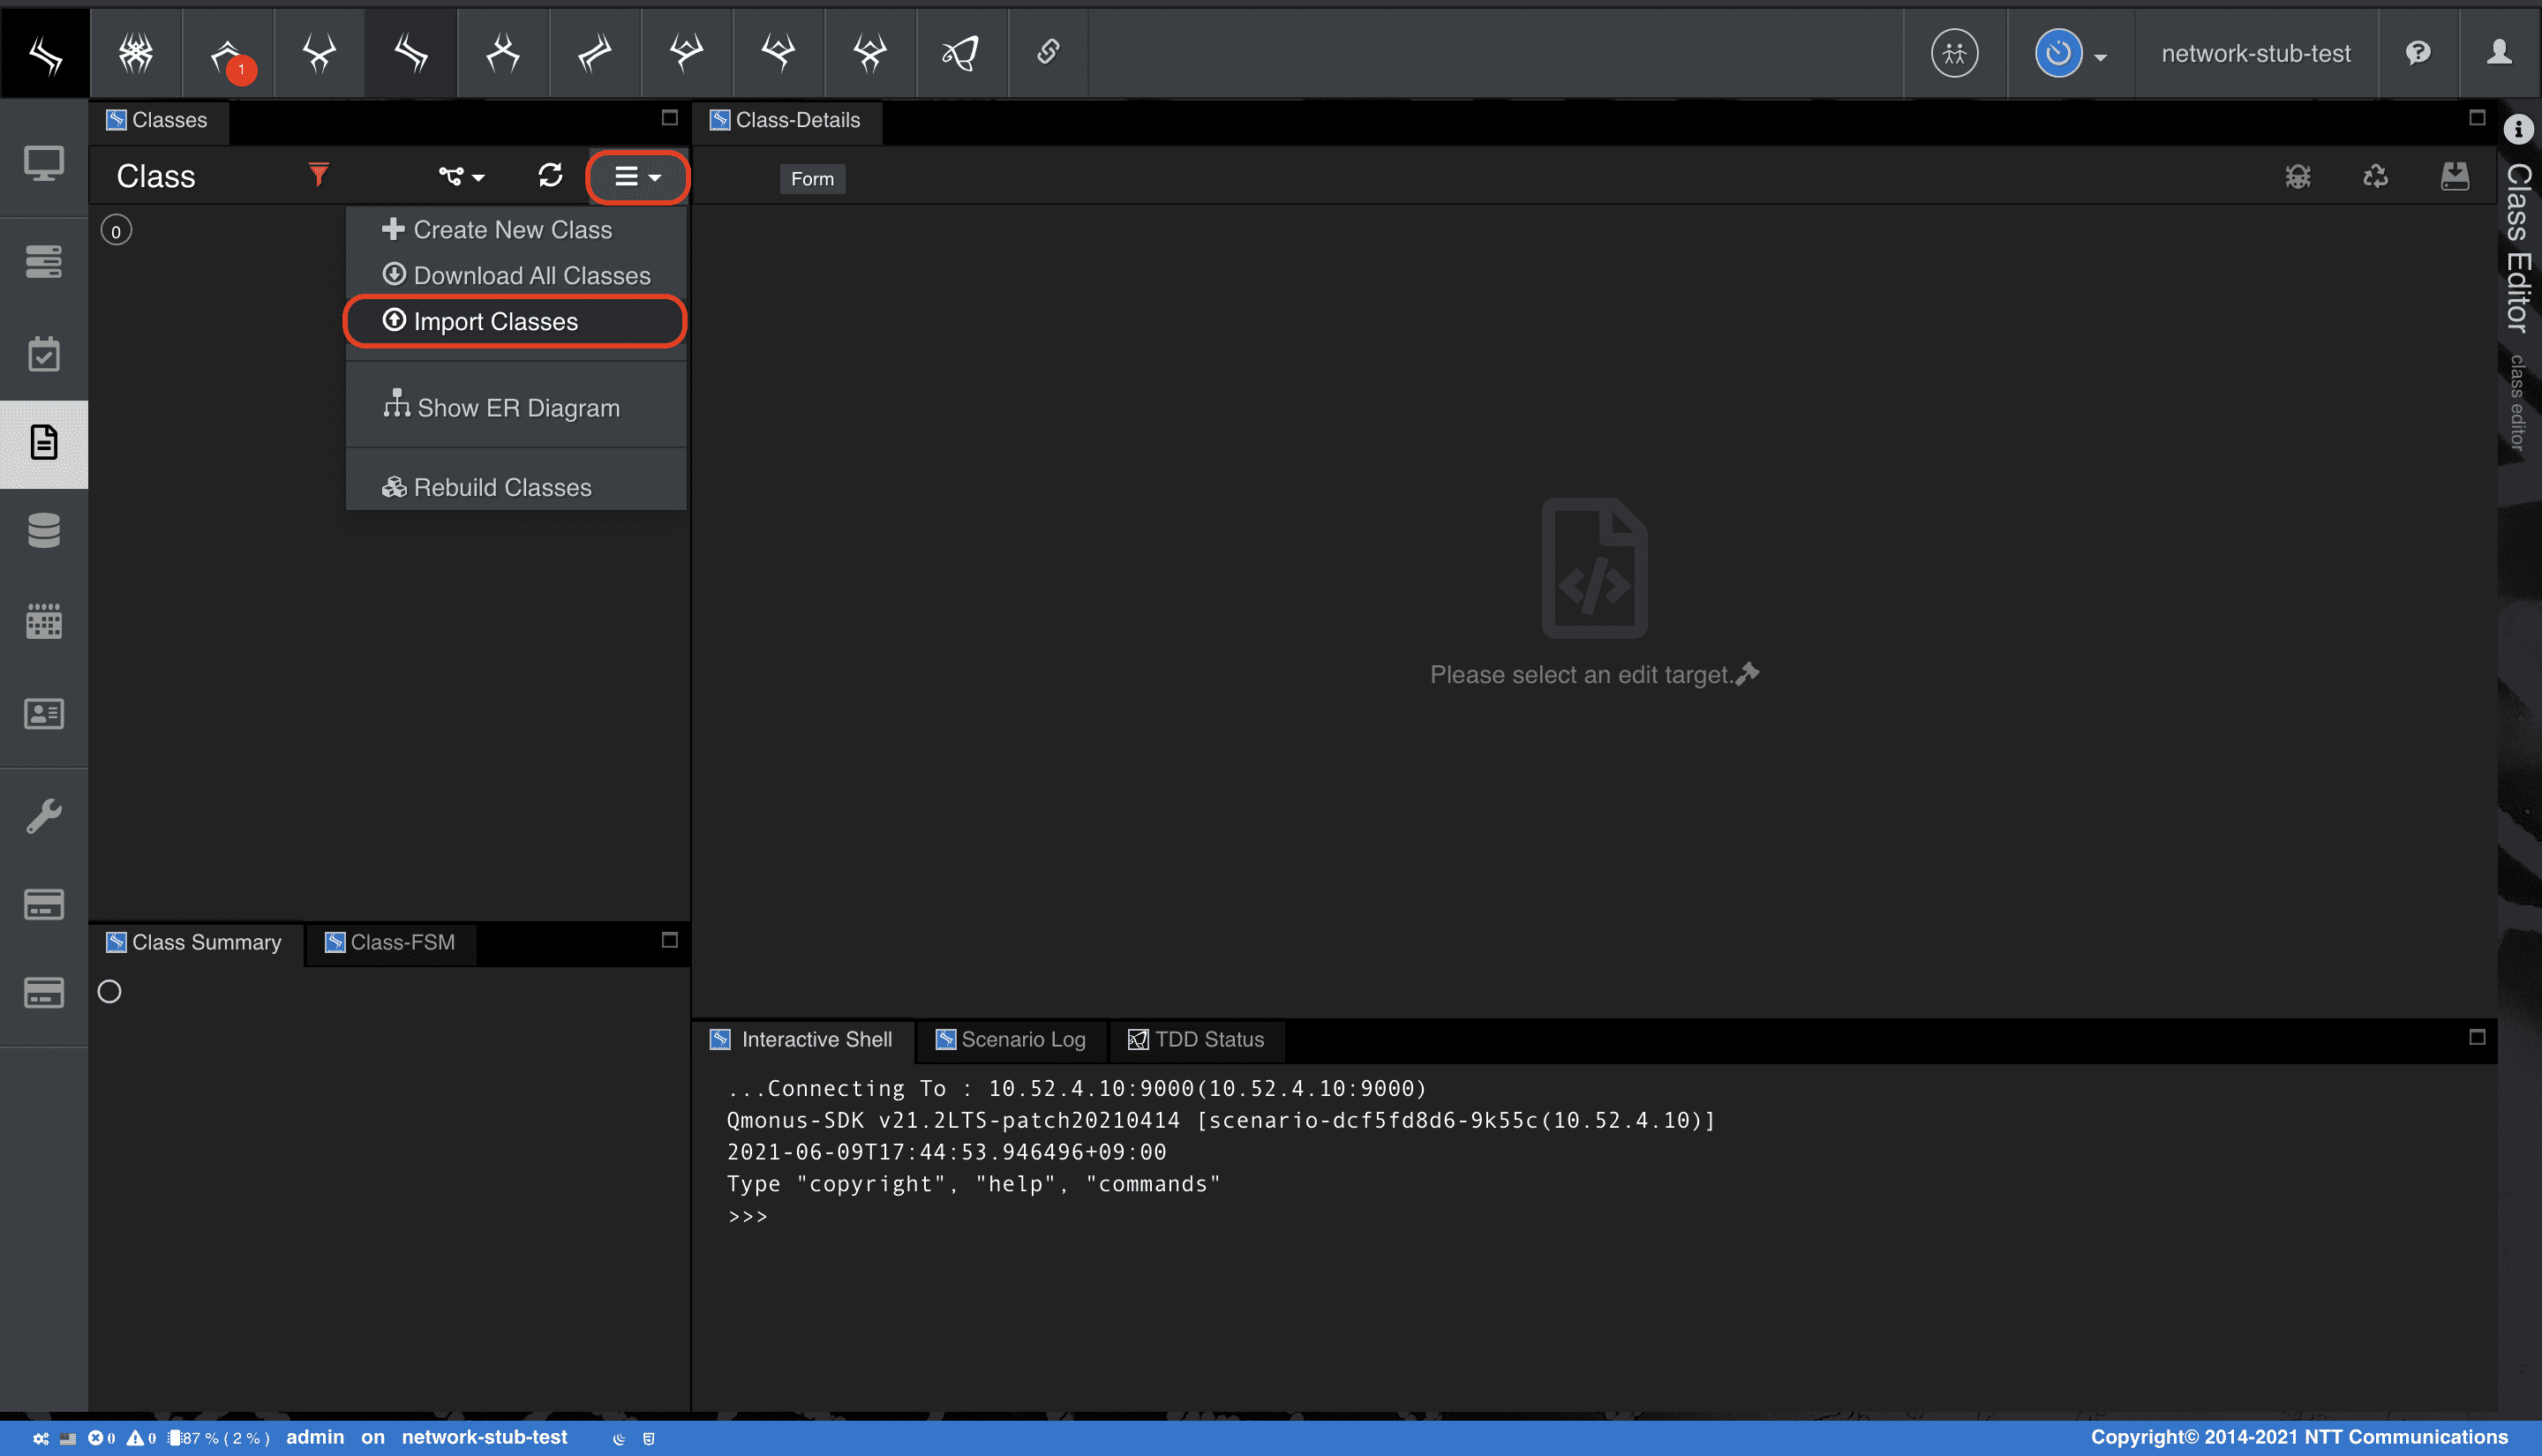
メインメニューから [Workflow Scenario as a Service] > [Class] を選択
-
クラスメニューの [Import Classes] を選択
-
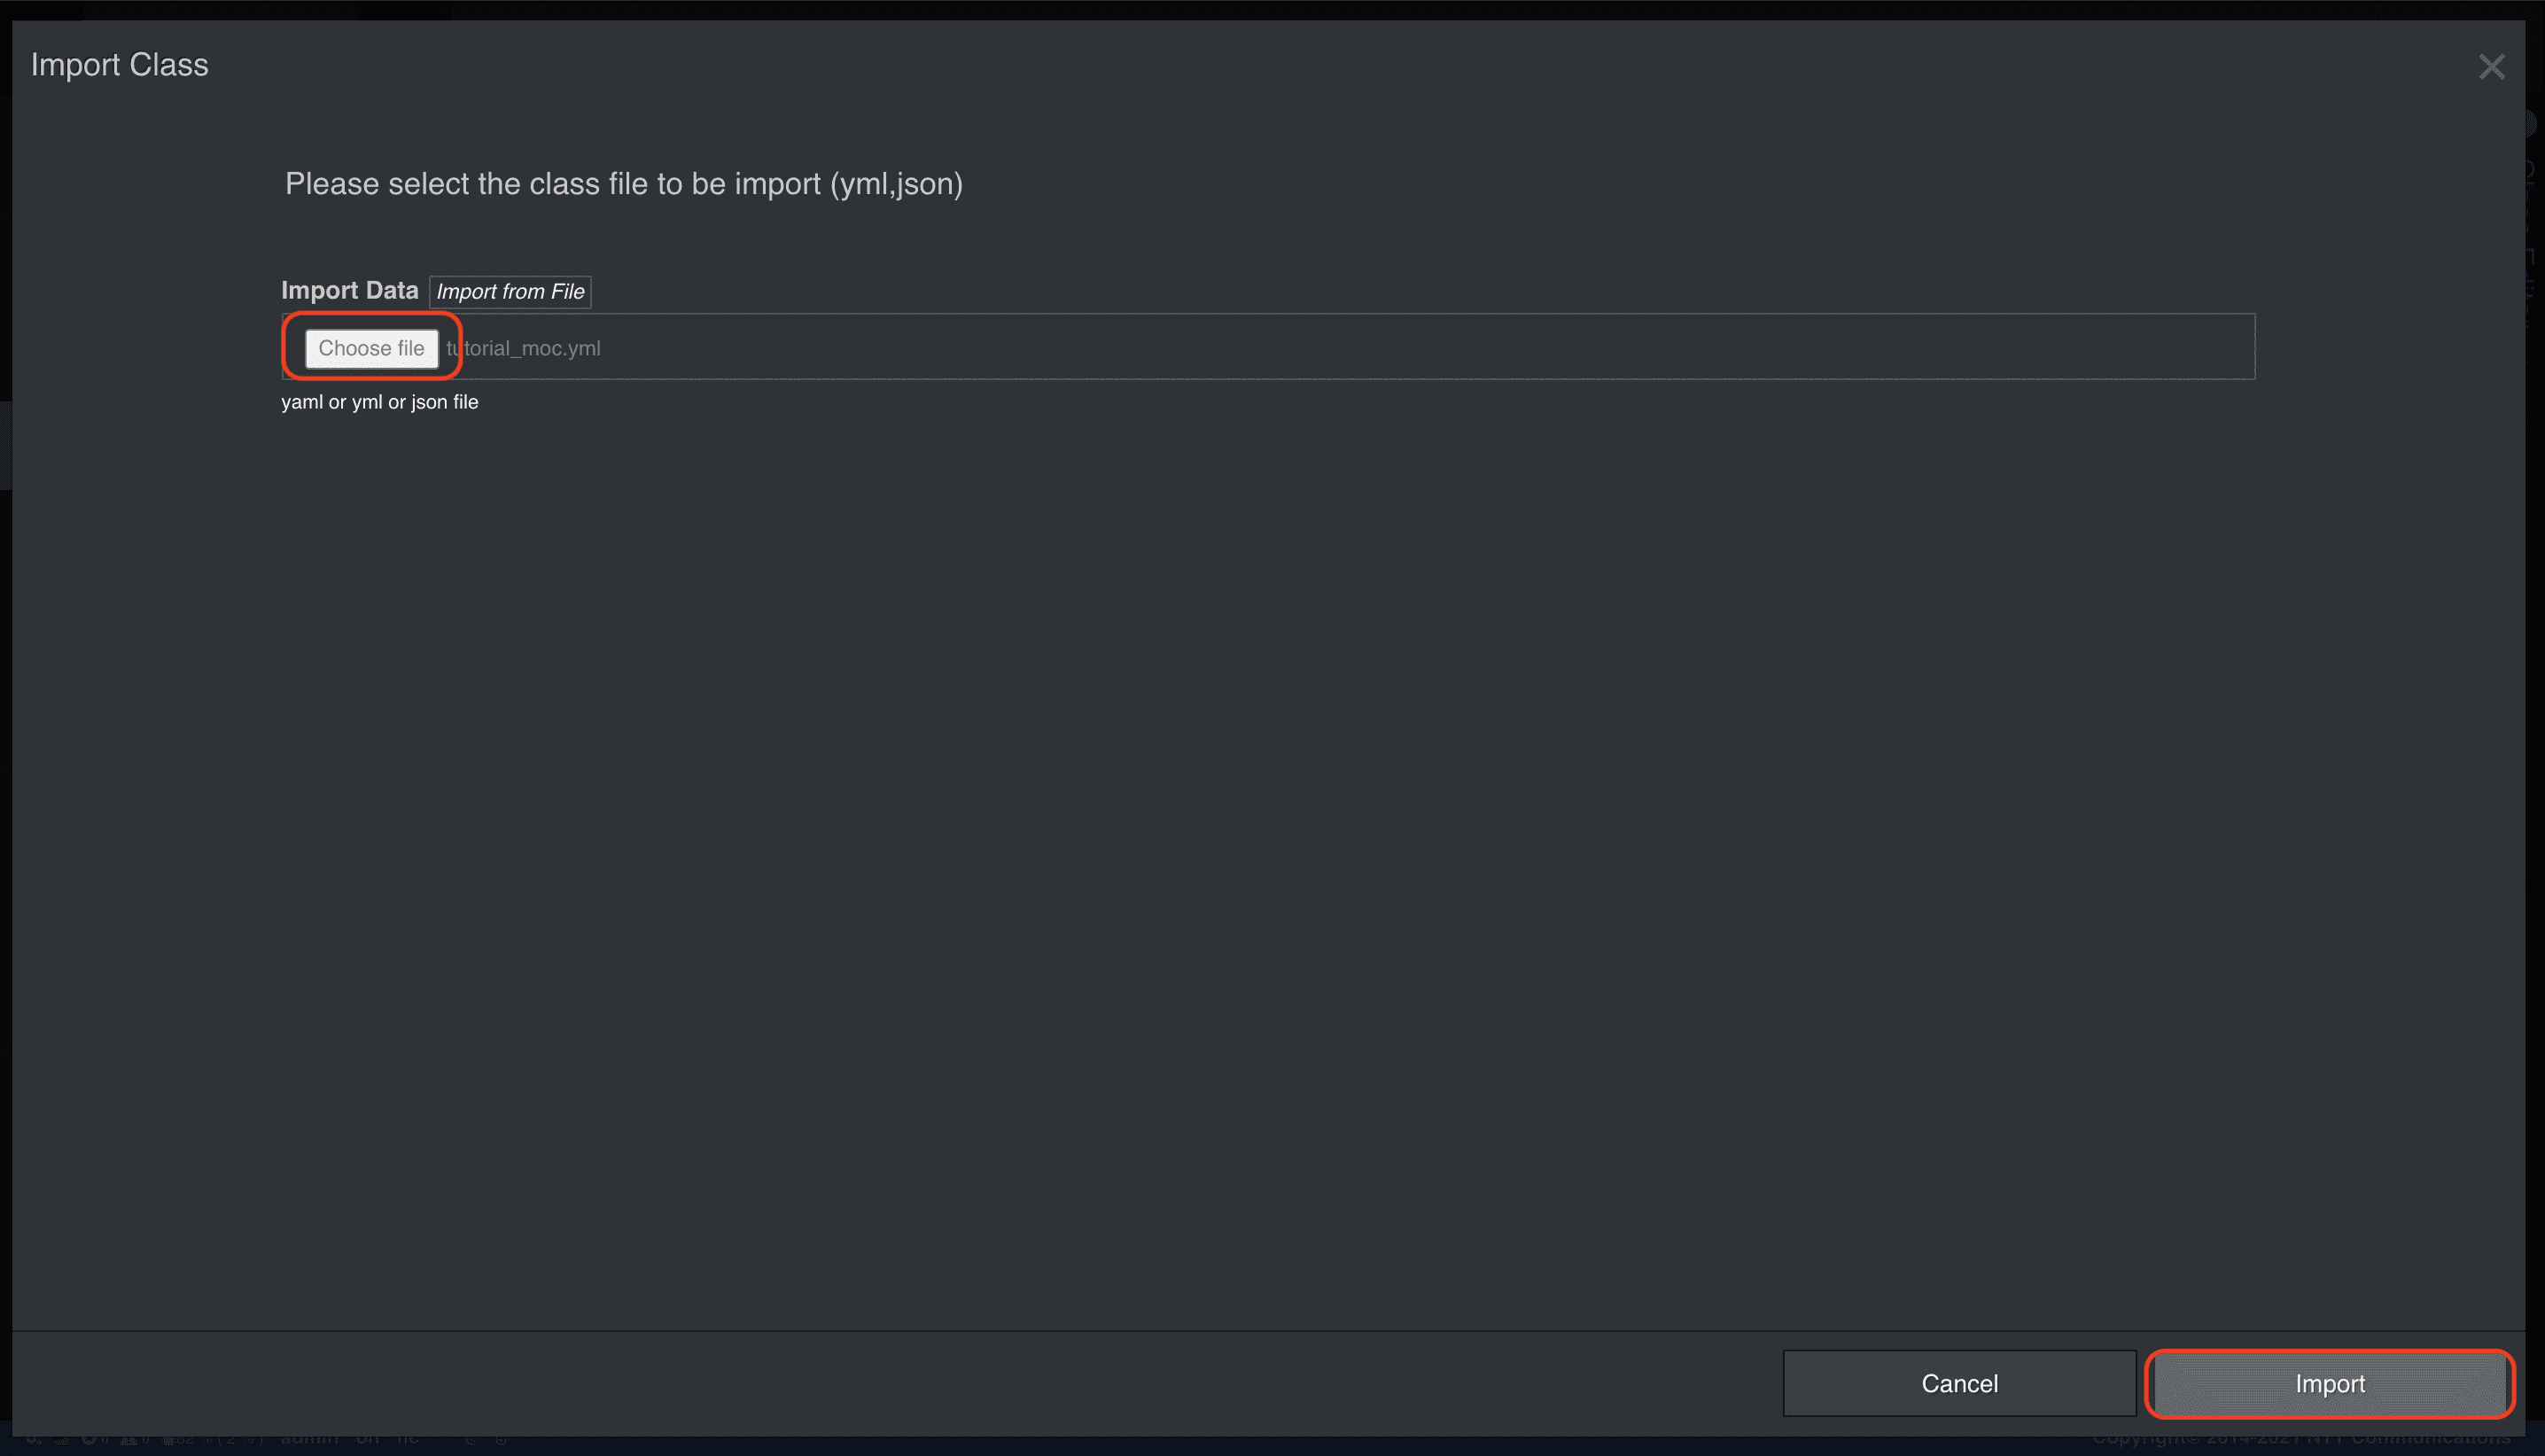
[Choose file] で上記の定義ファイルを指定後、[Import] を選択
Compositeクラスを作成する
Composite具象クラスはComponentを継承し、componentsフィールドでComponent型をリスト保持することで包含関係を構築します。
Componentと同様に、以下の定義でCompositeクラスを作成してください。
Compositeクラス ダウンロード
yaml
category: Tutorial
name: Composite
attributes:
  local_fields:
    - field_name: components
      field_type: array<AxisAtom.Component>
      field_persistence: true
      field_nullable: true
      field_immutable: false
      field_unique: false
  ref_fields: []
methods:
  class_methods: []
  instance_methods: []
persistence: true
abstract: false
api_generation: false
extends:
  - Component
Leafクラスを作成する
Leaf具象クラスはComponentを継承するだけです。
こちらも同様に、以下の定義でクラスを作成してください。
Leafクラス ダウンロード
yaml
category: Tutorial
name: Leaf
attributes:
  local_fields: []
  ref_fields: []
methods:
  class_methods: []
  instance_methods:
    - method_body: |-
        async def hello(self, *args, **kwargs):
           print("hello")
      propagation_mode: true
      topdown: true
      auto_rollback: true
      multiplexable_number: 1
      field_order: ascend
persistence: true
abstract: false
api_generation: false
extends:
  - Component
動作確認
REPLでCompositeインスタンスツリーを生成し、最上位のインスタンスに対してcreateメソッドを呼び出してください。
メソッド実行が伝搬され、各インスタンスは自律的に状態を遷移させます。
この間、トランザクションサービスが自動的にリンクされ、アトミックな制御が行われます。トランザクションモニターも合わせて確認しておくのも良いでしょう。
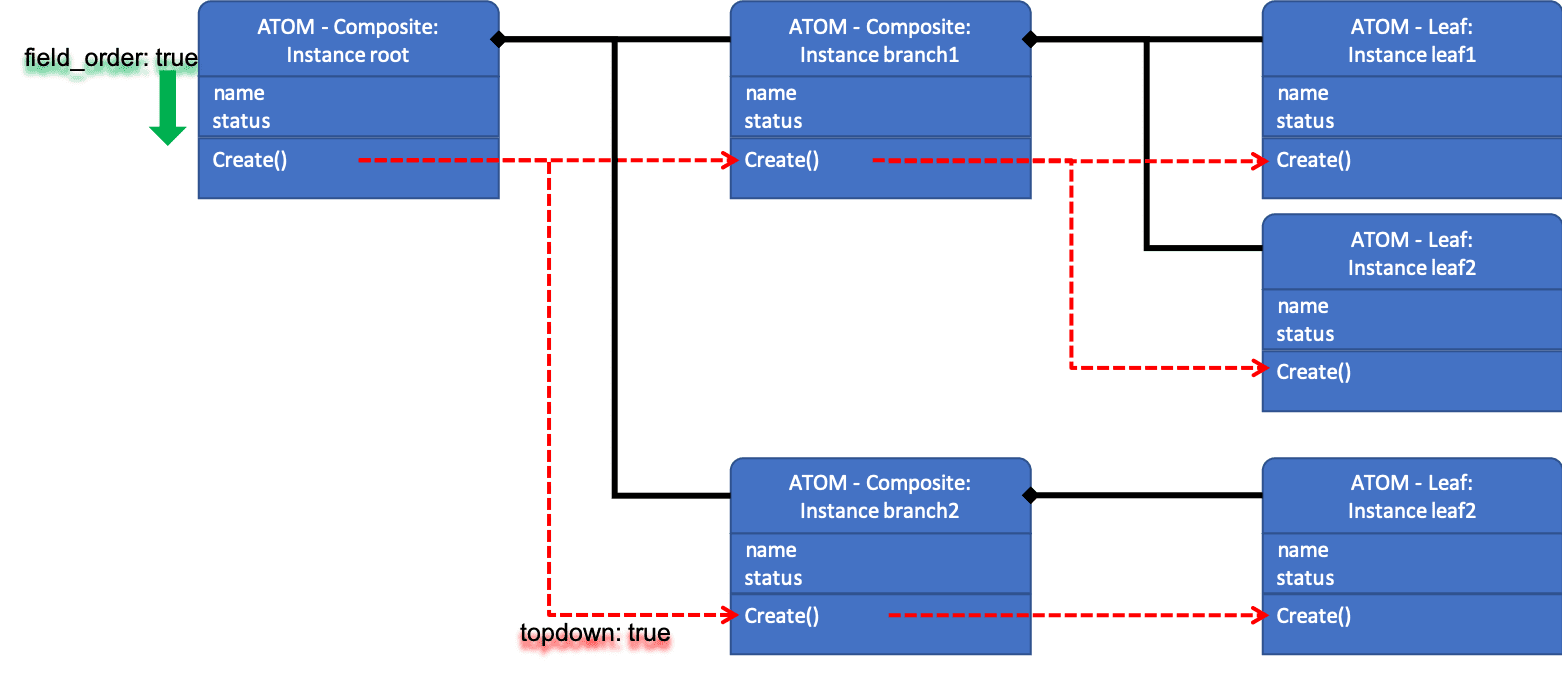
本チュートリアルでは、以下の構成でインスタンスツリーを作成していきます。
createメソッドの設定topdownをtrueにしているため、親から子クラス、ツリーでは左から右にメソッドの実行がおこなわれます。
また、field_orderをtrueに設定しており、インスタンスフィールドは昇順に伝搬します。
インスタンスメソッドにおけるその他の設定項目については、冒頭に紹介したガイドQmonus SDK Programming Guide » Scenario » ATOMのメソッド定義に記載しています。
以下の手順に従って、インスタンス生成、メソッド実行をしていきましょう。
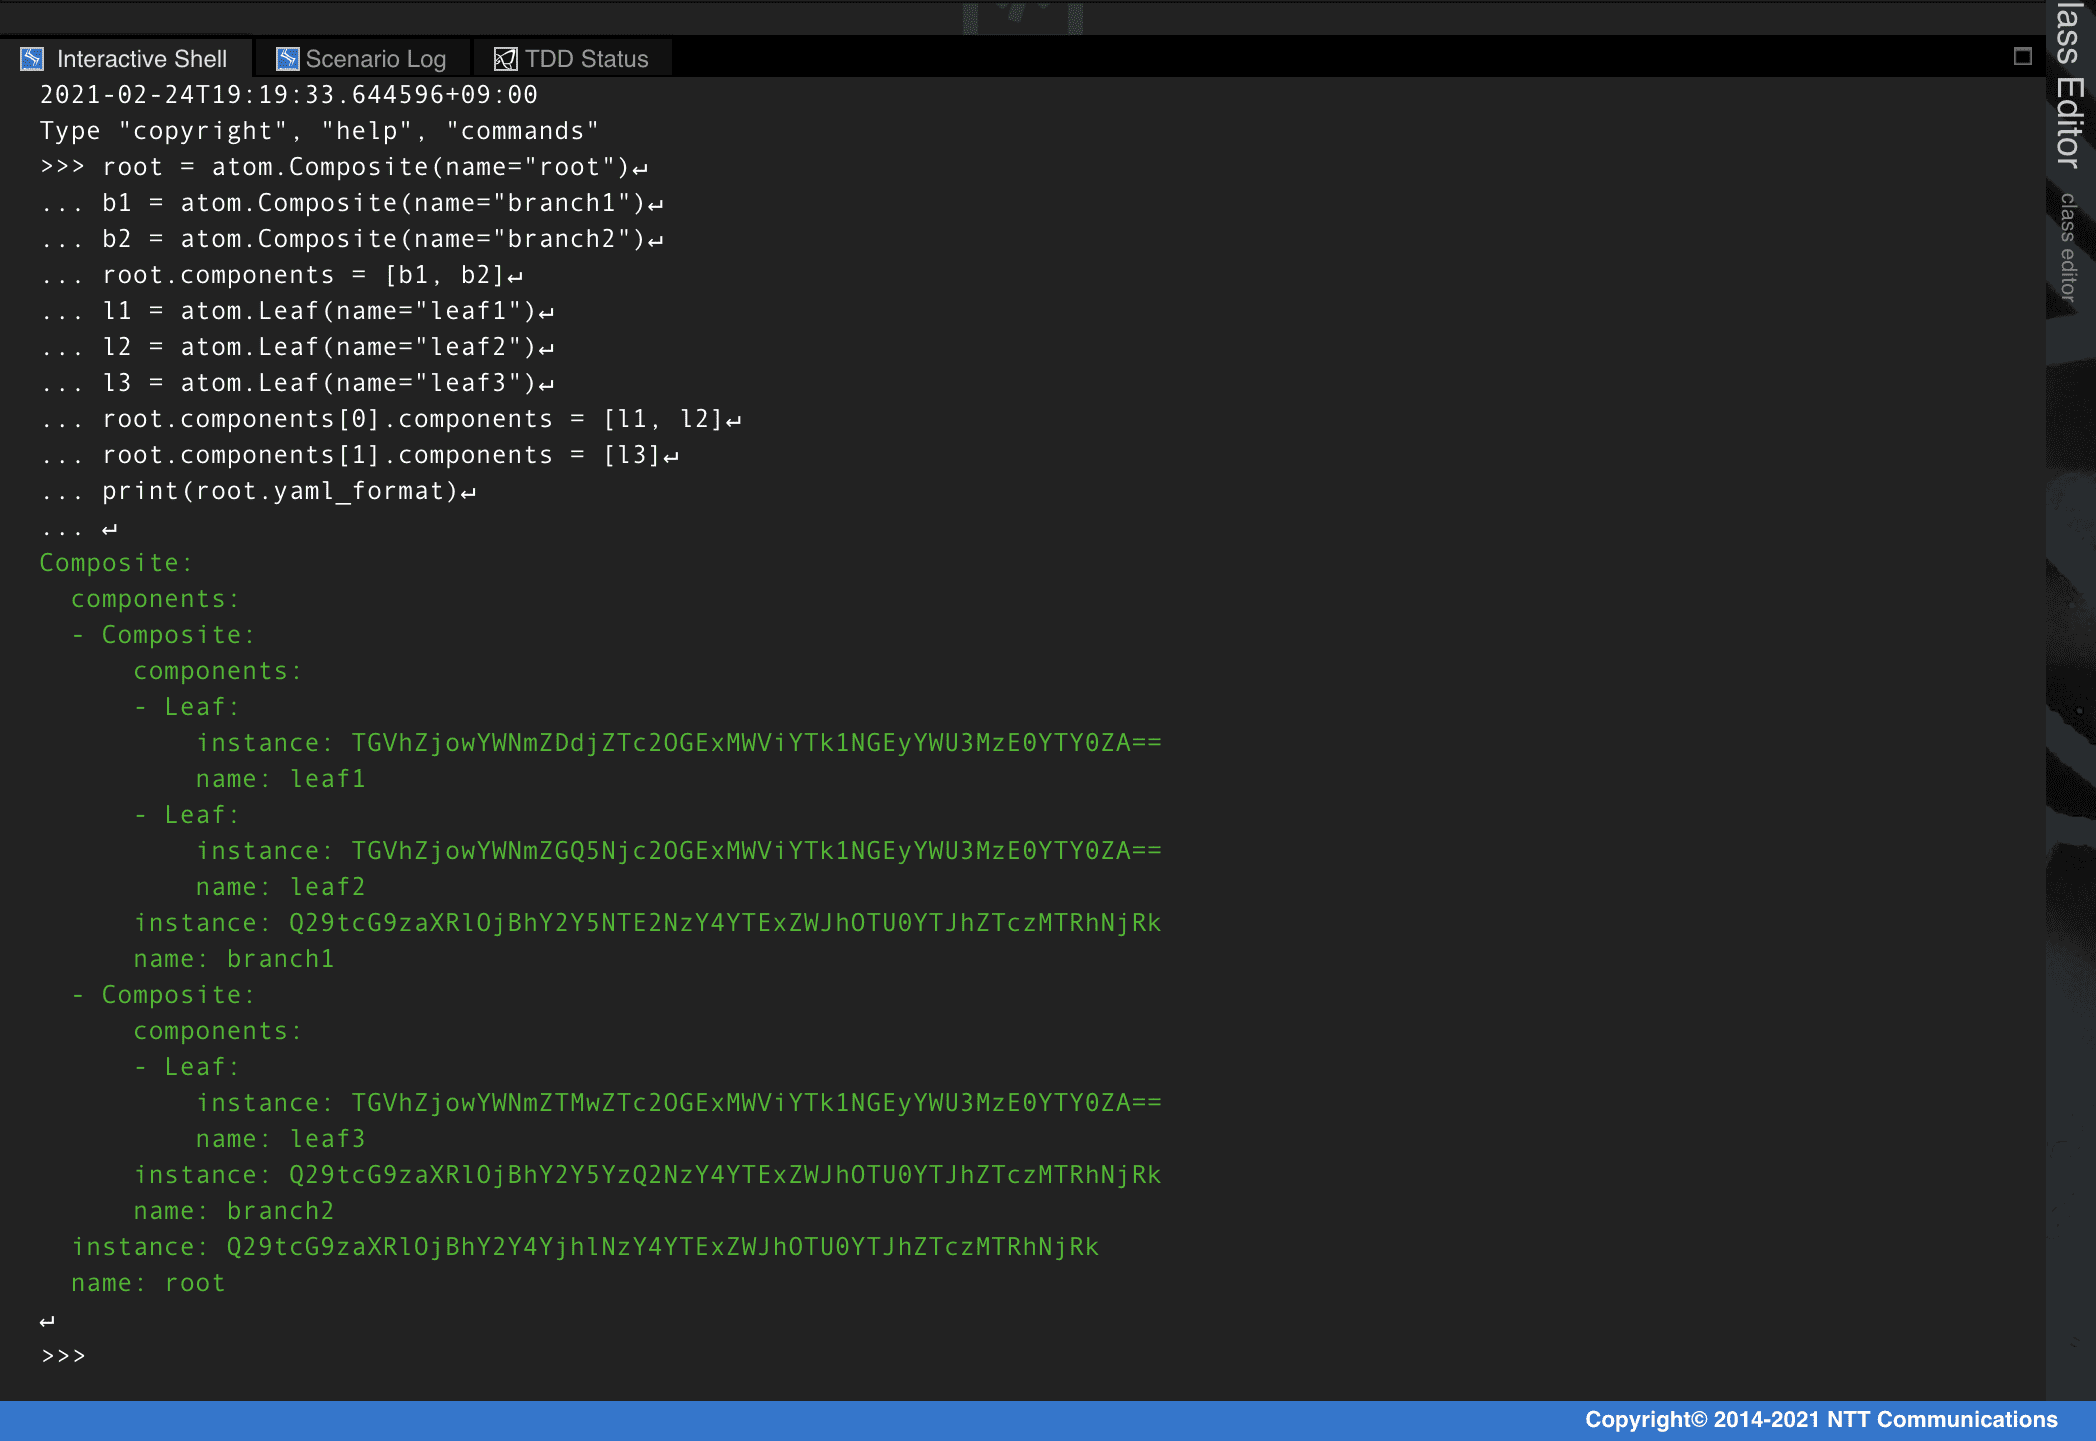
- [Interactive Shell] タブにて各命令を入力し、インスタンスを生成、確認する
python
root = atom.Composite(name="root")
b1 = atom.Composite(name="branch1")
b2 = atom.Composite(name="branch2")
root.components = [b1, b2]
l1 = atom.Leaf(name="leaf1")
l2 = atom.Leaf(name="leaf2")
l3 = atom.Leaf(name="leaf3")
root.components[0].components = [l1, l2]
root.components[1].components = [l3]
print(root.yaml_format)   <- yaml_format: ATOMのプロパティメソッド. 生成されたインスタンスの確認
↵                         <- 再Enter[↵]で実行
- インスタンス化した
Composite,Leaf情報を登録
python
await root.create()
↵
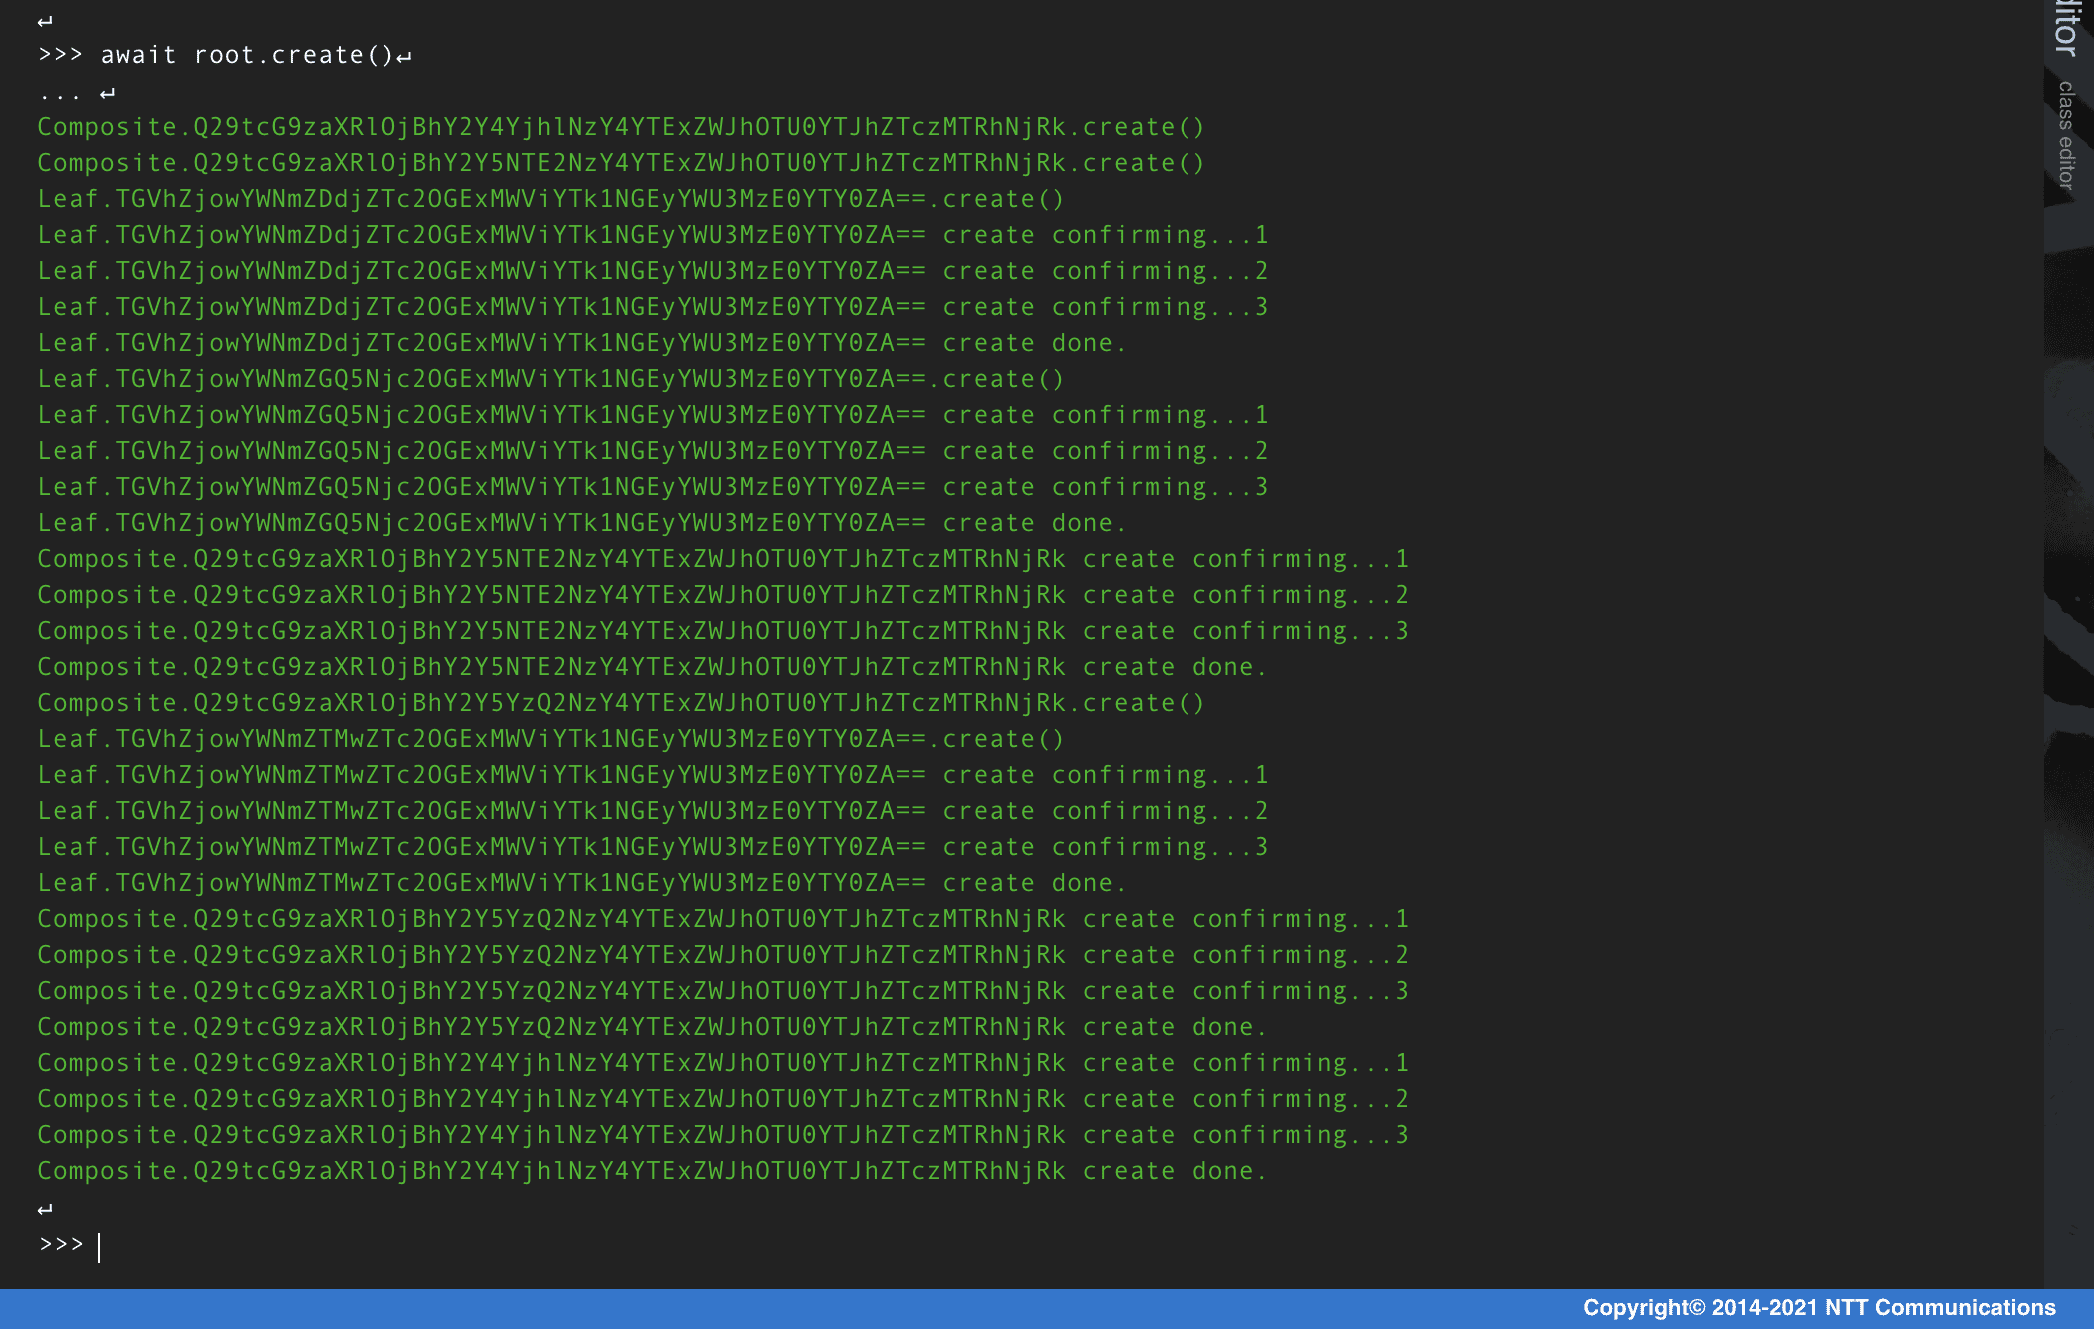
Compositeの登録情報を確認
sql
select * from Composite;
Leafの登録情報を確認
sql
select * from Leaf;

- 登録情報の削除
python
await root.delete()
↵
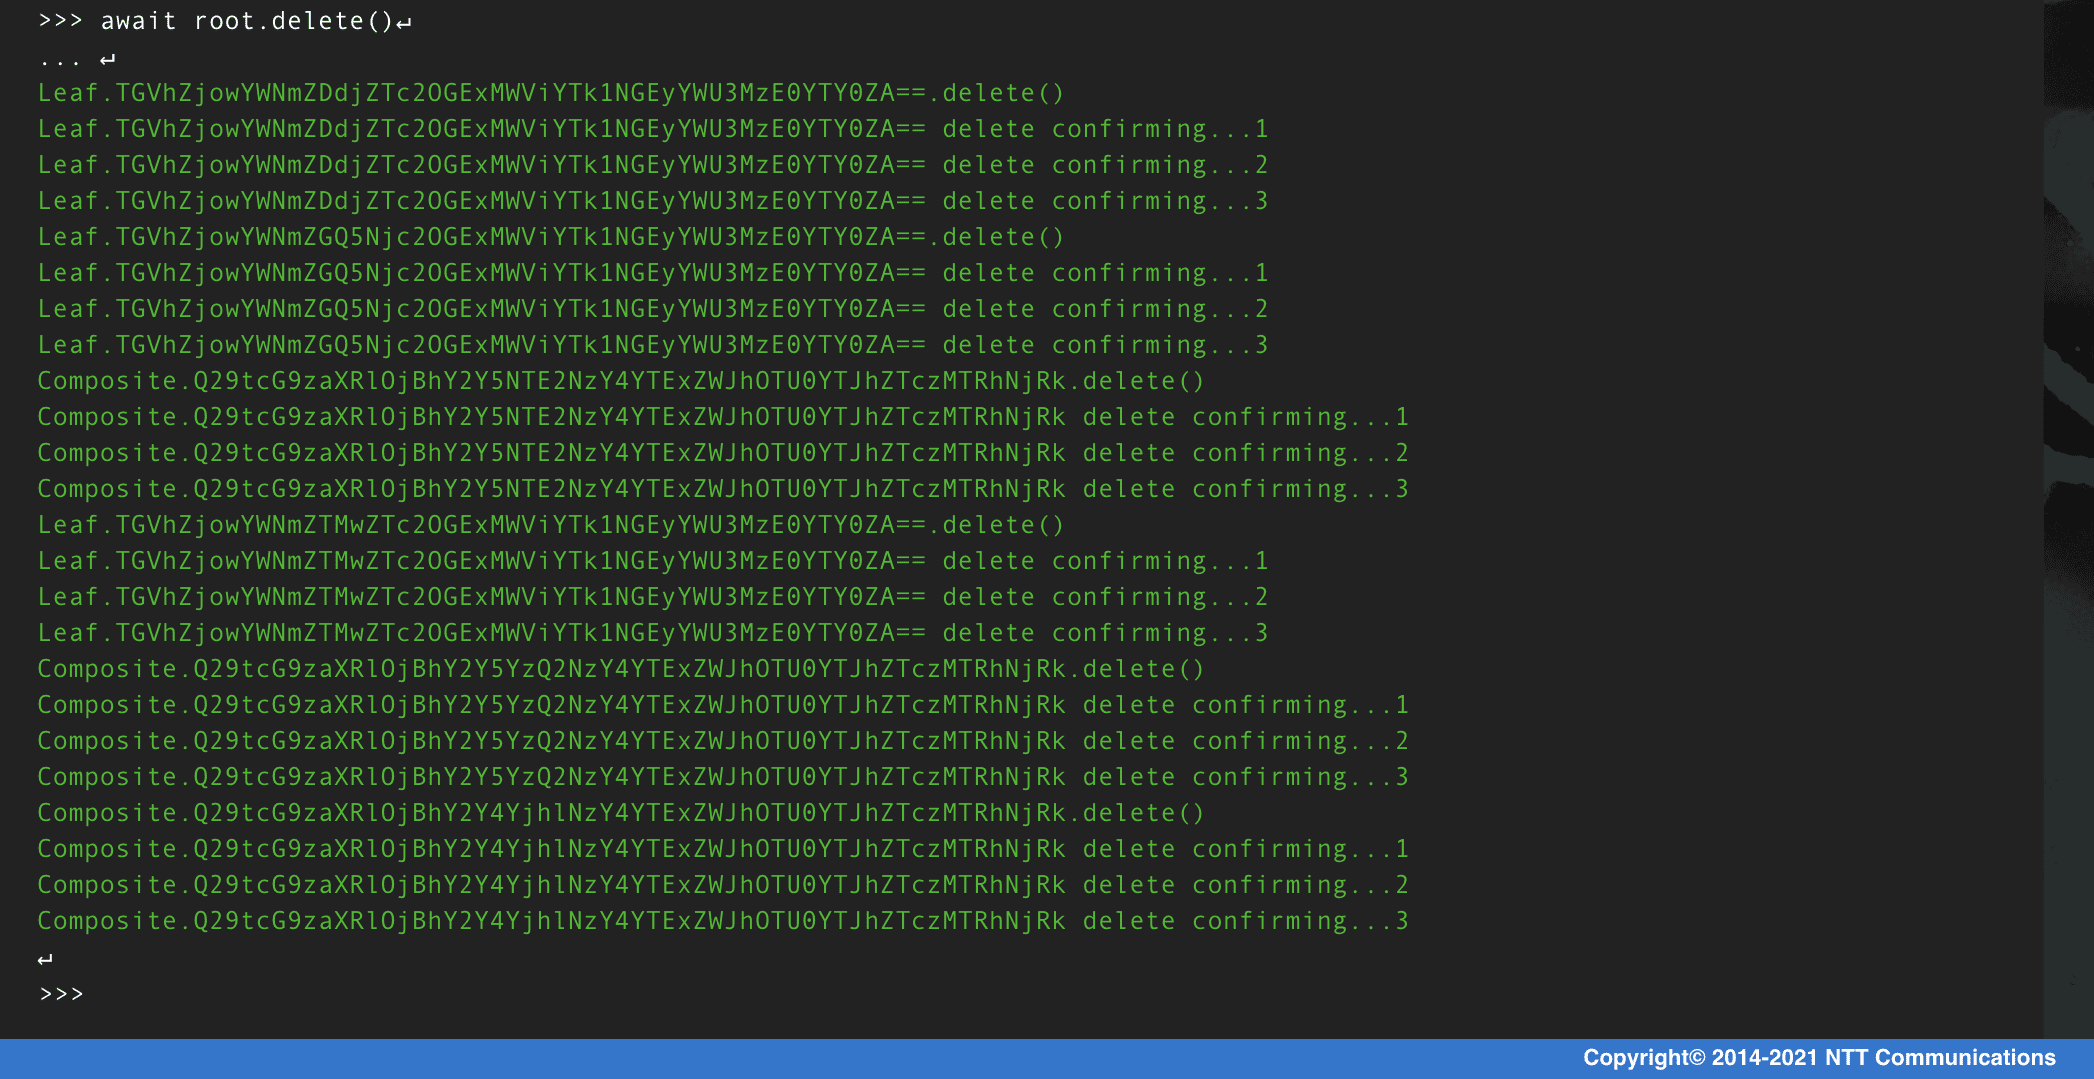
Composite情報が削除されていることを確認
sql
select * from Composite;
Leaf情報が削除されていることを確認
sql
select * from Leaf;
- インスタンスの状態確認
python
print(root.yaml_format)
↵
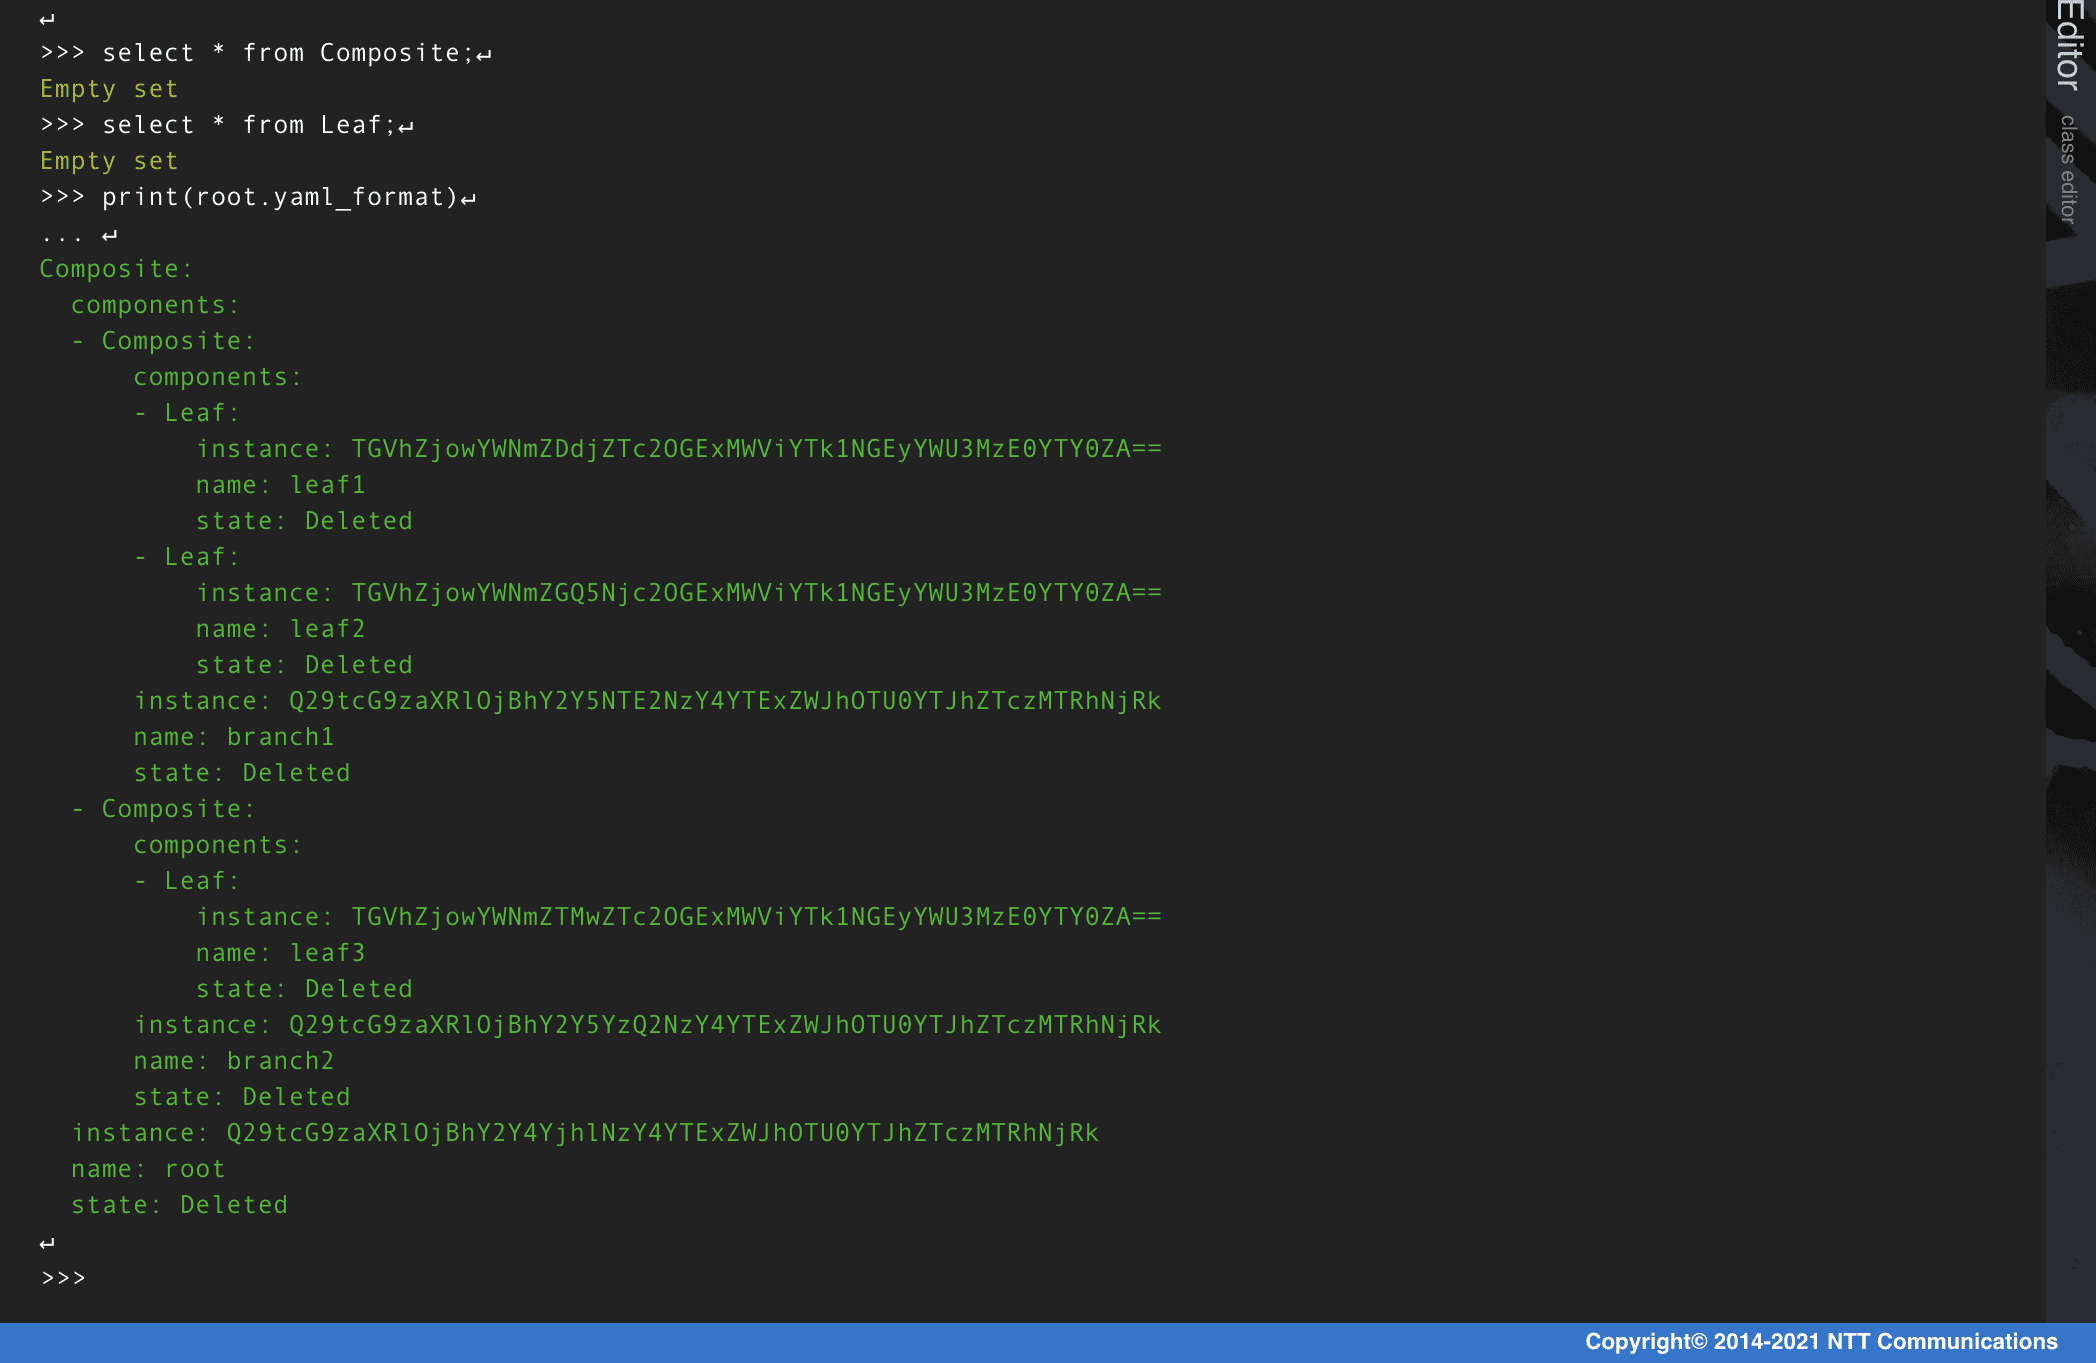
クラウドリソースのメトリックをクラウドPubsubなどのイベントブローカーにプッシュし、Qmonus SDK Programming Guide » Collector/Reflector » Workerを参考にイベントをコンシュームしてQmonus SDKに取り込み、ATOMの状態変化メソッドを呼び出してクラウドリソースをコントロールするようなメトリックフィードバックを実装することで自律的にステートを維持するようなアプリケーションを作ってみるとより理解を深めることができるでしょう。
実践的なテスト駆動型開発
本チュートリアルでは、Qmonus SDKでのテスト駆動型開発を学習します。チュートリアルを実践する前にQmonus SDK Programming Guide » Scenario » テスト駆動型開発に目を通してください。
Step1. アプリケーションの仕様を決定する
最初にチュートリアルで作成するアプリケーションの仕様を決めます。
以下のシーケンスのようにクライアントからの指示でオーダーデータを作成し、外部のHogeサービス側にもリソースを生成するアプリケーションを作成しましょう。
外部のHogeサービスとのインタラクションは非同期でリソースが生成されるまで状態をポーリングする必要があります。
シーケンス図
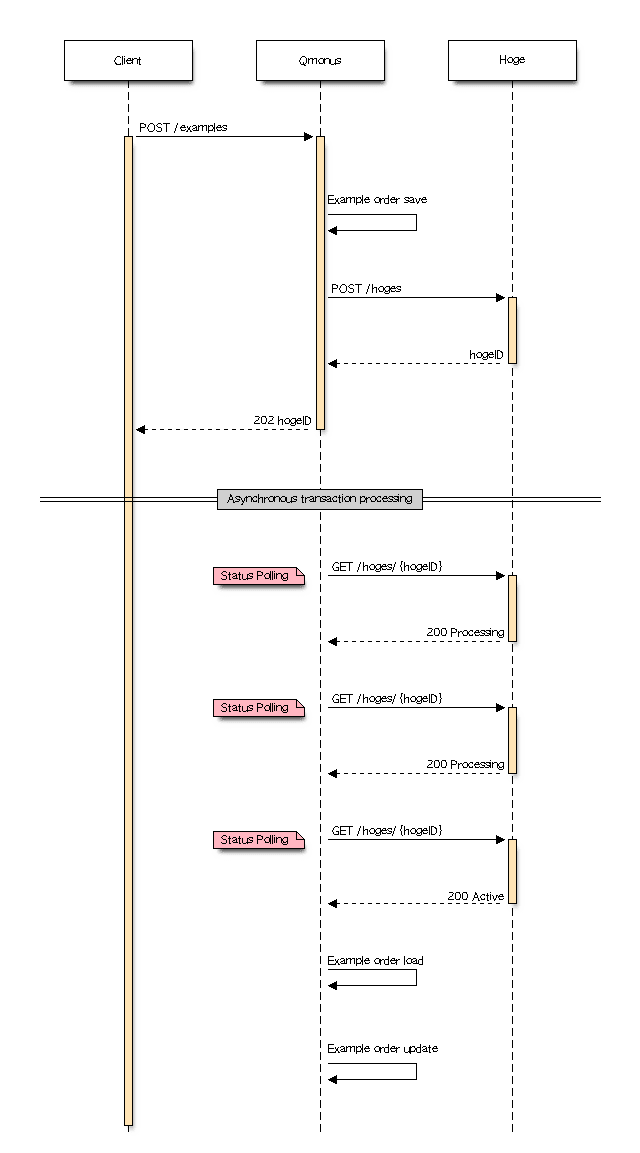
HogeサービスのAPI仕様
| method | path | request body | response body | success code | error code |
|---|---|---|---|---|---|
| POST | /hoges | name, region | hogeID | Accepted | Conflict, InternalError |
| DELETE | /hoges/{hogeID} | hogeID | Accepted | NotFound, InternalError | |
| GET | /hoges/{hogeID} | hogeID, status | Success | NotFound, InternalError |
Hogeリソースの状態マシン

開発するアプリケーションのAPI仕様
| method | path | request body | response body | success code | error code |
|---|---|---|---|---|---|
| POST | /examples | name, region | hogeID | Accepted | BadRequest, Conflict, InternalError |
Step2. テスト観点を実装する
テスト観点は、外部入出力のバリエーションです。これらは、Fakerによって実装することができます。
外部入出力のI/F毎に正常な応答、異常な応答が存在し、それらを網羅的に実装してテストシーンで動作を切り替えることで入出力テストを網羅することができます。
Faker ダウンロード
yaml
- name: postHoge
  category: example
  fakes:
    Accepted:
      script: |-
        async def Accepted(*args, **kwargs):
            hogeID = uuid.uuid1().hex
            await Cache.put(hogeID, "Pending", 15)
            return FakeHttpResponse(202, body=dict(hogeID=hogeID))
    Conflict:
      script: |-
        async def Conflict(*args, **kwargs):
            return FakeHttpResponse(409)
    InternalError:
      script: |-
        async def InternalError(*args, **kwargs):
            return FakeHttpResponse(500)
- category: example
  name: deleteHoge
  fakes:
    Accepted:
      script: |-
        async def Accepted(*args, **kwargs):
            hogeID = kwargs.get("path").split("/")[-1]
            await Cache.put(hogeID, "Pending", 15)
            return FakeHttpResponse(202, body=dict(hogeID=hogeID))
    InternalError:
      script: |-
        async def InternalError(*args, **kwargs):
            return FakeHttpResponse(500)
    NotFound:
      script: |-
        async def NotFound(*args, **kwargs):
            return FakeHttpResponse(404)
- category: example
  name: getHoge
  fakes:
    InternalError:
      script: |-
        async def InternalError(*args, **kwargs):
            return FakeHttpResponse(500)
    NotFound:
      script: |-
        async def NotFound(*args, **kwargs):
            return FakeHttpResponse(404)
    Success:
      script: |-
        async def Success(*args, **kwargs):
            hogeID = kwargs.get("path").split("/")[-1]
            return FakeHttpResponse(body=dict(hogeID=hogeID, status="Active"))
- category: example
  name: getHogeWaitForActive
  fakes:
    InternalError:
      script: |-
        async def InternalError(*args, **kwargs):
            return FakeHttpResponse(500)
    WaitForActive:
      script: |-
        async def Success(*args, **kwargs):
            hogeID = kwargs.get("path").split("/")[-1]
            value = await Cache.get(hogeID)
            return FakeHttpResponse(body=dict(hogeID=hogeID, status="Active" if value is None else "Processing"))
    WaitForError:
      script: |-
        async def Error(*args, **kwargs):
            hogeID = kwargs.get("path").split("/")[-1]
            value = await Cache.get(hogeID)
            return FakeHttpResponse(body=dict(hogeID=hogeID, status="Error" if value is None else "Processing"))
- category: example
  name: getHogeWaitForNotFound
  fakes:
    InternalError:
      script: |-
        async def InternalError(*args, **kwargs):
            return FakeHttpResponse(500)
    WaitForNotFound:
      script: |-
        async def WaitForNotFound(*args, **kwargs):
            hogeID = kwargs.get("path").split("/")[-1]
            value = await Cache.get(hogeID)
            if value:
                return FakeHttpResponse(body=dict(hogeID=hogeID, status="Active"))
            else:
                return FakeHttpResponse(404)
-
上記の
Fakerファイルを用意する -
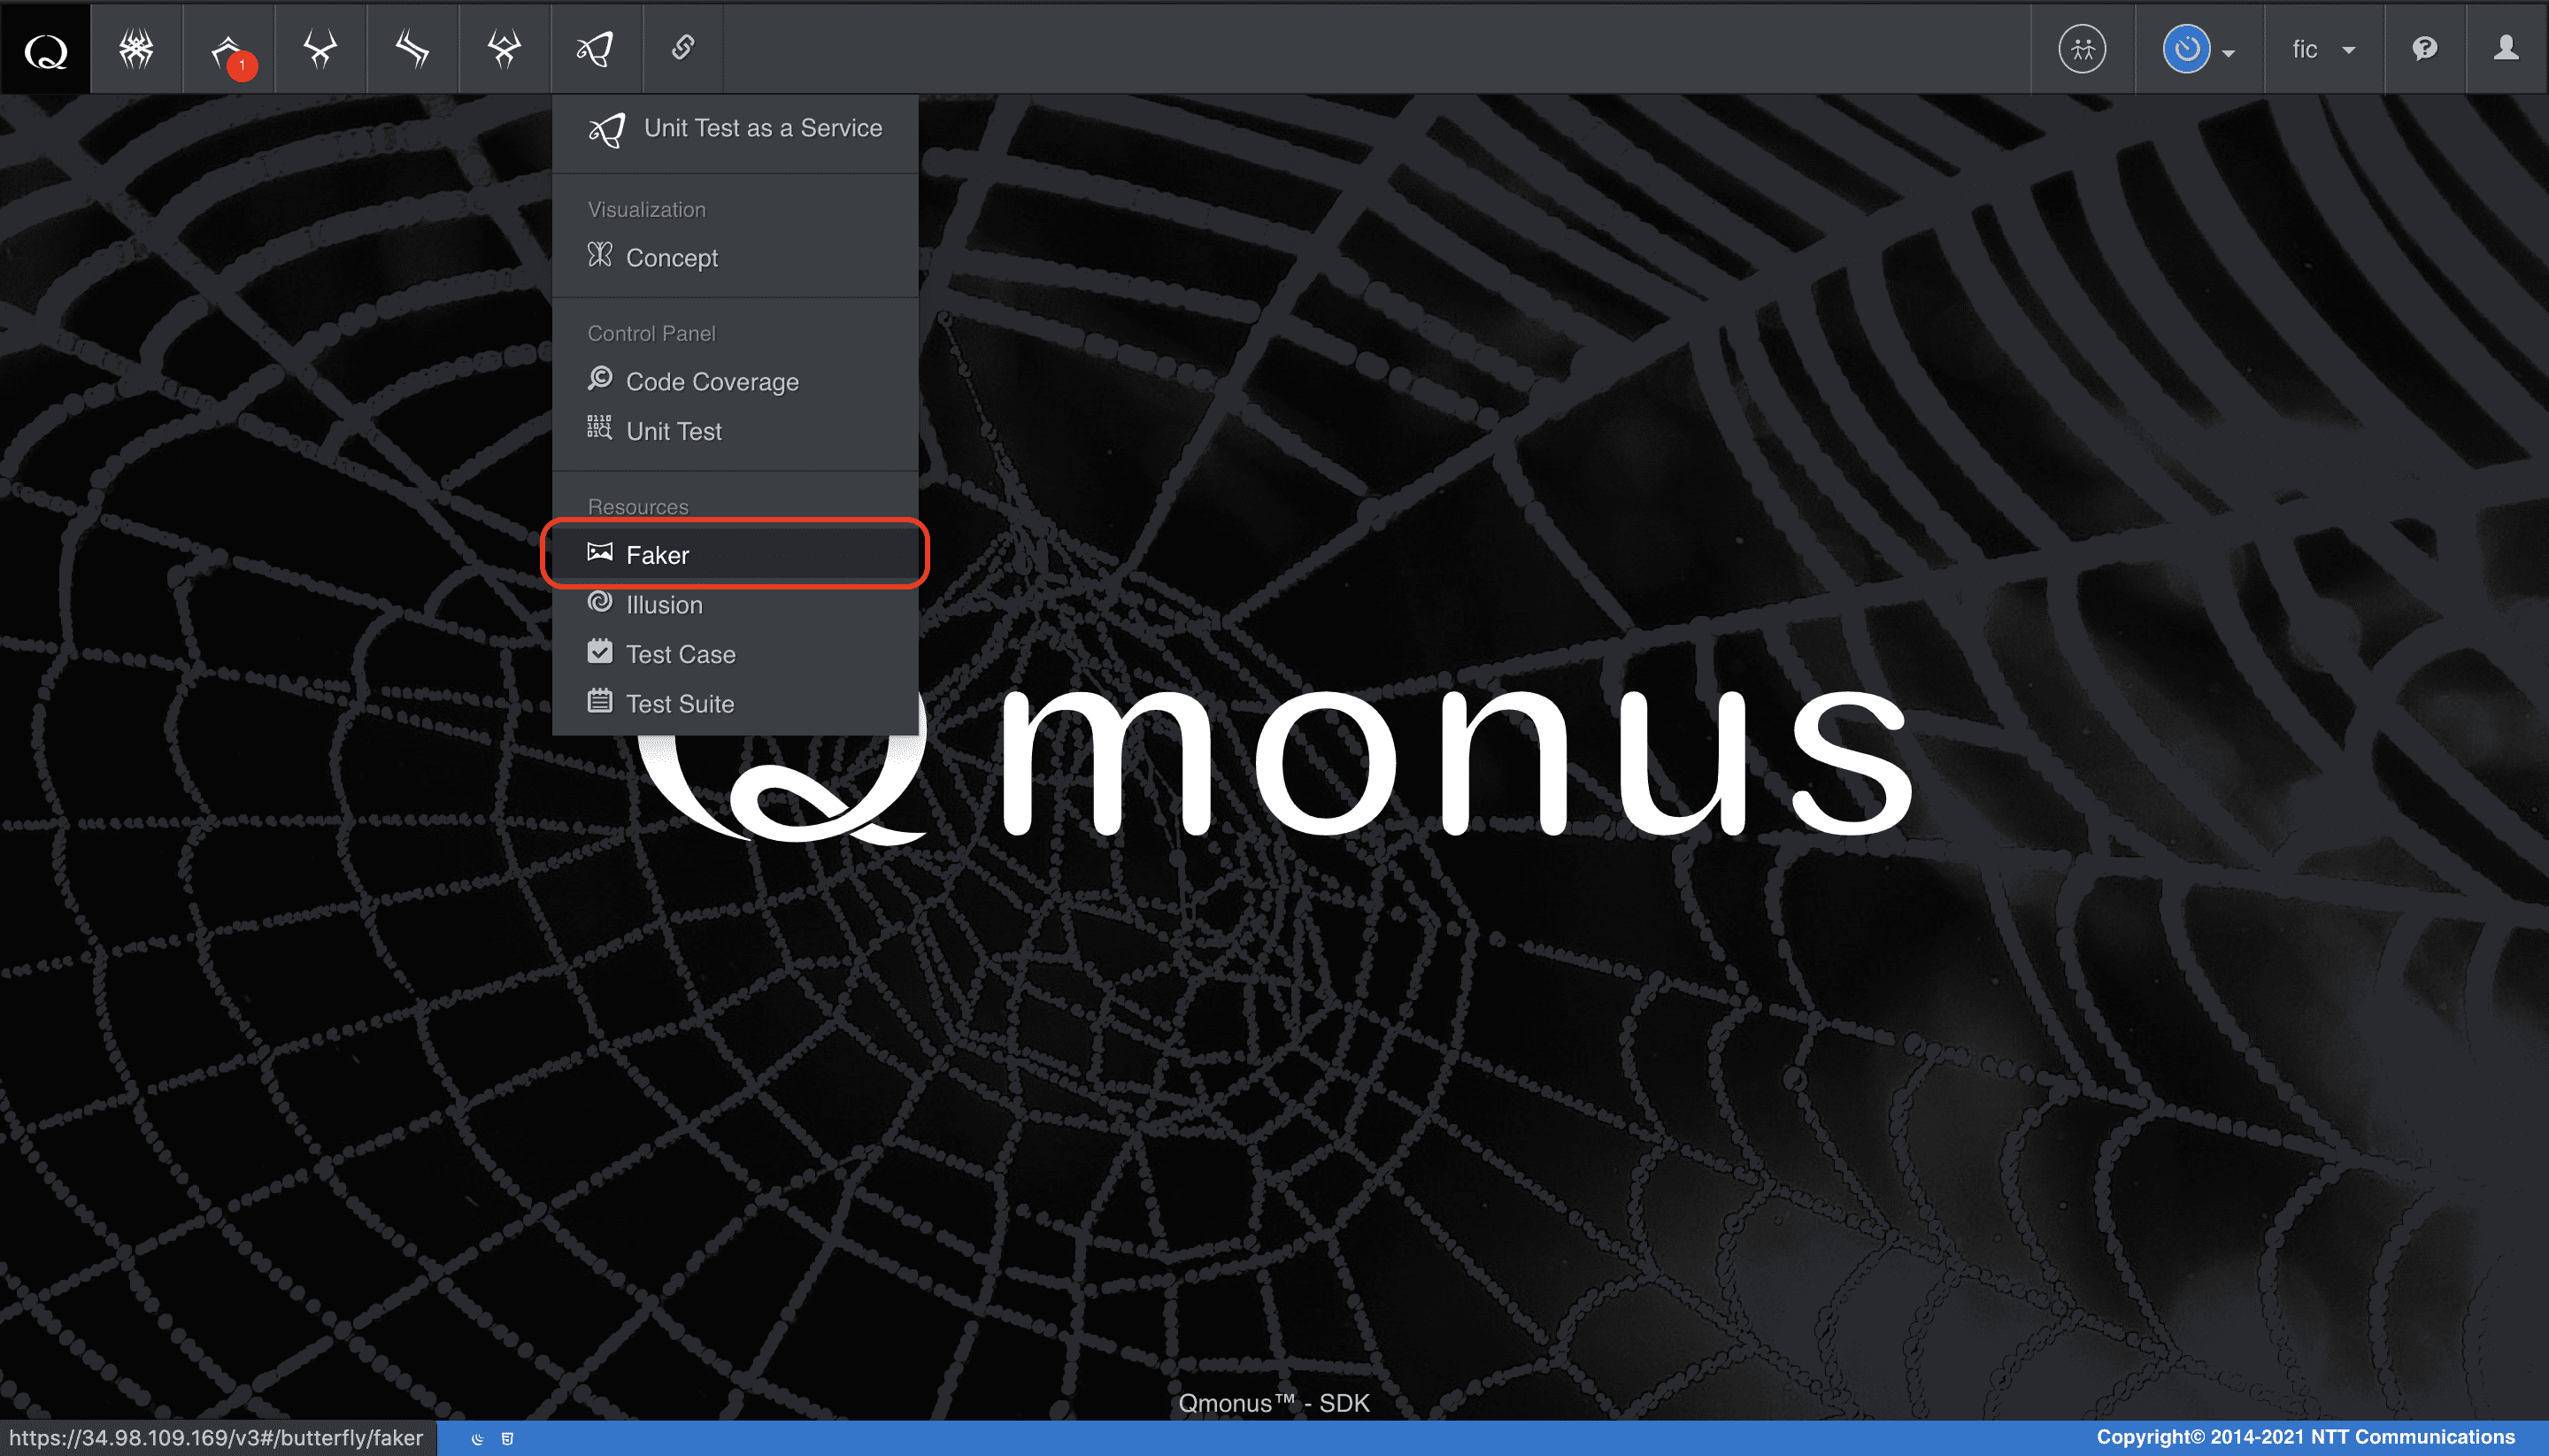
メインメニューから [Unit Test as a Service] > [Faker] を選択
-
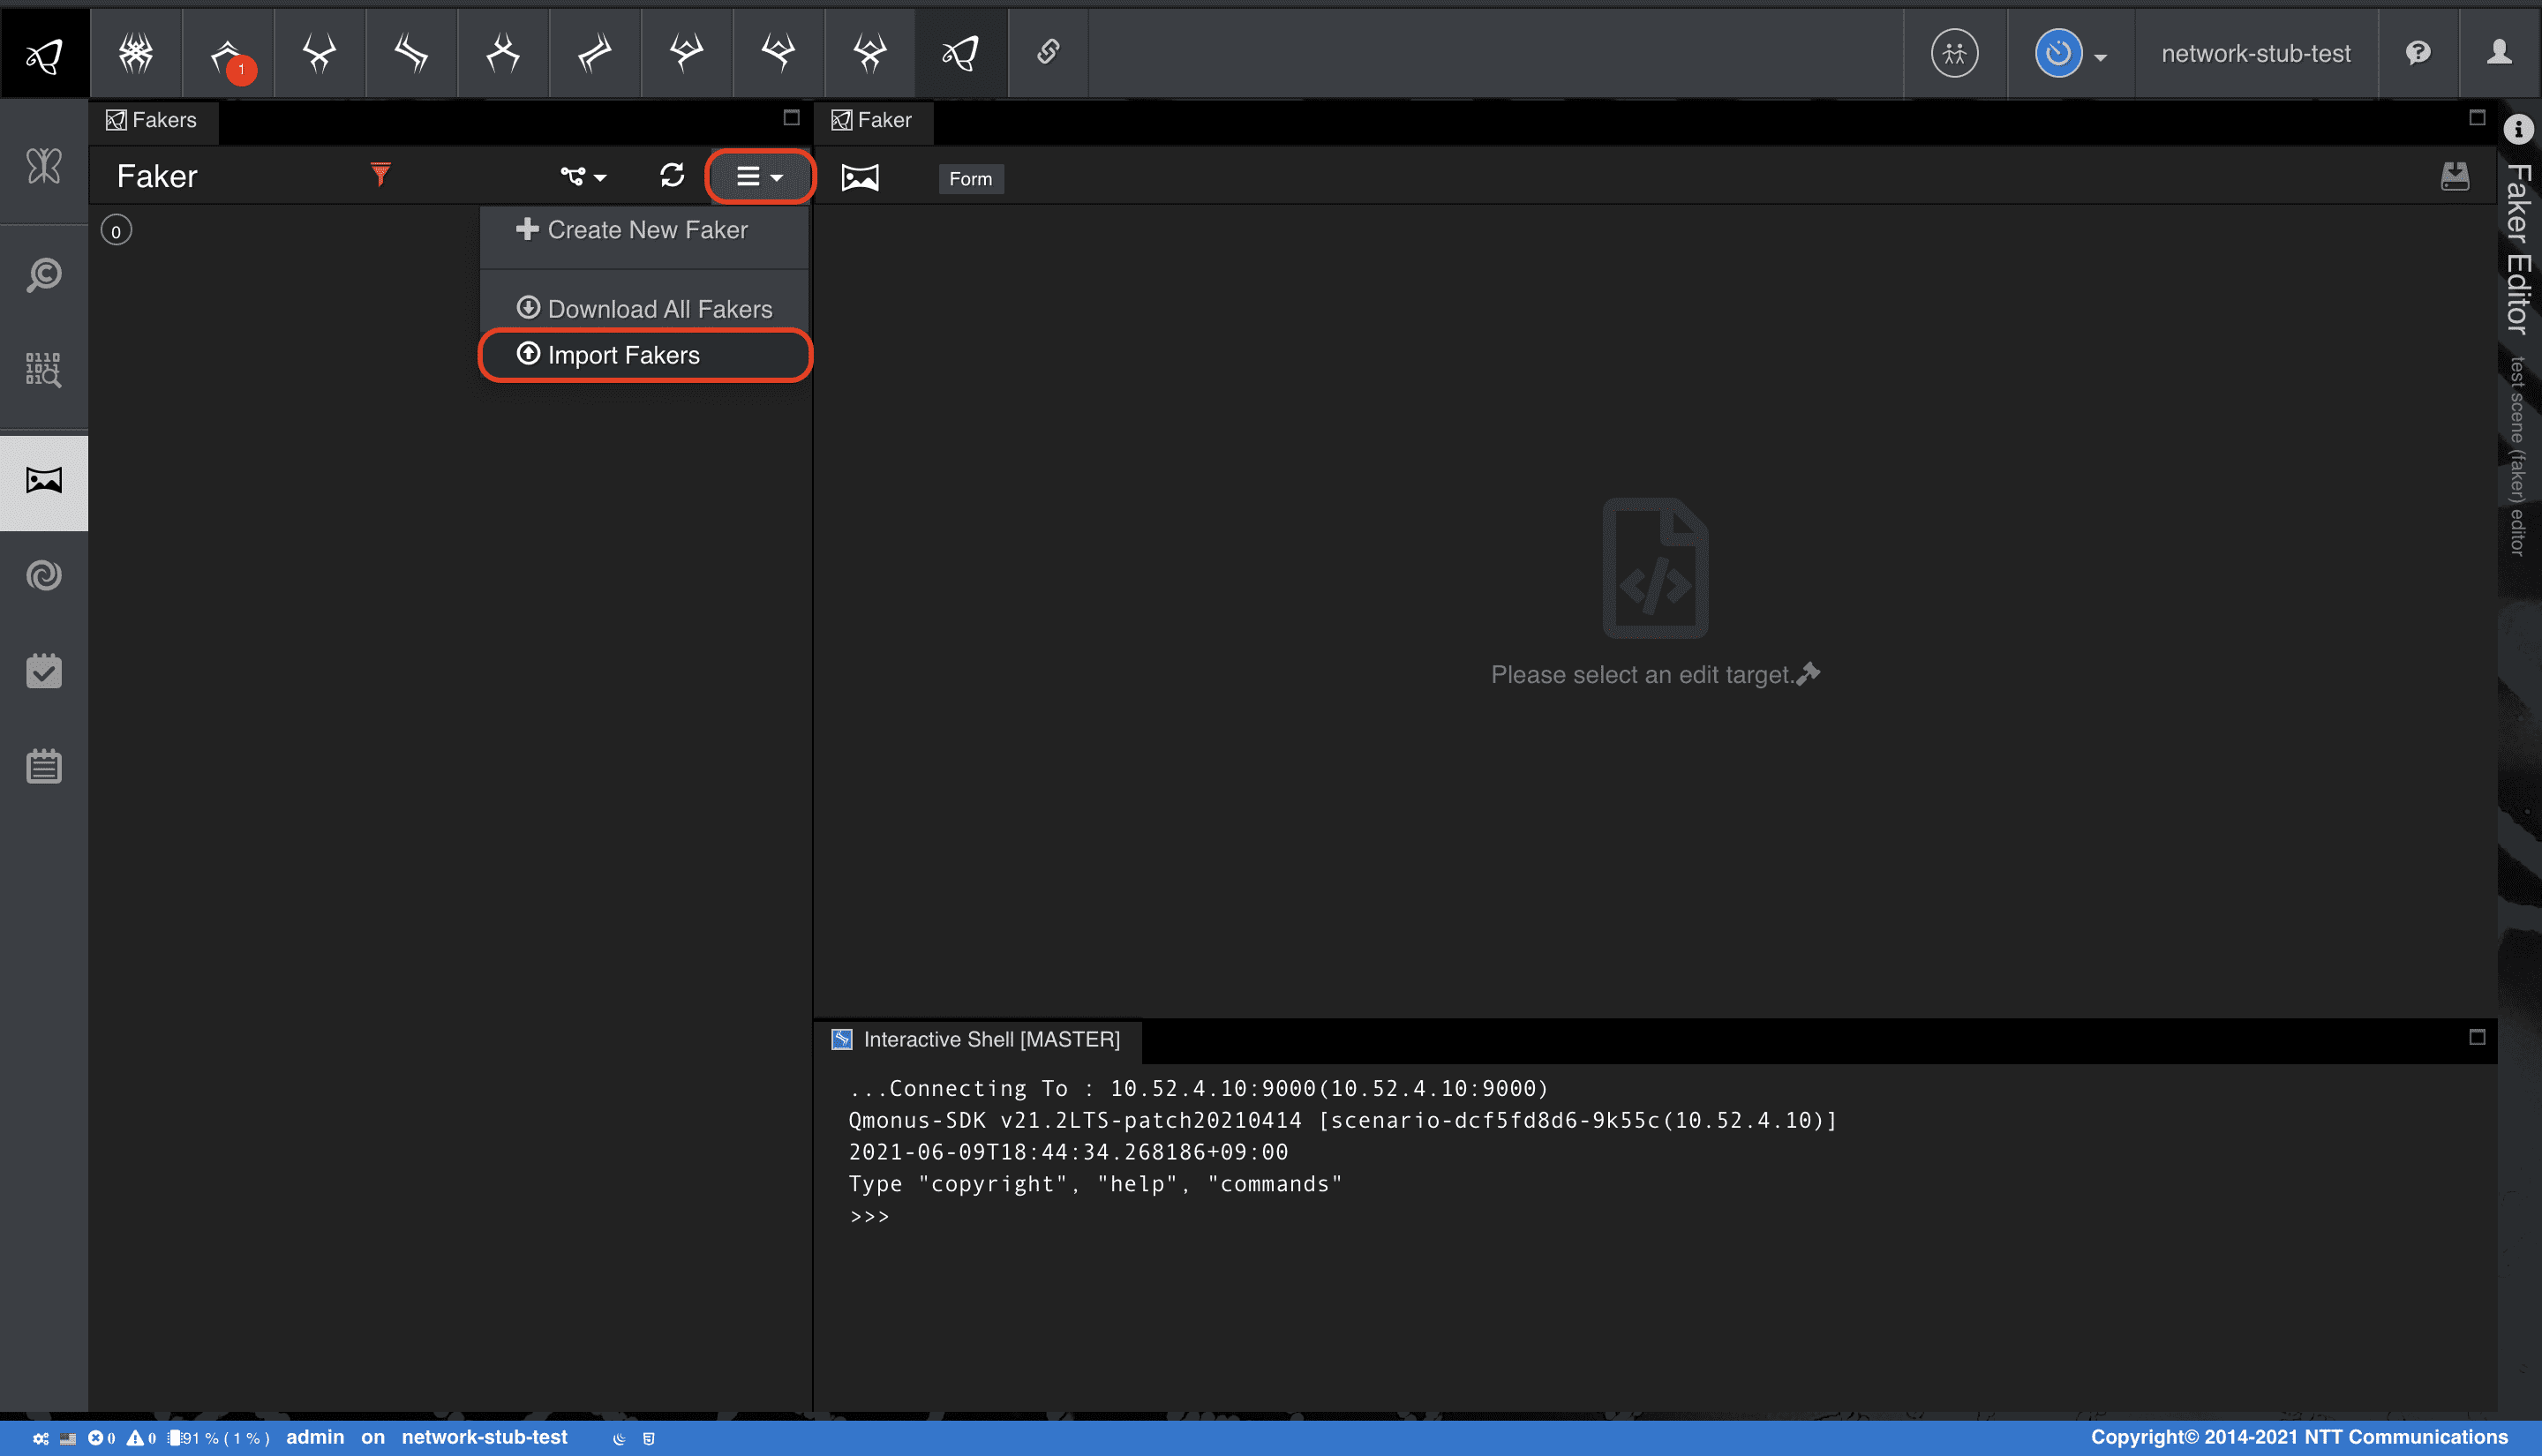
クラスメニューの [Import Fakers] を選択
-
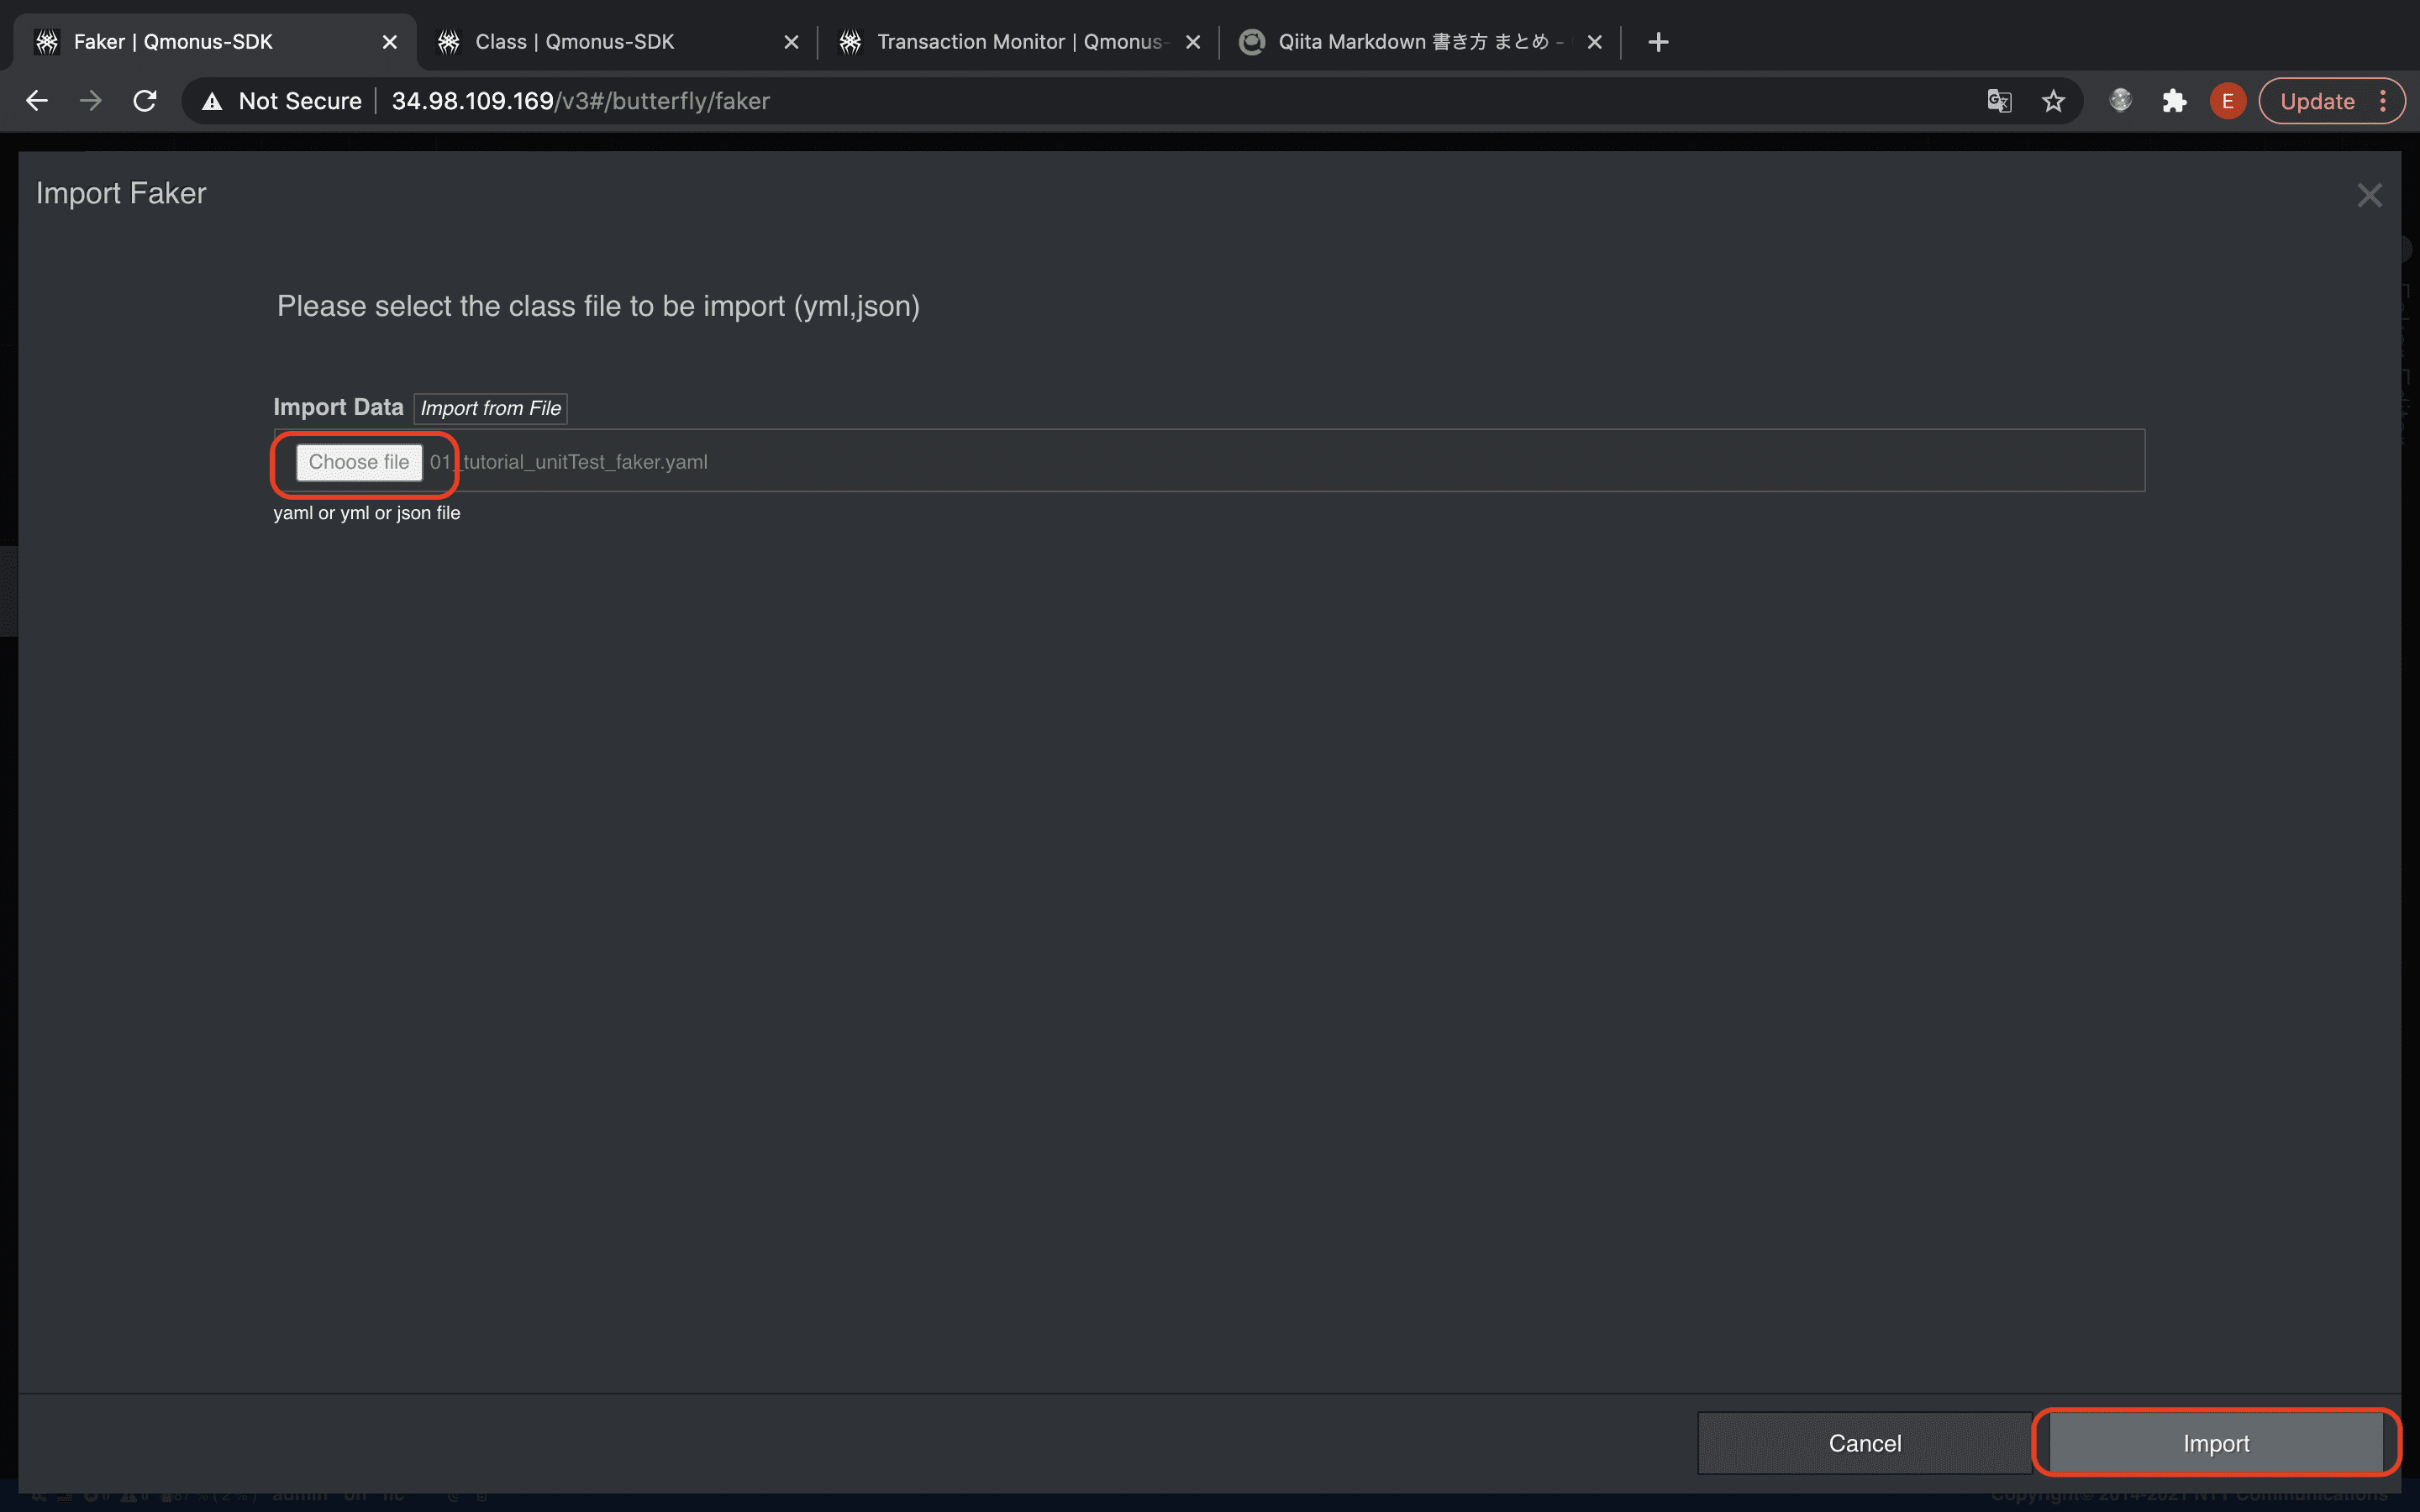
[Choose file] でファイルを指定後、[Import] を選択
上記で作成した各Fakerについて解説します。
まずは、POST /hogesのFakerを定義します。注意点としてHogeリソースの生成は非同期APIであるため、202応答後、一定時間は、Pending状態を維持する必要があります。ここでは、Cache組込みオブジェクトを使用して、15秒間リソースのPending状態を保持しています。
python
name: postHoge
category: example
fakes:
  Accepted:
    script: |-
      async def Accepted(*args, **kwargs):
          hogeID = uuid.uuid1().hex
          await Cache.put(hogeID, "Pending", 15)
          return FakeHttpResponse(202, body=dict(hogeID=hogeID))
  Conflict:
    script: |-
      async def Conflict(*args, **kwargs):
          return FakeHttpResponse(409)
  InternalError:
    script: |-
      async def InternalError(*args, **kwargs):
          return FakeHttpResponse(500)
次に、アプリケーションが、Active状態への遷移を監視するための、GET /hoges/{hogeID}に対してFakerを定義します。リクエストパスからhogeIDを取り出してPOST時にキャッシュしたPending状態の存在有無によって返却する状態値を切り替えています。
python
category: example
name: getHogeWaitForActive
fakes:
  InternalError:
    script: |-
      async def InternalError(*args, **kwargs):
          return FakeHttpResponse(500)
  WaitForActive:
    script: |-
      async def Success(*args, **kwargs):
          hogeID = kwargs.get("path").split("/")[-1]
          value = await Cache.get(hogeID)
          return FakeHttpResponse(body=dict(hogeID=hogeID, status="Active" if value is None else "Processing"))
  WaitForError:
    script: |-
      async def Error(*args, **kwargs):
          hogeID = kwargs.get("path").split("/")[-1]
          value = await Cache.get(hogeID)
          return FakeHttpResponse(body=dict(hogeID=hogeID, status="Error" if value is None else "Processing"))
ここまでの試験観点は、上記のシーケンスに従って、すべてが正常に処理されたときのものです。
何か問題が発生した場合(Hogeリソースの状態がErrorに移行した場合を含む)、アプリケーションは、ロールバックしなければなりません。
ロールバックは、Hogeリソースを完全に削除することです。
受信したオーダ情報は履歴として残します。
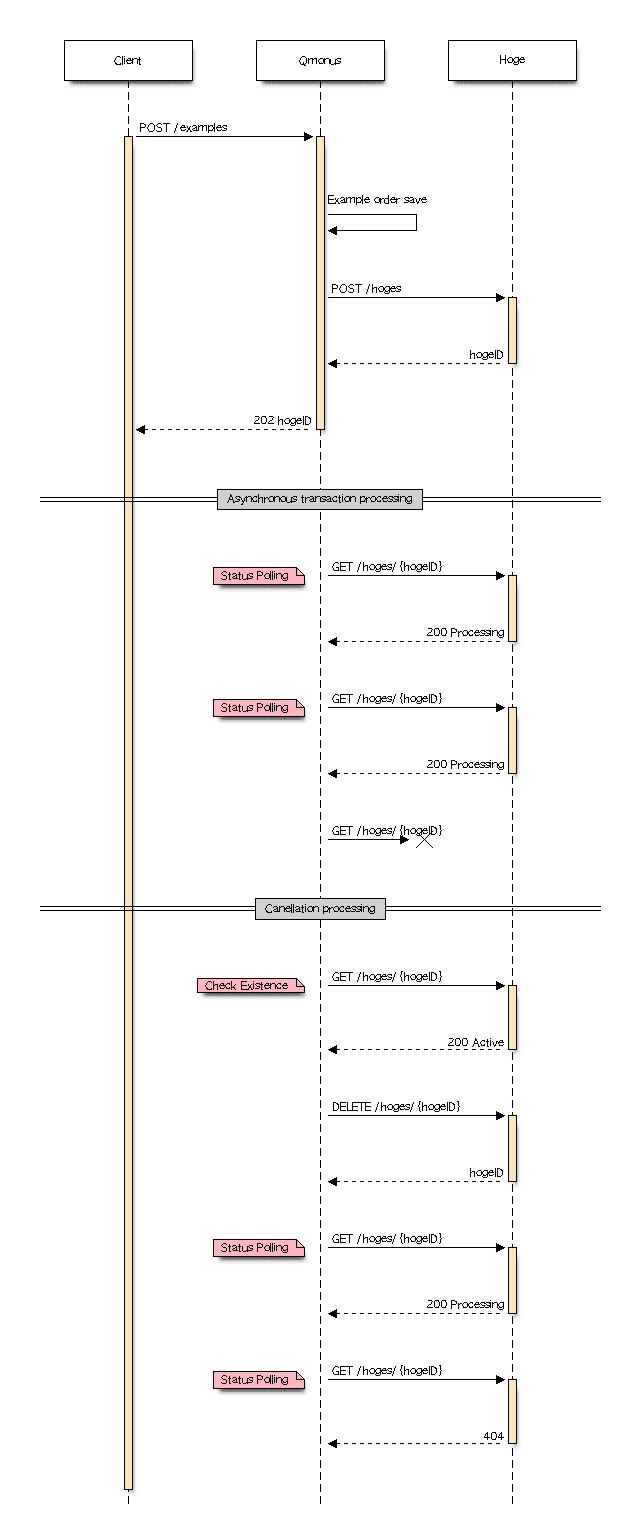
アプリケーションは、ロールバックを開始すると最初にGET /hoges/{hogeID}を送信してリソースの存在有無をチェックします。この時の応答バリエーションは、存在する、しない、わからないのいづれかです。
python
category: example
name: getHoge
fakes:
  InternalError:
    script: |-
      async def InternalError(*args, **kwargs):
          return FakeHttpResponse(500)
  NotFound:
    script: |-
      async def NotFound(*args, **kwargs):
          return FakeHttpResponse(404)
  Success:
    script: |-
      async def Success(*args, **kwargs):
          hogeID = kwargs.get("path").split("/")[-1]
          return FakeHttpResponse(body=dict(hogeID=hogeID, status="Active"))
削除対象が存在する場合、アプリケーションは、DELETE /hoges/{hogeID}を送信してリソースの削除を試行します。削除も非同期APIであることからPending状態をキャッシュに15秒間維持します。
python
category: example
name: deleteHoge
fakes:
  Accepted:
    script: |-
      async def Accepted(*args, **kwargs):
          hogeID = kwargs.get("path").split("/")[-1]
          await Cache.put(hogeID, "Pending", 15)
          return FakeHttpResponse(202, body=dict(hogeID=hogeID))
  InternalError:
    script: |-
      async def InternalError(*args, **kwargs):
          return FakeHttpResponse(500)
  NotFound:
    script: |-
      async def NotFound(*args, **kwargs):
          return FakeHttpResponse(404)
最後に、アプリケーションは、リソースが完全に削除されるのをGET /hoges/{hogeID}を送信して監視します。
python
category: example
name: getHogeWaitForNotFound
fakes:
  InternalError:
    script: |-
      async def InternalError(*args, **kwargs):
          return FakeHttpResponse(500)
  WaitForNotFound:
    script: |-
      async def WaitForNotFound(*args, **kwargs):
          hogeID = kwargs.get("path").split("/")[-1]
          value = await Cache.get(hogeID)
          if value:
              return FakeHttpResponse(body=dict(hogeID=hogeID, status="Active"))
          else:
              return FakeHttpResponse(404)
以上が、Fakerによる外部入手力の疑似実装です。
Step3. テストシーンを定義する
テストシーンとは、Step2で作成したFakerのfake動作の集合体です。
Fakerと同様に、テストシーンを一括インポートして実装します。インポート後に、後述の各定義を確認してください。
テストシーン ダウンロード
yaml
- category: example
  name: exampleDryrun
  fakers:
    postHoge: Accepted
    getHogeWaitForActive: WaitForActive
- category: example
  name: examplePostFailed
  fakers:
    postHoge: InternalError
- category: example
  name: exampleWaitforActiveFailed
  fakers:
    postHoge: Accepted
    getHogeWaitForActive: InternalError
    getHoge: Success
    deleteHoge: Accepted
    getHogeWaitForNotFound: WaitForNotFound
- category: example
  name: exampleGetFailed
  fakers:
    postHoge: Accepted
    getHogeWaitForActive: WaitForError
    getHoge: InternalError
    deleteHoge: Accepted
    getHogeWaitForNotFound: WaitForNotFound
- category: example
  name: exampleDeleteFailed
  fakers:
    postHoge: Accepted
    getHogeWaitForActive: WaitForError
    getHoge: Success
    deleteHoge: InternalError
    getHogeWaitForNotFound: WaitForNotFound
- category: example
  name: exampleWaitforNotFoundFailed
  fakers:
    postHoge: Accepted
    getHogeWaitForActive: WaitForError
    getHoge: Success
    deleteHoge: Accepted
    getHogeWaitForNotFound: InternalError
- category: example
  name: exampleDetectedErrorHogeState
  fakers:
    postHoge: Accepted
    getHogeWaitForActive: WaitForError
    getHoge: Success
    deleteHoge: Accepted
    getHogeWaitForNotFound: WaitForNotFound
-
上記のテストシーンファイルを用意する
-
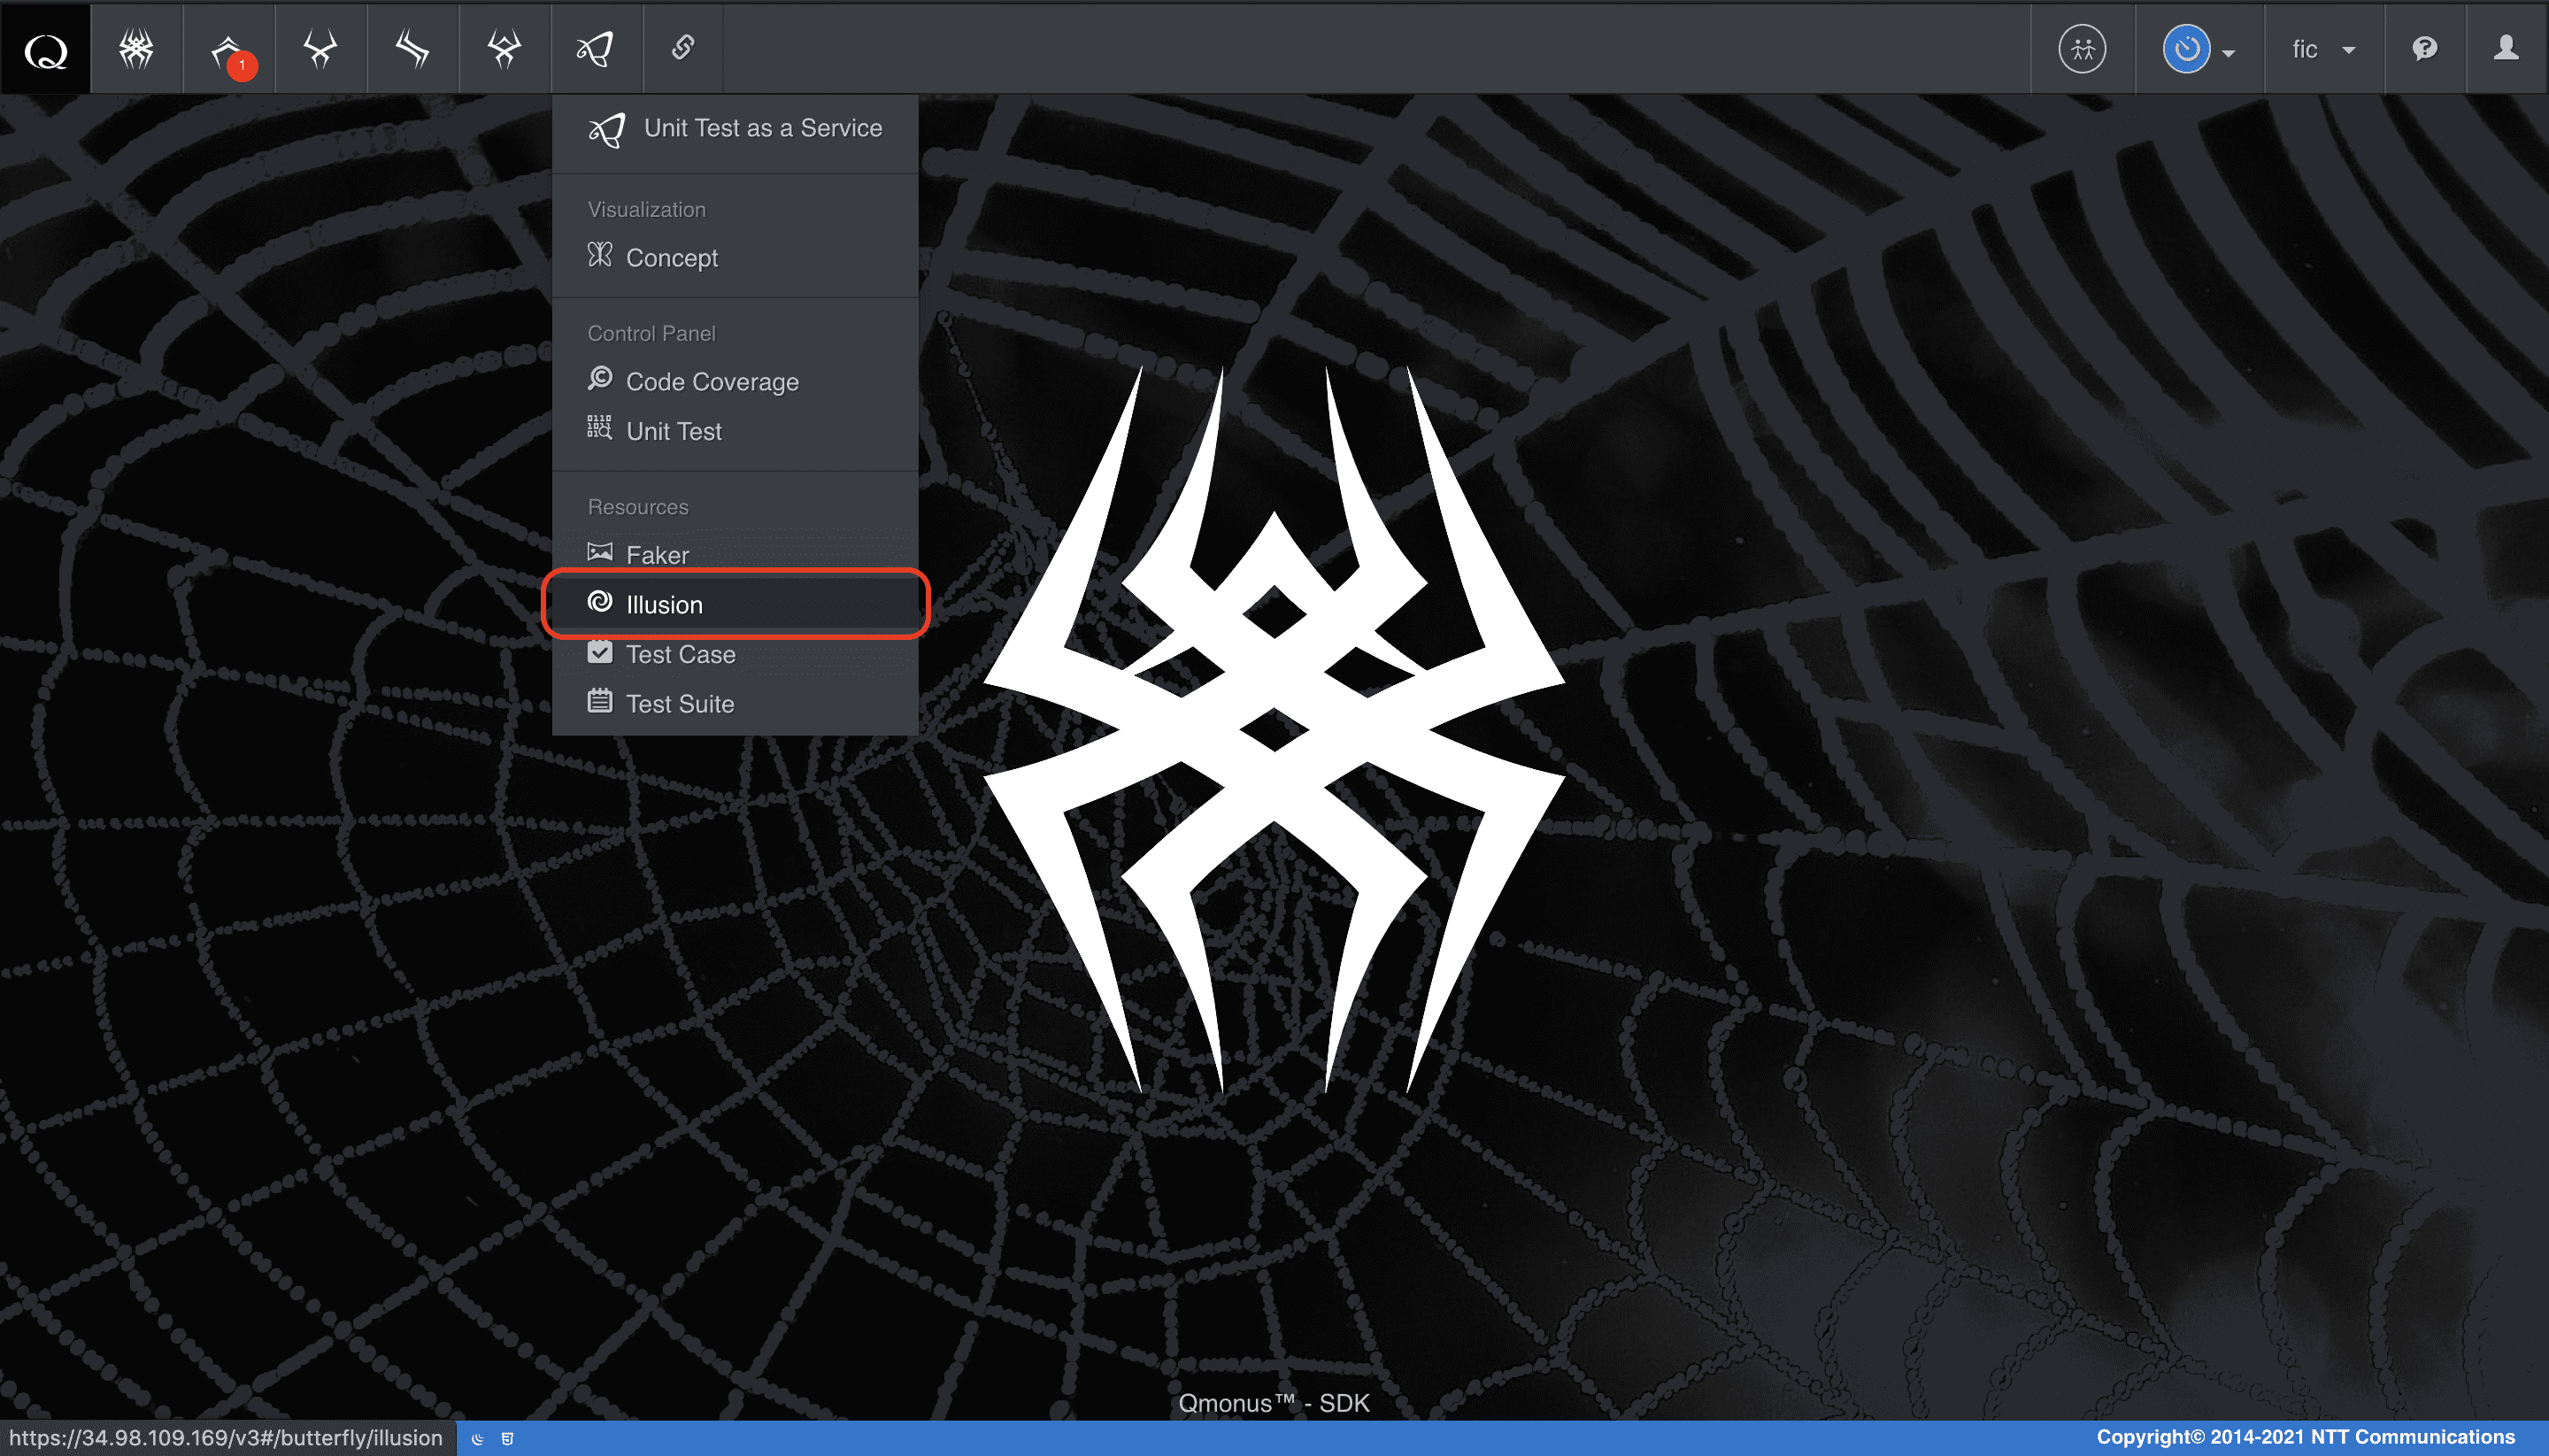
メインメニューから [Unit Test as a Service] > [Illusion] を選択
-
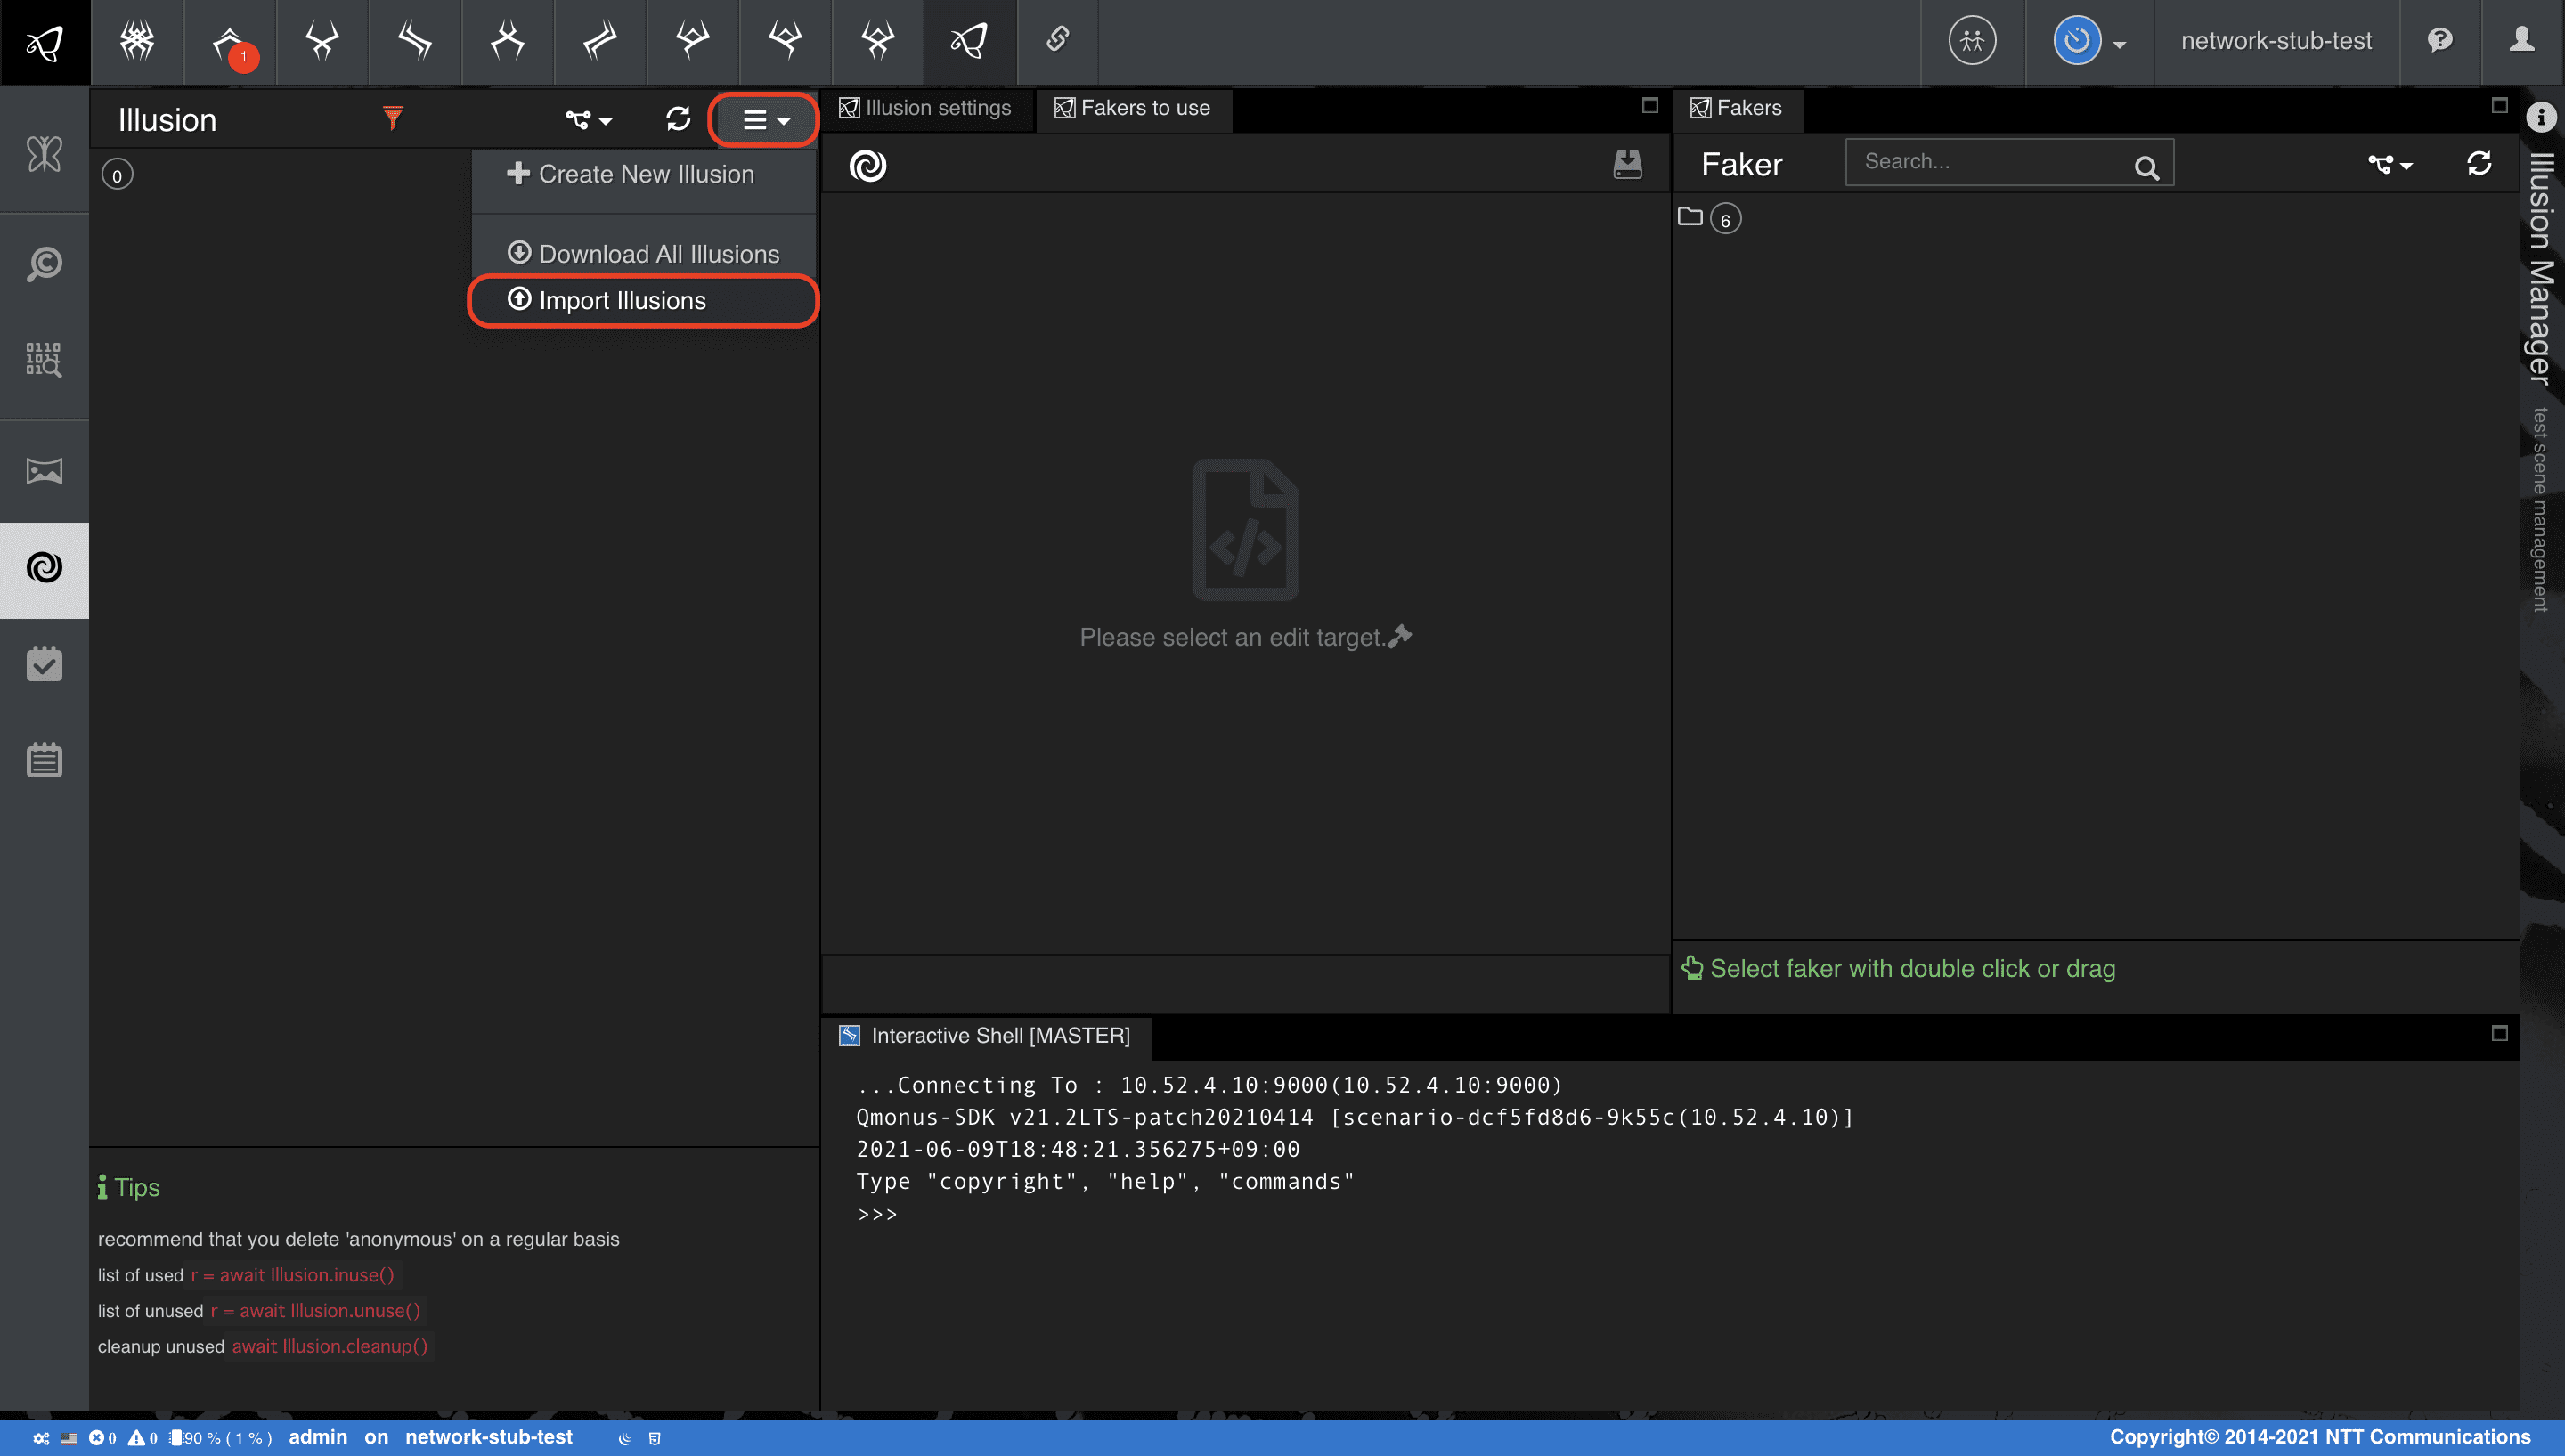
クラスメニューの [Import Illusions] を選択
-
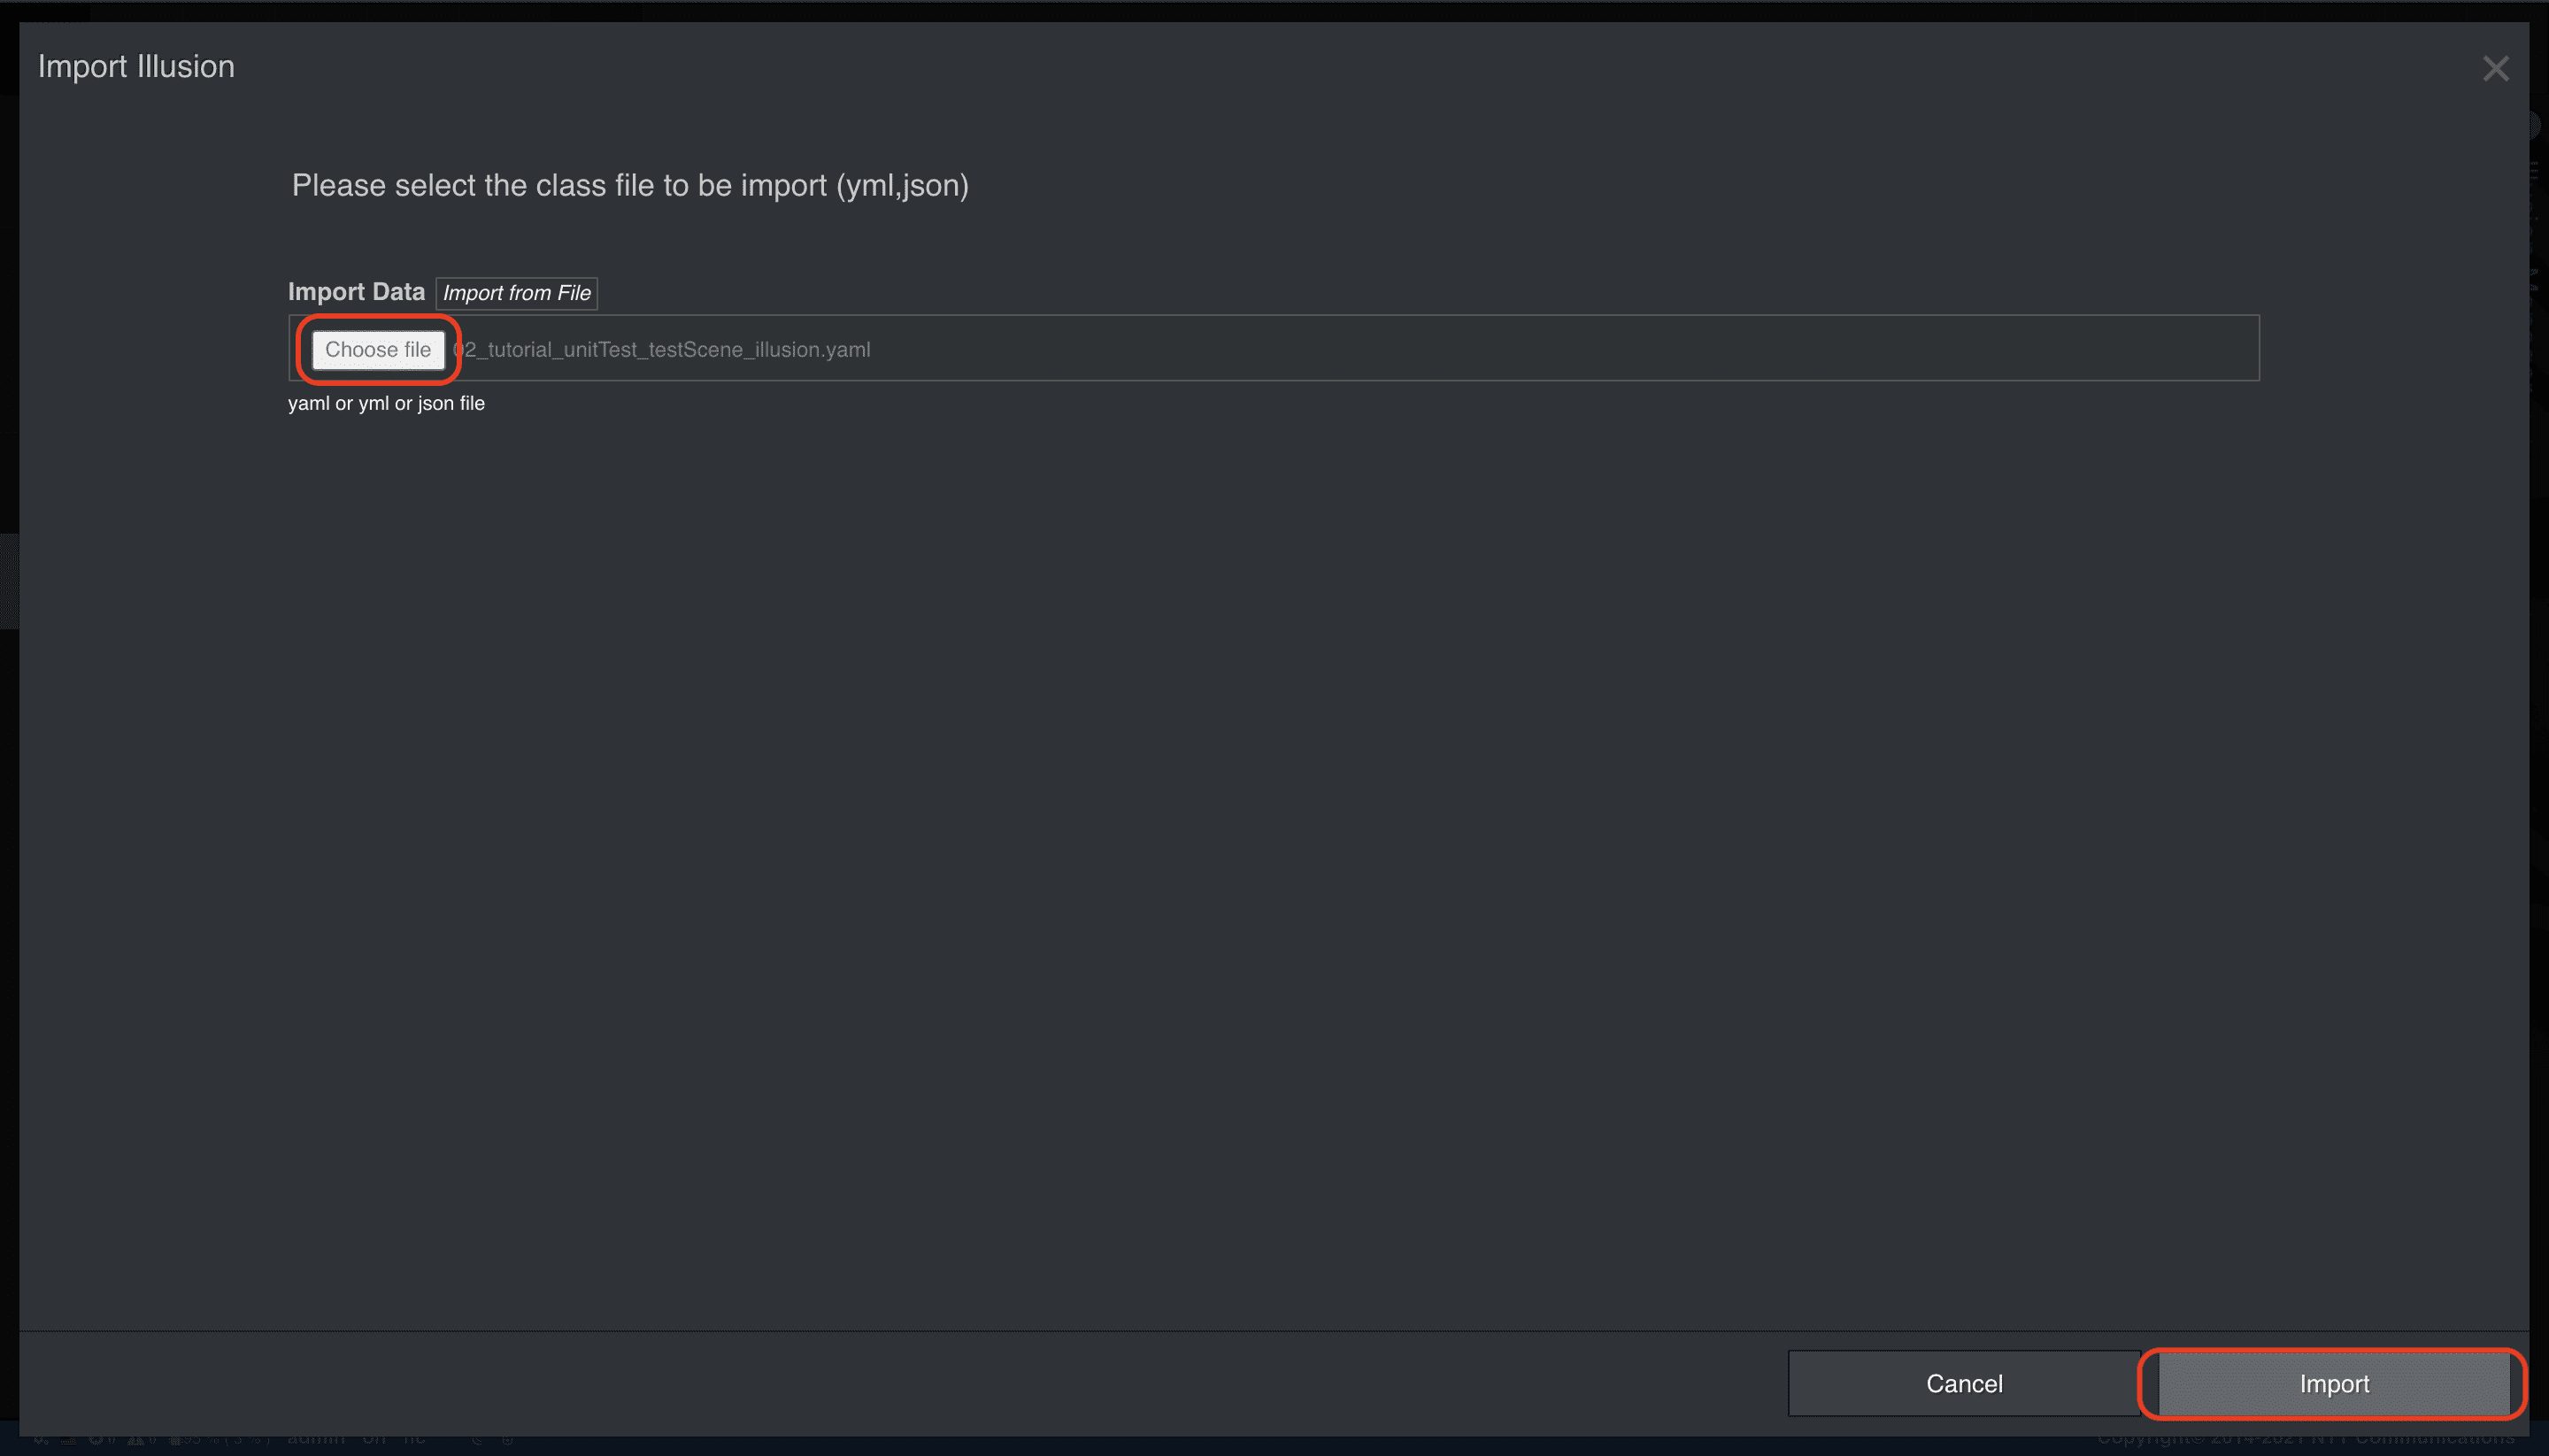
[Choose file] でファイルを指定後、[Import] を選択
上記で作成した各テストシーンの定義です。
全て期待する正常動作となるテストシーン
yaml
category: example
name: exampleDryrun
fakers:
  postHoge: Accepted
  getHogeWaitForActive: WaitForActive
POSTが失敗するテストシーン
yaml
category: example
name: examplePostFailed
fakers:
  postHoge: InternalError
Active状態の待機中にエラーが発生し、ロールバックするテストシーン
yaml
category: example
name: exampleWaitforActiveFailed
fakers:
  postHoge: Accepted
  getHogeWaitForActive: InternalError
  getHoge: Success
  deleteHoge: Accepted
  getHogeWaitForNotFound: WaitForNotFound
Active状態の待機中にエラーが発生し、ロールバックを試みたが、存在チェックのGETでさらに失敗するテストシーン
yaml
category: example
name: exampleGetFailed
fakers:
  postHoge: Accepted
  getHogeWaitForActive: WaitForError
  getHoge: InternalError
  deleteHoge: Accepted
  getHogeWaitForNotFound: WaitForNotFound
Active状態で待機中にエラーが発生し、ロールバックを試みたが、DELETEで失敗するテストシーン
yaml
category: example
name: exampleDeleteFailed
fakers:
  postHoge: Accepted
  getHogeWaitForActive: WaitForError
  getHoge: Success
  deleteHoge: InternalError
  getHogeWaitForNotFound: WaitForNotFound
Active状態で待機中にエラーが発生し、ロールバックを試みたが、削除完了の監視ポーリングで失敗するテストシーン
yaml
category: example
name: exampleWaitforNotFoundFailed
fakers:
  postHoge: Accepted
  getHogeWaitForActive: WaitForError
  getHoge: Success
  deleteHoge: Accepted
  getHogeWaitForNotFound: InternalError
Active状態の待機中にError状態を検出し、ロールバックするテストシーン
yaml
category: example
name: exampleDetectedErrorHogeState
fakers:
  postHoge: Accepted
  getHogeWaitForActive: WaitForError
  getHoge: Success
  deleteHoge: Accepted
  getHogeWaitForNotFound: WaitForNotFound
Step4. テストケースを実装する
いよいよテストケースを作成していきます。
Test Case ダウンロード
yaml
- category: example
  name: exampleValidationBodyEmpty
  target: example
  input:
    method: POST
    path: /examples
    headers:
      Content-Type: application/json
    body: |-
      def randomBody():
          return dict()
  assertion:
    output: |-
      async def assertion():
          assert Response.code==400, "Invalid validation schema %r" % Response.code
- category: example
  name: exampleValidationHeaderEmpty
  target: example
  input:
    method: POST
    path: /examples
    headers: {}
    body: |-
      def randomBody():
          import rstr
          return dict(name=rstr.xeger("^[A-Z][a-zA-Z_0-9-]+$"), region=rstr.rstr(["jp1", "jp2"], 1))
  assertion:
    output: |-
      async def assertion():
          assert Response.code==400, "Invalid validation schema %r" % Response.code
- category: example
  name: exampleValidationHeaderContentType
  target: example
  input:
    method: POST
    path: /examples
    headers:
      Content-Type: application/xml
    body: |-
      def randomBody():
          import rstr
          return dict(name=rstr.xeger("^[A-Z][a-zA-Z_0-9-]+$"), region=rstr.rstr(["jp1", "jp2"], 1))
  assertion:
    output: |-
      async def assertion():
          assert Response.code==400, "Invalid validation schema %r" % Response.code
- category: example
  name: exampleValidationBodyNameRequired
  target: example
  input:
    method: POST
    path: /examples
    headers:
      Content-Type: application/json
    body: |-
      def randomBody():
          import rstr
          return dict(region=rstr.rstr(["jp1", "jp2"], 1))
  assertion:
    output: |-
      async def assertion():
          assert Response.code==400, "Invalid validation schema %r" % Response.code
- category: example
  name: exampleValidationBodyRegionRequired
  target: example
  input:
    method: POST
    path: /examples
    headers:
      Content-Type: application/json
    body: |-
      def randomBody():
          import rstr
          return dict(name=rstr.word())
  assertion:
    output: |-
      async def assertion():
          assert Response.code==400, "Invalid validation schema %r" % Response.code
- category: example
  name: exampleNormalDryrun
  target: example
  illusion: exampleDryrun
  input:
    method: POST
    path: /examples
    headers:
      Content-Type: application/json
    body: |-
      def randomBody():
          import rstr
          return dict(name=rstr.xeger("^[A-Z][a-zA-Z_0-9-]+$"), region=rstr.rstr(["jp1", "jp2"], 1))
  assertion:
    output: |-
      async def assertion():
          assert Response.code==202, "Invalid response code %r" % Response.code
          assert Response.body, "Empty body %r" % Response.body
          assert "hogeID" in json.loads(Response.body), "Invalid response body %s" % Response.body
    progress:
    - index: 1
      script: |-
        async def assertion():
            assert Transaction.xglobals.name and Transaction.xglobals.region, "name or region is None"
            assert Transaction.xglobals.hogeID is not None, "hogeID is None"
    end: |-
      async def assertion():
          assert Transaction.status=="Complete", "Transaction is in an unexpected state %r" % Transaction.status
- category: example
  name: examplePostFailed
  target: example
  illusion: examplePostFailed
  input:
    method: POST
    path: /examples
    headers:
      Content-Type: application/json
    body: |-
      def randomBody():
          import rstr
          return dict(name=rstr.xeger("^[A-Z][a-zA-Z_0-9-]+$"), region=rstr.rstr(["jp1", "jp2"], 1))
  assertion:
    output: |-
      async def assertion():
          assert Response.code==500, "Invalid response code %r" % Response.code
- category: example
  name: exampleSubnormalWaitforActiveFailed
  target: example
  illusion: exampleWaitforActiveFailed
  input:
    method: POST
    path: /examples
    headers:
      Content-Type: application/json
    body: |-
      def randomBody():
          import rstr
          return dict(name=rstr.xeger("^[A-Z][a-zA-Z_0-9-]+$"), region=rstr.rstr(["jp1", "jp2"], 1))
  assertion:
    output: |-
      async def assertion():
          assert Response.code==202, "Invalid response code %r" % Response.code
          assert Response.body, "Empty body %r" % Response.body
          assert "hogeID" in json.loads(Response.body), "Invalid response body %s" % Response.body
    progress:
    - index: 1
      script: |-
        async def assertion():
            assert Transaction.xglobals.name and Transaction.xglobals.region, "name or region is None"
            assert Transaction.xglobals.hogeID is not None, "hogeID is None"
    end: |-
      async def assertion():
          assert Transaction.status=="Cancelled", "Transaction is in an unexpected state %r" % Transaction.status
- category: example
  name: exampleSubnormalDryrun
  target: example
  illusion: exampleDetectedErrorHogeState
  input:
    method: POST
    path: /examples
    headers:
      Content-Type: application/json
    body: |-
      def randomBody():
          import rstr
          return dict(name=rstr.xeger("^[A-Z][a-zA-Z_0-9-]+$"), region=rstr.rstr(["jp1", "jp2"], 1))
  assertion:
    output: |-
      async def assertion():
          assert Response.code==202, "Invalid response code %r" % Response.code
          assert Response.body, "Empty body %r" % Response.body
          assert "hogeID" in json.loads(Response.body), "Invalid response body %s" % Response.body
    progress:
    - index: 1
      script: |-
        async def assertion():
            assert Transaction.xglobals.name and Transaction.xglobals.region, "name or region is None"
            assert Transaction.xglobals.hogeID is not None, "hogeID is None"
    end: |-
      async def assertion():
          assert Transaction.status=="Cancelled", "Transaction is in an unexpected state %r" % Transaction.status
- category: example
  name: exampleAbnormalGetFailed
  target: example
  illusion: exampleGetFailed
  input:
    method: POST
    path: /examples
    headers:
      Content-Type: application/json
    body: |-
      def randomBody():
          import rstr
          return dict(name=rstr.xeger("^[A-Z][a-zA-Z_0-9-]+$"), region=rstr.rstr(["jp1", "jp2"], 1))
  assertion:
    output: |-
      async def assertion():
          assert Response.code==202, "Invalid response code %r" % Response.code
          assert Response.body, "Empty body %r" % Response.body
          assert "hogeID" in json.loads(Response.body), "Invalid response body %s" % Response.body
    progress:
    - index: 1
      script: |-
        async def assertion():
            assert Transaction.xglobals.name and Transaction.xglobals.region, "name or region is None"
            assert Transaction.xglobals.hogeID is not None, "hogeID is None"
    end: |-
      async def assertion():
          assert Transaction.status=="Aborted", "Transaction is in an unexpected state %r" % Transaction.status
  cleanup: |-
    async def cleanup():
        await Transaction.cancel(force=True)
        assert Transaction.status=="ForceCancelled", "Force cancel failed %r" % Transaction.status
- category: example
  name: exampleAbnormalDeleteFailed
  target: example
  illusion: exampleDeleteFailed
  input:
    method: POST
    path: /examples
    headers:
      Content-Type: application/json
    body: |-
      def randomBody():
          import rstr
          return dict(name=rstr.xeger("^[A-Z][a-zA-Z_0-9-]+$"), region=rstr.rstr(["jp1", "jp2"], 1))
  assertion:
    output: |-
      async def assertion():
          assert Response.code==202, "Invalid response code %r" % Response.code
          assert Response.body, "Empty body %r" % Response.body
          assert "hogeID" in json.loads(Response.body), "Invalid response body %s" % Response.body
    progress:
    - index: 1
      script: |-
        async def assertion():
            assert Transaction.xglobals.name and Transaction.xglobals.region, "name or region is None"
            assert Transaction.xglobals.hogeID is not None, "hogeID is None"
    end: |-
      async def assertion():
          assert Transaction.status=="Aborted", "Transaction is in an unexpected state %r" % Transaction.status
  cleanup: |-
    async def cleanup():
        await Transaction.cancel(force=True)
        assert Transaction.status=="ForceCancelled", "Force cancel failed %r" % Transaction.status
- category: example
  name: exampleAbnormalWaitforNotFoundFailed
  target: example
  illusion: exampleWaitforNotFoundFailed
  input:
    method: POST
    path: /examples
    headers:
      Content-Type: application/json
    body: |-
      def randomBody():
          import rstr
          return dict(name=rstr.xeger("^[A-Z][a-zA-Z_0-9-]+$"), region=rstr.rstr(["jp1", "jp2"], 1))
  assertion:
    output: |-
      async def assertion():
          assert Response.code==202, "Invalid response code %r" % Response.code
          assert Response.body, "Empty body %r" % Response.body
          assert "hogeID" in json.loads(Response.body), "Invalid response body %s" % Response.body
    progress:
    - index: 1
      script: |-
        async def assertion():
            assert Transaction.xglobals.name and Transaction.xglobals.region, "name or region is None"
            assert Transaction.xglobals.hogeID is not None, "hogeID is None"
    end: |-
      async def assertion():
          assert Transaction.status=="Aborted", "Transaction is in an unexpected state %r" % Transaction.status
  cleanup: |-
    async def cleanup():
        await Transaction.cancel(force=True)
        assert Transaction.status=="ForceCancelled", "Force cancel failed %r" % Transaction.status
-
上記の
Test Caseファイルを用意する -
メインメニューから [Unit Test as a Service] > [Test Case] を選択
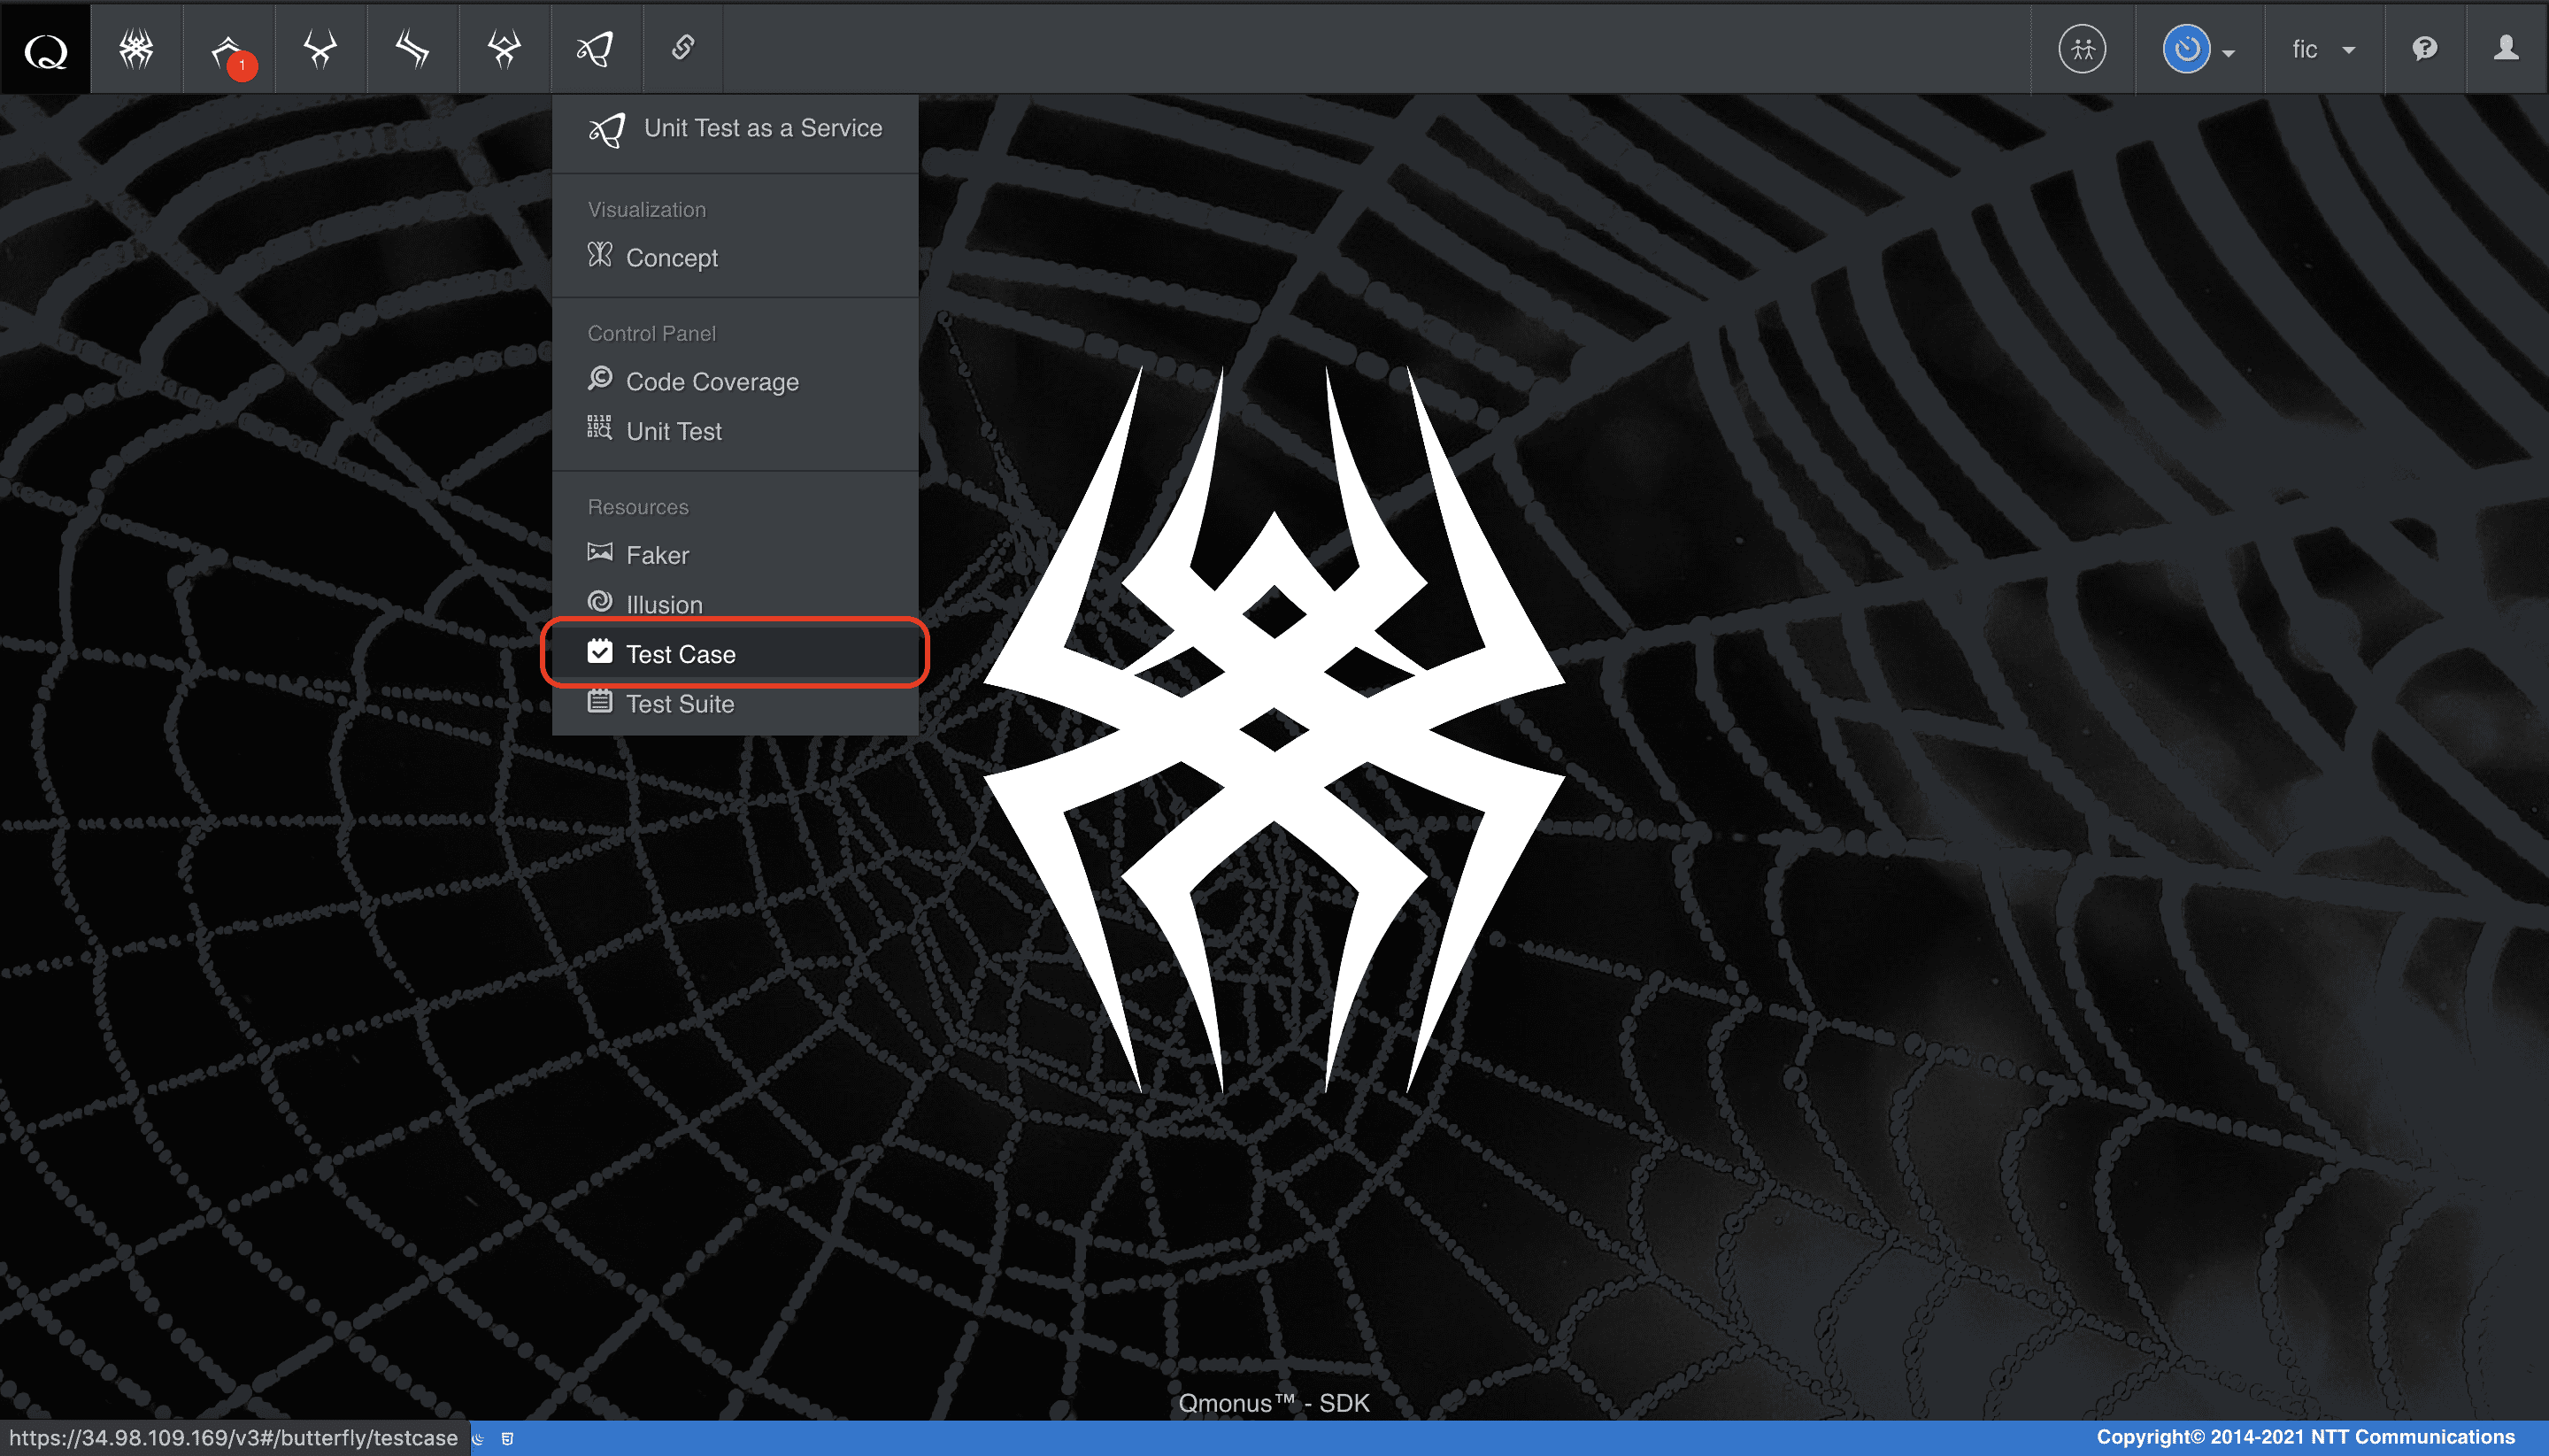
-
クラスメニューの [Import Testcases] を選択
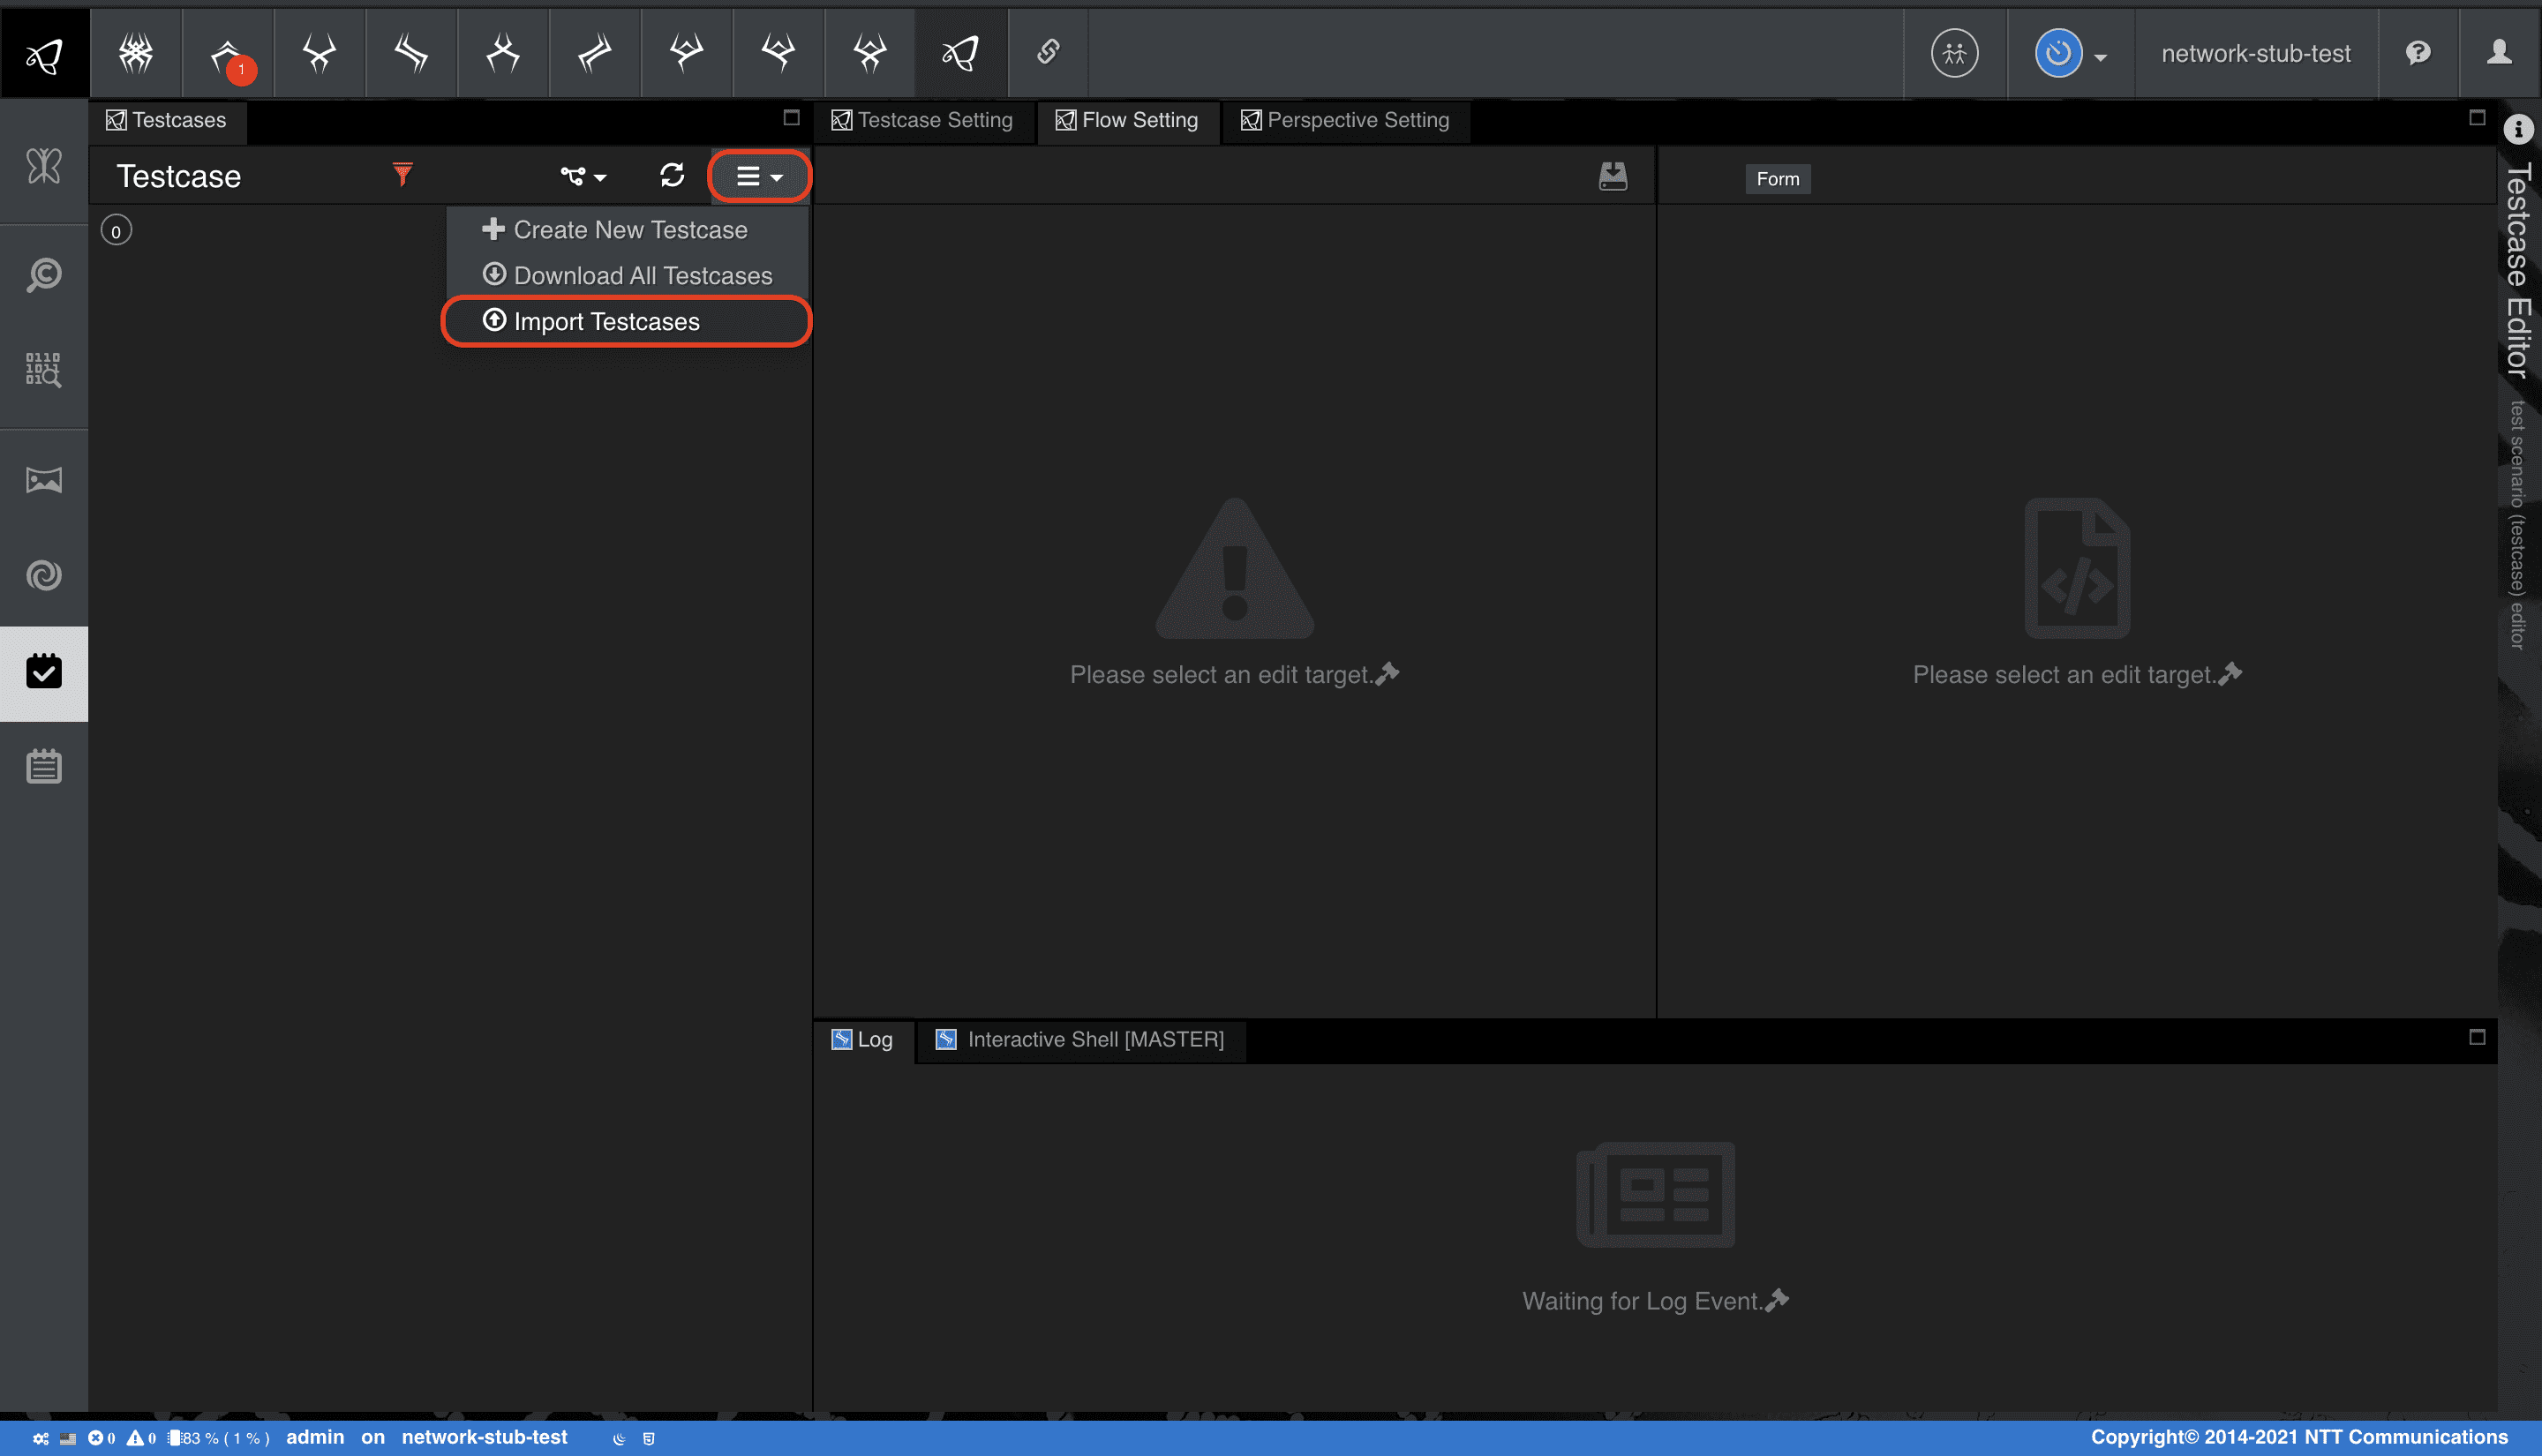
-
[Choose file] でファイルを指定後、[Import] を選択
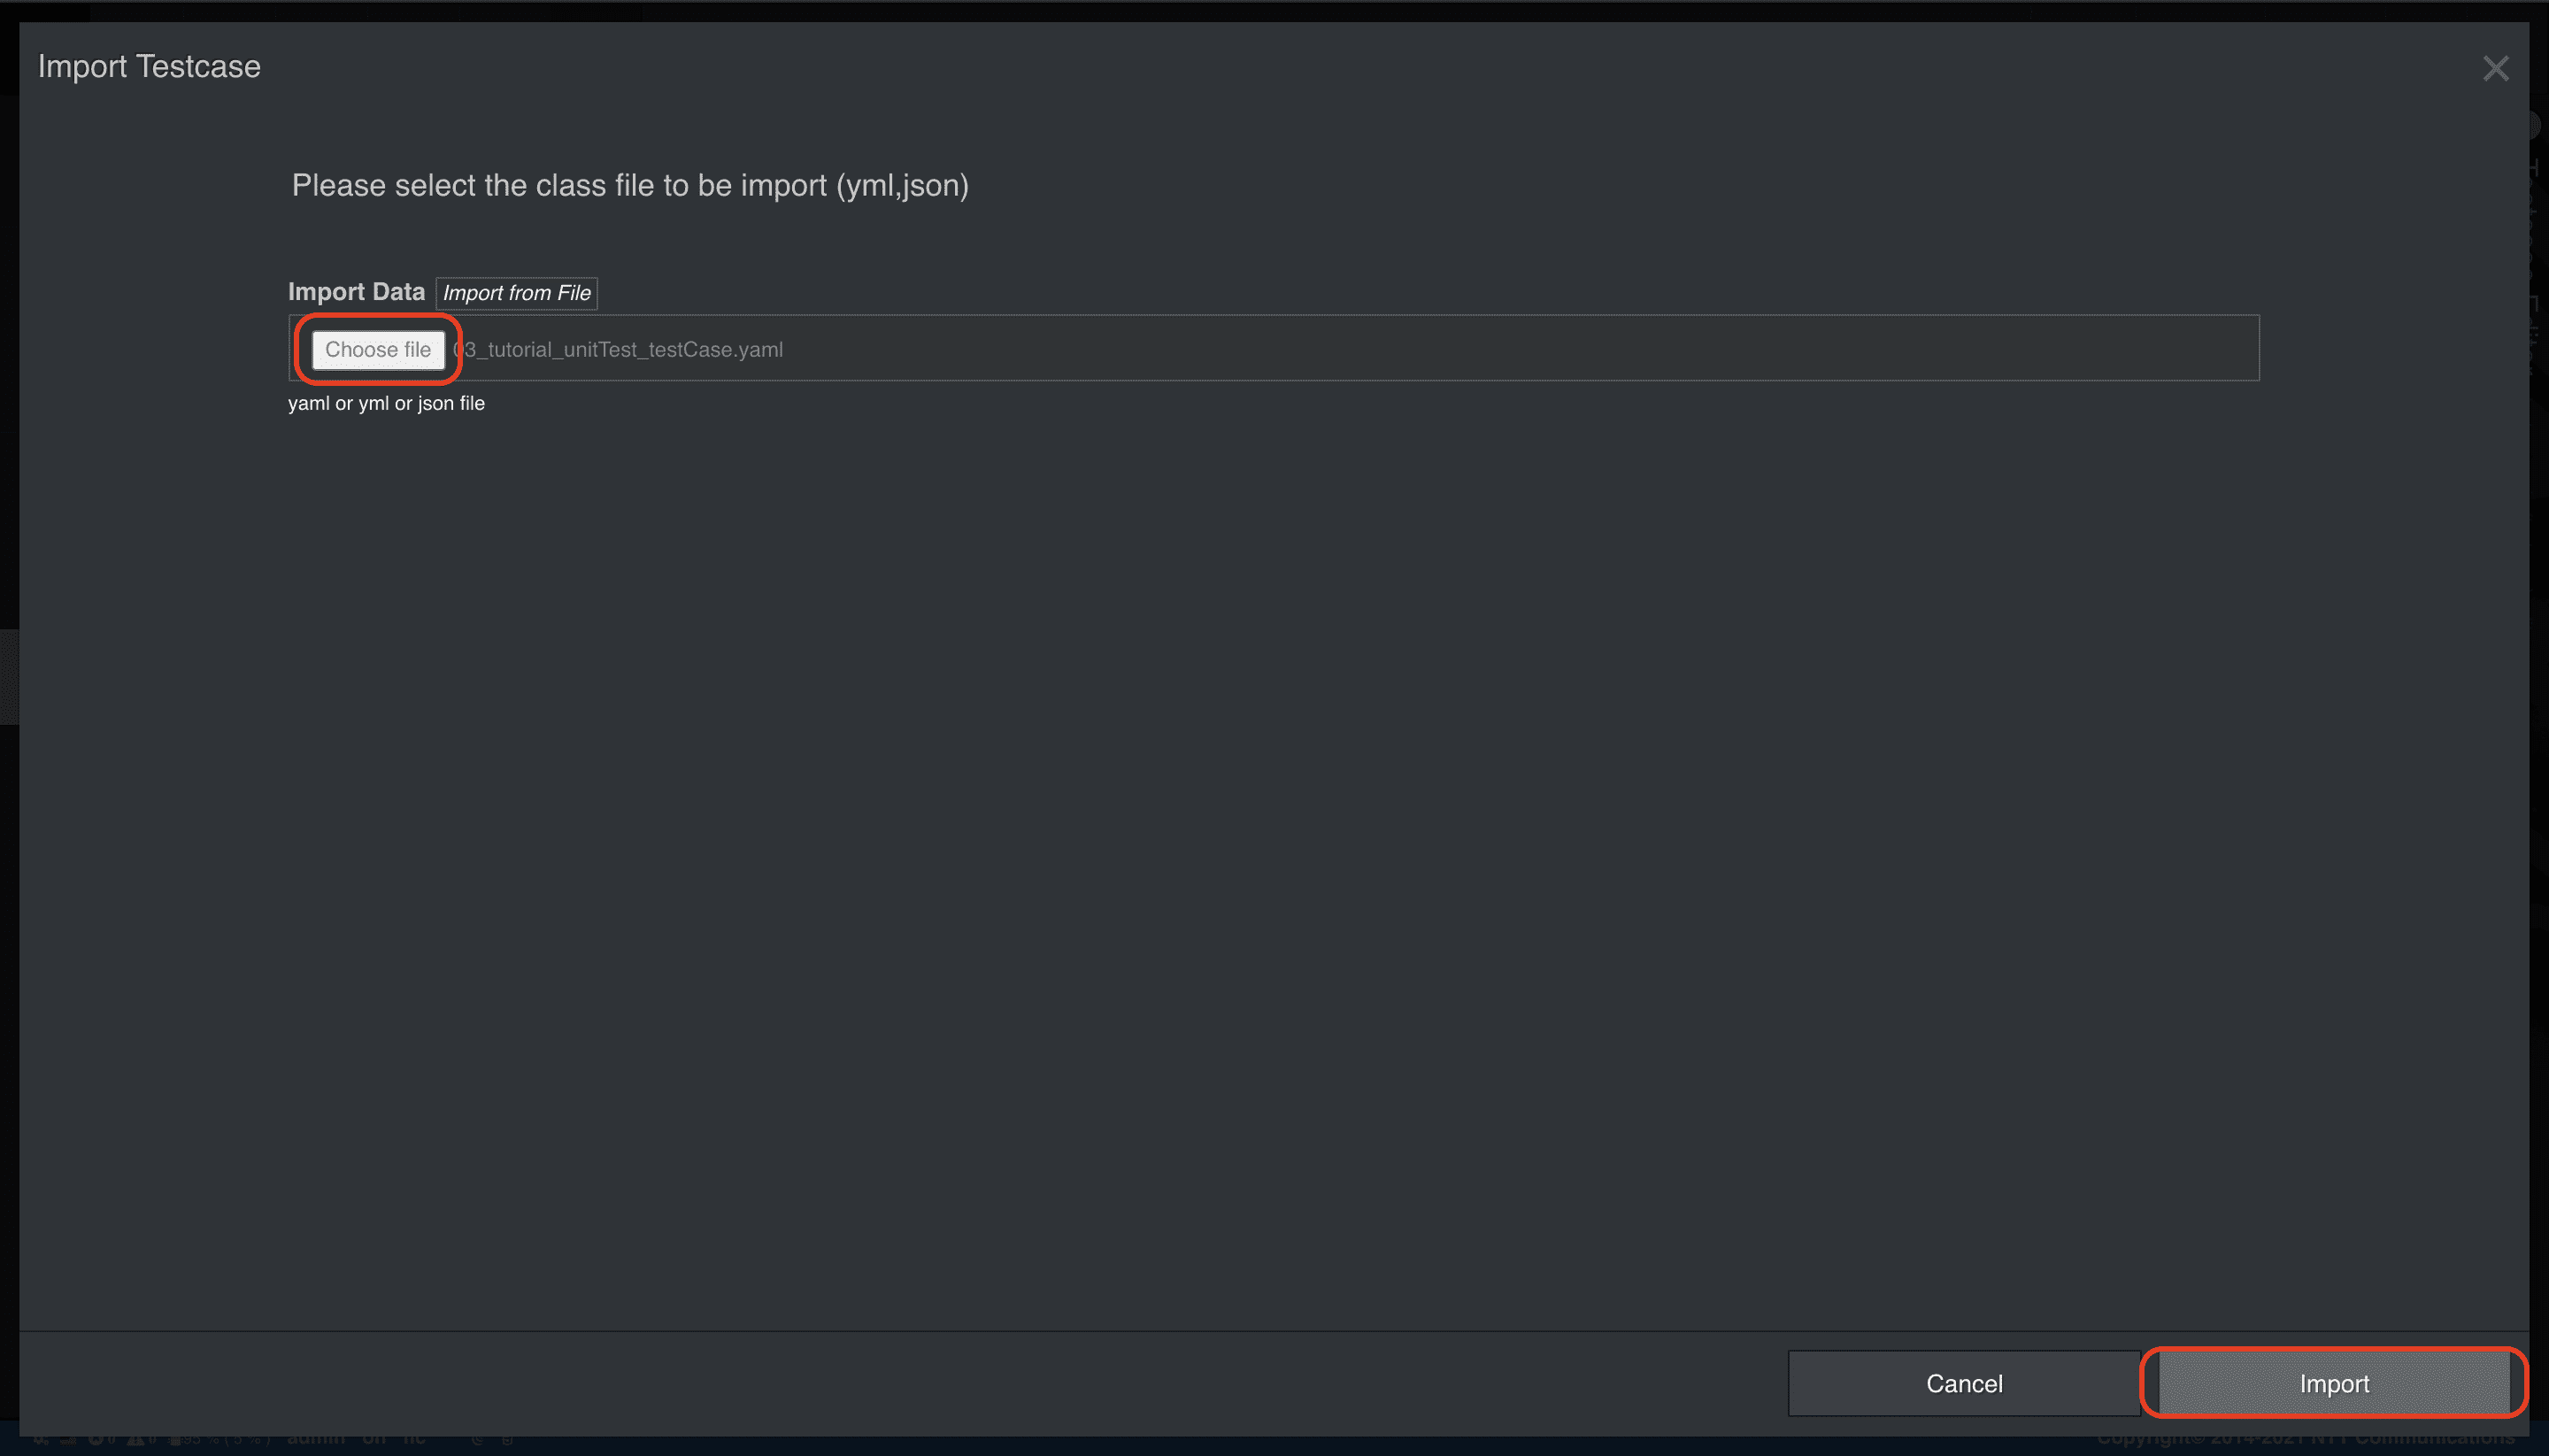
Step3でテストシーンを定義しましたが、原則としてテストシーンとテストケースは1:1の関係になります。
インポートせず手動でテストケースを作成する場合はシナリオを指定する必要があります。
今回のような流れで開発を行う場合は空のシナリオを用意し、指定してください。
テスト項目
| テスト分類 | テストシーン | テストケース名 |
|---|---|---|
| Input validation test | Empty body | exampleValidationBodyEmpty |
| Empty headers | exampleValidationHeaderEmpty | |
| Bad Content-Type | exampleValidationHeaderContentType | |
| Unspecified name | exampleValidationBodyNameRequired | |
| Unspecified region | exampleValidationBodyRegionRequired | |
| Normal test | exampleDryrun | exampleNormalDryrun |
| Subnormal test | examplePostFailed | examplePostFailed |
| exampleWaitforActiveFailed | exampleSubnormalWaitforActiveFailed | |
| exampleDetectedErrorHogeState | exampleSubnormalDryrun | |
| Abnormal test | exampleGetFailed | exampleAbnormalGetFailed |
| exampleDeleteFailed | exampleAbnormalDeleteFailed | |
| exampleWaitforNotFoundFailed | exampleAbnormalWaitforNotFoundFailed |
各テストケースの定義です。
exampleValidationBodyEmpty
空bodyを受信したら、400応答することを確認します。
python
category: example
name: exampleValidationBodyEmpty
target: example
input:
  method: POST
  path: /examples
  headers:
    Content-Type: application/json
  body: |-
    def randomBody():
        return dict()
assertion:
  output: |-
    async def assertion():
        assert Response.code==400, "Invalid validation schema %r" % Response.code
exampleValidationHeaderEmpty
空headerを受信したら、400応答することを確認します。rstrモジュールを利用してランダムなbody値を生成すると便利です。
python
category: example
name: exampleValidationHeaderEmpty
target: example
input:
  method: POST
  path: /examples
  headers: {}
  body: |-
    def randomBody():
        import rstr
        return dict(name=rstr.xeger("^[A-Z][a-zA-Z_0-9-]+$"), region=rstr.rstr(["jp1", "jp2"], 1))
assertion:
  output: |-
    async def assertion():
        assert Response.code==400, "Invalid validation schema %r" % Response.code
exampleValidationHeaderContentType
application/json以外のContent-Typeを受信したら、400応答することを確認します。
python
category: example
name: exampleValidationHeaderContentType
target: example
input:
  method: POST
  path: /examples
  headers:
    Content-Type: application/xml
  body: |-
    def randomBody():
        import rstr
        return dict(name=rstr.xeger("^[A-Z][a-zA-Z_0-9-]+$"), region=rstr.rstr(["jp1", "jp2"], 1))
assertion:
  output: |-
    async def assertion():
        assert Response.code==400, "Invalid validation schema %r" % Response.code
exampleValidationBodyNameRequired
nameキーが含まれていないbodyを受信したら、400応答することを確認しています。
python
category: example
name: exampleValidationBodyNameRequired
target: example
input:
  method: POST
  path: /examples
  headers:
    Content-Type: application/json
  body: |-
    def randomBody():
        import rstr
        return dict(region=rstr.rstr(["jp1", "jp2"], 1))
assertion:
  output: |-
    async def assertion():
        assert Response.code==400, "Invalid validation schema %r" % Response.code
exampleValidationBodyRegionRequired
regionキーが含まれていないbodyを受信したら、400応答することを確認しています。
python
category: example
name: exampleValidationBodyRegionRequired
target: example
input:
  method: POST
  path: /examples
  headers:
    Content-Type: application/json
  body: |-
    def randomBody():
        import rstr
        return dict(name=rstr.word())
assertion:
  output: |-
    async def assertion():
        assert Response.code==400, "Invalid validation schema %r" % Response.code
exampleNormalDryrun
正しい要求であれば、202応答を返却し、トランザクションがCompleteすることを確認しています。
python
category: example
name: exampleNormalDryrun
target: example
illusion: exampleDryrun
input:
  method: POST
  path: /examples
  headers:
    Content-Type: application/json
  body: |-
    def randomBody():
        import rstr
        return dict(name=rstr.xeger("^[A-Z][a-zA-Z_0-9-]+$"), region=rstr.rstr(["jp1", "jp2"], 1))
assertion:
  output: |-
    async def assertion():
        assert Response.code==202, "Invalid response code %r" % Response.code
        assert Response.body, "Empty body %r" % Response.body
        assert "hogeID" in json.loads(Response.body), "Invalid response body %s" % Response.body
  progress:
  - index: 1
    script: |-
      async def assertion():
          assert Transaction.xglobals.name and Transaction.xglobals.region, "name or region is None"
          assert Transaction.xglobals.hogeID is not None, "hogeID is None"
  end: |-
    async def assertion():
        assert Transaction.status=="Complete", "Transaction is in an unexpected state %r" % Transaction.status
examplePostFailed
HogeリソースのPOSTに失敗すると、500応答を返却することを確認しています。
yaml
category: example
name: examplePostFailed
target: example
illusion: examplePostFailed
input:
  method: POST
  path: /examples
  headers:
    Content-Type: application/json
  body: |-
    def randomBody():
        import rstr
        return dict(name=rstr.xeger("^[A-Z][a-zA-Z_0-9-]+$"), region=rstr.rstr(["jp1", "jp2"], 1))
assertion:
  output: |-
    async def assertion():
        assert Response.code==500, "Invalid response code %r" % Response.code
exampleSubnormalWaitforActiveFailed
HogeリソースのPOSTに成功すると、202応答を返却することを確認しています。その後、Hogeリソースが正常に遷移しなかった場合は、トランザクションがロールバックされていることを確認しています。
python
category: example
name: exampleSubnormalWaitforActiveFailed
target: example
illusion: exampleWaitforActiveFailed
input:
  method: POST
  path: /examples
  headers:
    Content-Type: application/json
  body: |-
    def randomBody():
        import rstr
        return dict(name=rstr.xeger("^[A-Z][a-zA-Z_0-9-]+$"), region=rstr.rstr(["jp1", "jp2"], 1))
assertion:
  output: |-
    async def assertion():
        assert Response.code==202, "Invalid response code %r" % Response.code
        assert Response.body, "Empty body %r" % Response.body
        assert "hogeID" in json.loads(Response.body), "Invalid response body %s" % Response.body
  progress:
  - index: 1
    script: |-
      async def assertion():
          assert Transaction.xglobals.name and Transaction.xglobals.region, "name or region is None"
          assert Transaction.xglobals.hogeID is not None, "hogeID is None"
  end: |-
    async def assertion():
        assert Transaction.status=="Cancelled", "Transaction is in an unexpected state %r" % Transaction.status
exampleSubnormalDryrun
HogeリソースのPOSTに成功すると、202応答を返却することを確認しています。その後、HogeリソースがErrorに遷移した場合は、トランザクションがロールバックされていることを確認しています。
python
category: example
name: exampleSubnormalDryrun
target: example
illusion: exampleDetectedErrorHogeState
input:
  method: POST
  path: /examples
  headers:
    Content-Type: application/json
  body: |-
    def randomBody():
        import rstr
        return dict(name=rstr.xeger("^[A-Z][a-zA-Z_0-9-]+$"), region=rstr.rstr(["jp1", "jp2"], 1))
assertion:
  output: |-
    async def assertion():
        assert Response.code==202, "Invalid response code %r" % Response.code
        assert Response.body, "Empty body %r" % Response.body
        assert "hogeID" in json.loads(Response.body), "Invalid response body %s" % Response.body
  progress:
  - index: 1
    script: |-
      async def assertion():
          assert Transaction.xglobals.name and Transaction.xglobals.region, "name or region is None"
          assert Transaction.xglobals.hogeID is not None, "hogeID is None"
  end: |-
    async def assertion():
        assert Transaction.status=="Cancelled", "Transaction is in an unexpected state %r" % Transaction.status
exampleAbnormalGetFailed
HogeリソースのPOSTに成功すると、202応答を返却することを確認しています。その後、トランザクションロールバック時にHogeリソース情報の取得が失敗し、Abortedに遷移していることを確認後、強制ロールバックを実行してForceCancelledに遷移することを確認しています。
python
category: example
name: exampleAbnormalGetFailed
target: example
illusion: exampleGetFailed
input:
  method: POST
  path: /examples
  headers:
    Content-Type: application/json
  body: |-
    def randomBody():
        import rstr
        return dict(name=rstr.xeger("^[A-Z][a-zA-Z_0-9-]+$"), region=rstr.rstr(["jp1", "jp2"], 1))
assertion:
  output: |-
    async def assertion():
        assert Response.code==202, "Invalid response code %r" % Response.code
        assert Response.body, "Empty body %r" % Response.body
        assert "hogeID" in json.loads(Response.body), "Invalid response body %s" % Response.body
  progress:
  - index: 1
    script: |-
      async def assertion():
          assert Transaction.xglobals.name and Transaction.xglobals.region, "name or region is None"
          assert Transaction.xglobals.hogeID is not None, "hogeID is None"
  end: |-
    async def assertion():
        assert Transaction.status=="Aborted", "Transaction is in an unexpected state %r" % Transaction.status
cleanup: |-
  async def cleanup():
      await Transaction.cancel(force=True)
      assert Transaction.status=="ForceCancelled", "Force cancel failed %r" % Transaction.status
exampleAbnormalDeleteFailed
HogeリソースのPOSTに成功すると、202応答を返却することを確認しています。その後、トランザクションロールバック時にHogeリソースの削除が失敗し、Abortedに遷移していることを確認後、強制ロールバックを実行してForceCancelledに遷移することを確認しています。
python
category: example
name: exampleAbnormalDeleteFailed
target: example
illusion: exampleDeleteFailed
input:
  method: POST
  path: /examples
  headers:
    Content-Type: application/json
  body: |-
    def randomBody():
        import rstr
        return dict(name=rstr.xeger("^[A-Z][a-zA-Z_0-9-]+$"), region=rstr.rstr(["jp1", "jp2"], 1))
assertion:
  output: |-
    async def assertion():
        assert Response.code==202, "Invalid response code %r" % Response.code
        assert Response.body, "Empty body %r" % Response.body
        assert "hogeID" in json.loads(Response.body), "Invalid response body %s" % Response.body
  progress:
  - index: 1
    script: |-
      async def assertion():
          assert Transaction.xglobals.name and Transaction.xglobals.region, "name or region is None"
          assert Transaction.xglobals.hogeID is not None, "hogeID is None"
  end: |-
    async def assertion():
        assert Transaction.status=="Aborted", "Transaction is in an unexpected state %r" % Transaction.status
cleanup: |-
  async def cleanup():
      await Transaction.cancel(force=True)
      assert Transaction.status=="ForceCancelled", "Force cancel failed %r" % Transaction.status
exampleAbnormalWaitforNotFoundFailed
HogeリソースのPOSTに成功すると、202応答を返却することを確認しています。その後、トランザクションロールバック時にHogeリソースの削除ポーリングが失敗し、Abortedに遷移していることを確認後、強制ロールバックを実行してForceCancelledに遷移することを確認しています。
python
category: example
name: exampleAbnormalWaitforNotFoundFailed
target: example
illusion: exampleWaitforNotFoundFailed
input:
  method: POST
  path: /examples
  headers:
    Content-Type: application/json
  body: |-
    def randomBody():
        import rstr
        return dict(name=rstr.xeger("^[A-Z][a-zA-Z_0-9-]+$"), region=rstr.rstr(["jp1", "jp2"], 1))
assertion:
  output: |-
    async def assertion():
        assert Response.code==202, "Invalid response code %r" % Response.code
        assert Response.body, "Empty body %r" % Response.body
        assert "hogeID" in json.loads(Response.body), "Invalid response body %s" % Response.body
  progress:
  - index: 1
    script: |-
      async def assertion():
          assert Transaction.xglobals.name and Transaction.xglobals.region, "name or region is None"
          assert Transaction.xglobals.hogeID is not None, "hogeID is None"
  end: |-
    async def assertion():
        assert Transaction.status=="Aborted", "Transaction is in an unexpected state %r" % Transaction.status
cleanup: |-
  async def cleanup():
      await Transaction.cancel(force=True)
      assert Transaction.status=="ForceCancelled", "Force cancel failed %r" % Transaction.status
Step5. テストスイートを定義する
テストケースが作成できたので、それらをテストスイートに統合しましょう。テストをまとめて実行するのに便利です。
Test Suite ダウンロード
yaml
category: example
name: exampleSuite
suites:
  testcases:
  - exampleValidationHeaderEmpty
  - exampleValidationHeaderContentType
  - exampleValidationBodyEmpty
  - exampleValidationBodyNameRequired
  - exampleValidationBodyRegionRequired
  - examplePostFailed
  - exampleNormalDryrun
  - exampleSubnormalDryrun
  - exampleAbnormalGetFailed
  - exampleAbnormalDeleteFailed
  - exampleAbnormalWaitforNotFoundFailed
  - exampleSubnormalWaitforActiveFailed
-
上記の
Test Suiteファイルを用意する -
メインメニューから [Unit Test as a Service] > [Test Suite] を選択
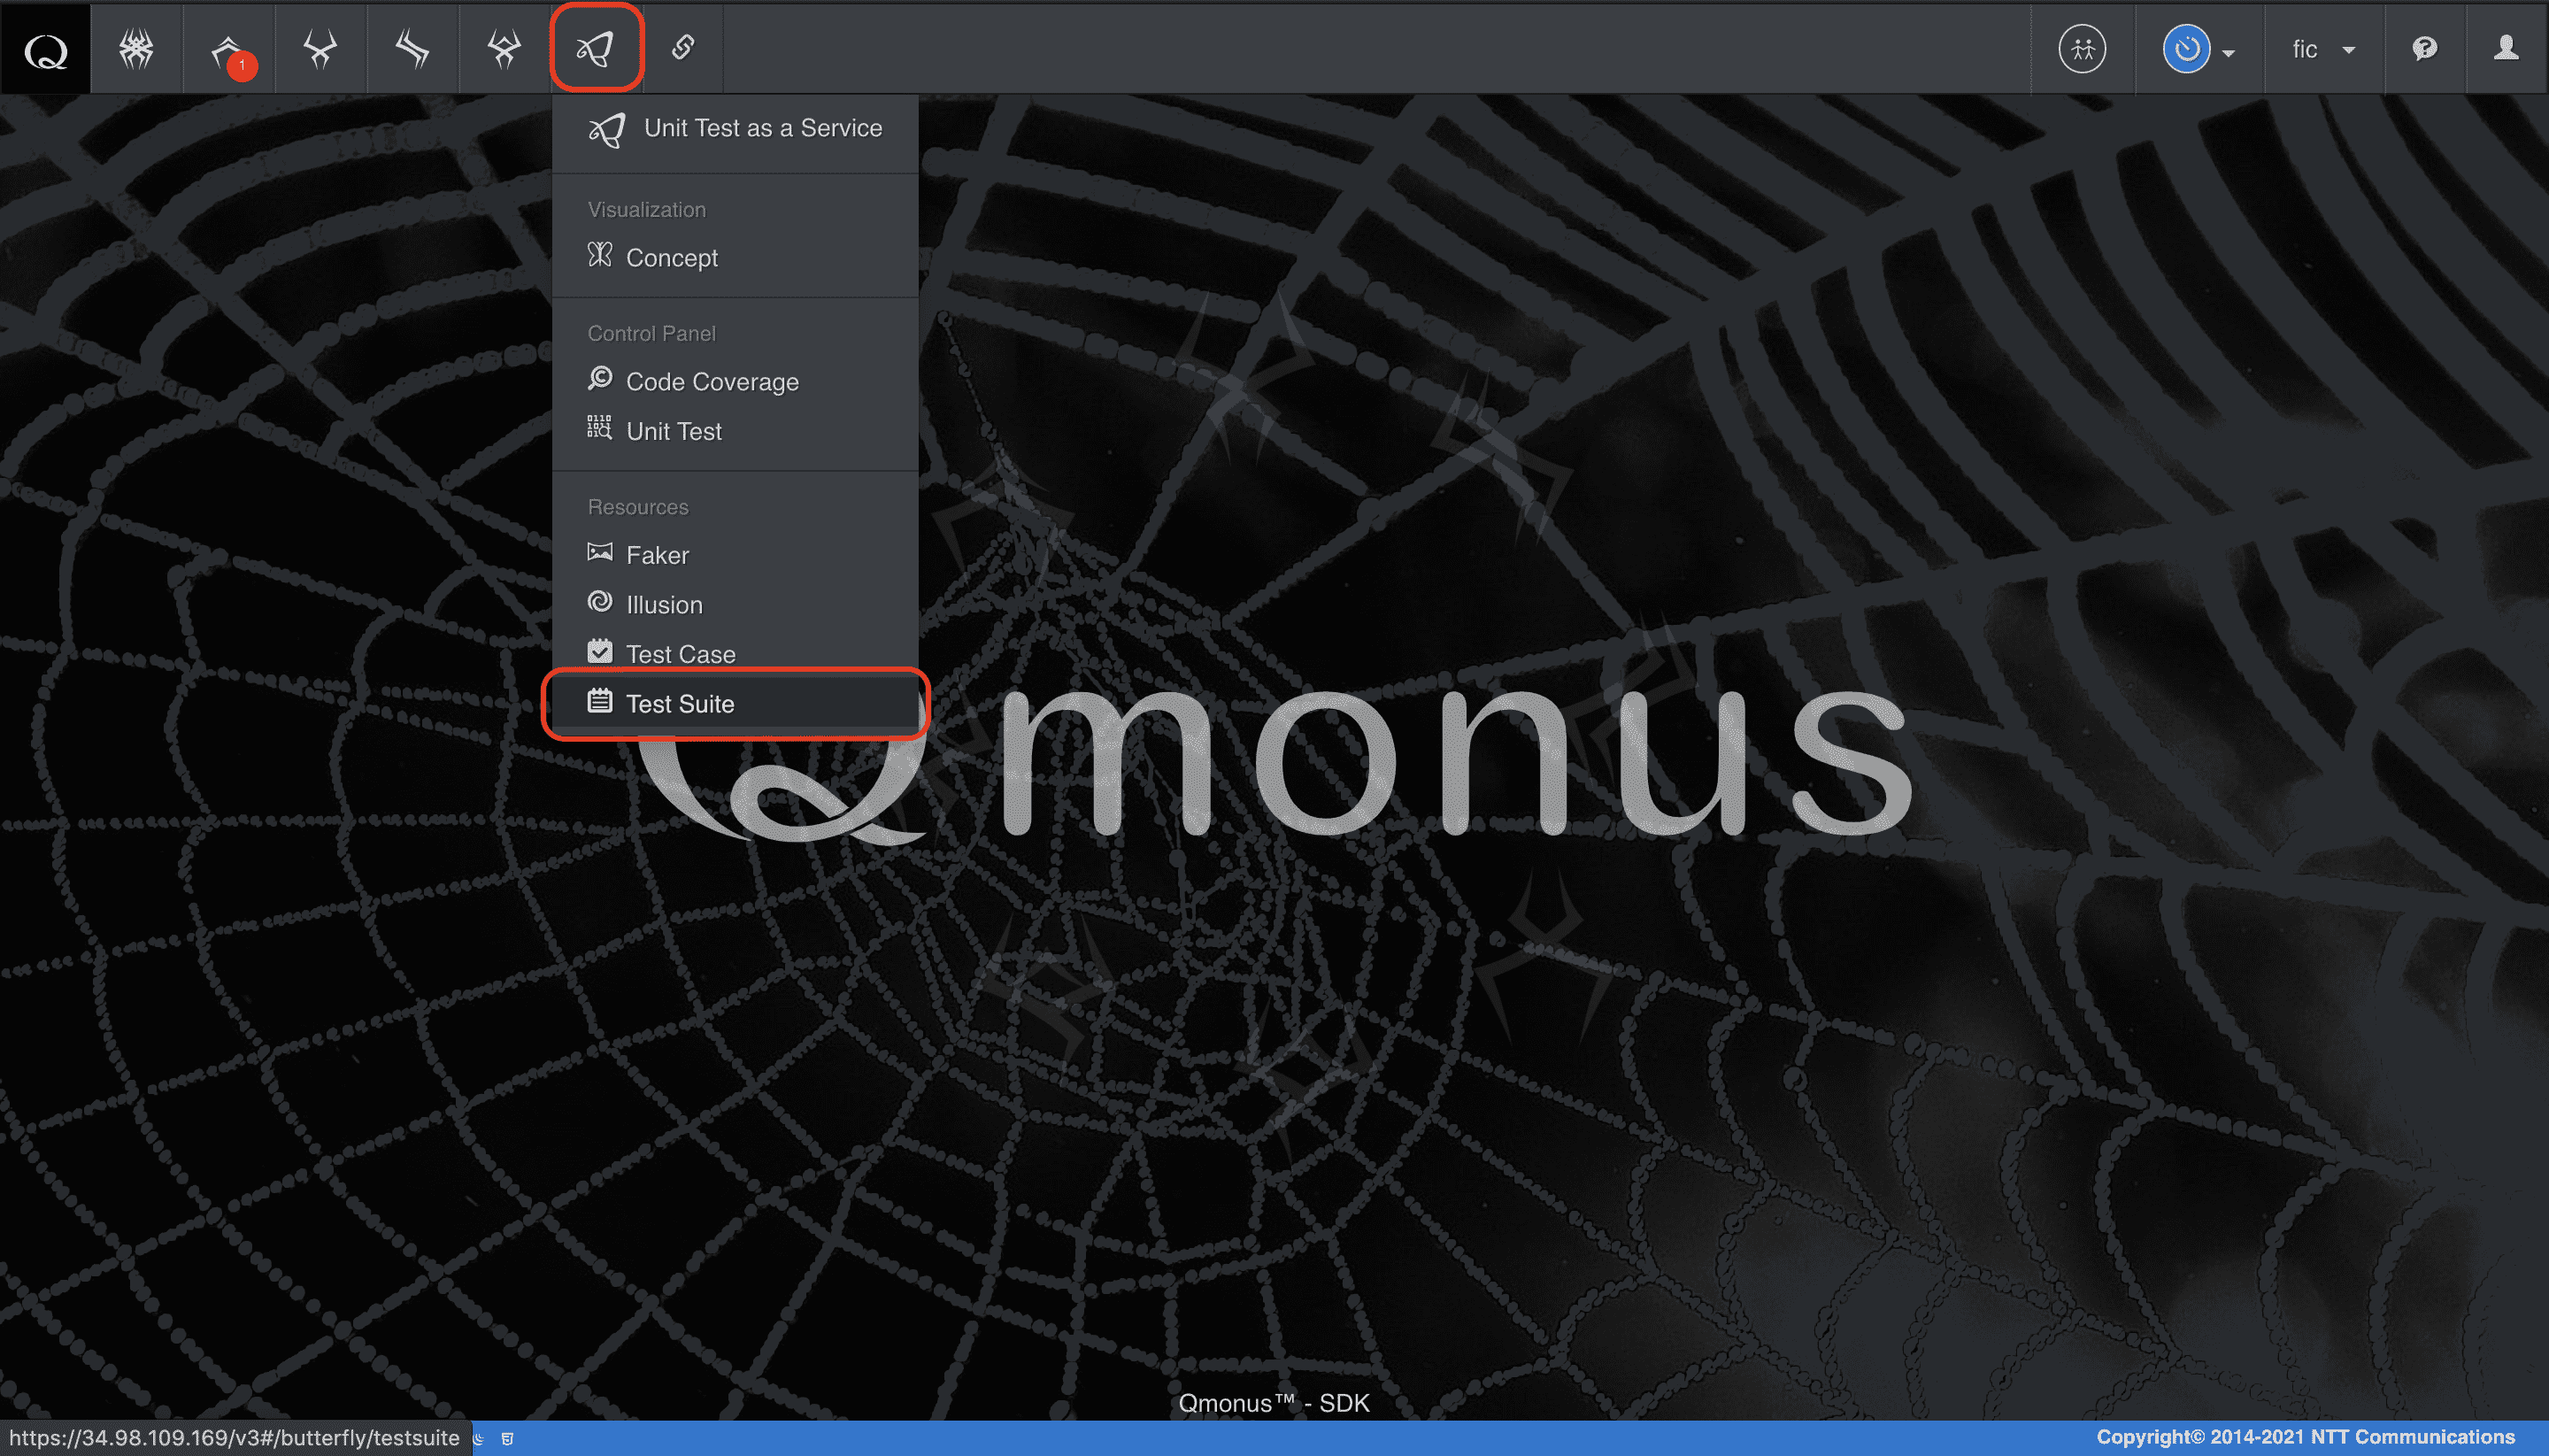
-
クラスメニューの [Import Testsuites] を選択
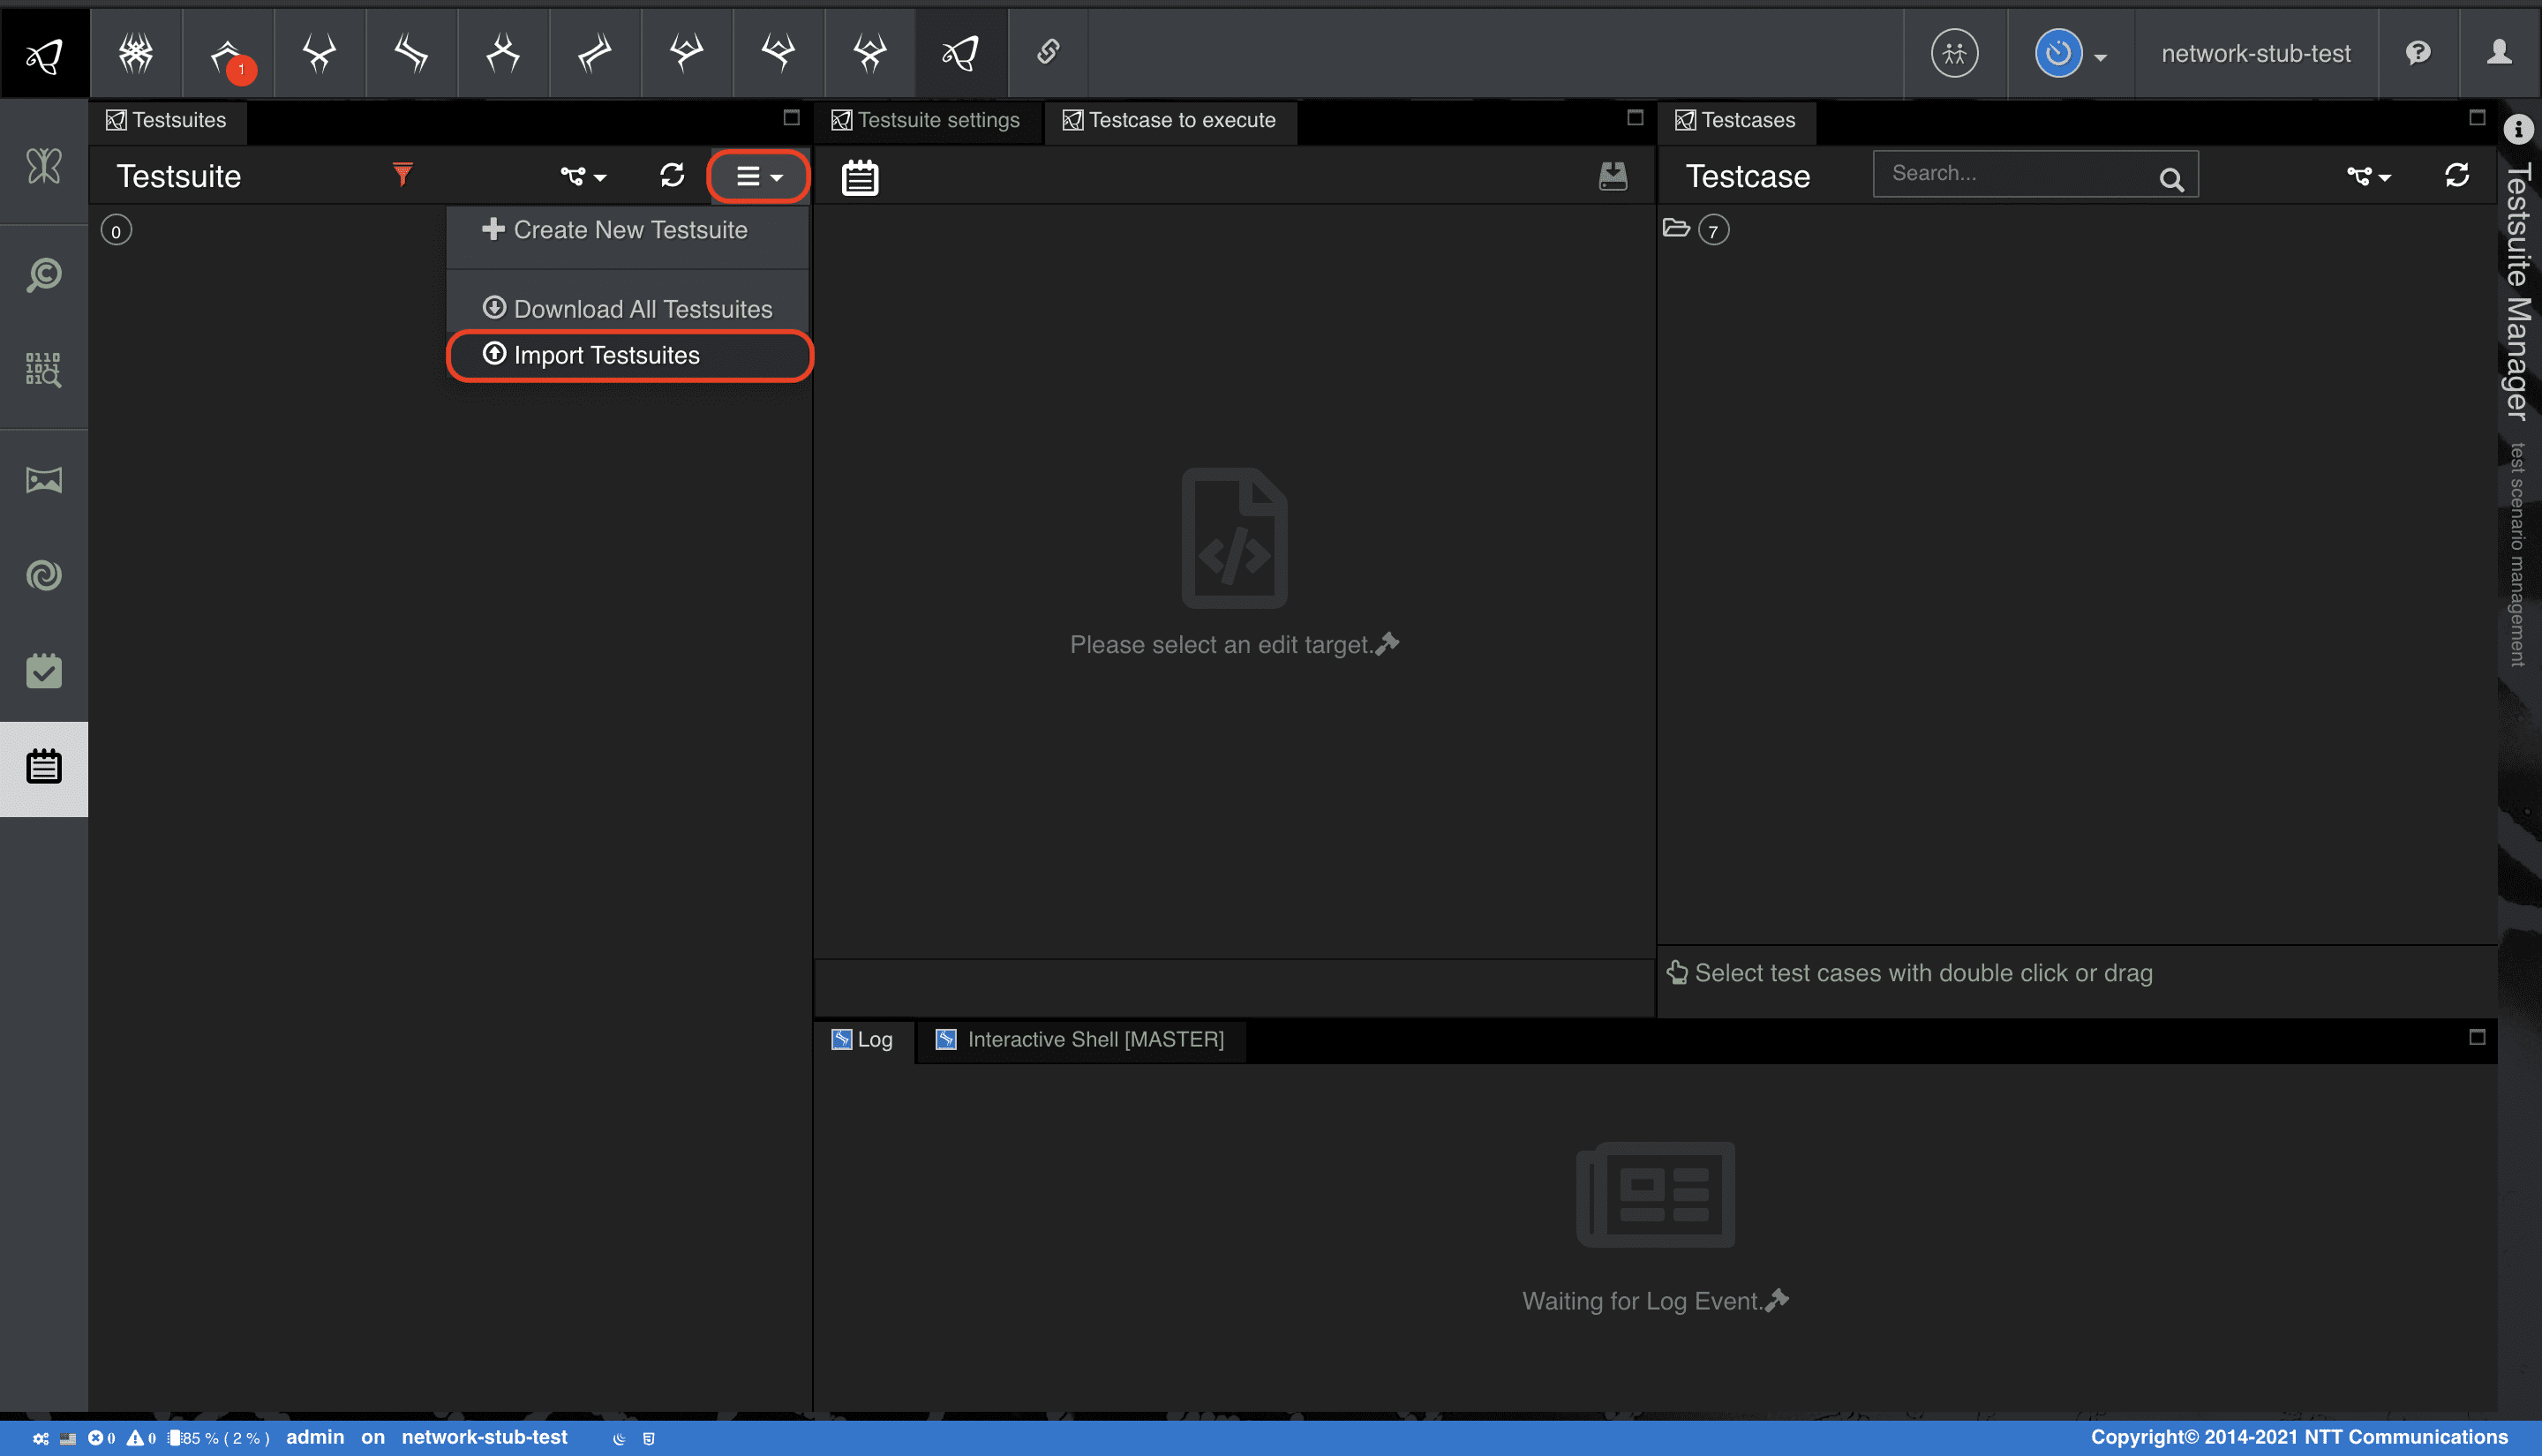
-
[Choose file] で定義ファイルを指定後、[Import] を選択
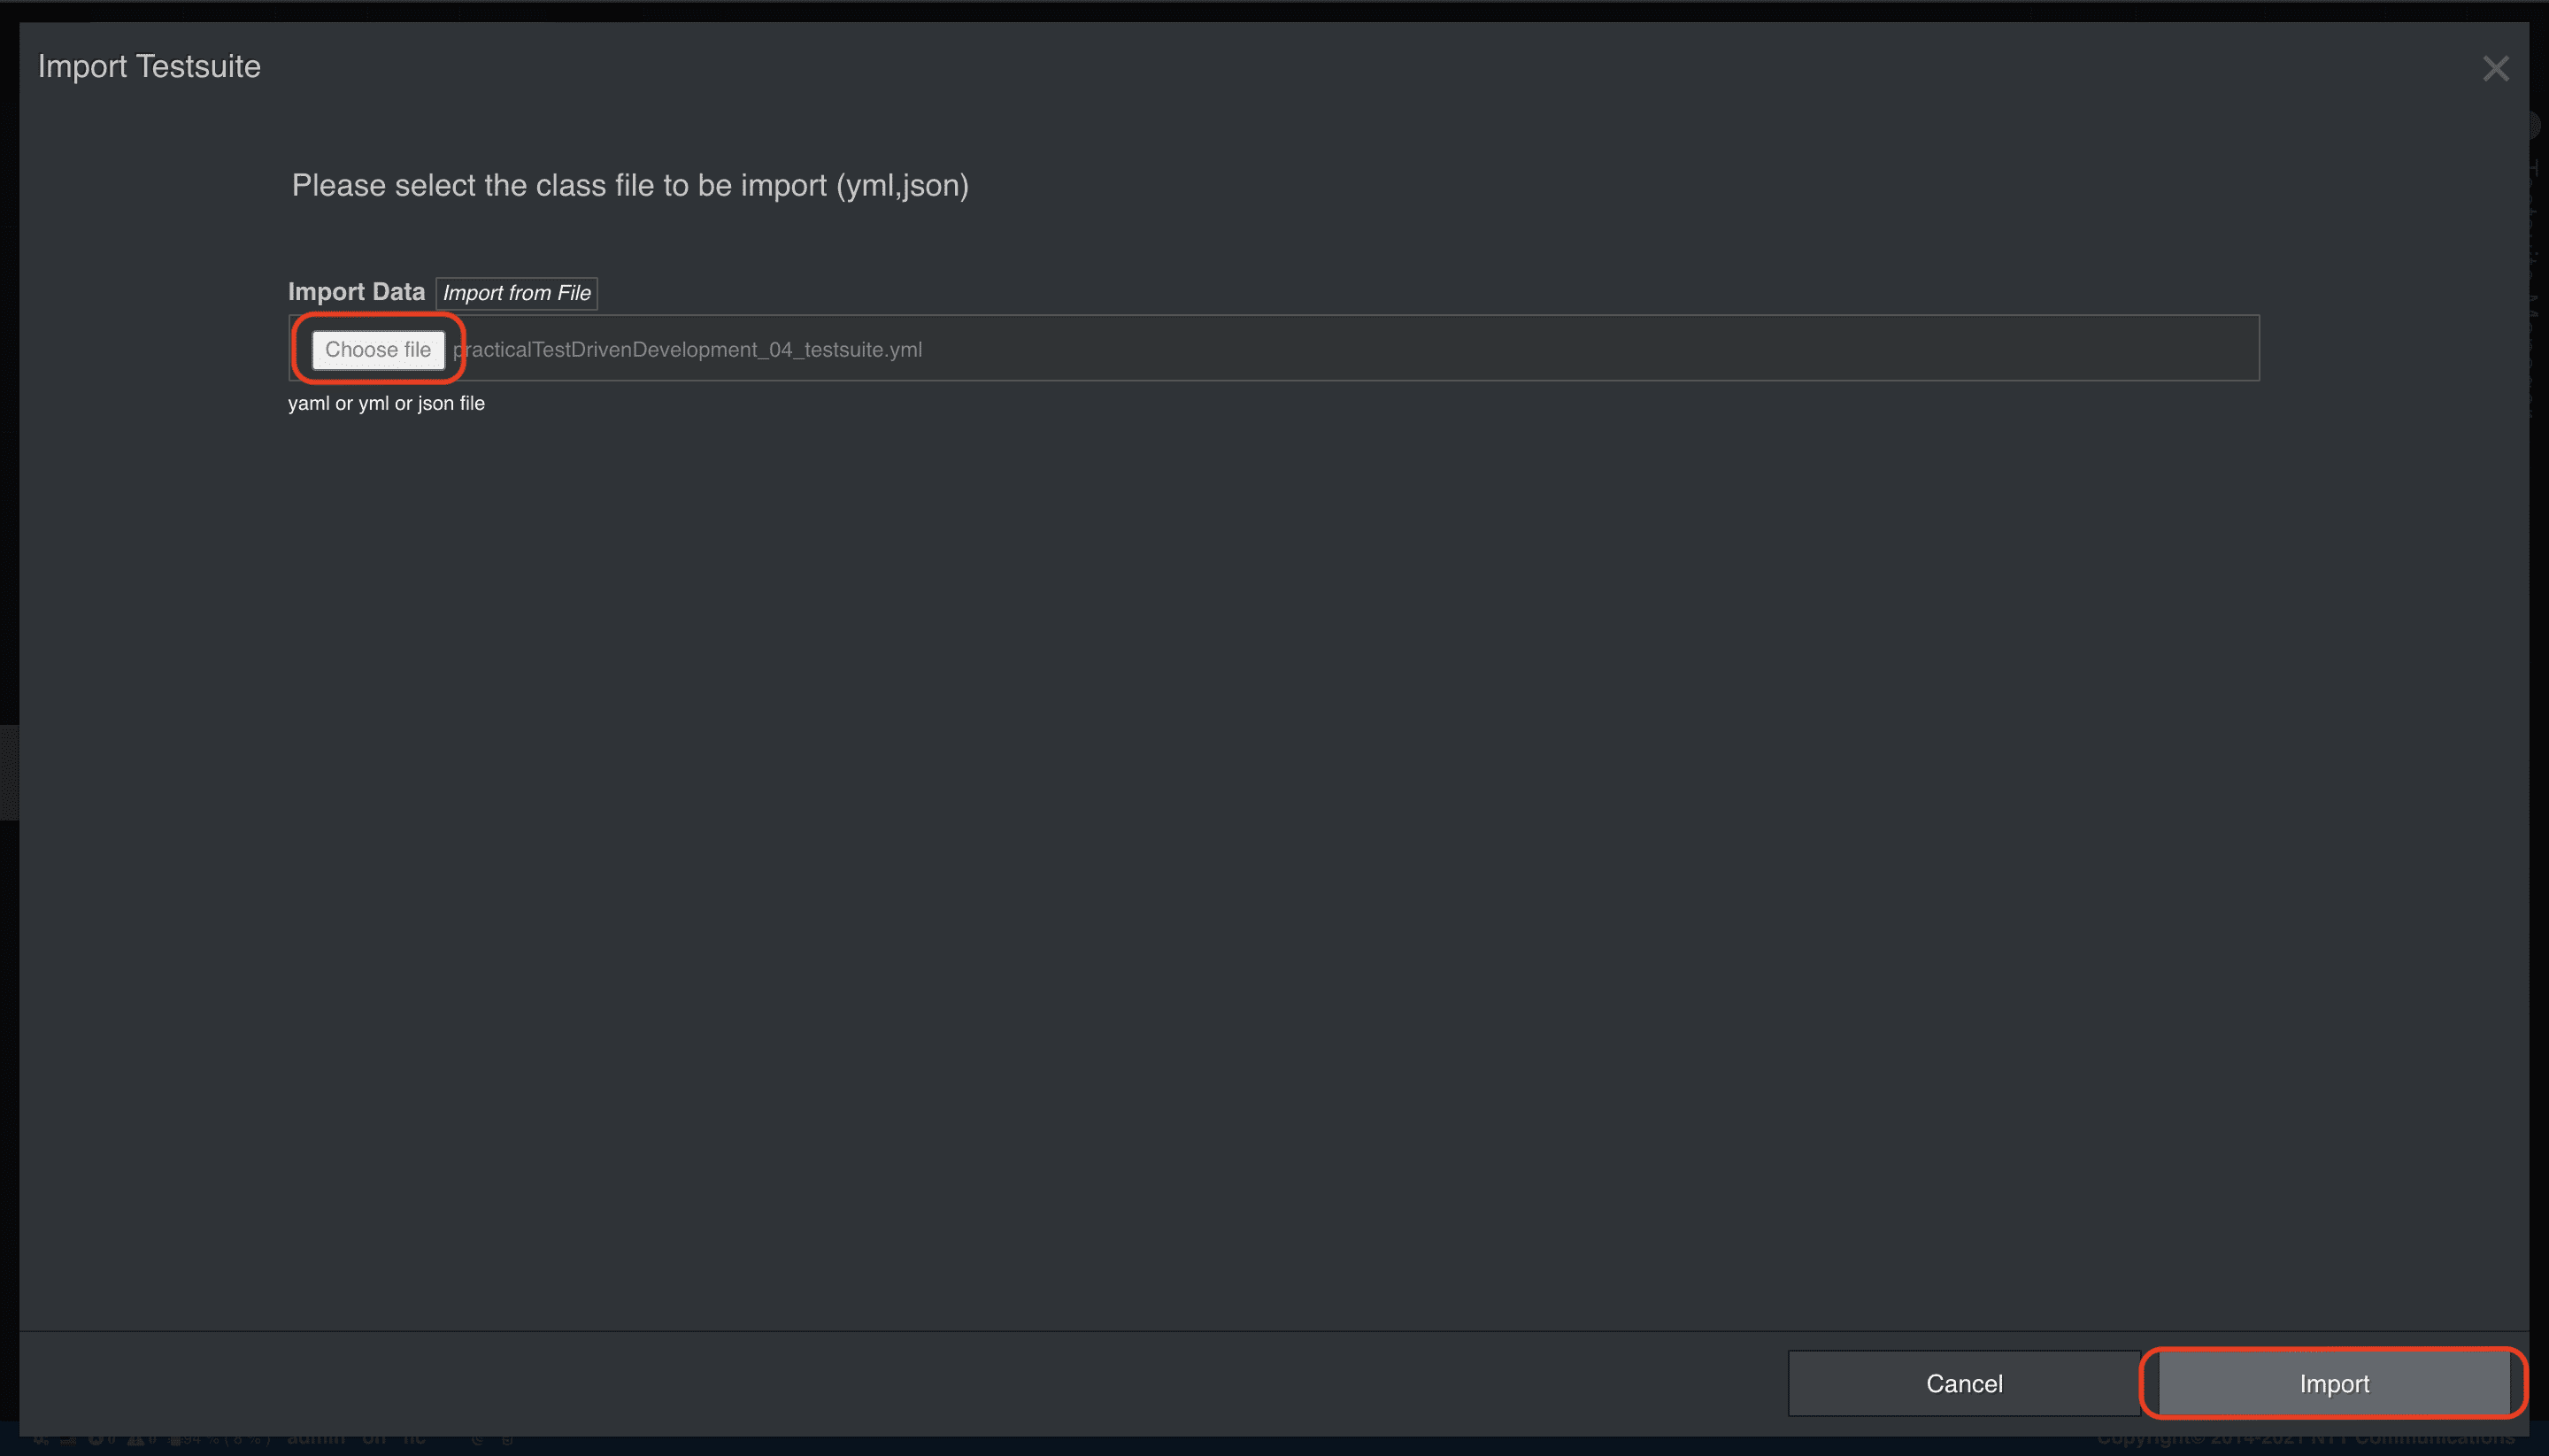
Step6. アプリケーションを実装する
最後にアプリケーションを作成しましょう。
ここまででテスト環境は作成済ですのでFrontalでの開発時にTDDをオンにしてテストを駆動しながら実装するのも良いでしょう。
また、以下のATOMやシナリオは実装例です。これまでに定義したテストをクリアするアプリケーションを自由に作成してみてください。
ATOM
作成するAPIは、要求された情報および注文情報としてデータベースに保持します。ATOMで注文情報のCRUDモデルを作成します。
Application ATOM ダウンロード
yaml
category: example
name: Example
persistence: true
abstract: false
api_generation: false
attributes:
  identifier:
    field_immutable: true
    field_name: name
    field_persistence: true
    field_type: string
  local_fields:
  - field_immutable: false
    field_name: region
    field_nullable: true
    field_persistence: true
    field_type: string
    field_unique: false
  - field_immutable: false
    field_name: description
    field_nullable: true
    field_persistence: true
    field_type: string
    field_unique: false
  - field_immutable: false
    field_name: hogeID
    field_nullable: true
    field_persistence: true
    field_type: string
    field_unique: false
  - field_immutable: false
    field_name: createdAt
    field_nullable: true
    field_persistence: true
    field_type: DateTime
    field_unique: false
  ref_fields: []
methods:
  class_methods: []
  instance_methods: []
-
上記の
Application ATOMファイルを用意する -
メインメニューから [Workflow Scenario as a Service] > [Class] を選択
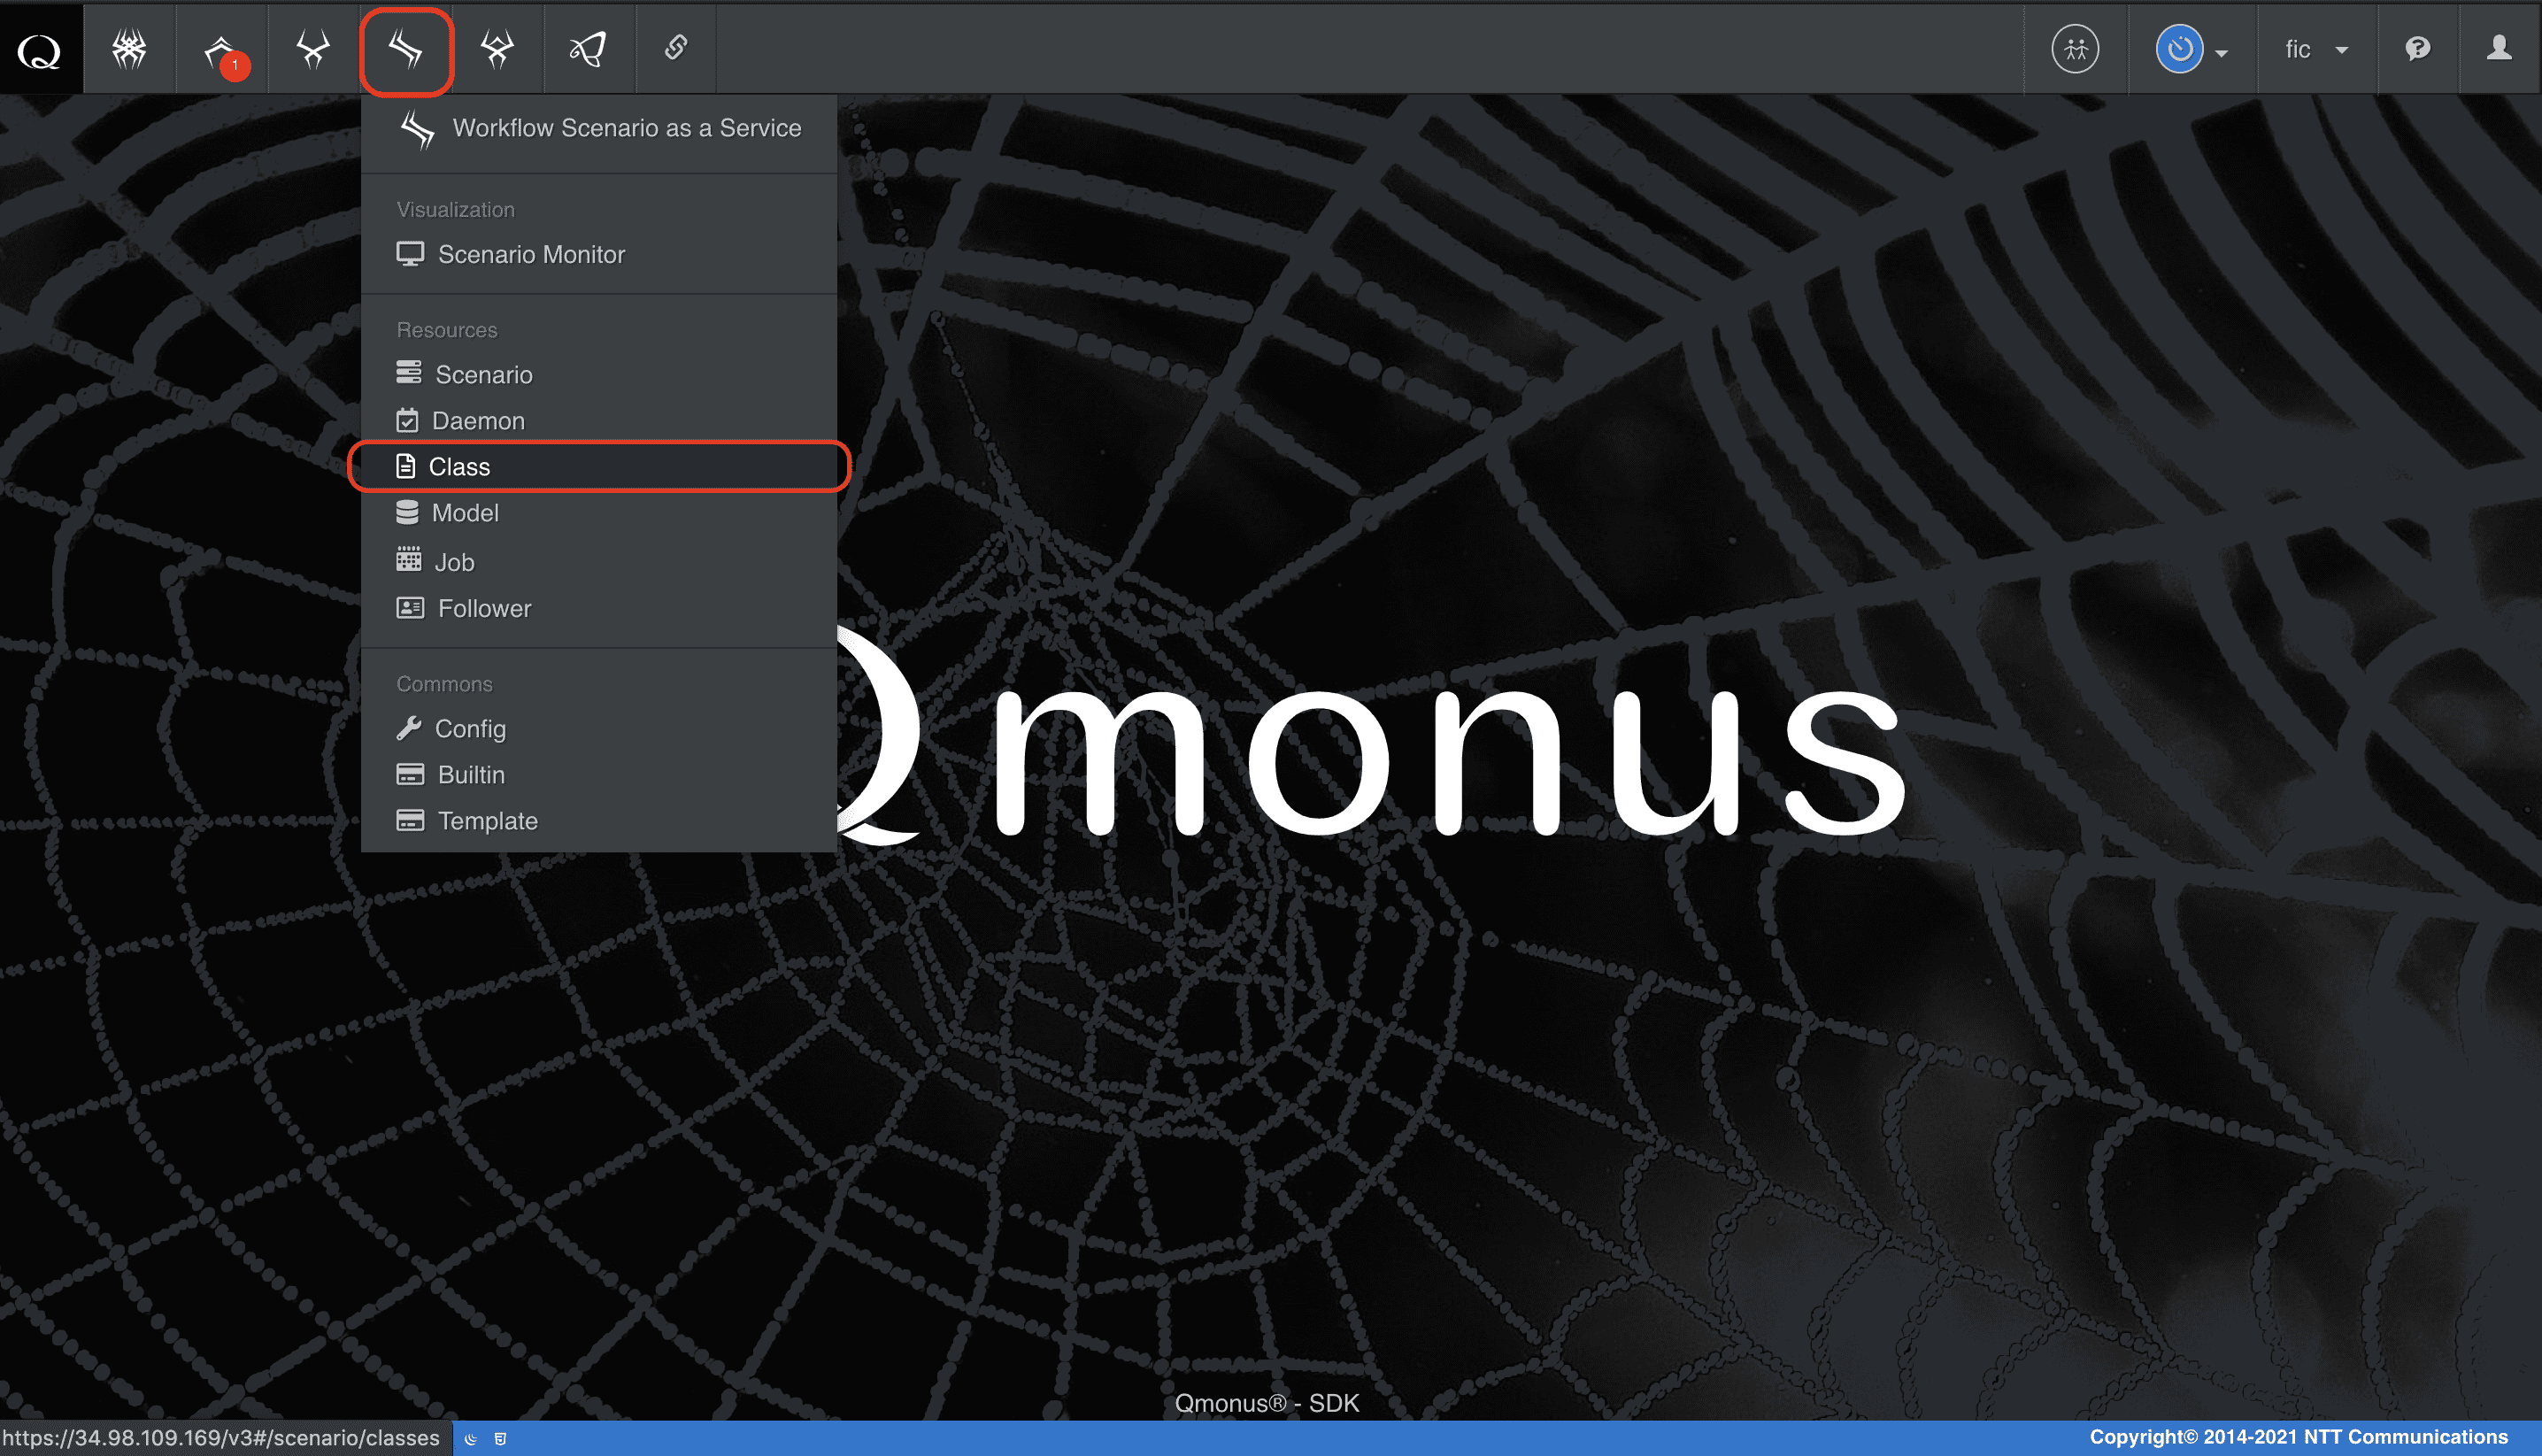
-
クラスメニューの [Import Classes] を選択
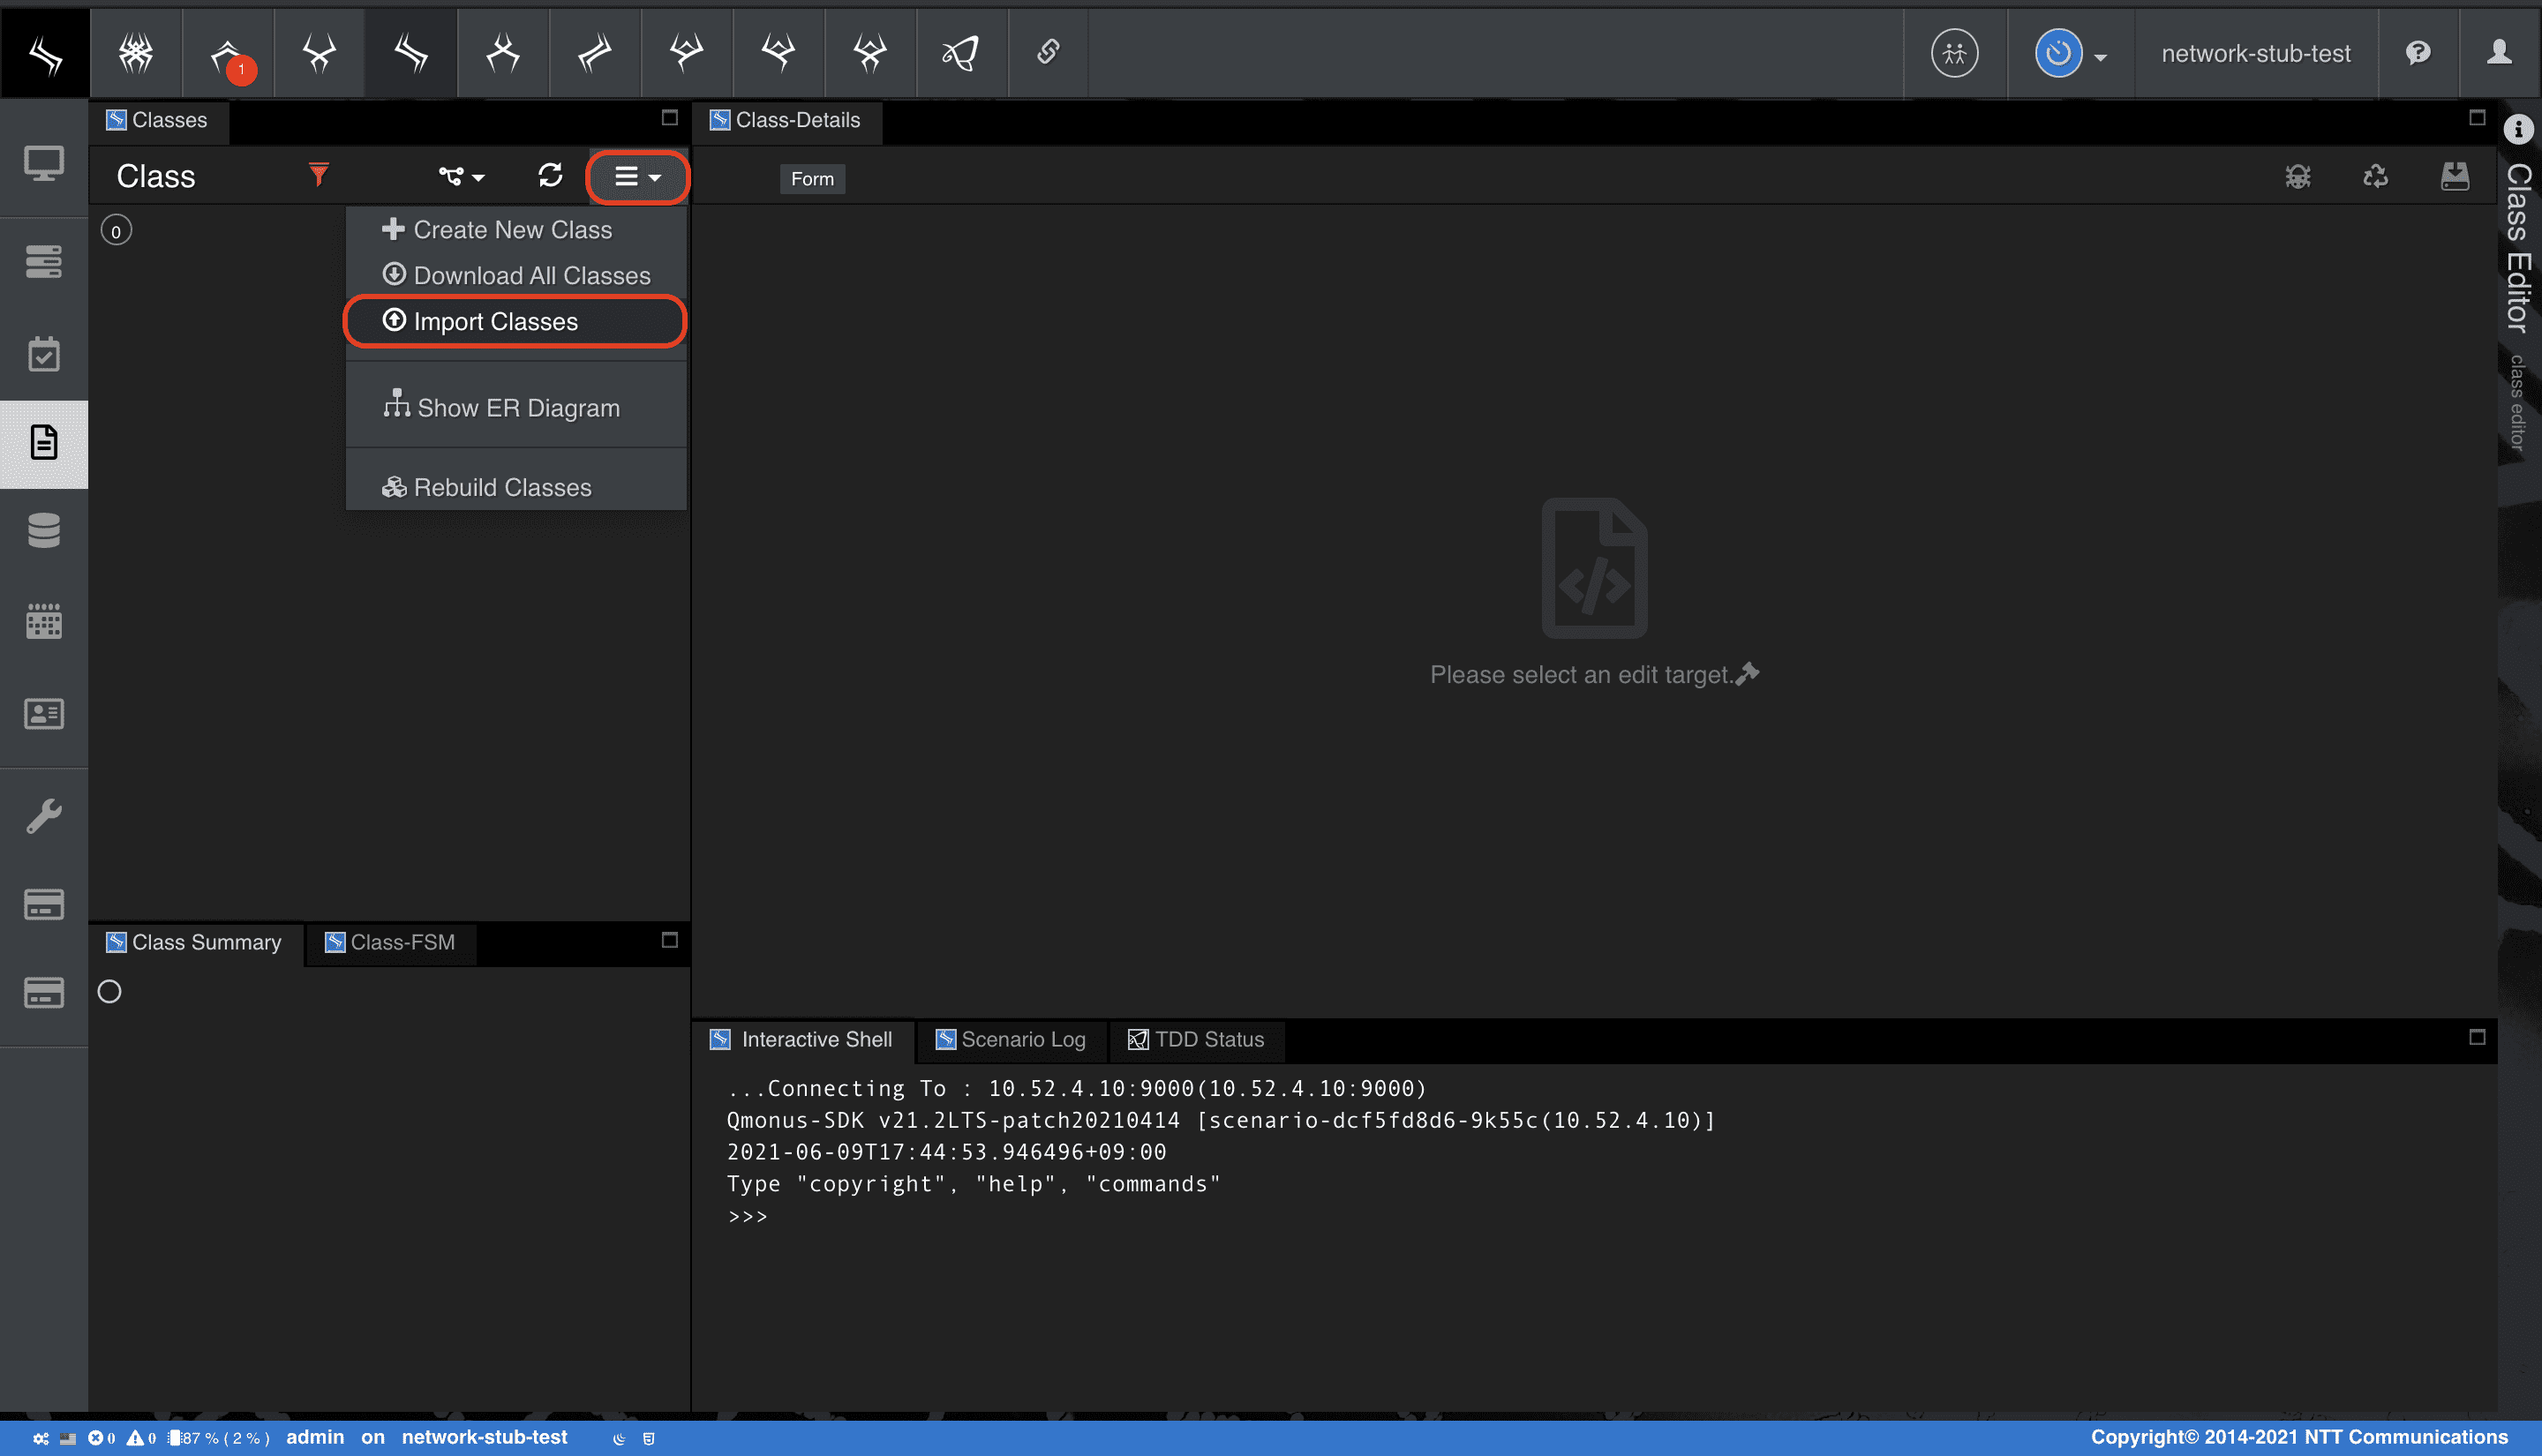
-
[Choose file] でファイルを指定後、[Import] を選択
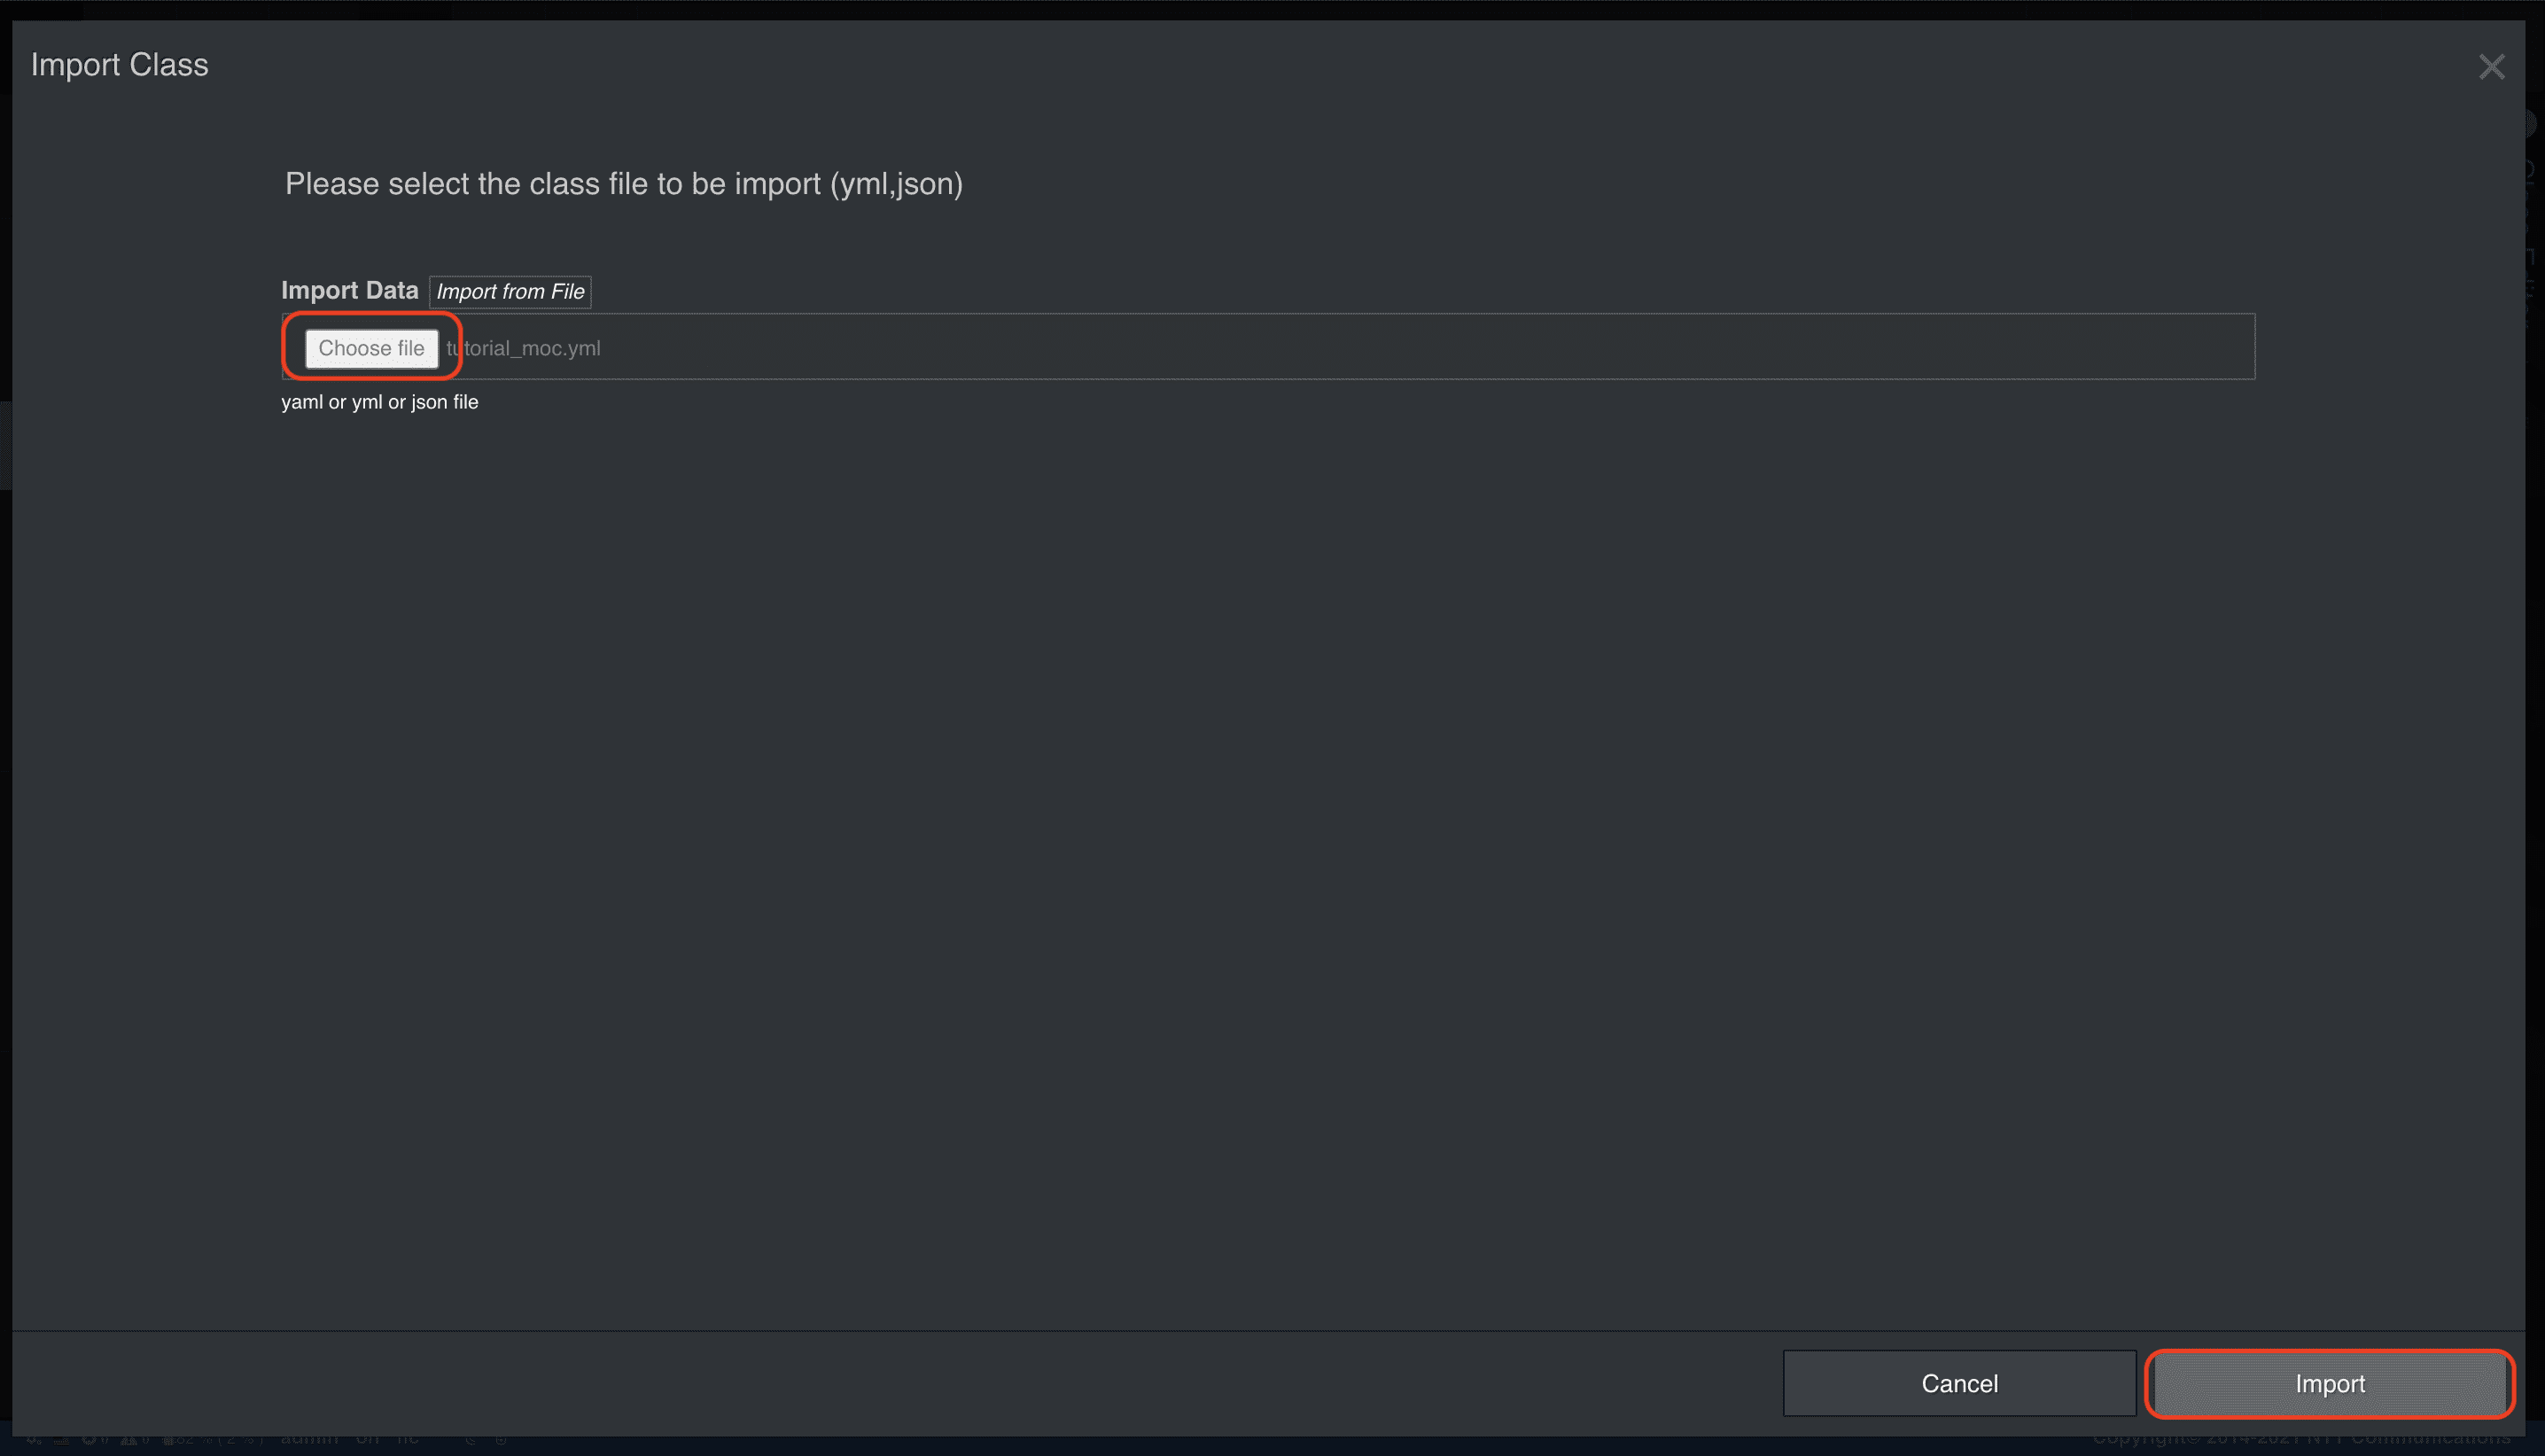
注文情報には識別子としてnameがあり、属性としてregion、description、createdAtが定義されています。
また、hogeリソースに割り当てられたhogeIDを保持します。
Scenario
最後に、シナリオを作成します。
Application Scenario ダウンロード
python
category: Tutorial
name: example
method: POST
uri: /examples
routing_auto_generation_mode: true
global_variables:
  example:
    initial: null
  hoge:
    initial: null
  hogeID:
    initial: null
  name:
    description: resource name
    initial: null
  r:
    initial: null
  region:
    description: region name
    initial: null
transaction:
  async: true
  auto_response: false
  enable: true
commands:
- command: request_validation
  label: Order Validation
  kwargs:
    aspect_options:
      post:
        process: |-
          (name, region) = (context.request.body.name, context.request.body.region)
    body:
      properties:
        description:
          type: string
        name:
          pattern: ^[A-Z][a-zA-Z_0-9-]+$
          type: string
        region:
          enum:
          - jp1
          - jp2
          type: string
      required:
      - name
      - region
      type: object
    headers:
      properties:
        Content-Type:
          enum:
          - application/json
          type: string
      required:
      - Content-Type
      type: object
- command: script
  label: Create Hoge
  kwargs:
    code: |-
      faker("ExampleFaker")
      await atom.Example(**context.request.body.dictionary).save()

      faker("postHoge")
      r = await callout(path="/hoges", method="POST", body=dict(name=name, region=region))
      if r.error:
          raise Error(r.code, reason="POST failed")

      hogeID = MU(json.loads(r.body)).hogeID
      context.session.set_status(202)
      context.session.finish(dict(hogeID=hogeID))
    cancellation:
      cancellable: true
      actions:
      - action_type: script
        code: |-
          if hogeID:
              faker("getHoge")
              r = await callout(path="/hoges/{}".format(hogeID))
              if r.error and r.code != 404:
                  raise Error(r.code, reason="Unable to get hoge %r" % hogeID)
              if r.code!=404:
                  faker("deleteHoge")
                  r = await callout(path="/hoges/{}".format(hogeID), method="DELETE")
                  if r.error and r.code != 404:
                      raise Error(r.code, reason="Unable to delete hoge %r" % hogeID)

              for i in range(30):
                  faker("getHogeWaitForNotFound")
                  r = await callout(path="/hoges/{}".format(hogeID))
                  if r.error and r.code==404:
                      faker("ExampleFaker")
                      example = await atom.Example.load(name)
                      if example is not None:
                          faker("ExampleFaker")
                          await example.destroy()
                          return
                  await asyncio.sleep(1)
              raise Error(500, reason="Status poll retry over")
- command: script
  label: Wait for Active State
  kwargs:
    code: |-
      for i in range(30):
          faker("getHogeWaitForActive")
          r = await callout(path="/hoges/{}".format(hogeID))
          if r.error:
              continue
          hoge = MU(json.loads(r.body))
          if hoge.status == "Active":
              return
          elif hoge.status == "Error":
              raise Error(500, reason="Transited to Error state")
          await asyncio.sleep(1)
      raise Error(500, reason="Status poll retry over")
- command: script
  label: Update Order
  kwargs:
    code: |-
      faker("ExampleFaker")
      example = await atom.Example.load(name)
      (example.hogeID, example.createdAt) = (hogeID, clock.now())

      faker("ExampleFaker")
      await example.save()
-
上記の
Application Scenarioファイルを用意する -
メインメニューから [Workflow Scenario as a Service] > [Scenario] を選択
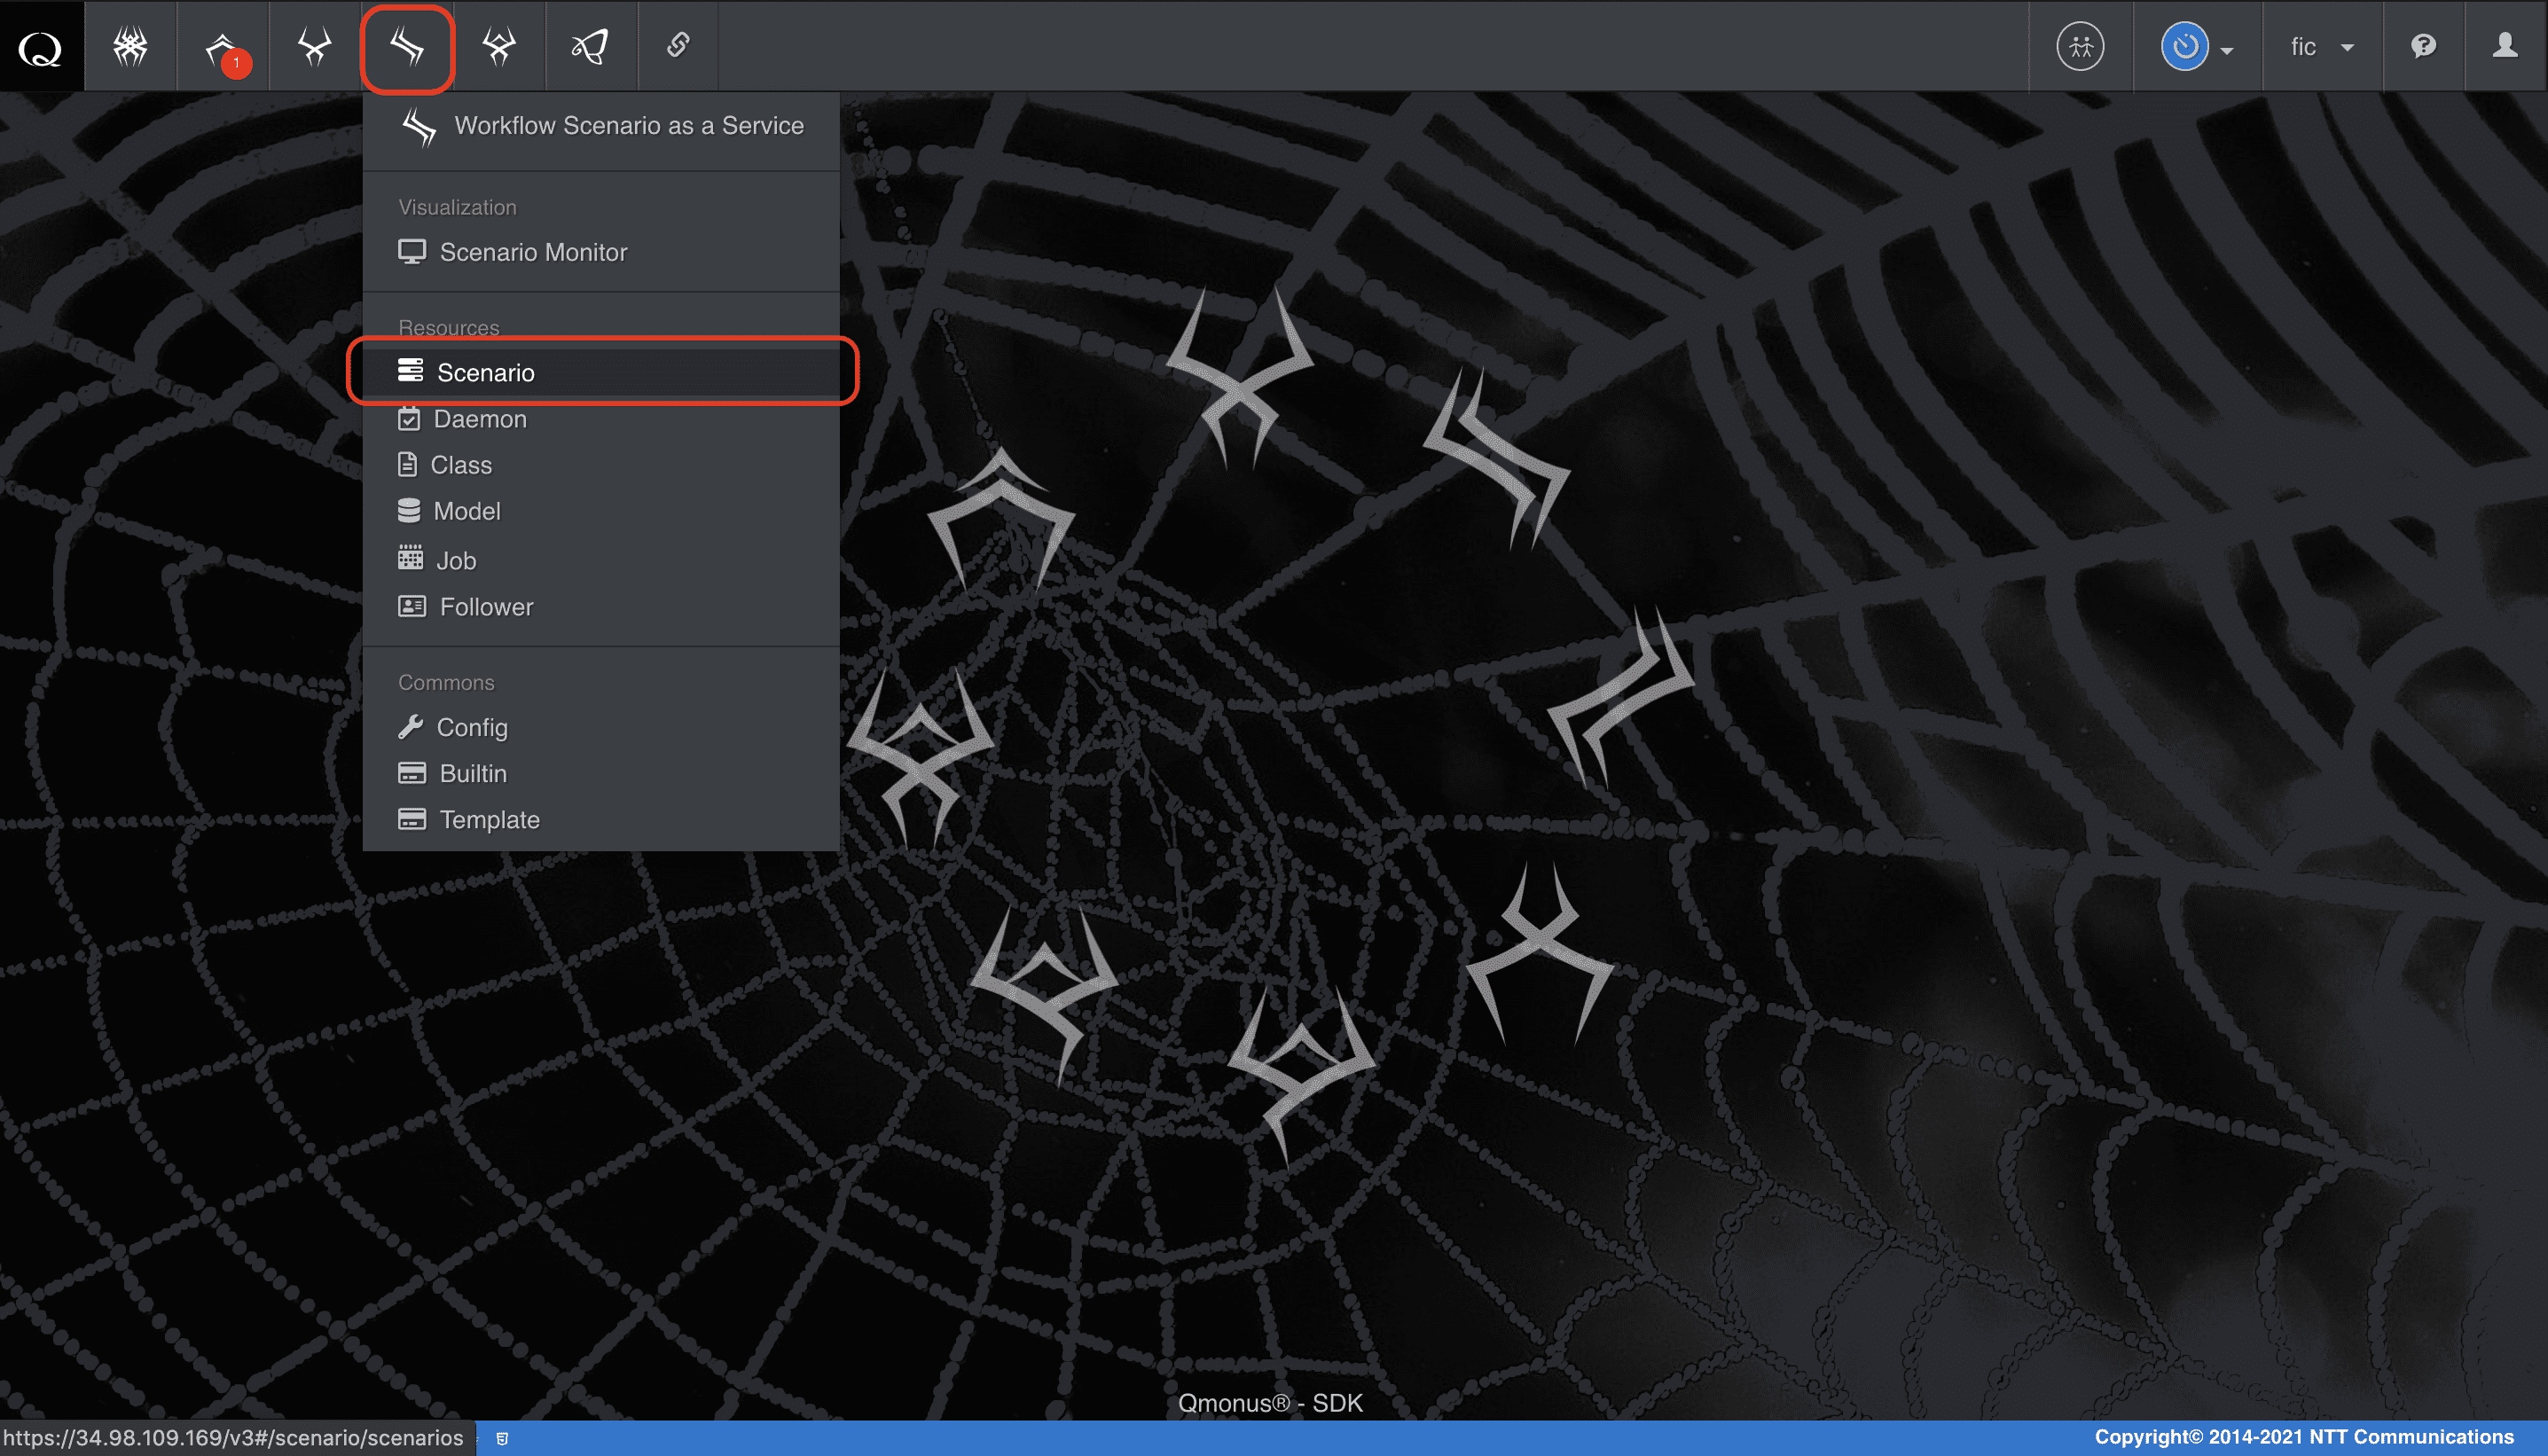
-
クラスメニューの [Import Scenarios] を選択
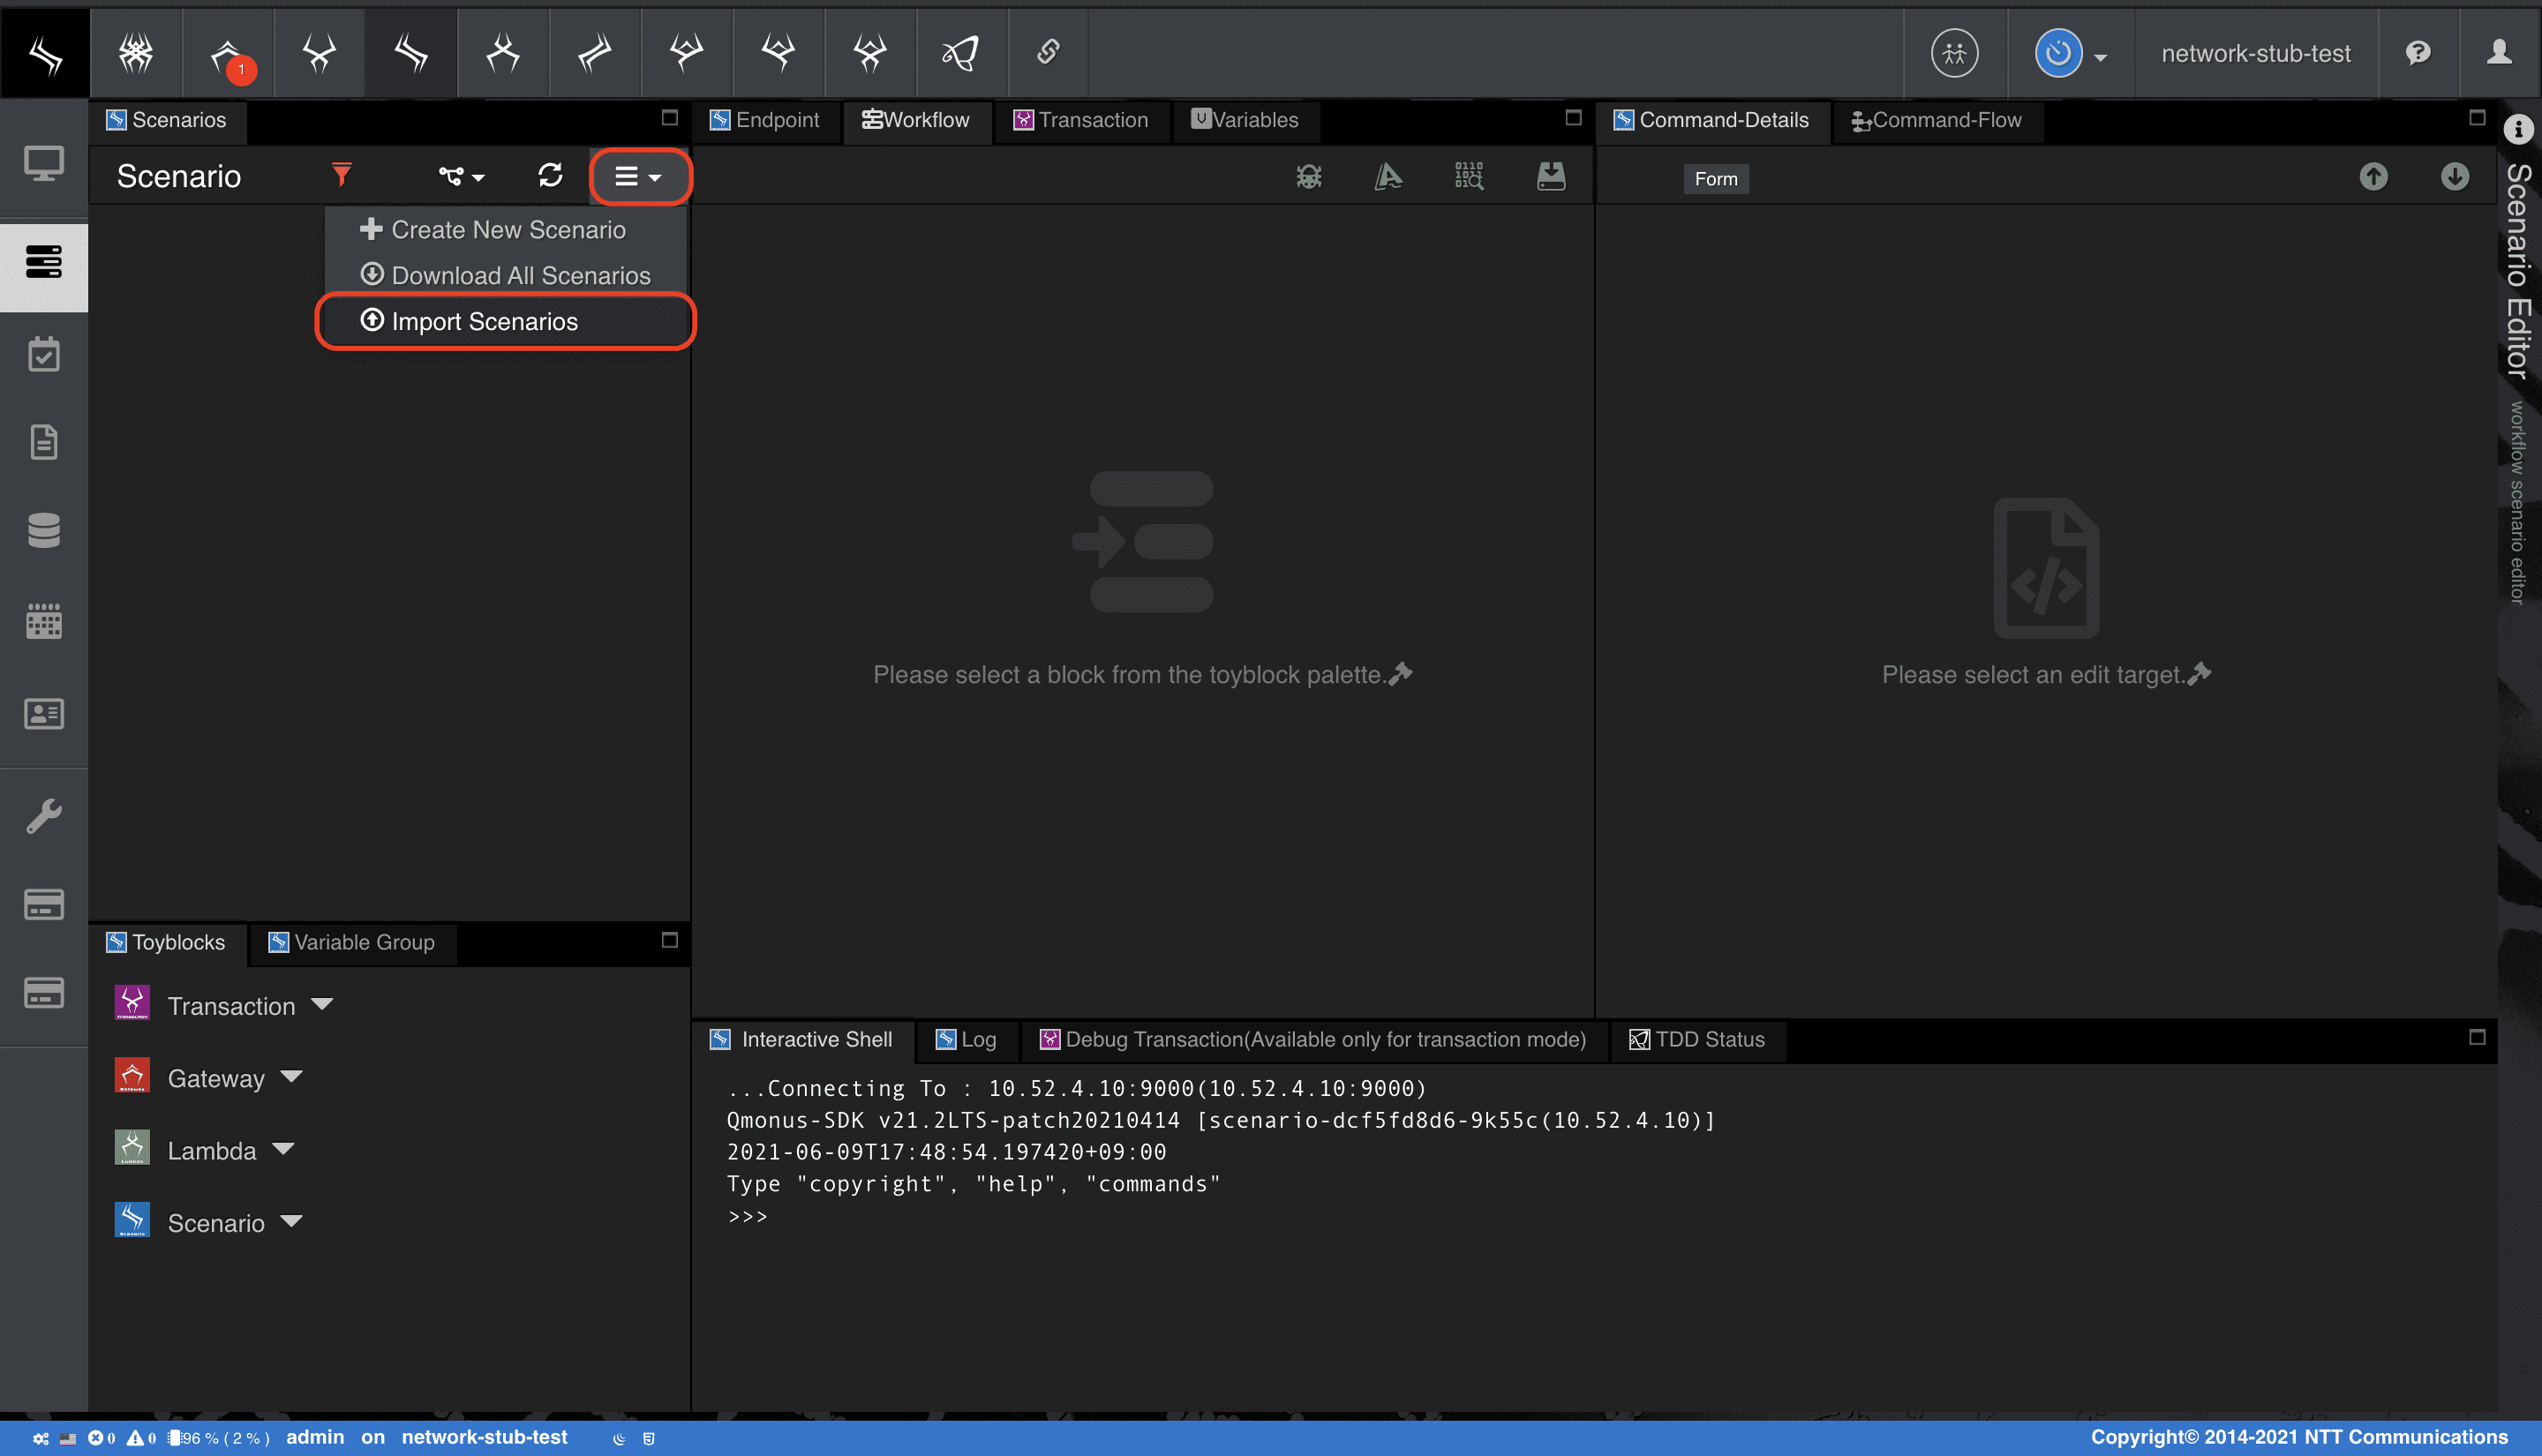
-
[Choose file] でファイルを指定後、[Import] を選択
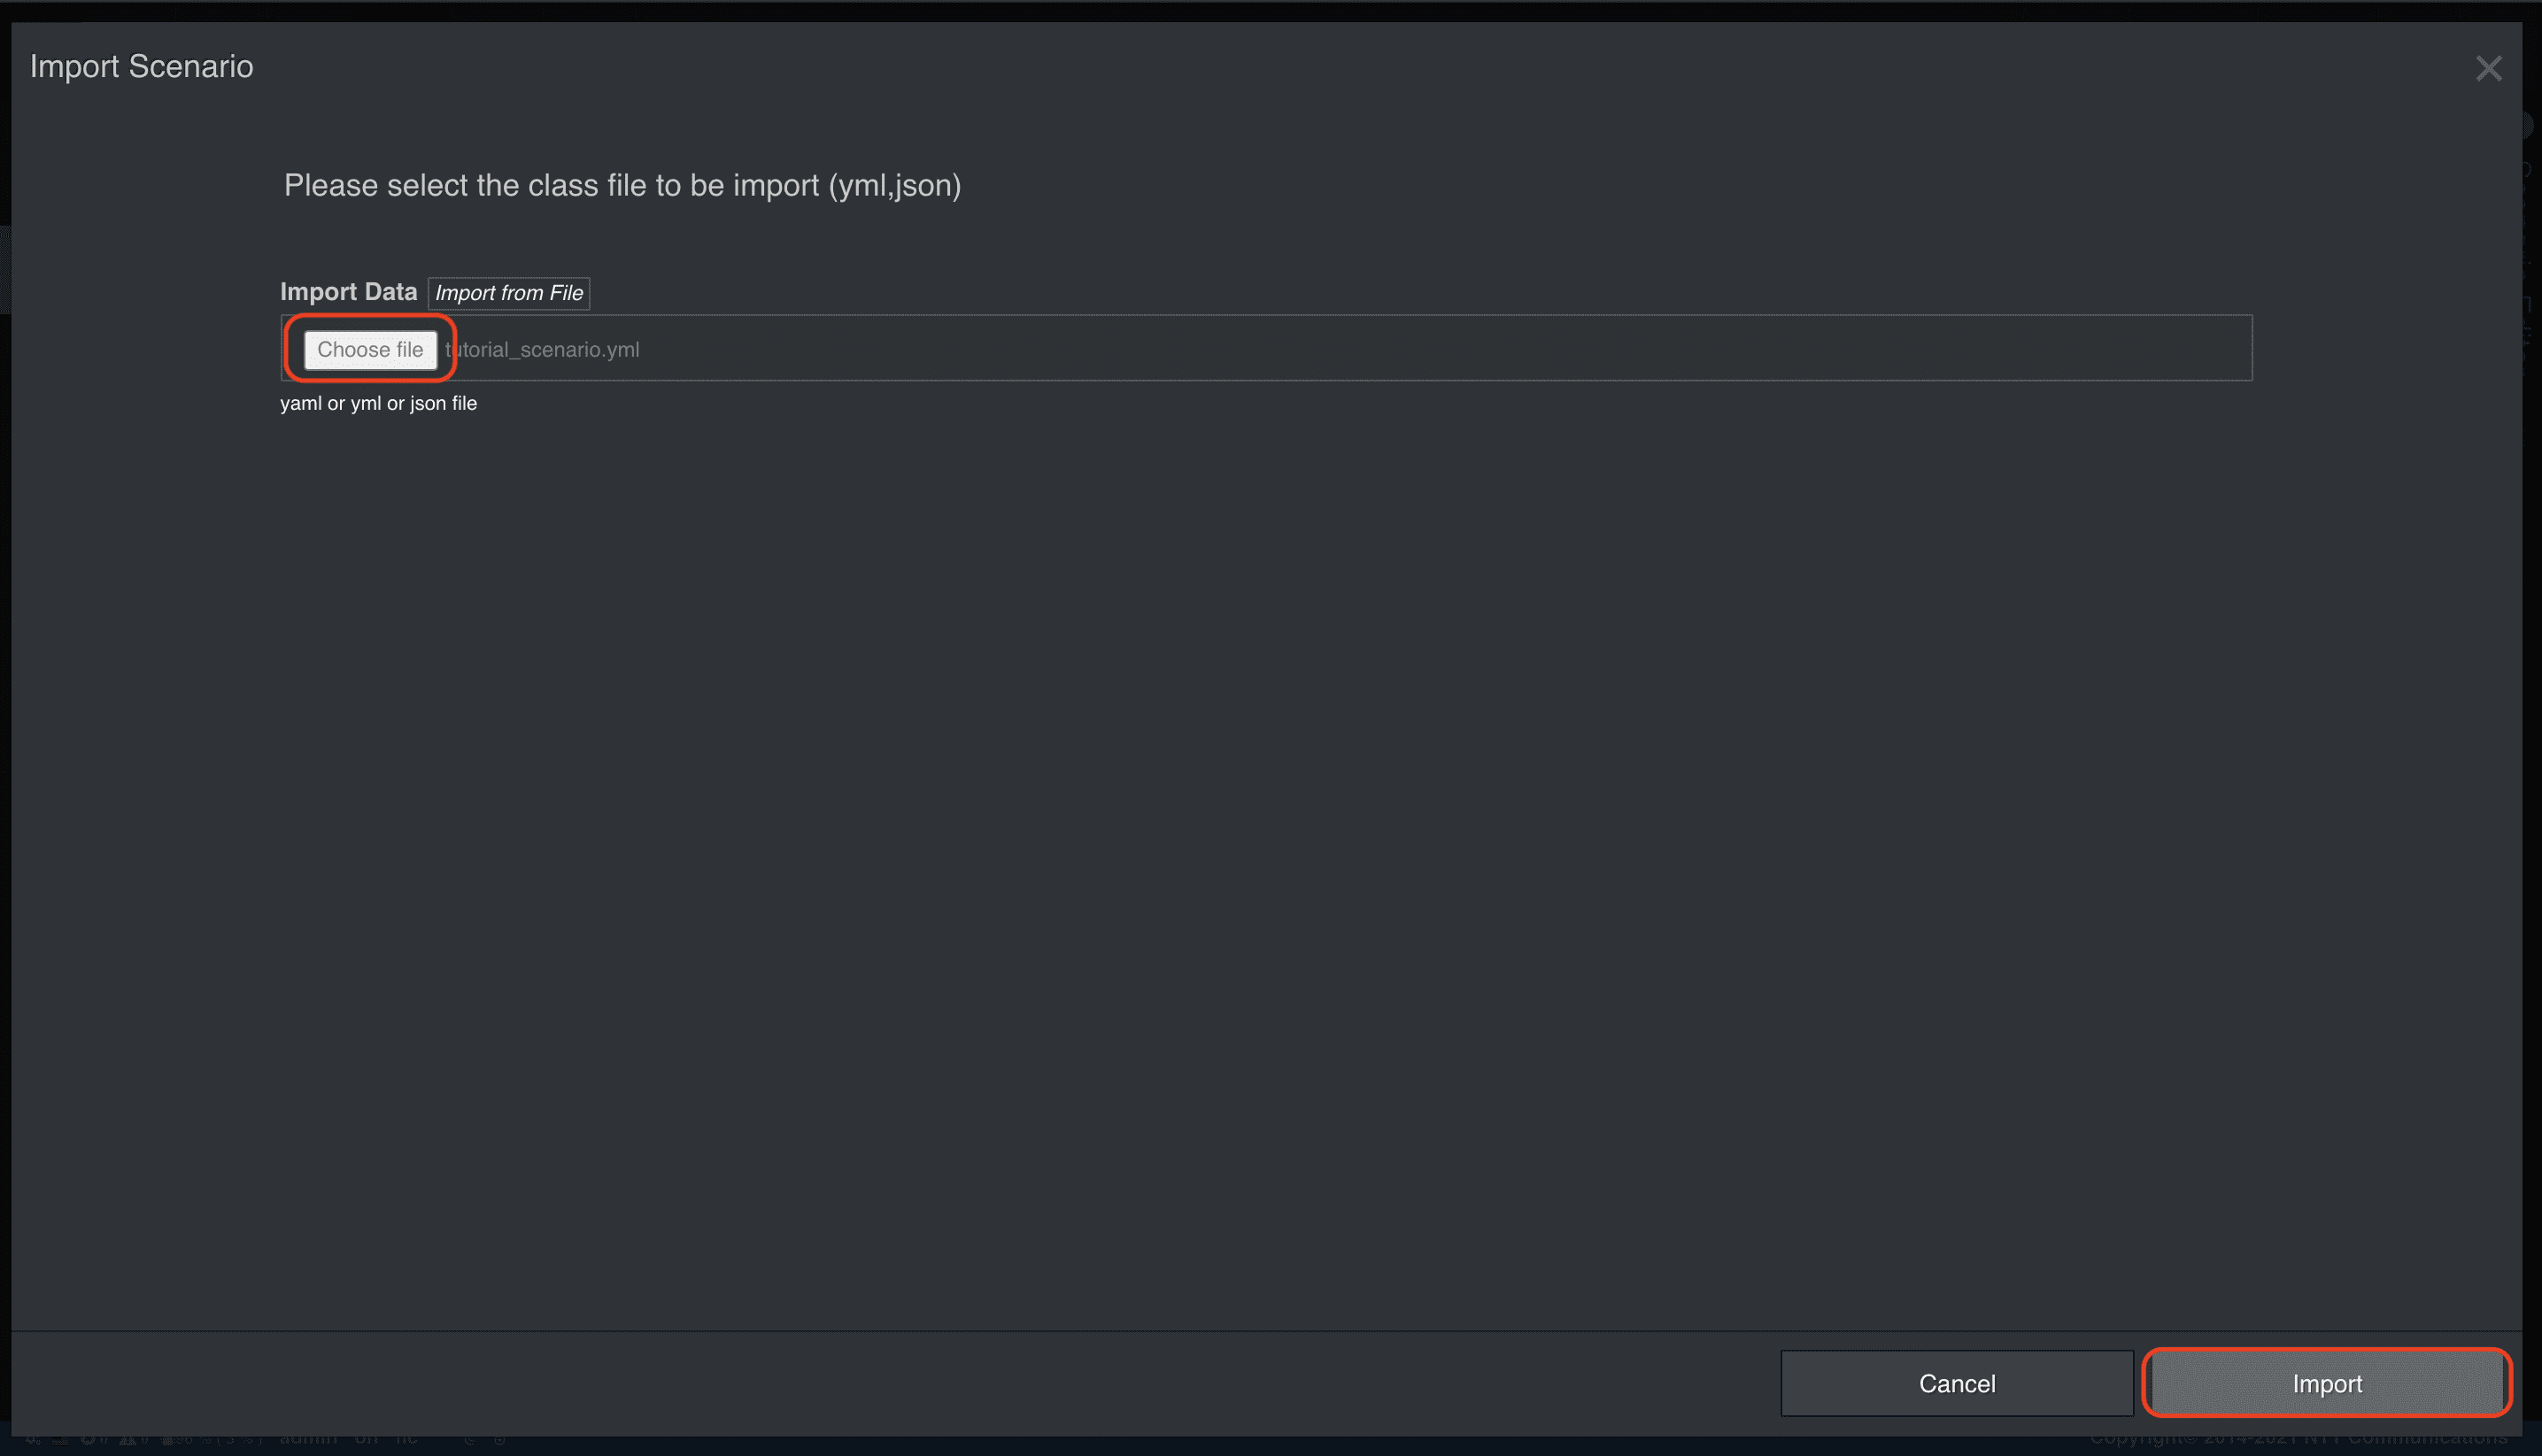
Unit Test
それでは、UnitTest画面から実際に試験を実行してみましょう。
すべてのテストに合格することを願っています!
-
メインメニューから [Unit Test as a Service] > [Unit Test] を選択
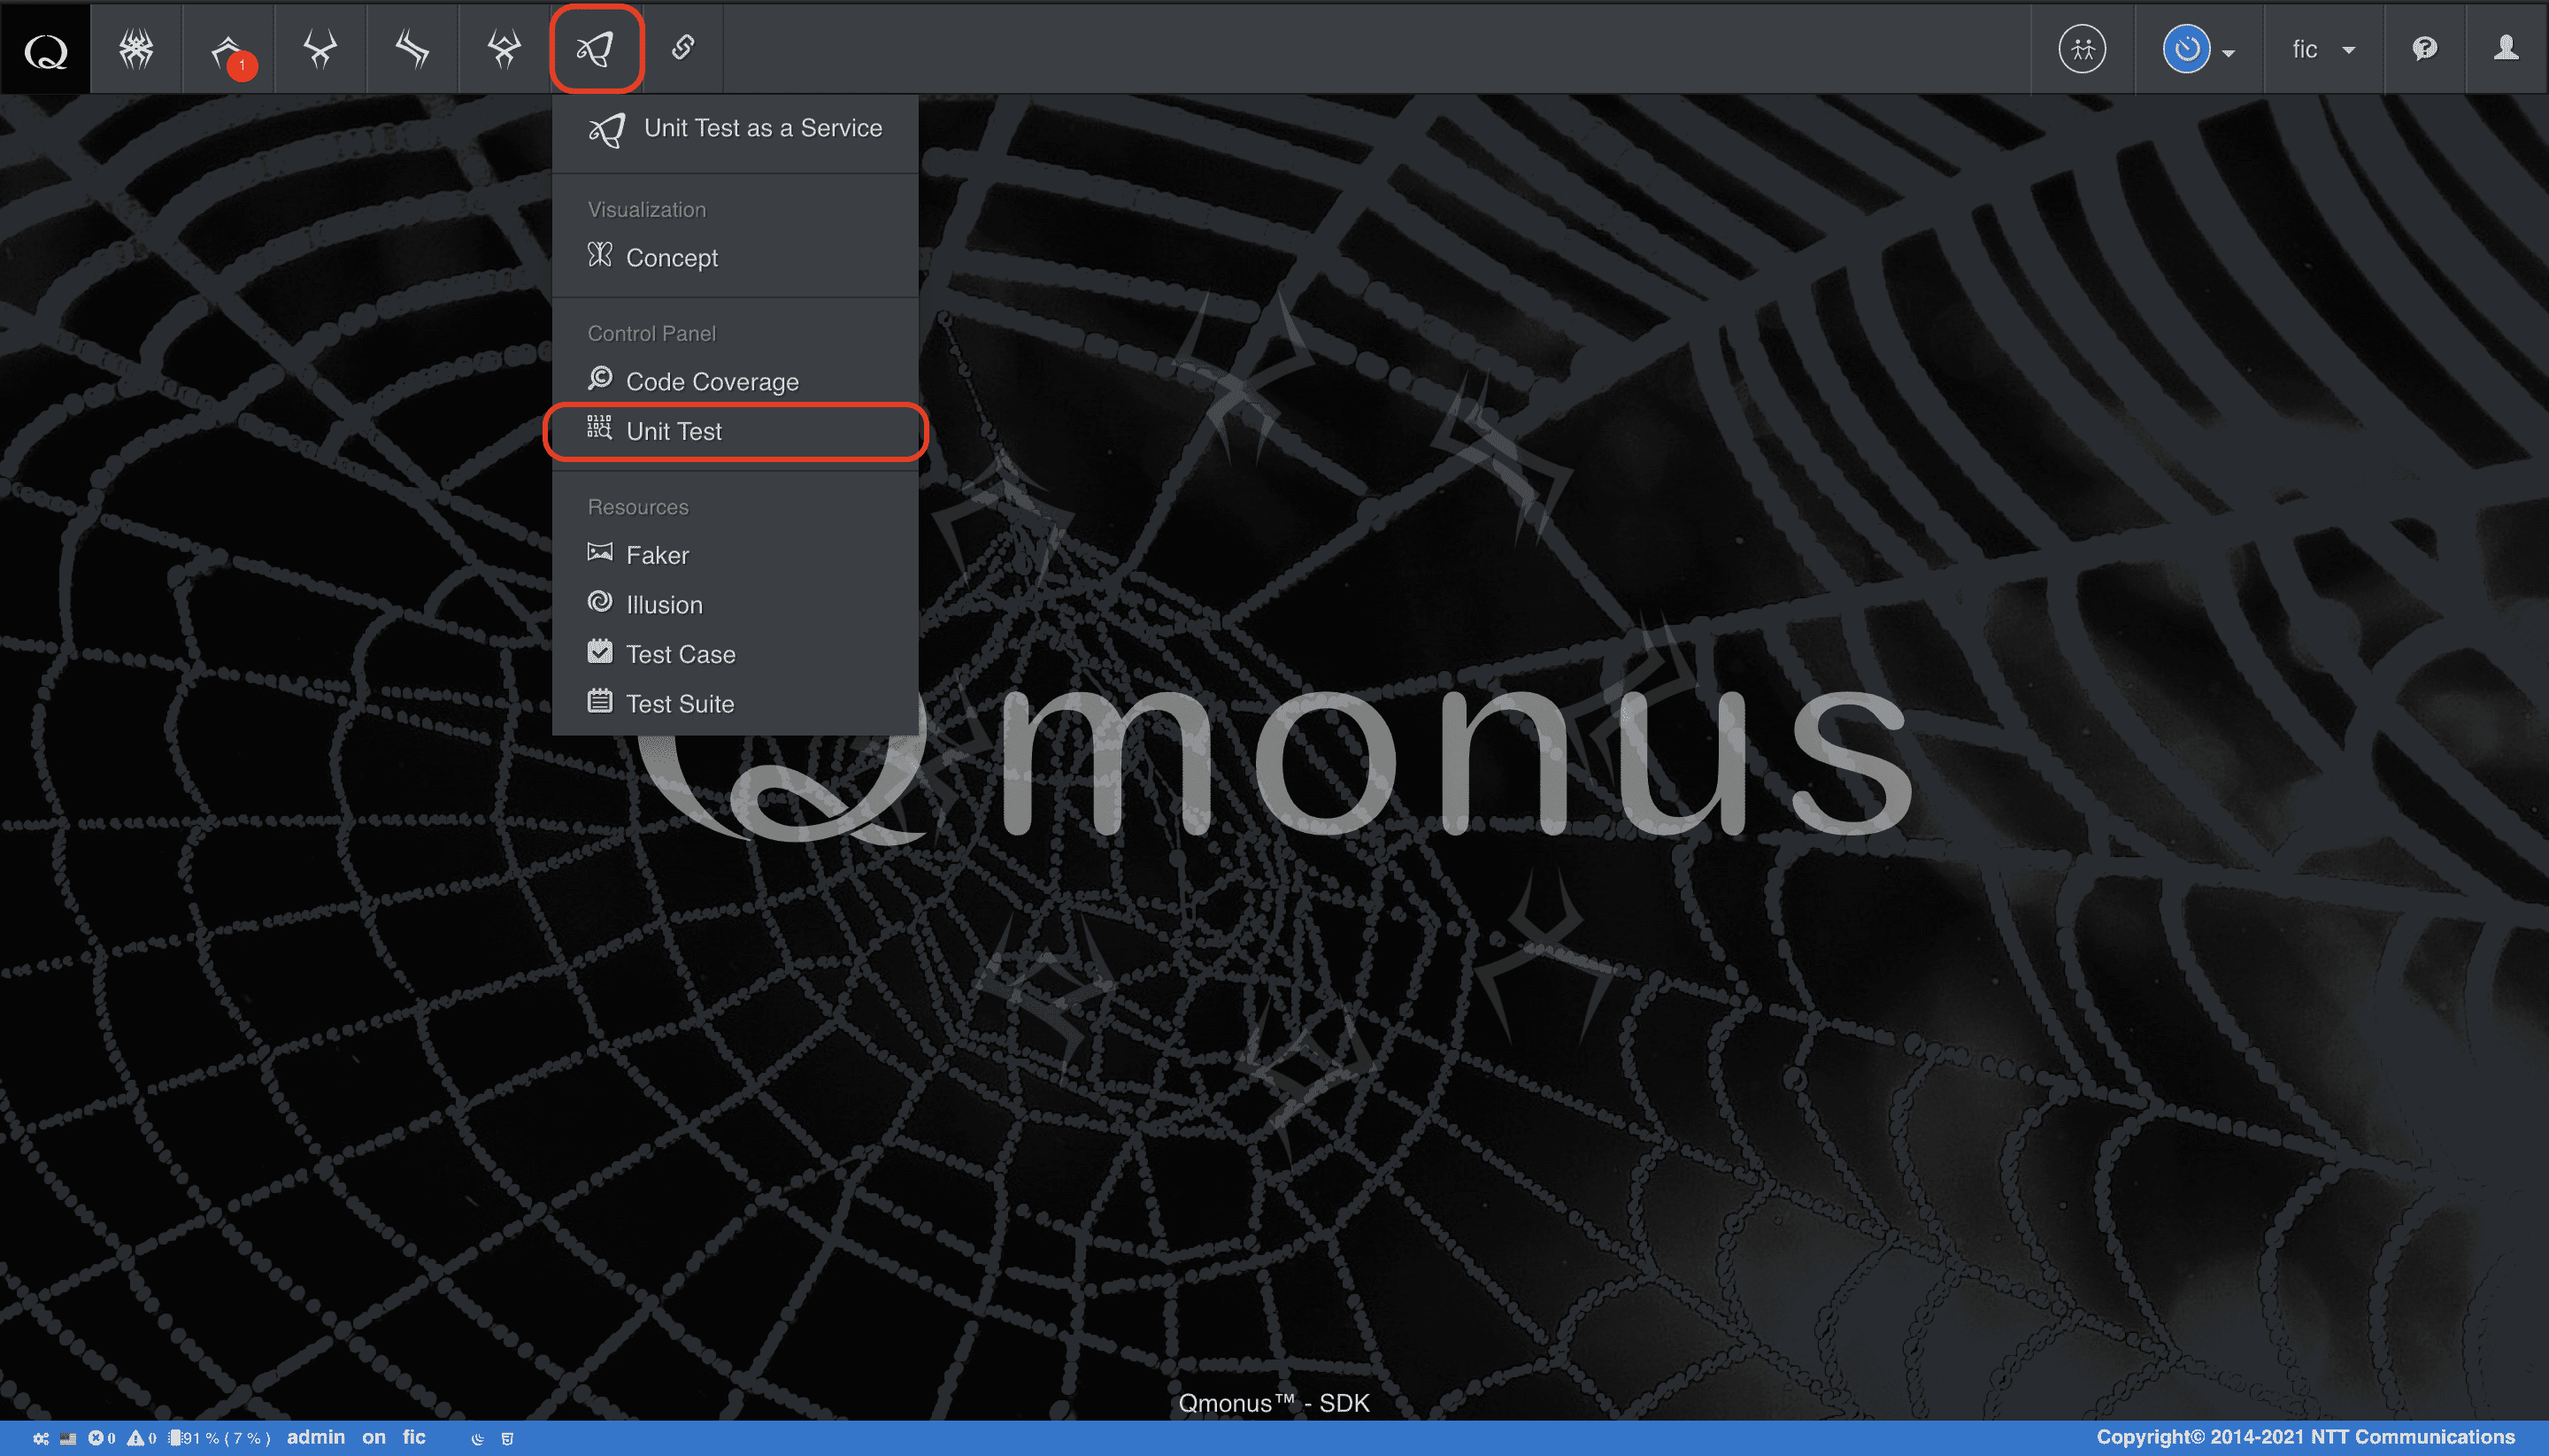
-
実行するテストスイートを右クリック、メニューから [Run Test] を選択し、試験を実行する
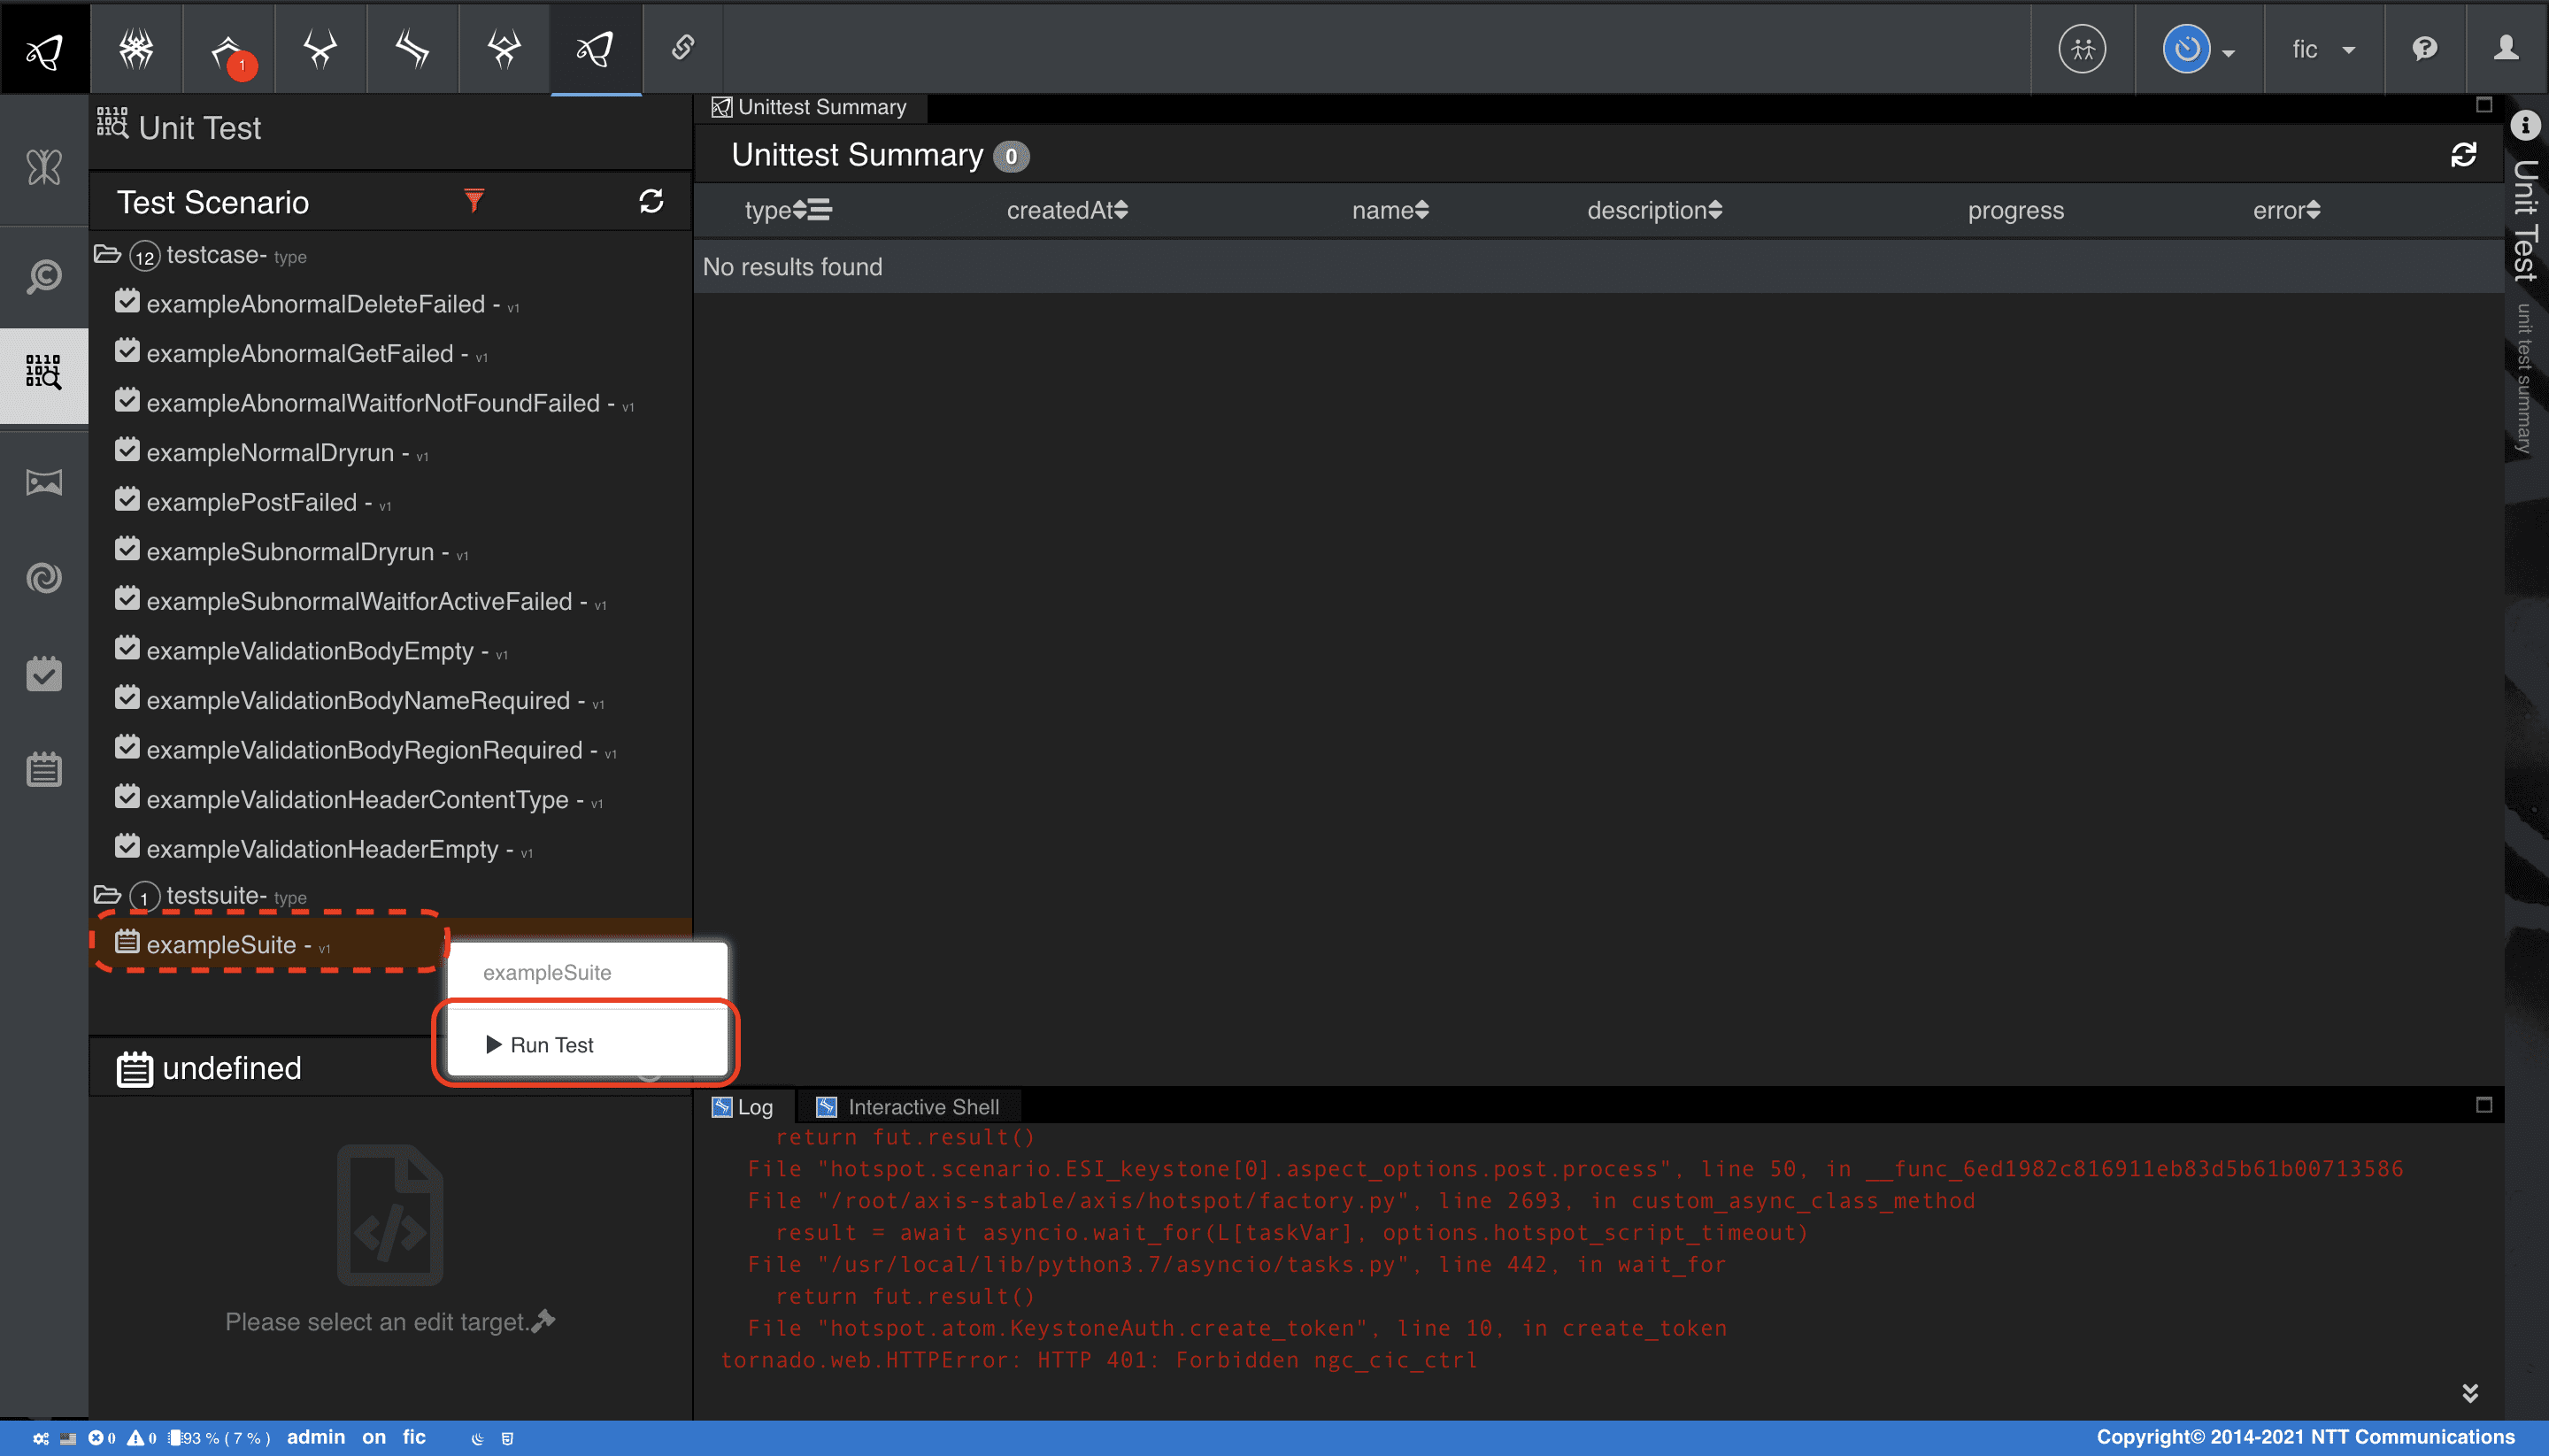
-
実行状況を確認する。
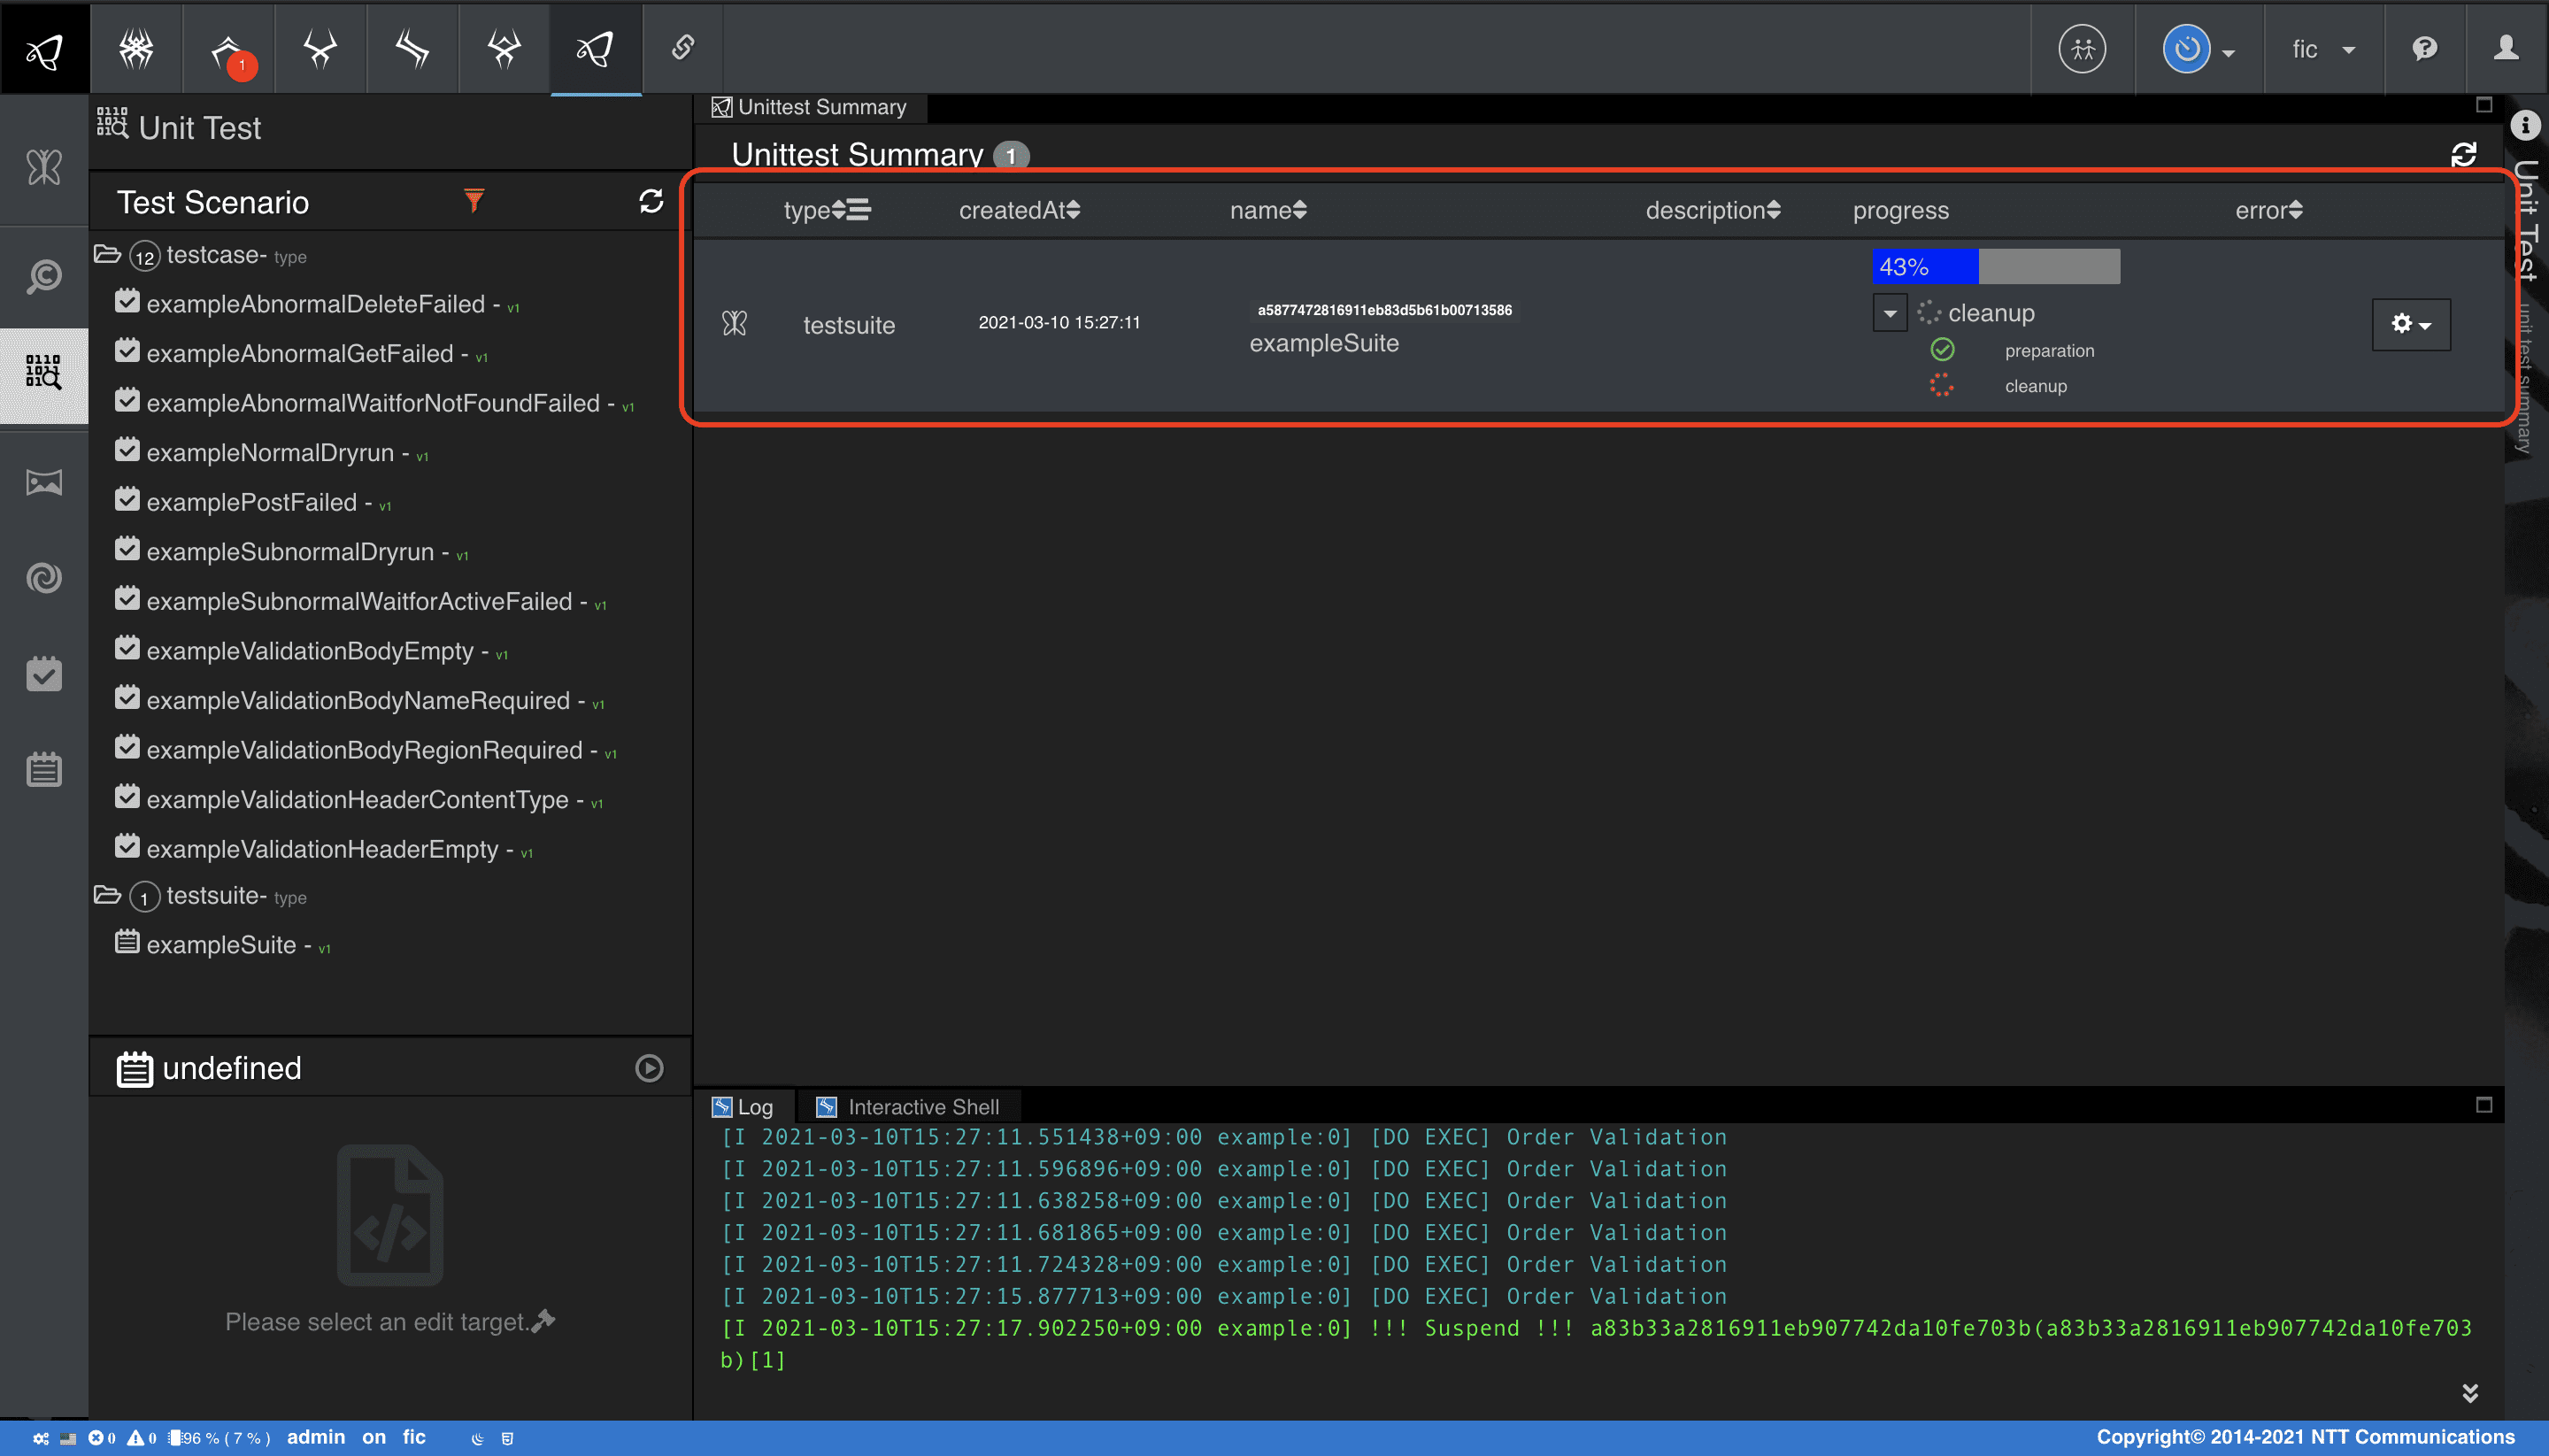
各テストケース、テストスイートのフロー進捗状況はprogress欄で目視することができます。
正常終了した場合は、進捗バーが緑色の100%になります。
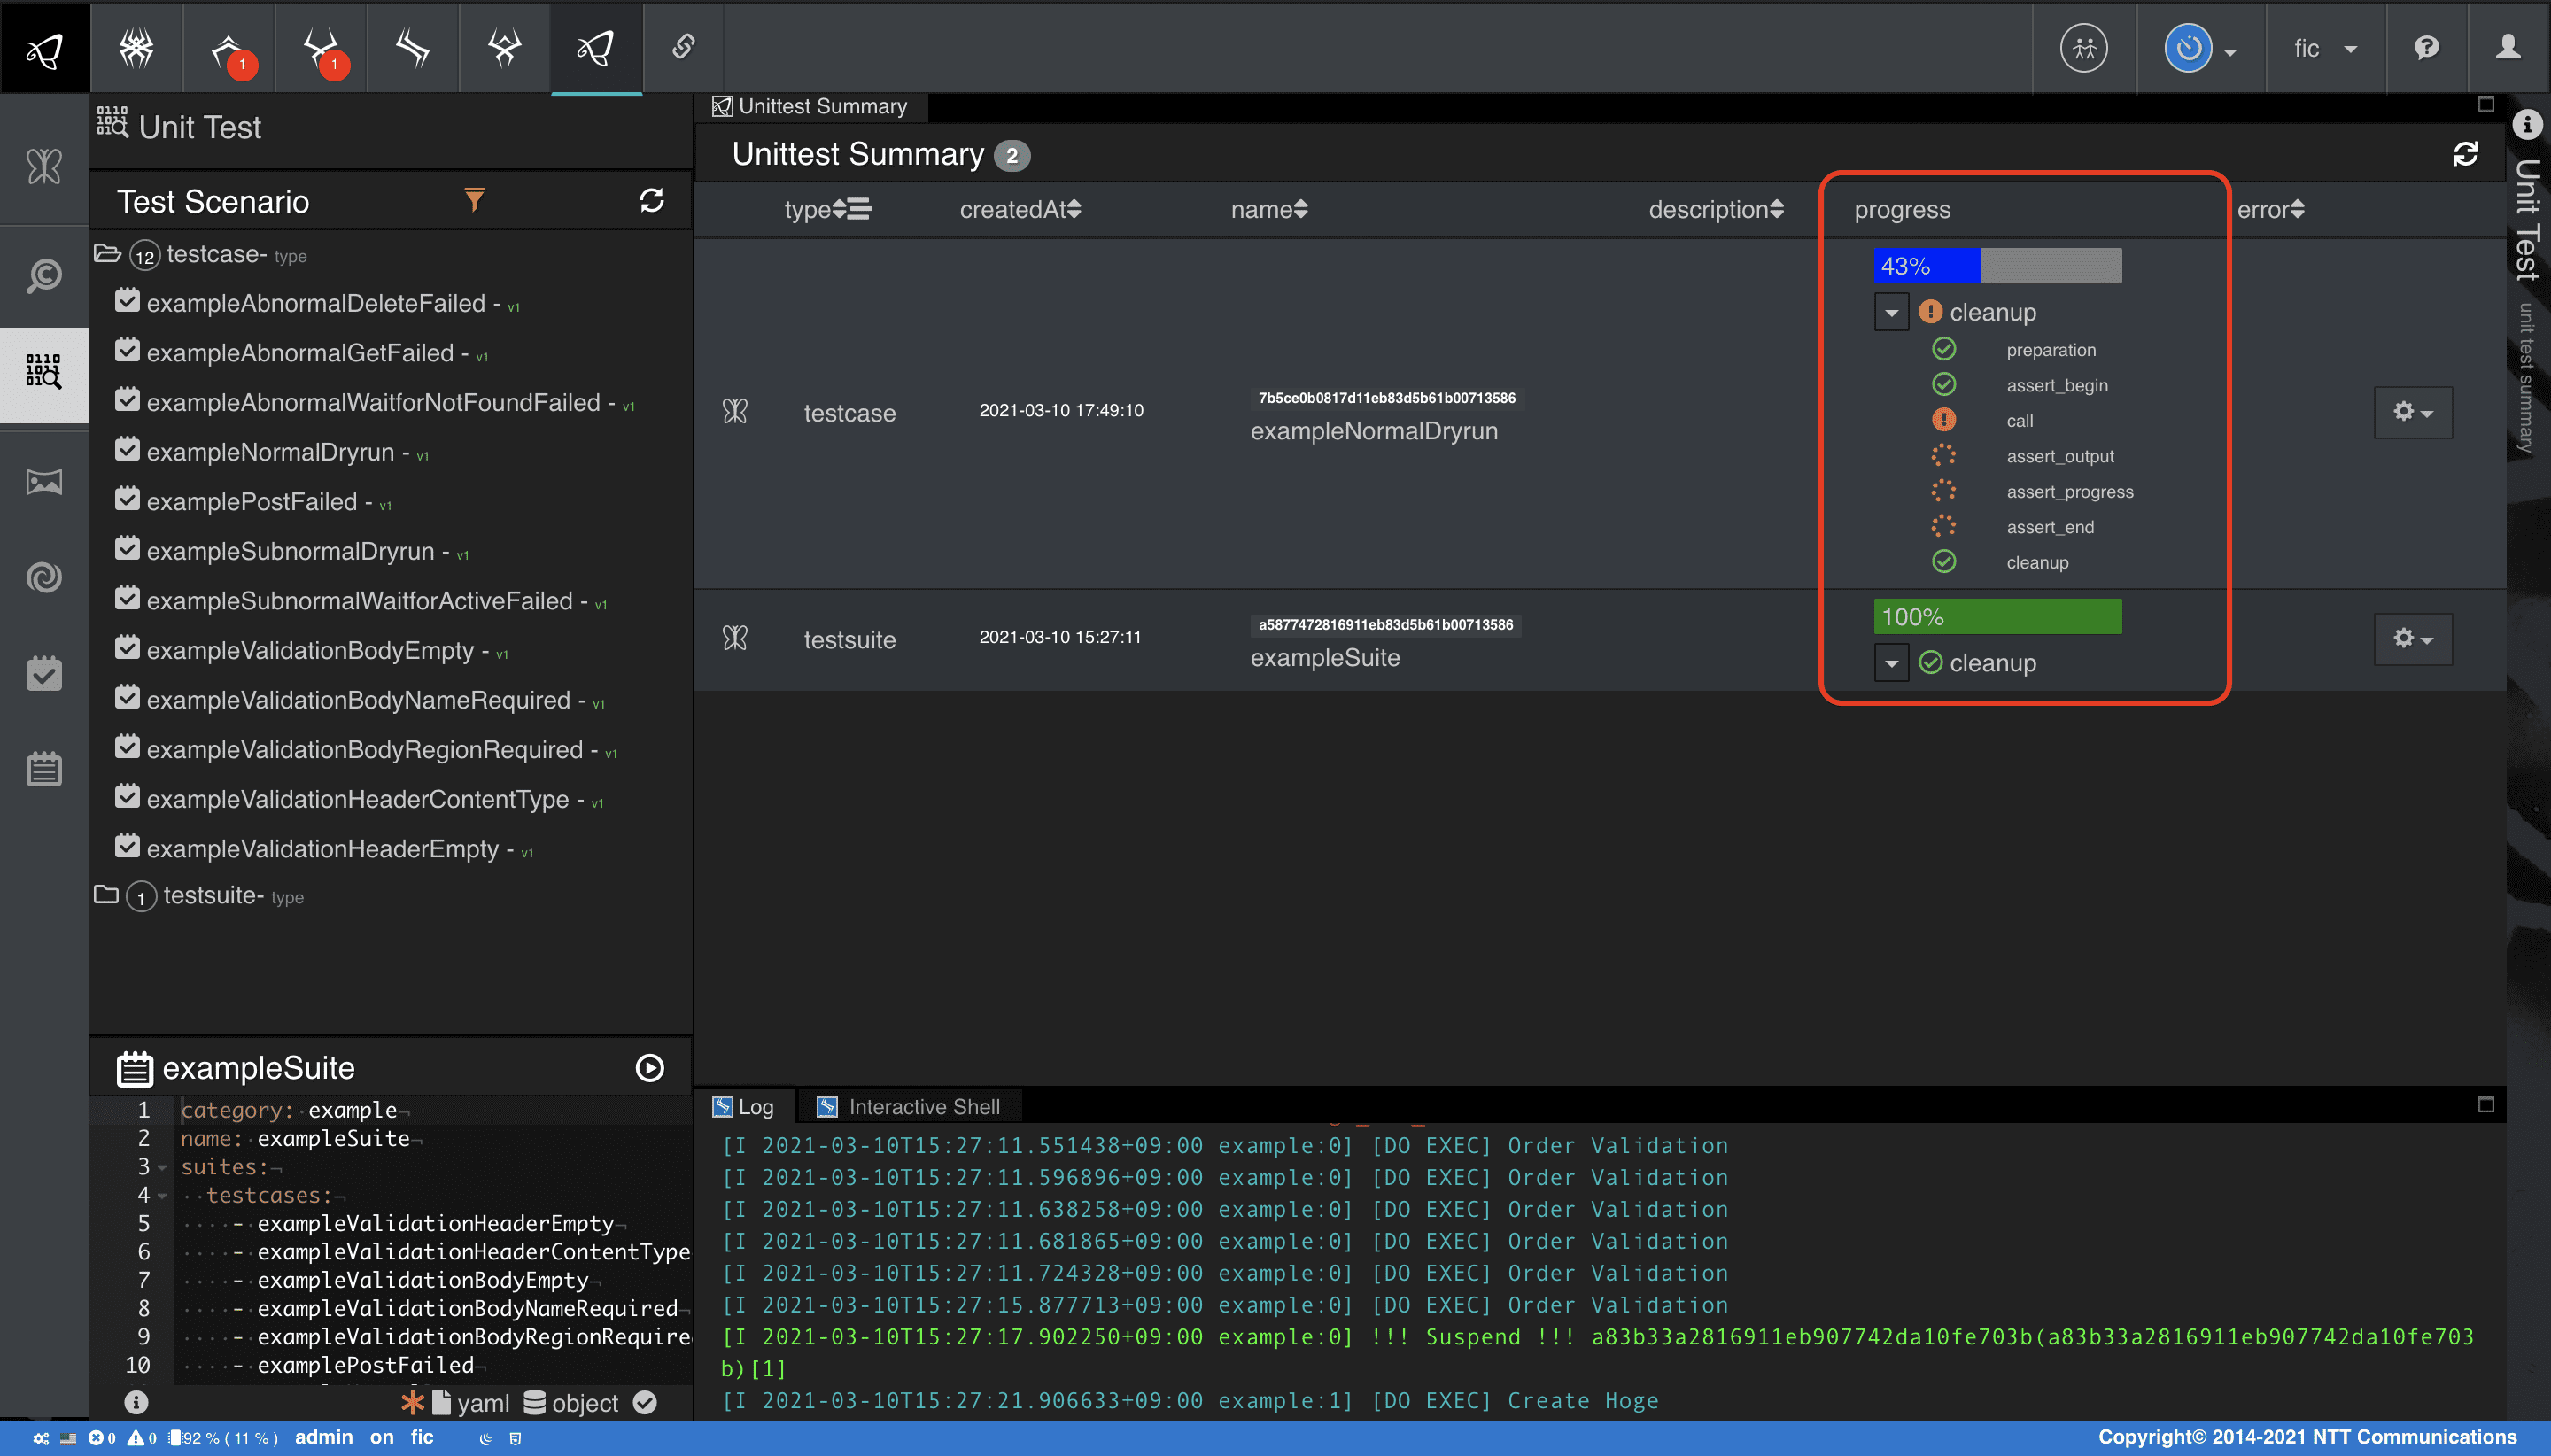
Advanced CRUD
システム構成例
本チュートリアルでは、開発で使用頻度が高い機能の実装例を紹介していきます。
アプリケーションおよび外部サービス仕様は実践的なテストドリブン開発のStep1.をもとに、CRUD APIを作成しています。
* 本サンプルコードを環境に適用する場合、チュートリアル[ 実践的なテスト駆動型開発 ]で導入したシナリオを全て削除してください。
POST API実装
POST APIのシナリオで記述しているポイントをまとめています。
request_validationブロック(Pre-processingとPost-processing)
request_validationブロックではschema定義によるバリデーションに加えて、ビジネスロジックのチェック等の処理を記述することができます。
処理の記述はPost-processing機能、Pre-processing機能で実現できますが、それぞれの用途の違いを確認しましょう。
Pre-processingおよびPost-processing機能(パラメータ)は、ブロック共通機能AOP Settingの機能の一つです。
- request_validationブロックで定義可能なパラメータ
- AOP Setting : ブロック共通
- Repeat conditions : ブロックの繰り返し実行条件
- Pre-processing : ブロックの事前処理
- Post-processing : ブロックの事後処理
- HTTP header schema : リクエストヘッダのJSON Schema
- HTTP body schema : リクエストボディのJSON Schema
- HTTP resource path schema : リクエストパスのJSON Schema
- HTTP query schema : クエリパラメータのJSON Schema
- AOP Setting : ブロック共通
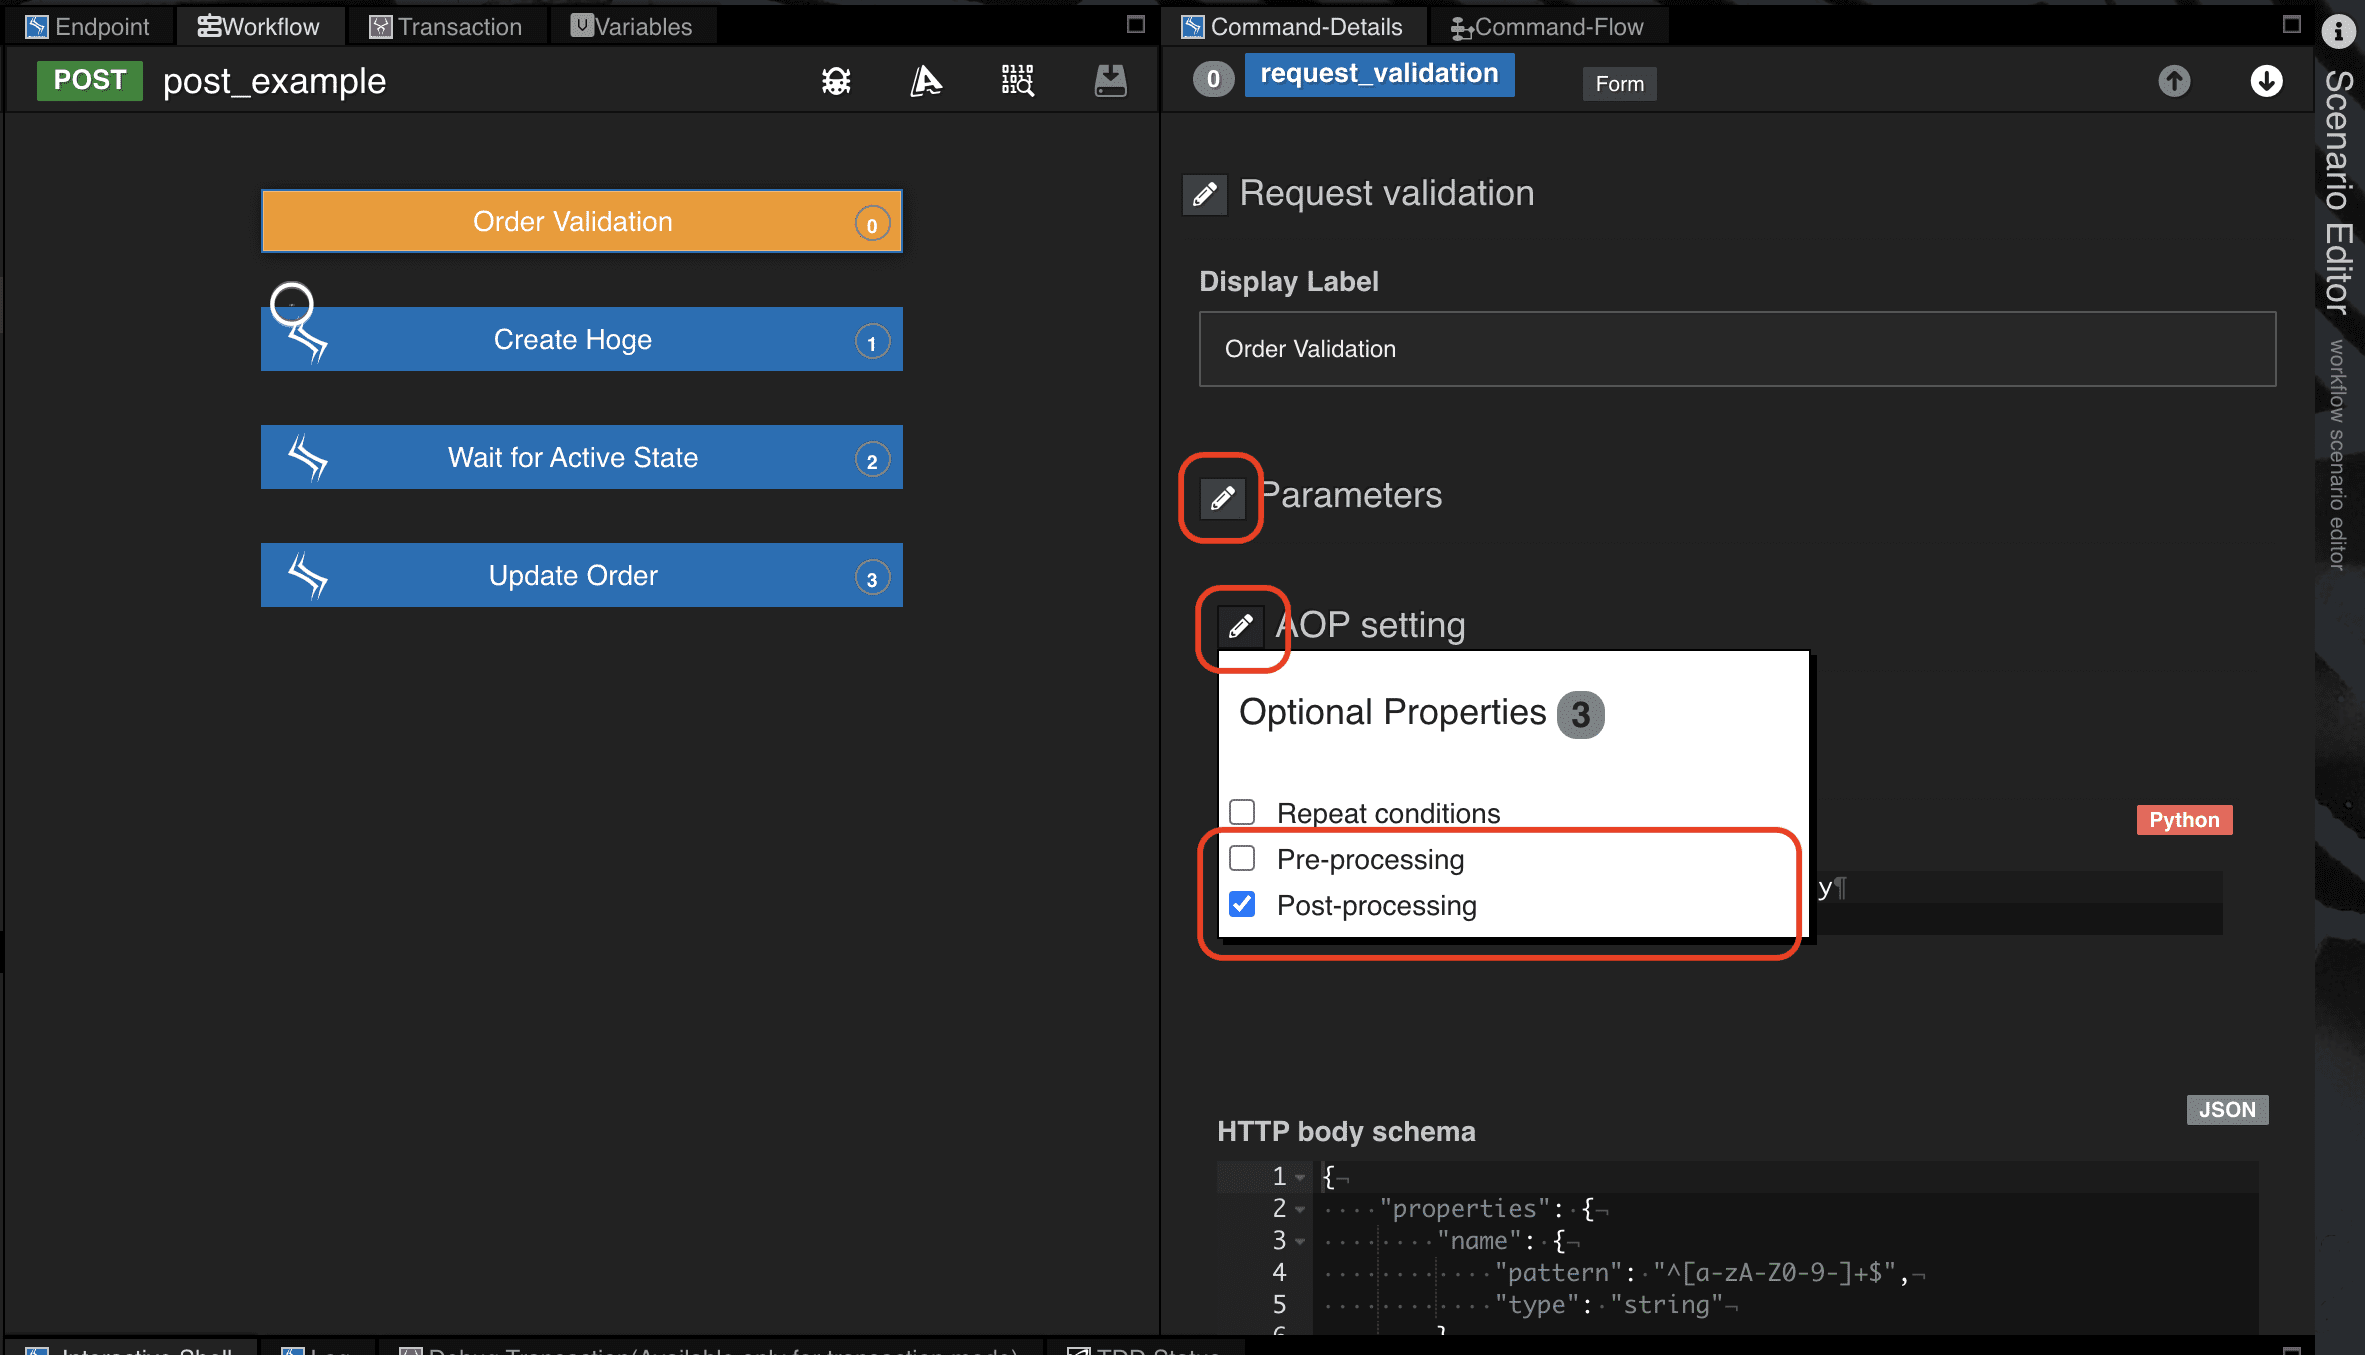
Post-processingで設定した定義はブロックの事後処理に使われるため、AOP Setting以外のパラメータ定義の後に実行されます。
そのため、サンプルコードでの実装はHTTP body schemaでリクエストボディのパラメータをチェックした後、Post-processingにパラメータ値をグローバル変数に格納するという順番になります。逆に、HTTP body schemaの前に実行させたい処理があれば、Pre-processingに定義することで可能になります。
Pre-processing > HTTP Schema > Post-processing の順に実行します。
データベースのUPSERT操作 - save()
Qmonus SDKで管理する情報のUPSERT処理を、save()というATOMの組み込みメソッドで実現します。
サンプルコードでは、Qmonus SDKで管理するExample情報を保存する処理として記述しています。
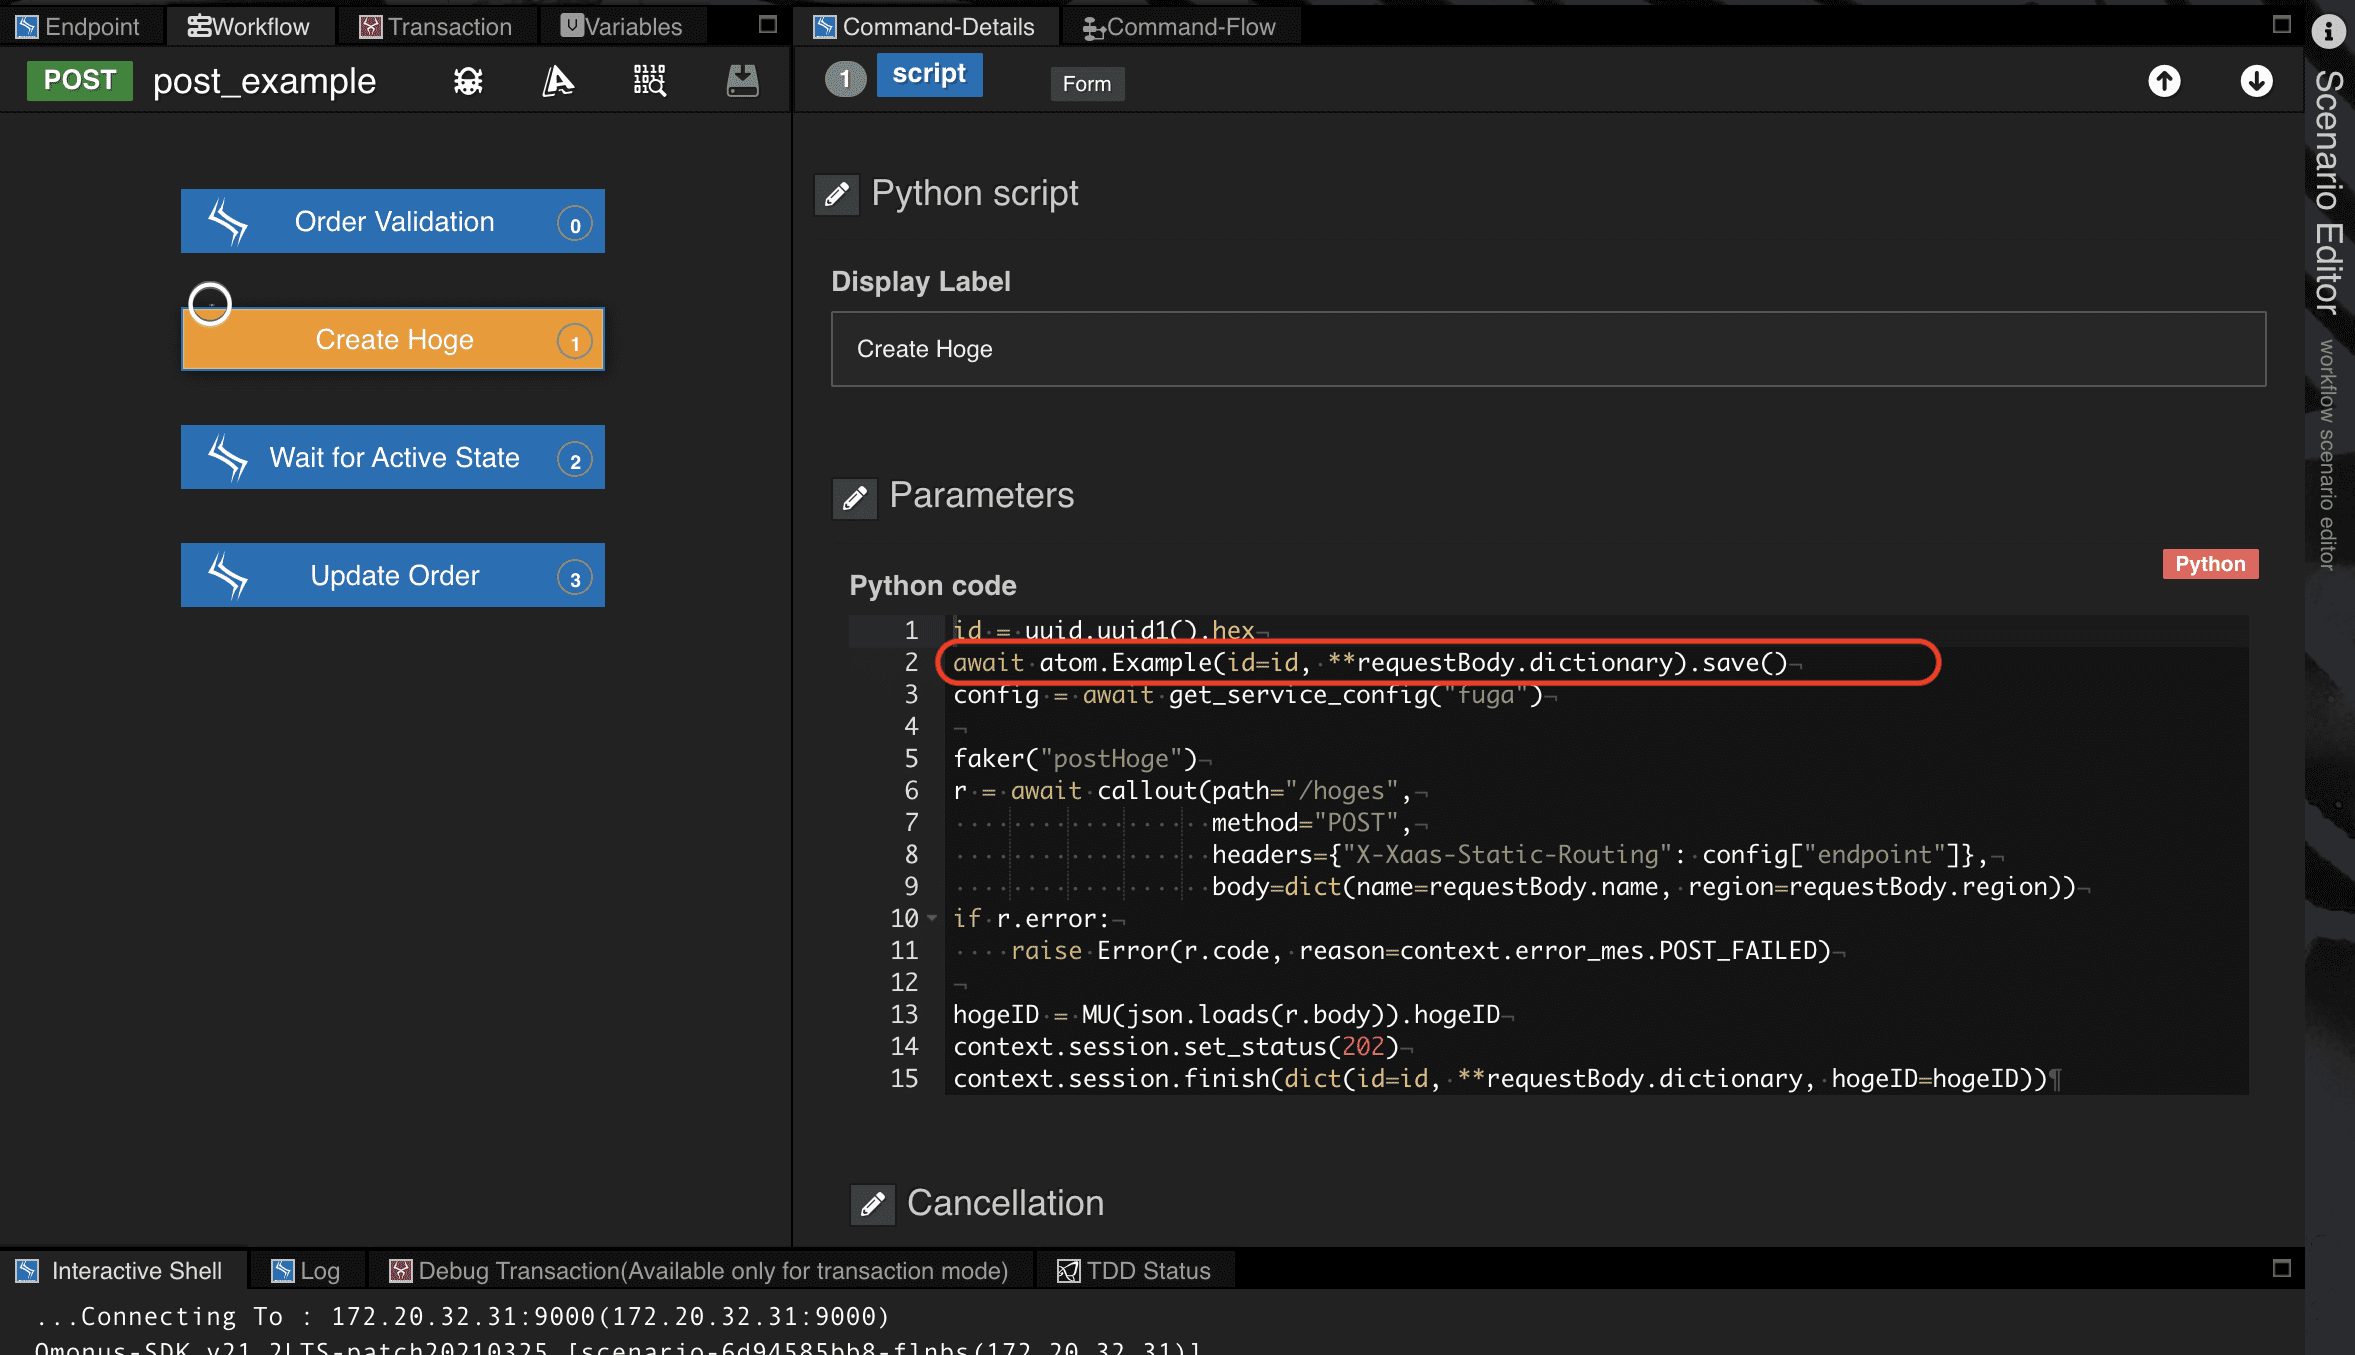
ATOMで定義したExample情報を操作する方法として、UPSERT処理を行うsave()の他に、DELETE、GET、SELECTの機能を持つdestroy()、load()、retrieve()を備えています。これらは後述で出てきますが、詳細は
Qmonus SDK Programming Guide » Scenario » ATOMの [ATOMオブジェクトの永続化について] を参照してください。
Configプラグインを取得する - get_service_config
シナリオからConfigプラグインの呼び出す方法を確認しておきましょう。
- メインメニュー [Workflow Scenario as a Service] > [Config] を選択、ここで確認できる
endpoint値(scenario:9000)をシナリオ内で取得します。
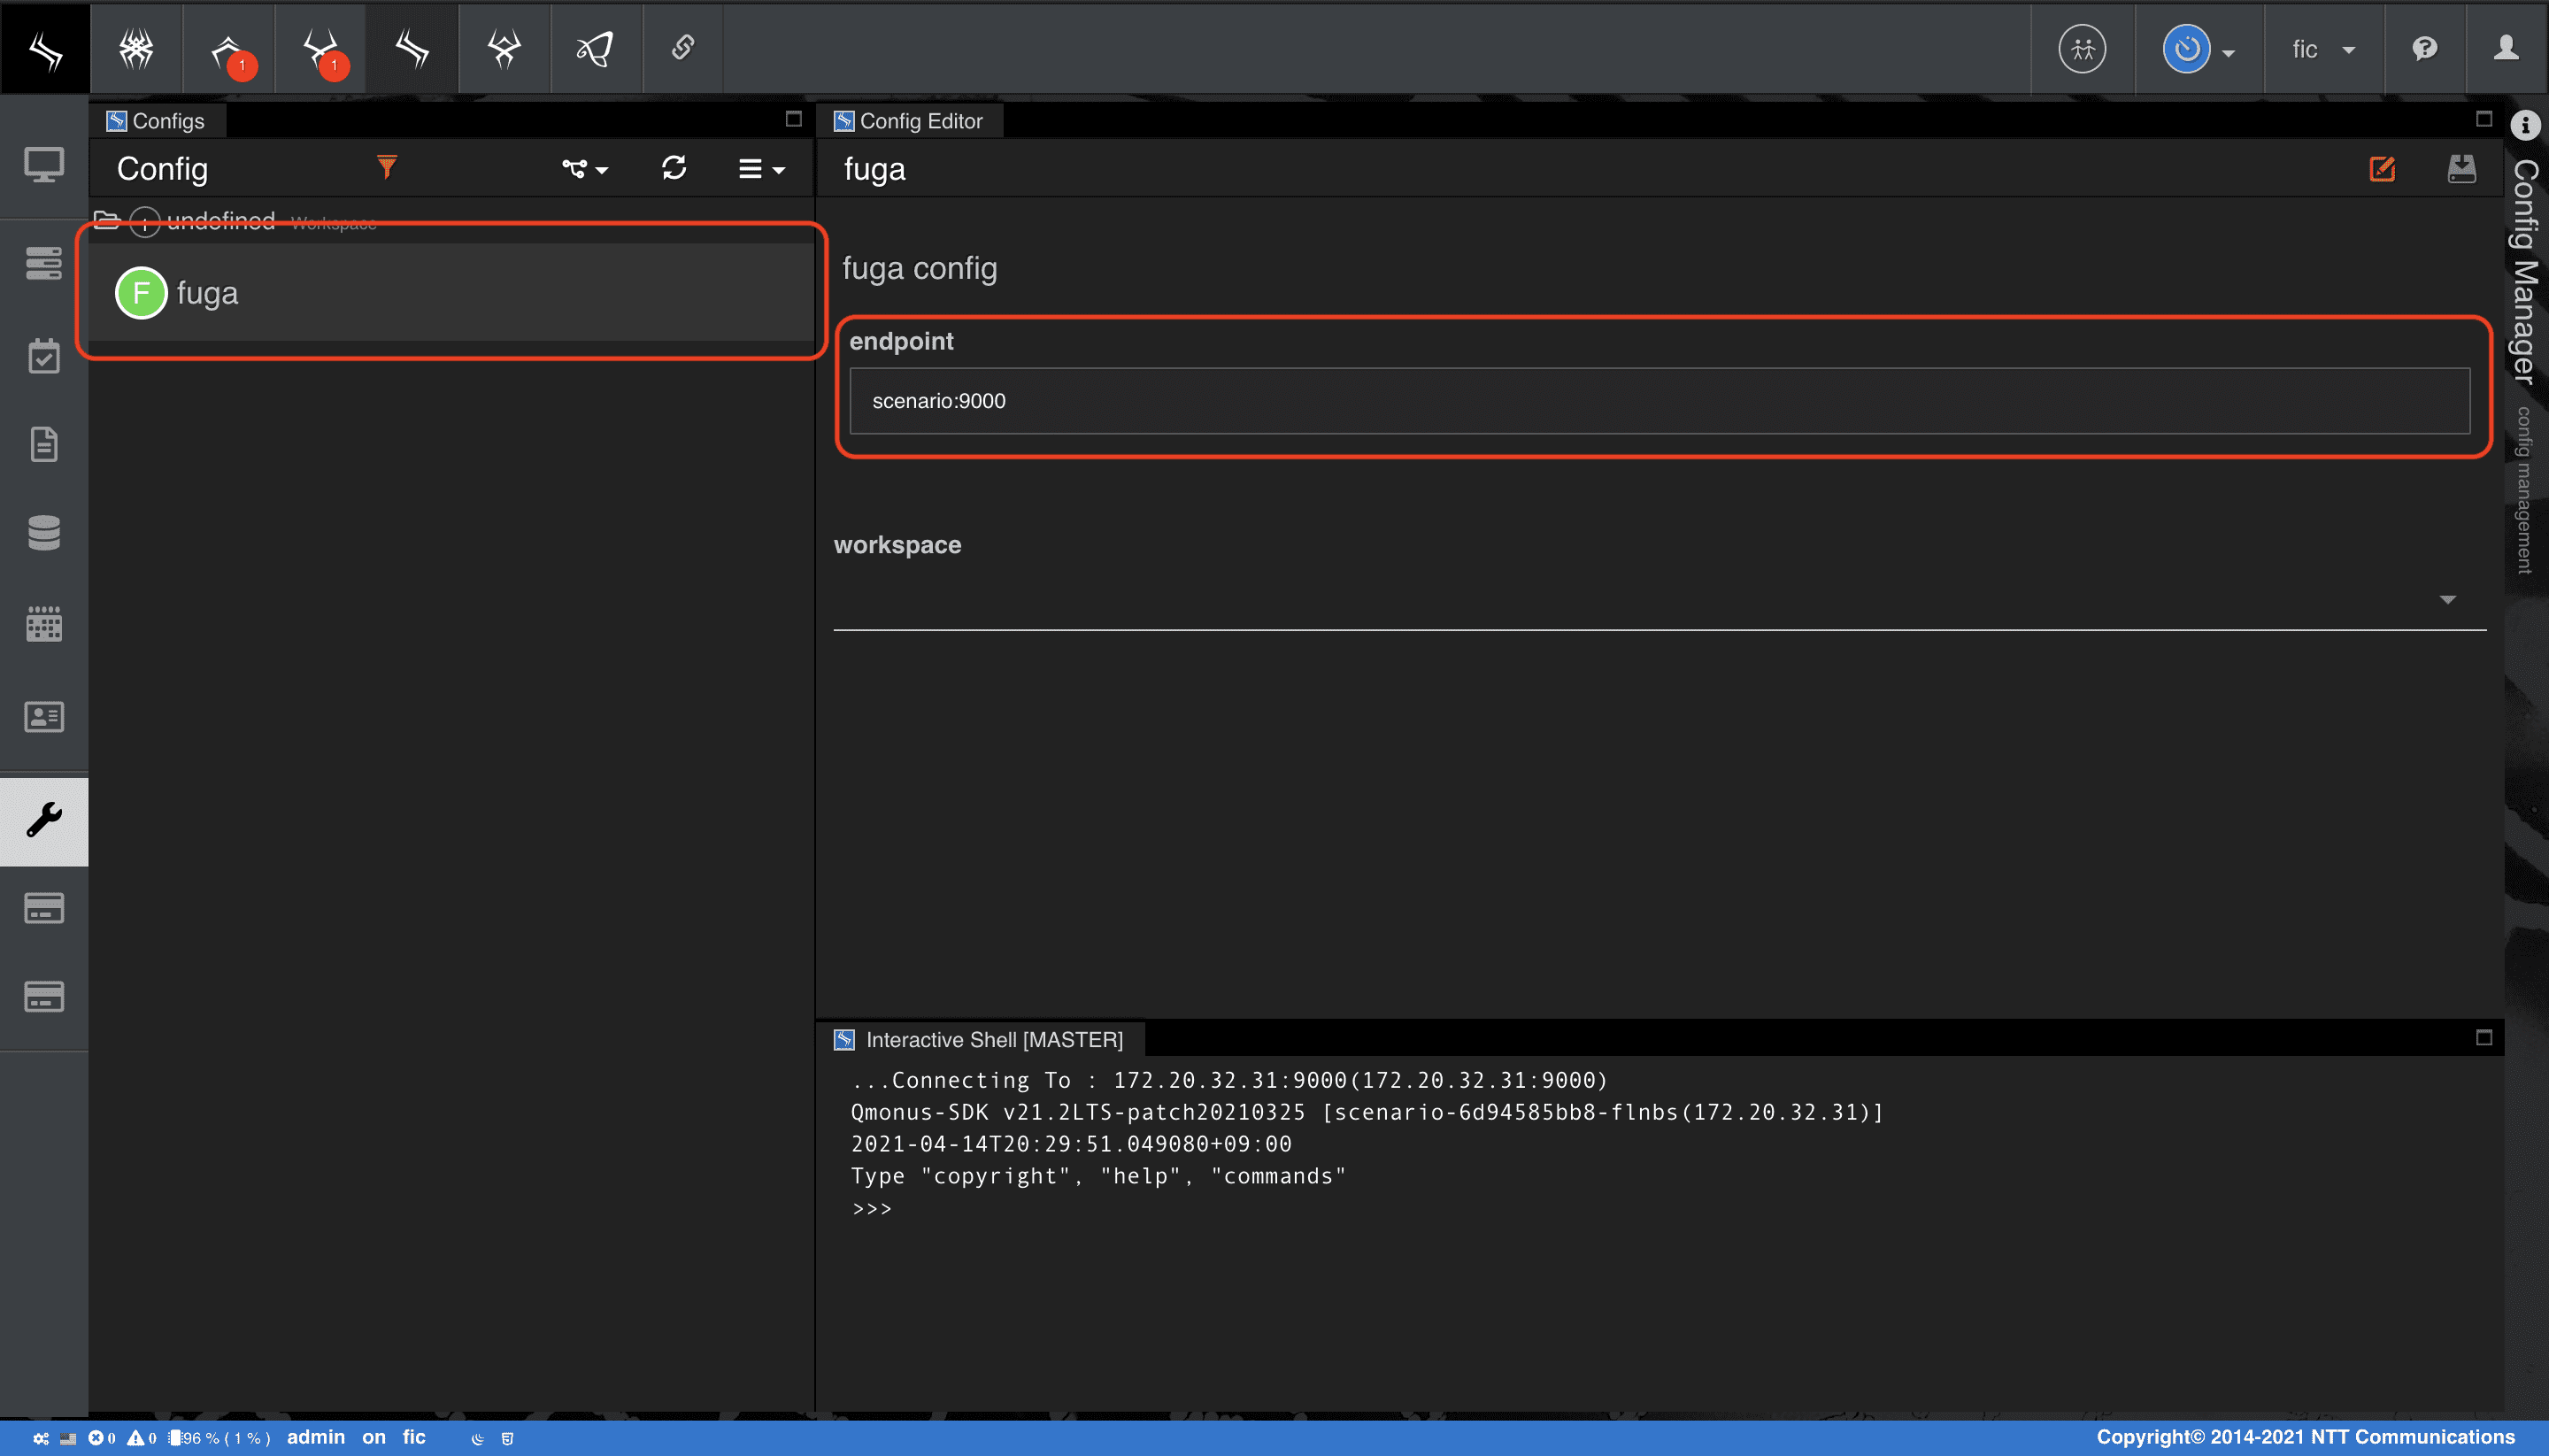
- シナリオからは、以下のようにビルトインオブジェクト
get_service_configで呼び出すことができます。
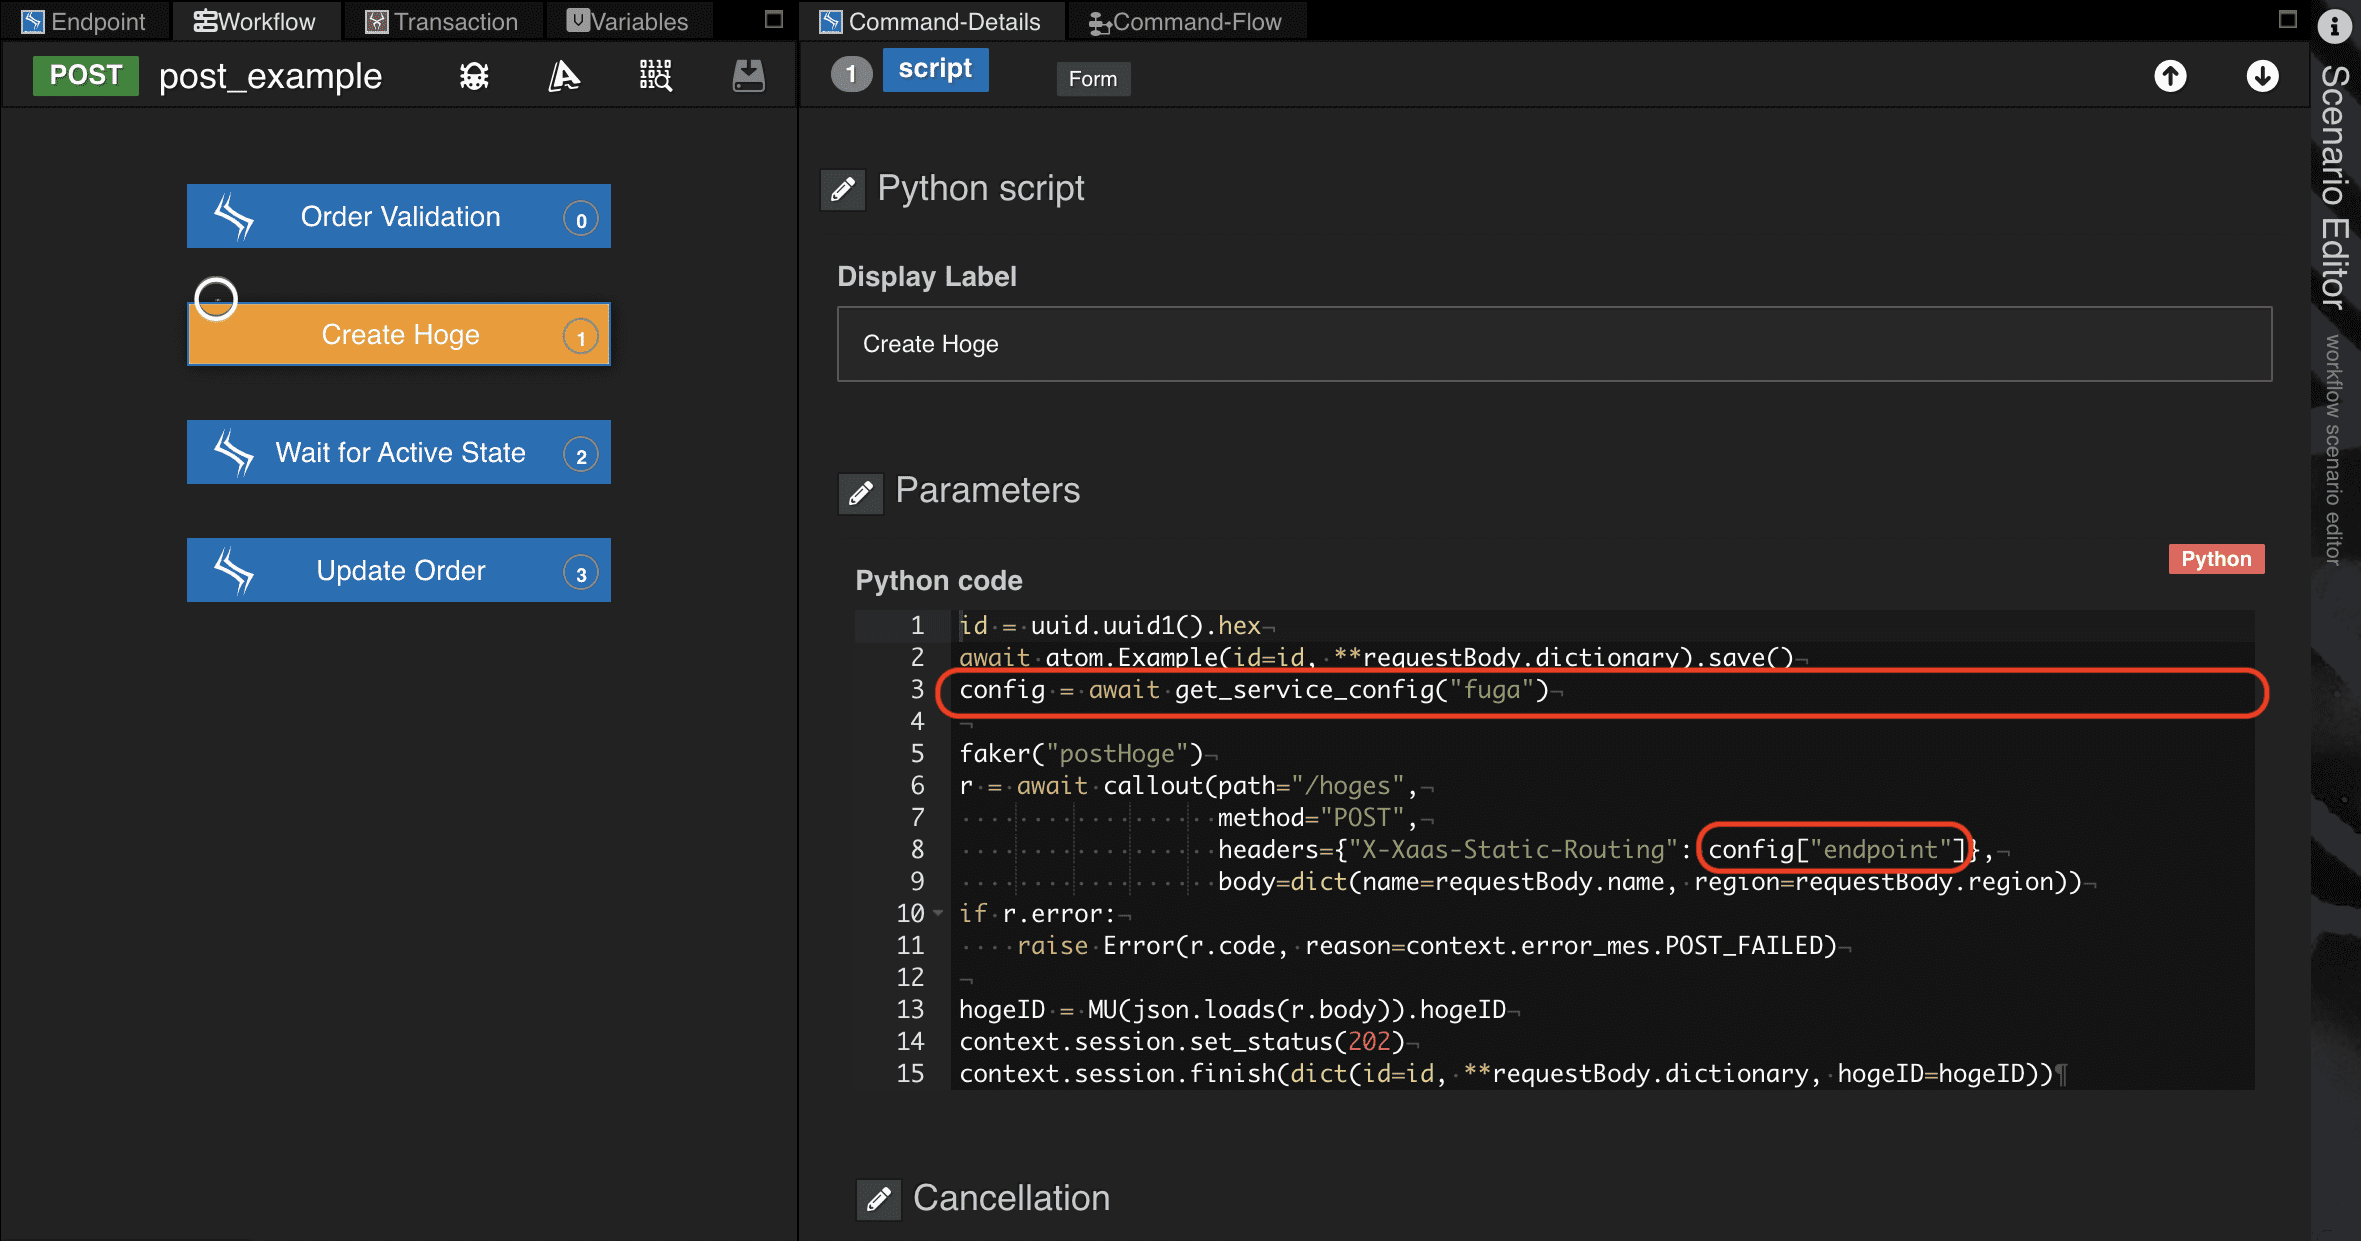
今回はコンフィグに定義されているservice名称がfugaとなっているため、以下のように呼び出しました。
config = await get_service_config("fuga")config["endpoint"]
ただし、シナリオのcategory名称とコンフィグのservice名称が一致する場合、以下のように呼び出すことも可能です。
__CONFIG__["endpoint"]
シナリオpost_exampleのcategory名称がTutorialのため、同様のコンフィグをfugaではなく新しくTutorialとして作成することで__CONFIG__が使用できるようになります。
シナリオで多用する、以下のビルドインオブジェクトについては
Qmonus SDK Programming Guide » リファレンス » ビルトインオブジェクトを参照してください。
get_service_configcallout、ErrorFaker
プラグインモジュールを取得する
シナリオからプラグインモジュールを呼び出す方法を確認しておきましょう。
- メインメニュー [Workflow Scenario as a Service] > [Builtin] の ビルトイン画面 > [Module]タブ で設定したモジュールをシナリオ内で取得します。
error_mesモジュールのPOST_FAILED値(POST Failed)
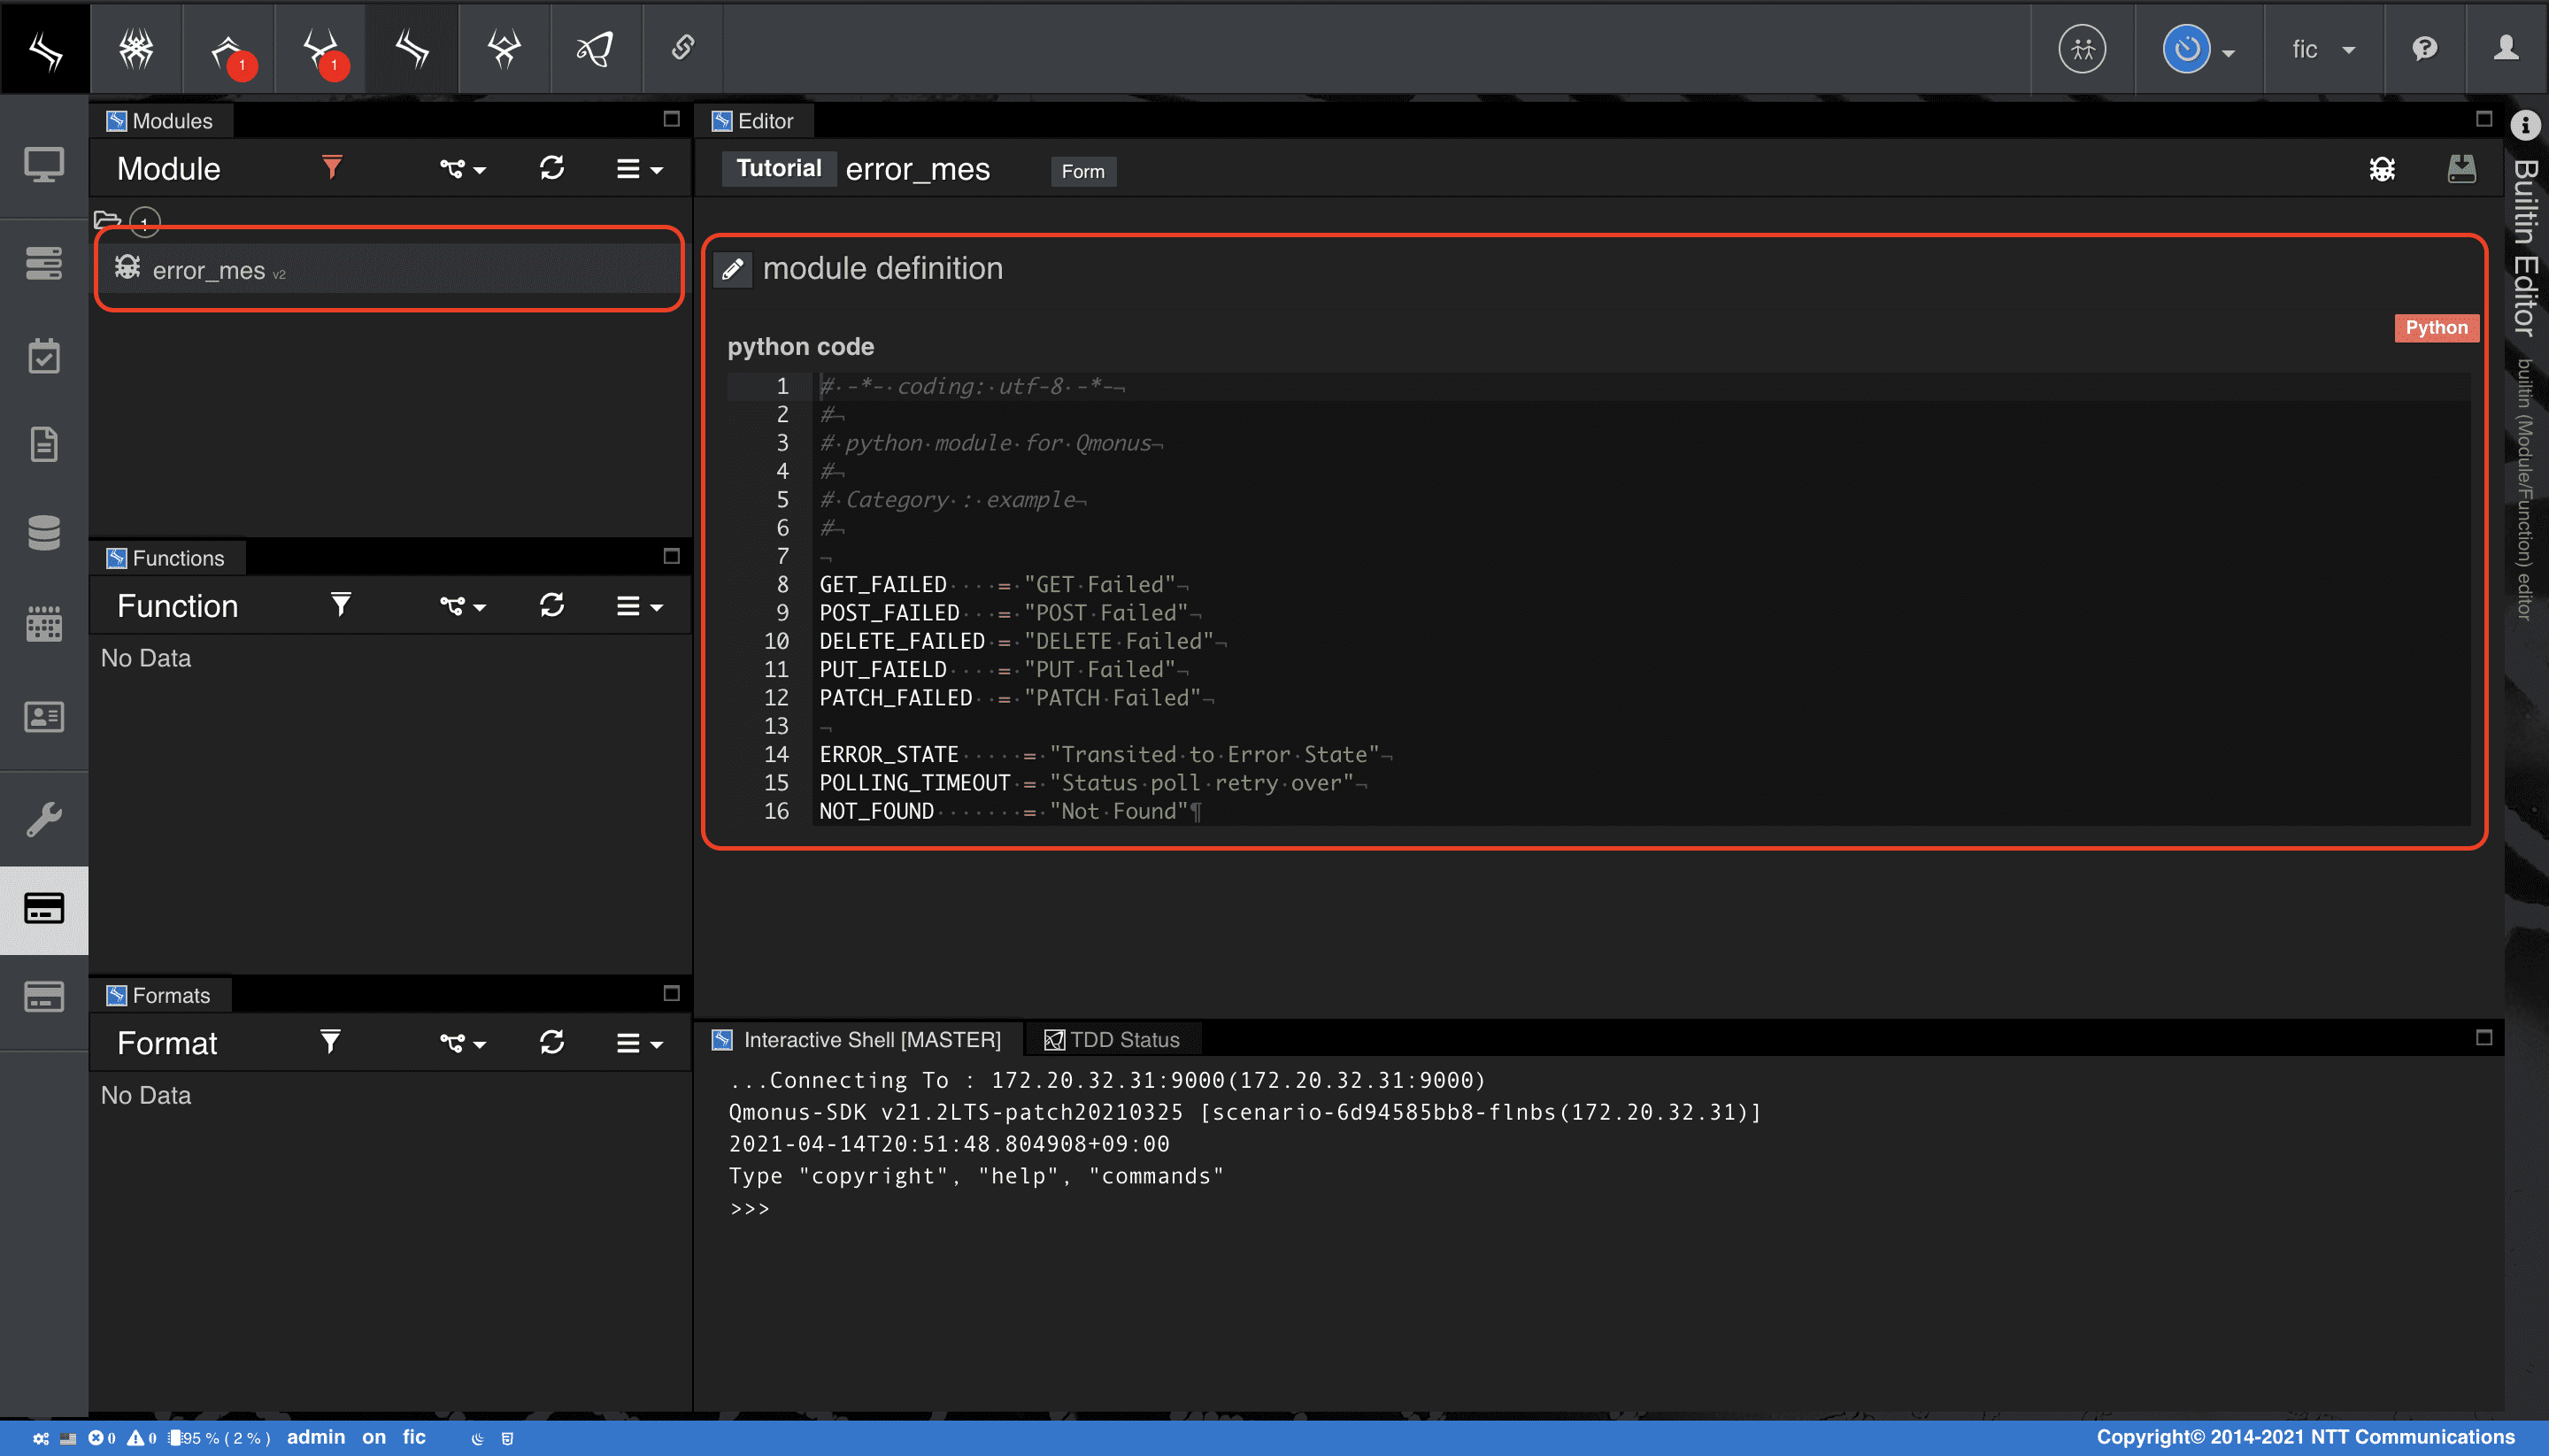
- シナリオからは、
contextオブジェクト配下に格納されており、ビルトイン画面でModule、Functionを定義すると以下のように呼び出すことができます。context.[モジュール名/ファンクション名]
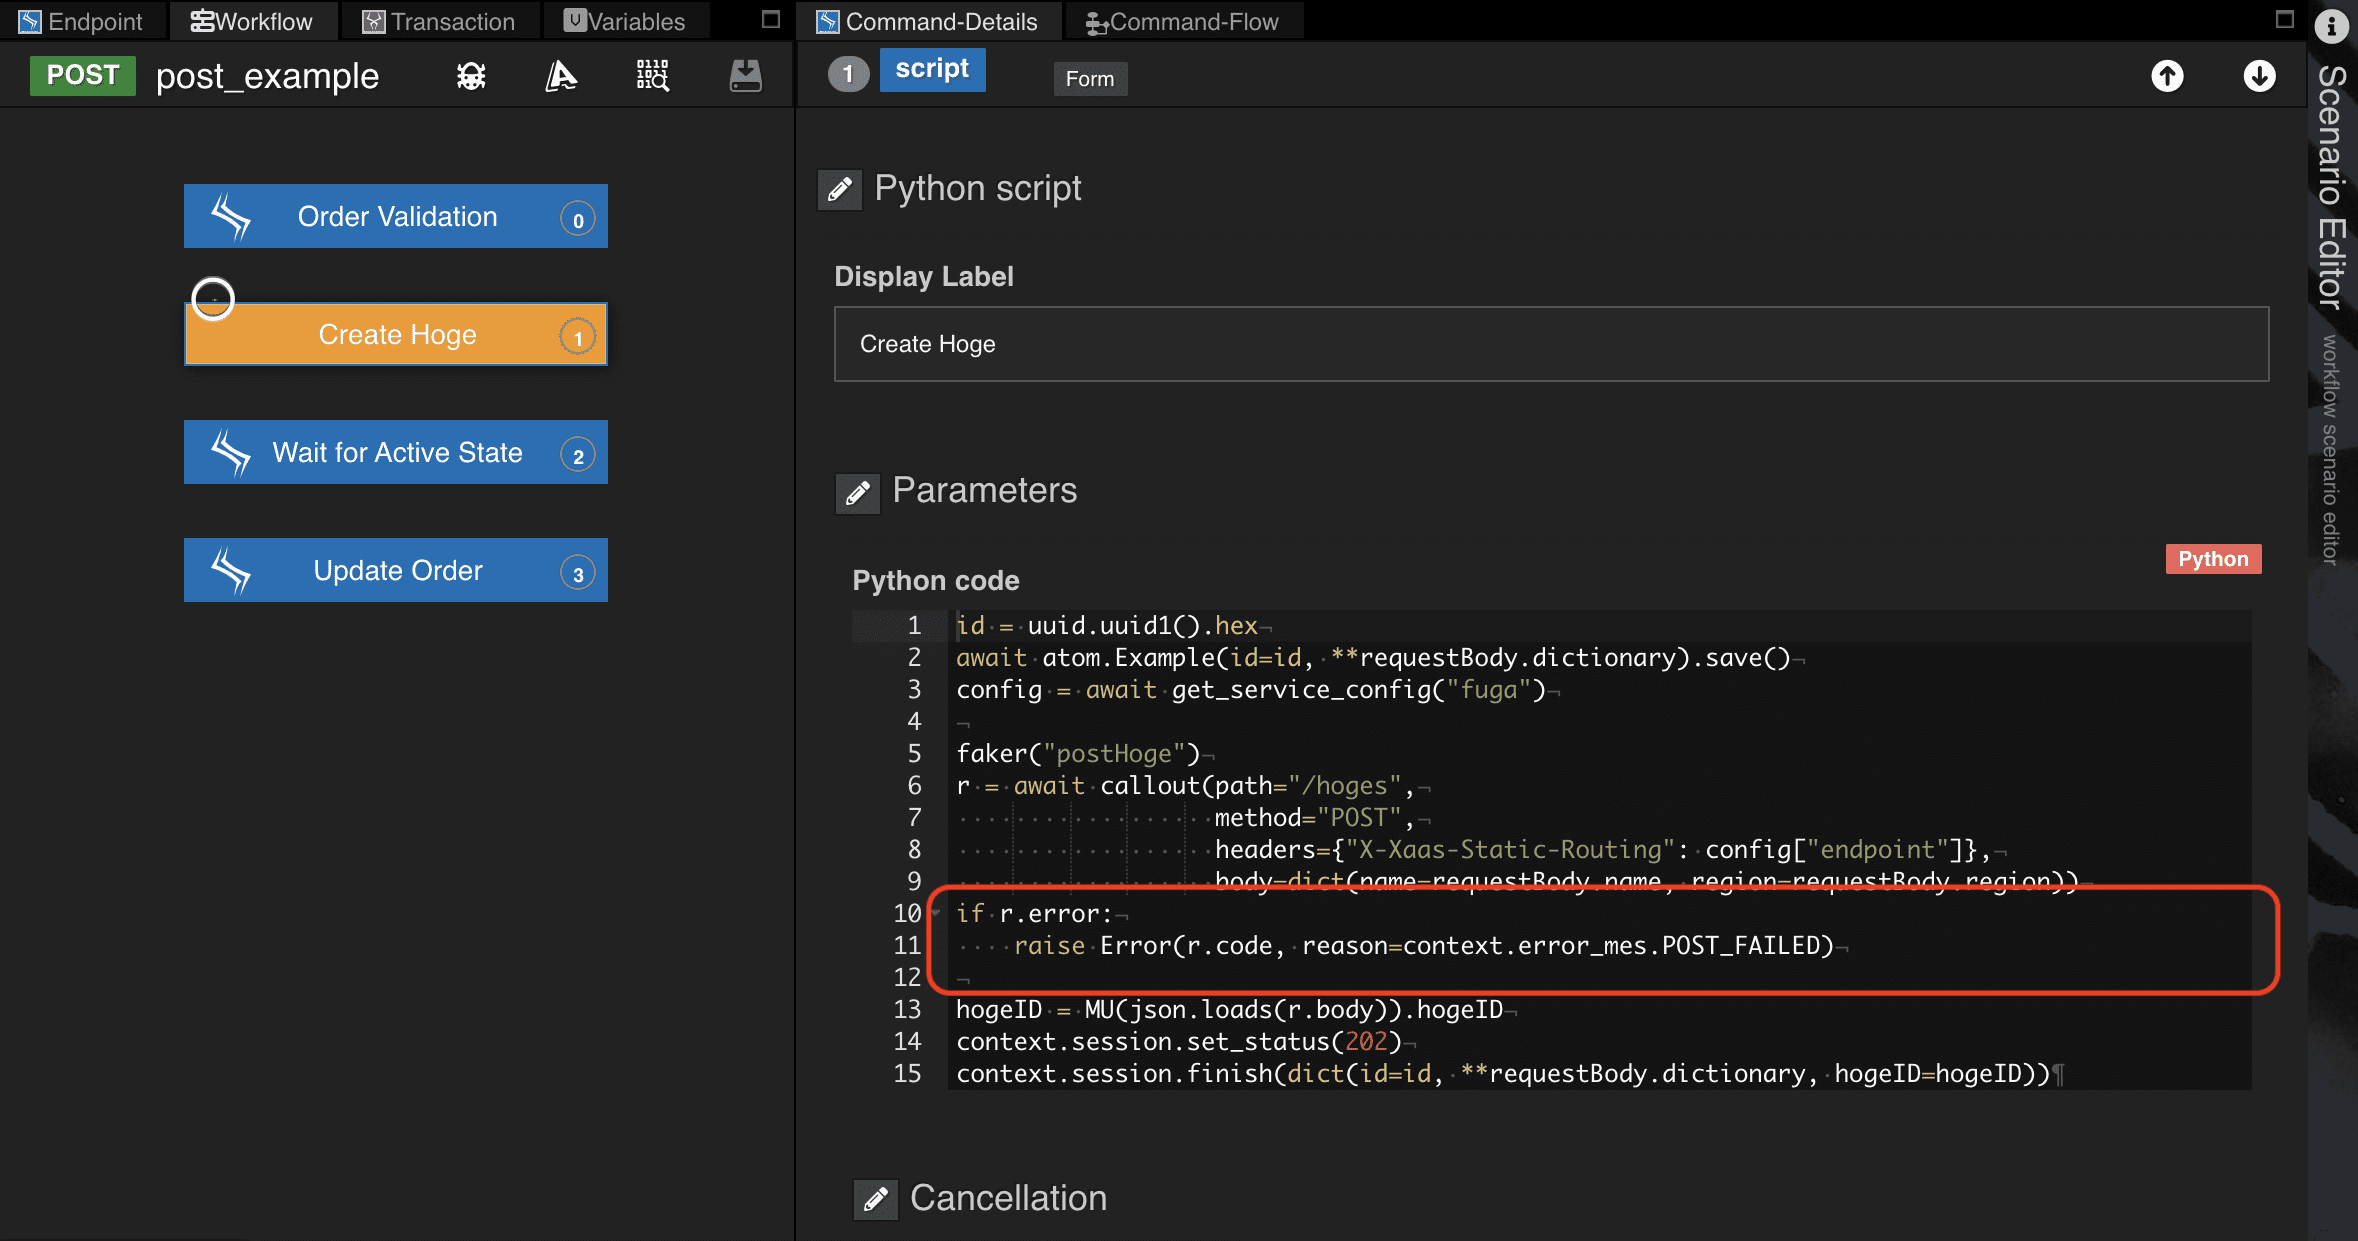
現在時刻を取得する clock.now()
現在時刻を取得するビルトインオブジェクトの関数です。(
Qmonus SDK Programming Guide » リファレンス » ビルトインオブジェクト clock)
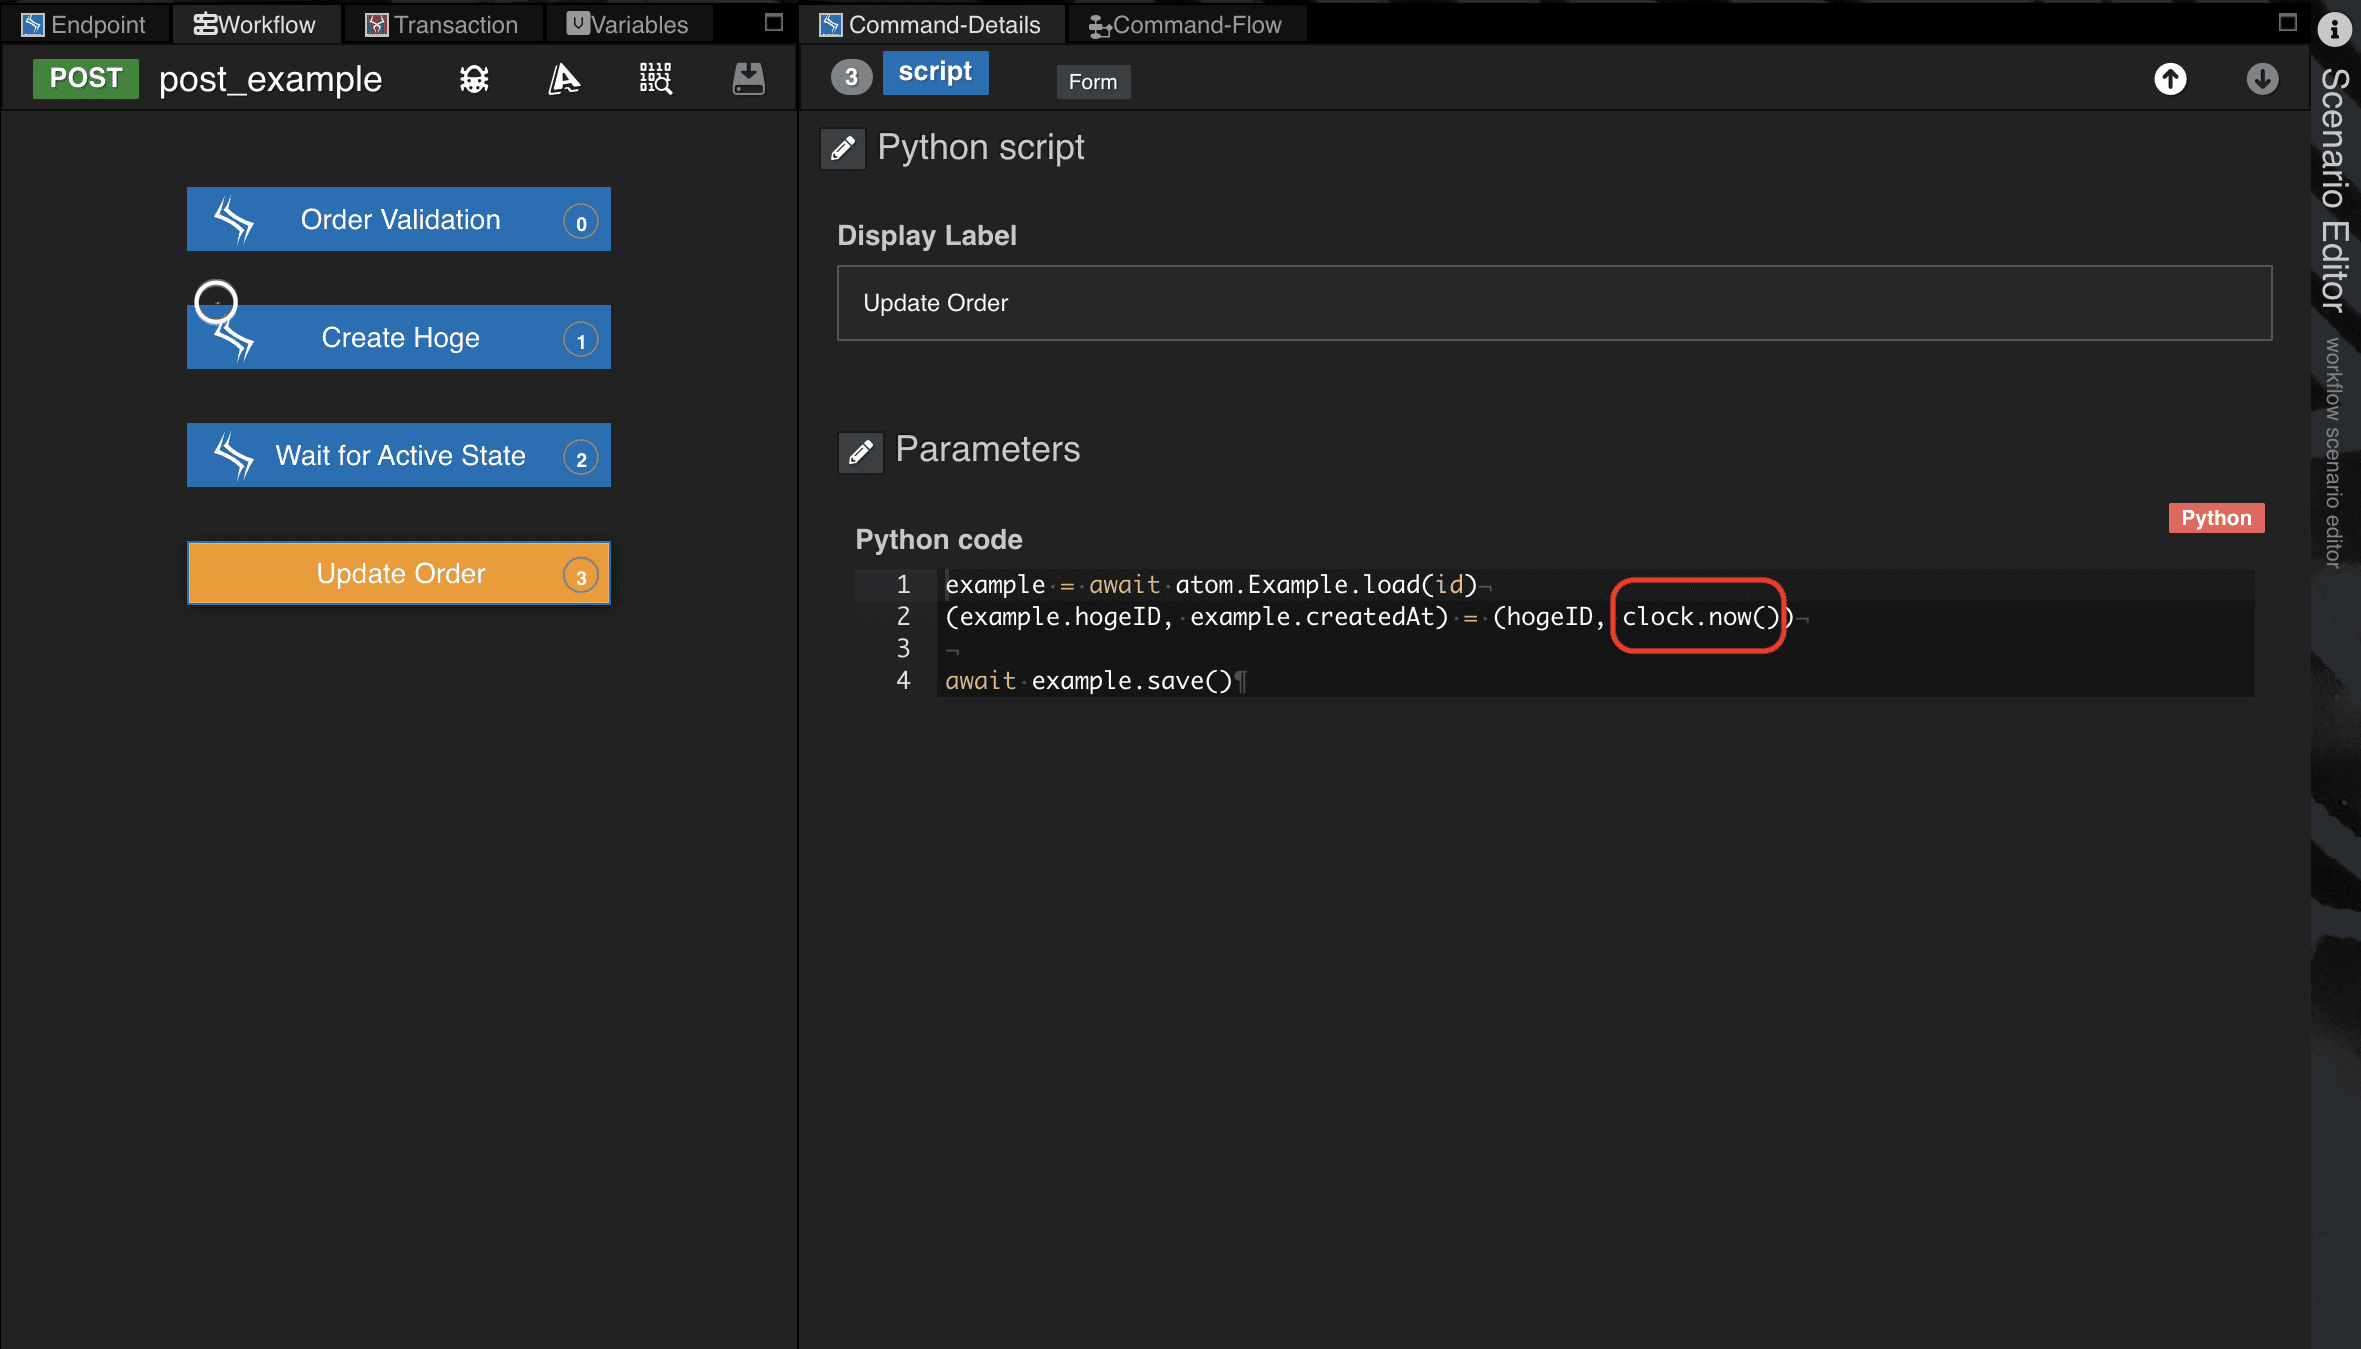
データベースのGET操作 - load()
Qmonus SDKで管理する情報のGET処理を、load()というATOMの組み込みメソッドで実現します。
サンプルコードでは、オーダ情報を更新するために更新前のExample情報をGETする処理として記述しています。
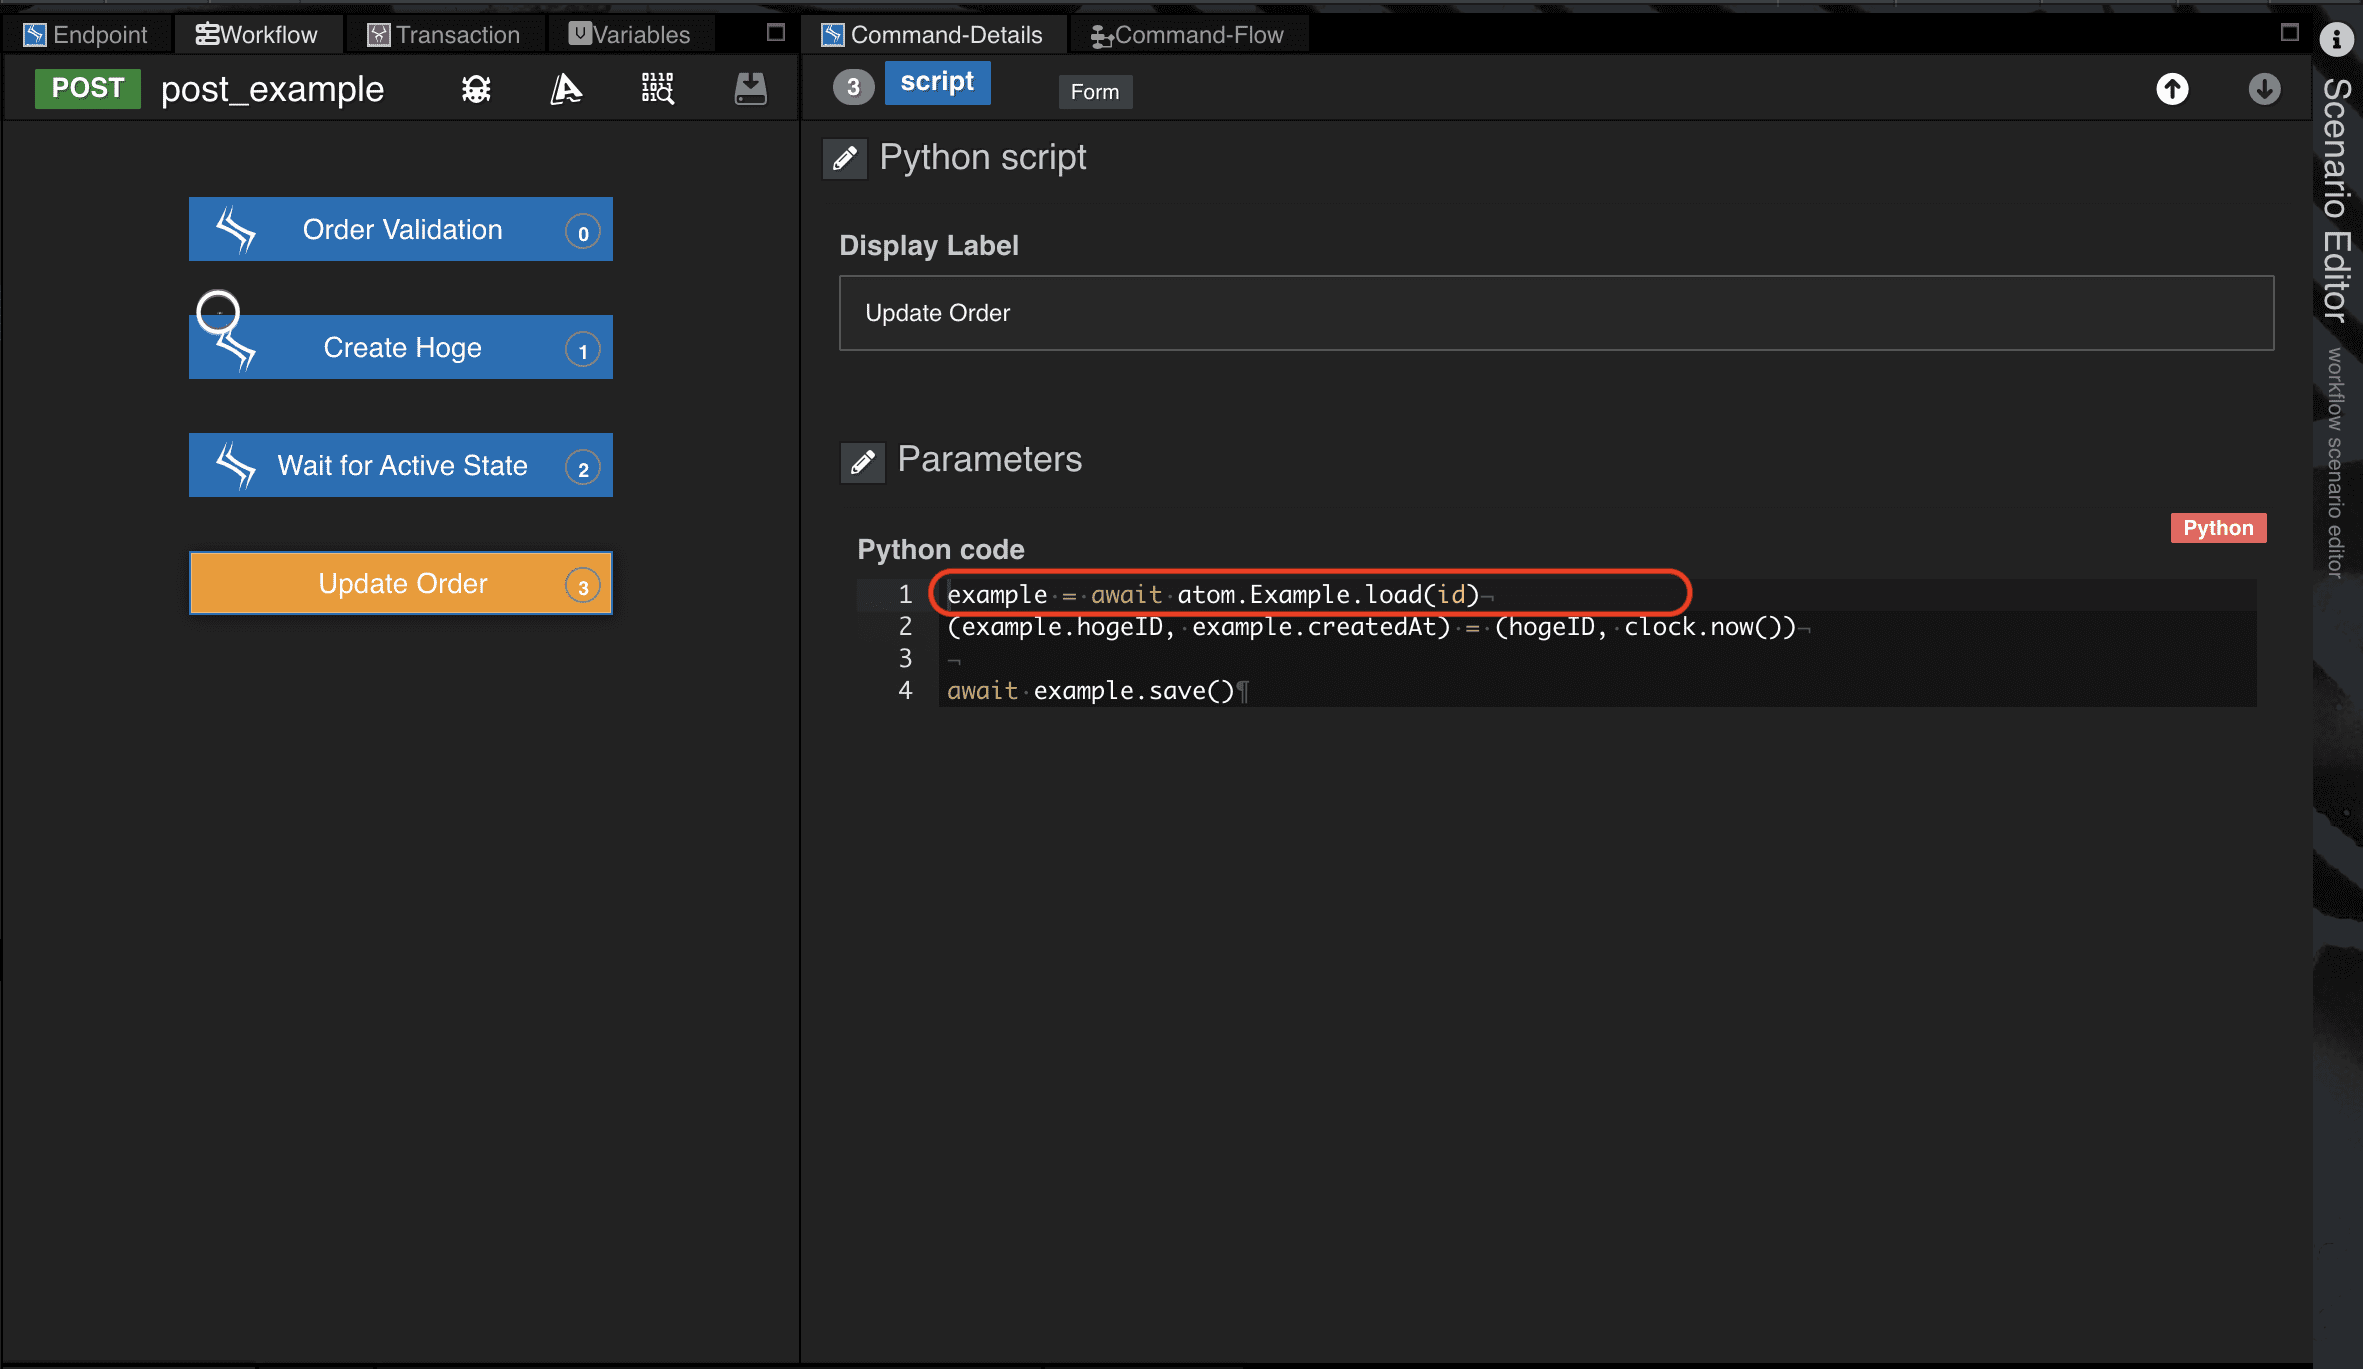
GET API実装
GET APIのシナリオで記述しているポイントをまとめています。
リソースパス変数、クエリパラメータを取得する
APIにアクセスがきた際の、リソースパス変数、クエリパラメータの取得方法を確認しましょう。
GET APIでは、/examples/{id}のようなアクセスがあった場合と/examples?id=のようなクエリ指定のアクセスがあった場合の実装をしています。
-
前者の場合、リソースパス変数
idを以下のように取得しています。context.request.resources.id
-
後者のクエリ指定の場合、クエリパラメータ
idは以下のように取得しています。context.request.params.id
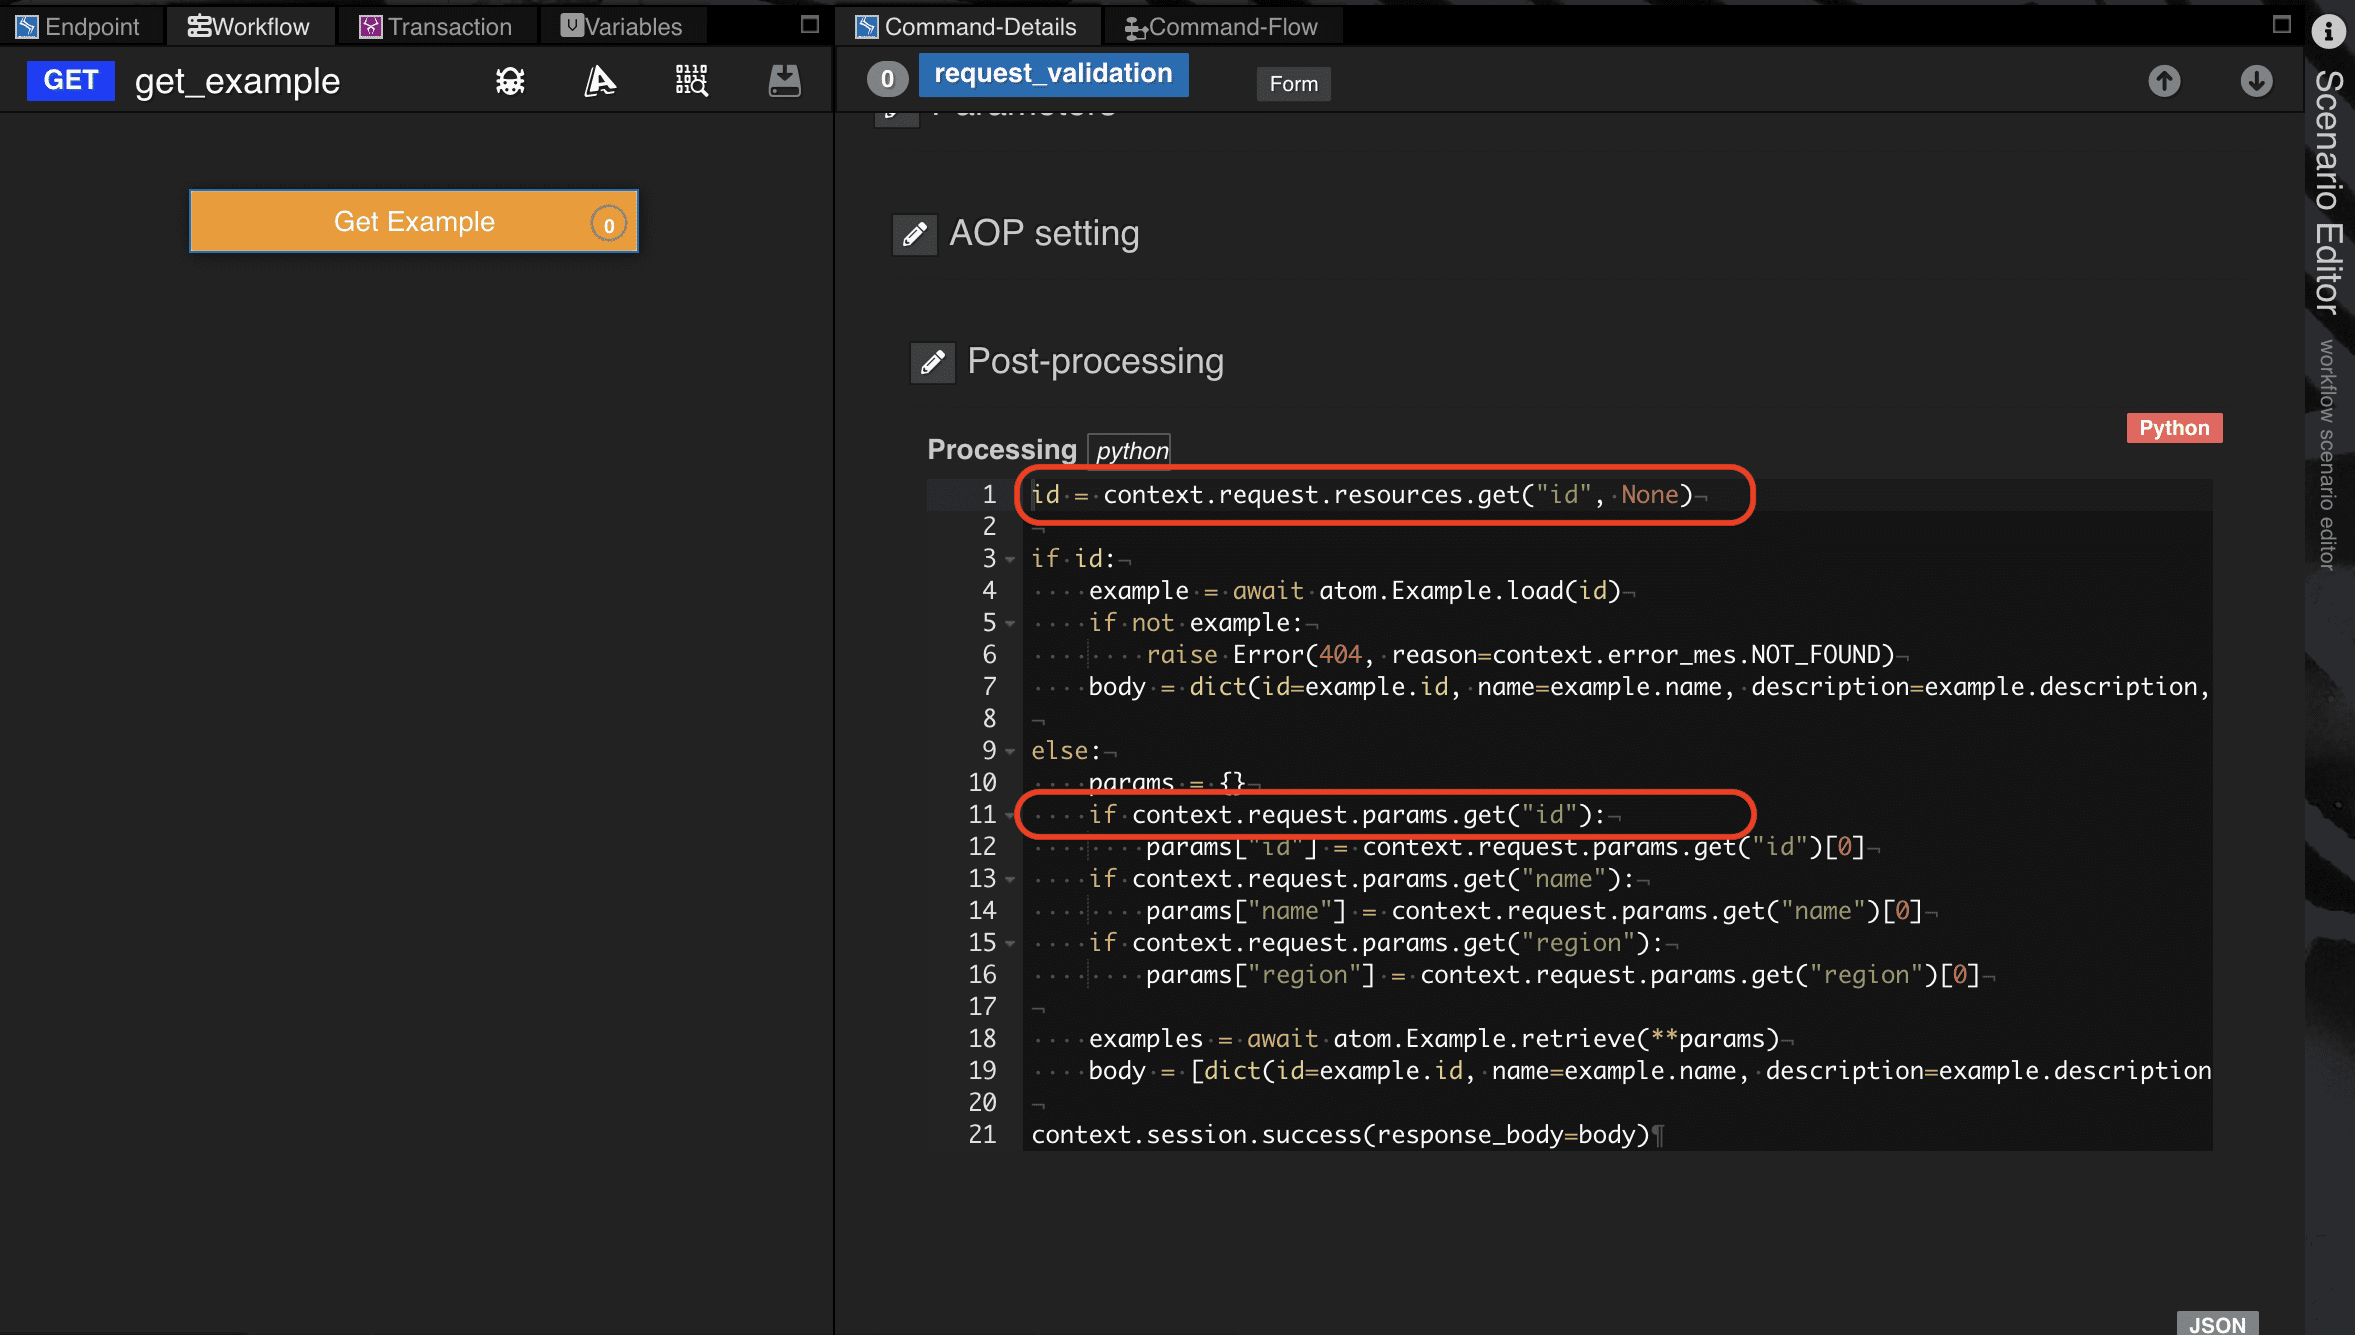
データベースのSELECT操作 - retrieve()
Qmonus SDKで管理する情報のSELECT処理を、retrieve()というATOMの組み込みメソッドで実現します。
サンプルコードでは、GET APIアクセス時のセッション情報から取得したパラメータを検索条件として、Example情報をSELECTする処理として記述しています。
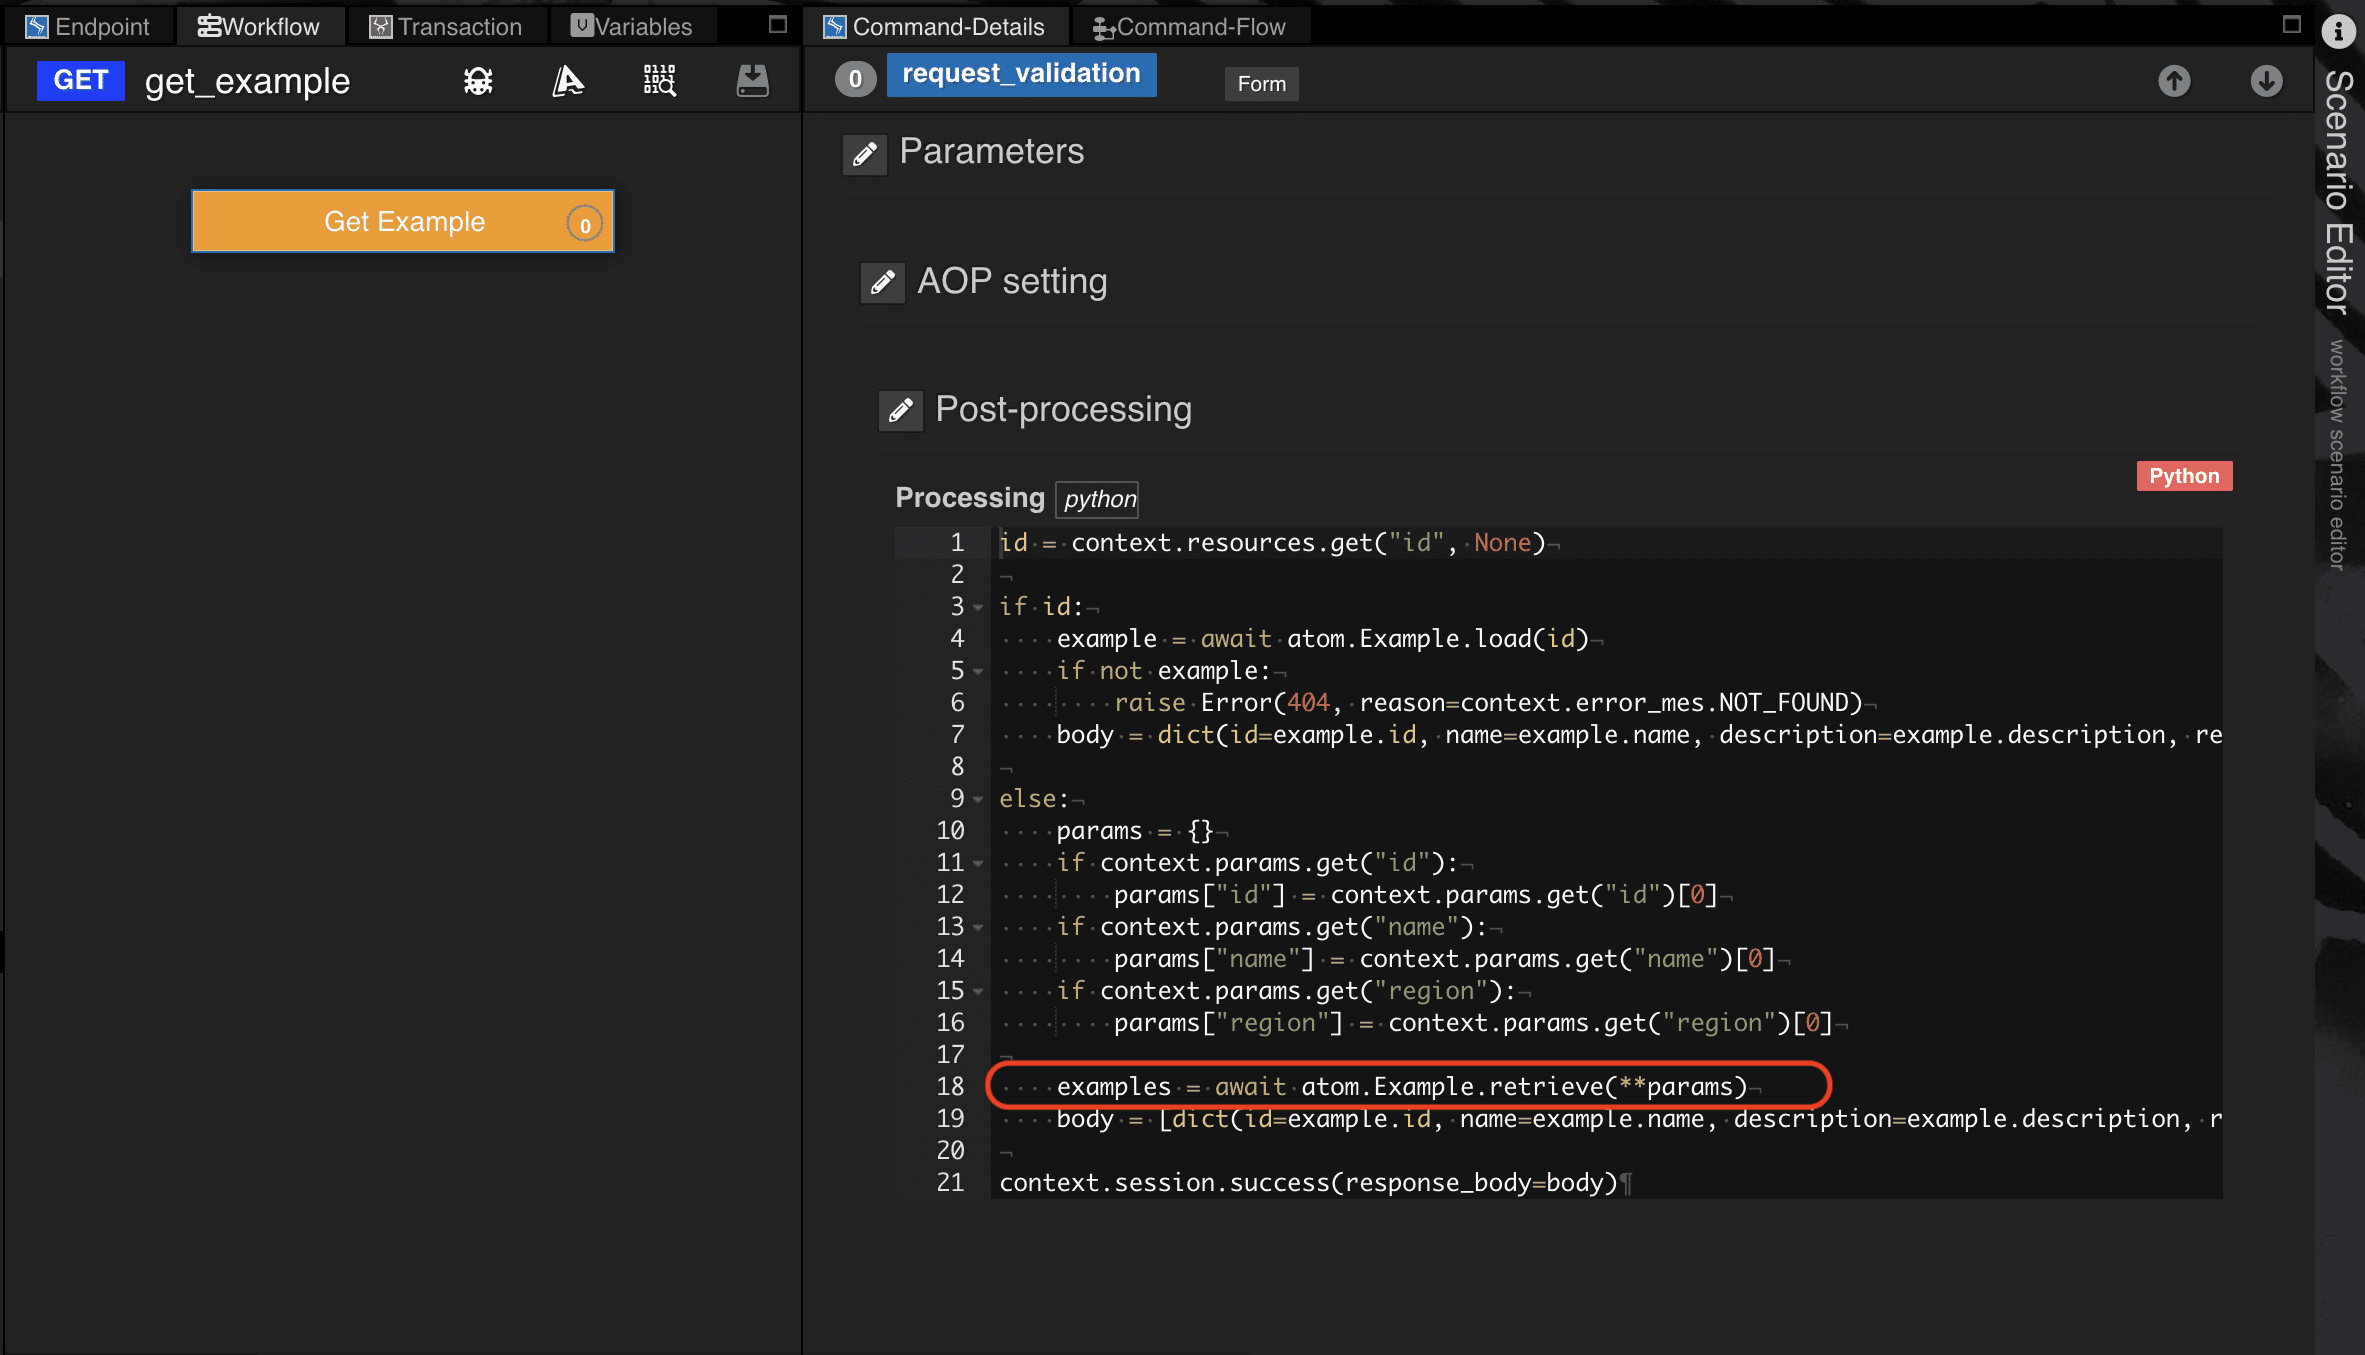
PUT API実装
PUT APIのシナリオで記述しているポイントをまとめています。
データベースのUPSERT操作 - save()
データベースの更新処理は、POST APIのExample情報の登録時と同様で、UPSERT機能を持つsave()というATOMの組み込みメソッドで実現します。
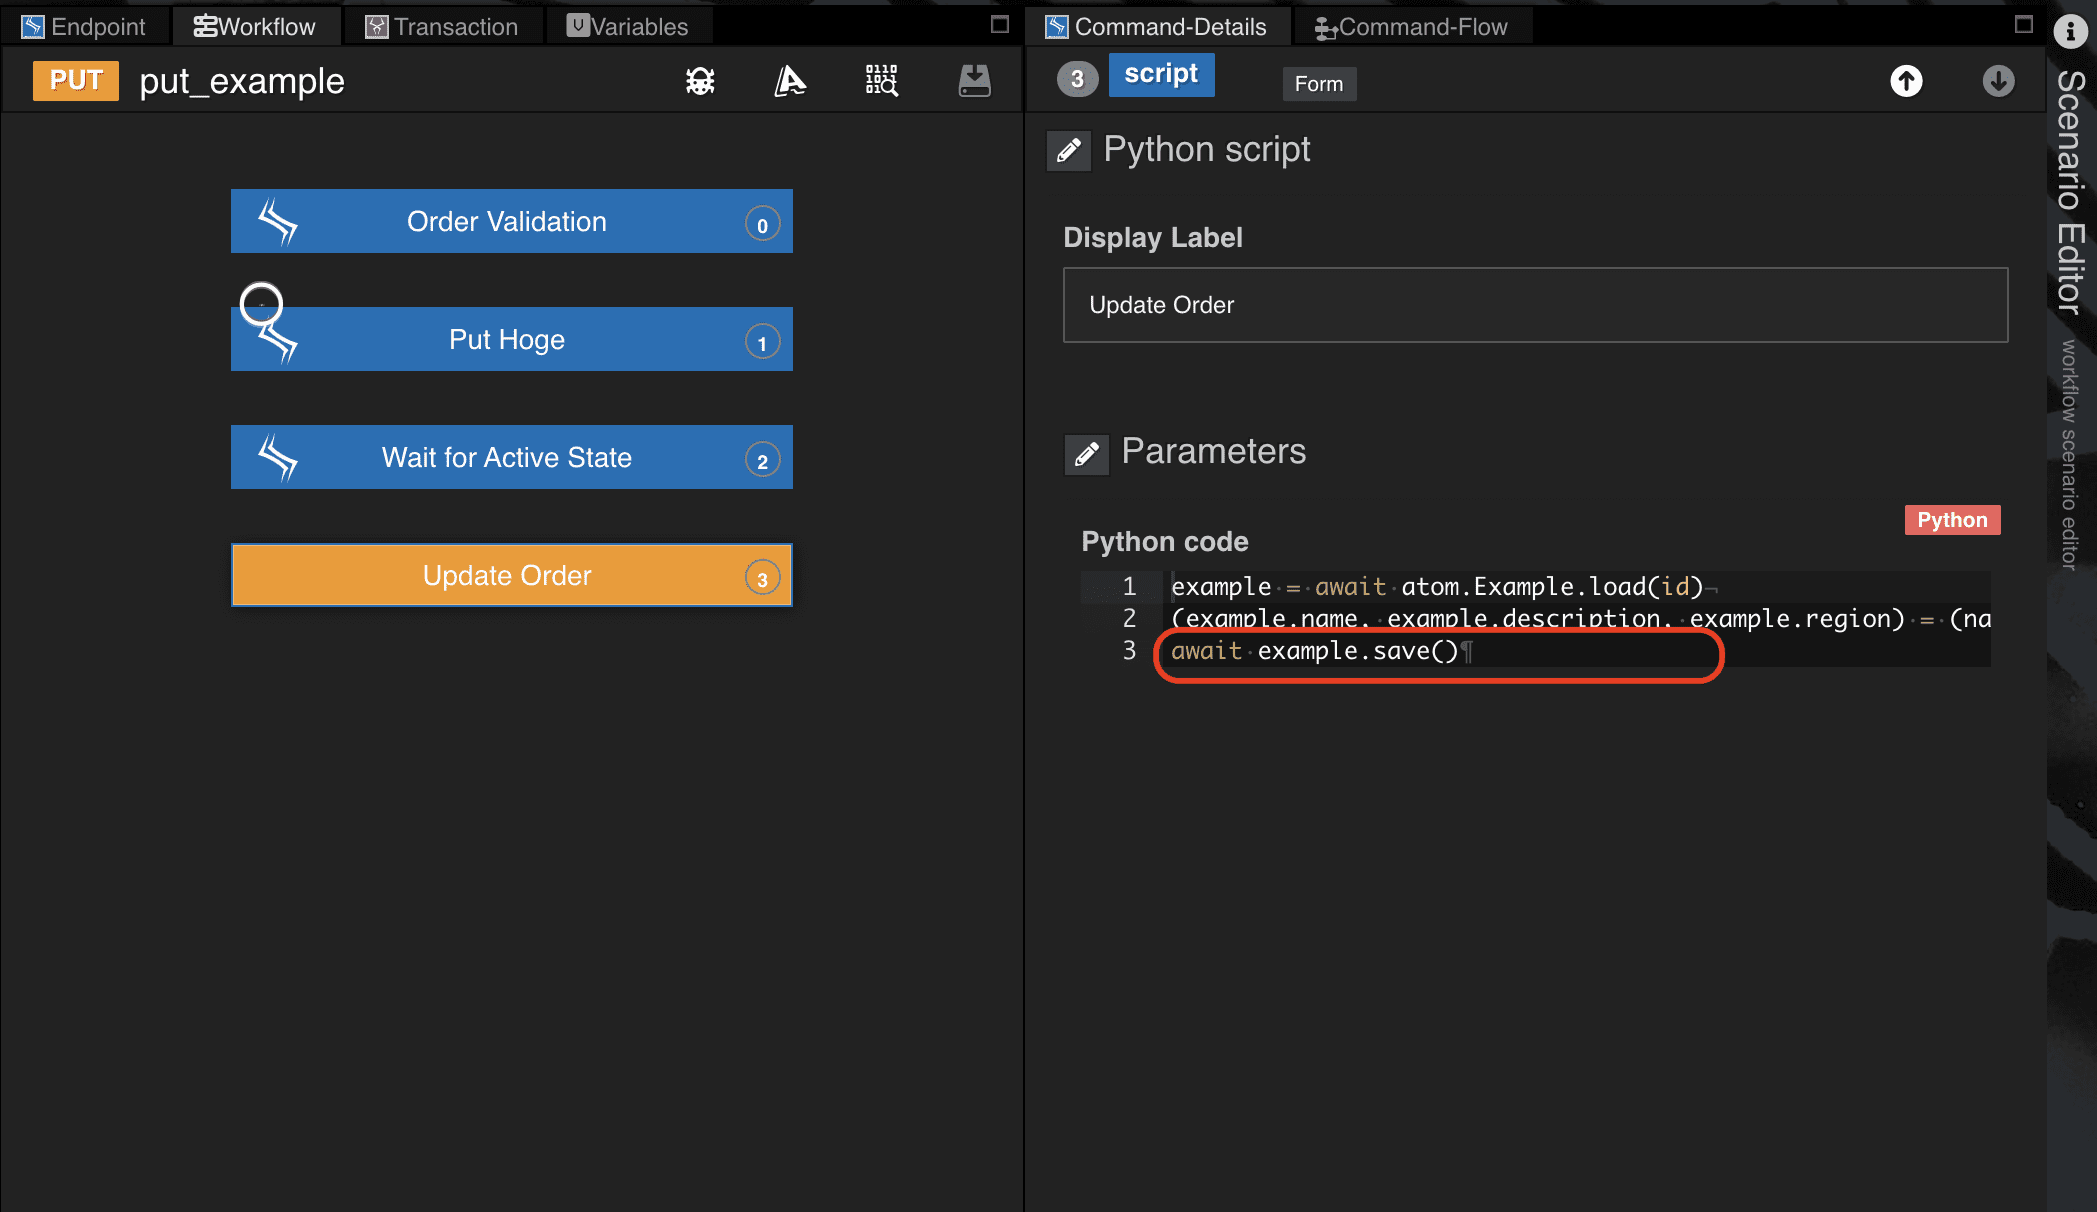
更新情報を外部サービスのリクエスト情報にセットする
PUT APIのリクエストボディ情報を、さらに外部APIのリクエスト情報にセットする際によく用いられる記述を紹介します。
処理の流れとしては、事前に更新対象のデータベース情報をATOMのload()メソッドでインスタンス取得しておきます。PUT APIのリクエストボディに指定がなかった場合、データベースから取得したインスタンス情報の値をセットするようになっています。
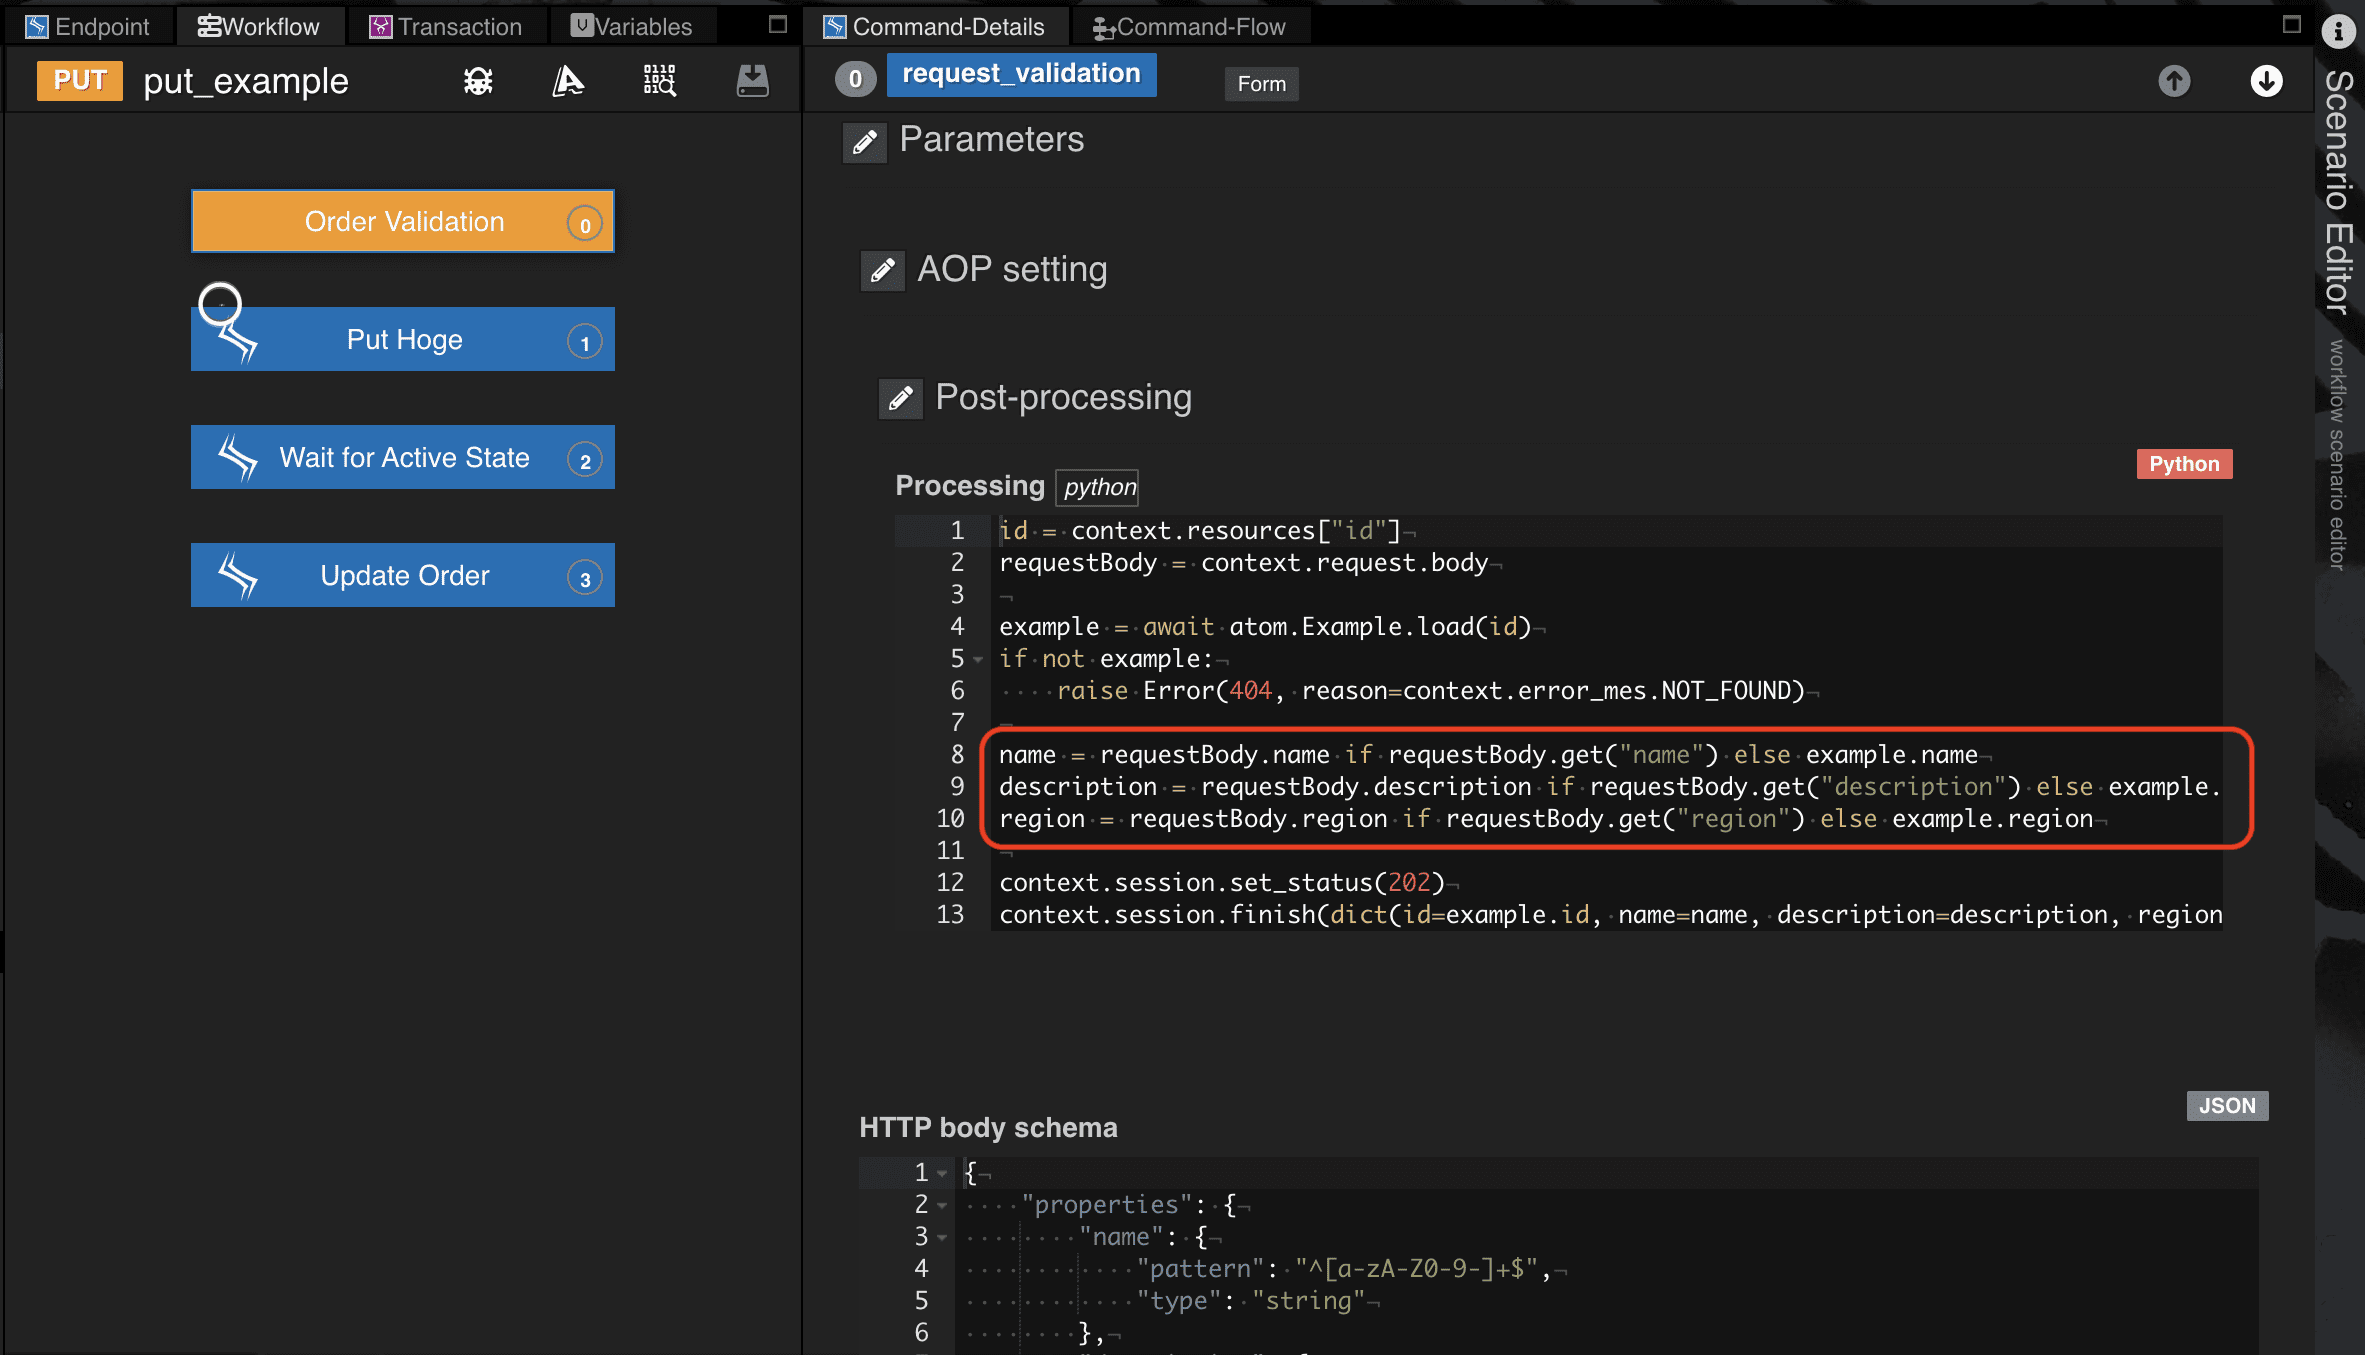
DELETE API実装
DELETE APIのシナリオで記述しているポイントをまとめています
データベースのDELETE操作 - destroy()
Qmonus SDKで管理する情報のDELETE処理を、destroy()というATOMの組み込みメソッドで実現します。
サンプルコードでは、Order Validationブロックで削除するExample情報をload()メソッドで取得し、得られたインスタンス情報をもとにDELETEする処理として記述しています。
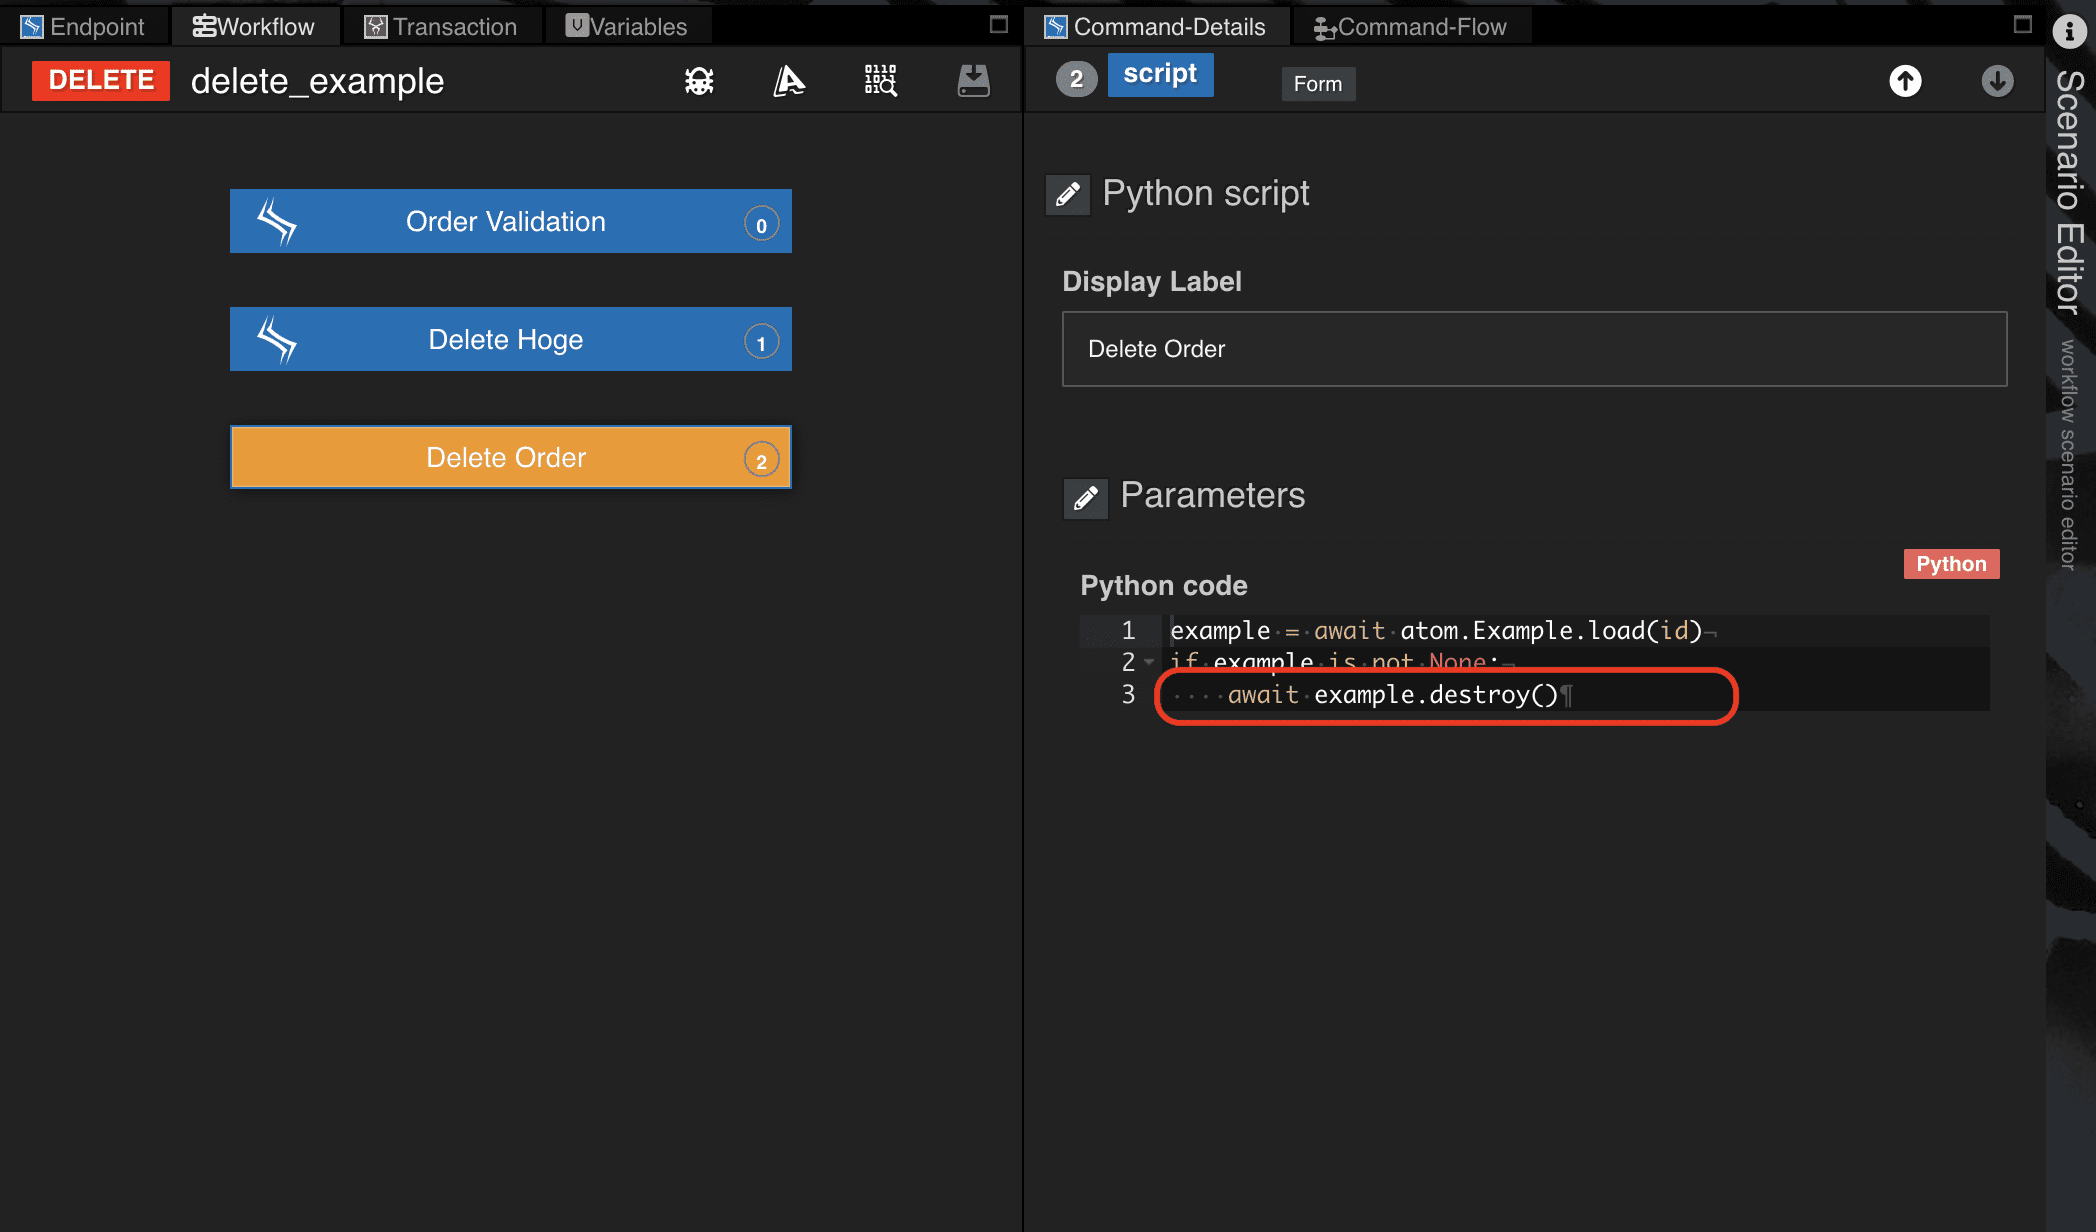
Routing設定
ルーティングのポイントです。
ターゲットエンドポイントを動的に切り替える
シナリオから外部サービスにアクセスするケースです。
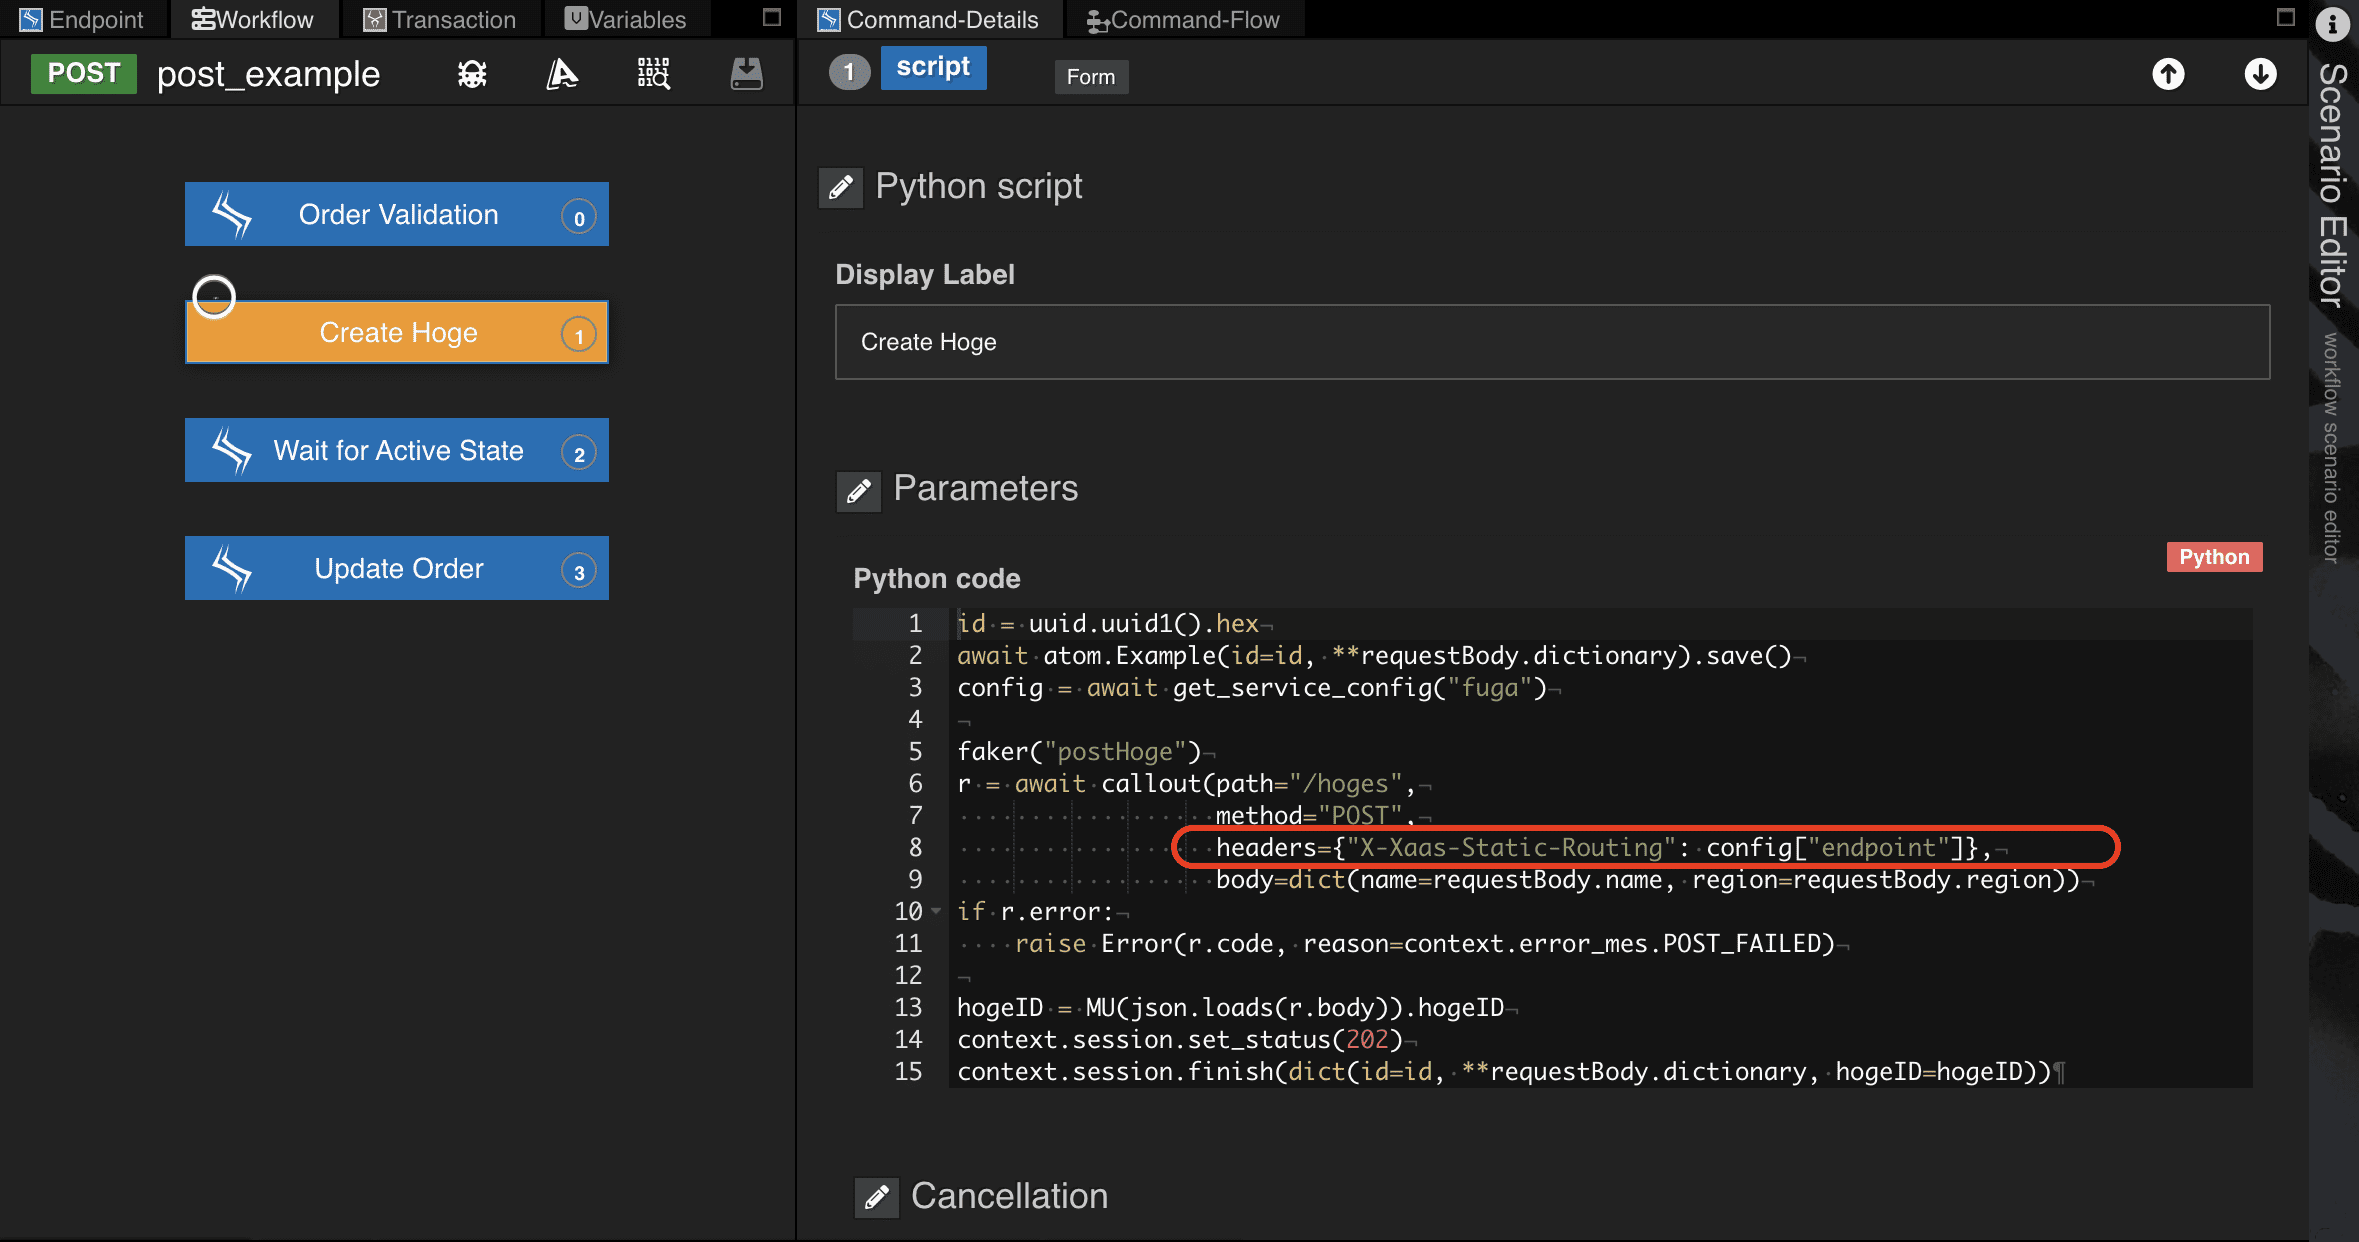
同一pathで複数のendpointがあるサービスとAPI連携する際、上記の様にシナリオの中でエンドポイントを指定(切り替え)することが可能です。外部サービスへアクセスするルーティングのスコープをsecureに設定し、シナリオではcalloutの
記述にてX-Xaas-Static-Routing拡張ヘッダを埋め込み、エンドポイントを指定します。
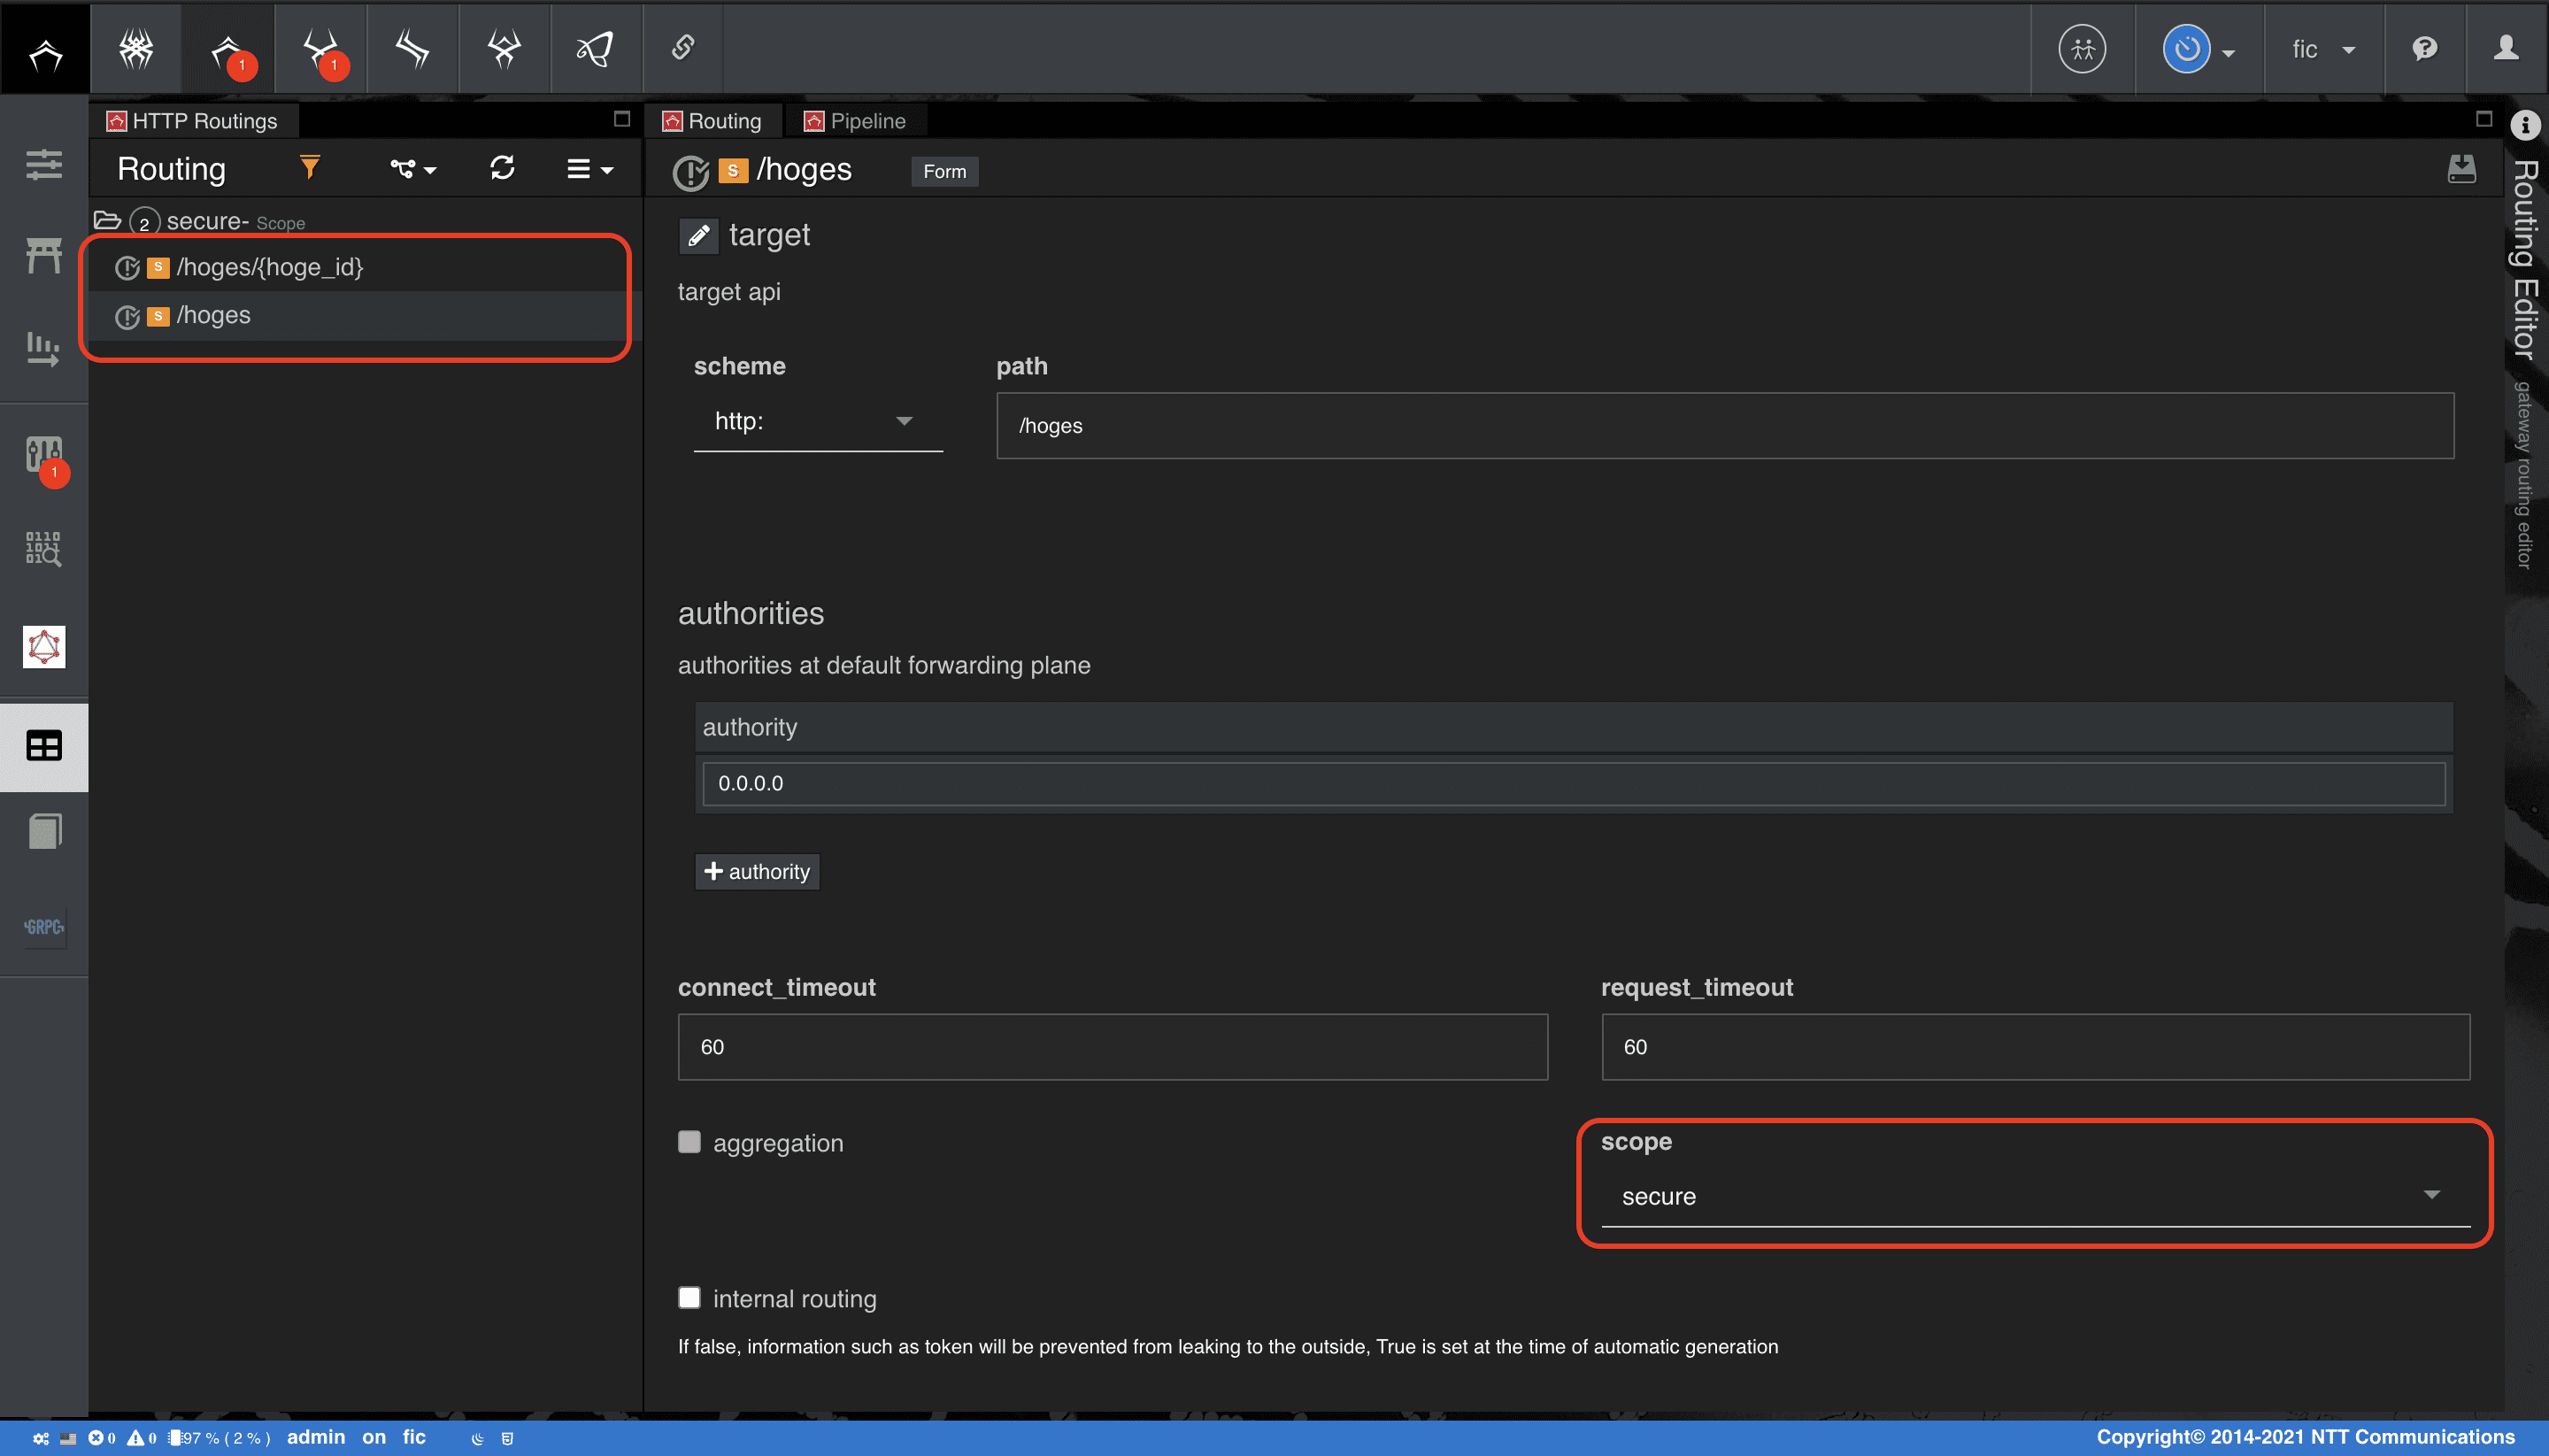
X-Xaas-Static-Routingで指定したエンドポイントを優先してターゲットエンドポイントに変換します。(ルーティング定義のエンドポイント、ここでは0.0.0.0がターゲットエンドポイントにならない)
ルーティングのスコープsecureモードについての詳細は、
Qmonus SDK Programming Guide » Scenario » ATOMの [APIの認証スコープについて] を確認してください。
Account Setting
Qmonus SDKを利用するユーザの、ロールおよびアカウント作成について学習します。
ロールを作成する
ロールは、APIに対するアクセス制御に利用されます。
-
メインメニューから [Admin Area] > [Account & Role] を選択
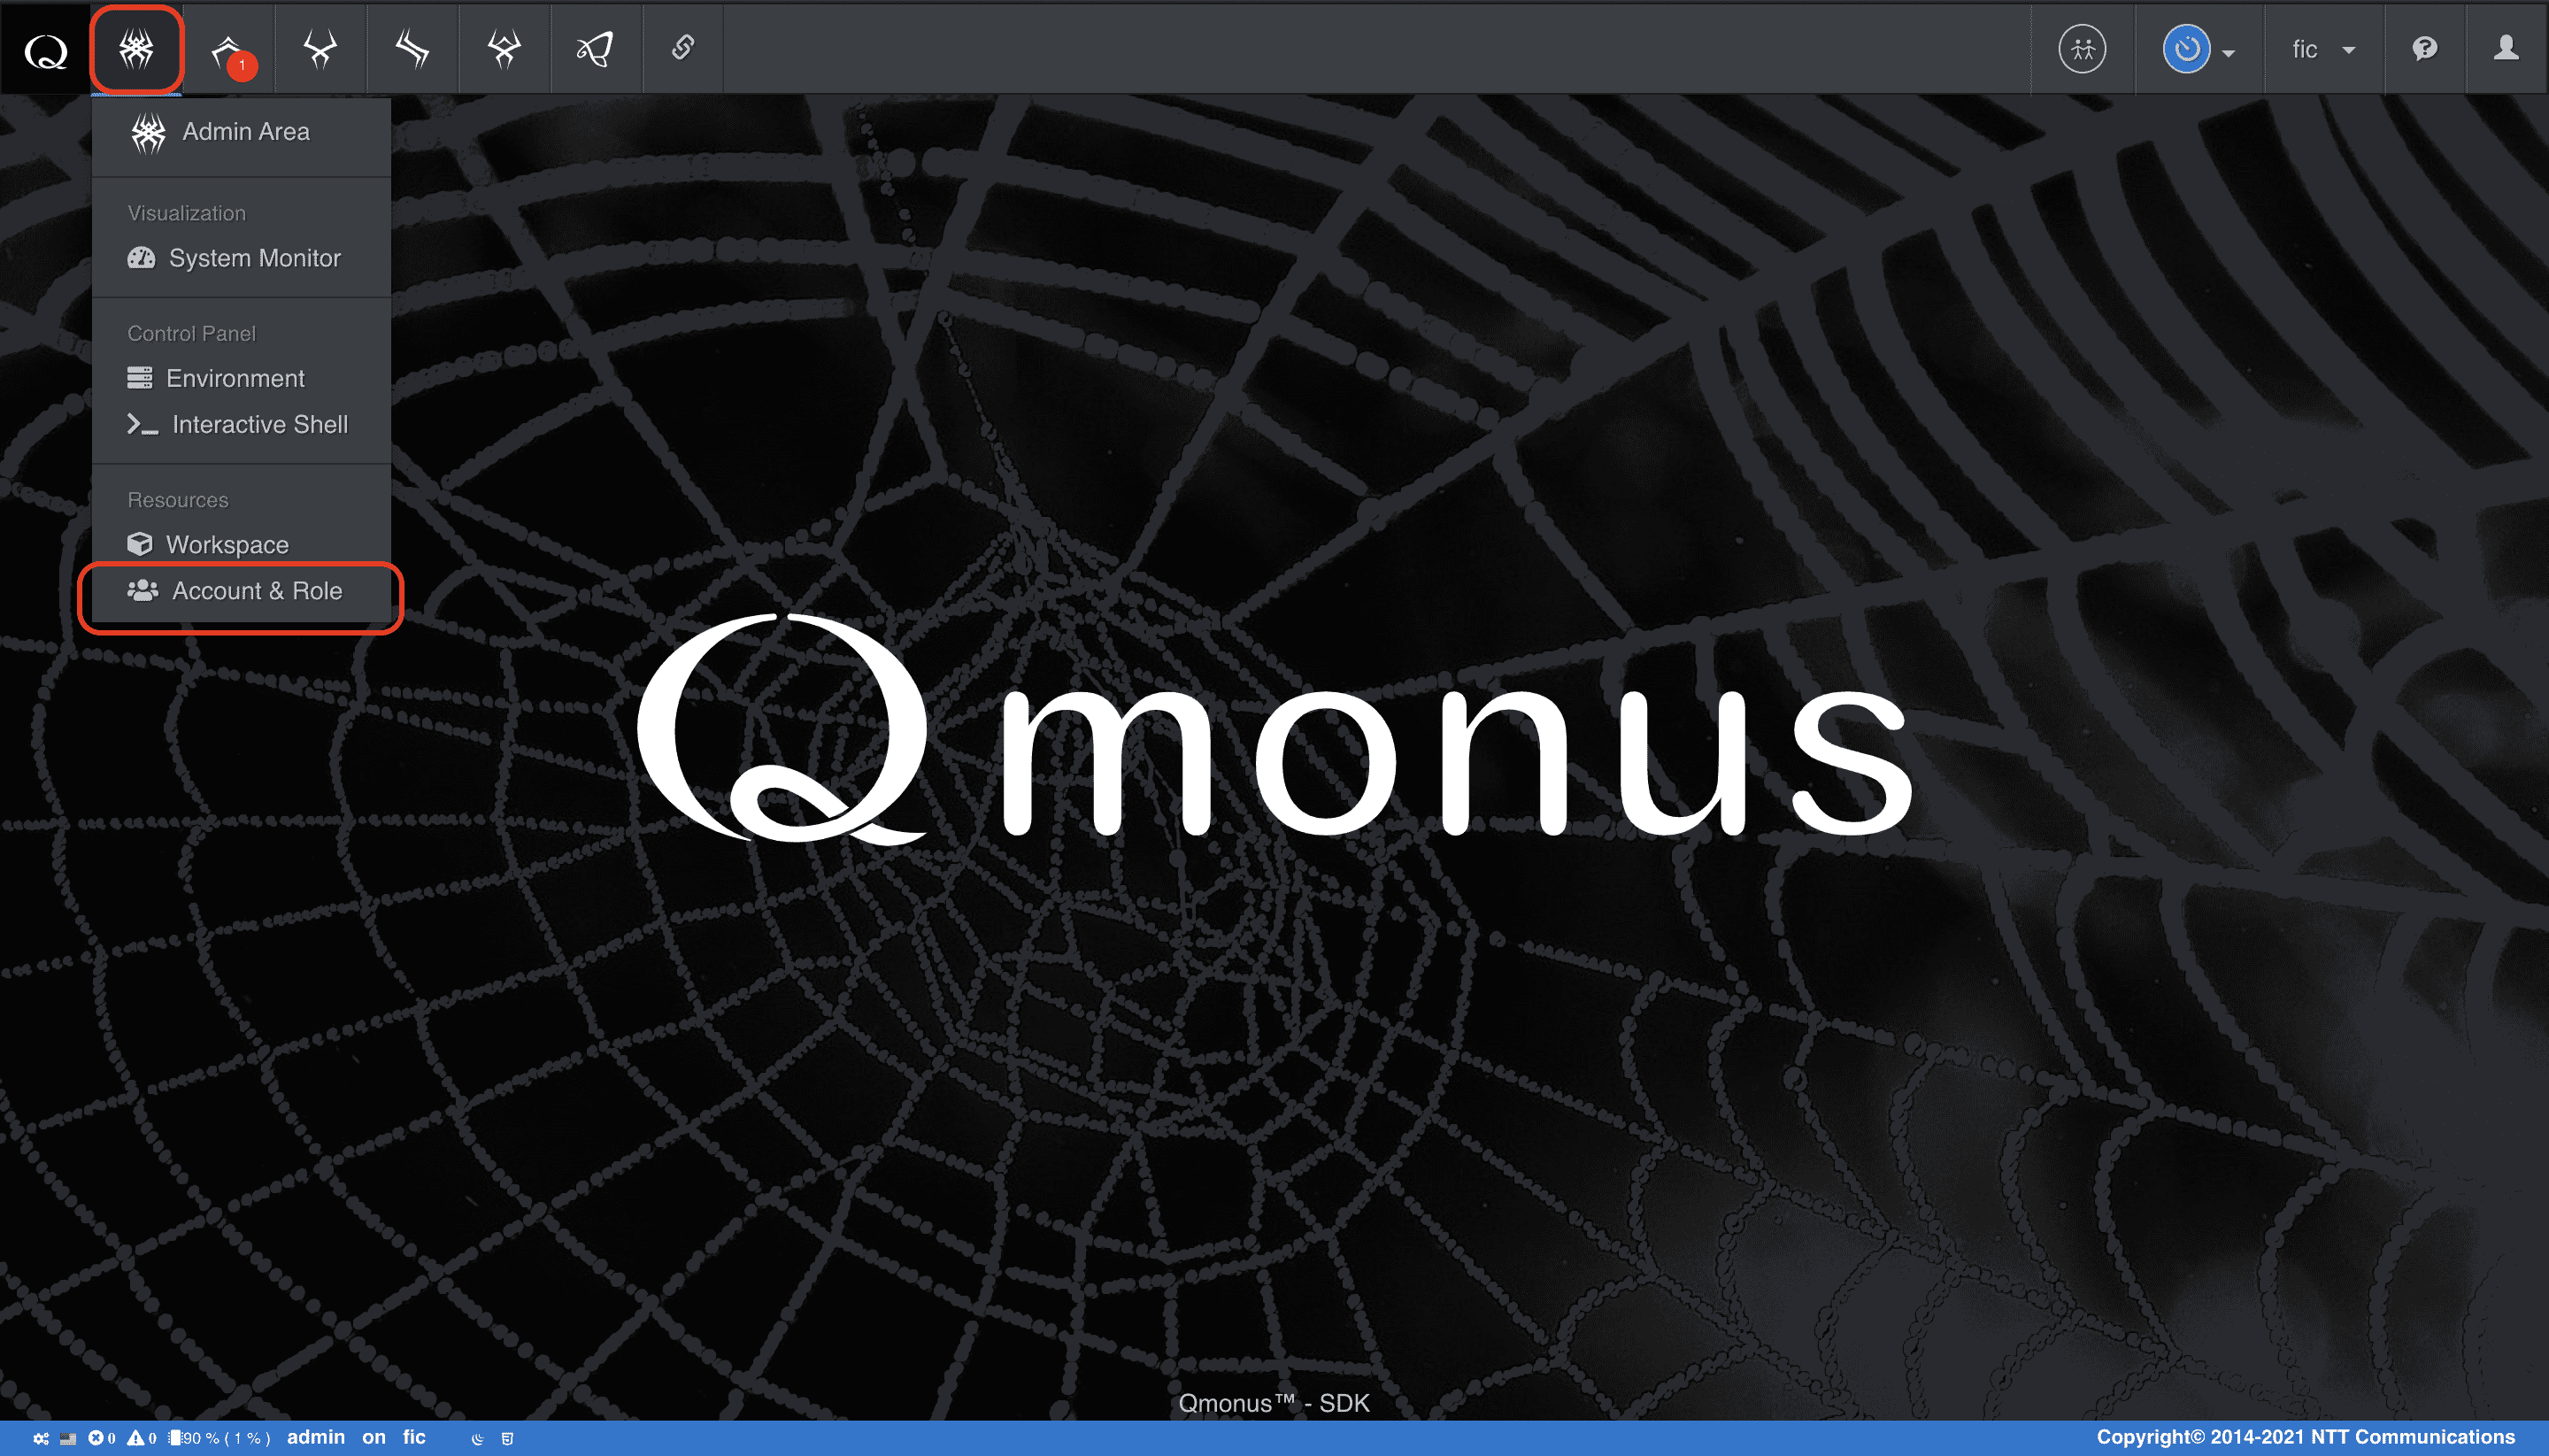
-
左のメニューバーから [Qmonus Role] > ロールメニュー [Create New Role] を選択
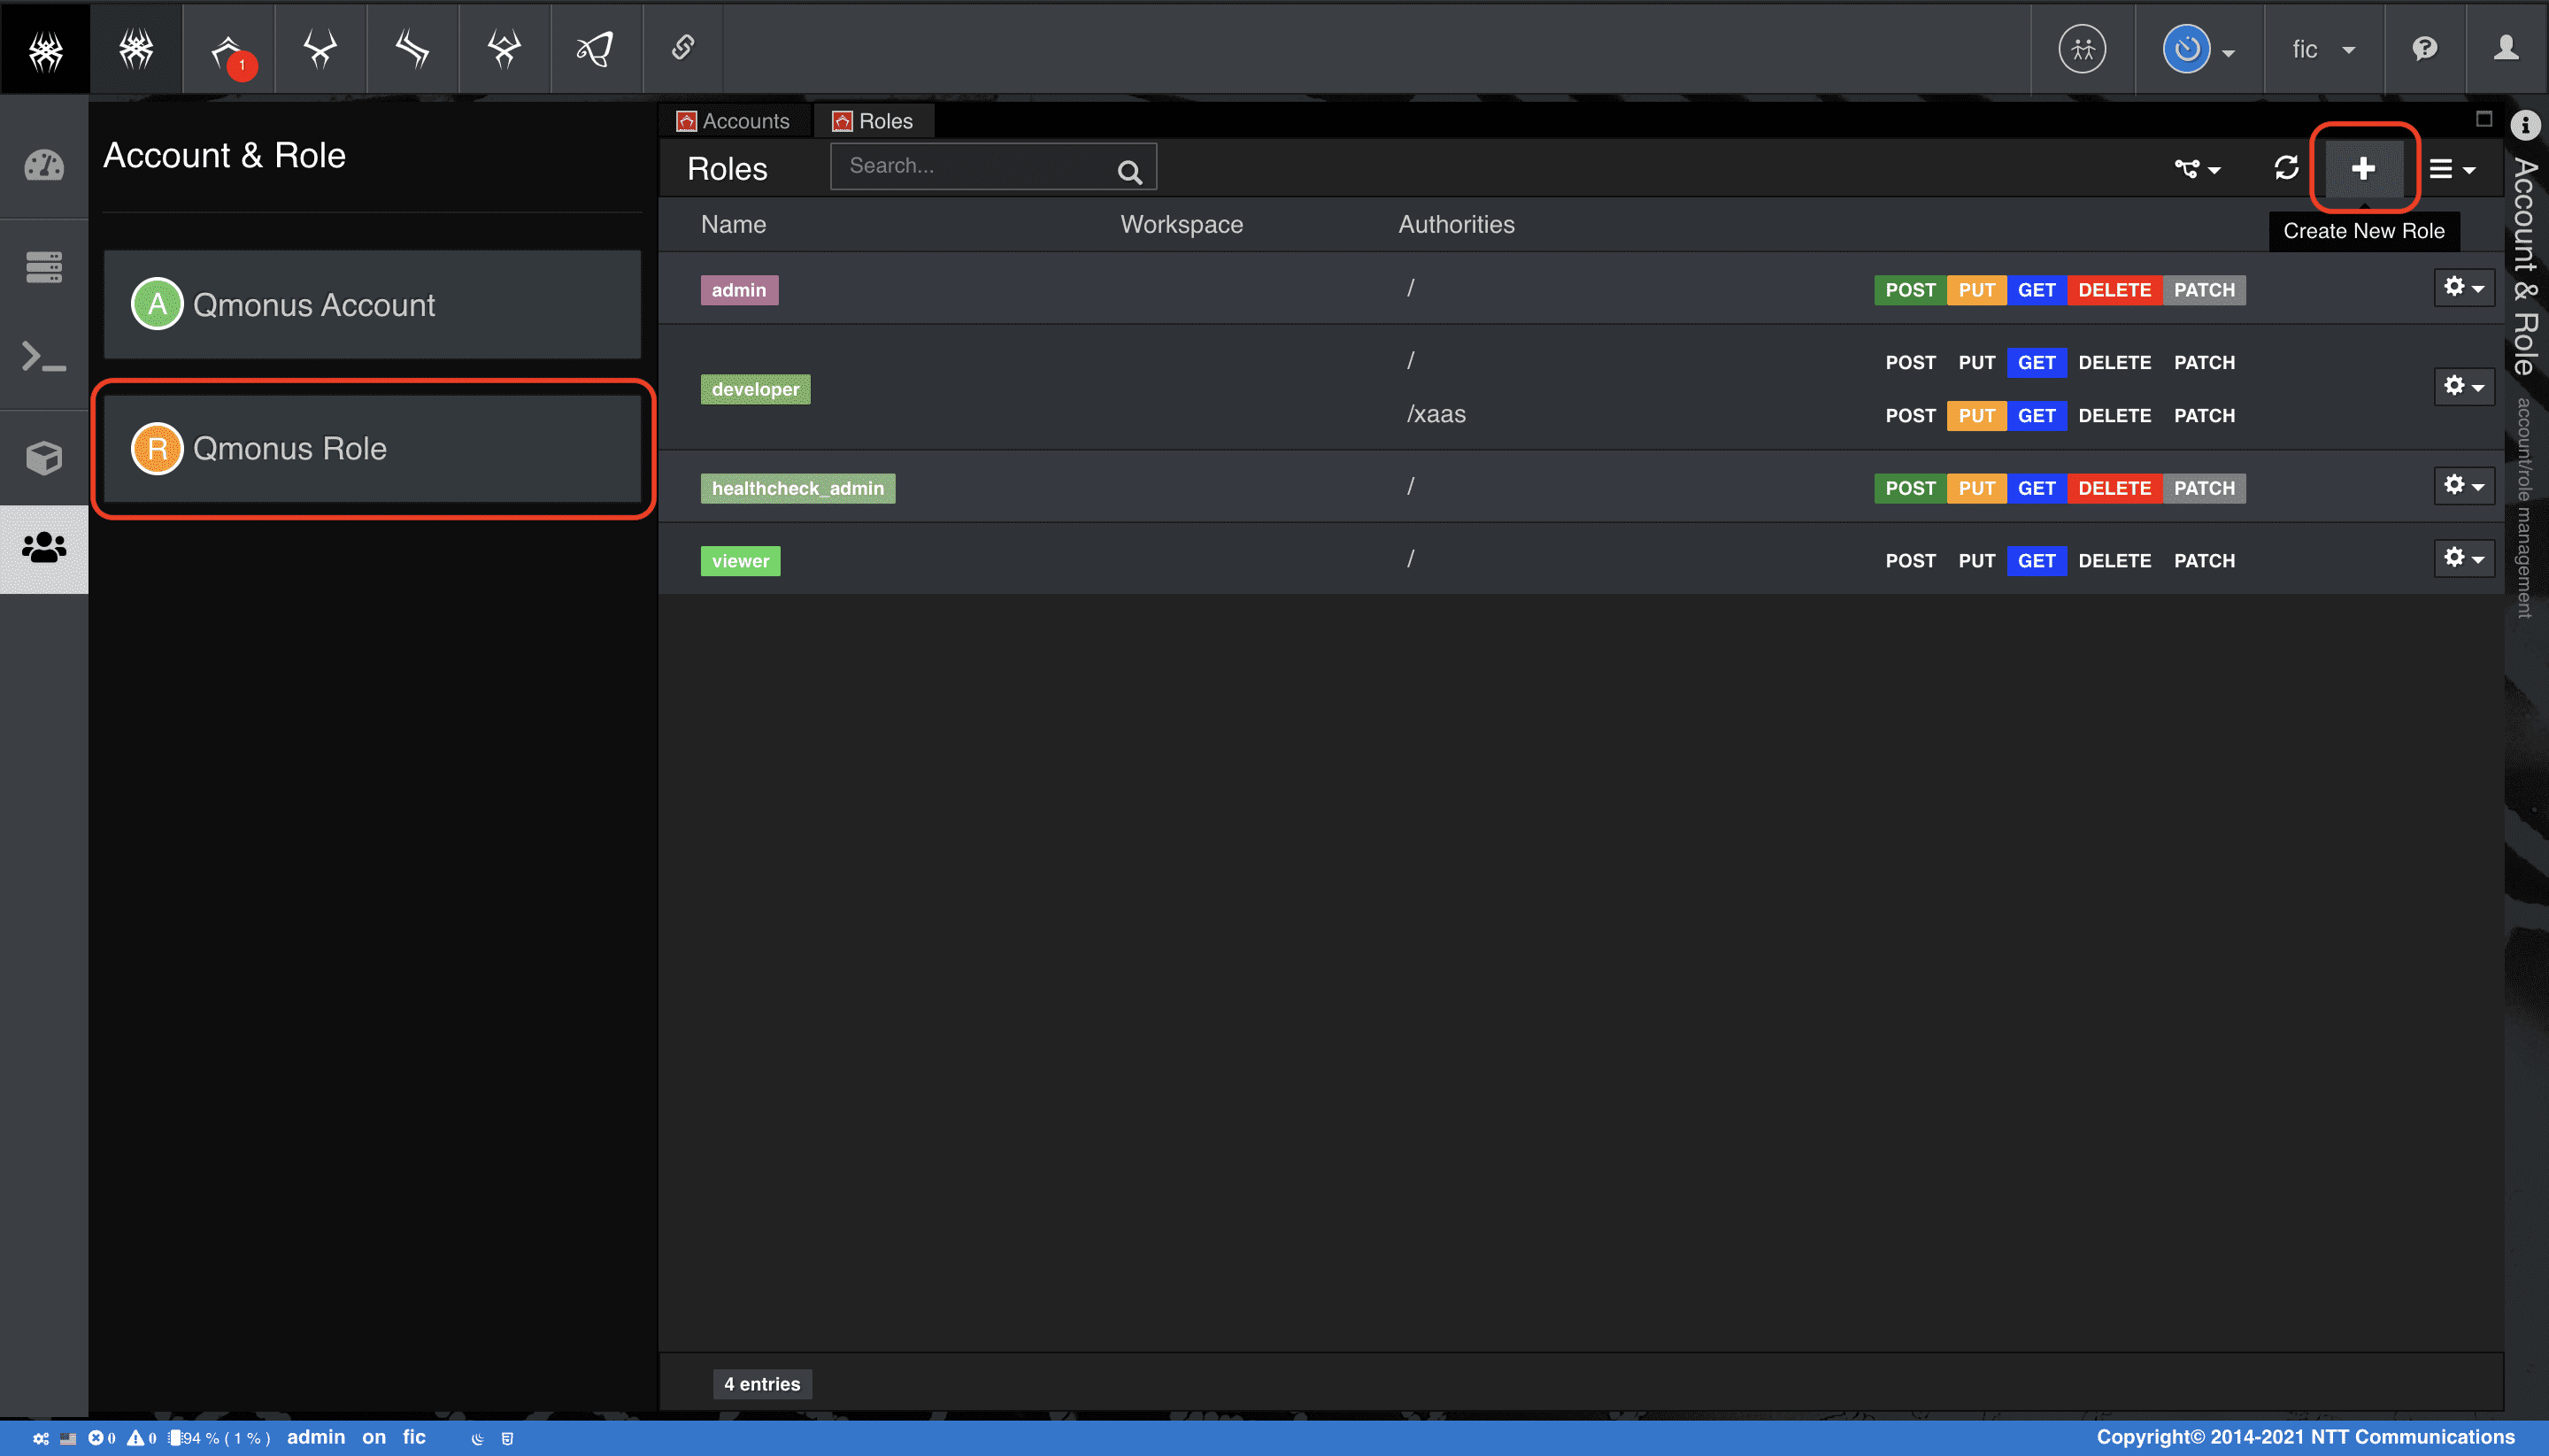
-
新規作成画面で [name] に
example、[Authorities] > [regex] に/config*、[methods] でGETを選択後、[Create Role] を選択
アカウントを作成する
定義したロールを指定して、アカウントを作成しましょう。
1つのアカウントにつき、複数のロールを指定することも可能です。
-
左のメニューバーから [Qmonus Account] > ロールメニュー [Create New Account] を選択
-
新規作成画面で [username] に
exampleUser、[password] にチェックを入れてexample1234、[role] でexampleを選択後、[Create Account] を選択
本章の手順で登場したusername、password、API鍵で認証・認可を行うことで、開発されたAPIを利用することができるようになります。
認証・認可の詳細については、Qmonus SDK Programming Guide » API Gateway » 認証・認可を確認してください。
作成したアカウントでQmonus SDKに再ログインし、指定したroleで操作ができるか、確認してみましょう。
-
exampleUser/example1234ユーザでQmonus SDKに再ログイン
-
メインメニューから [Workflow Scenario as a Service] > [Config] を選択
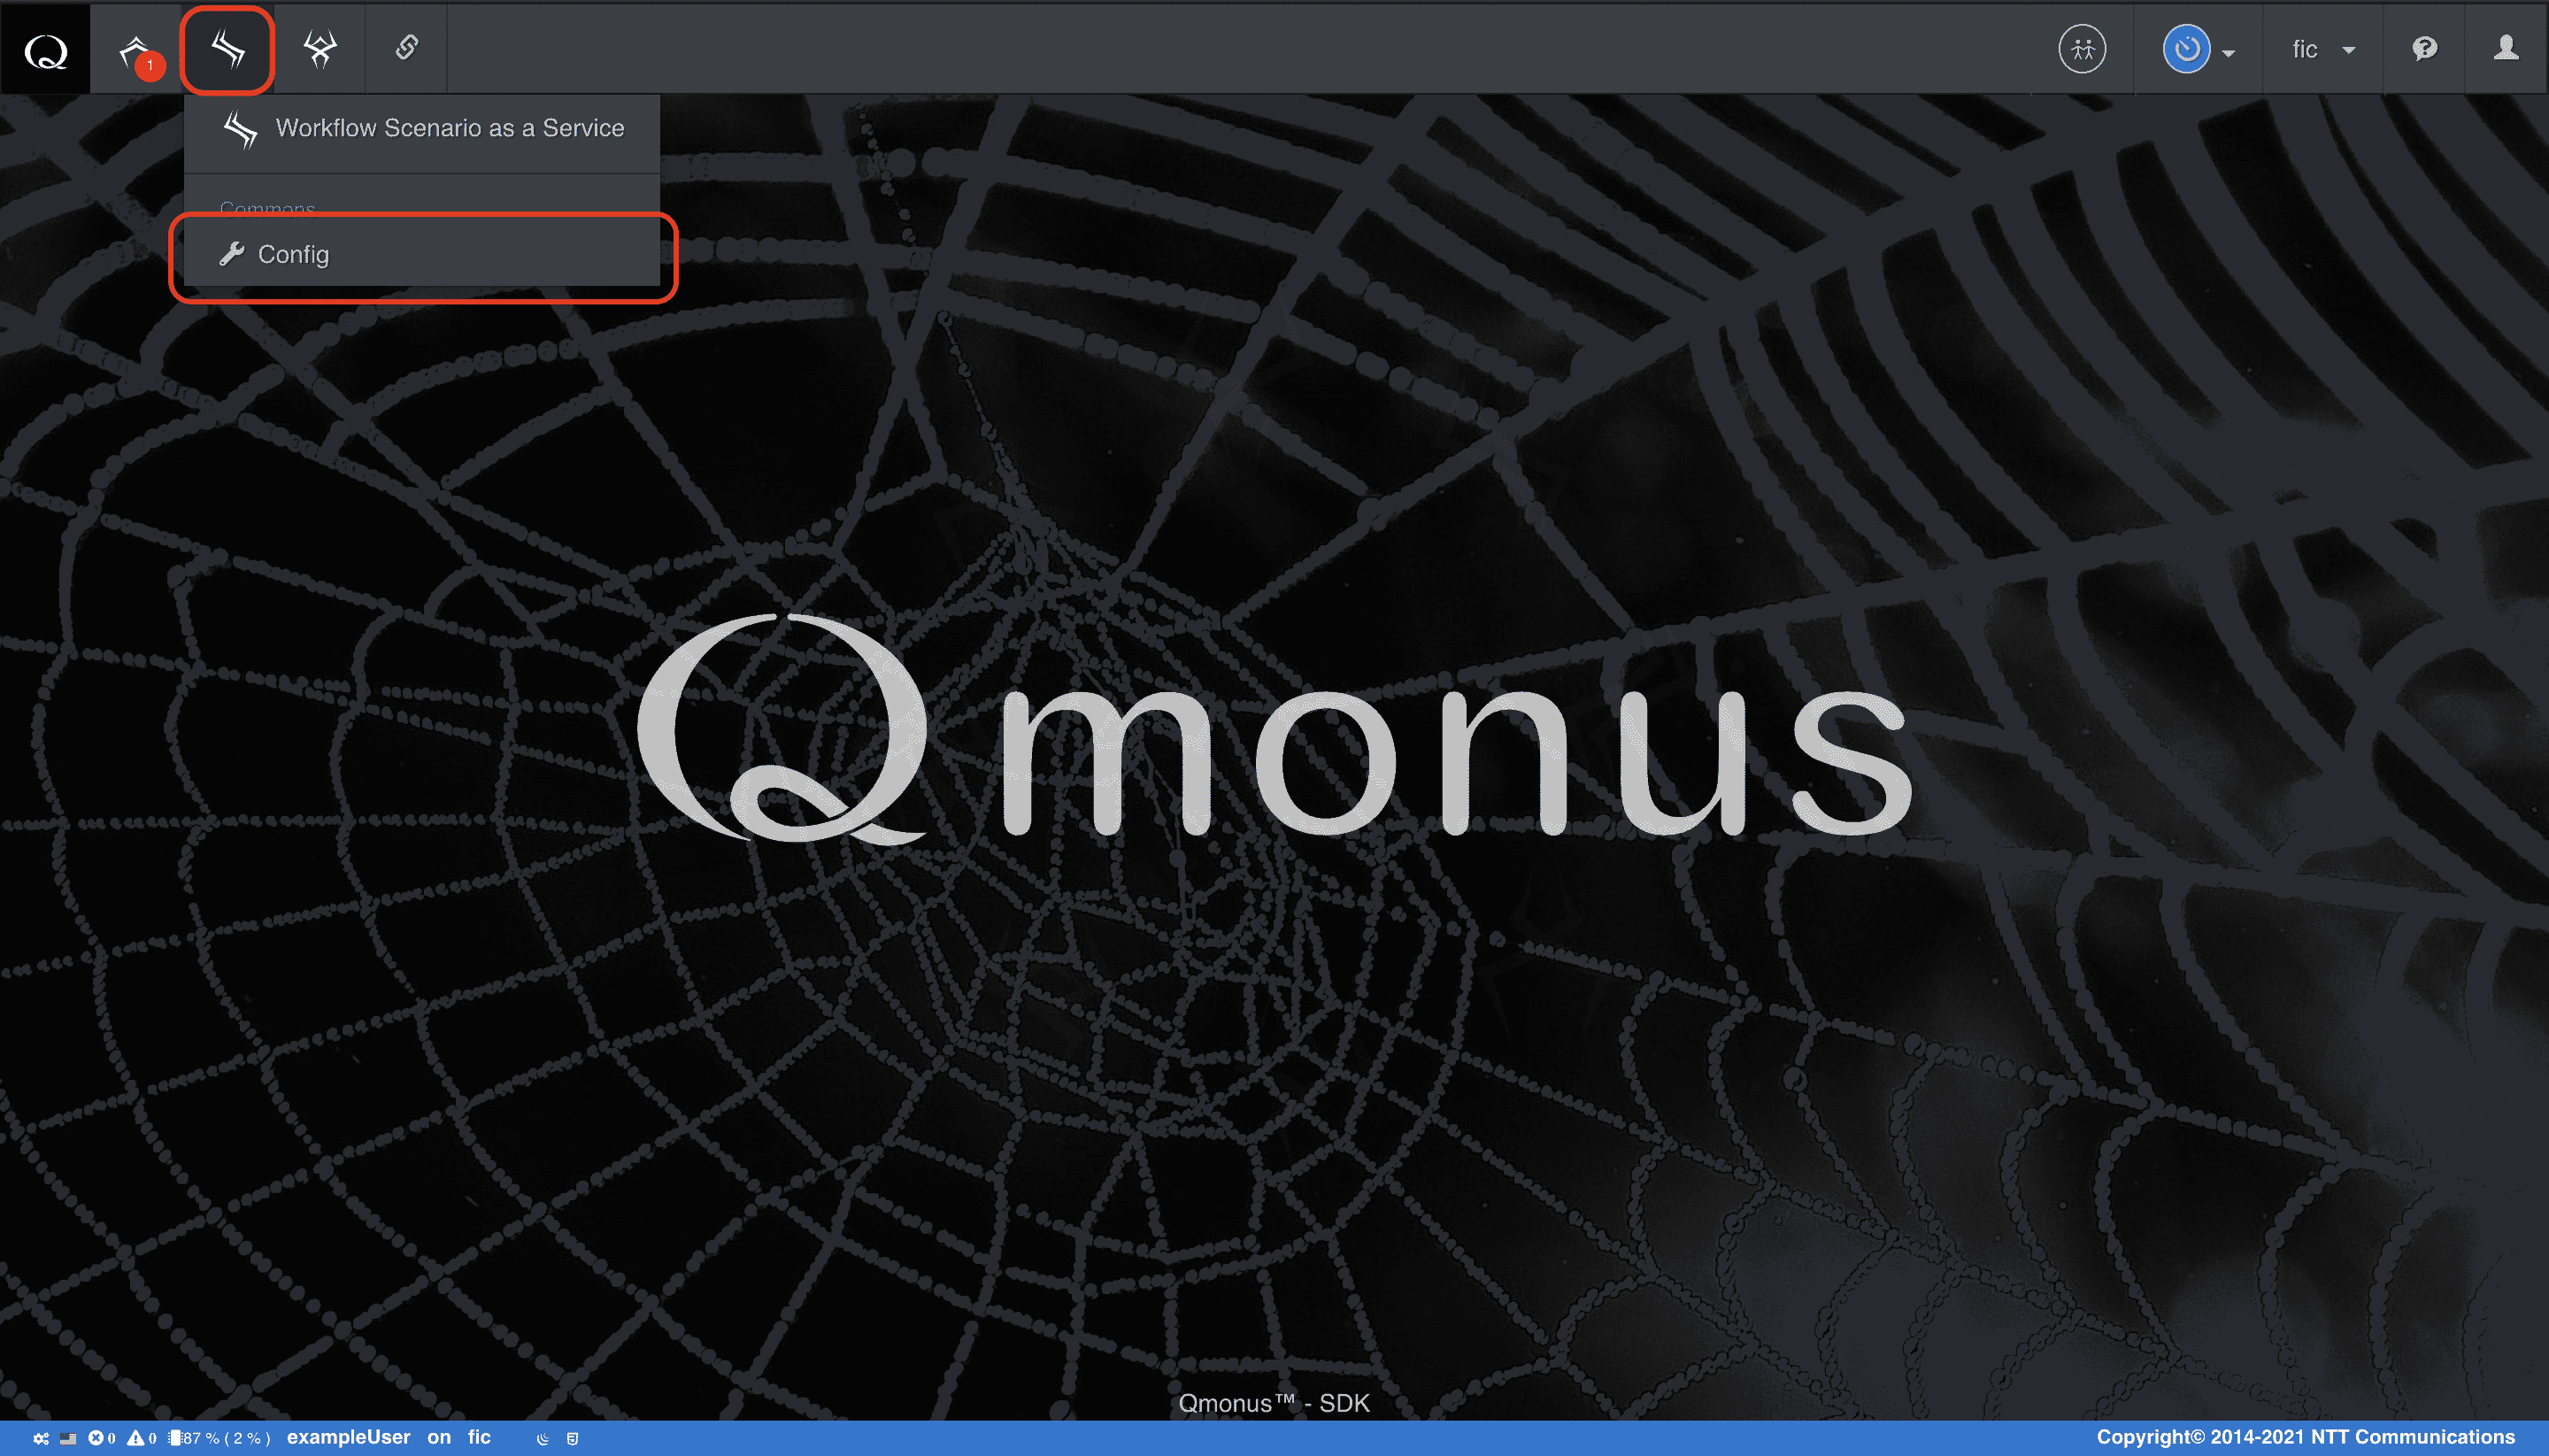
-
Configを編集して
Save Configを選択
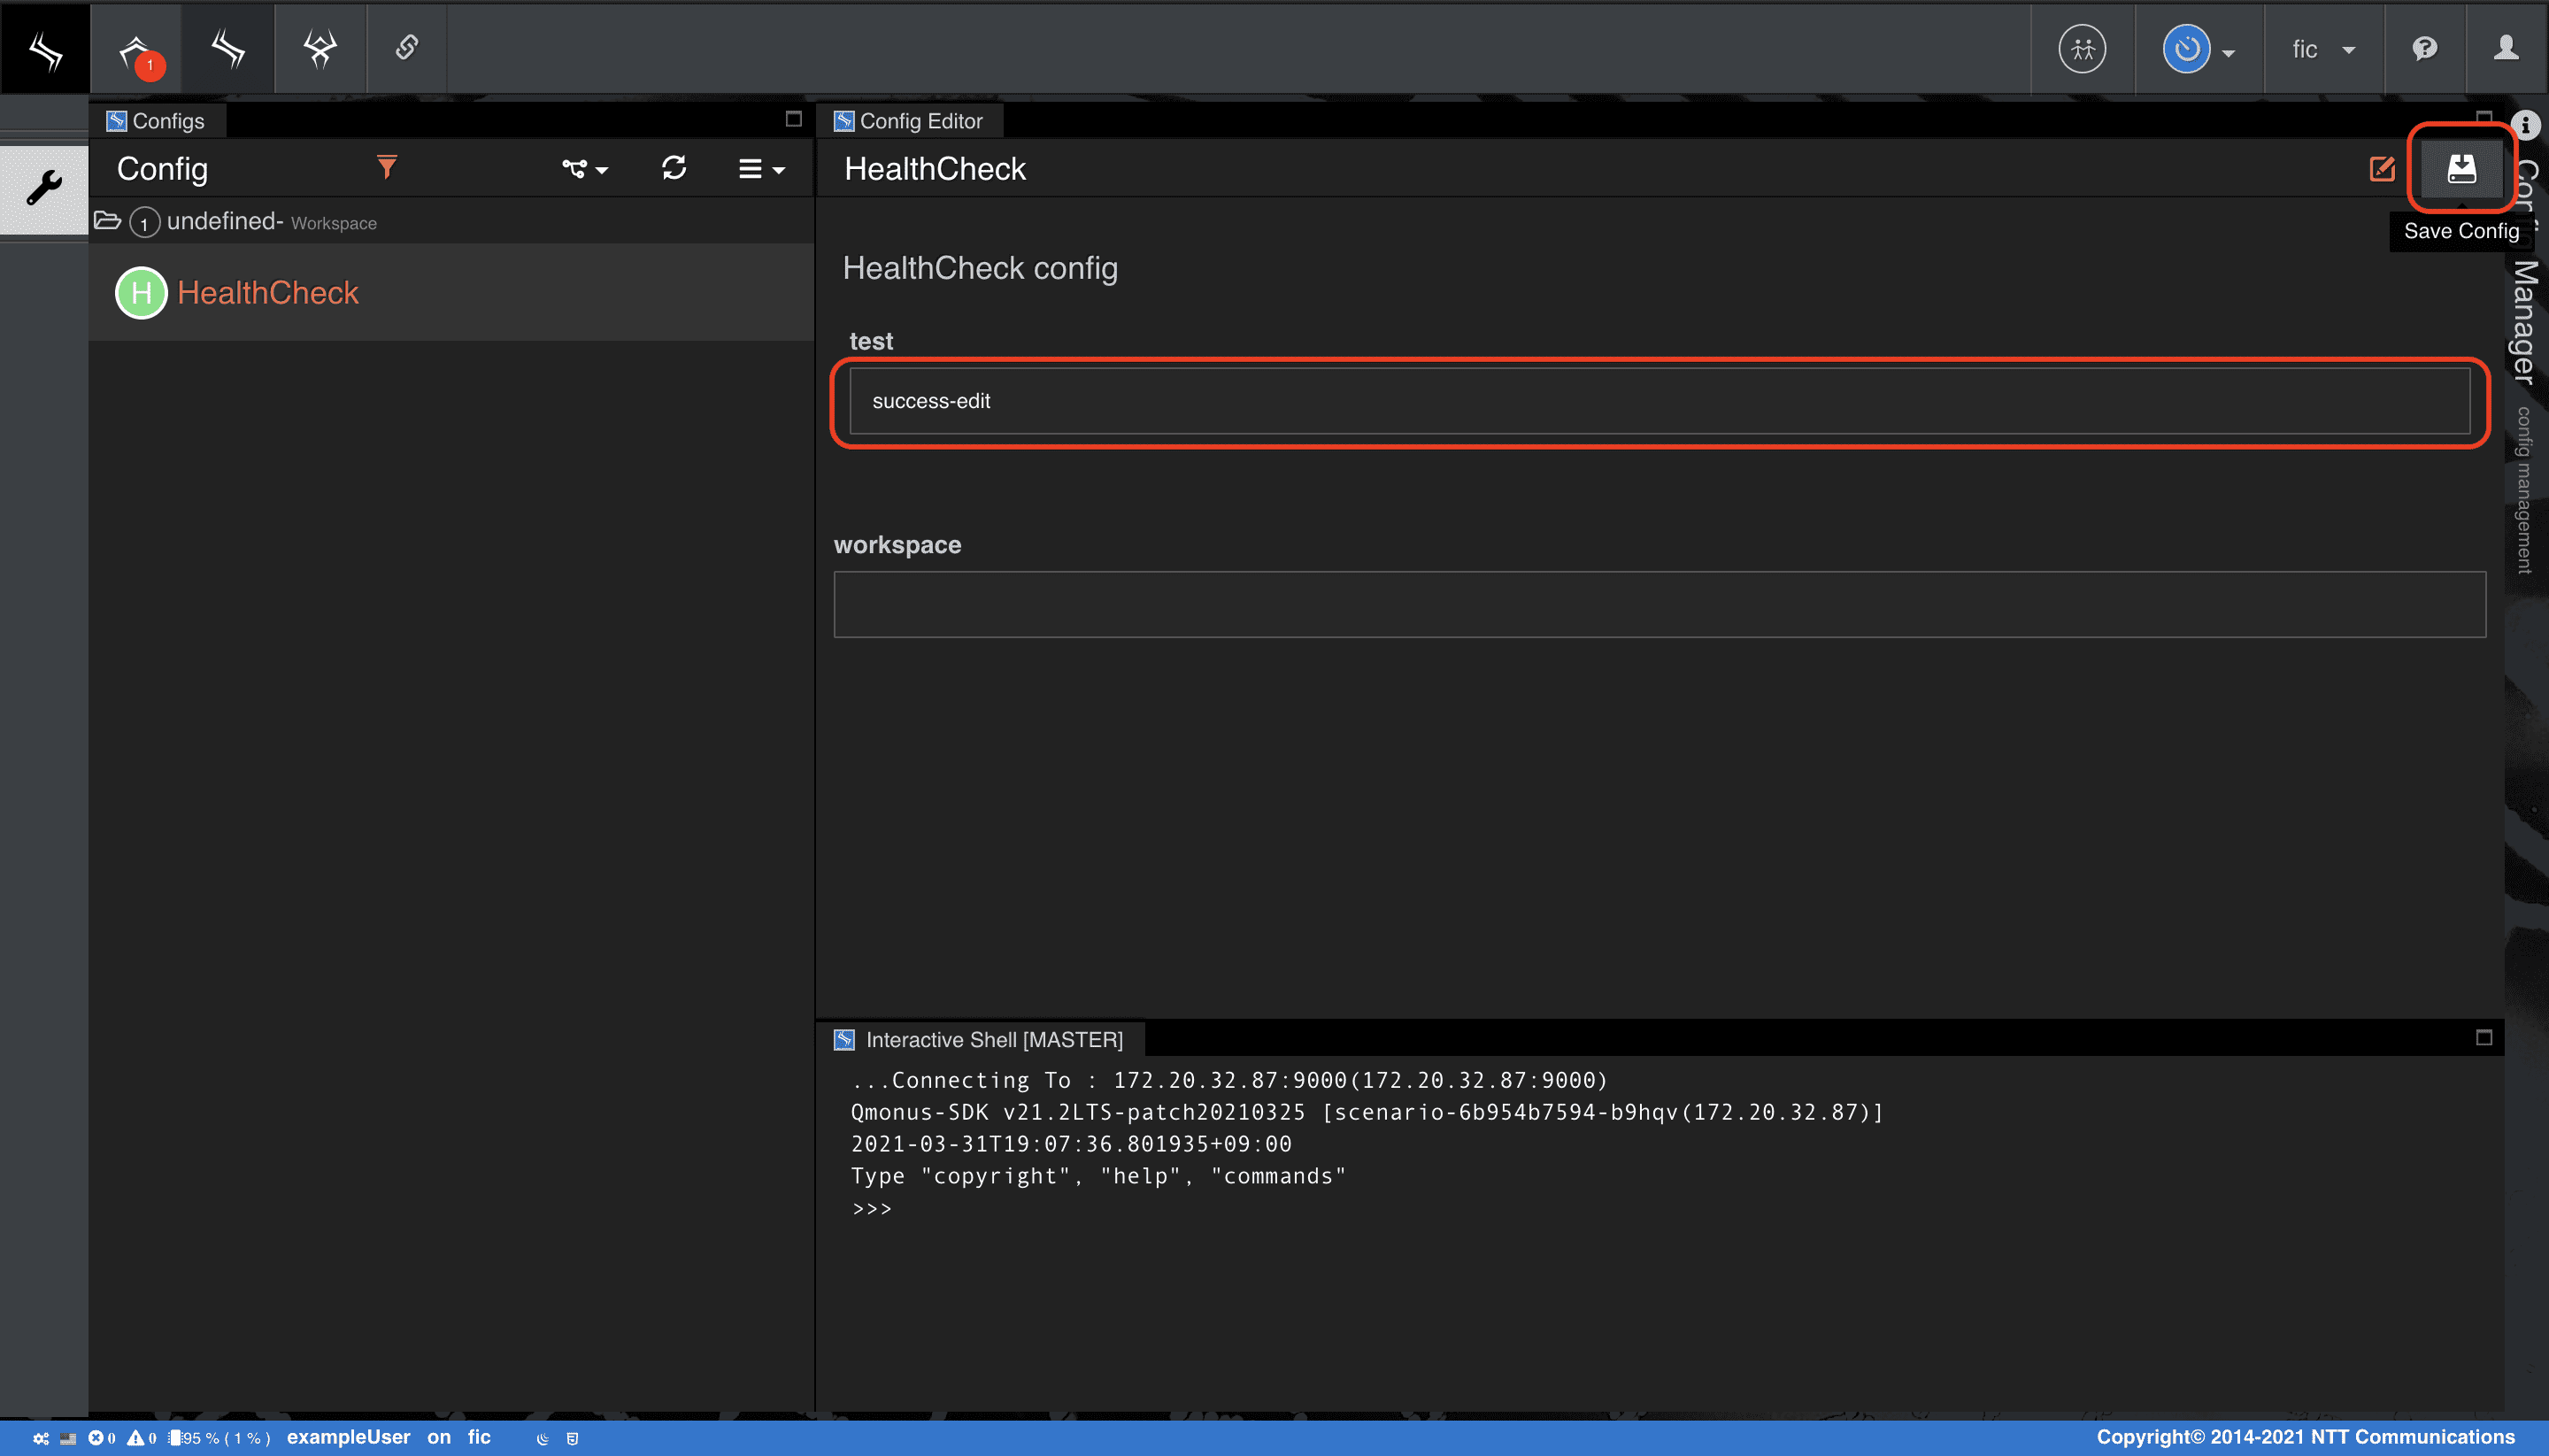
-
権限エラーが出ることを確認
GET /config*操作のみを許容しているため、変更を保存する際に401エラーになることが確認できます。