Dashboard チュートリアル
0. はじめに
本チュートリアルでは、手順に沿って Dashboard を作成することで Dashboard のイメージを掴み、作成ツールである Dashboard Builder の利用方法を習得することを目的としています。
ここでは、API開発チュートリアル「Simple CRUD - シナリオ編」で作成したEmploymentの一連のAPIを操作する Dashboard を作成してみましょう。
削除対象
「Simple CRUD - ATOM編」で作成した以下のクラスが残っている場合は削除してください。
- Class「Employment」
導入対象
「Simple CRUD - シナリオ編」で作成した以下のカウンタ、モデル、シナリオを導入してください。
- Counter「entryNumber」
- Model「Employment」
- Scenario「createEmployment」
- Scenario「updateEmployment」
- Scenario「getEmployment」
- Scenario「deleteEmployment」
counter_entryNumber.yml ダウンロード
yaml
- counter_name: entryNumber
  counter_type: number
  counter_format: E$
  counter_script: null
  max_num: 9999
  min_num: 1
  padding: true
  __FILE__: entryNumber.yml
  version: 1
  update: '2024-03-28T15:30:30.173123+09:00'
  current: 11
model_Employment.yml ダウンロード
yaml
category: Tutorial
scenario_auto_generation_mode: false
model:
  name: Employment
  schema:
    type: object
    properties:
      entryNumber:
        type: string
      firstName:
        type: string
      lastName:
        type: string
      email:
        type: string
      salaryRequirements:
        type: integer
    required:
      - entryNumber
      - firstName
      - lastName
      - email
  constraints:
    primary_key: entryNumber
    unique_keys:
        - email
scenarios_crudEmployment.yml ダウンロード
yaml
- category: Tutorial
  name: createEmployment
  uri: /tutorials/employments
  method: POST
  routing_auto_generation_mode: true
  spec:
    response:
      normal:
        codes:
          - 200
    request:
      headers:
        type: object
        properties:
          Content-Type:
            type: string
            default: application/json
        required:
          - Content-Type
      body:
        type: object
        properties:
          firstName:
            type: string
            pattern: '[a-zA-Z]'
          lastName:
            type: string
            pattern: '[a-zA-Z]'
          email:
            type: string
            format: email
          salaryRequirements:
            type: integer
            minimum: 0
            maximum: 99999999
        required:
          - firstName
          - lastName
          - email
          - salaryRequirements
  commands:
    - command: script
      kwargs:
        code: |
          entryNumber = await allocate_counter("entryNumber")
          async with model.aiodb() as conn:
              cursor = await conn.execute(model.Employment.select().where(model.Employment.c.email==context.request.body.email))
              if cursor.rowcount != 0:
                  raise Error(400, reason="E-mail address is already registered")

              await conn.execute(model.Employment.insert().values(entryNumber=entryNumber,
                                                                  firstName=context.request.body.firstName,
                                                                  lastName=context.request.body.lastName,
                                                                  email=context.request.body.email,
                                                                  salaryRequirements=context.request.body.salaryRequirements))
          context.session.finish({"entryNumber": entryNumber})
      id: 1d72118eeda711ee94911a1cf3b6076c
  request_timeout: 60
  connect_timeout: 60
  global_variables: {}
  variable_groups: []
  version: 2
  update: '2024-03-29T17:38:29.411178+09:00'
- category: Tutorial
  name: updateEmployment
  uri: /tutorials/employments/{entryNumber}
  method: PUT
  routing_auto_generation_mode: true
  request_timeout: 60
  connect_timeout: 60
  spec:
    response:
      normal:
        codes:
          - 200
    request:
      headers:
        type: object
        properties:
          Content-Type:
            type: string
            default: application/json
        required:
          - Content-Type
      body:
        type: object
        properties:
          firstName:
            type: string
            pattern: '[a-zA-Z]'
          lastName:
            type: string
            pattern: '[a-zA-Z]'
          email:
            type: string
            format: email
          salaryRequirements:
            type: integer
            minimum: 0
            maximum: 99999999
      resources:
        type: object
        properties:
          entryNumber:
            type: string
        required:
          - entryNumber
  commands:
    - command: script
      kwargs:
        code: |
          async with model.aiodb() as conn:
              if not context.request.resources.entryNumber:
                  raise Error(400, reason="entryNumber is not specified")

              cursor = await conn.execute(model.Employment.select().where(model.Employment.c.entryNumber==context.request.resources.entryNumber))
              if cursor.rowcount == 0:
                  raise Error(404, reason="Could not found employment")

              row = await cursor.fetchone()
              employment = rowtodict(row)
              employment.update(context.request.body.dictionary)
              await conn.execute(model.Employment.update().where(model.Employment.c.entryNumber==context.request.resources.entryNumber).values(**employment))
              context.session.finish({"entryNumber": context.request.resources.entryNumber})
      id: 3d3ae216eda711ee94911a1cf3b6076c
  global_variables: {}
  variable_groups: []
  version: 1
  update: '2024-03-29T17:35:03.765559+09:00'
- category: Tutorial
  name: getEmployment
  uri: /tutorials/employments
  additional_paths:
    - /tutorials/employments/{entryNumber}
  method: GET
  routing_auto_generation_mode: true
  spec:
    response:
      normal:
        codes:
          - 200
    request:
      params:
        type: object
        properties:
          entryNumber:
            type: array
            items:
              type: string
          firstName:
            type: array
            items:
              type: string
              pattern: '[a-zA-Z]'
          lastName:
            type: array
            items:
              type: string
              pattern: '[a-zA-Z]'
          email:
            type: array
            items:
              type: string
              format: email
          salaryRequirements:
            type: array
            items:
              type: integer
              minimum: 0
              maximum: 99999999
      resources:
        type: object
        properties:
          entryNumber:
            type: string
  commands:
    - command: script
      kwargs:
        code: |
          async with model.aiodb() as conn:
              if context.request.resources.entryNumber:
                  cursor = await conn.execute(model.Employment.select().where(model.Employment.c.entryNumber==context.request.resources.entryNumber))
                  if cursor.rowcount == 0:
                      raise Error(404, reason="Could not found employment")

                  employment = await cursor.fetchone()
                  context.session.finish(rowtodict(employment))
                  return
              logger.info(context.request.params.dictionary)
              cursor = await conn.execute(model.Employment.select().where(where_statement(model.Employment, context.request.params.dictionary)))
              employments = await cursor.fetchall()
              context.session.finish([rowtodict(employment) for employment in employments])
      id: 357a30aeeda711ee94911a1cf3b6076c
  request_timeout: 60
  connect_timeout: 60
  global_variables: {}
  variable_groups: []
  version: 1
  update: '2024-03-29T17:34:50.758699+09:00'
- category: Tutorial
  name: deleteEmployment
  uri: /tutorials/employments/{entryNumber}
  method: DELETE
  routing_auto_generation_mode: true
  spec:
    response:
      normal:
        codes:
          - 200
    request:
      resources:
        type: object
        properties:
          entryNumber:
            type: string
        required:
          - entryNumber
  commands:
    - command: script
      kwargs:
        code: |
          async with model.aiodb() as conn:
              if not context.request.resources.entryNumber:
                  raise Error(400, reason="entryNumber is not specified")

              cursor = await conn.execute(model.Employment.select().where(model.Employment.c.entryNumber==context.request.resources.entryNumber))
              if cursor.rowcount == 0:
                  raise Error(404, reason="Could not found employment")

              await conn.execute(model.Employment.delete().where(model.Employment.c.entryNumber==context.request.resources.entryNumber))
              context.session.set_status(204)
              context.session.finish()
      id: 4296c02ceda711ee94911a1cf3b6076c
  request_timeout: 60
  connect_timeout: 60
  global_variables: {}
  variable_groups: []
  version: 1
  update: '2024-03-29T17:35:12.756215+09:00'
作成する Dashboard のイメージ
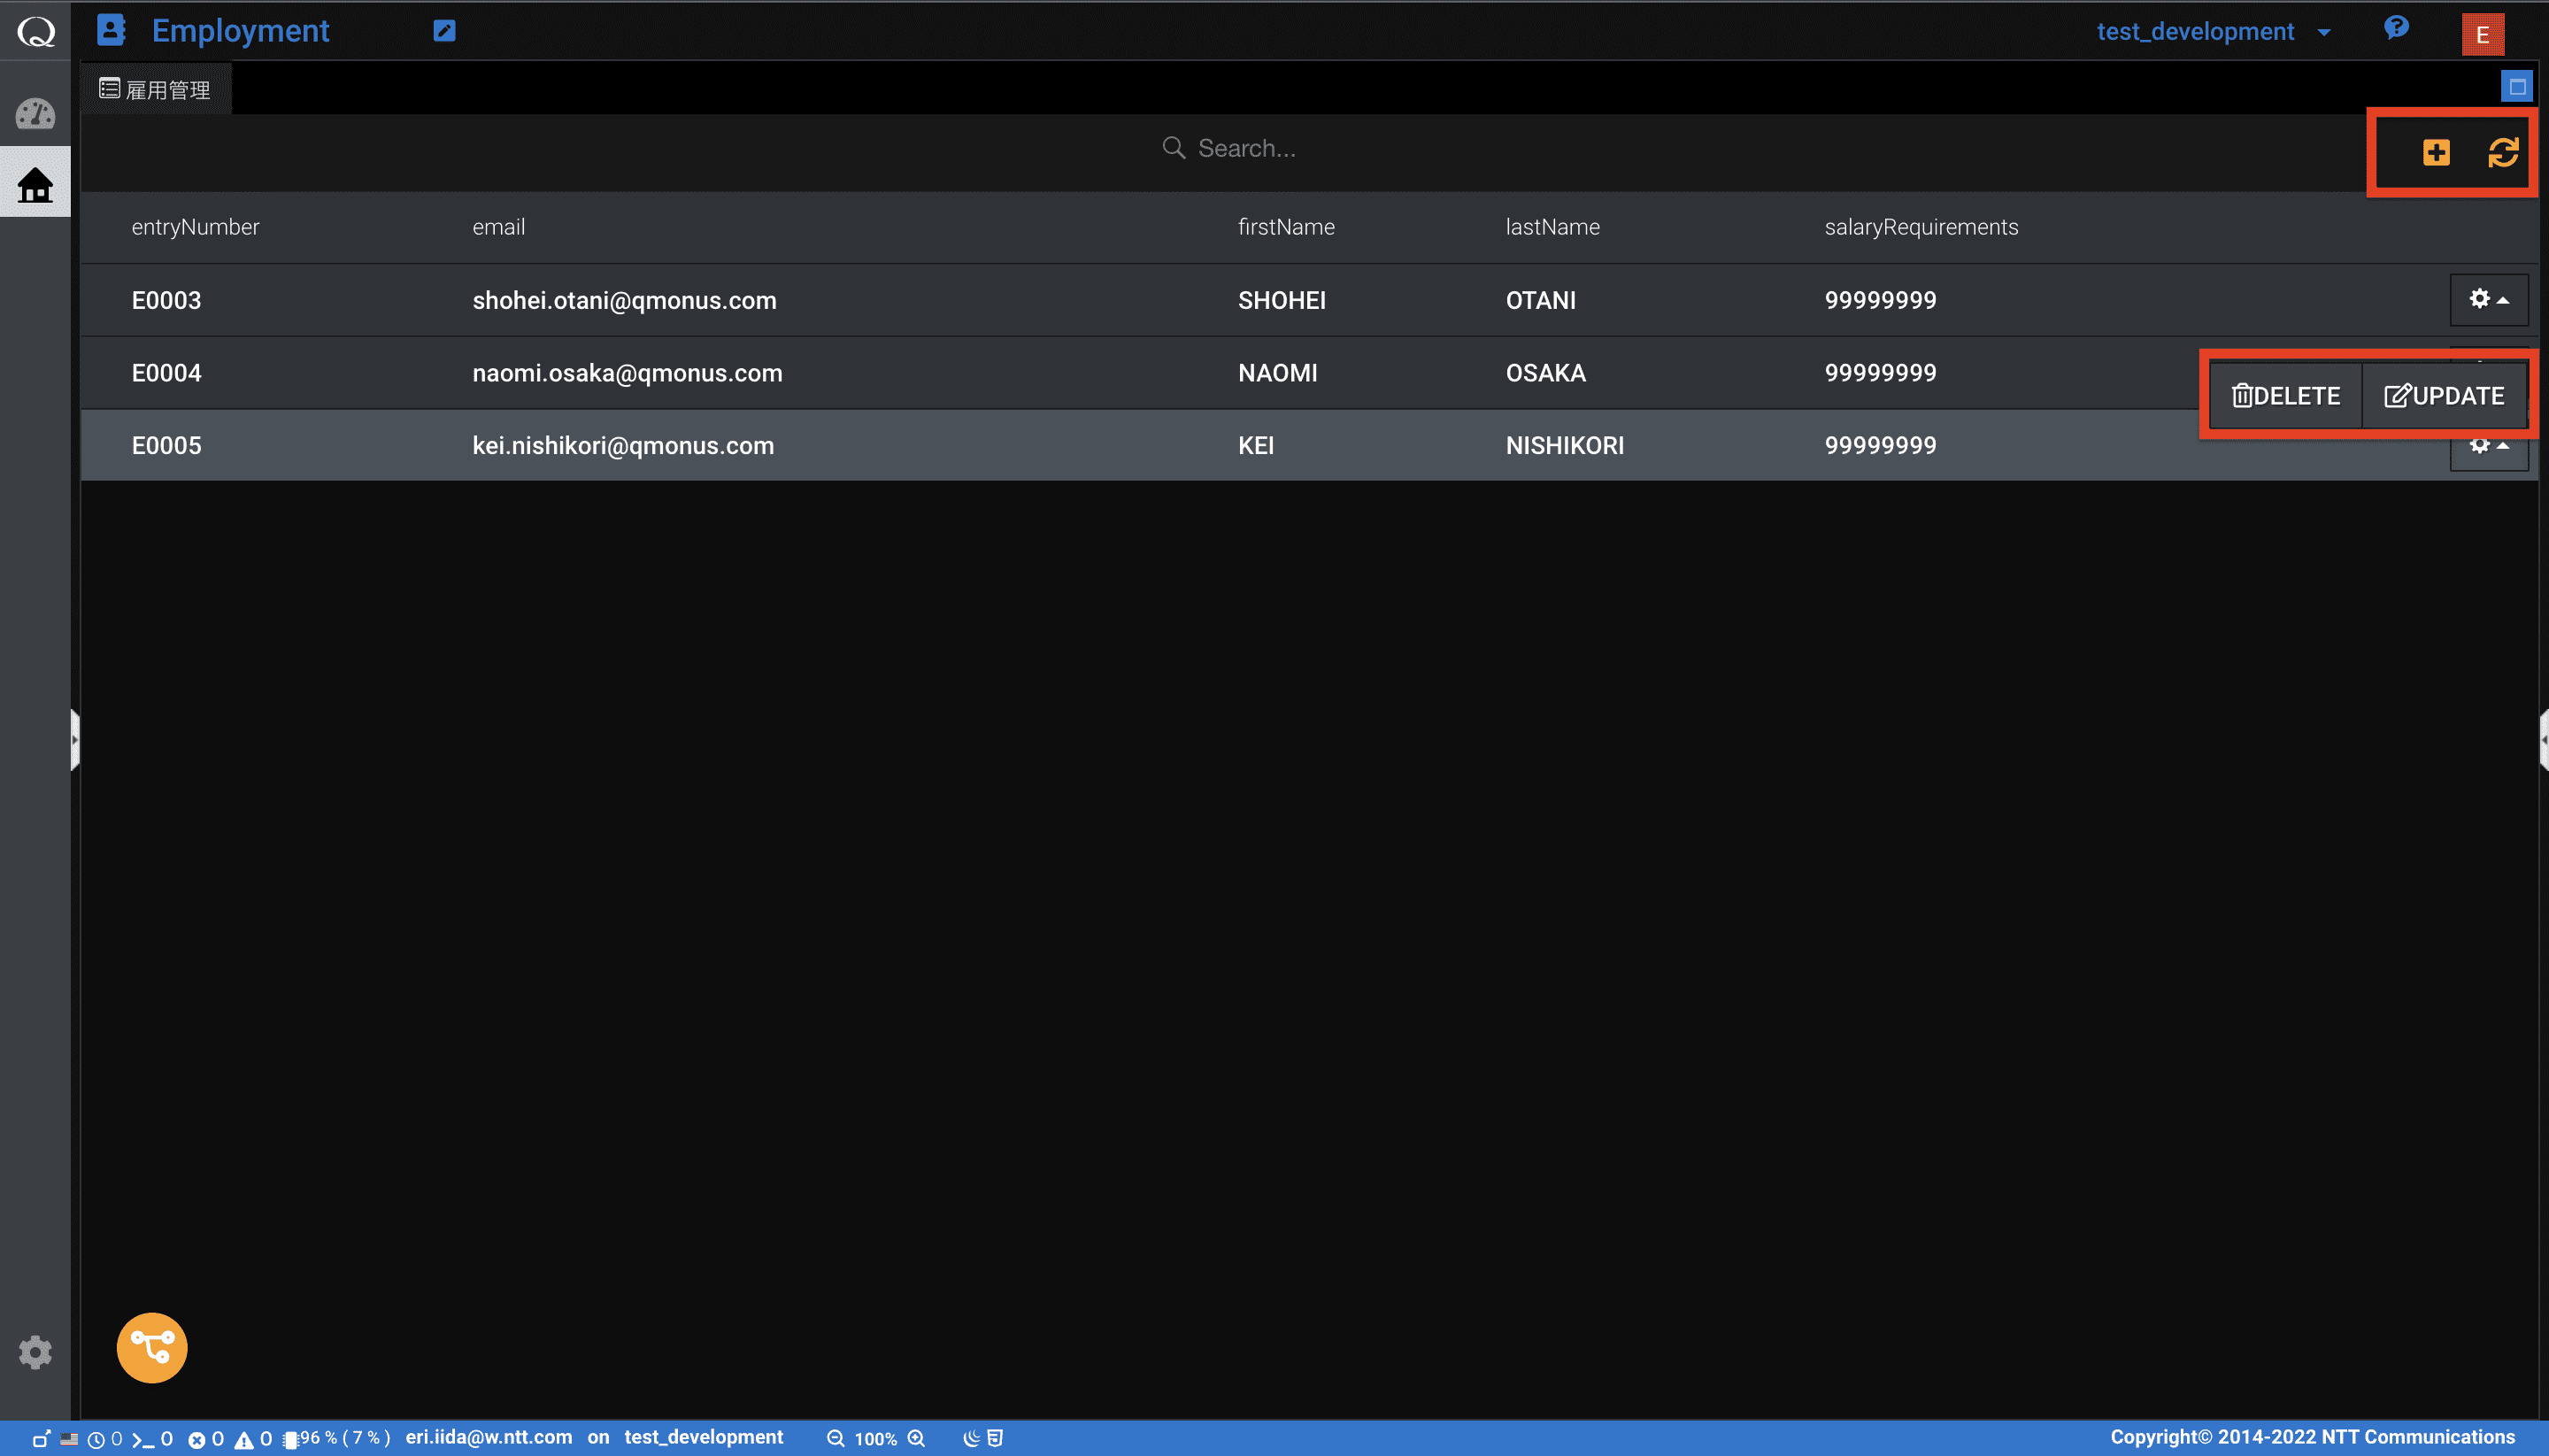
Dashboard イメージ。一覧情報の再読み込み、新規作成、更新、削除機能が備わっている
今回は雇用情報を一覧管理する Dashboard を作成します。Dashboard で作成する機能は以下の通りです。
-
雇用情報の新規登録(新規登録ボタン)
-
各雇用情報の更新(編集ボタン)
-
各雇用情報の削除(削除ボタン)
-
一覧表示の更新(更新ボタン)
-
雇用情報 (employment)
- 姓 (lastName)
- 名 (firstName)
- emailアドレス (email)
- 給与要件 (salaryRequirements)
1. Layout 設定
-
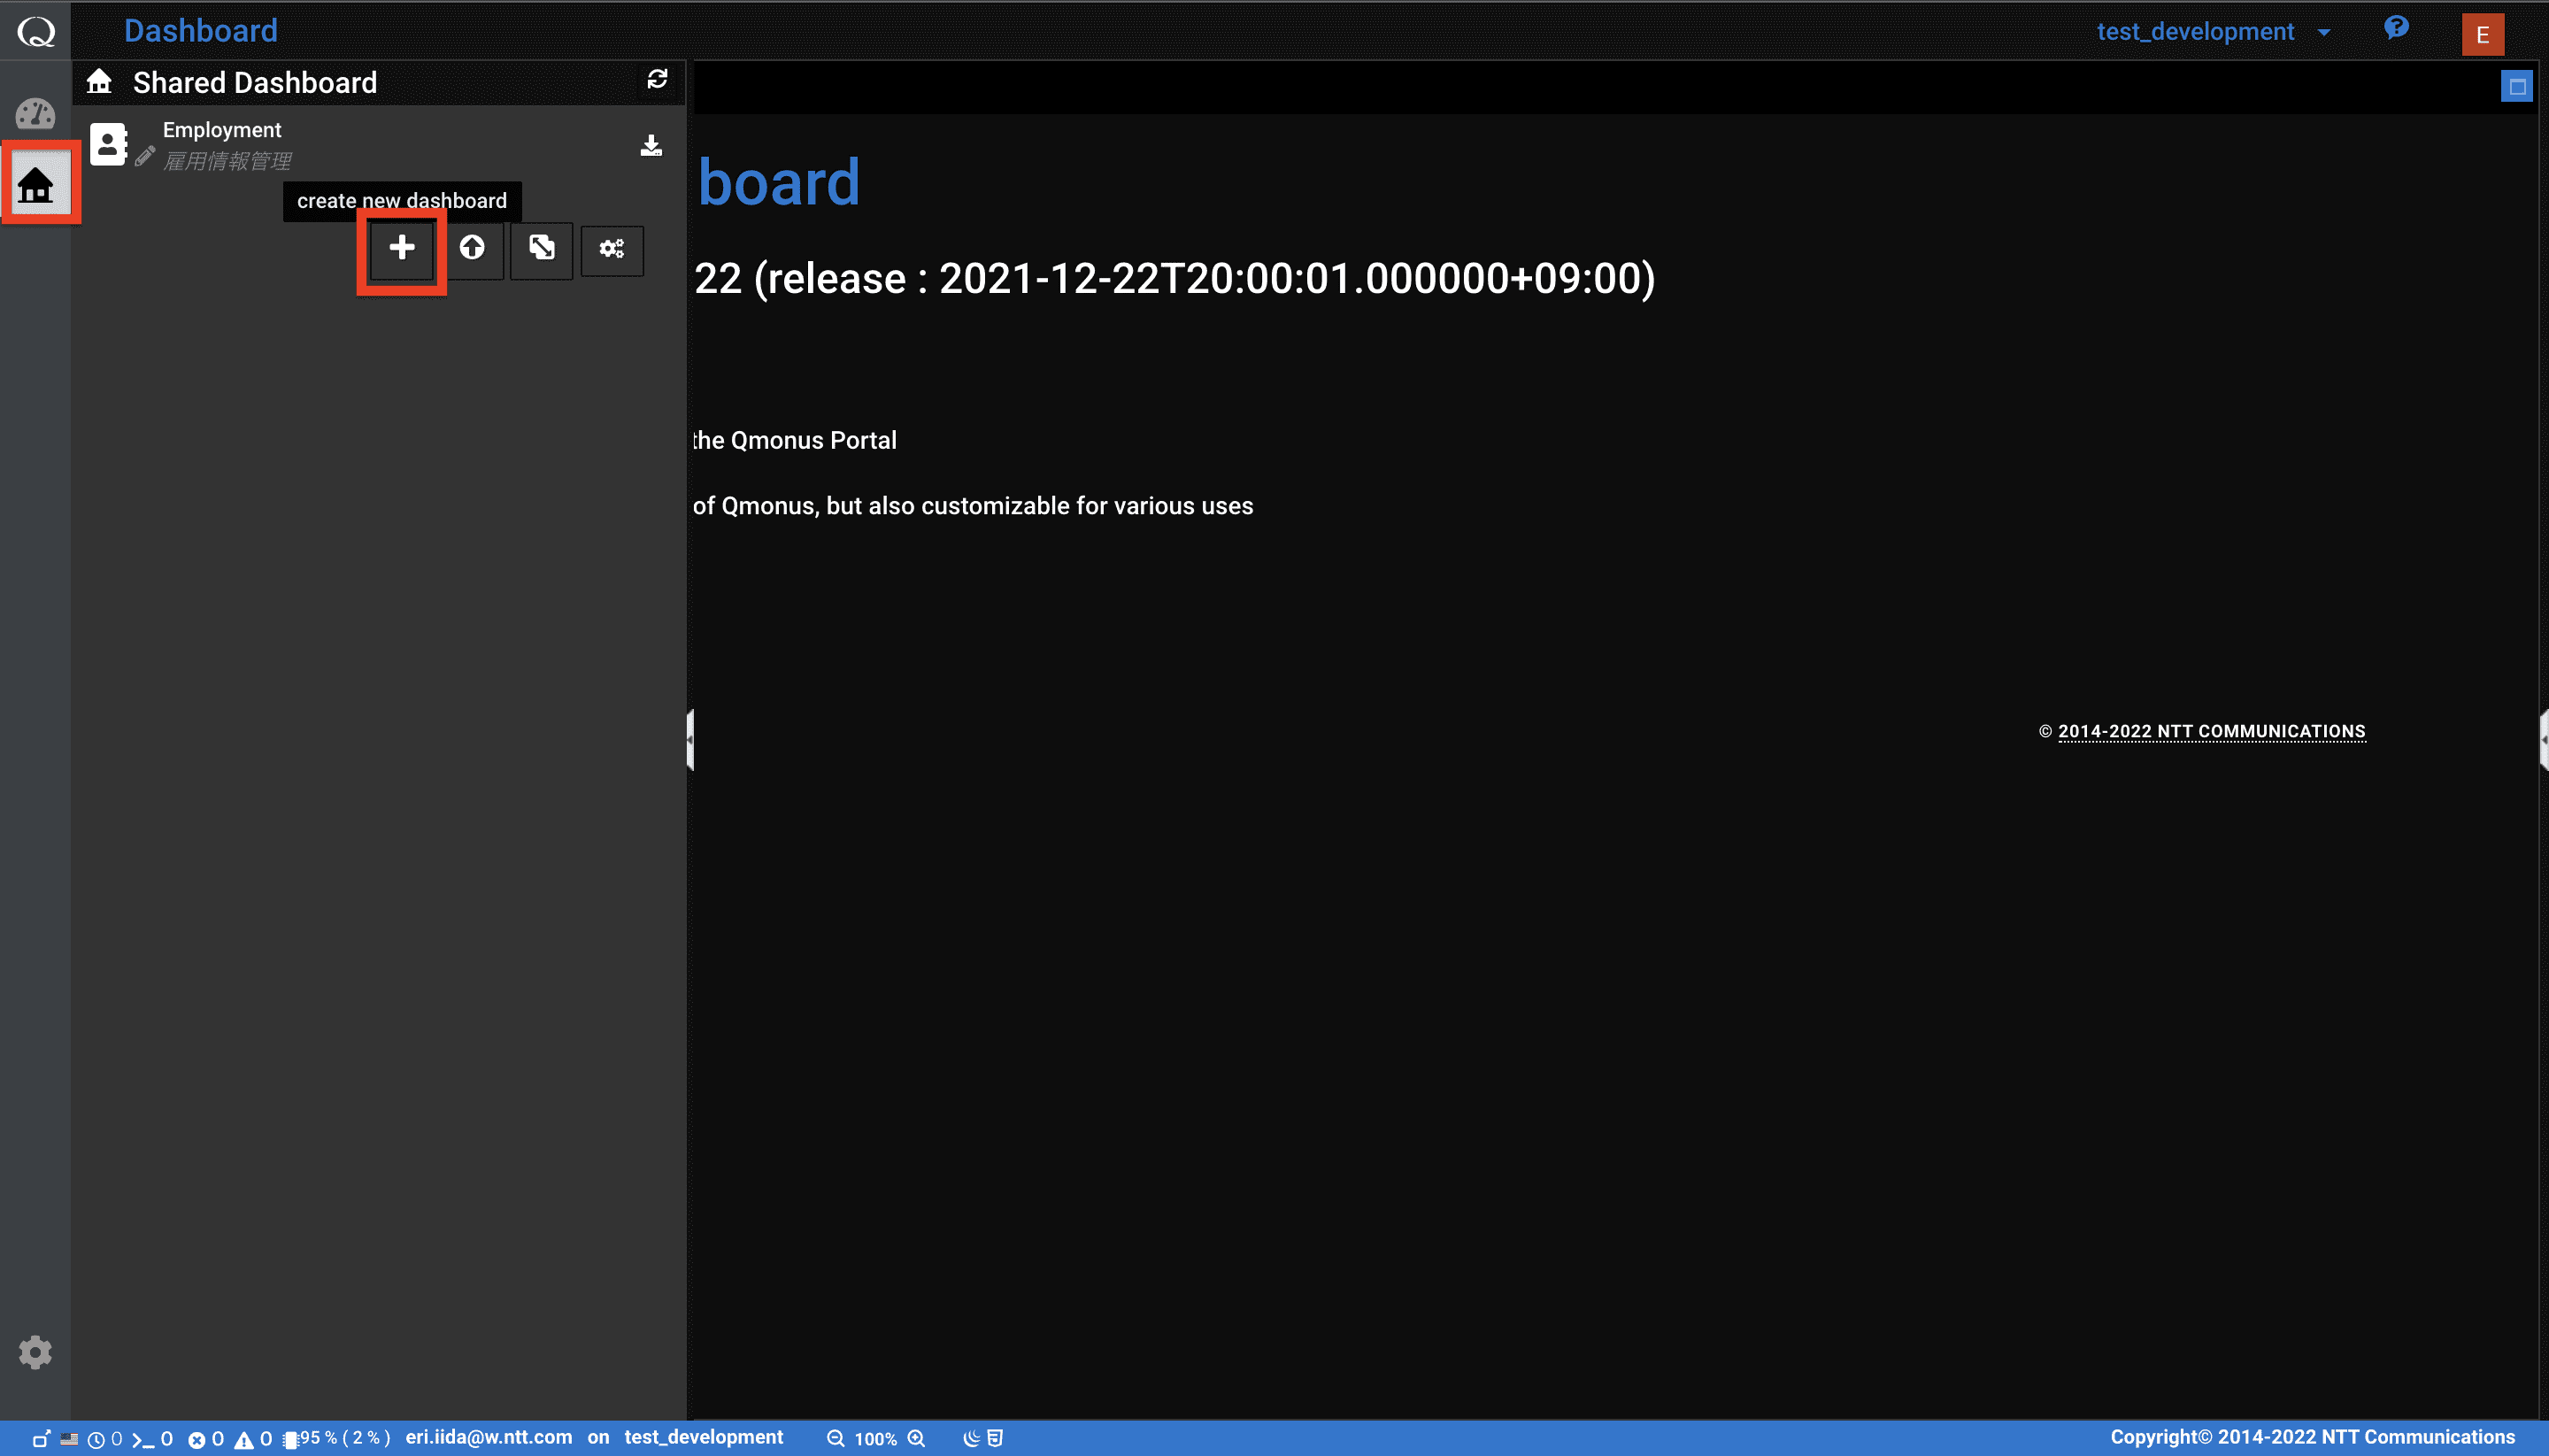
Dashboard Builder の画面左列、上から2つ目のマーク [Shared Dashboard] メニュー > [Create New Dashboard] を選択します。
-
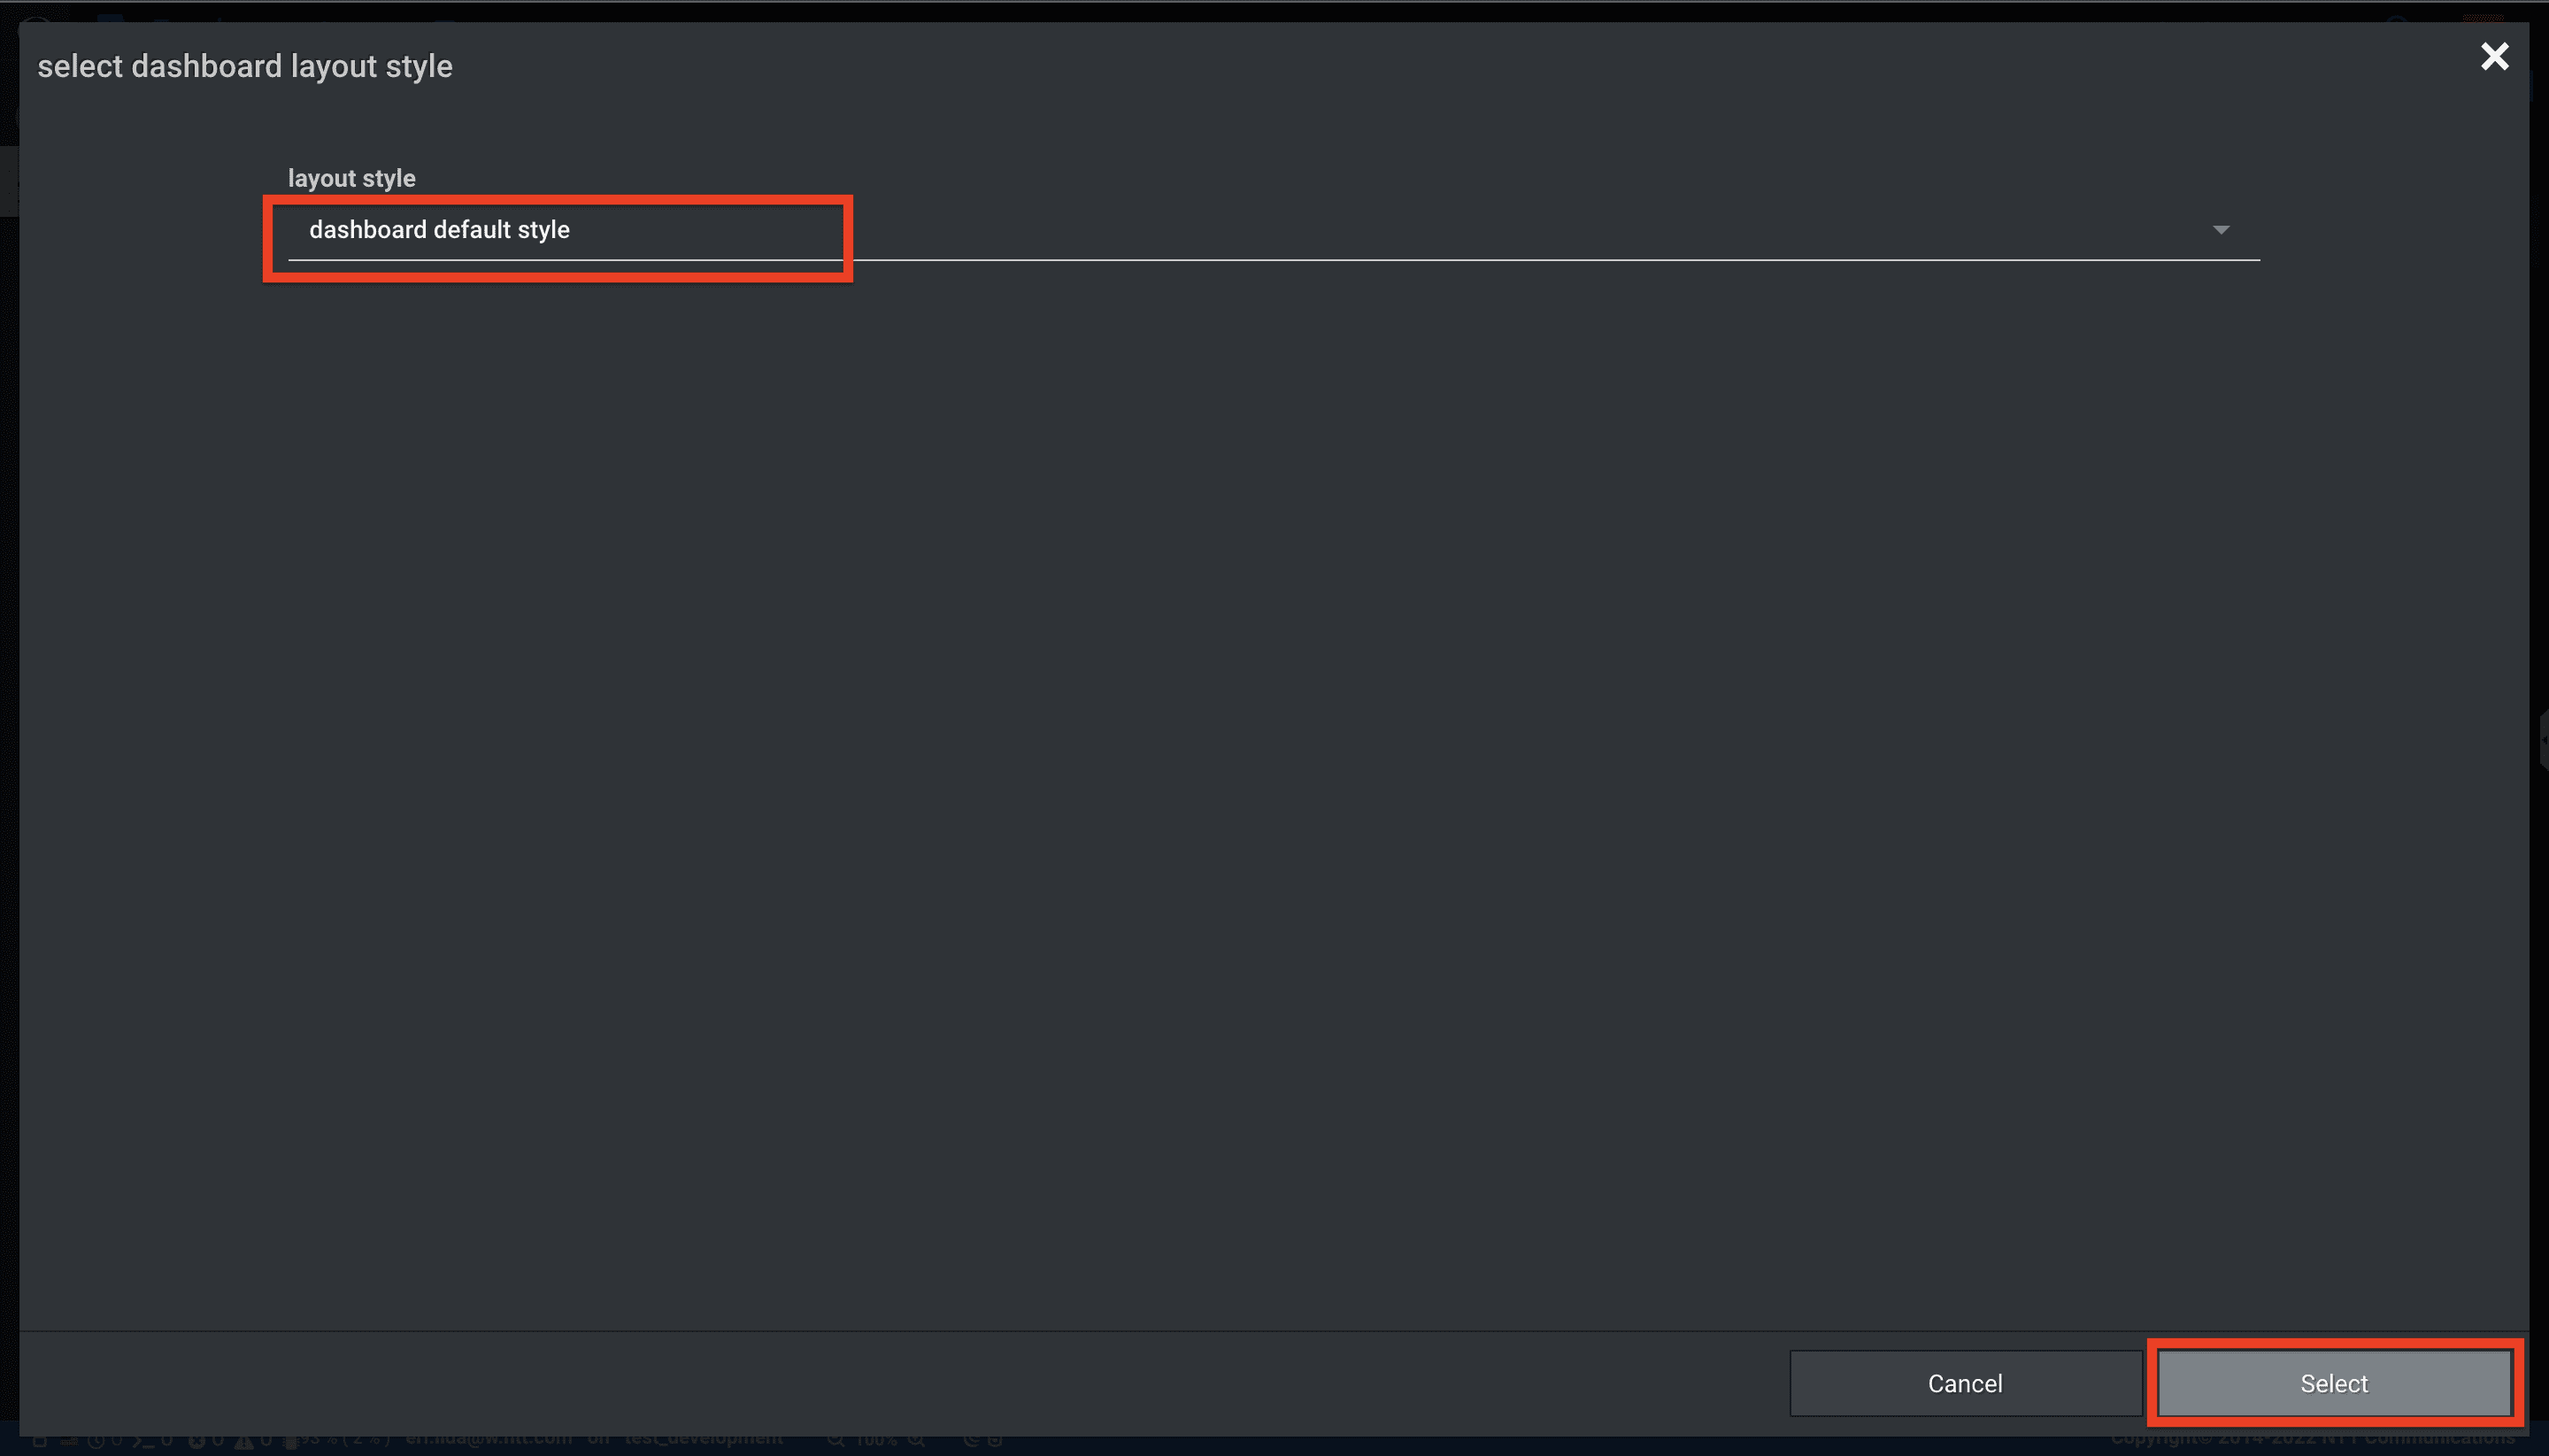
[Layout Style] にてレイアウトを選択し、[Select] を押下します。ここでは、[dashboard default style] を選択します。
2. Context Area 設定
Context Area では、画面に表示するデータ等を定義する変数 Variables や、画面イベント発生時に実行される Action を設定していきます。
2.1 Variables 設定
-
[Variables] の 新規作成ボタンを押下して、Variables を設定します。ここでは、雇用情報をlist型で格納する変数として
employment_listを設定します。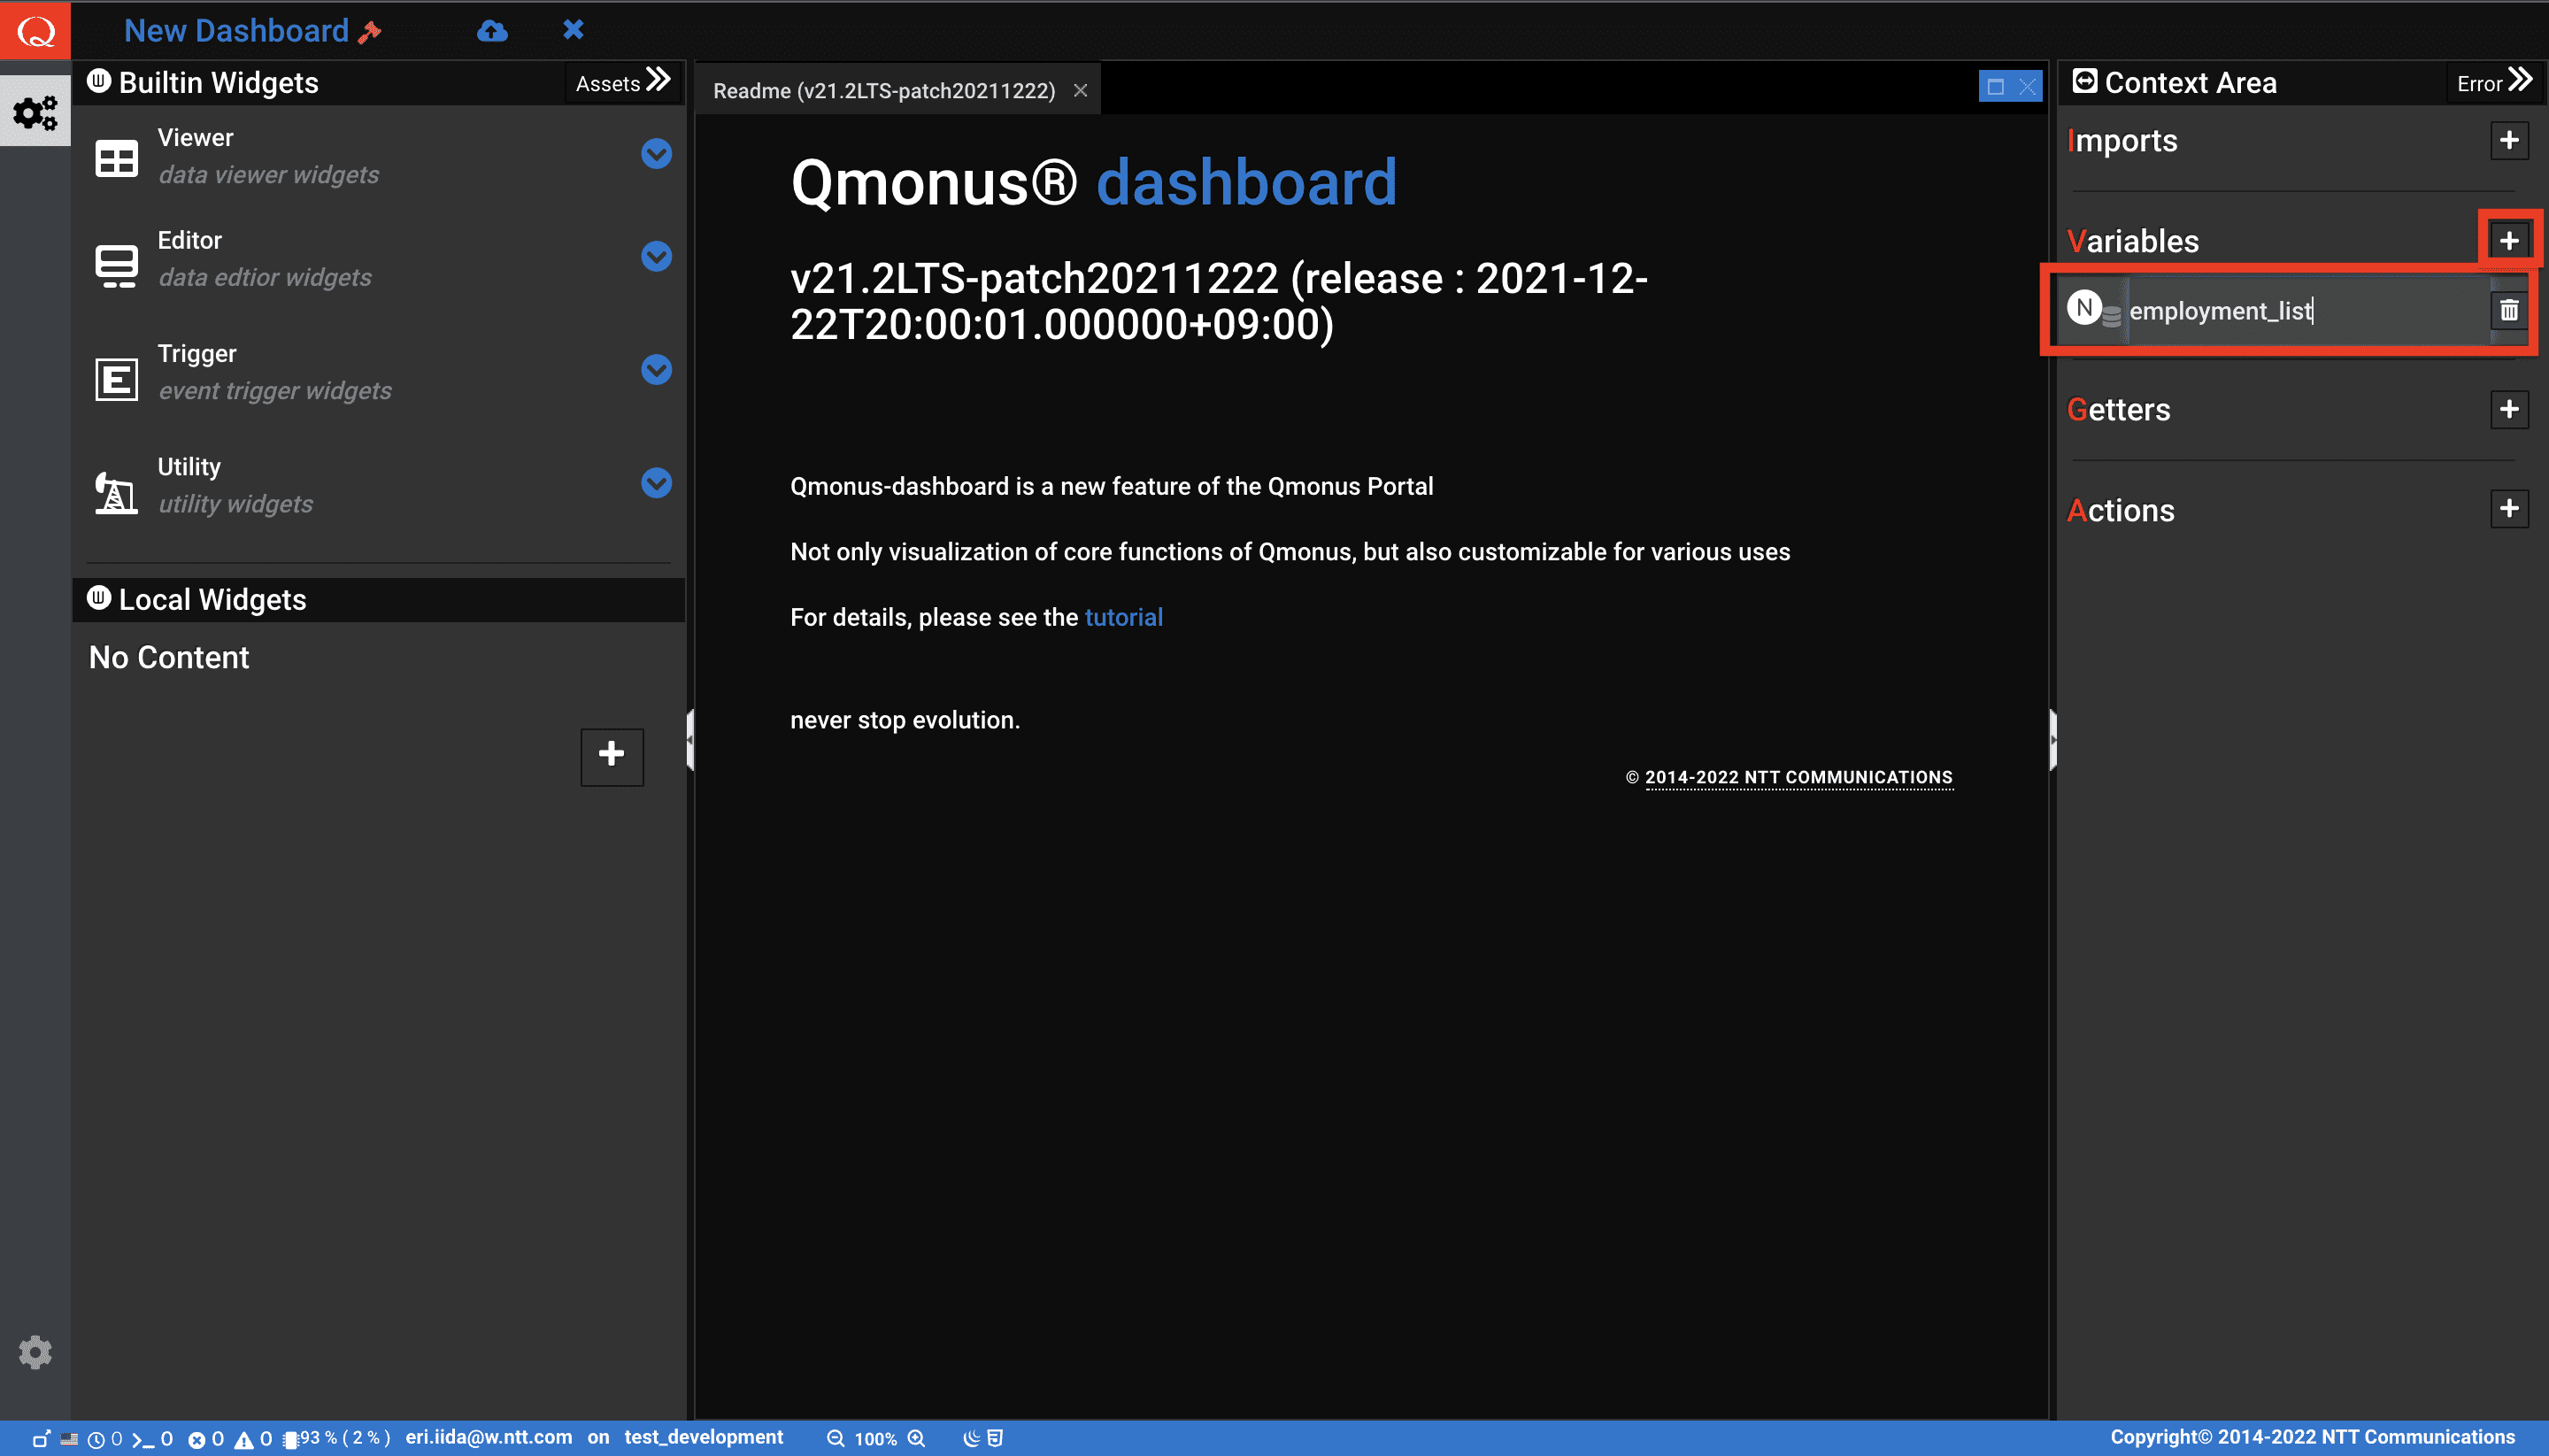
2.2 Actions 設定
-
チュートリアルでは、雇用情報を 登録/ 取得/ 更新/ 削除 する処理関数として以下の Action を作成します。
# Action 名 画面イベント Action の処理内容 1 getEmployment 画面の初期表示 / 画面更新ボタン押下 GET API を 実行 し、画面に表示するデータを取得する。 2 createEmployment 新規登録ボタン押下 登録画面を表示、ユーザの入力値をもとに POST API を実行し、一覧画面を再表示する。 3 updateEmployment 更新ボタン押下 変更画面を表示、ユーザの入力値をもとに PUT API を実行し、一覧画面を再表示する。 4 deleteEmployment 削除ボタン押下 削除確認画面を表示、 DELETE API を実行し、一覧画面を再表示する。 -
まず、getEmployment を以下の手順で作成します。
-
[Actions] の新規作成ボタンを押下します。
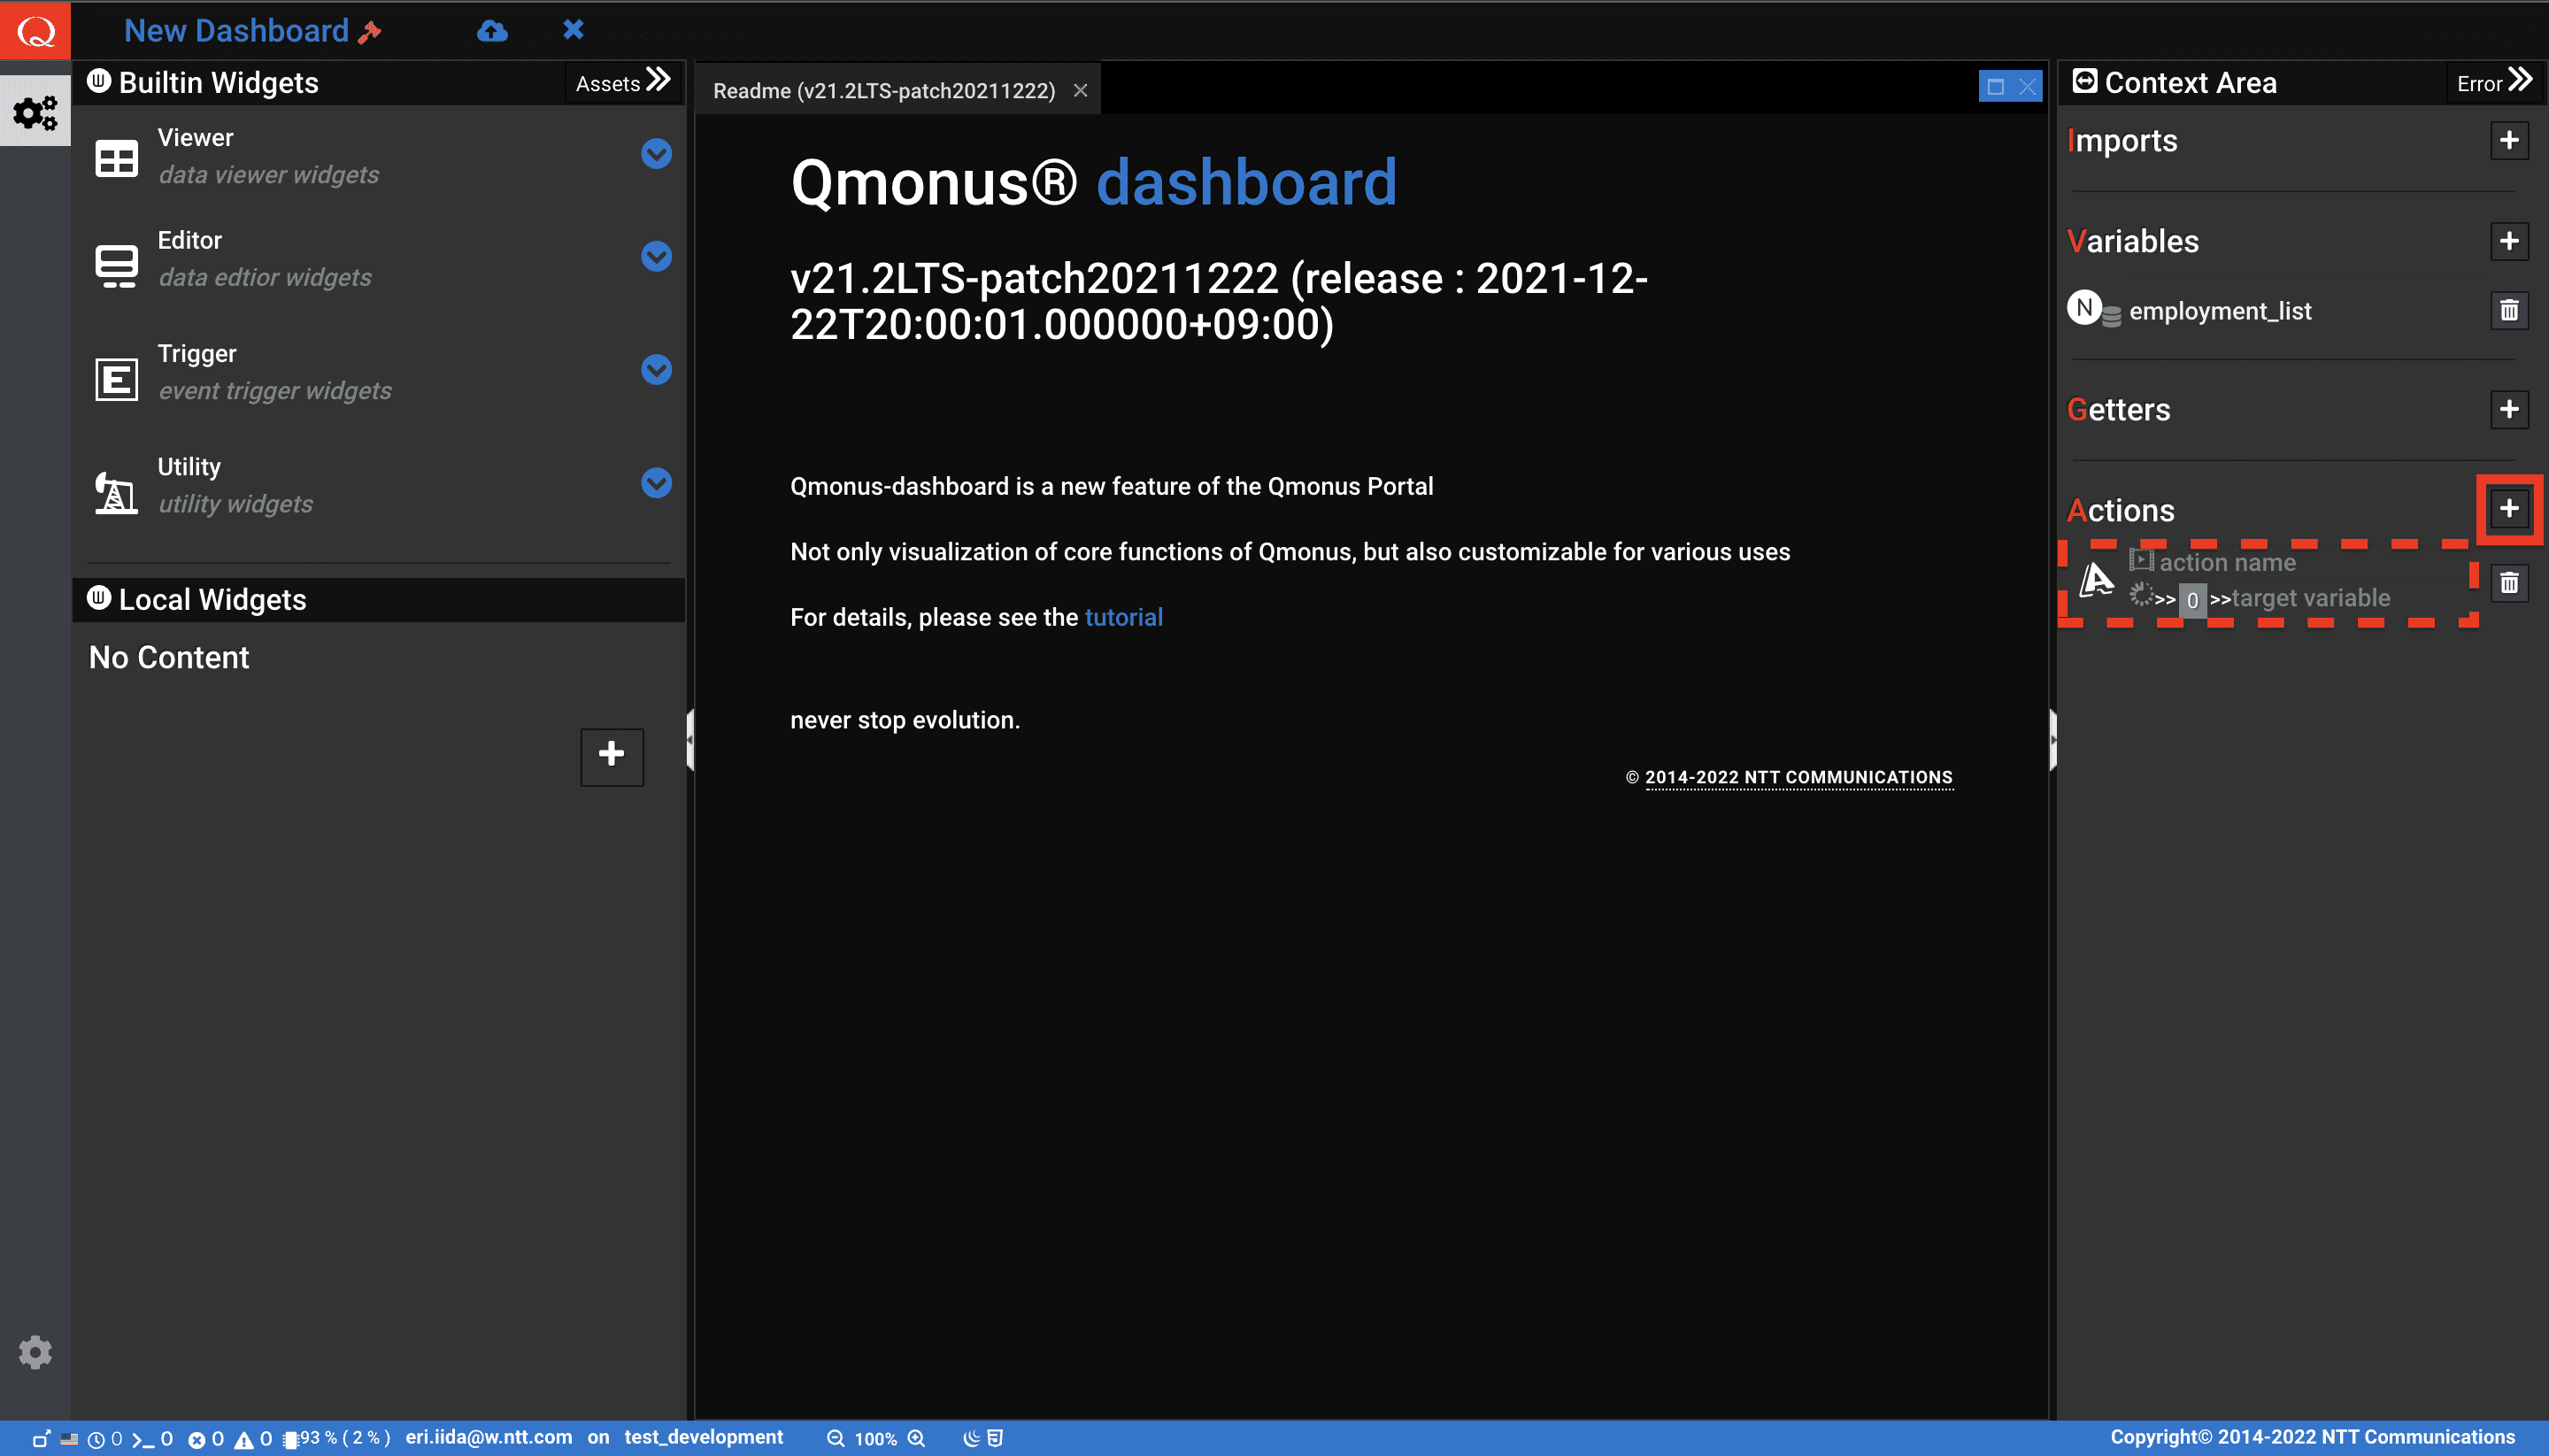
-
空の Action が追加されたら、[action name] に
getEmployment、[target variable] に先程 [Variables] で定義したemployment_listを定義します。そしてこの Action はDashboard の初期表示時にも実行させるため、キャプチャの① [Action自動再生マーク] をクリックして緑色の活性状態に変更します。また、画面更新ボタンを連打しても連続で Action 実行をさせないように ②の[Action連続実行ブロックマーク] はデフォルト状態 (緑色の活性状態) にしておきます。入力値に関する詳細は利用マニュアル2.3.4.1 Action を定義する章を参照ください。
Action 定義 - 入力前

Action 定義 - 入力後
-
編集ボタンを押下して Action Details 画面がポップアップ表示されたら、Action の詳細を設定していきます。Command 一覧 [Command Pallet] にある [ajax_strict] Command をクリック選択し、 [Action Pipeline] に追加します。 Command を追加すると、詳細エリア [Command Detail] でパラメータを設定することが可能になるので、以下のパラメータ値を入力し、[Submit] ボタンの押下で Action を保存します。

編集ボタンを押下
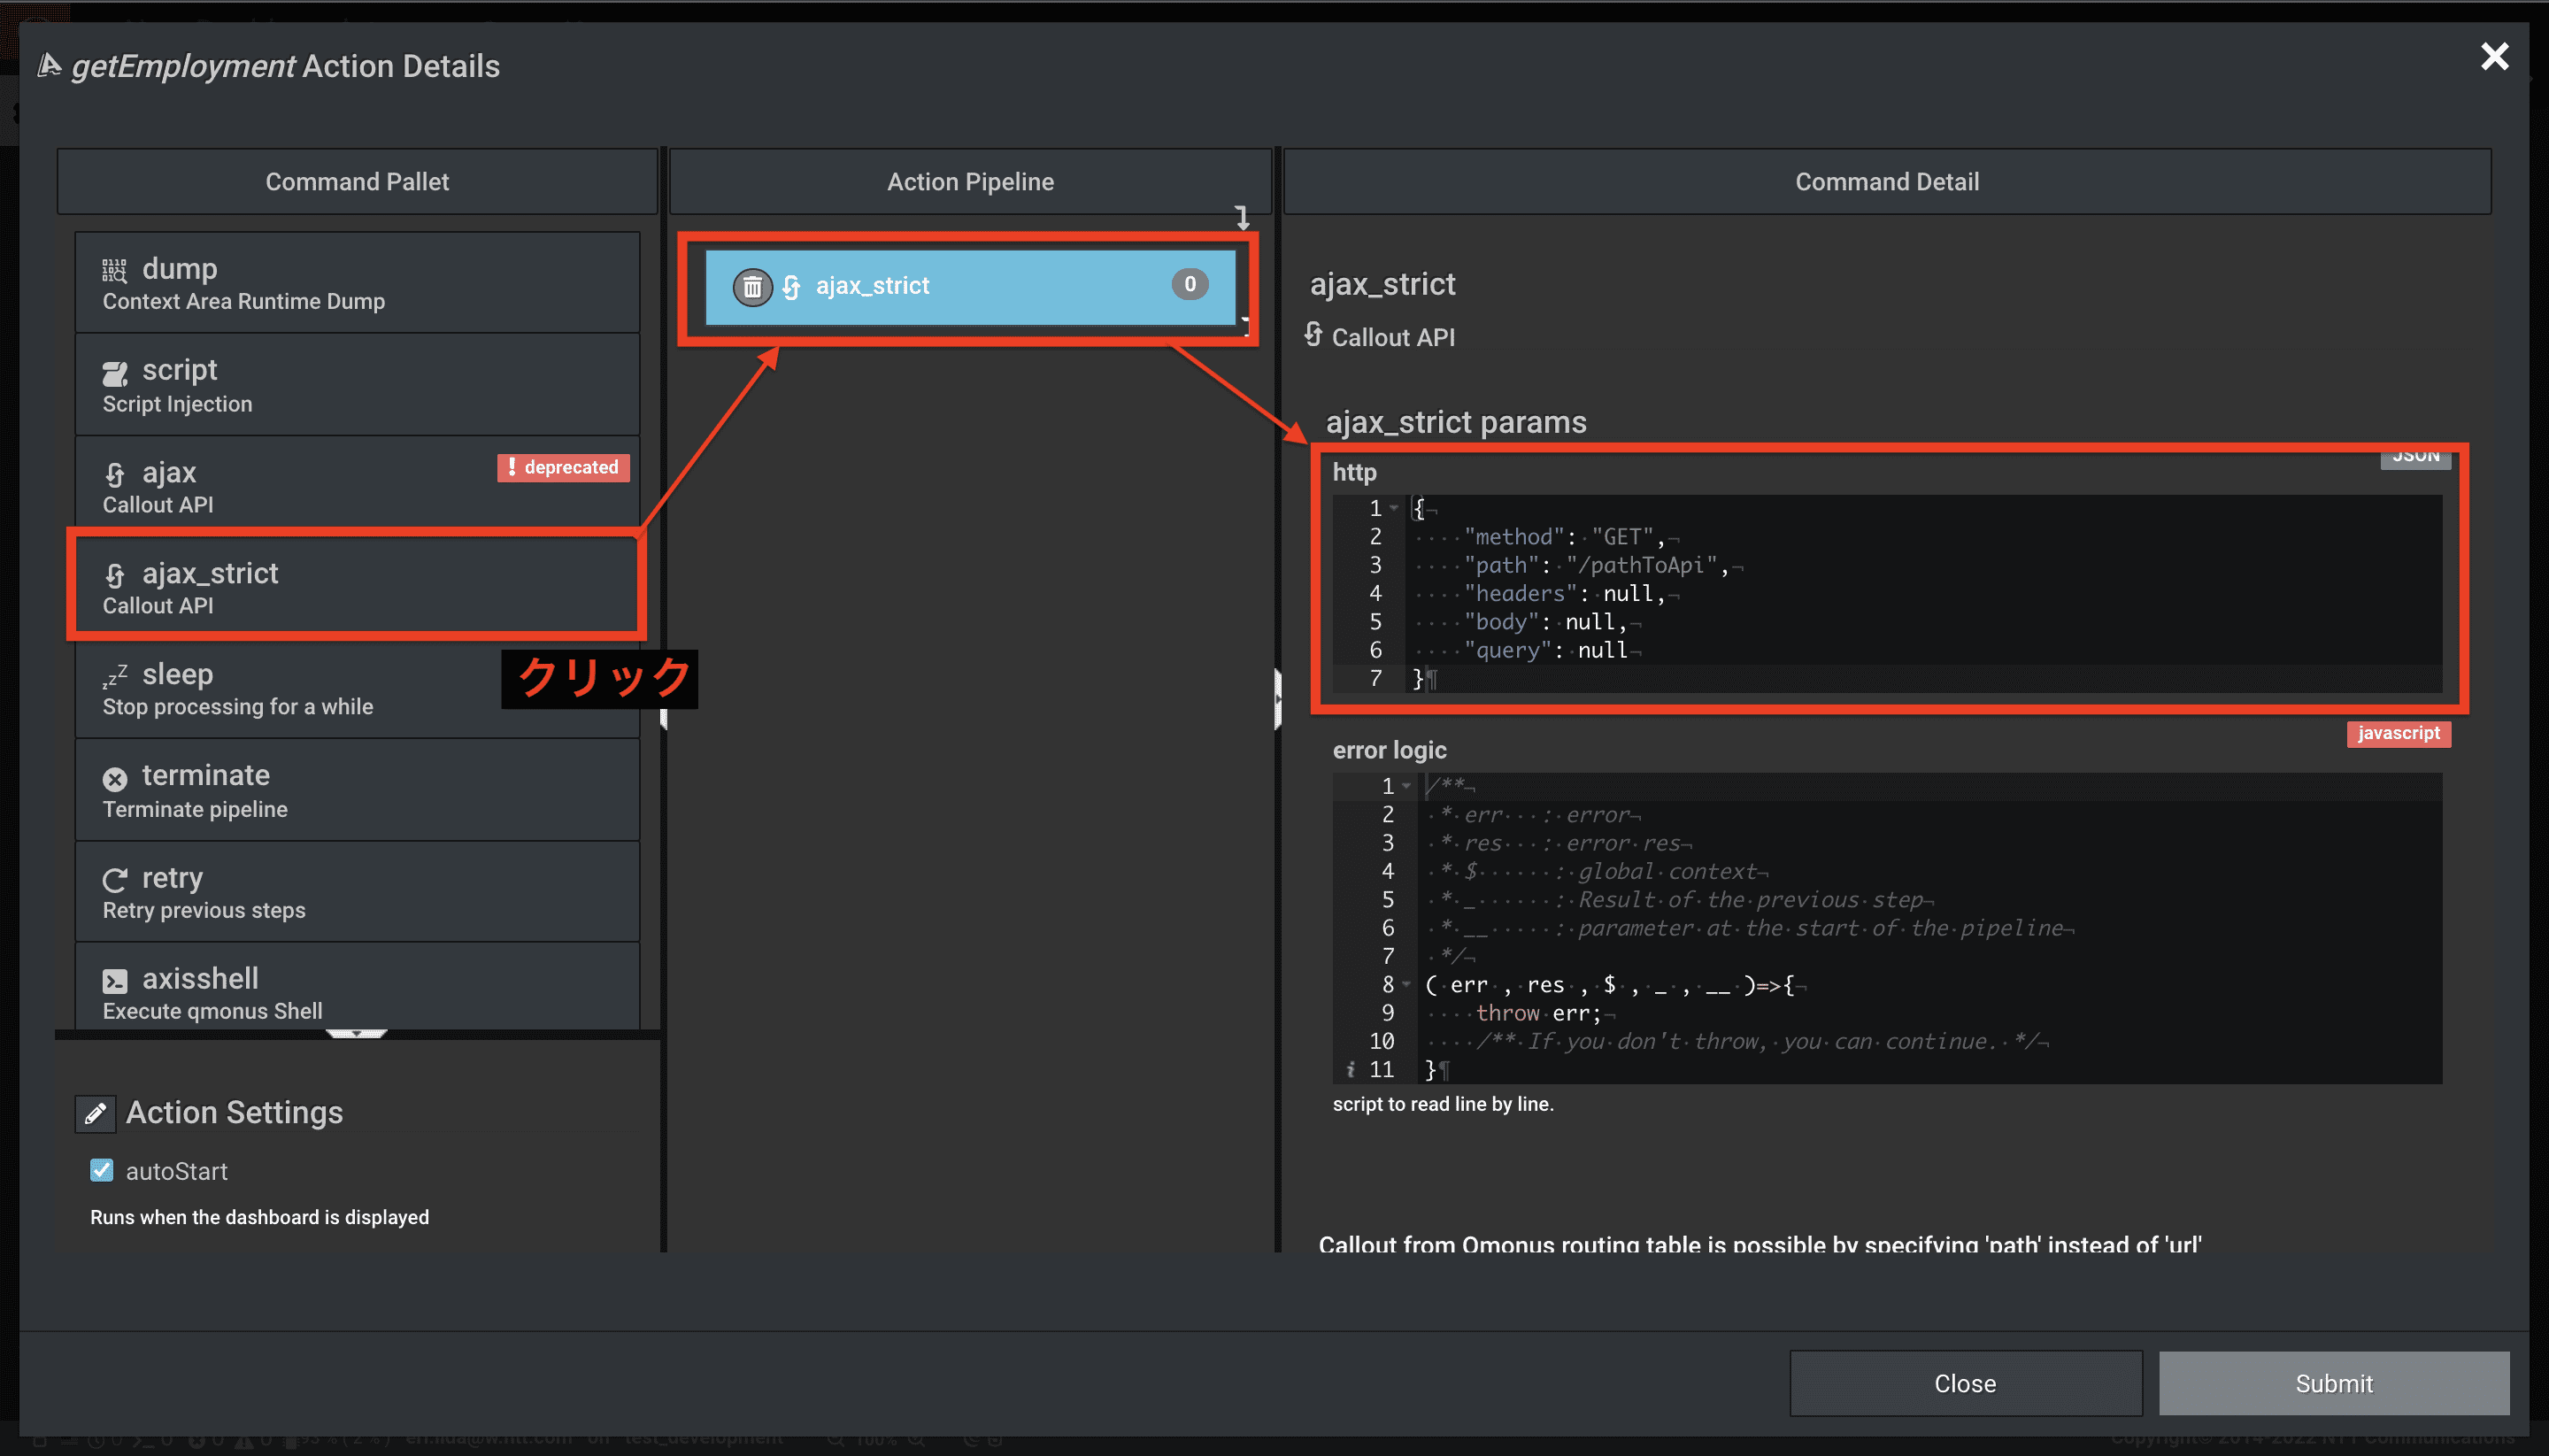
Action Details 画面。Command Palette から Command をクリック選択して Action Pipeline に追加し、設定値を入力する
-
ajax_strict コマンド設定値
json
# http パラメータの設定値
# GET API を実行するためのhttp情報を入力
{
    "method": "GET",
    "path": "/tutorials/employments",
    "headers": null,
    "body": null,
    "query": null
}

# error logic パラメータについて今回は入力なし
以上で getEmployment の設定は完了です。
-
-
-
同様に、残りの Action (createEmployment/ updateEmployment/ deleteEmployment) も作成します。いずれも [target variable] は設定不要で、[Action自動再生マーク] および [Action連続実行ブロックマーク] もデフォルト表示で変更不要です。
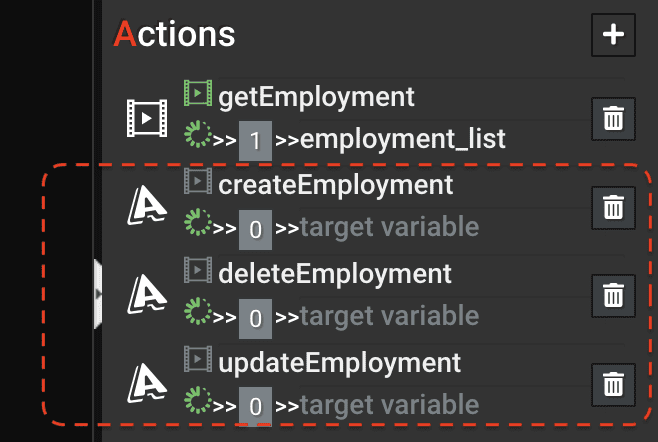
Action 定義後 (createEmployment/ updateEmployment/ deleteEmployment)
-
以下のページをもとに、各 Action (createAction/ updateAction/ deleteAction) に Action Details を設定していきます。
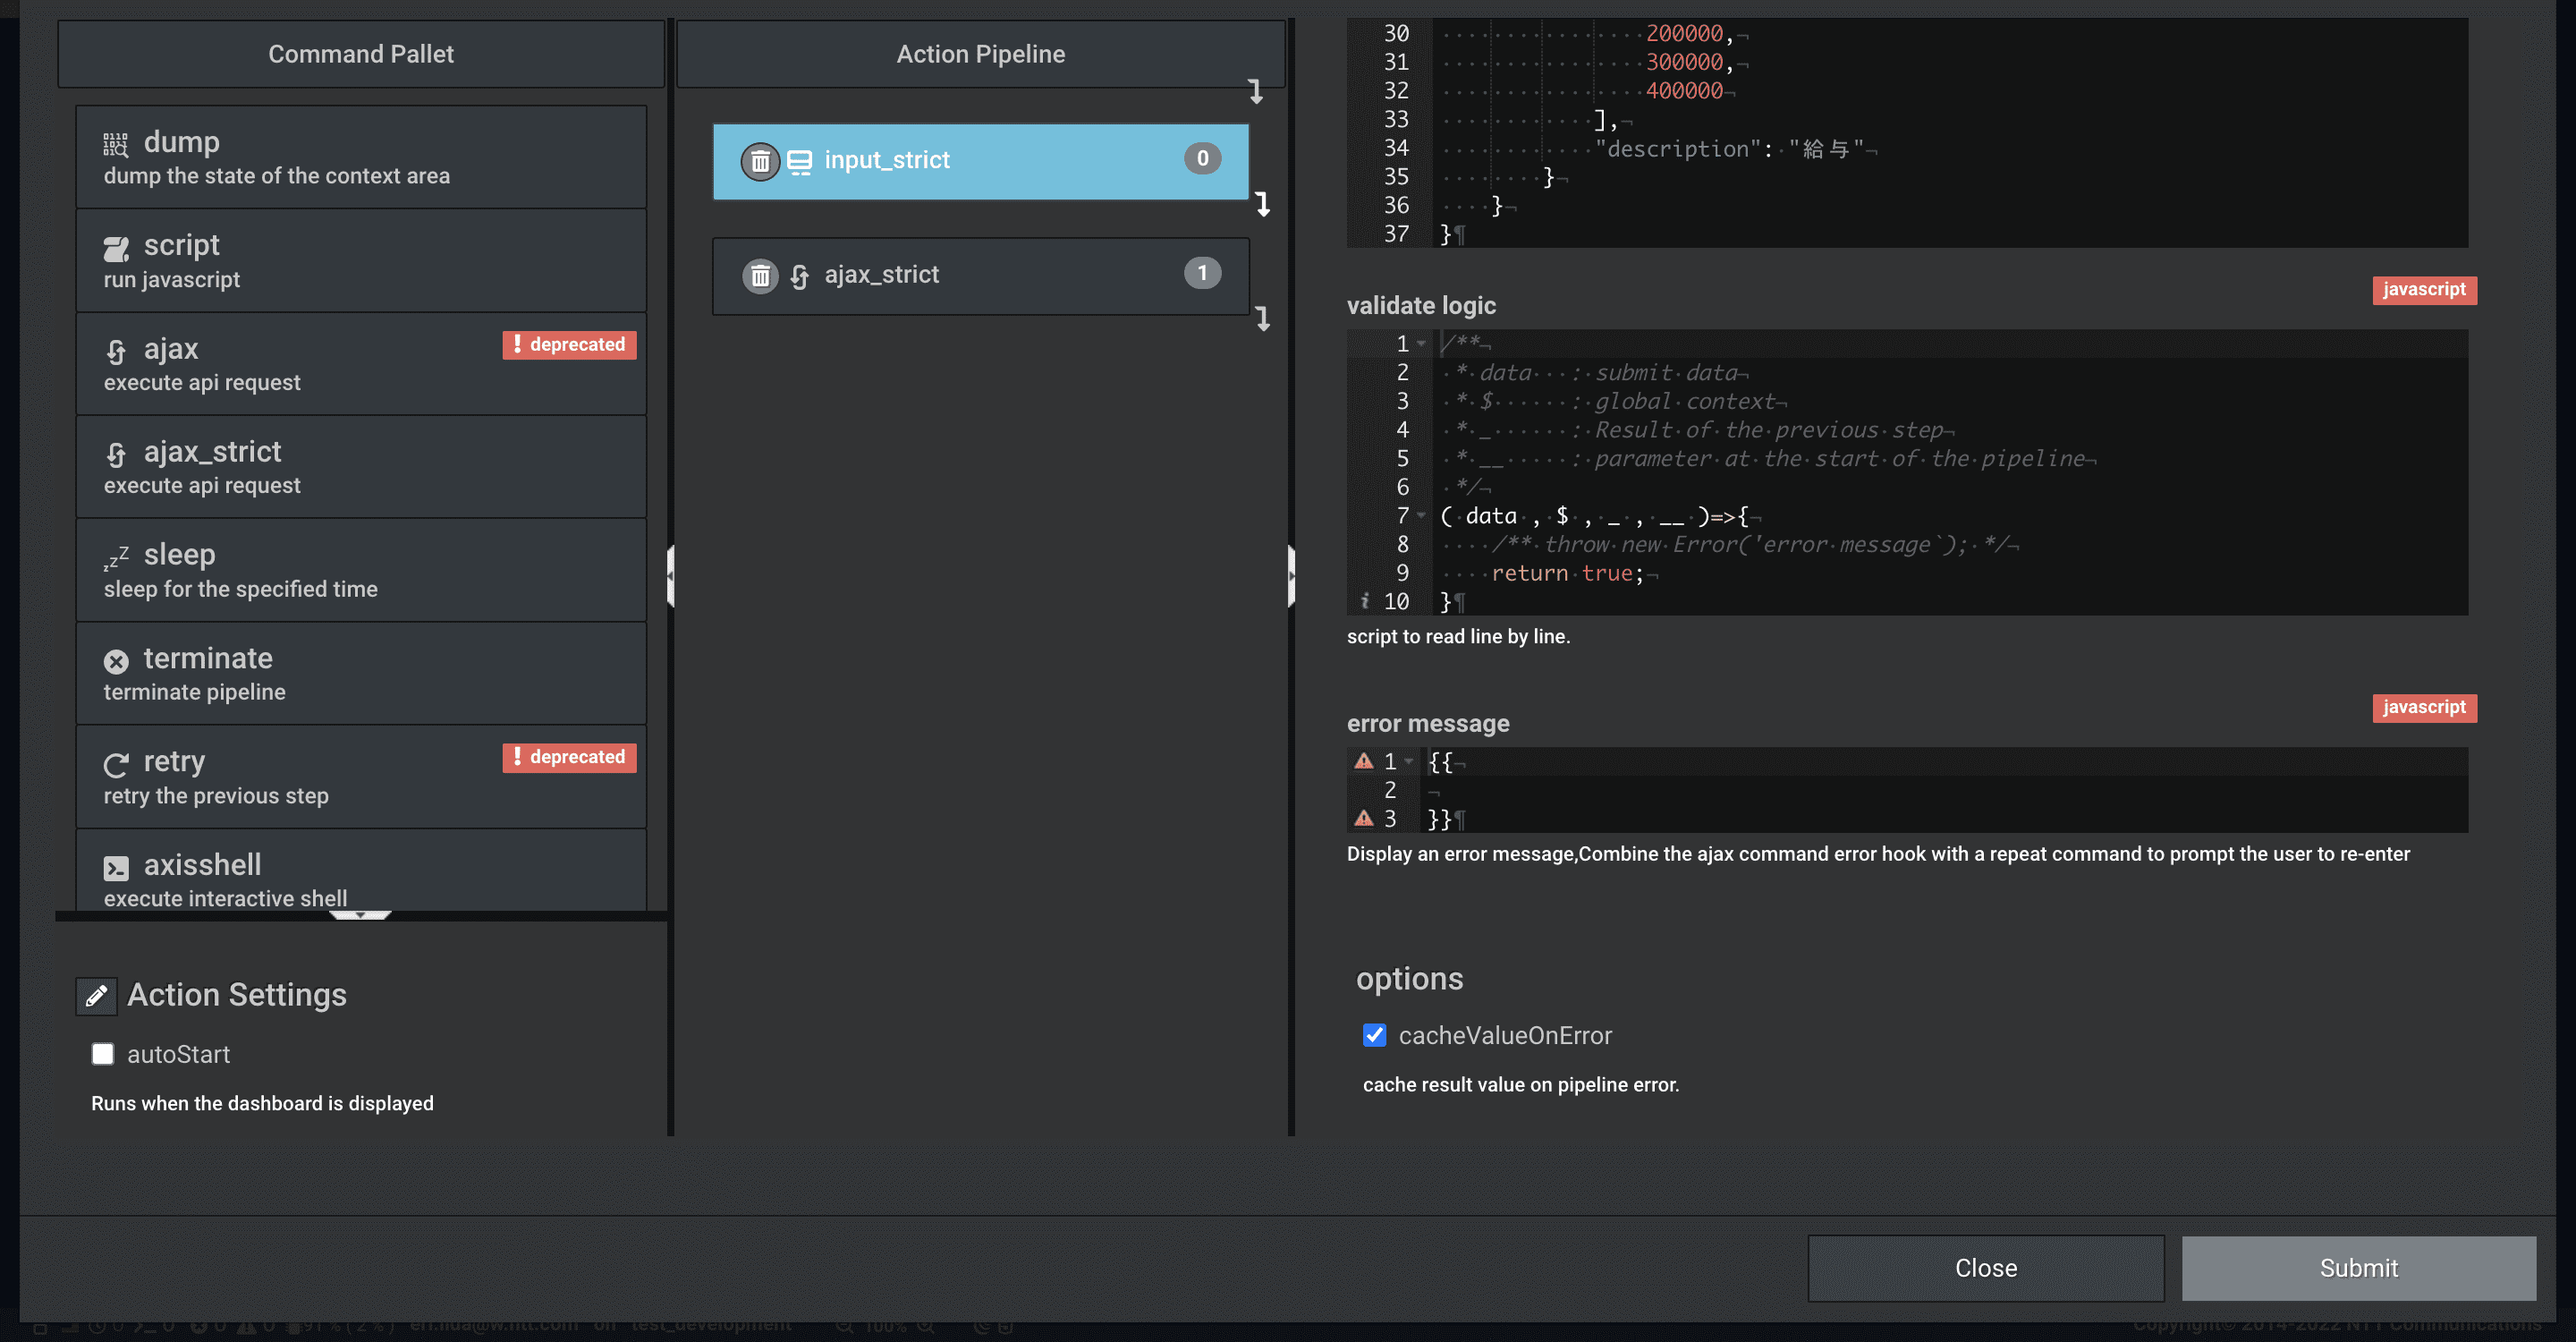
input_strict コマンド 設定値

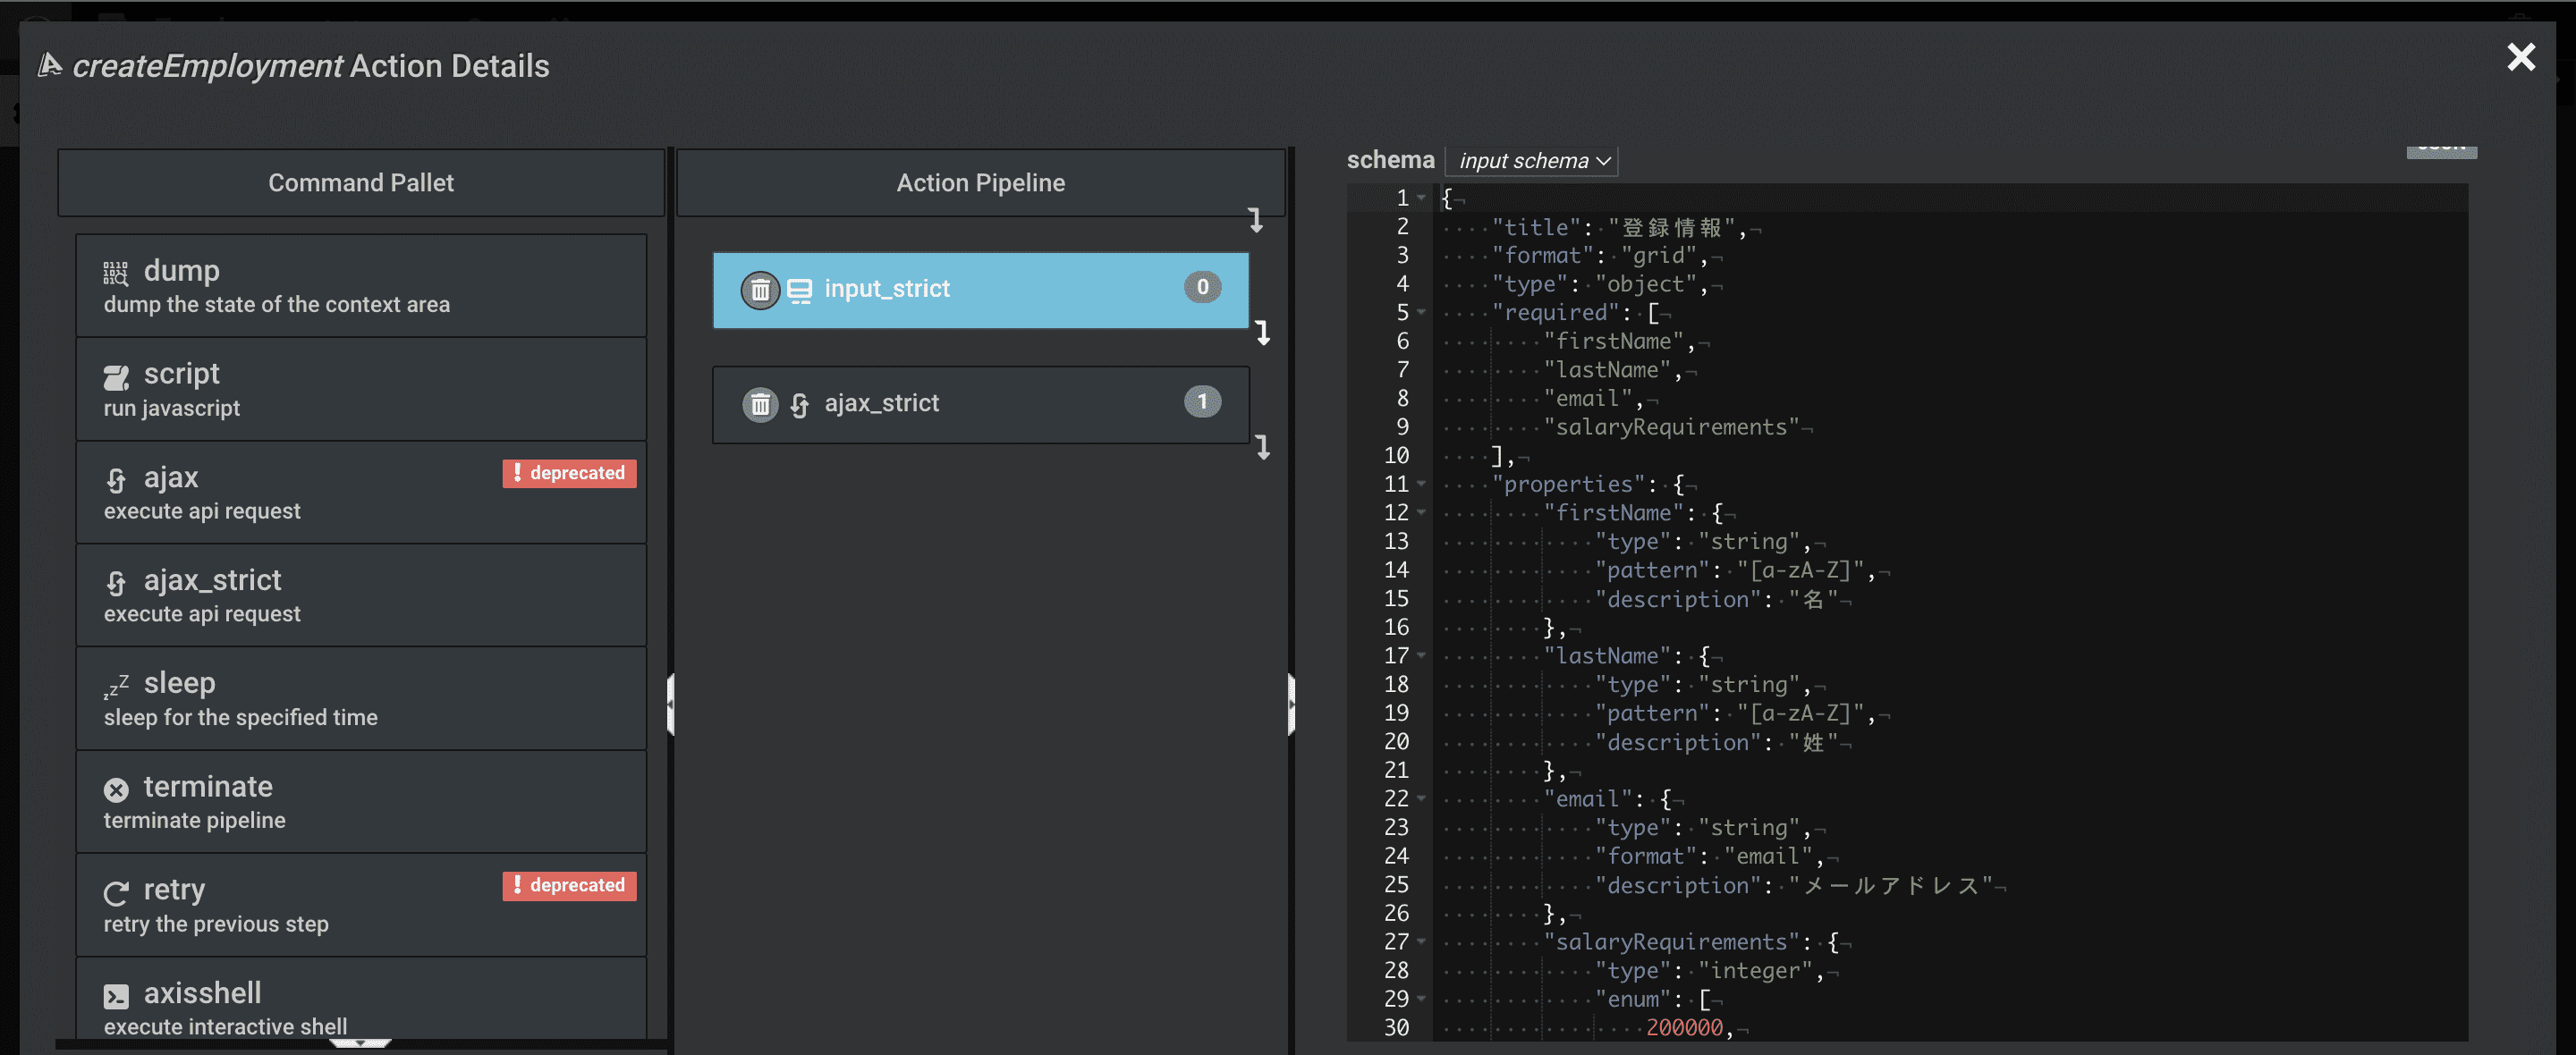
-
input_strict>dialogパラメータjson
{ "title": "Employment情報登録", "description": "", "submit": "実行", "cancel": "キャンセル" } -
input_strict>schemaパラメータjson
{ "title": "登録情報", "format": "grid", "type": "object", "required": [ "firstName", "lastName", "email", "salaryRequirements" ], "properties": { "firstName": { "type": "string", "pattern": "[a-zA-Z]", "description": "名" }, "lastName": { "type": "string", "pattern": "[a-zA-Z]", "description": "姓" }, "email": { "type": "string", "format": "email", "description": "メールアドレス" }, "salaryRequirements": { "type": "integer", "enum": [ 200000, 300000, 400000 ], "description": "給与" } } } -
input_strict>validate_logicパラメータjson
初期値のまま -
input_strict>error messageパラメータjson
初期値のまま
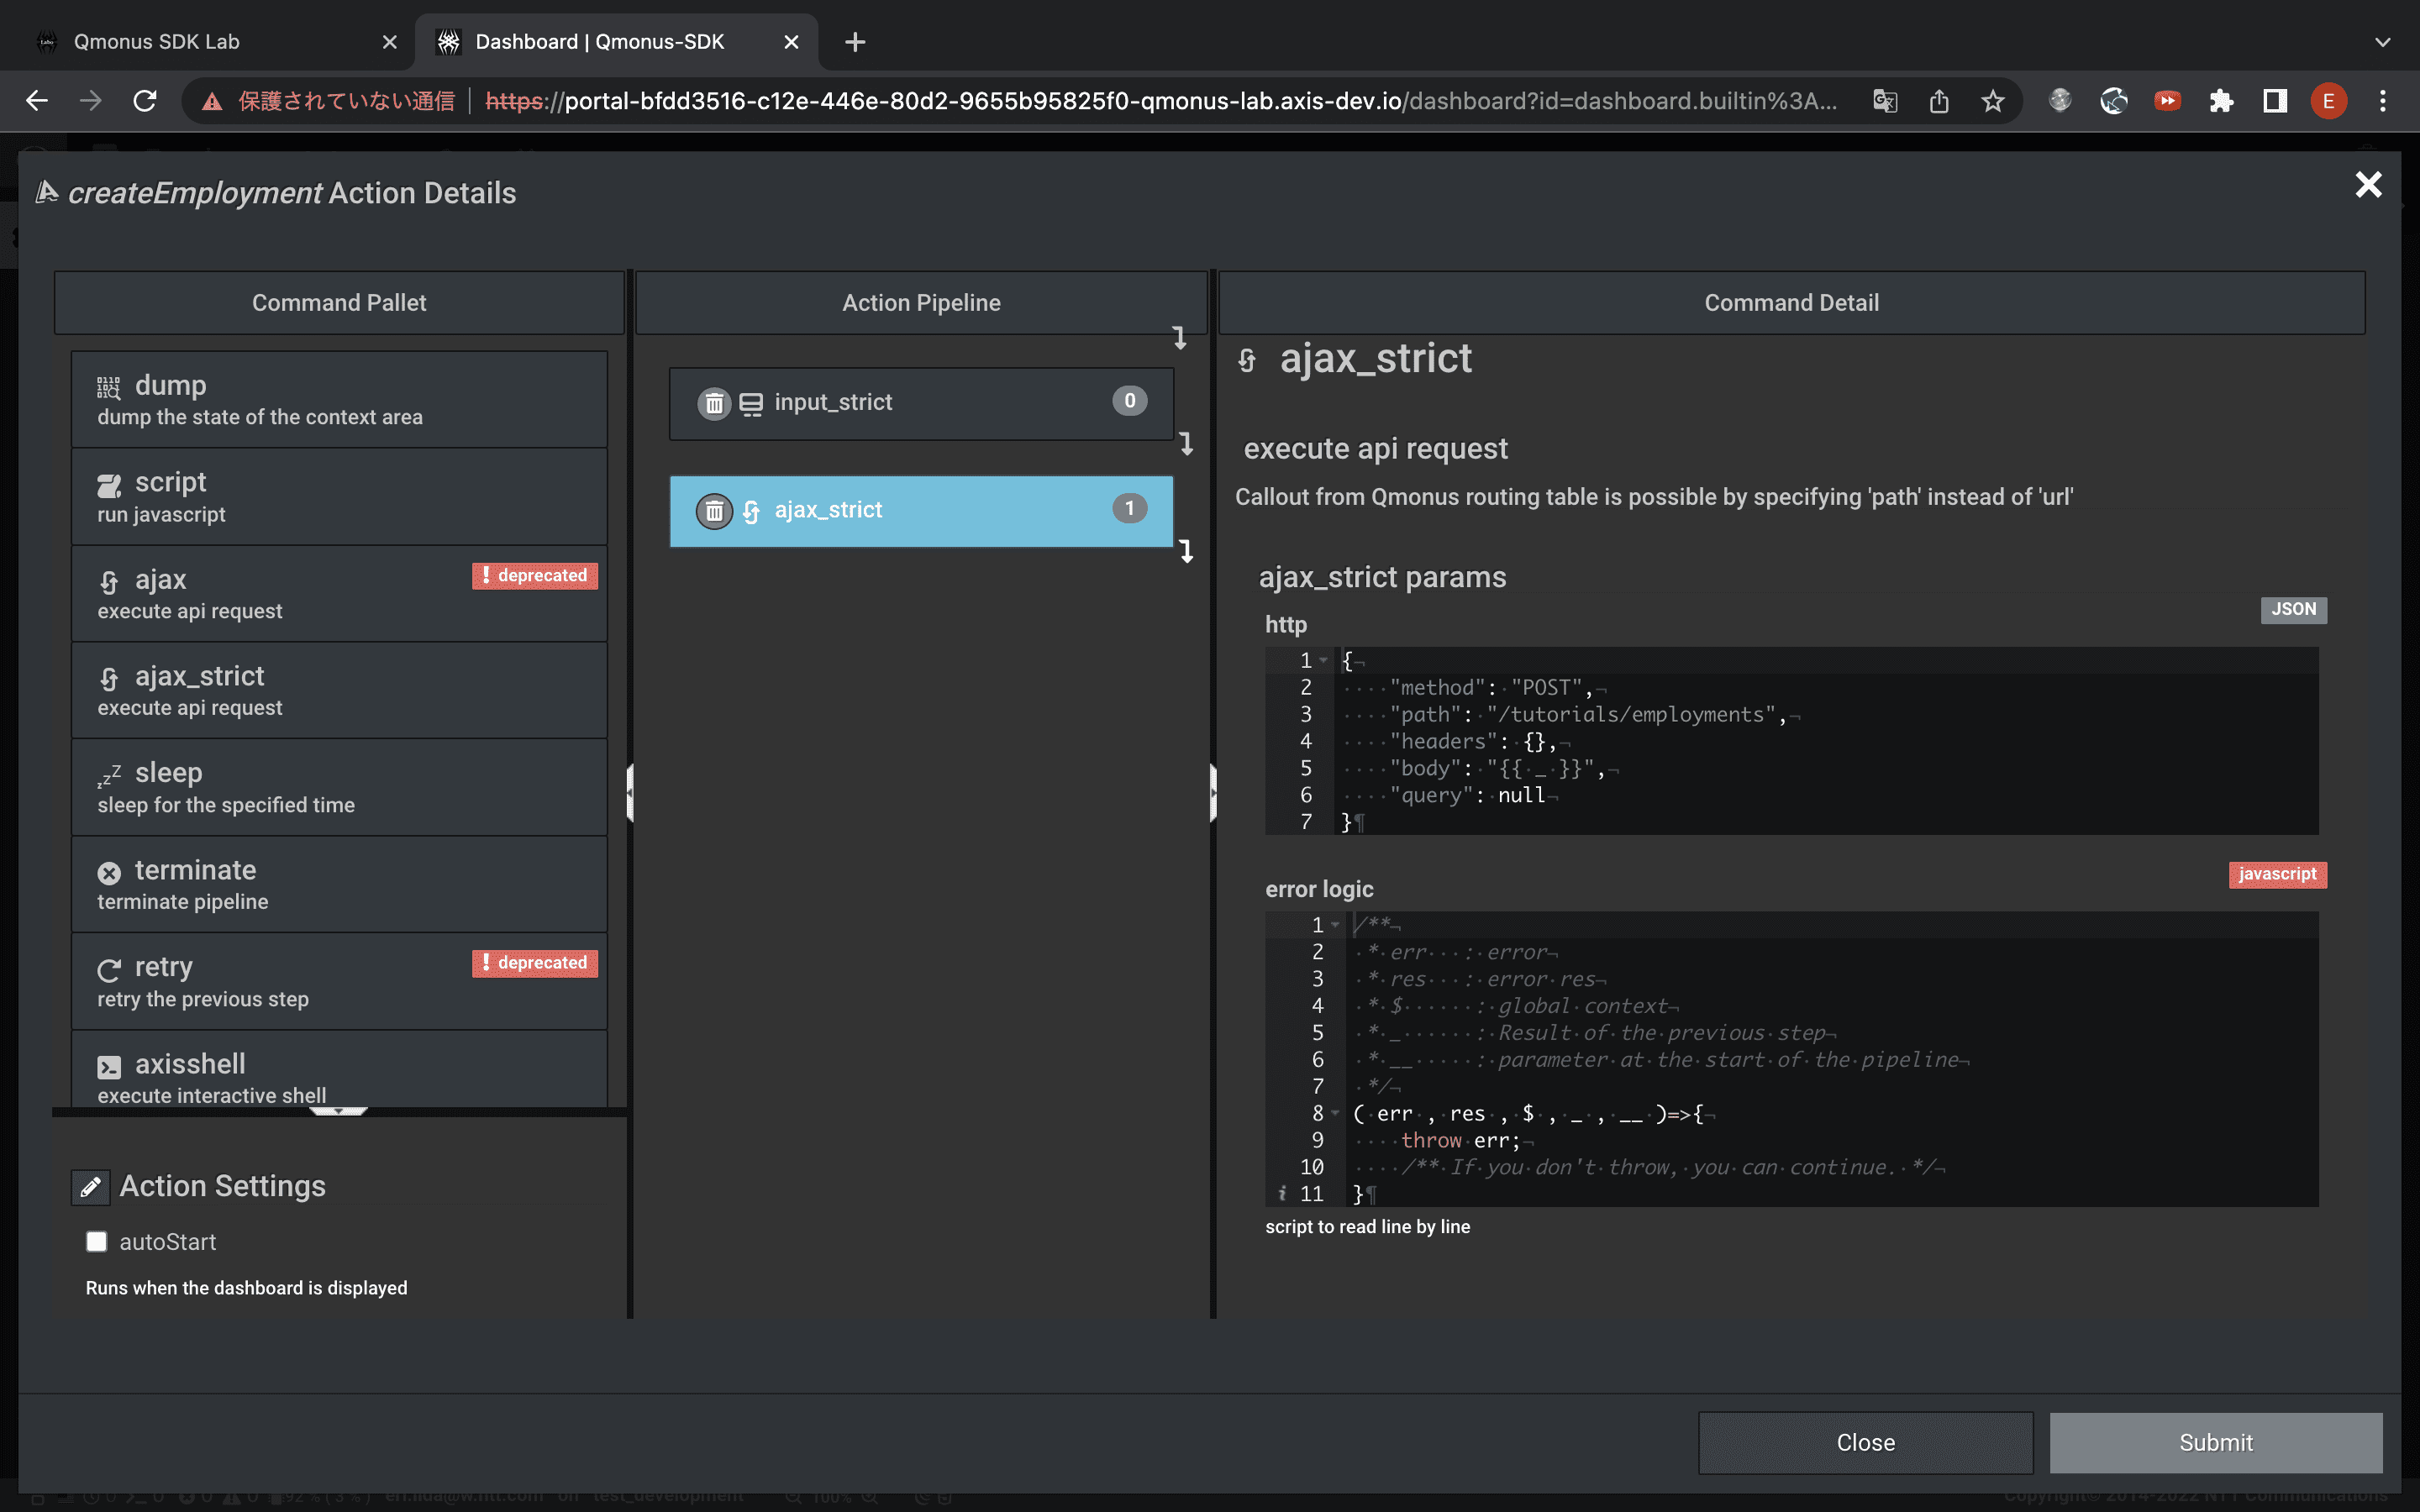
ajax_strict コマンド 設定値
-
ajax_strict>httpパラメータjson
{ "method": "POST", "path": "/tutorials/employments", "headers": {}, "body": "{{ _ }}", "query": null } -
ajax_strict>error logicパラメータjson
初期値のまま
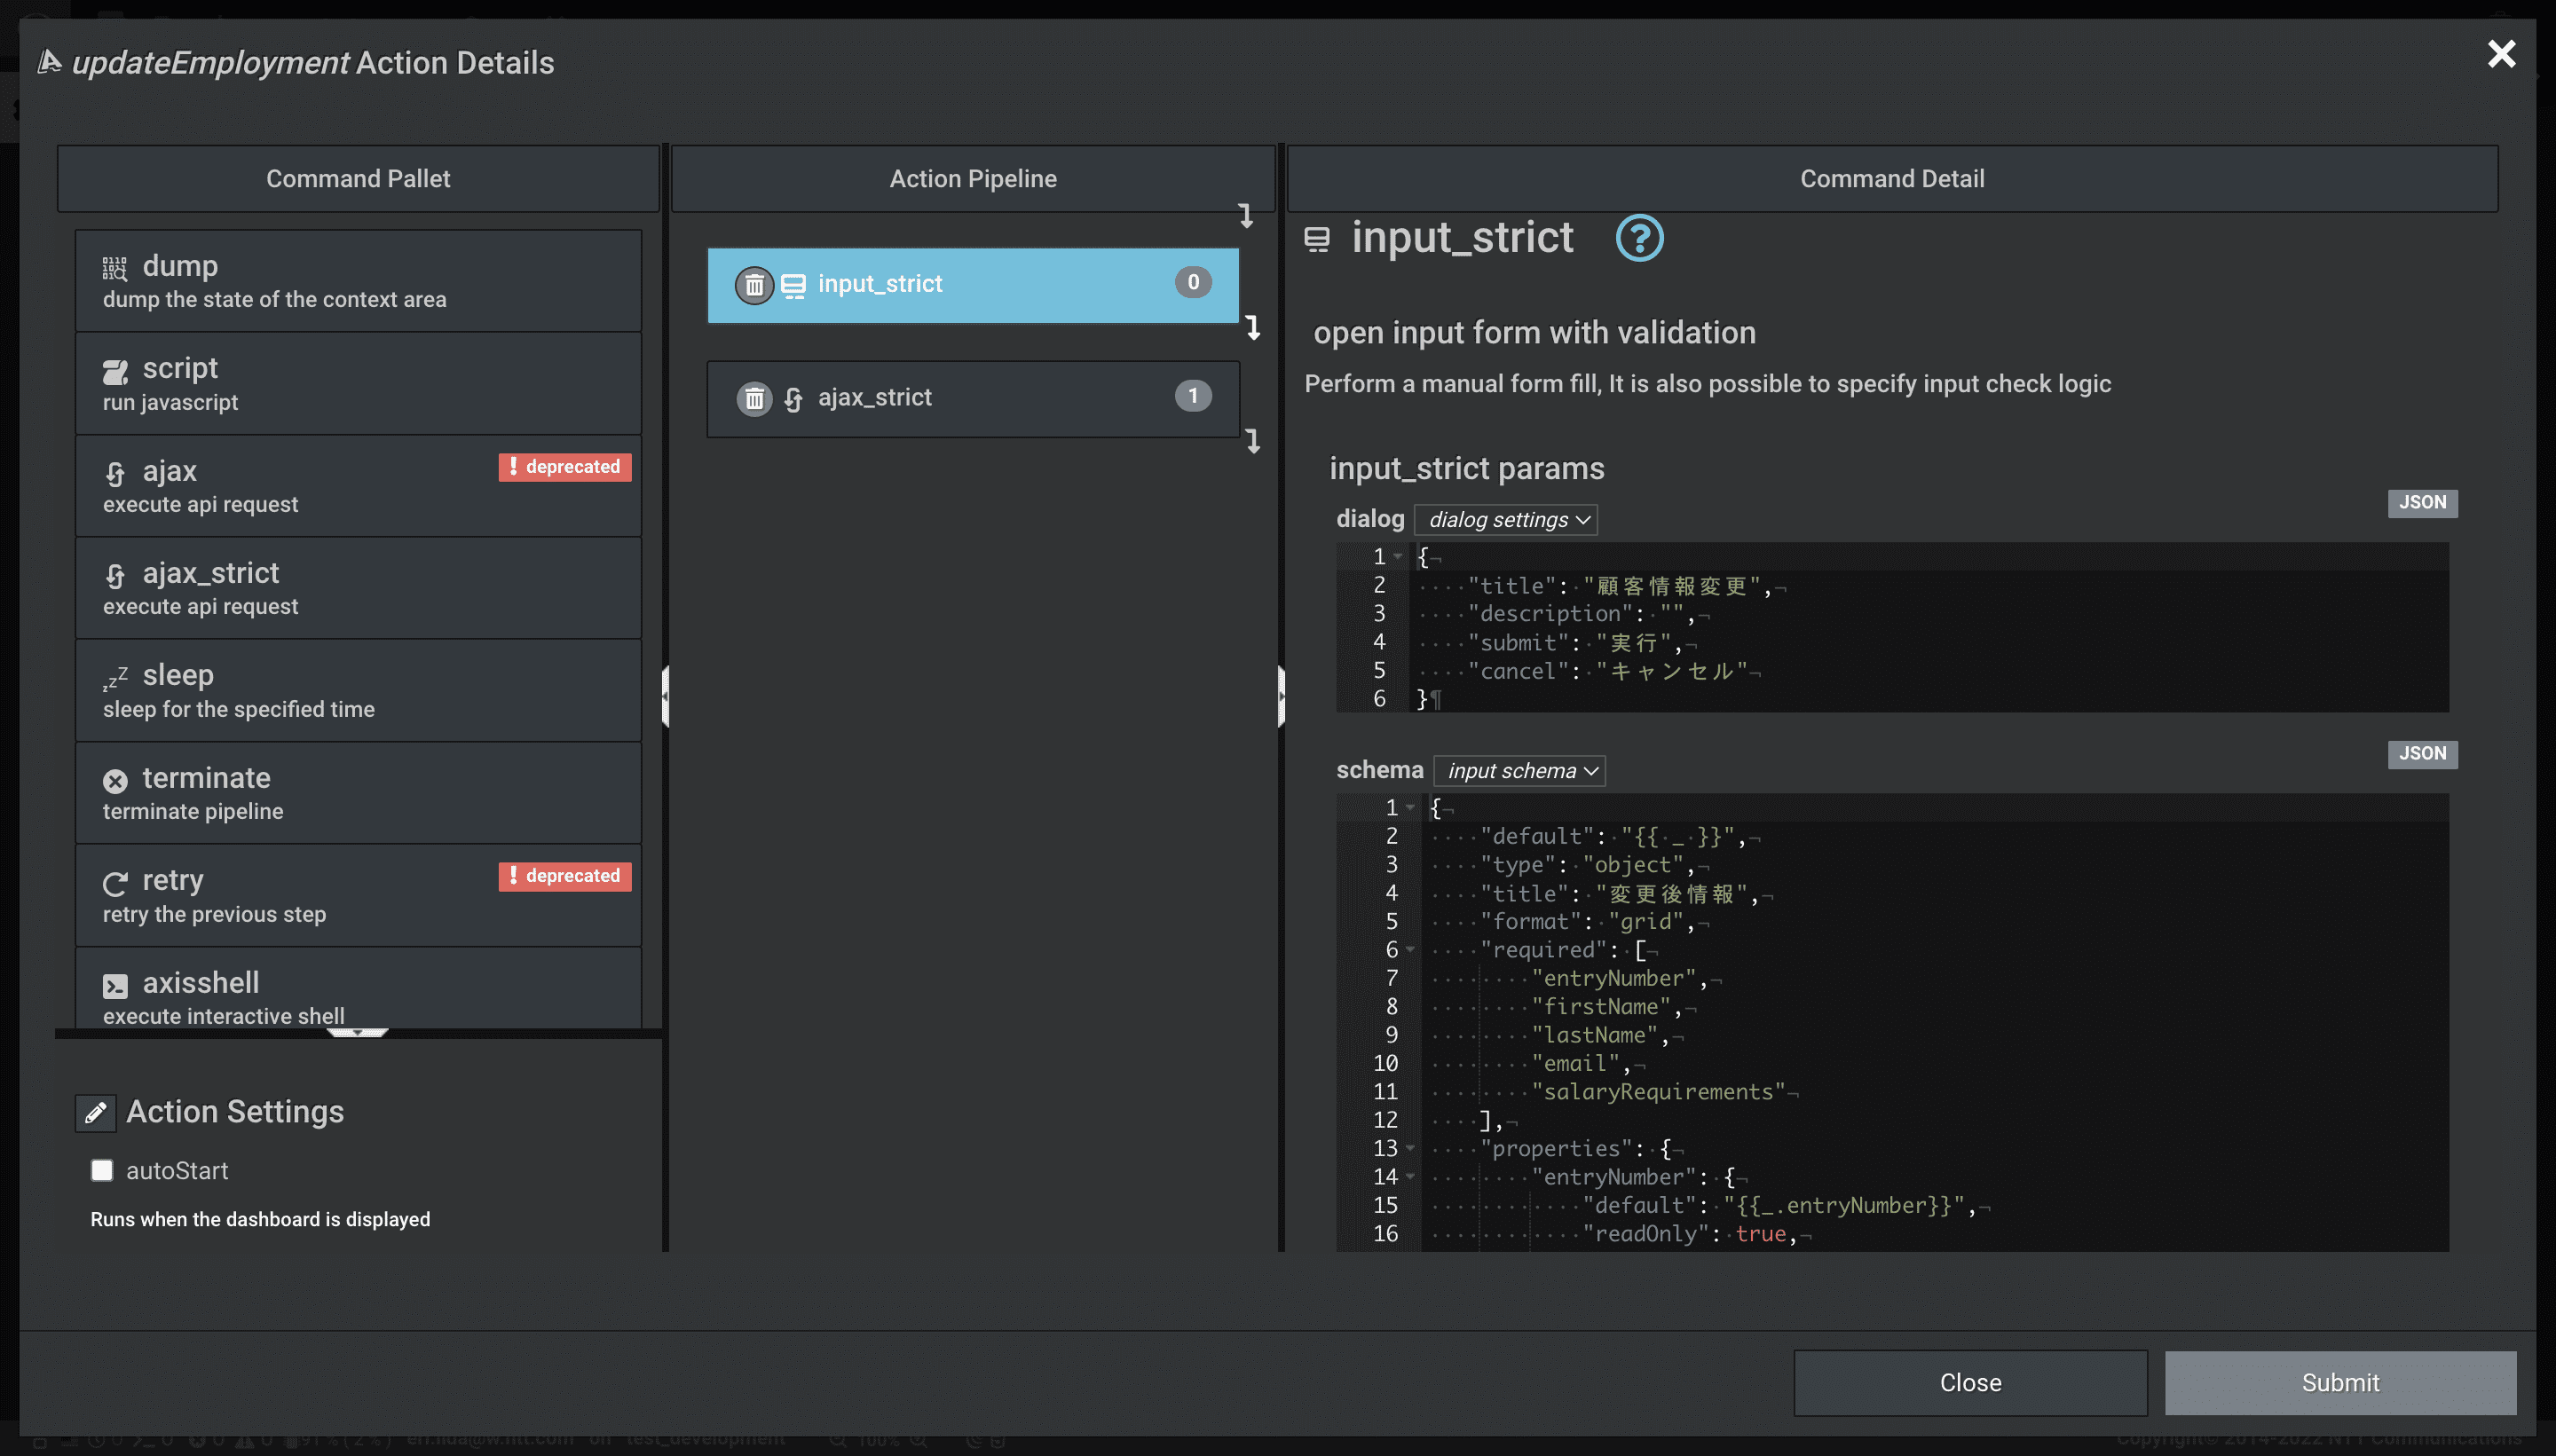
input_strict コマンド 設定値
-
input_strict>dialogパラメータjson
{ "title": "Employment情報変更", "description": "", "submit": "実行", "cancel": "キャンセル" } -
input_strict>schemaパラメータjson
{ "default": "{{ _ }}", "type": "object", "title": "変更後情報", "format": "grid", "required": [ "entryNumber", "firstName", "lastName", "email", "salaryRequirements" ], "properties": { "entryNumber": { "default": "{{_.entryNumber}}", "readOnly": true, "type": "string" }, "firstName": { "default": "{{_.firstName}}", "type": "string", "pattern": "[a-zA-Z]", "description": "名" }, "lastName": { "default": "{{_.lastName}}", "type": "string", "pattern": "[a-zA-Z]", "description": "姓" }, "email": { "default": "{{_.email}}", "type": "string", "format": "email", "description": "メールアドレス" }, "salaryRequirements": { "default": "{{_.salaryRequirements}}", "type": "integer", "enum": [ 200000, 300000, 400000 ], "description": "給与" } } } -
input_strict>validate_logicパラメータjson
初期値のまま -
input_strict>error messageパラメータjson
初期値のまま
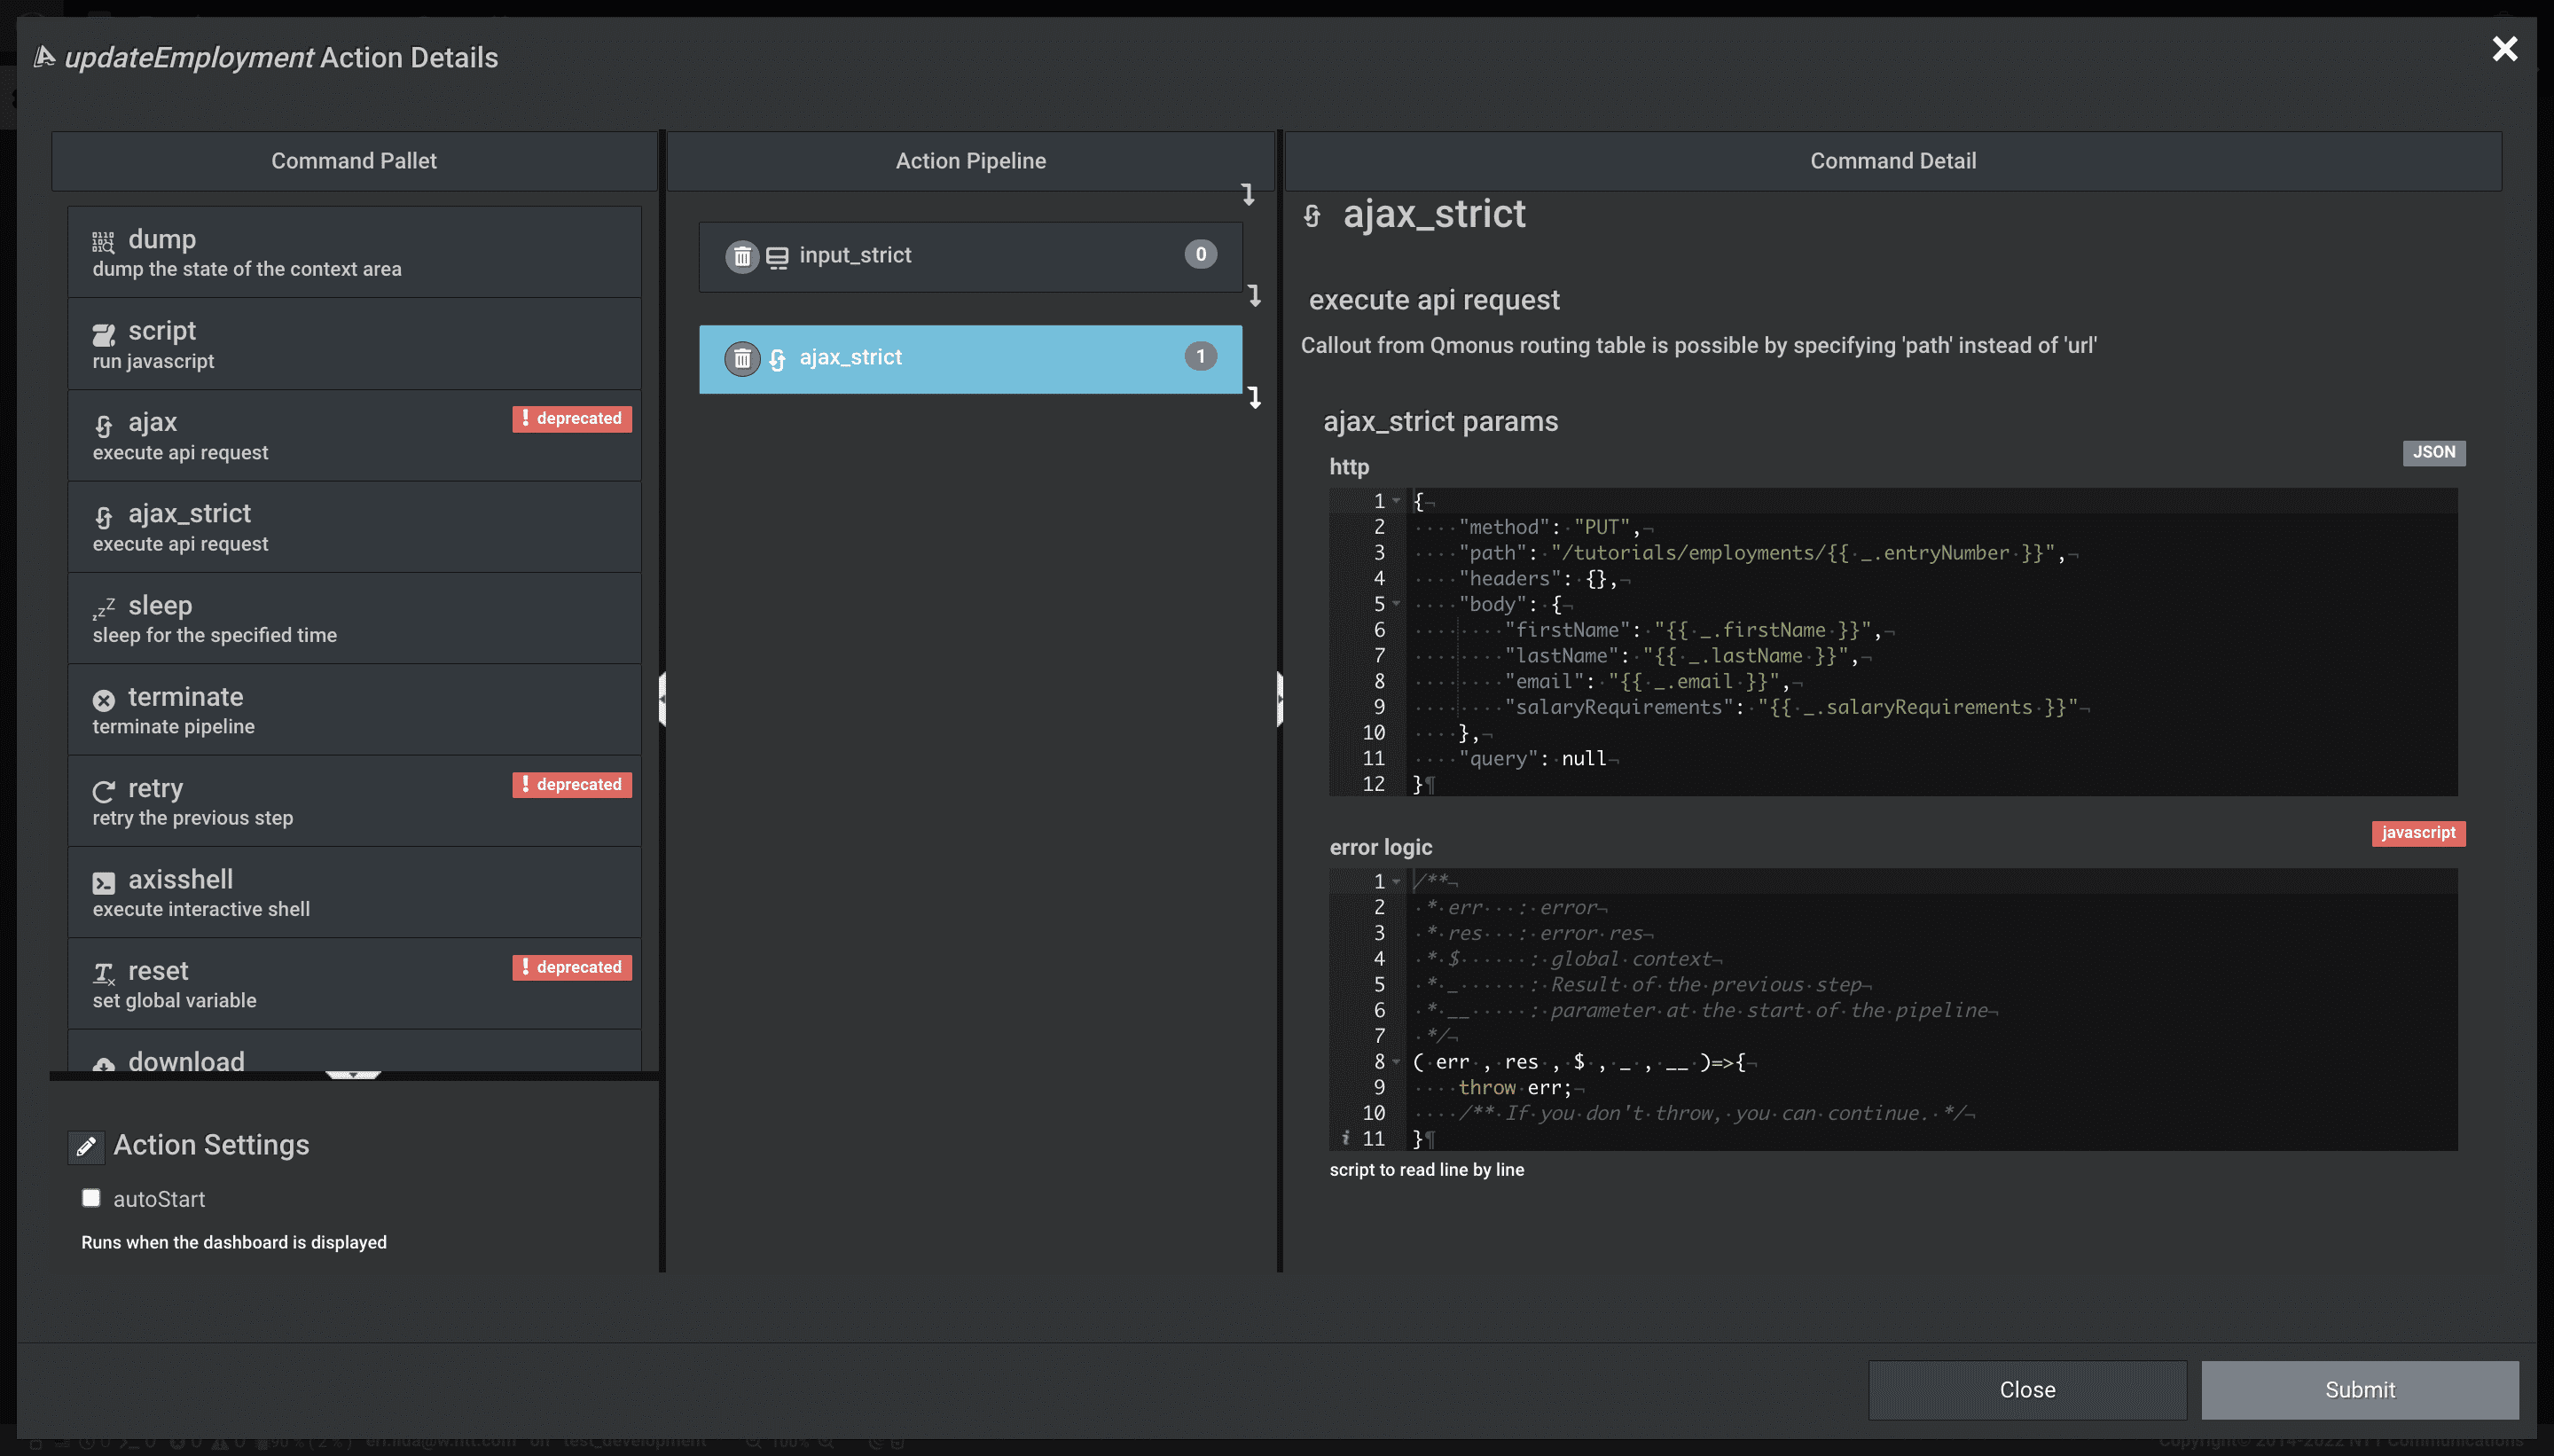
ajax_strict コマンド 設定値
-
ajax_strict>httpパラメータjson
{ "method": "PUT", "path": "/tutorials/employments/{{ _.entryNumber }}", "headers": {}, "body": { "firstName": "{{ _.firstName }}", "lastName": "{{ _.lastName }}", "email": "{{ _.email }}", "salaryRequirements": "{{ _.salaryRequirements }}" }, "query": null } -
ajax_strict>error logicパラメータjson
初期値のまま
confirm コマンド 設定値
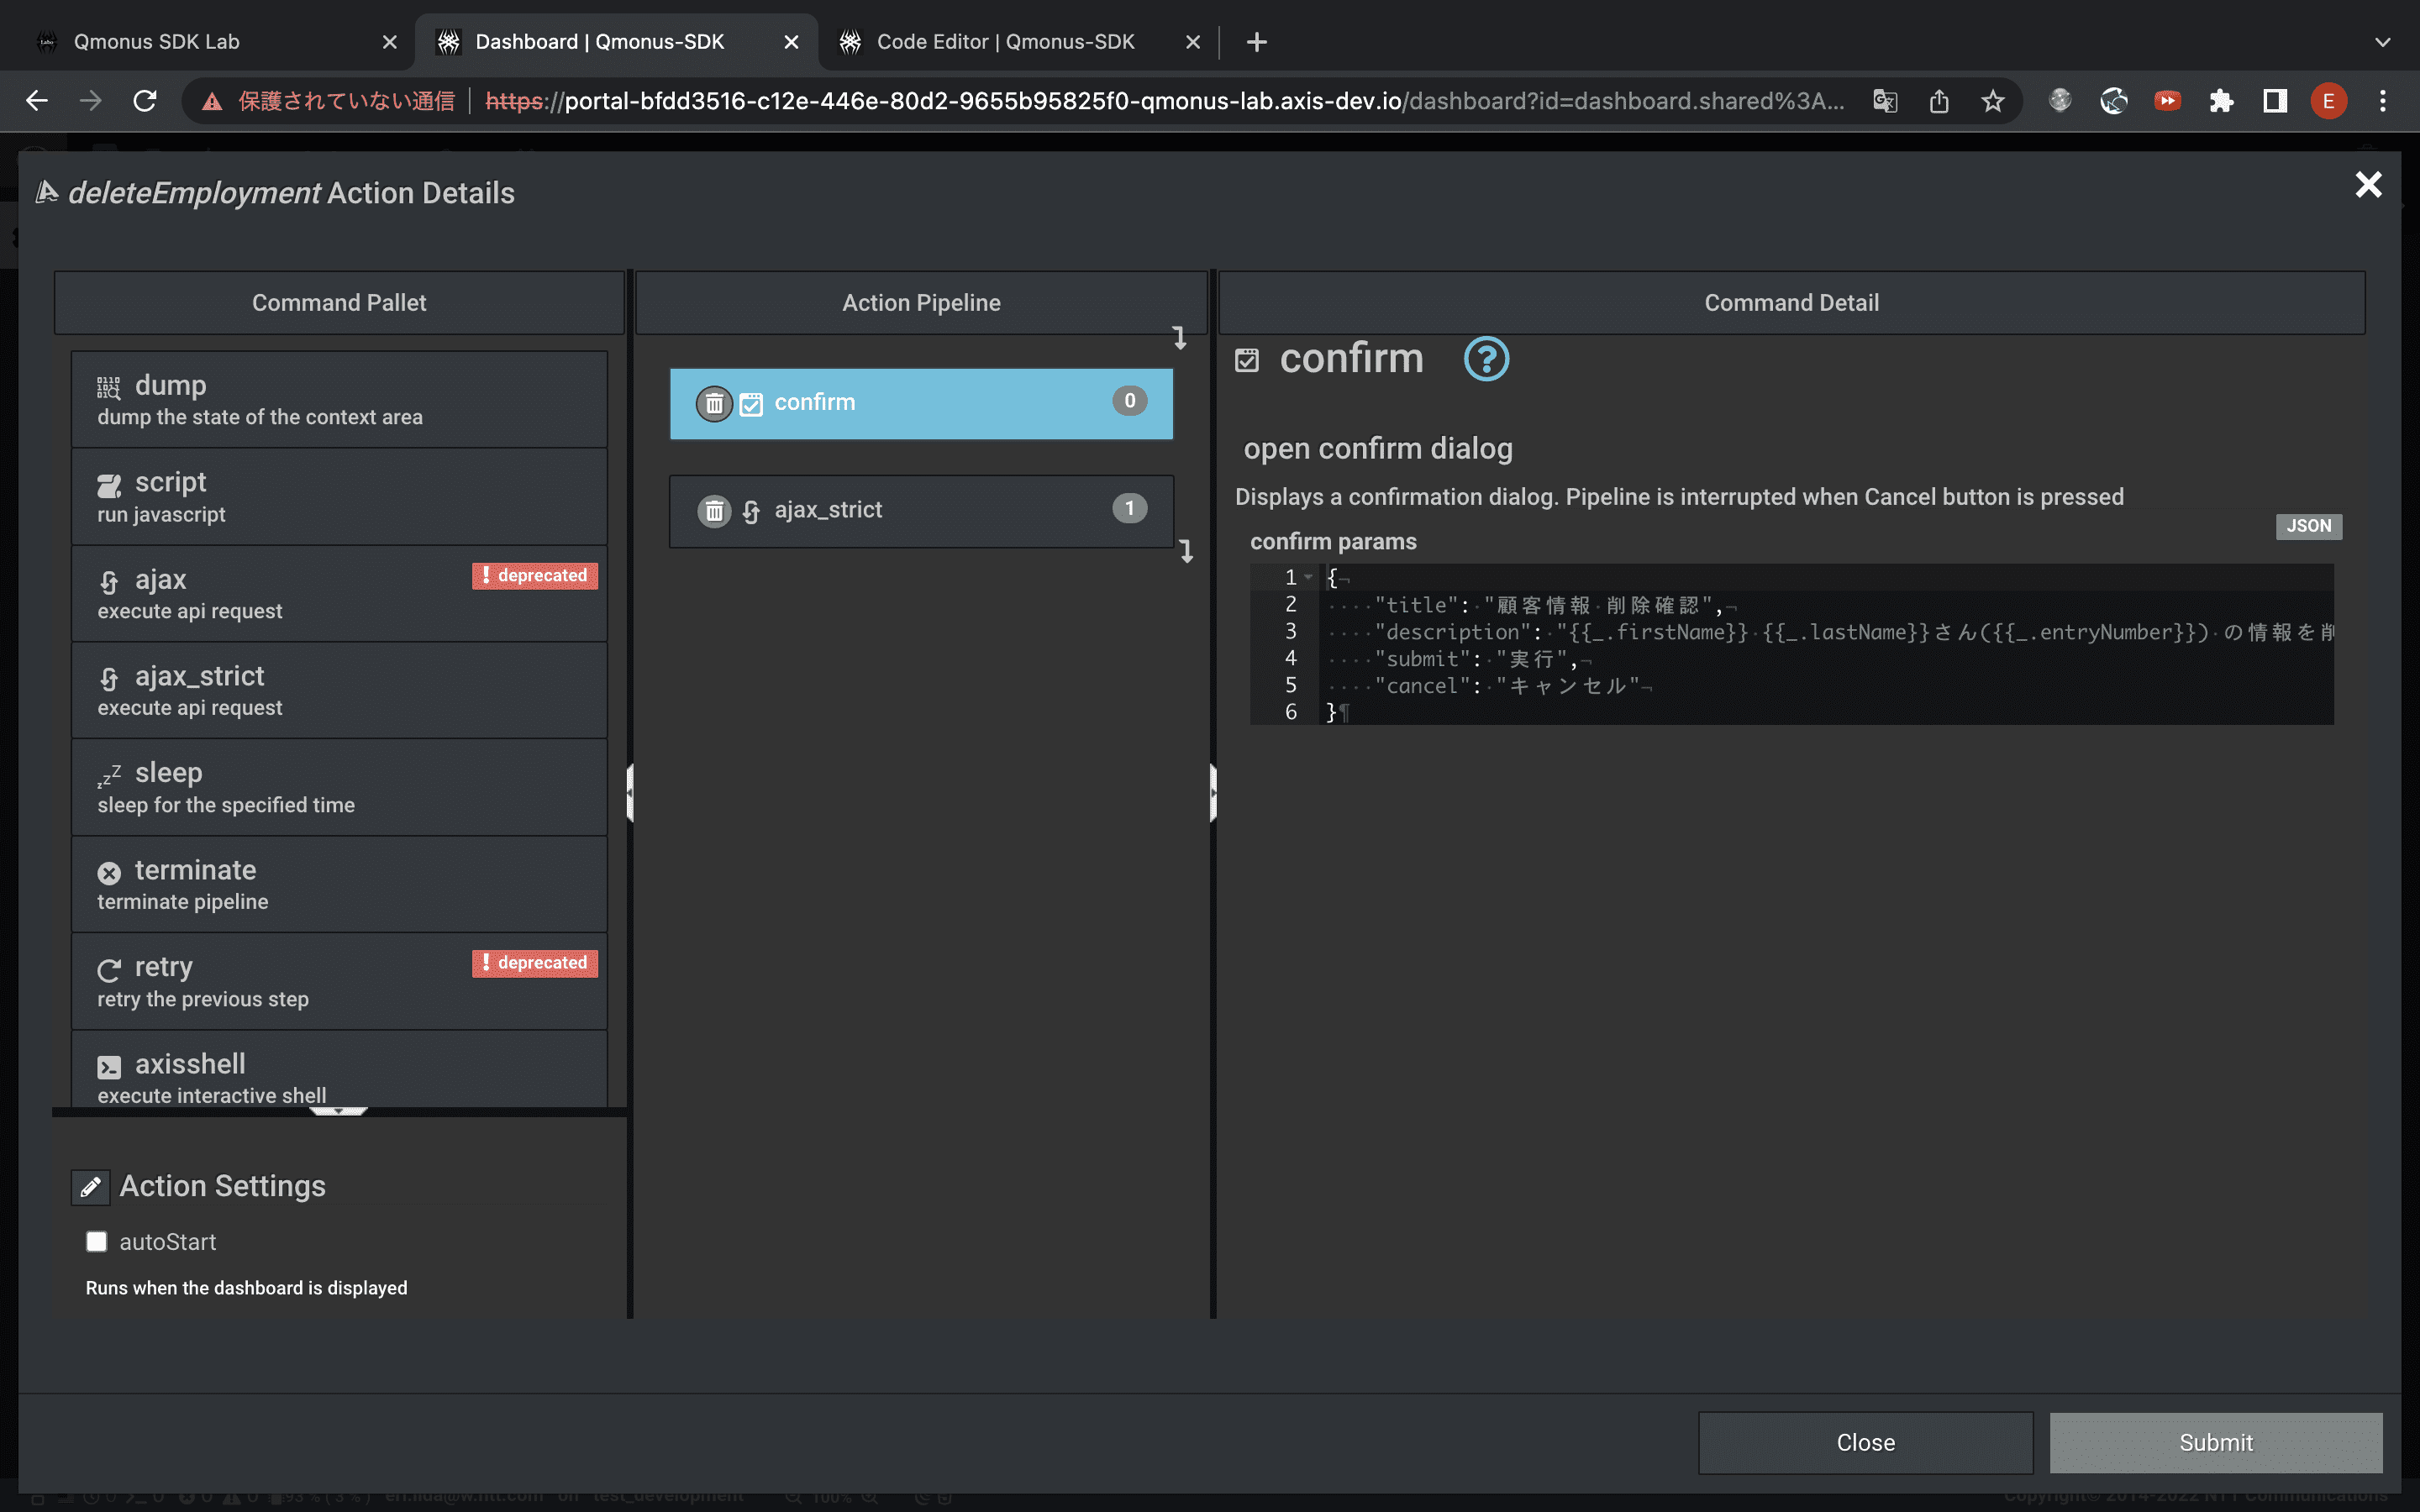
-
confirm>confirm paramsパラメータjson
{ "title": "Employment情報 削除確認", "description": "{{_.firstName}} {{_.lastName}}さん({{_.entryNumber}}) の情報を削除しますか?", "submit": "実行", "cancel": "キャンセル" }
ajax_strict コマンド 設定値
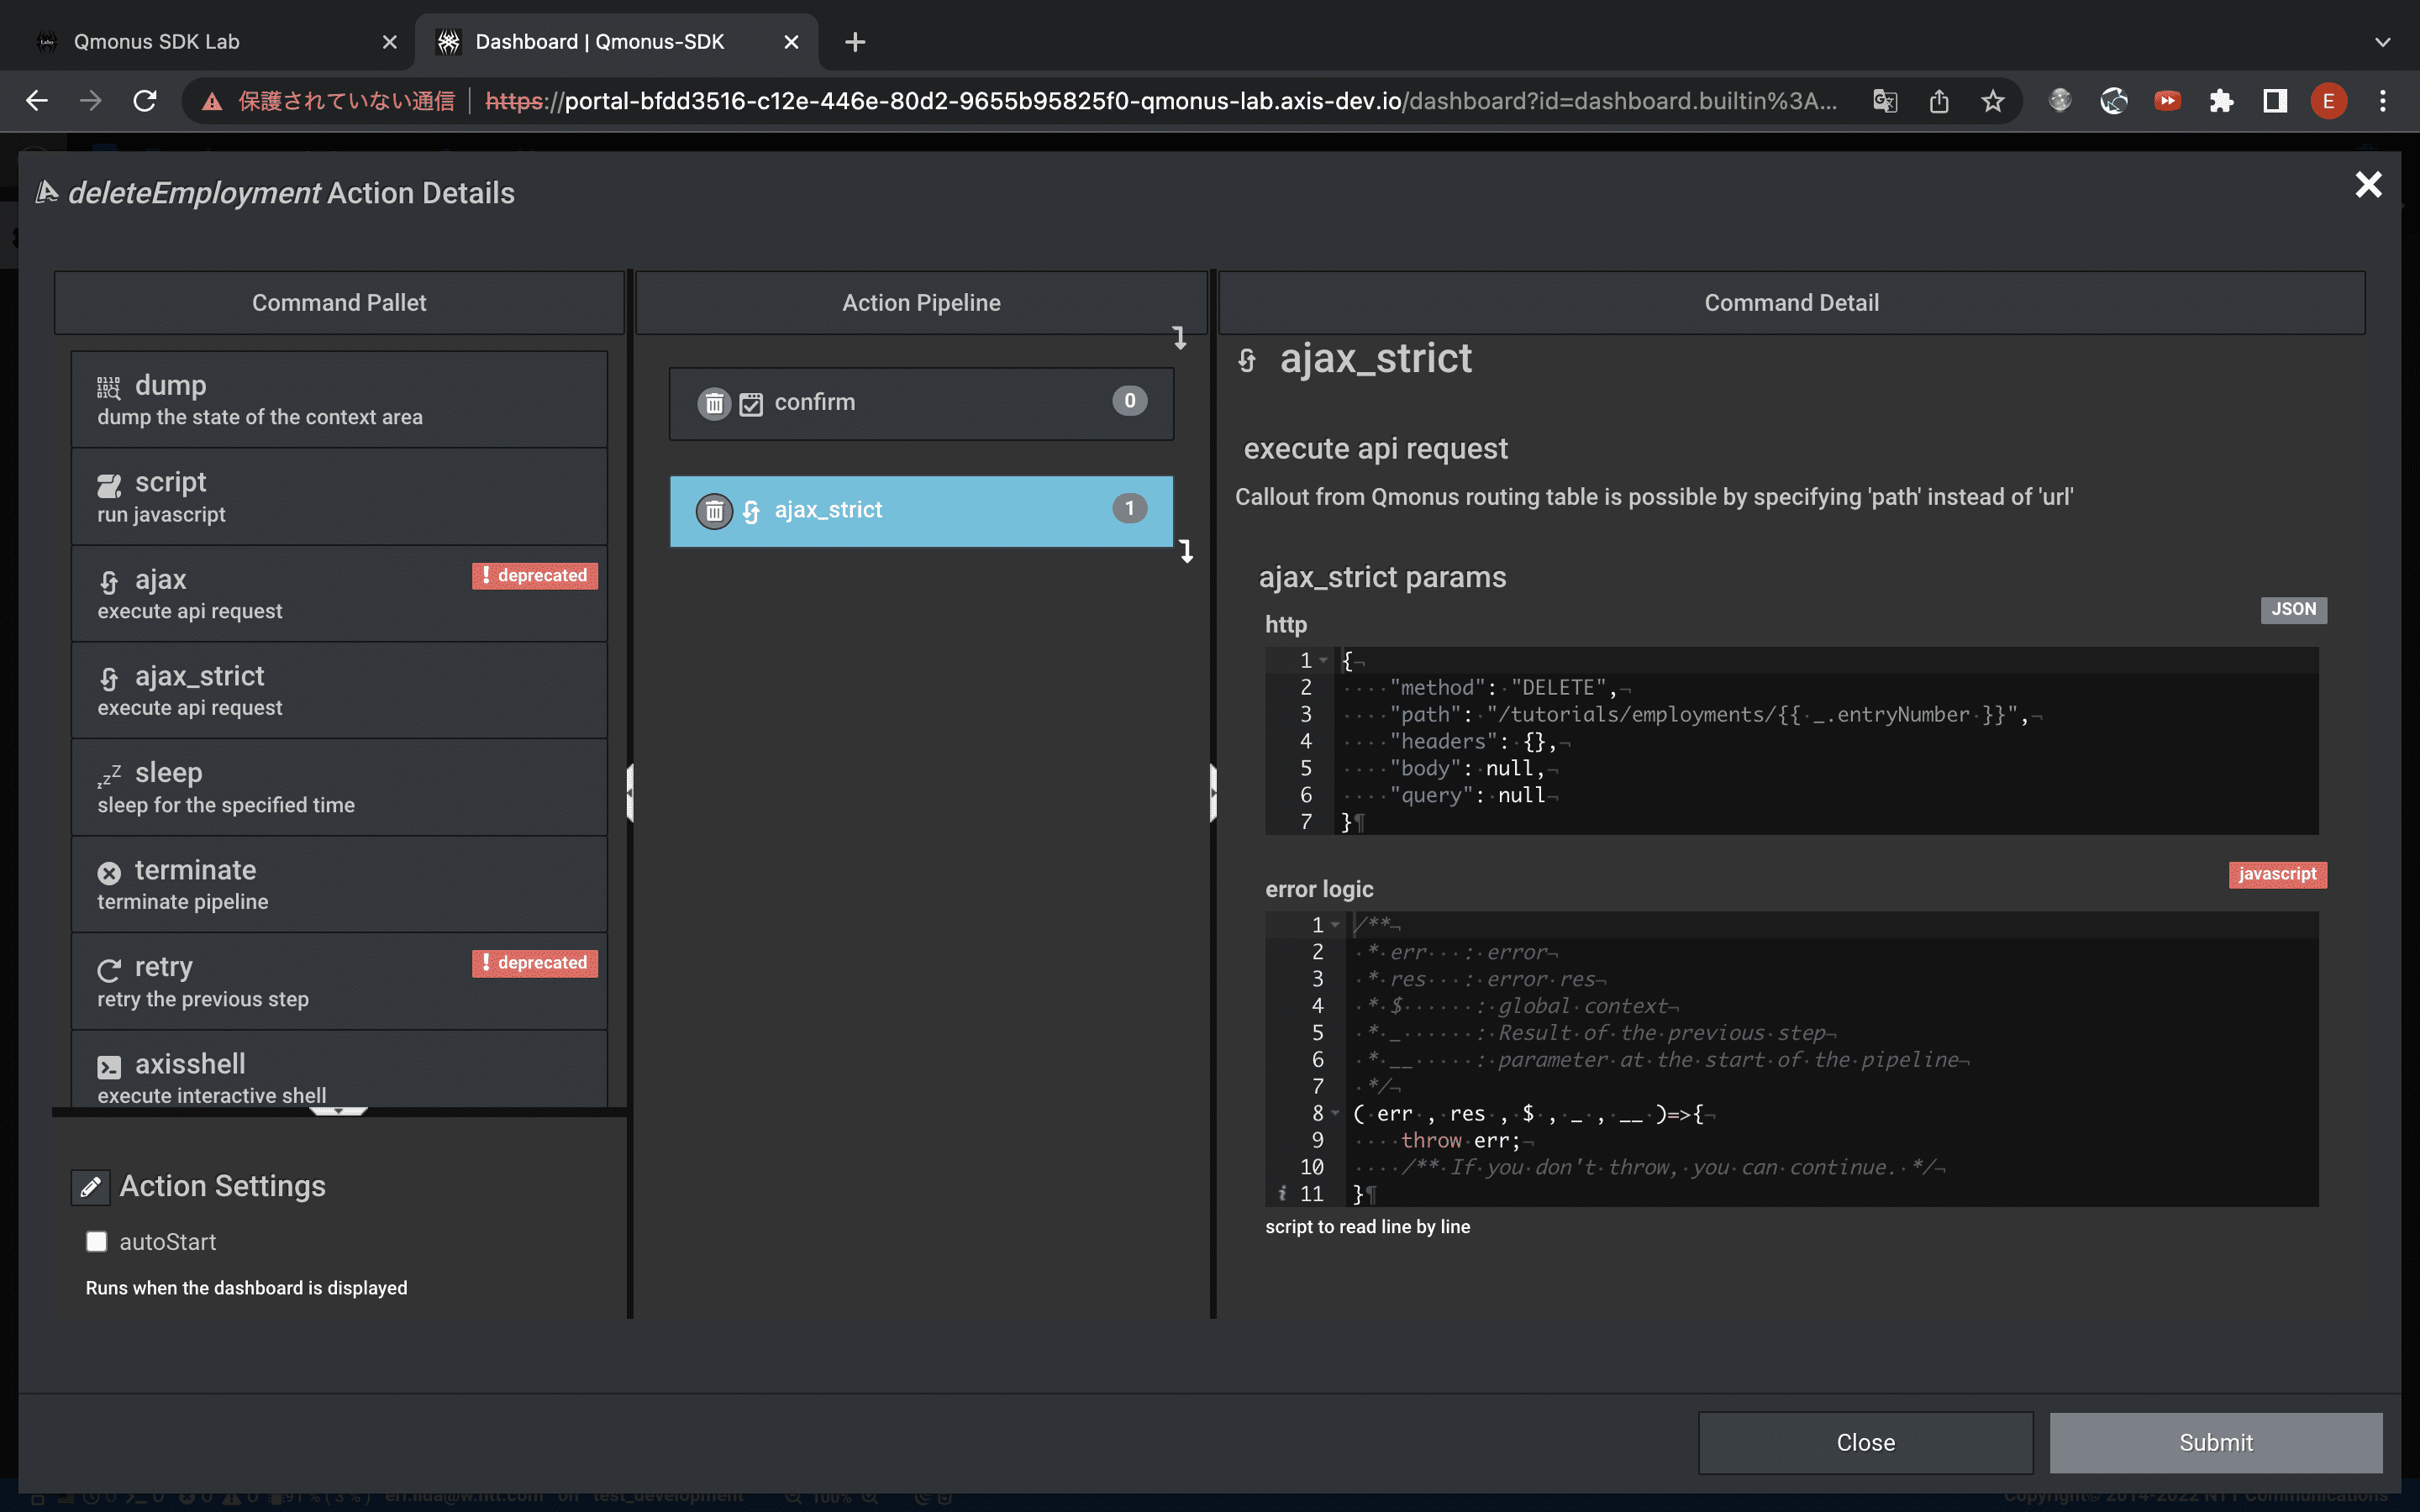
-
ajax_strict>httpパラメータjson
{ "method": "DELETE", "path": "/tutorials/employments/{{ _.entryNumber }}", "headers": {}, "body": null, "query": null } -
ajax_strict>error logicパラメータjson
初期値のまま
Context Area (Variables, Action) の設定は以上です。
3. Widget 選択 / 設定
Dashboard Builder にはデータ型 (Object / Array / スカラ) に応じた入出力ウィジェットがバンドルされており、表示したいAPIのデータに合わせたウィジェットを自由に選択・配置し、データをバインドすることができます。また、 Vue.js の Component フォーマットで自作のウィジェットを追加することも可能です。ここでは、利用頻度の高いウィジェット Array Table View を選択して Dashboard を作成していきます。
3.1 Widget 選択
-
[Builtin Widgets] > [Array Table View] を選択します。
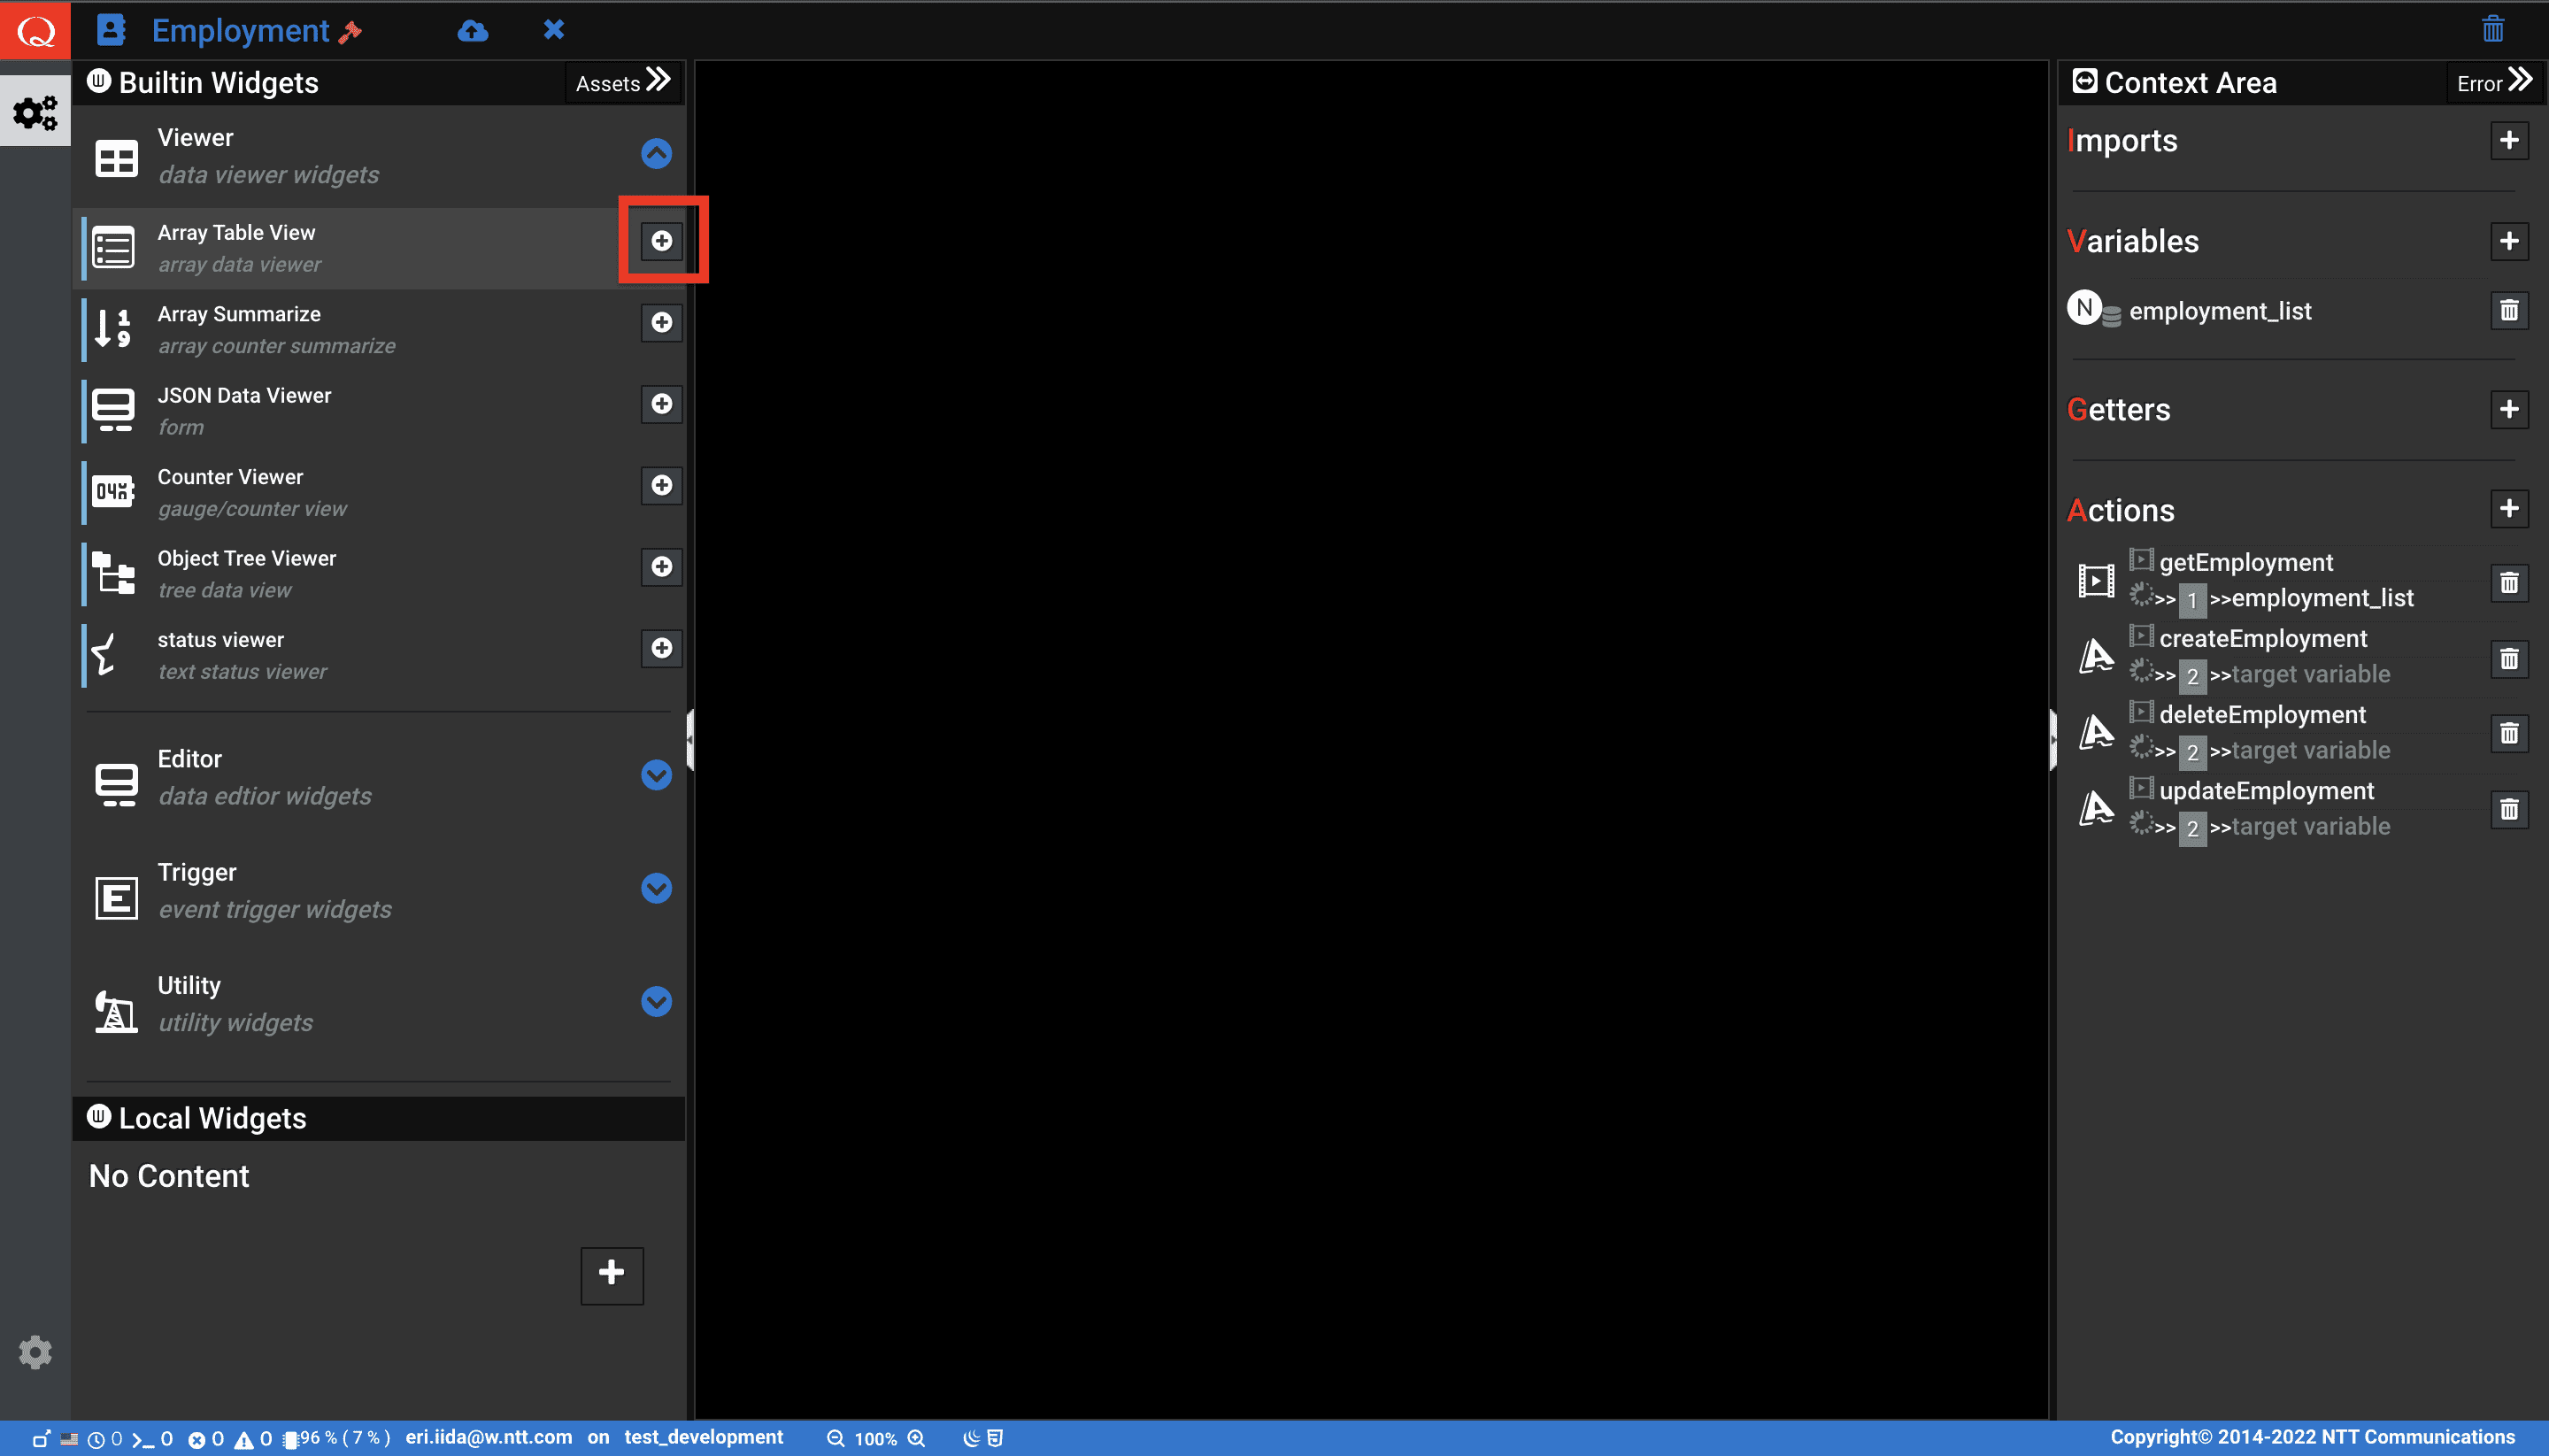
3.2 Widget 設定
3.2.1 Display 設定
-
ステップ [Display] では Widget のタイトルを設定します。ここでは、[雇用管理] と設定します。
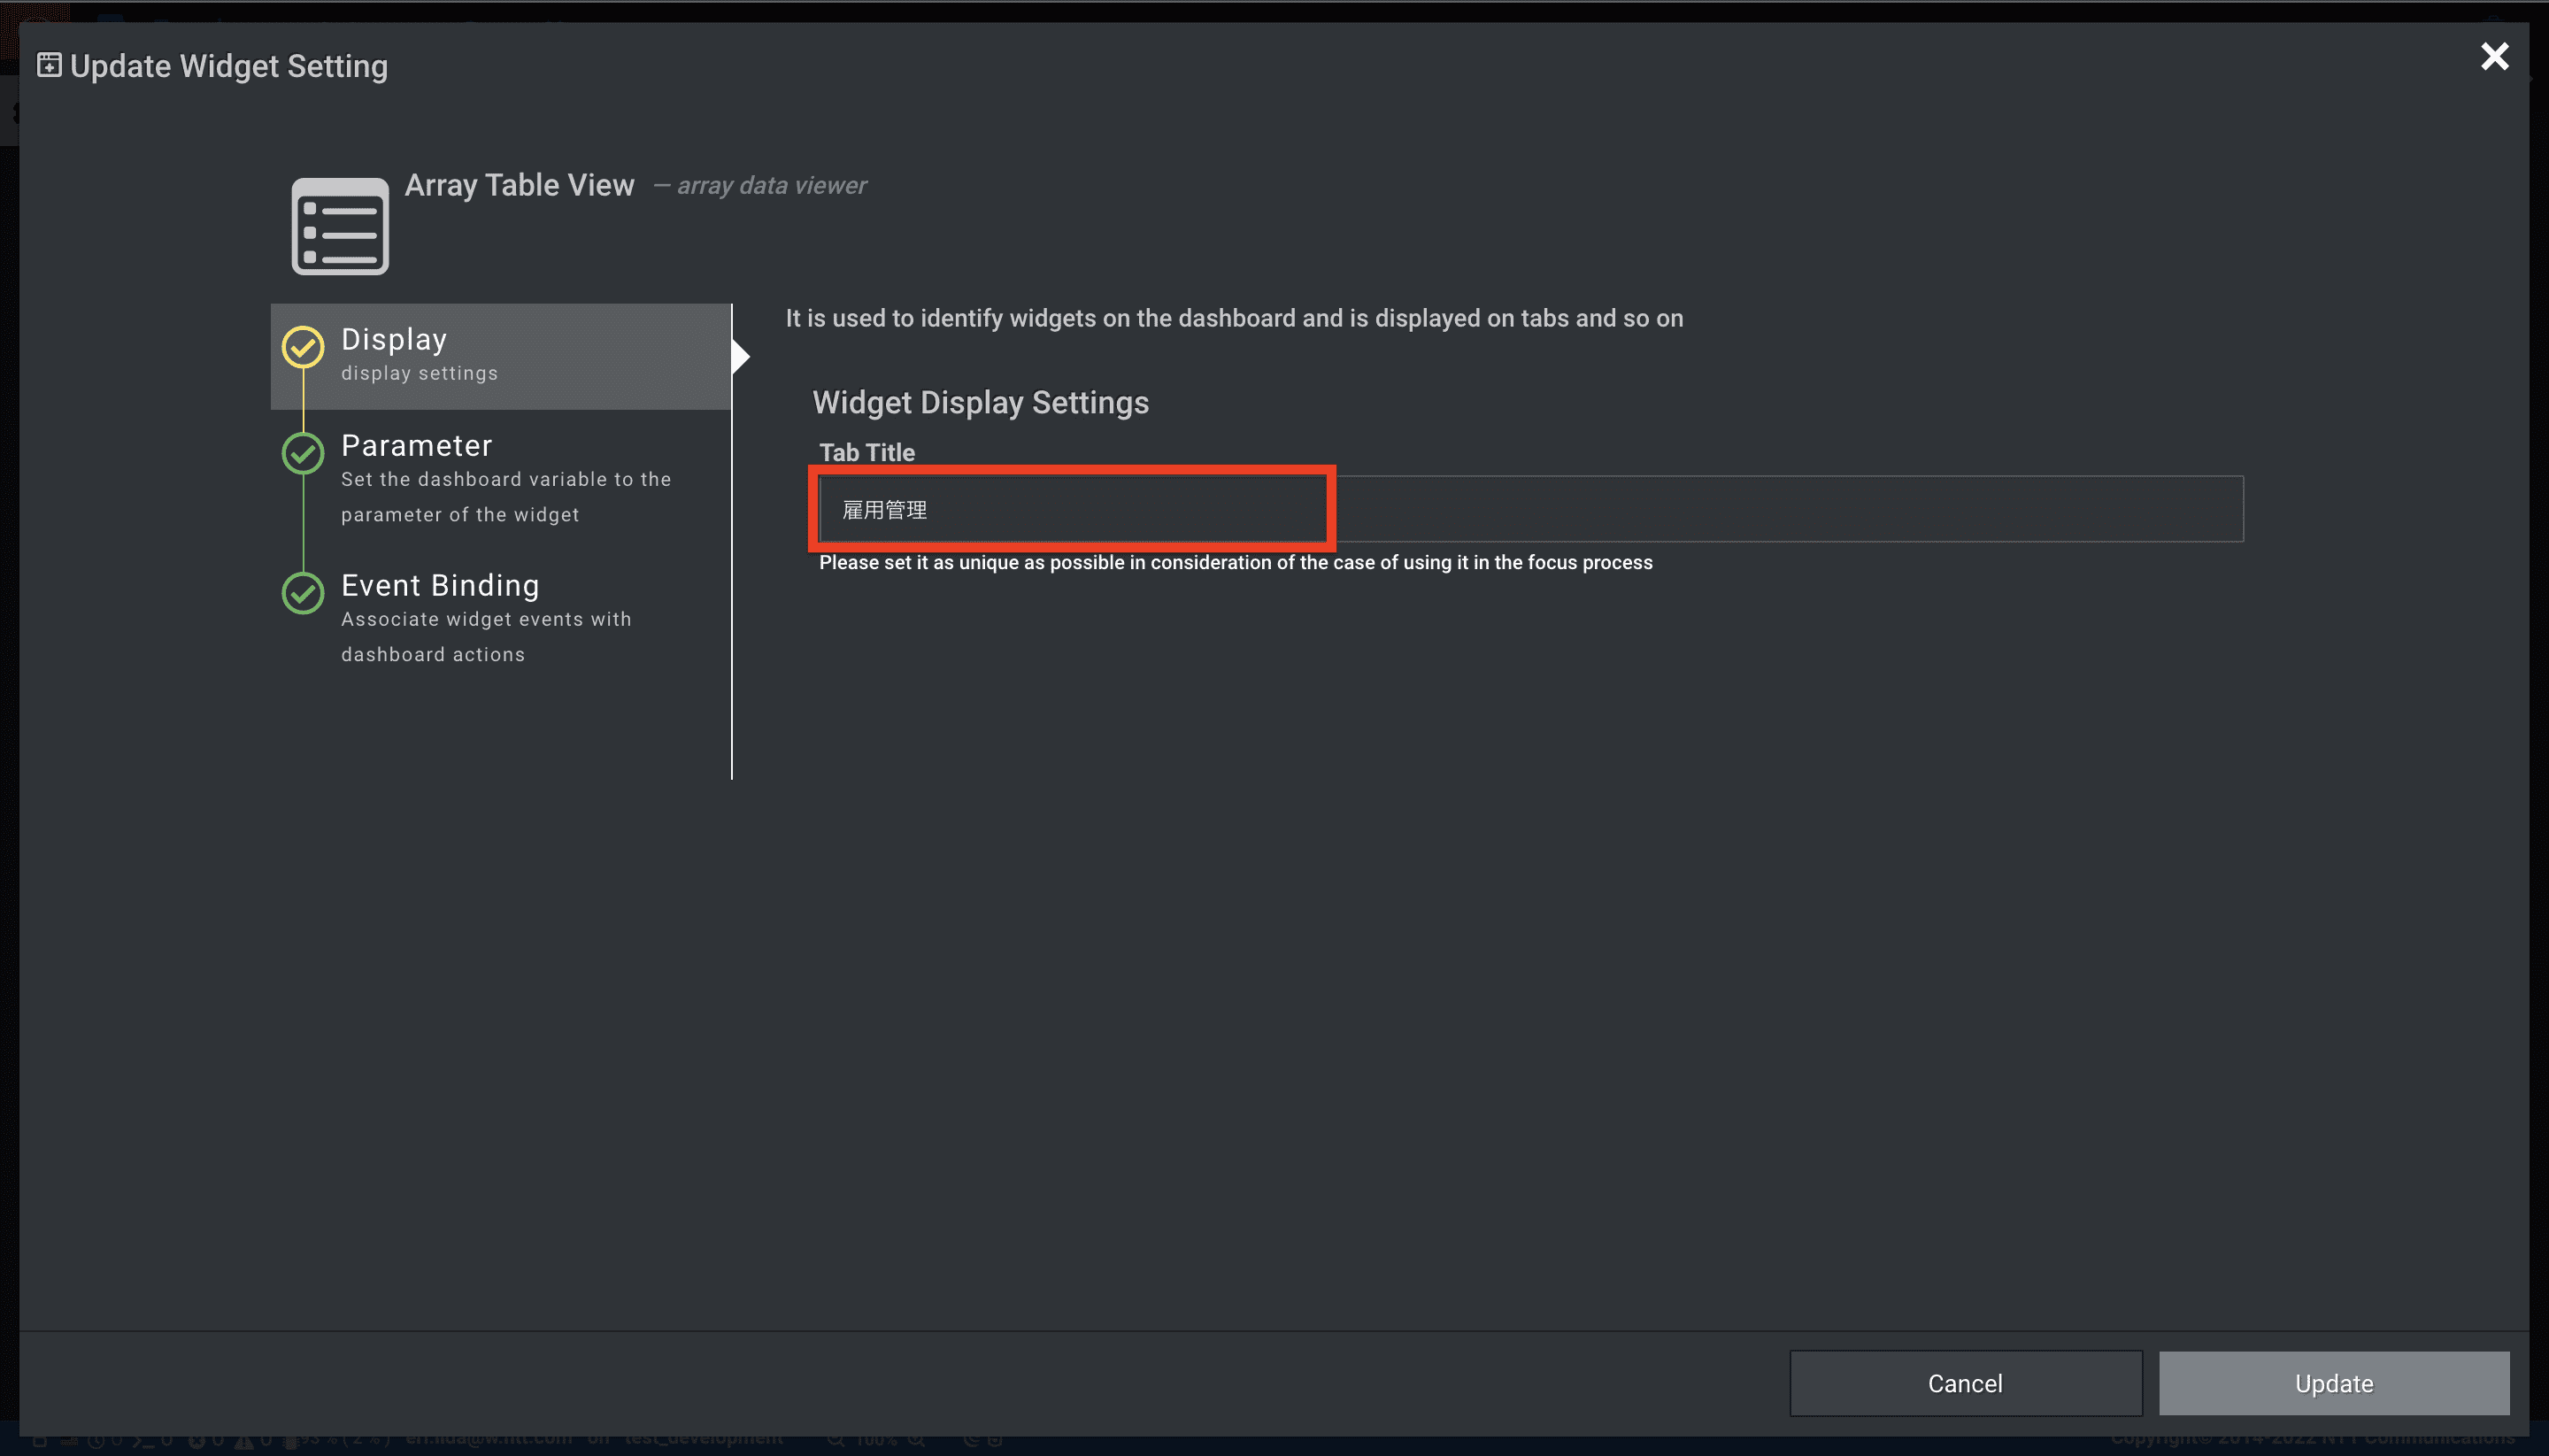
Dashboard 完成時に以下のように表示されます。

3.2.2 Parameter 設定
-
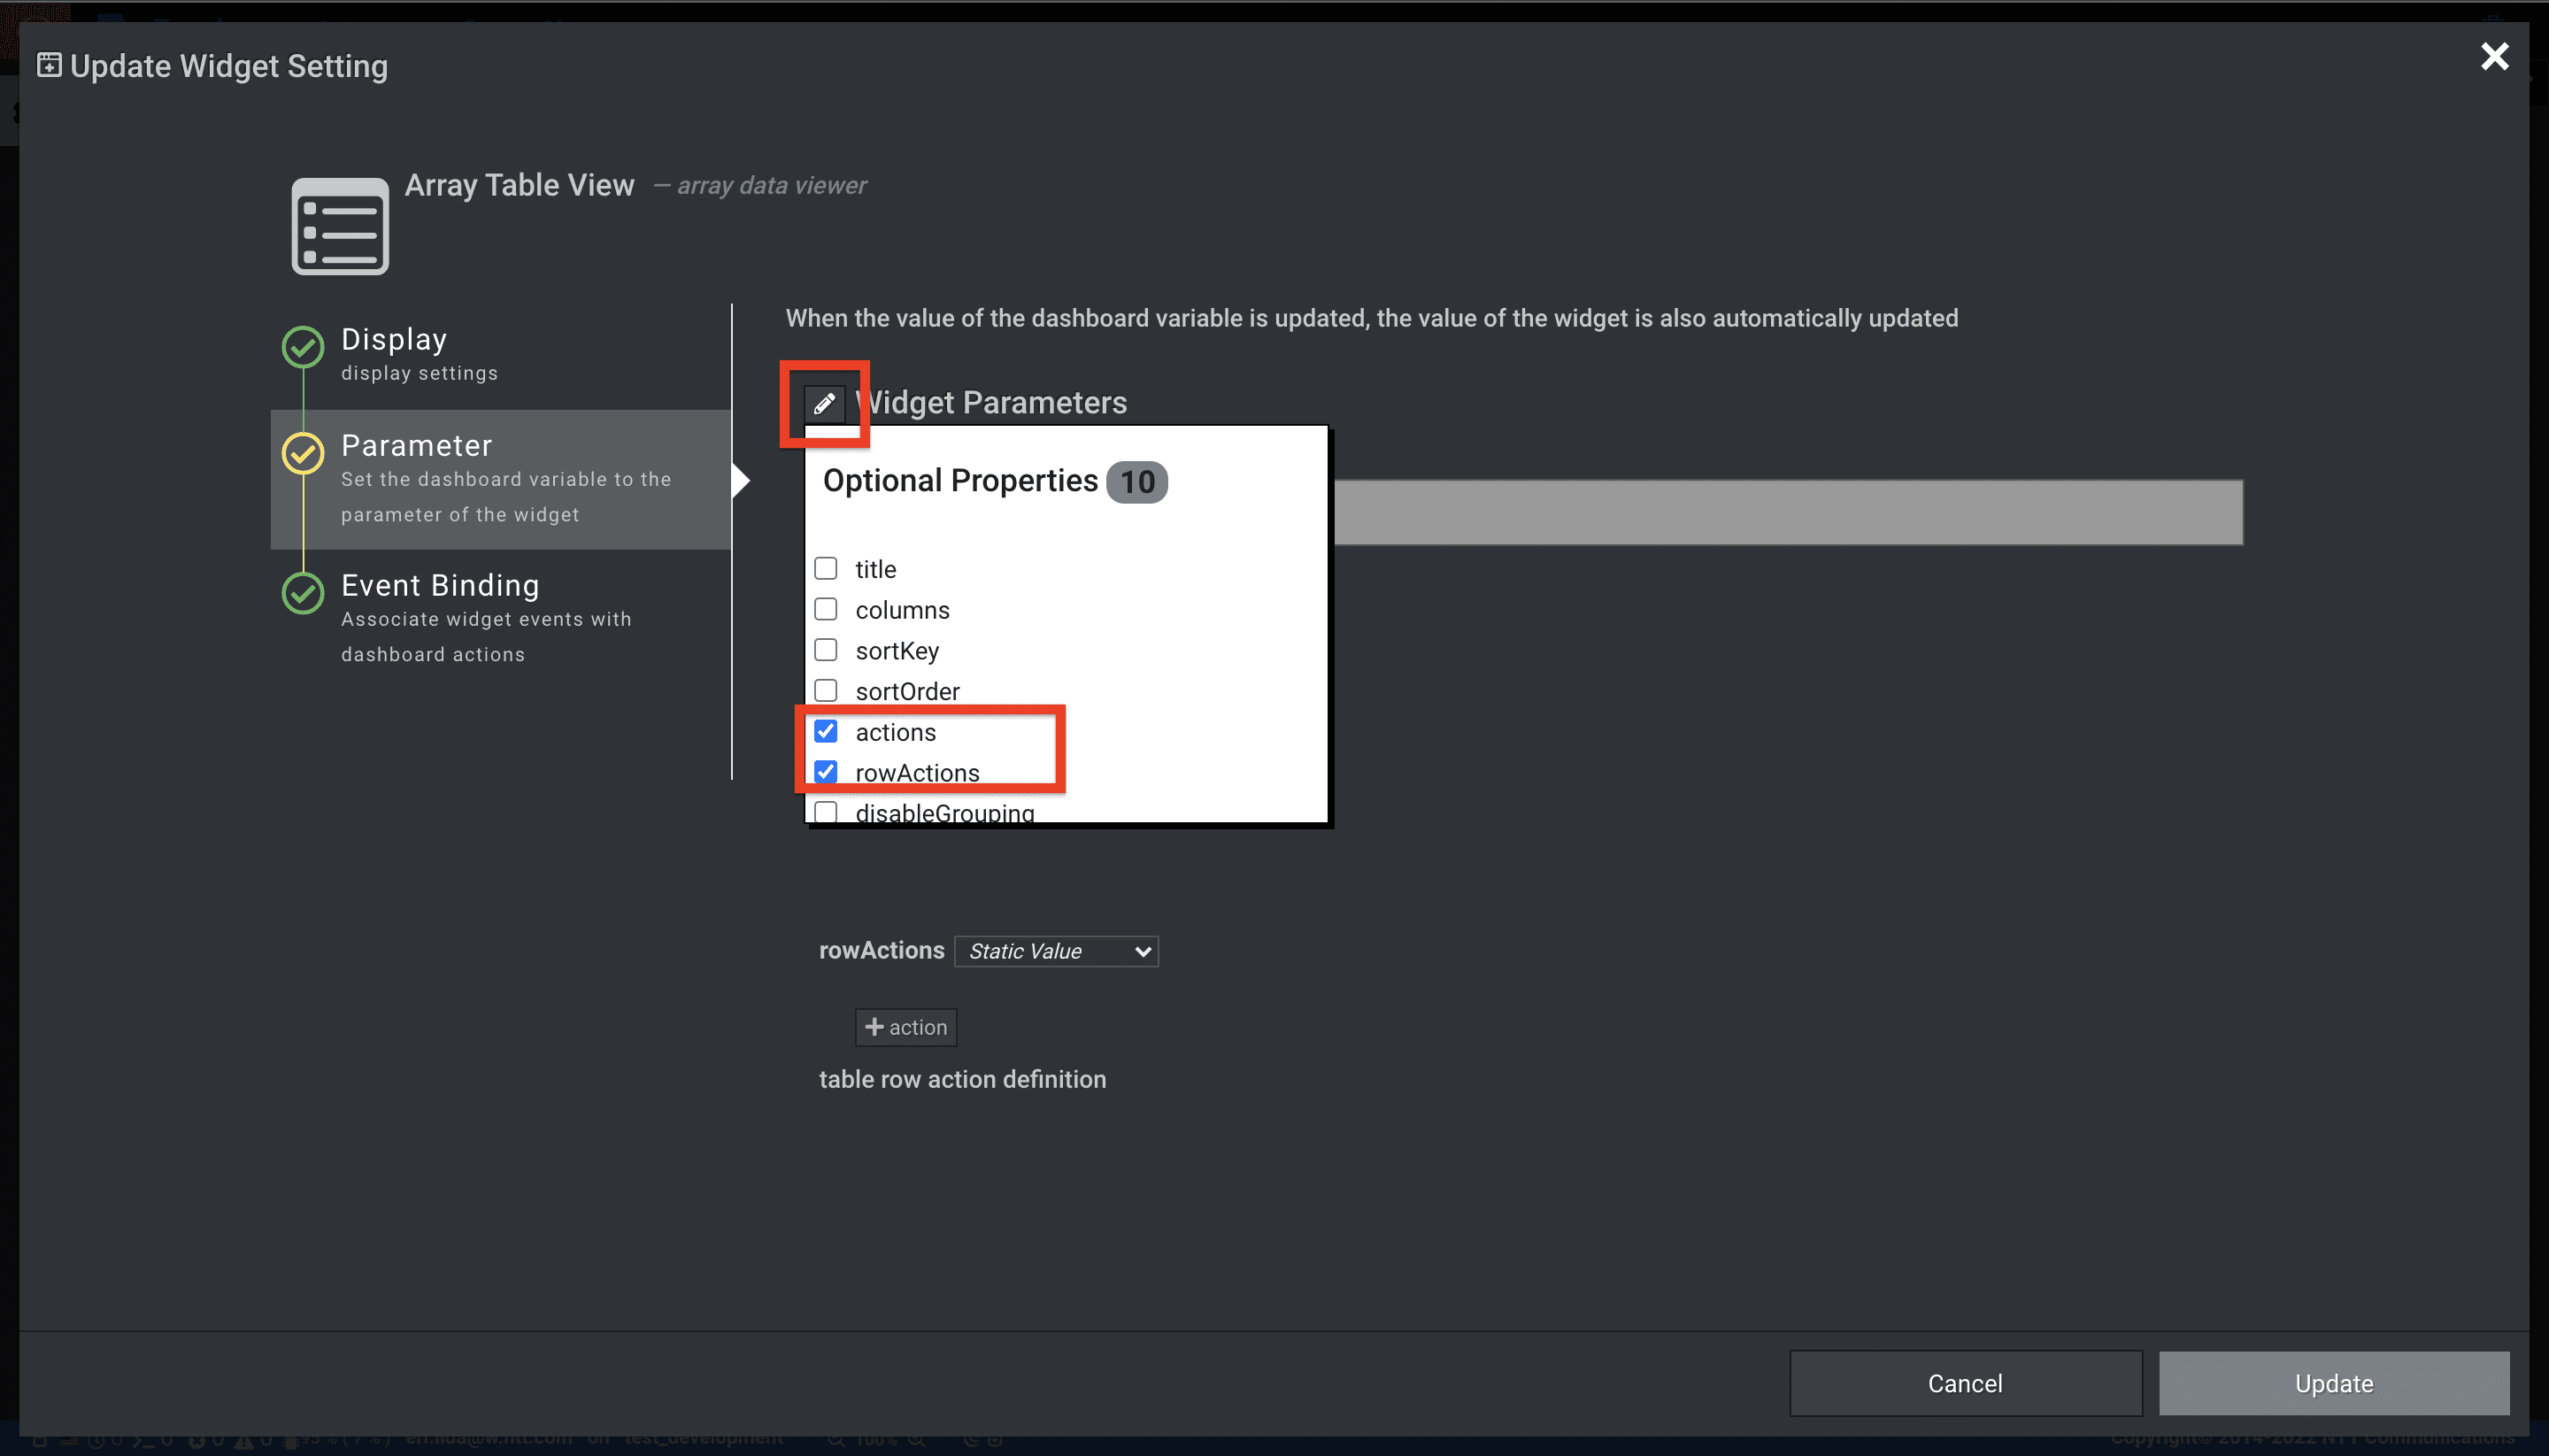
[Widget Parameters] 左のeditボタンを押下し、オプションパラメータ [actions] [rowActions] を選択します。
-
各パラメータに値を設定していきます。[data] には顧客一覧情報を格納するVariable
employment_listを選択します。[actions]、[rowActions] の設定手順は次項で記載します。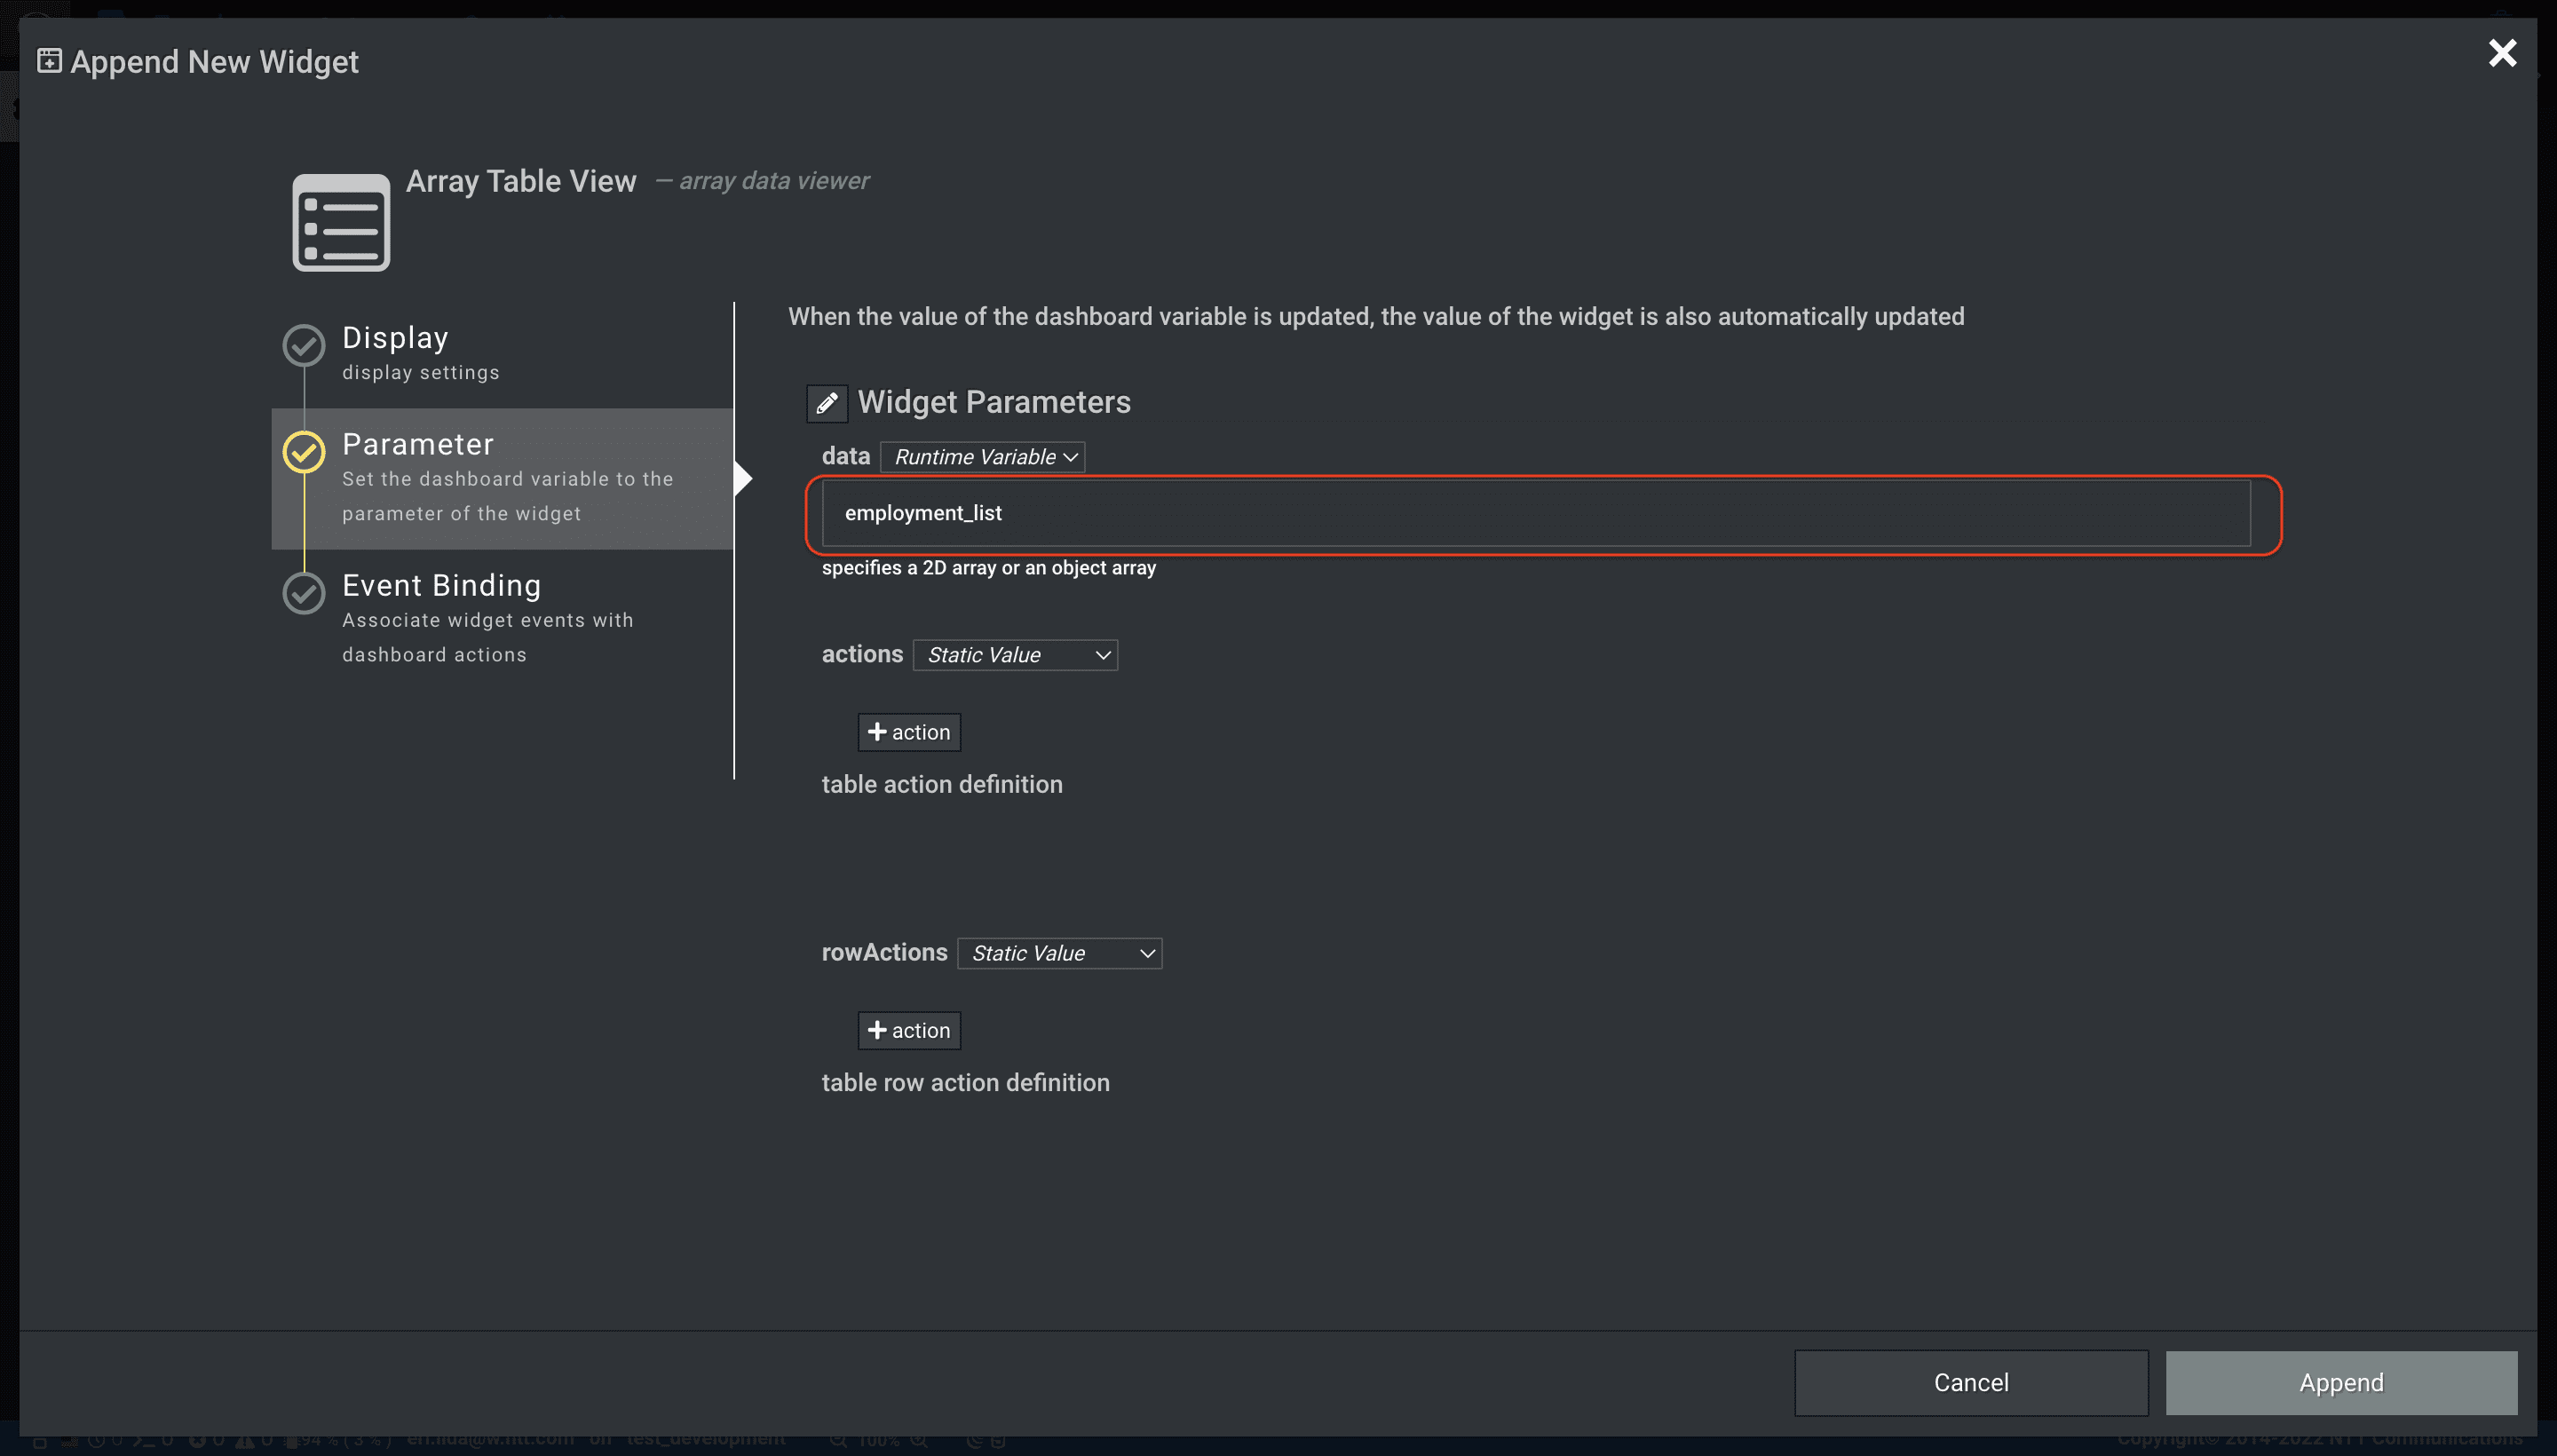
Widget Parameters 設定値 data Widget に表示させるデータを設定する。ここでは Context Area の Variables で定義した、リスト情報employment_listをプルダウンで選択する。 actions 次項で記載。Employment 情報の新規登録ボタンと、最新の data ( employment_list) を取得する更新ボタンをパラメータとして設定する。 rowActions 次項で記載。data (employment_list) の各Employment情報に対して、編集ボタンと削除ボタンをパラメータ設定する。 -
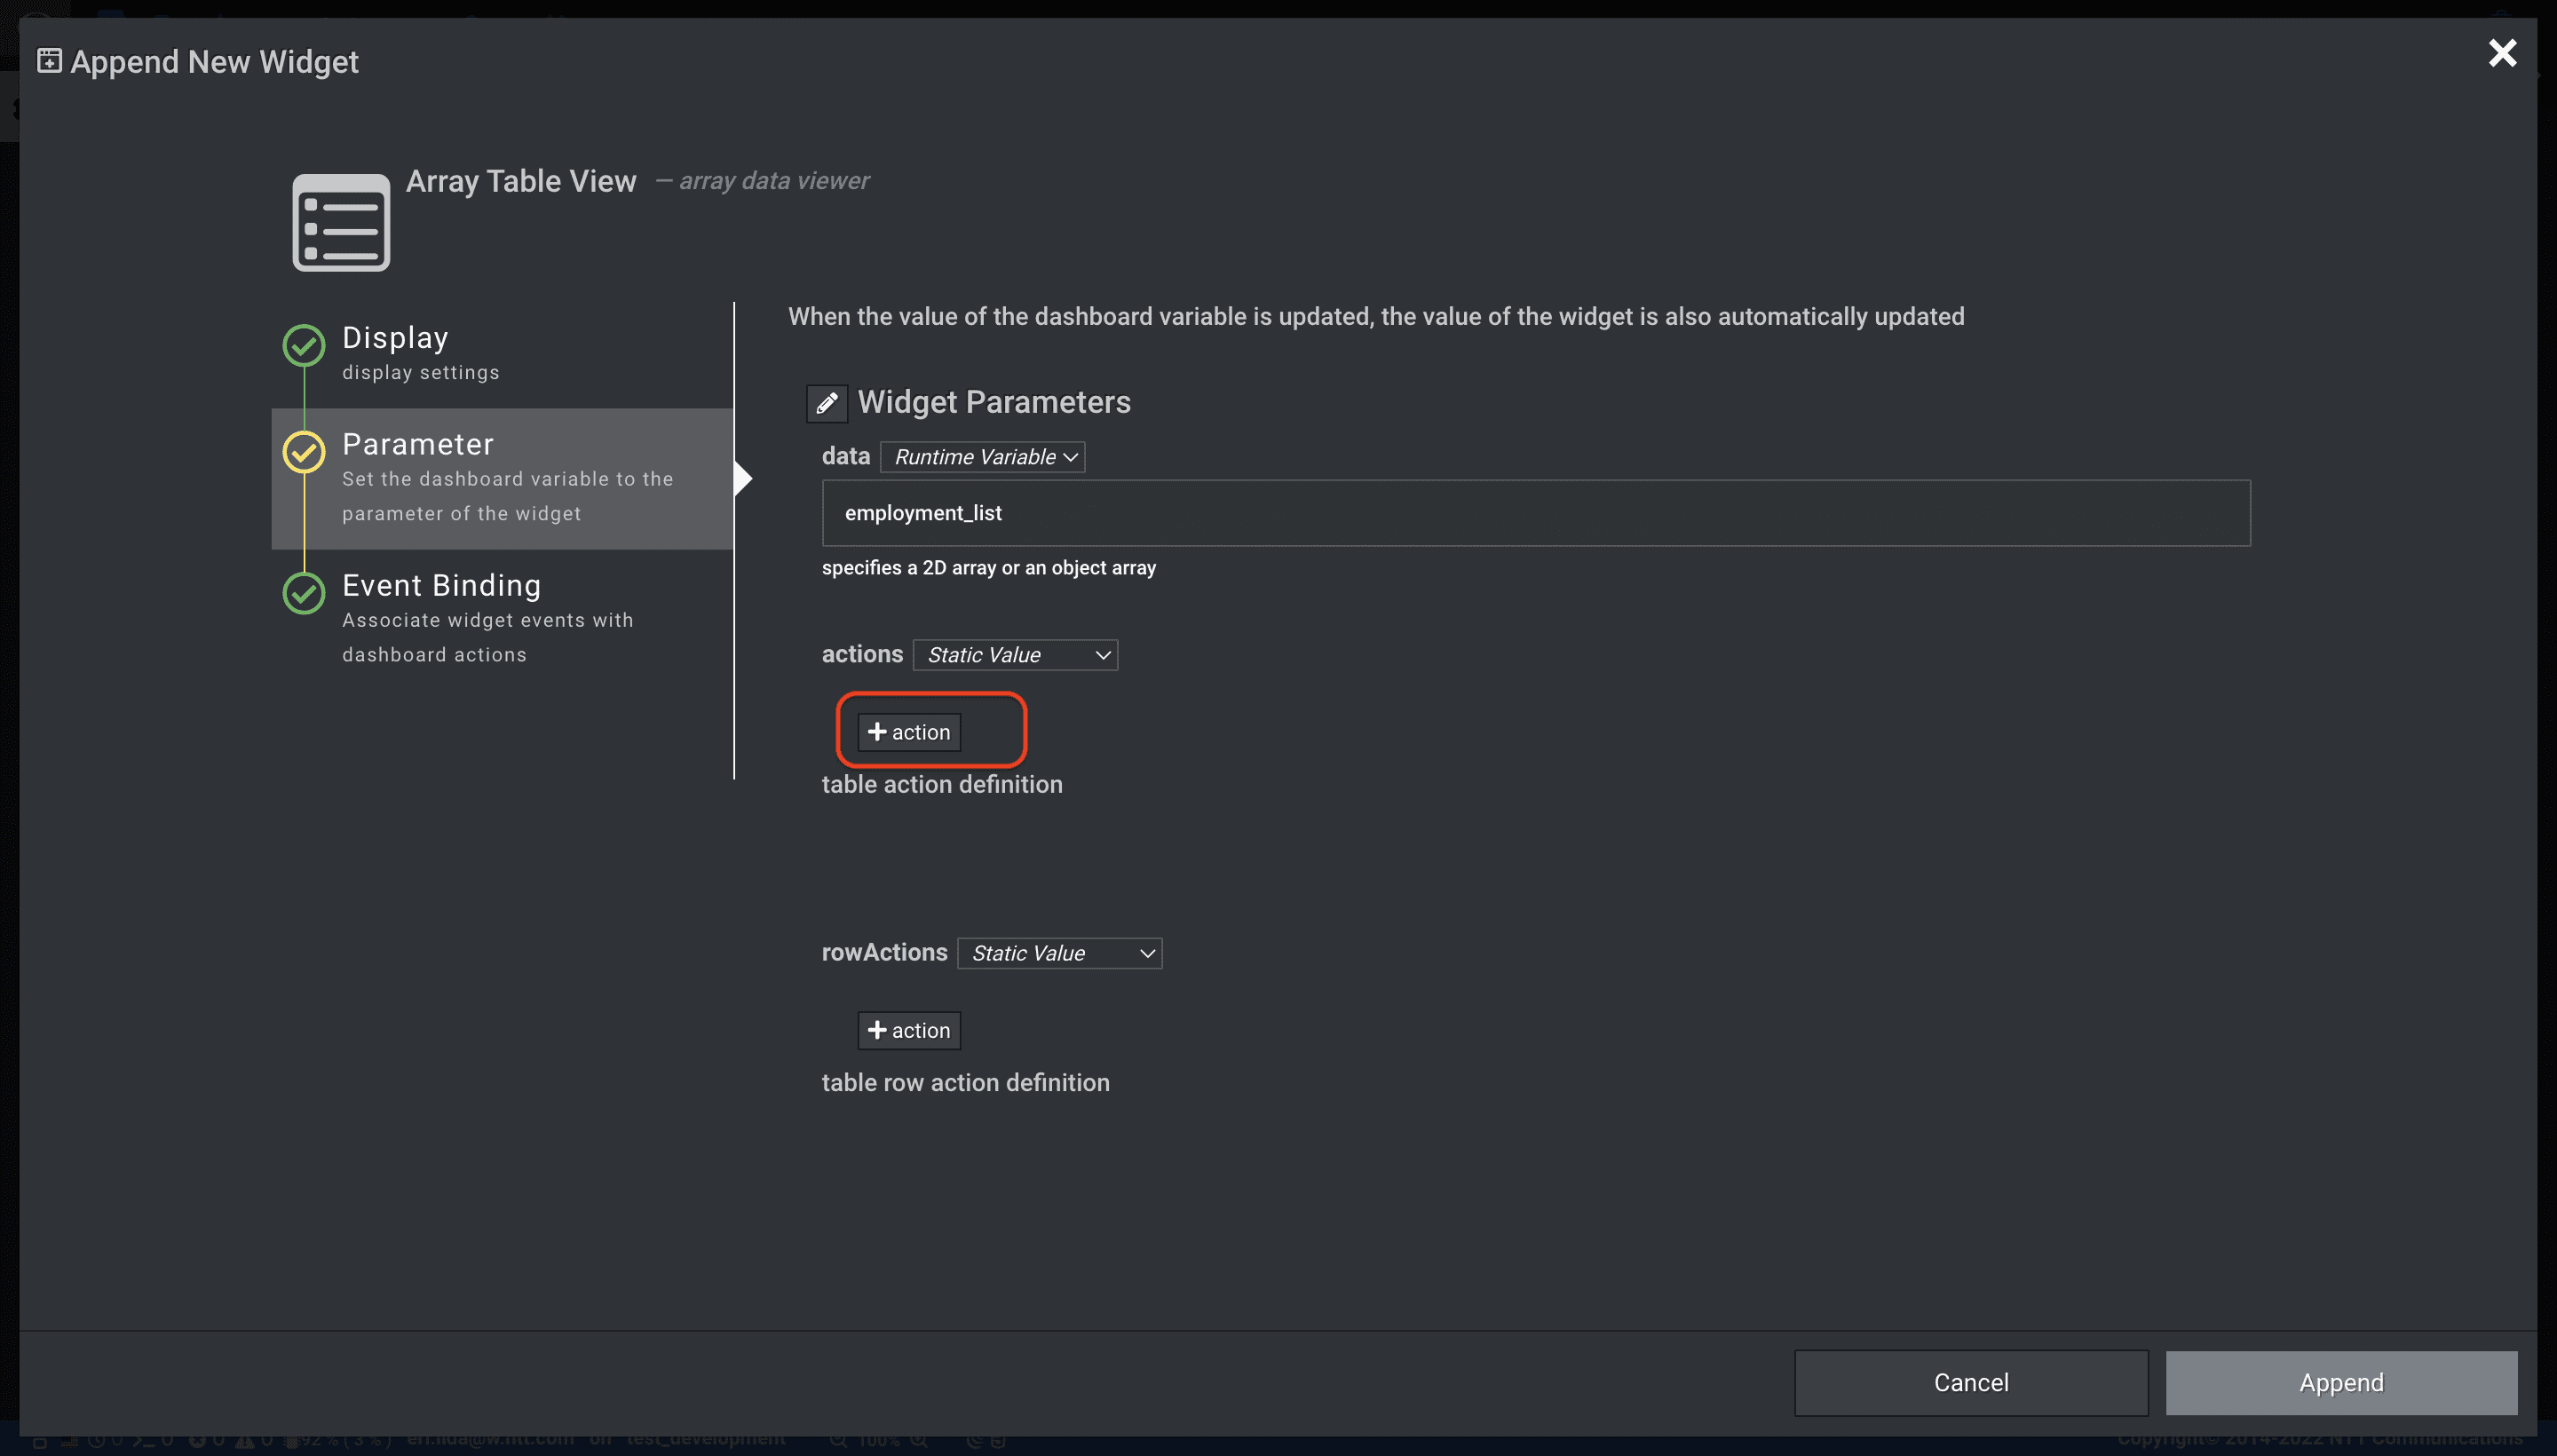
パラメータ [actions] を設定します。まずは新規作成ボタンを定義します。
-
[+ action] を押下して action を追加します。
-
追加した [action] に、新規作成ボタンのパラメータを設定します。
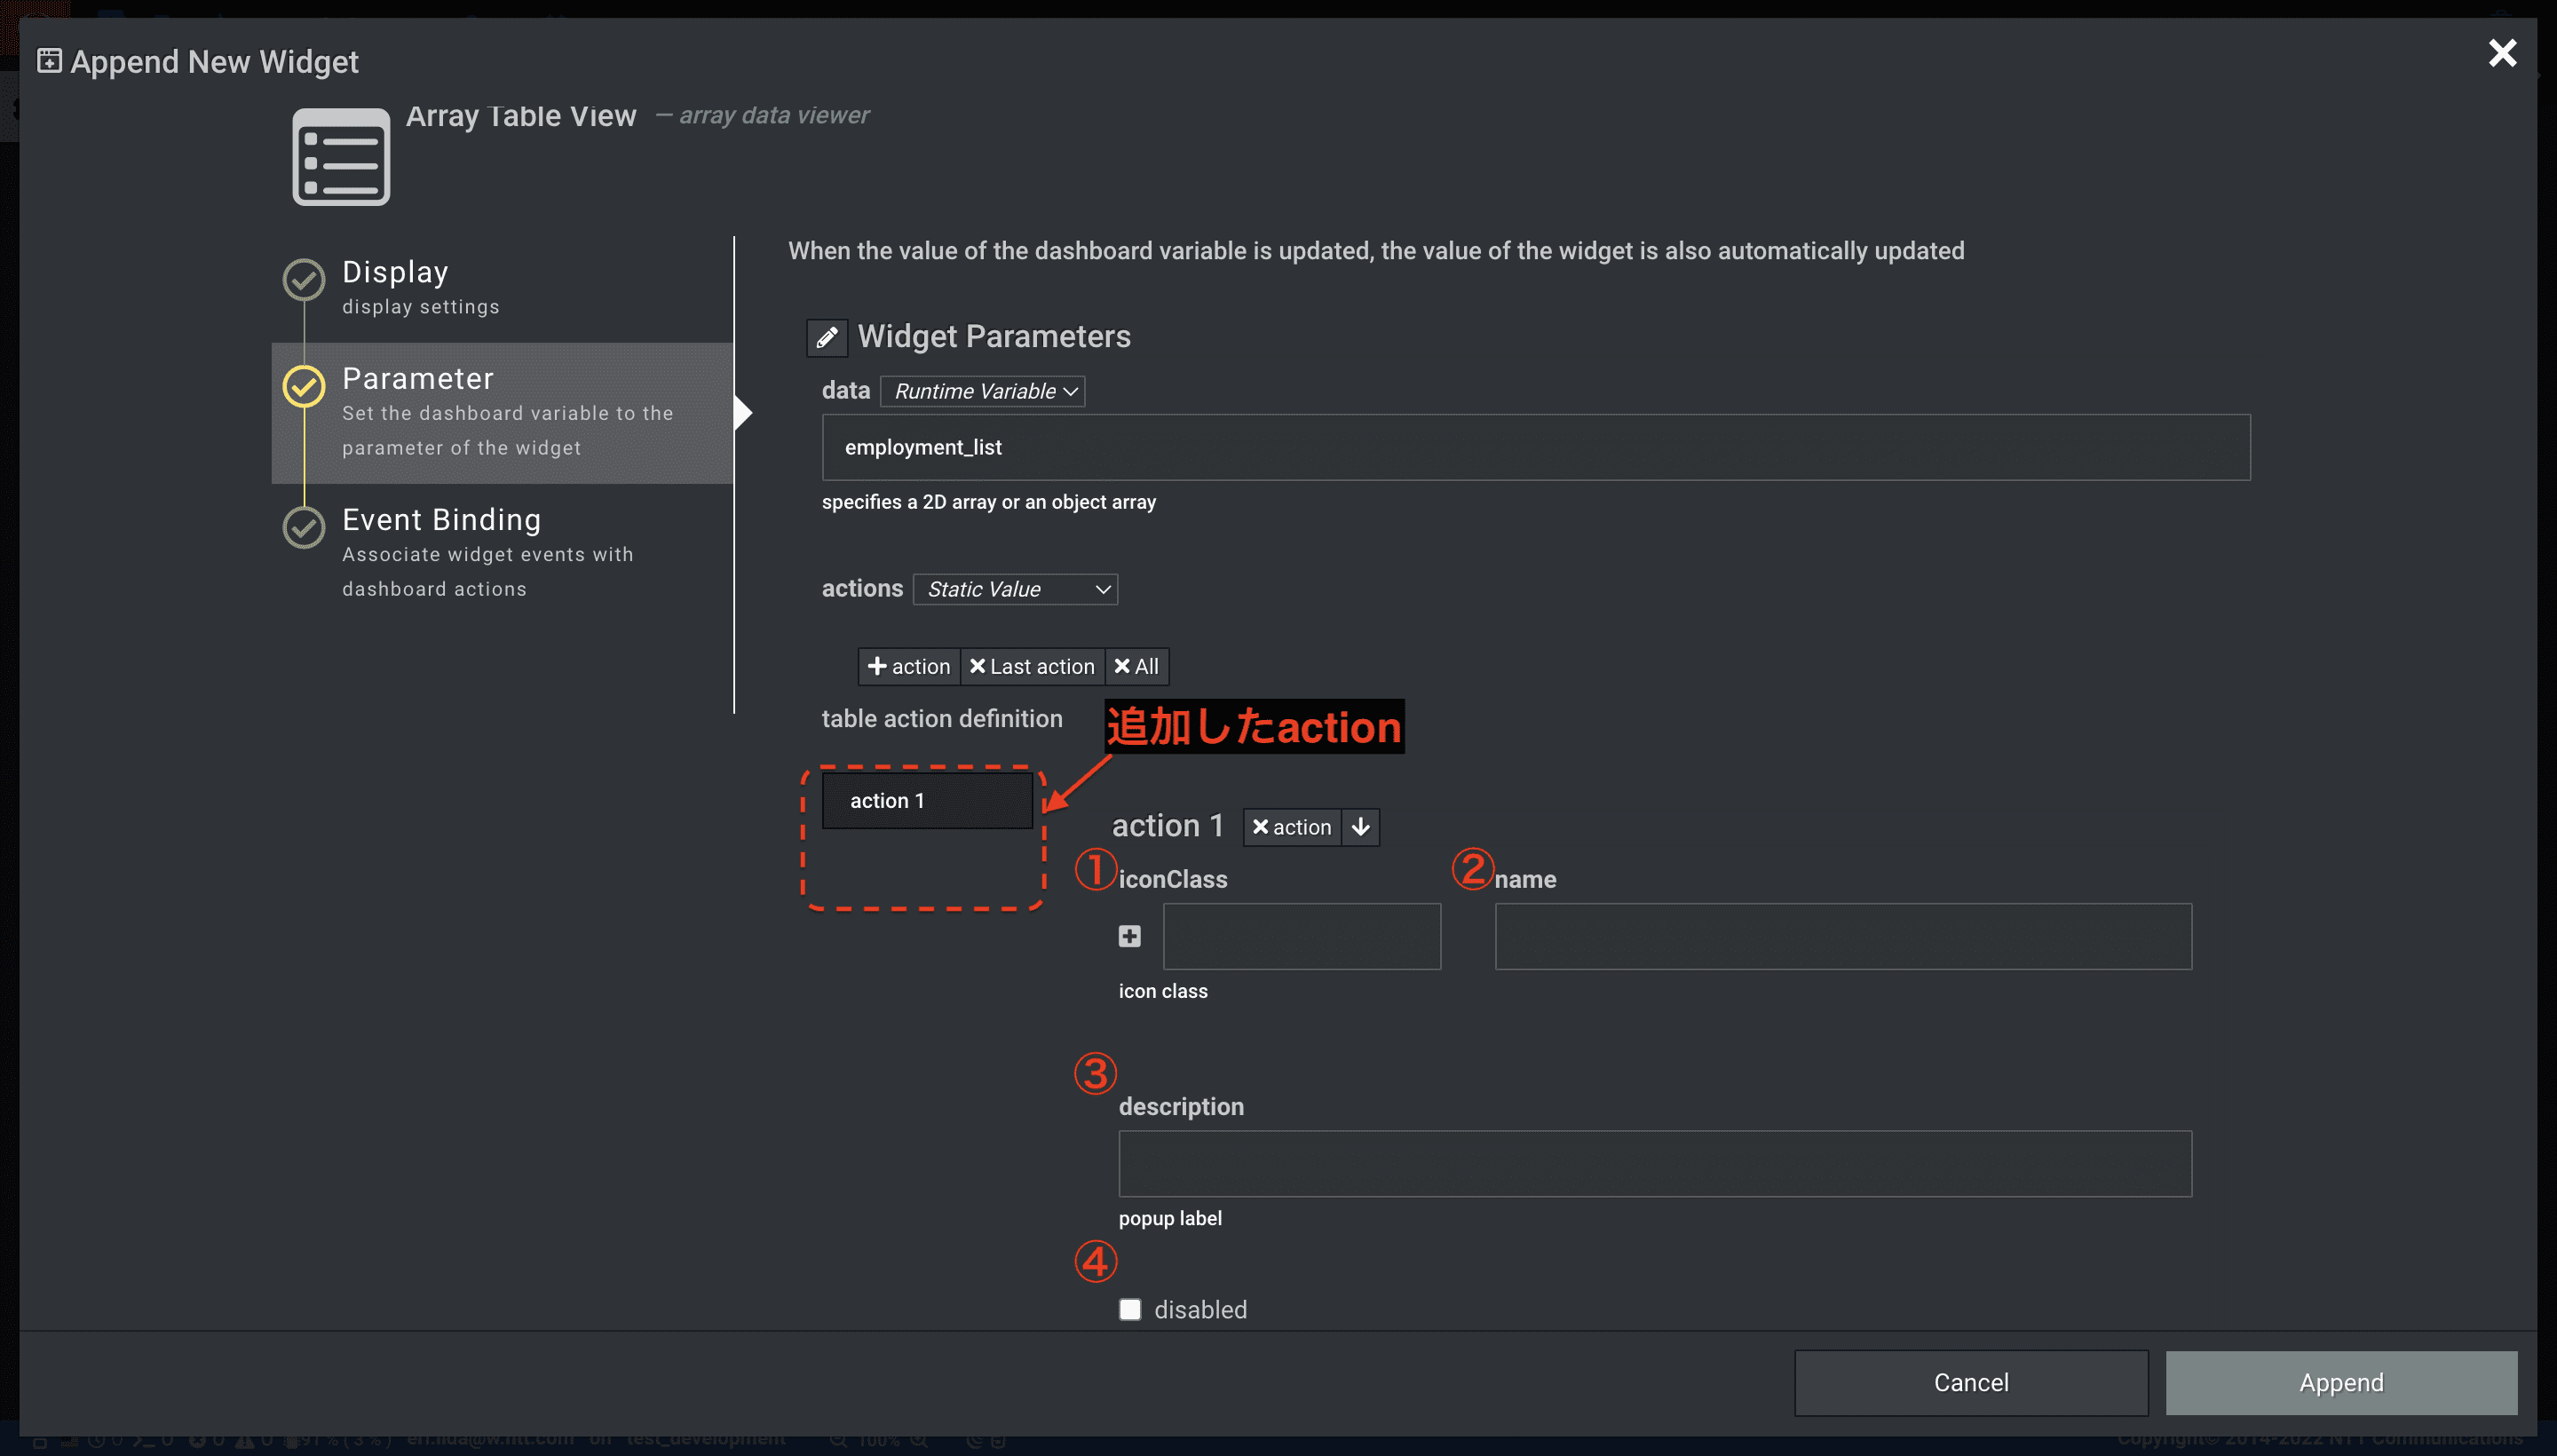
①iconClass ②name ③description ④disabled fa fa-plus-square CREATE Create new Employment. - (チェックなし) -
同様に、[action] を追加して更新ボタンのパラメータを定義します。
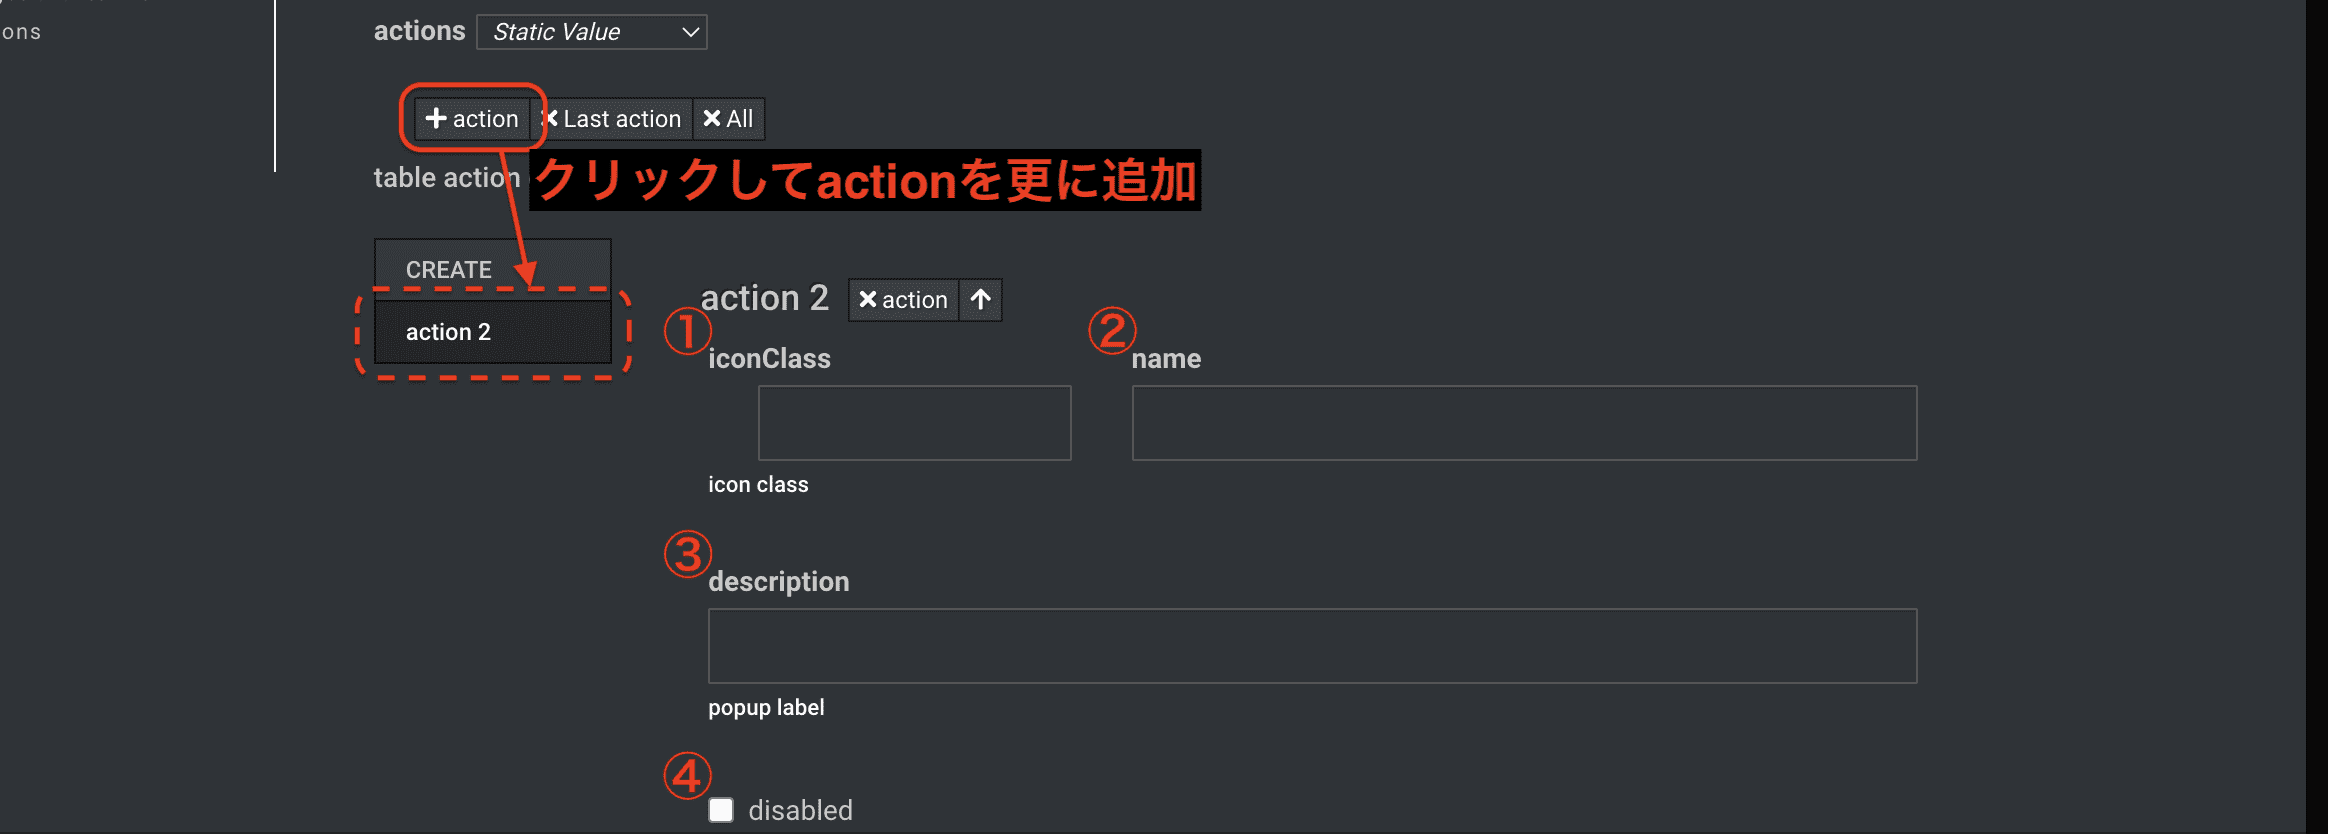
rowAction 入力フォーム

iconClass は検索窓に class 名を入力検索し、検索結果からアイコンを選択する。
①iconClass ②name ③description ④disabled fa fa-refresh (入力して検索結果にでてきたアイコンを選択) REROAD Reload List. - (チェックなし) パラメータ [actions] の設定は以上です。
-
-
パラメータ [rowActions] を設定します。まずは削除ボタンを定義します。
-
[+ rowAction] を追加します。
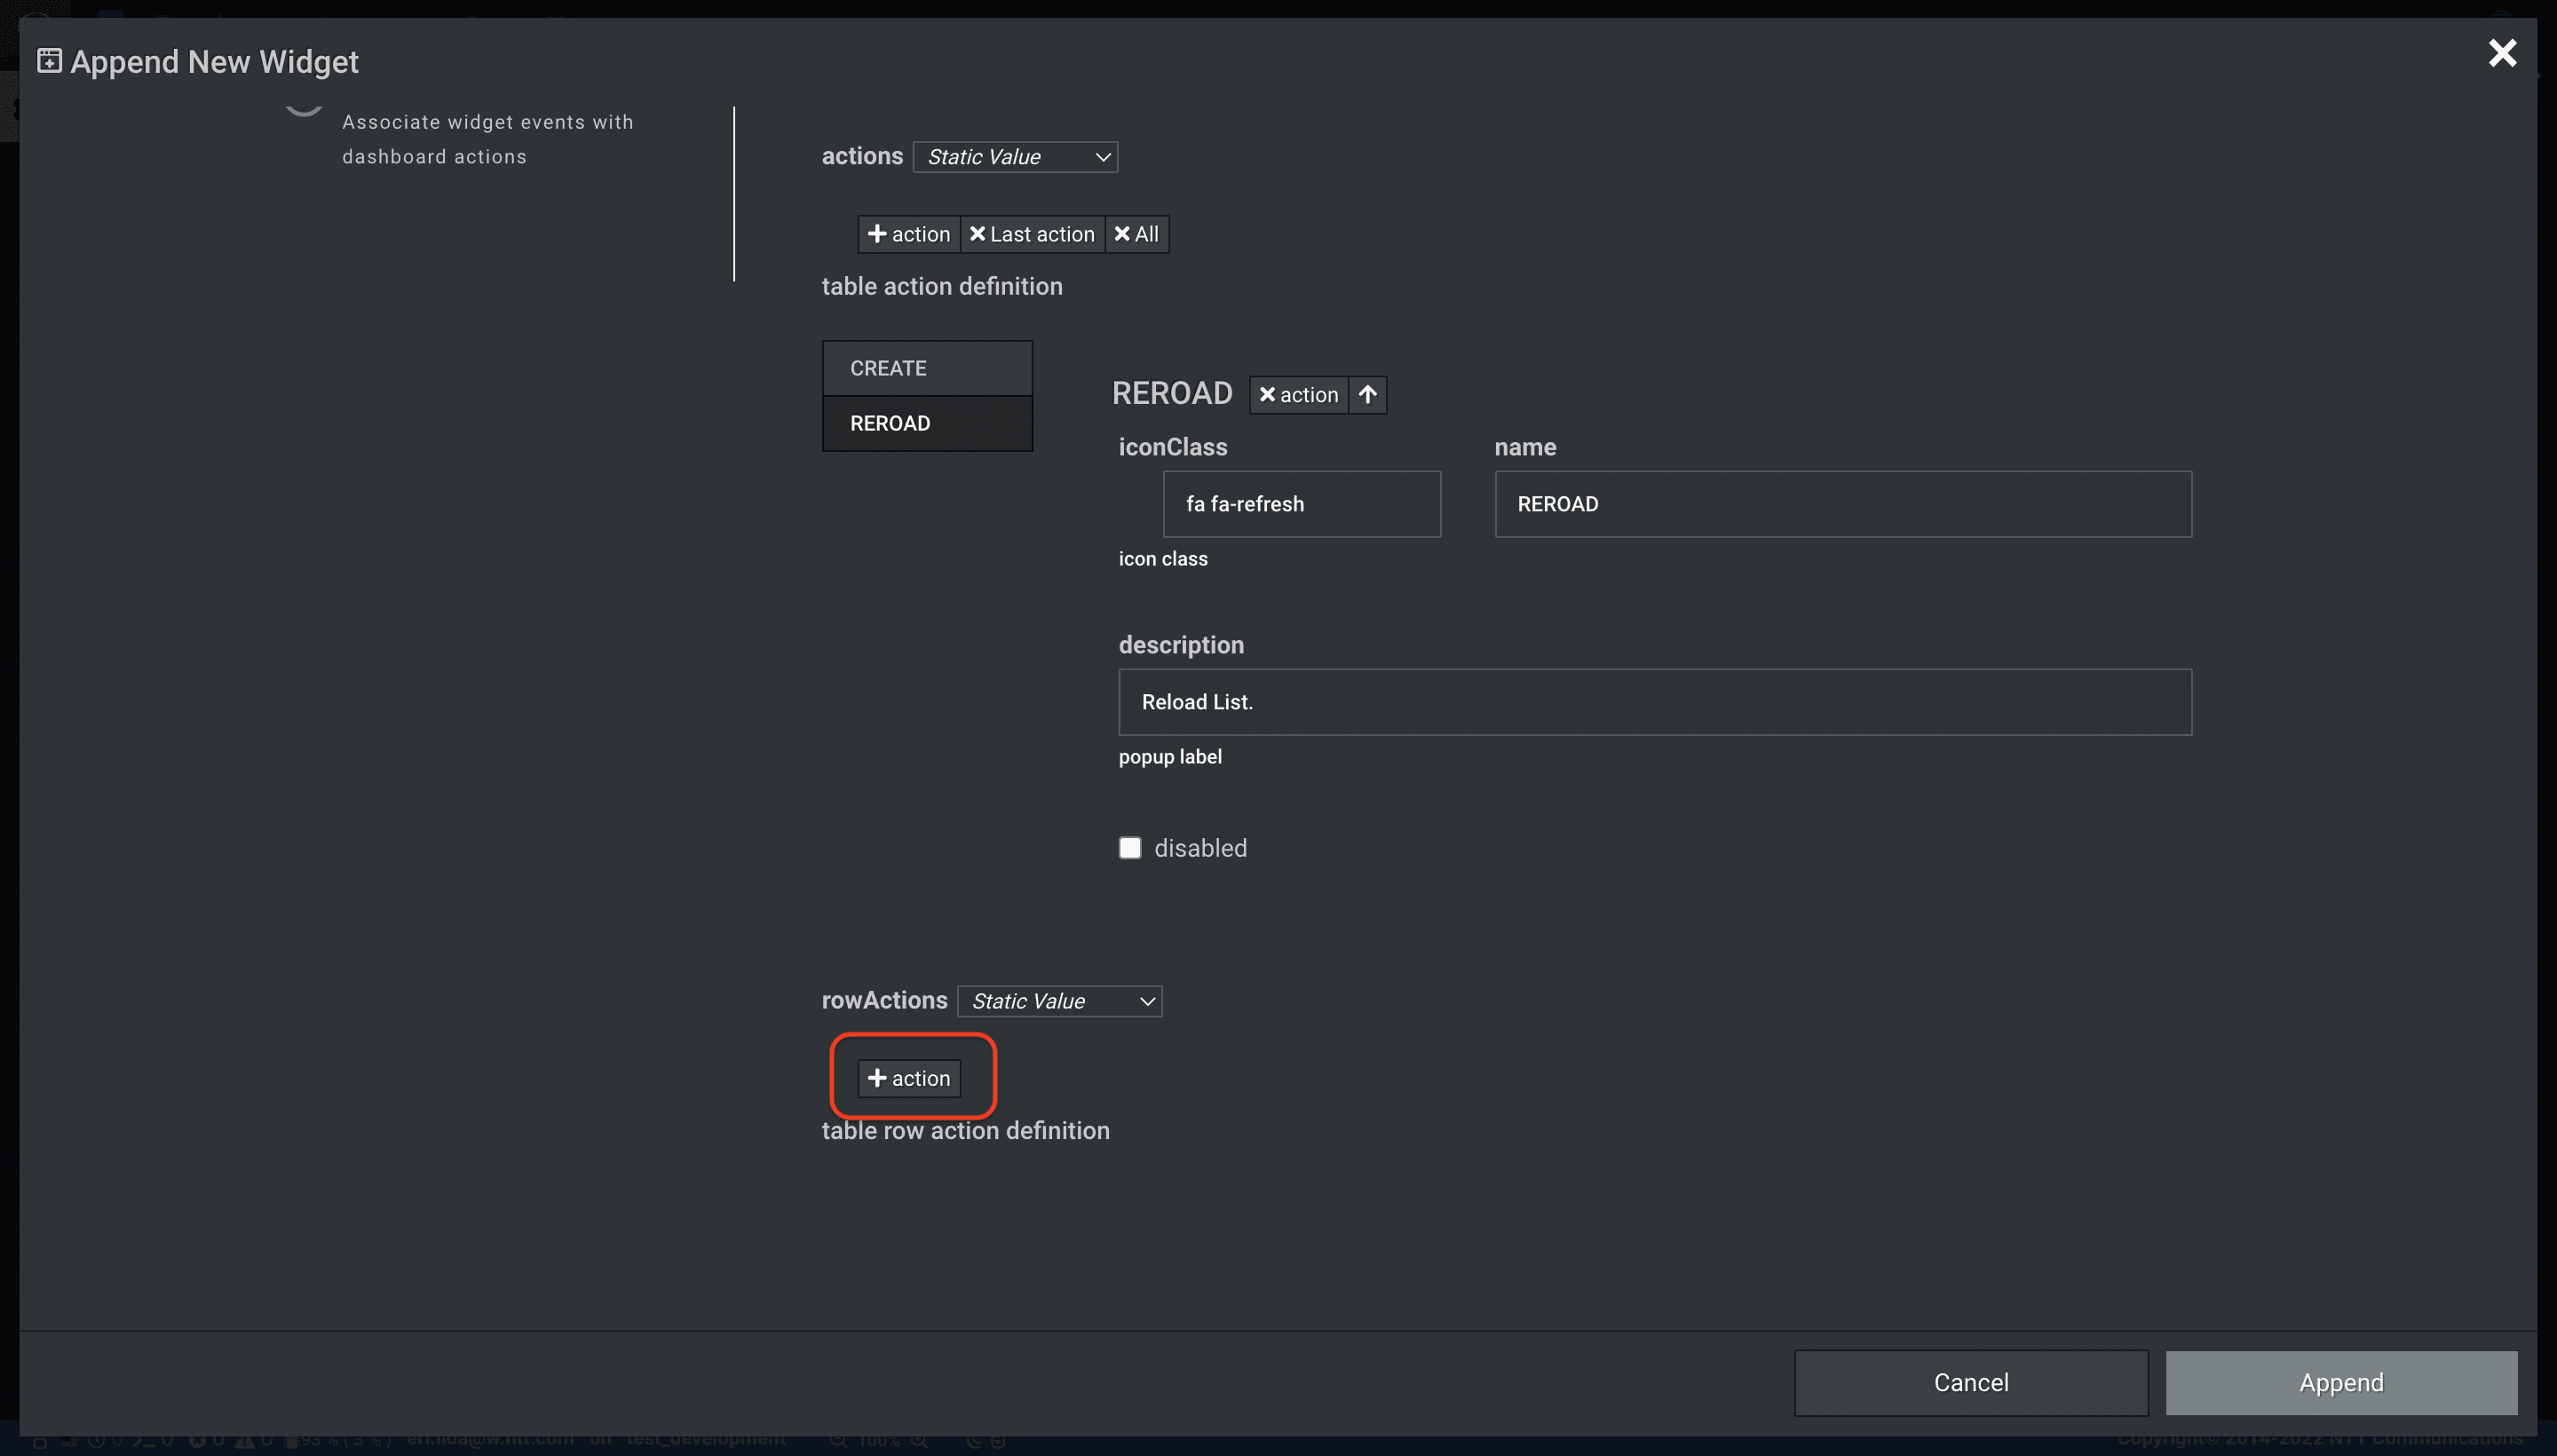
-
追加した [rowAction] に、削除ボタンのパラメータを設定します。
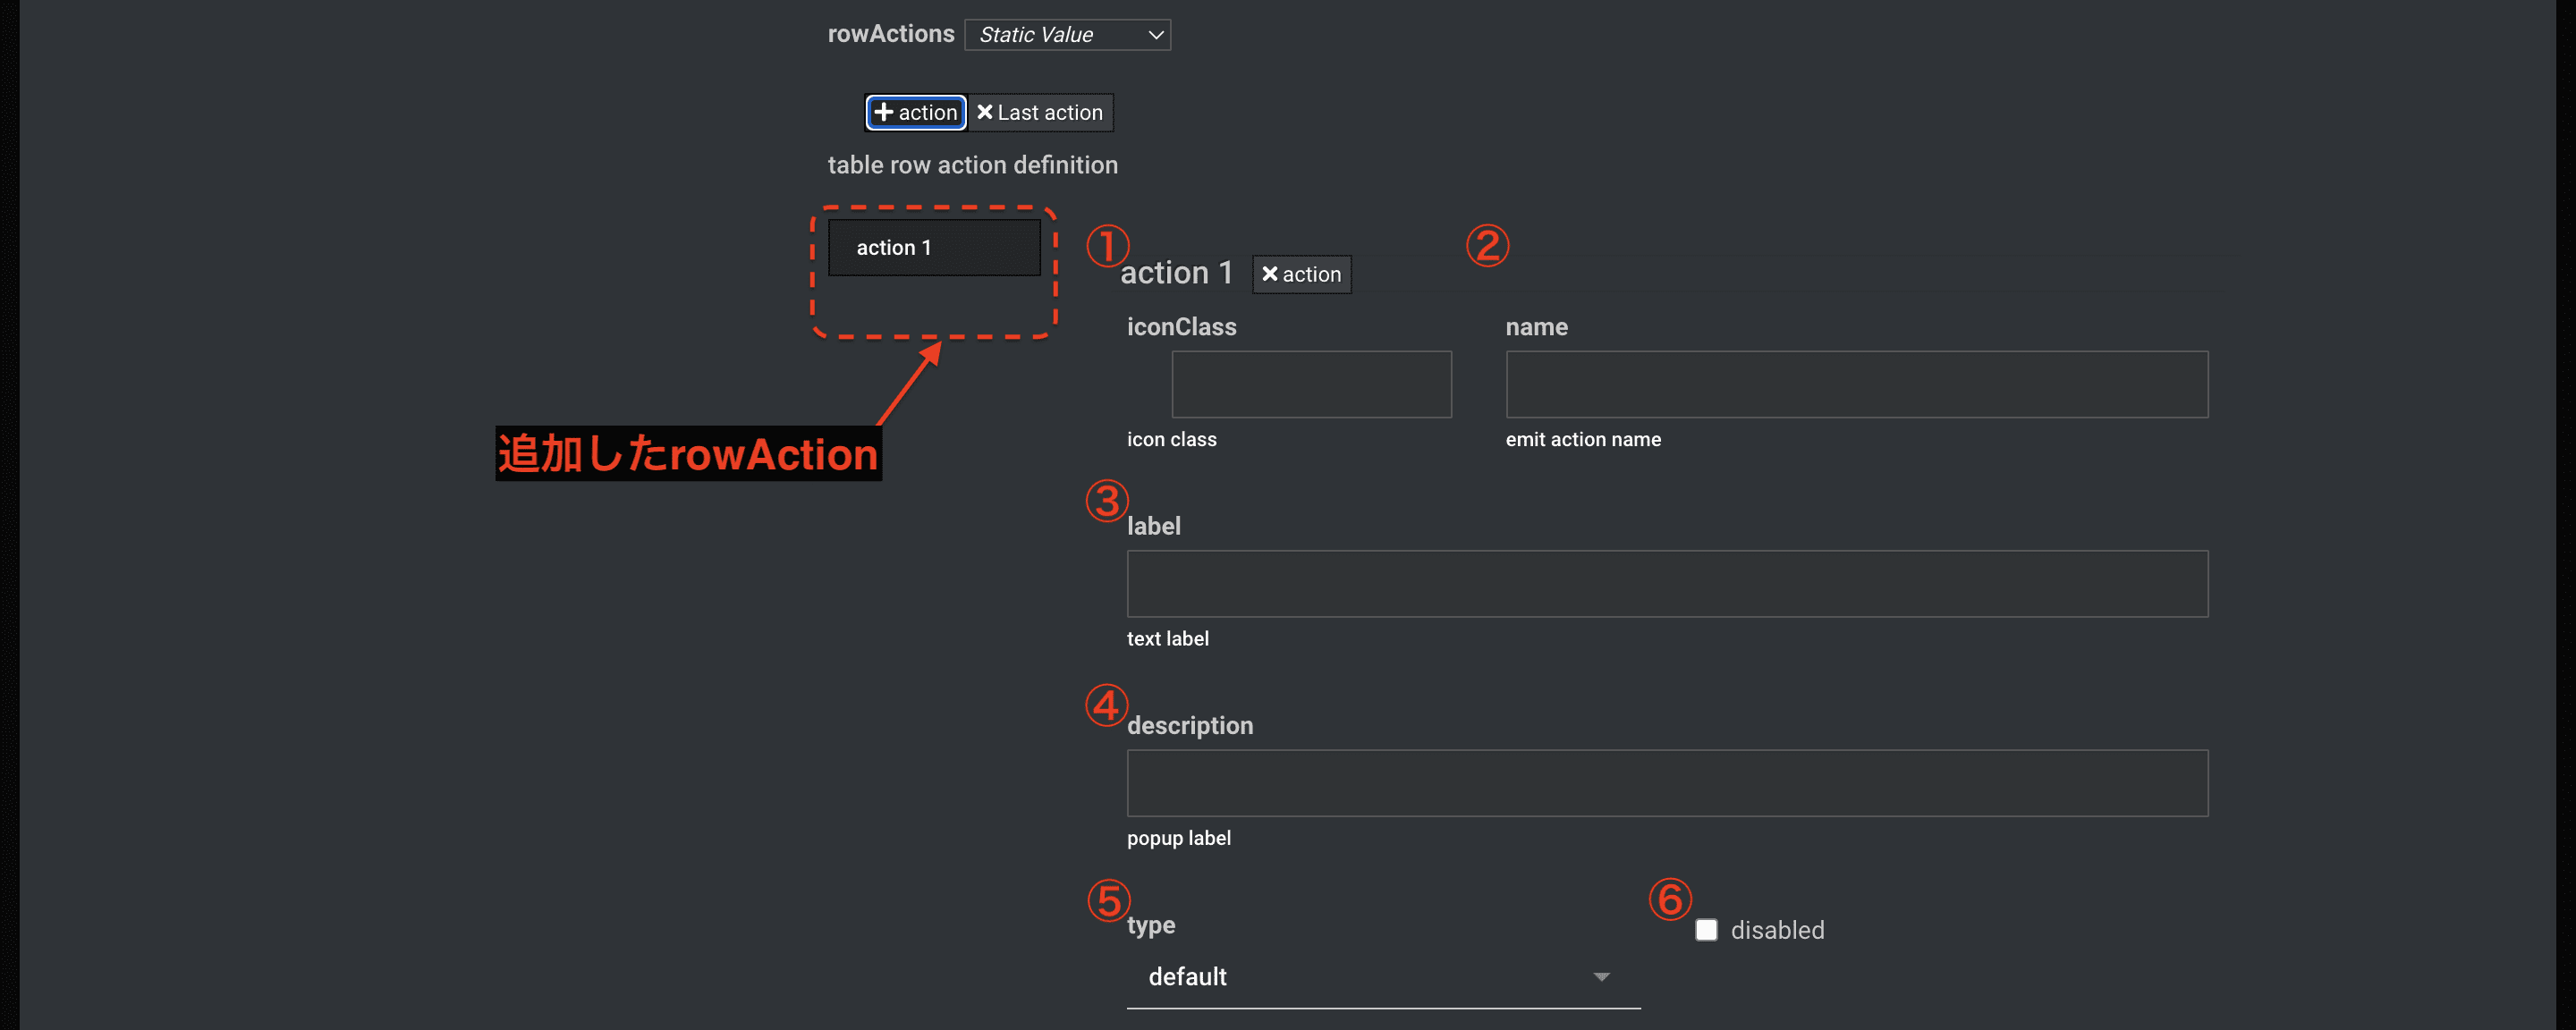
①iconClass ②name ③label ④description ⑤type ⑥disabled fa fa-trash DELETE - Delete Employment. default - (チェックなし) -
同様に、変更ボタンを設定します。
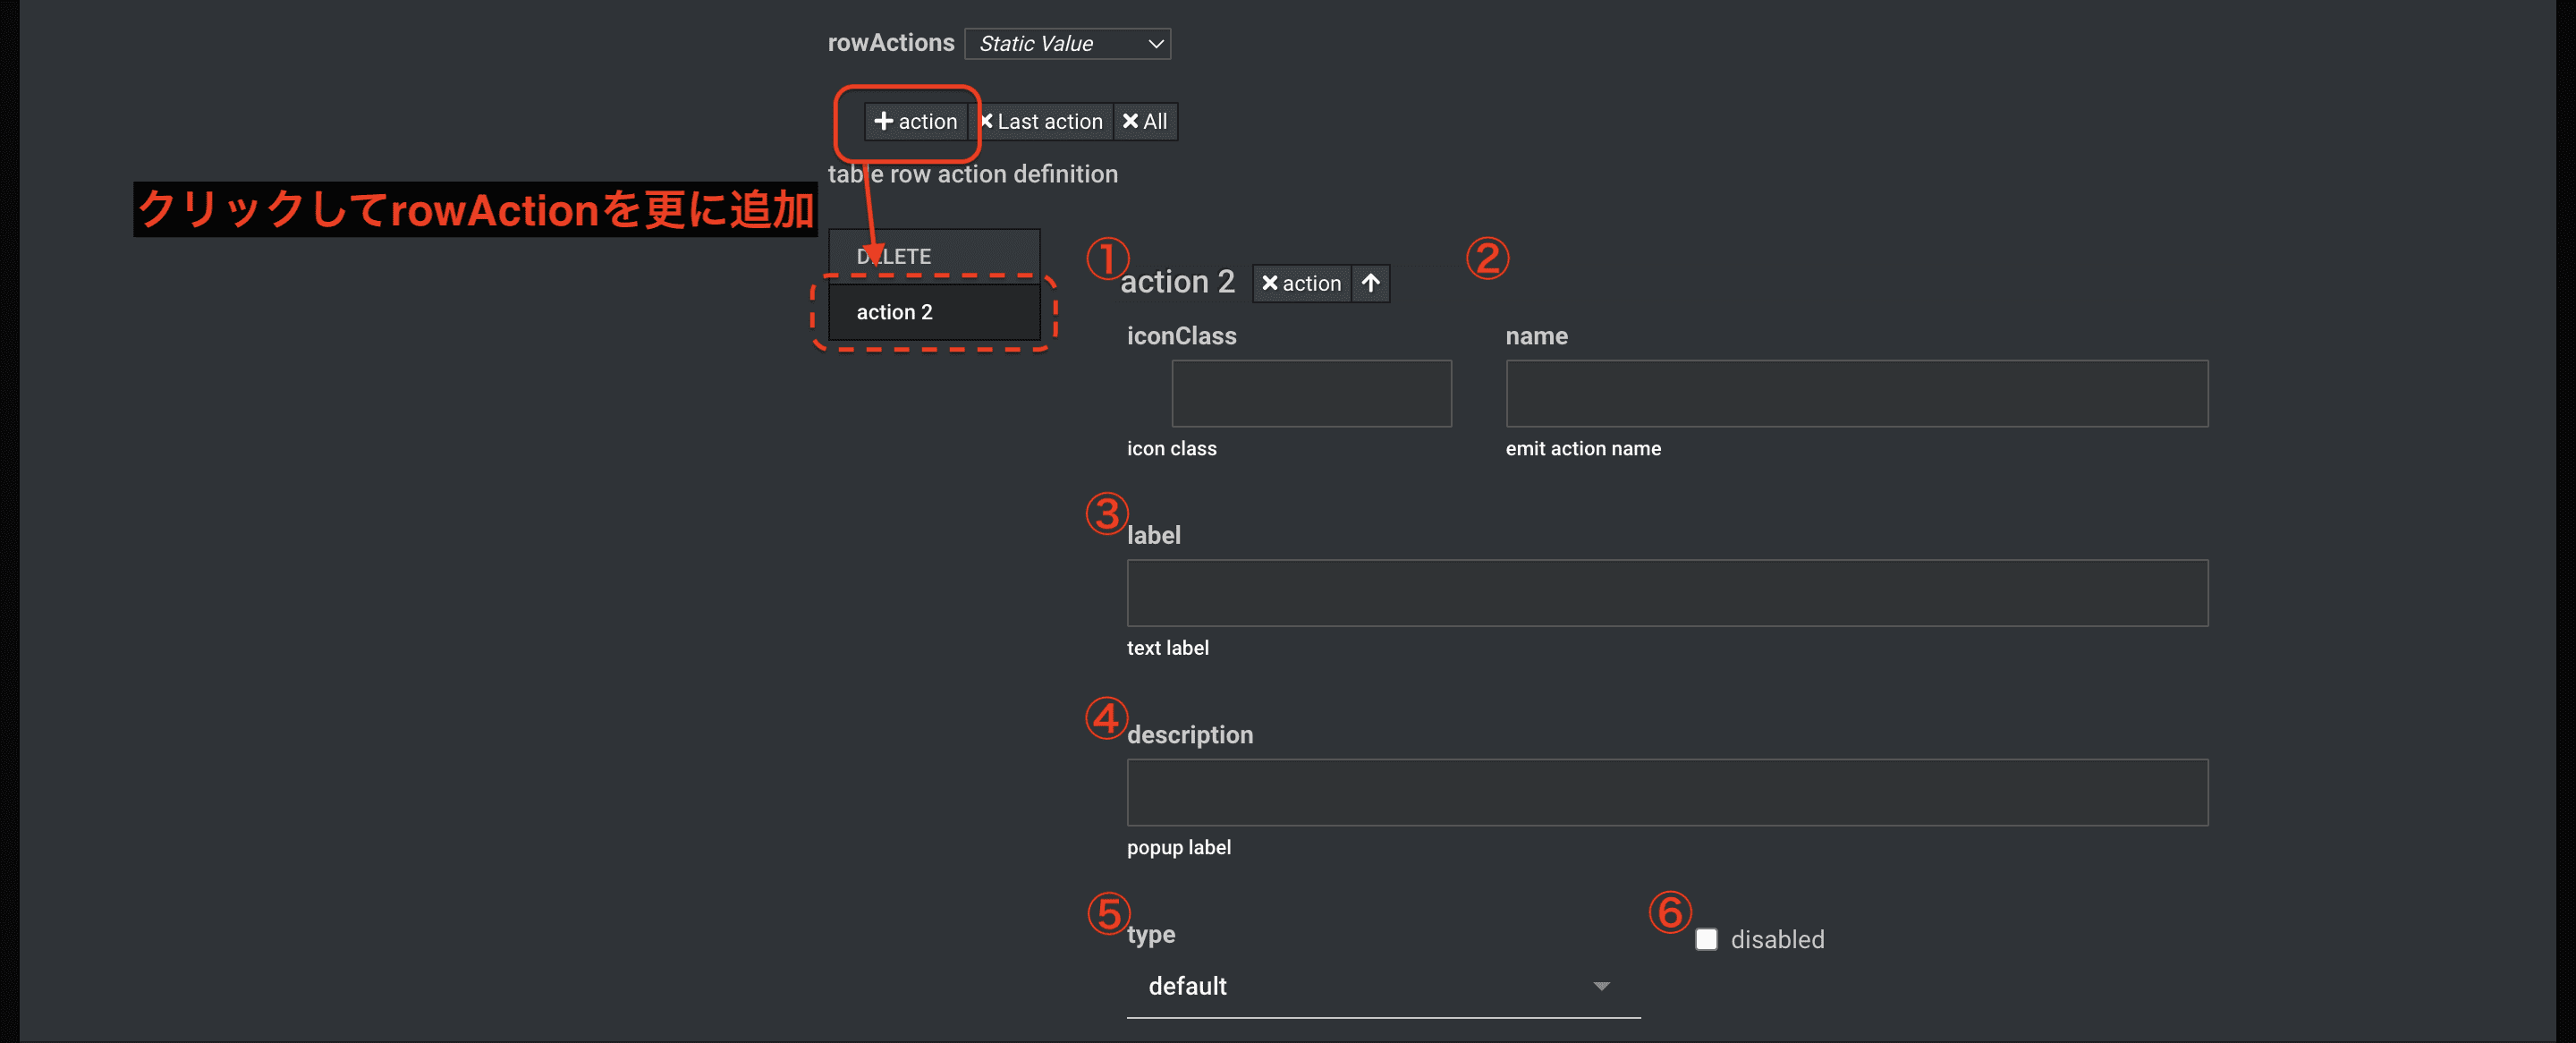
①iconClass ②name ③label ④description ⑤type ⑥disabled fa fa-edit UPDATE - Update Employment. default - (チェックなし) ステップ [Parameter] の設定は以上です。
-
3.2.2 Event Binding 設定
-
[+ handler] ボタンを押下し、イベントハンドラを追加します。
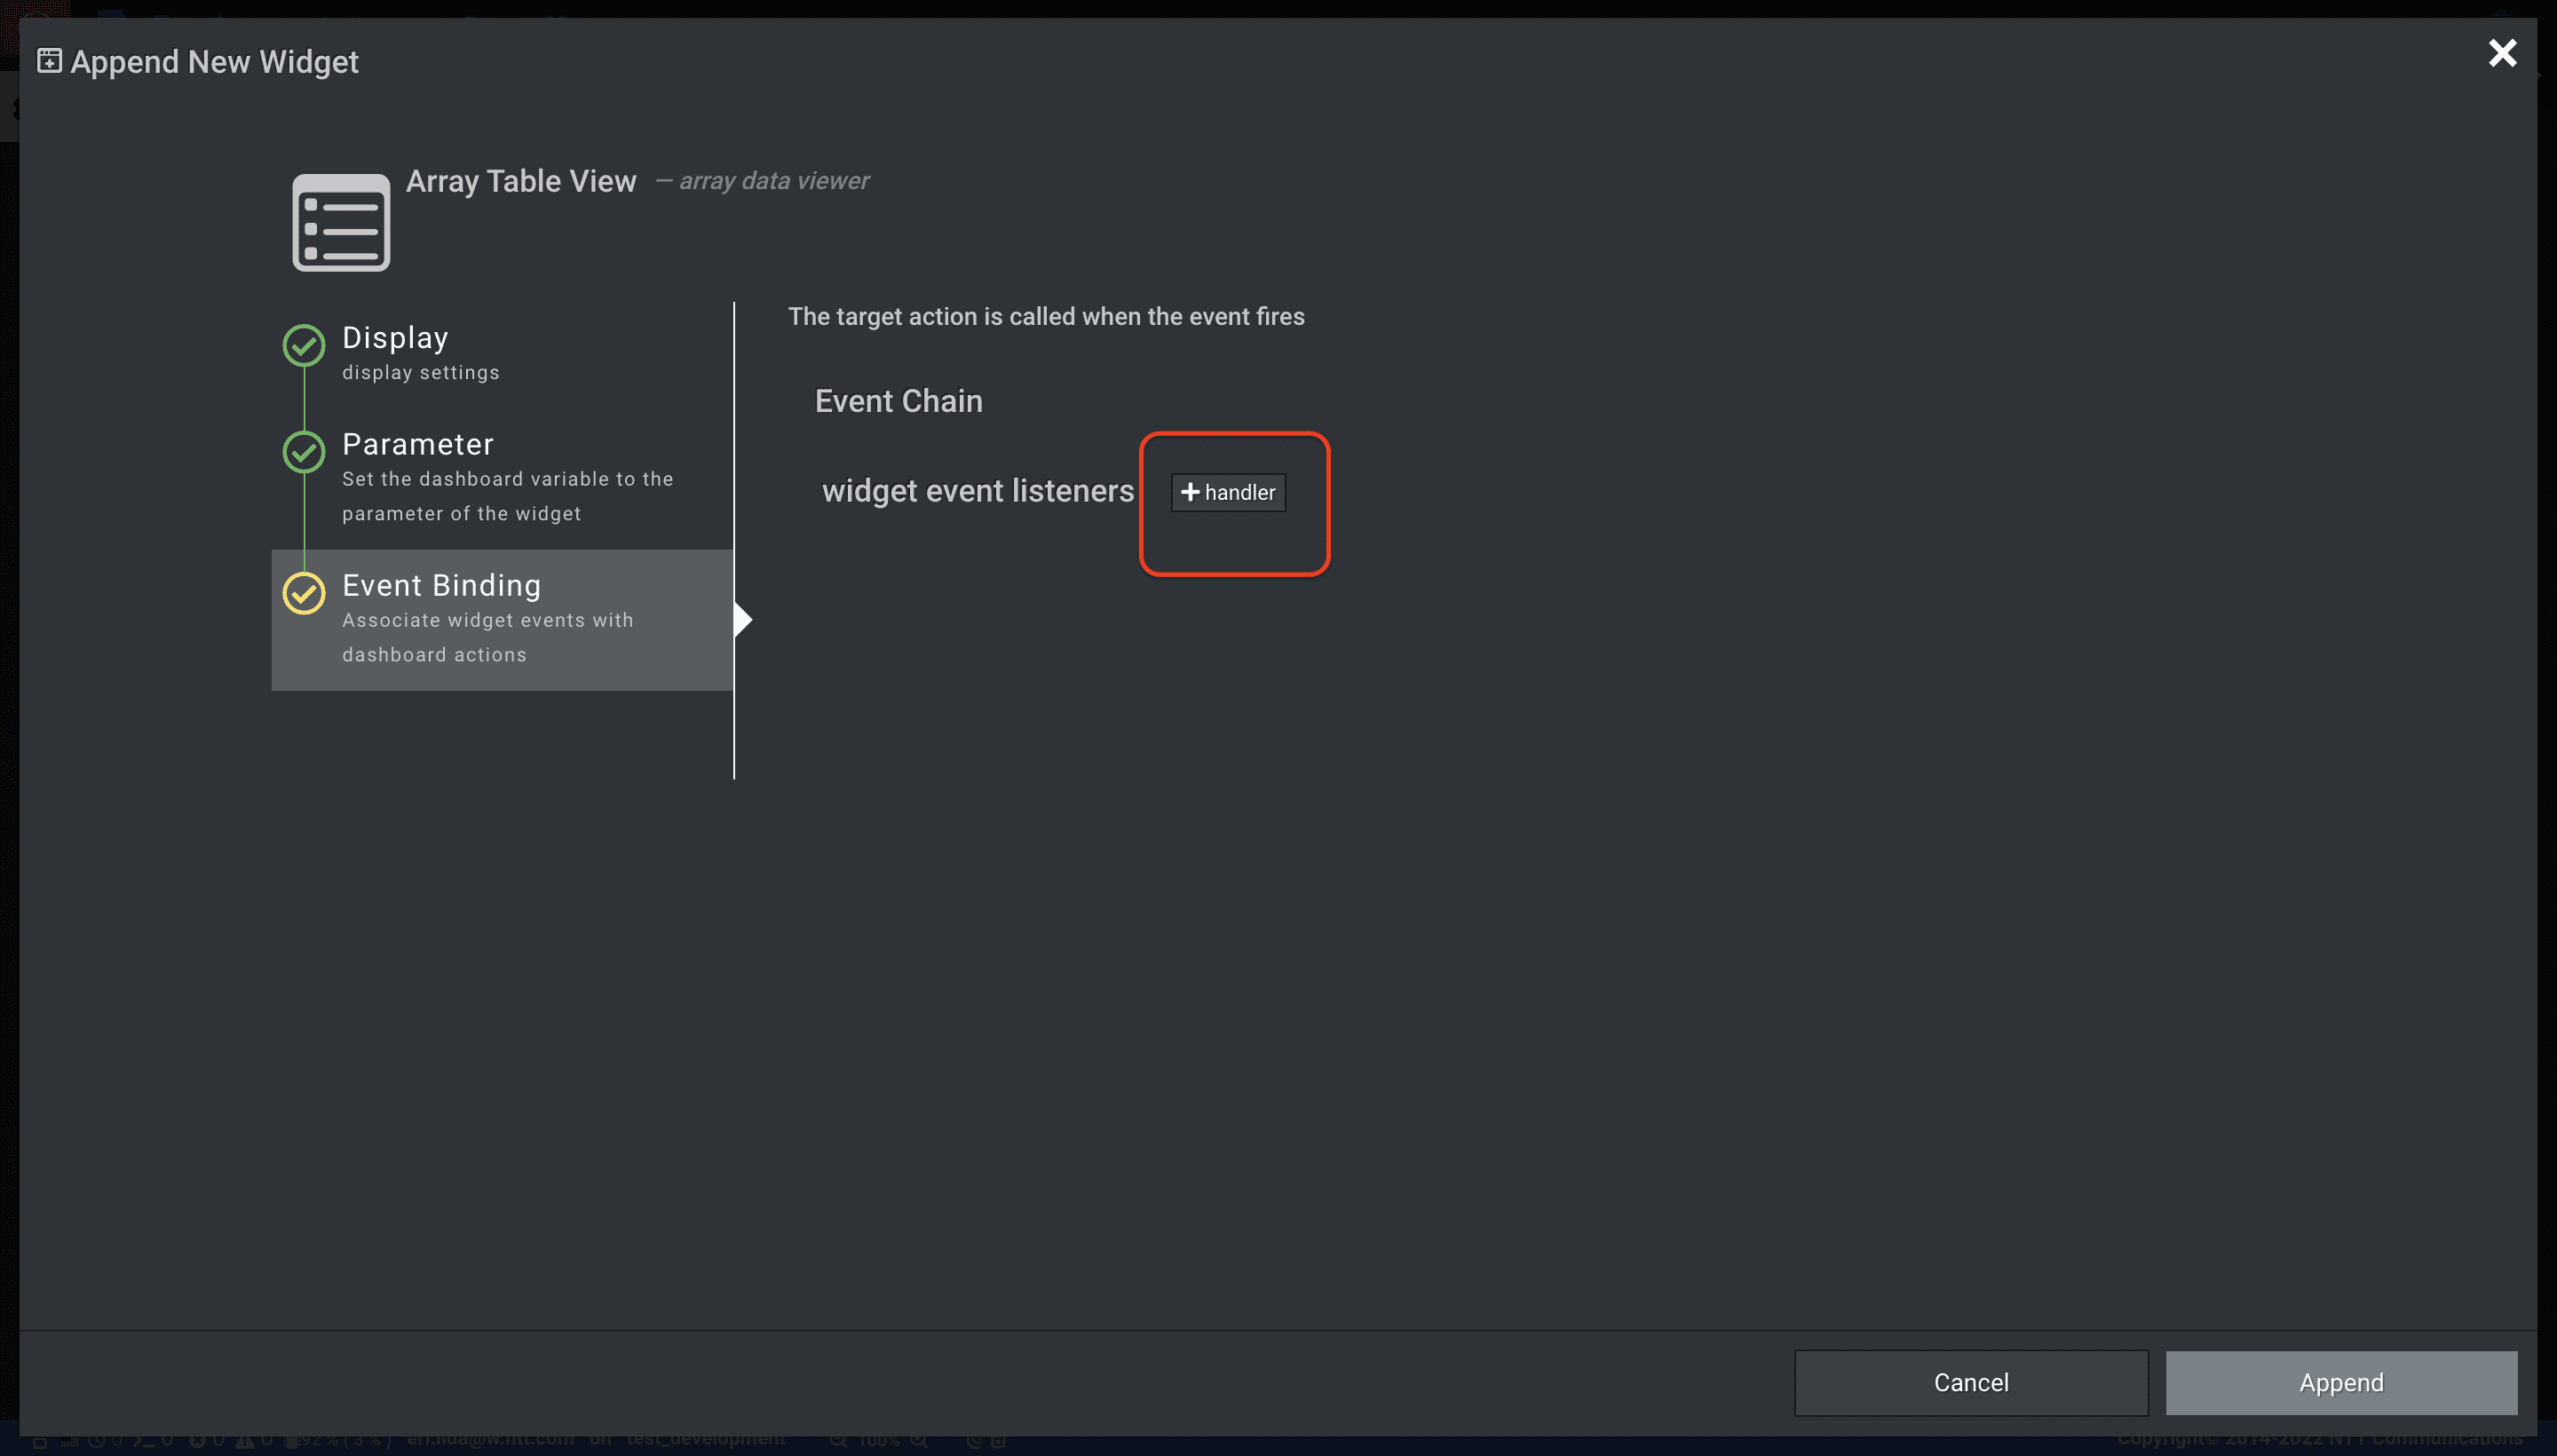
-
まずは新規作成ボタンが押下されたときに登録画面の表示・POST API が実行されるように、パラメータ
CREATE(新規作成ボタン) にcreateEmploymentAction を紐付けていきます。イベントハンドラのタイプは action を選択します。これは、CREATEがStep2 [Parameter] のオプションパラメータ action で定義されているためです。また、CREATEには雇用情報を登録するcreateEmploymentAction と、一覧情報を再取得して表示するgetEmploymentActionを順に紐付けます。.f465e496.png)
イベントハンドラのタイプは action を選択する。
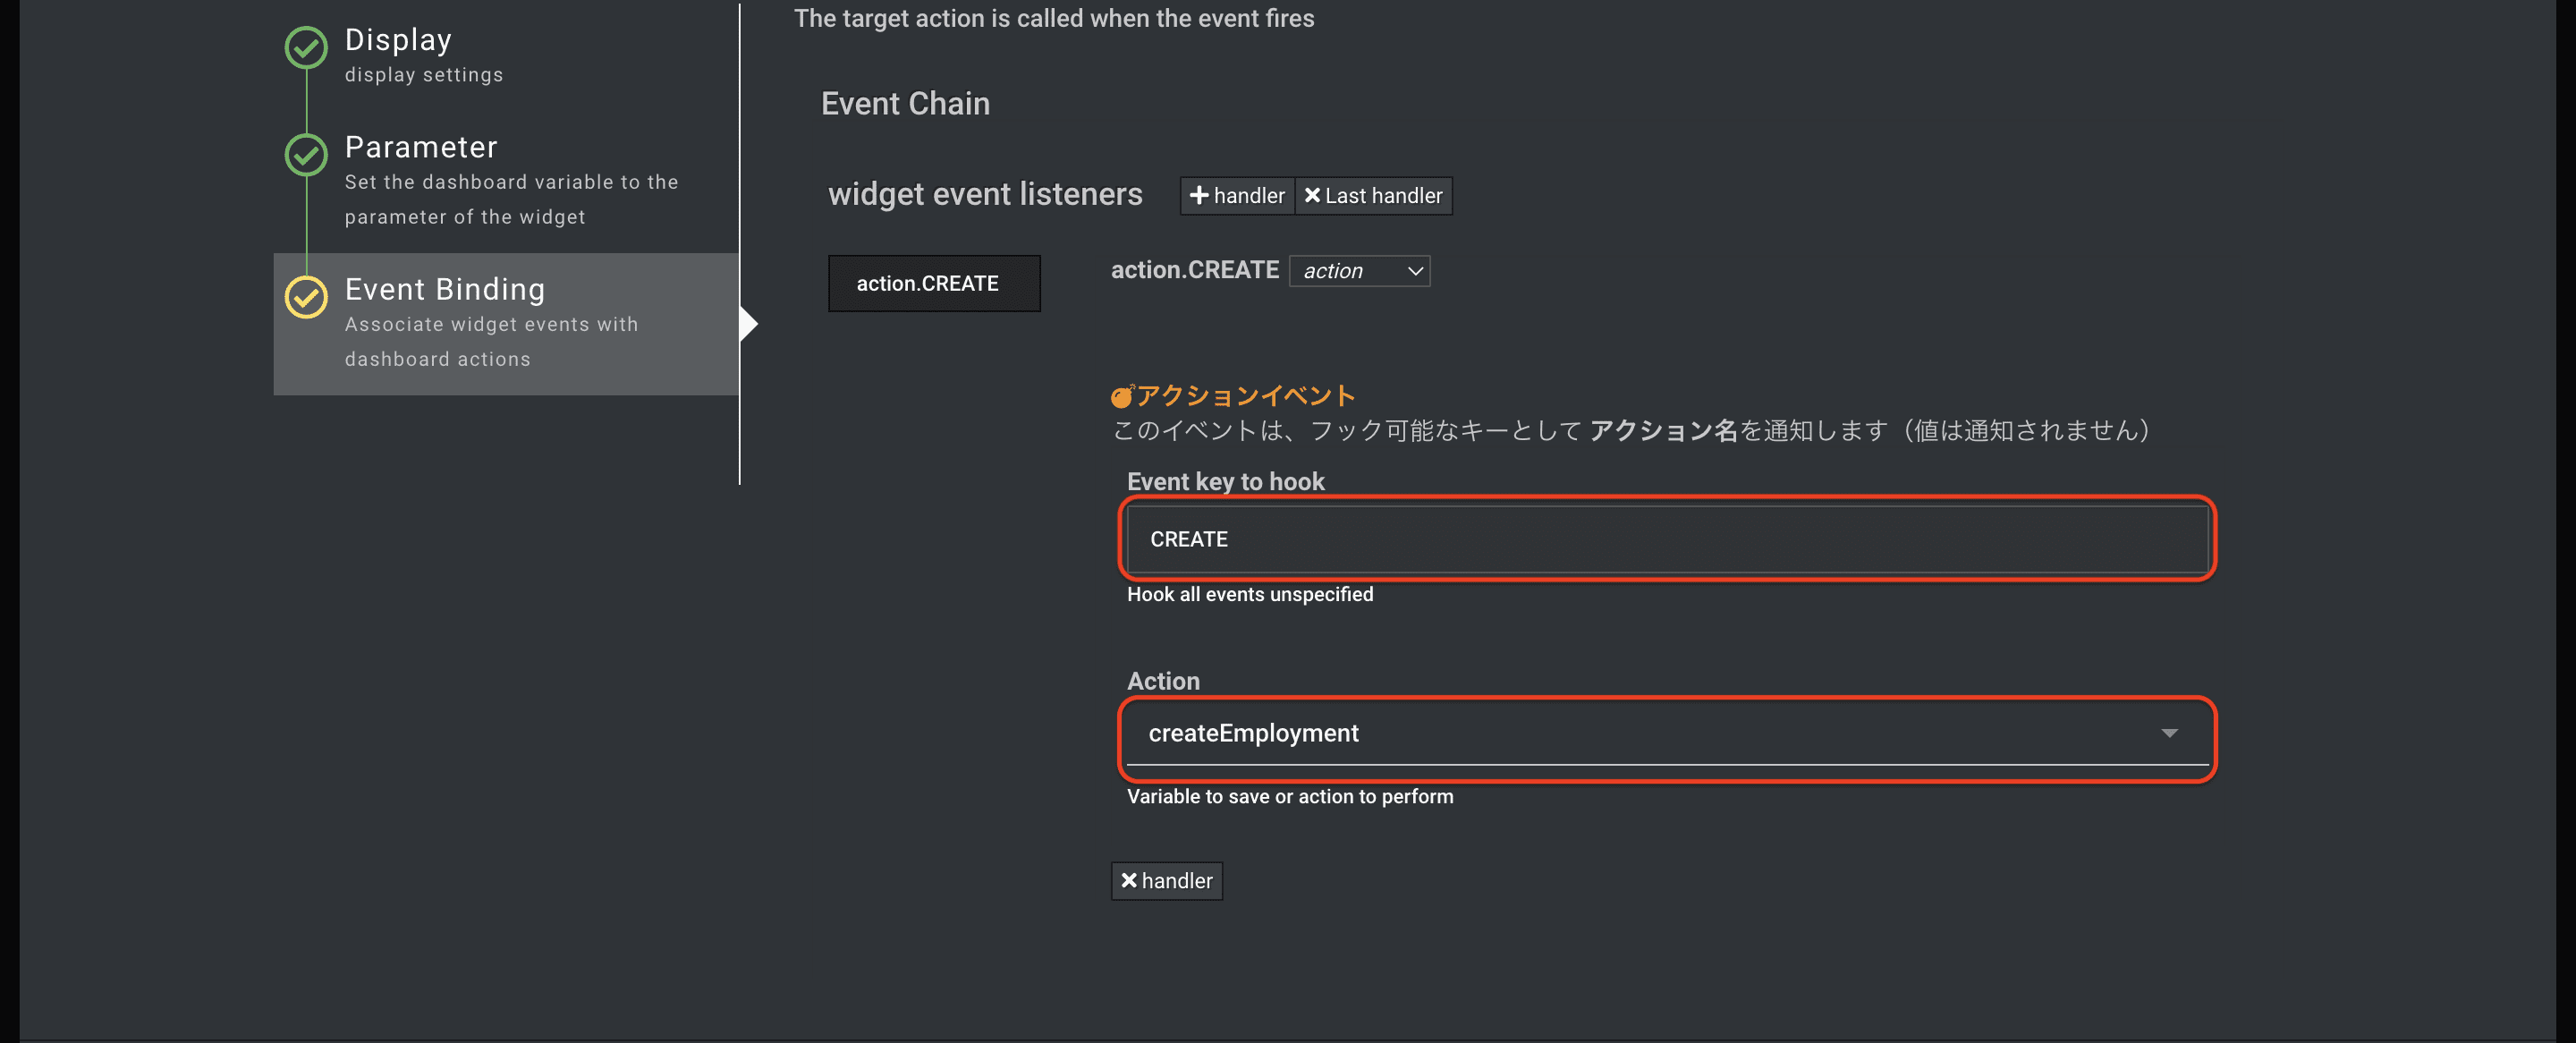
[Event key to hook] にはパラメータ CREATE を選択, [Action] には createEmployment を選択
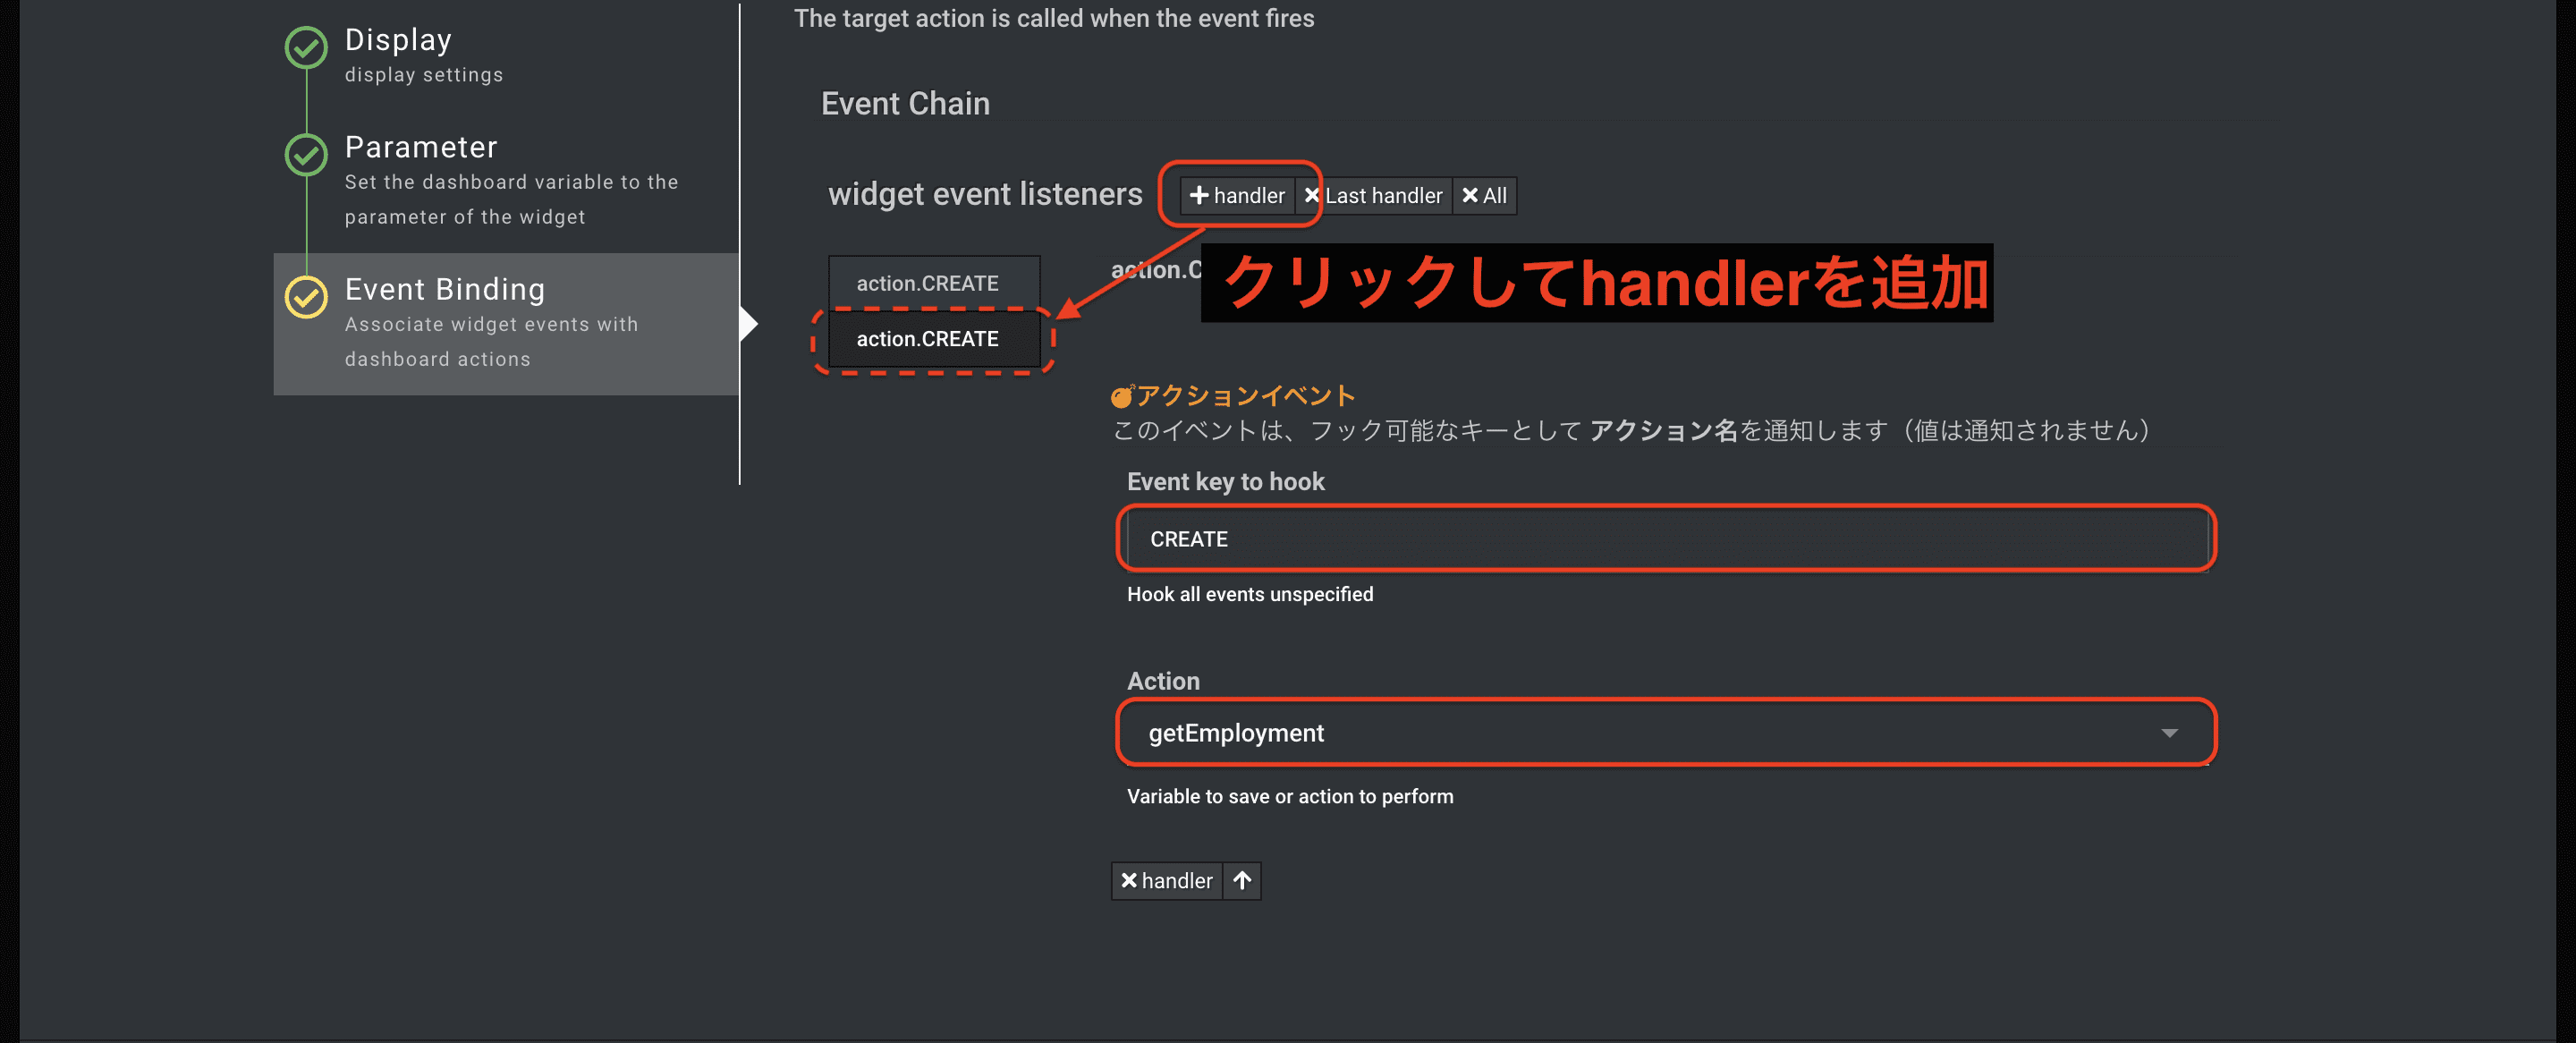
同様にイベントハンドラを追加し、イベントハンドラのタイプに [action] 、[Event key to hook] に CREATE、[Action] に getEmployment を選択。
-
同様に、以下表の上から順に [handler] を追加します。
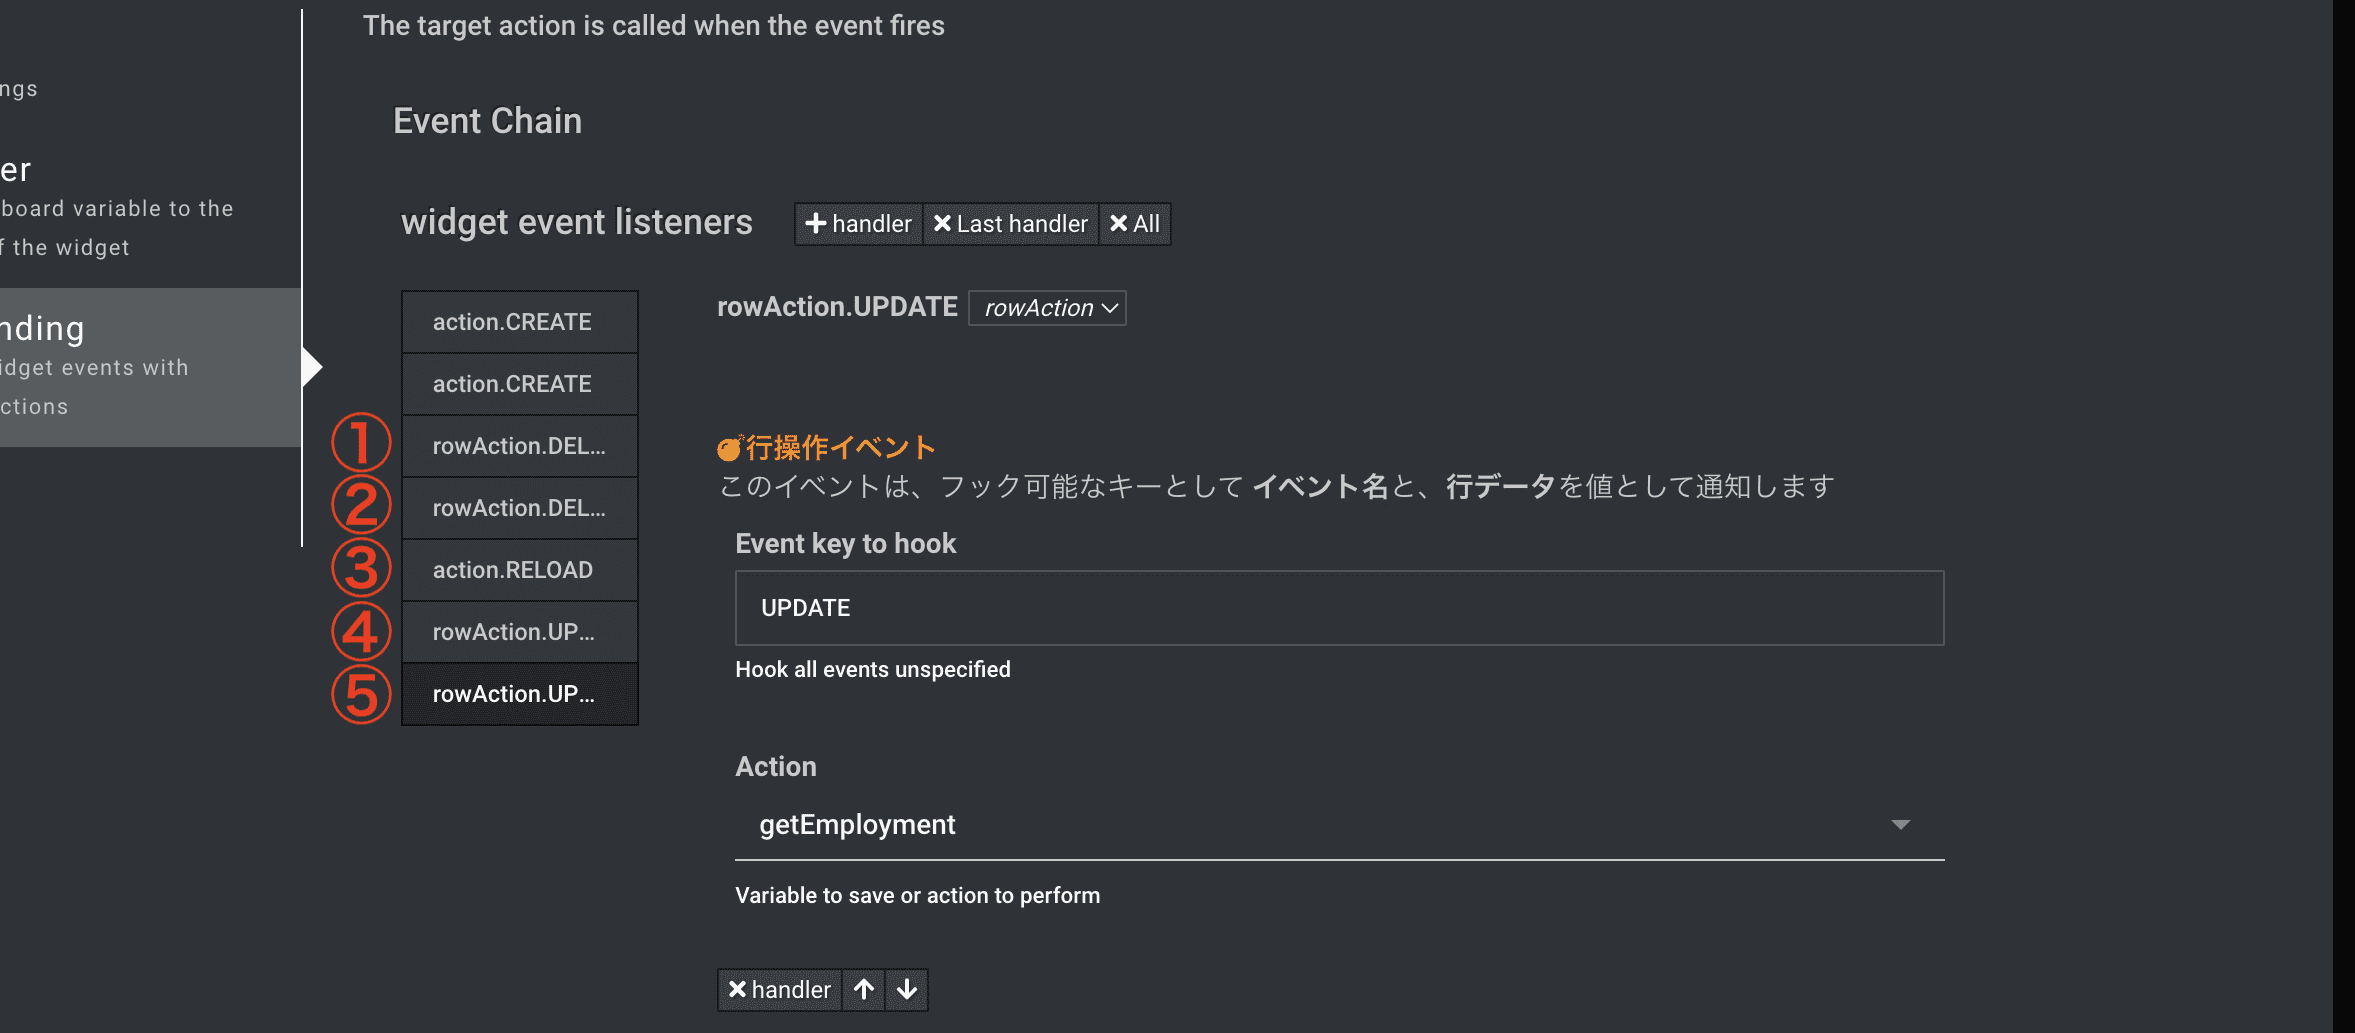
# プルダウン (select/ action/ rowAction/ pagePrev/ pageNext) フックするイベントキー (ステップ[Parameter]で設定したaction/ rowAction の[name] 値) Action (Context Area で定義した Actions から選択する) 1 rowAction DELETE deleteEmployment 2 rowAction DELETE getEmployment 3 action RELOAD getEmployment 4 rowAction UPDATE updateEmployment 5 rowAction UPDATE getEmployment
最後に [Append] ボタンを押下してWidgetの作成を完了してください。
Widgetが保有する設定パラメータの詳細は
5.6 Builtin Widget 仕様
を参照してください。
4. 動作確認・保存
4.1 動作確認をする(編集画面)
-
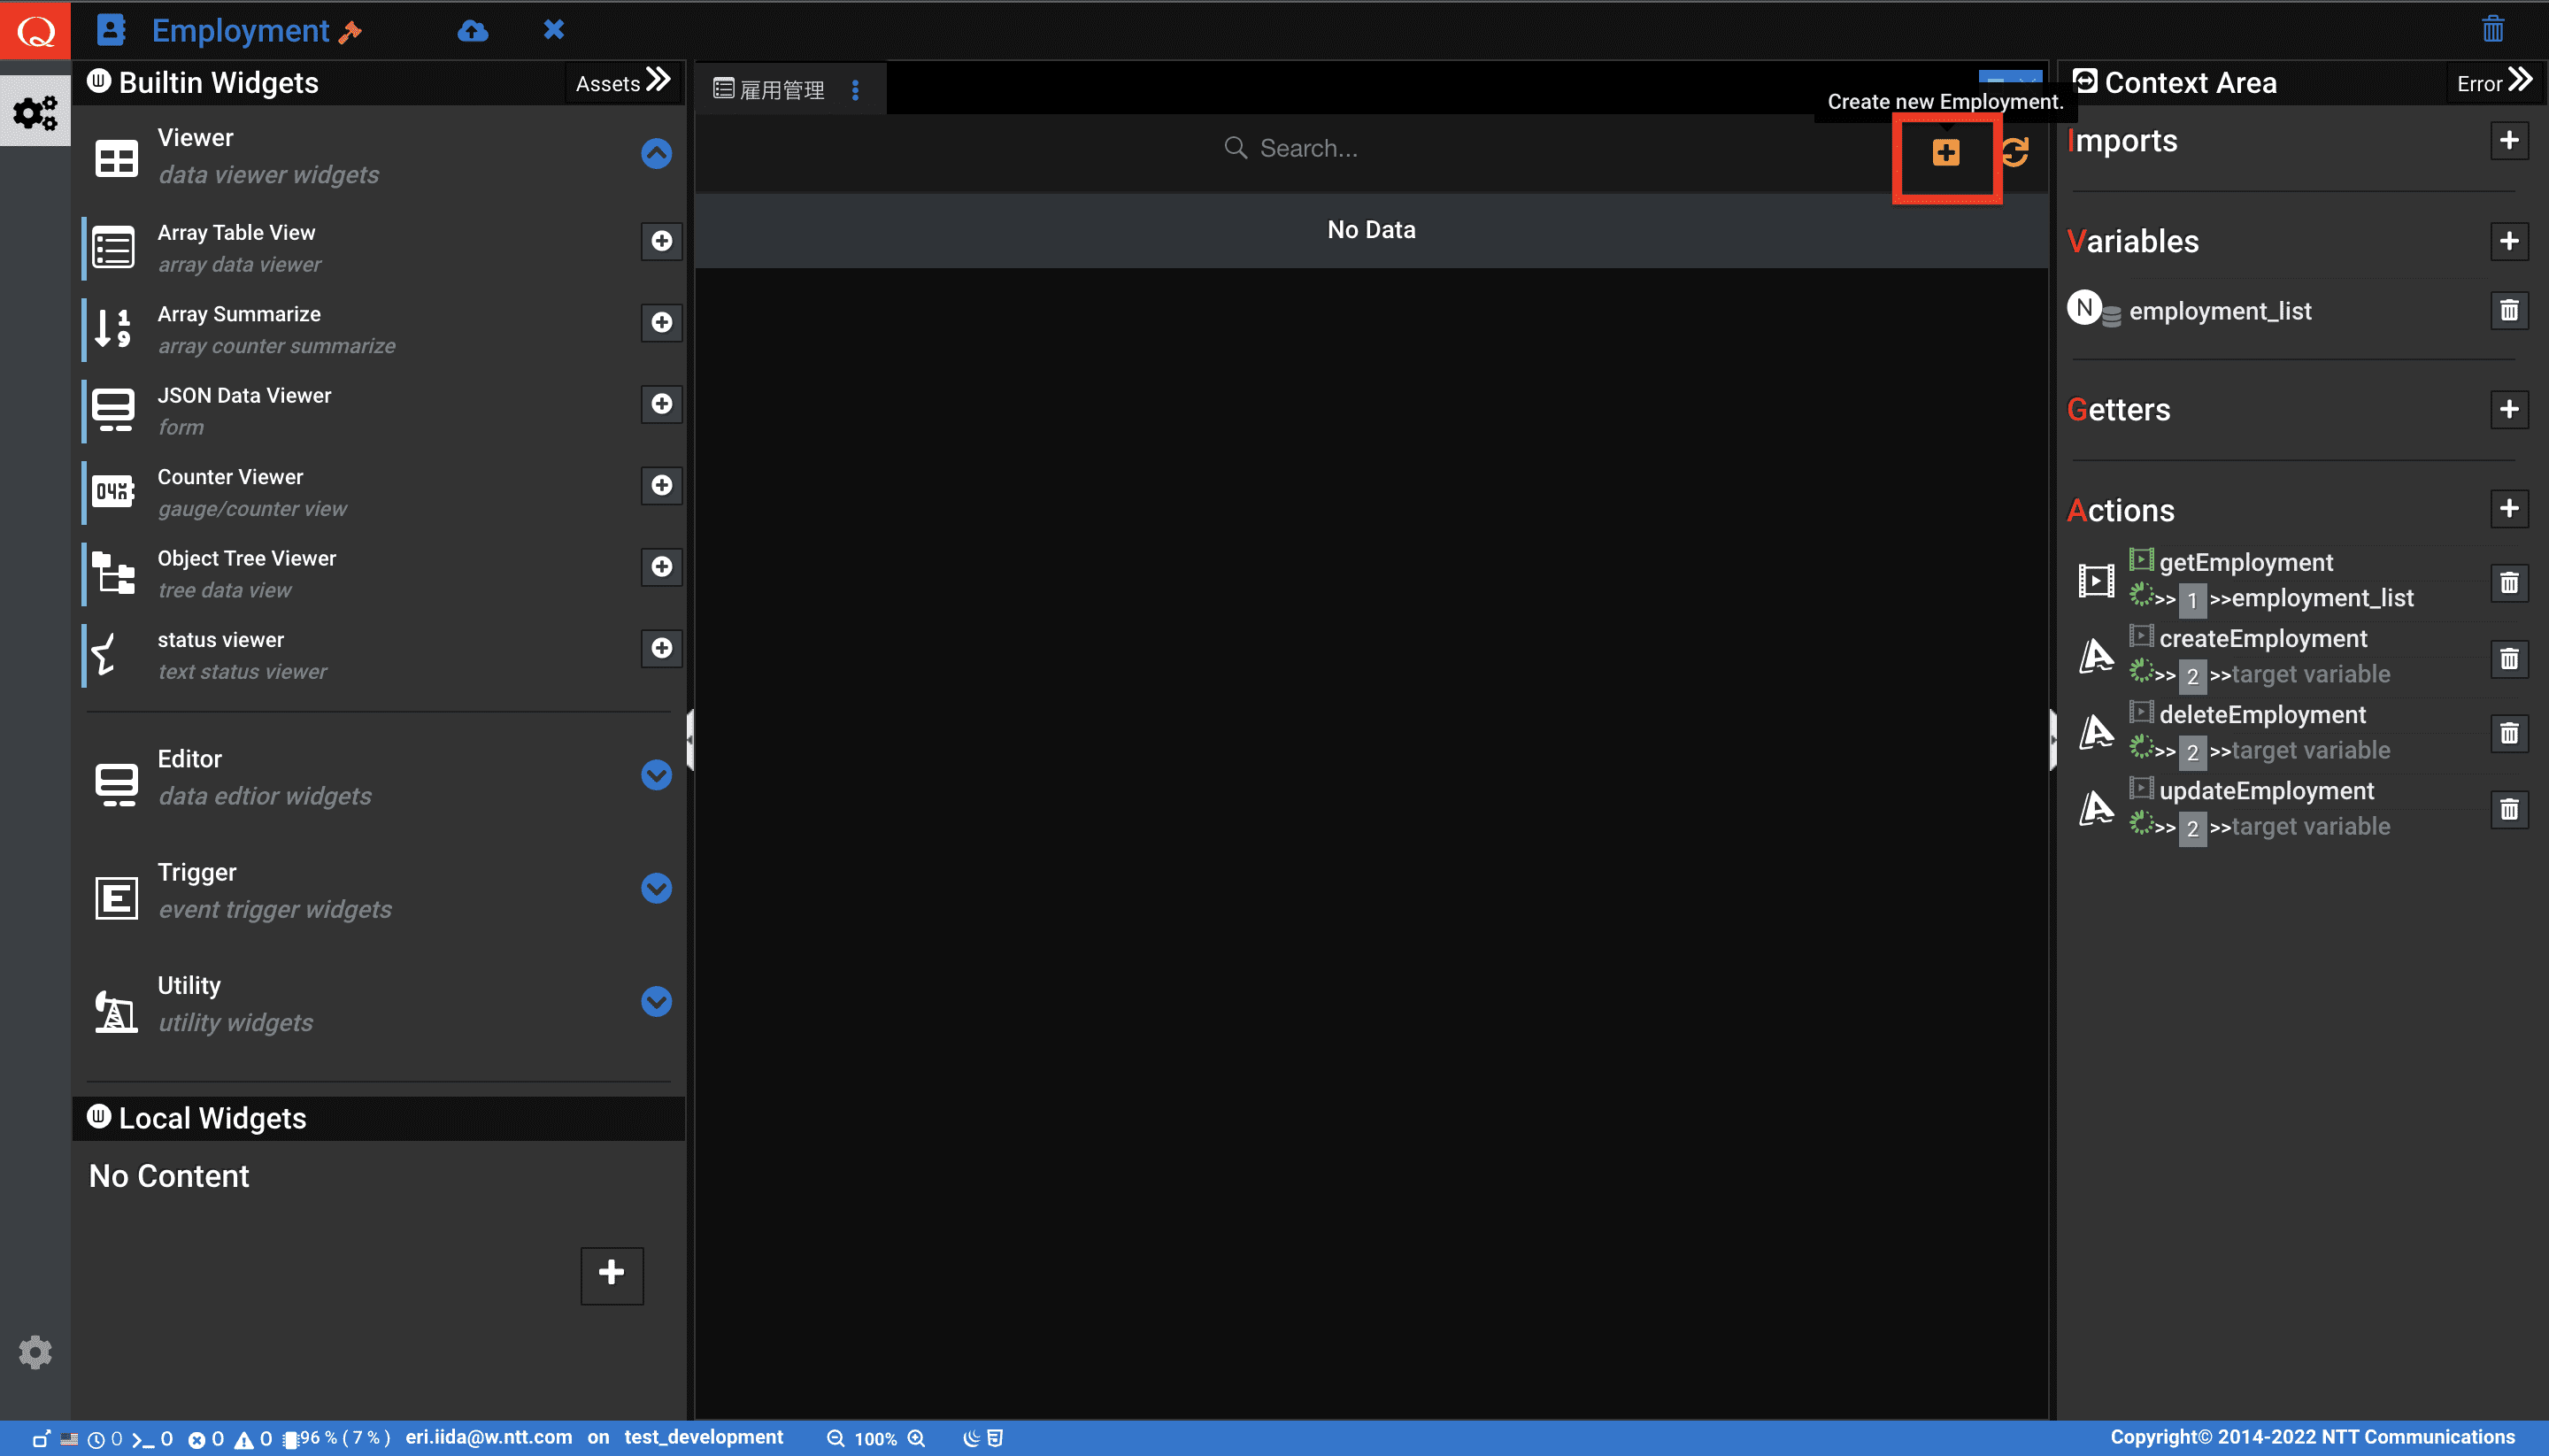
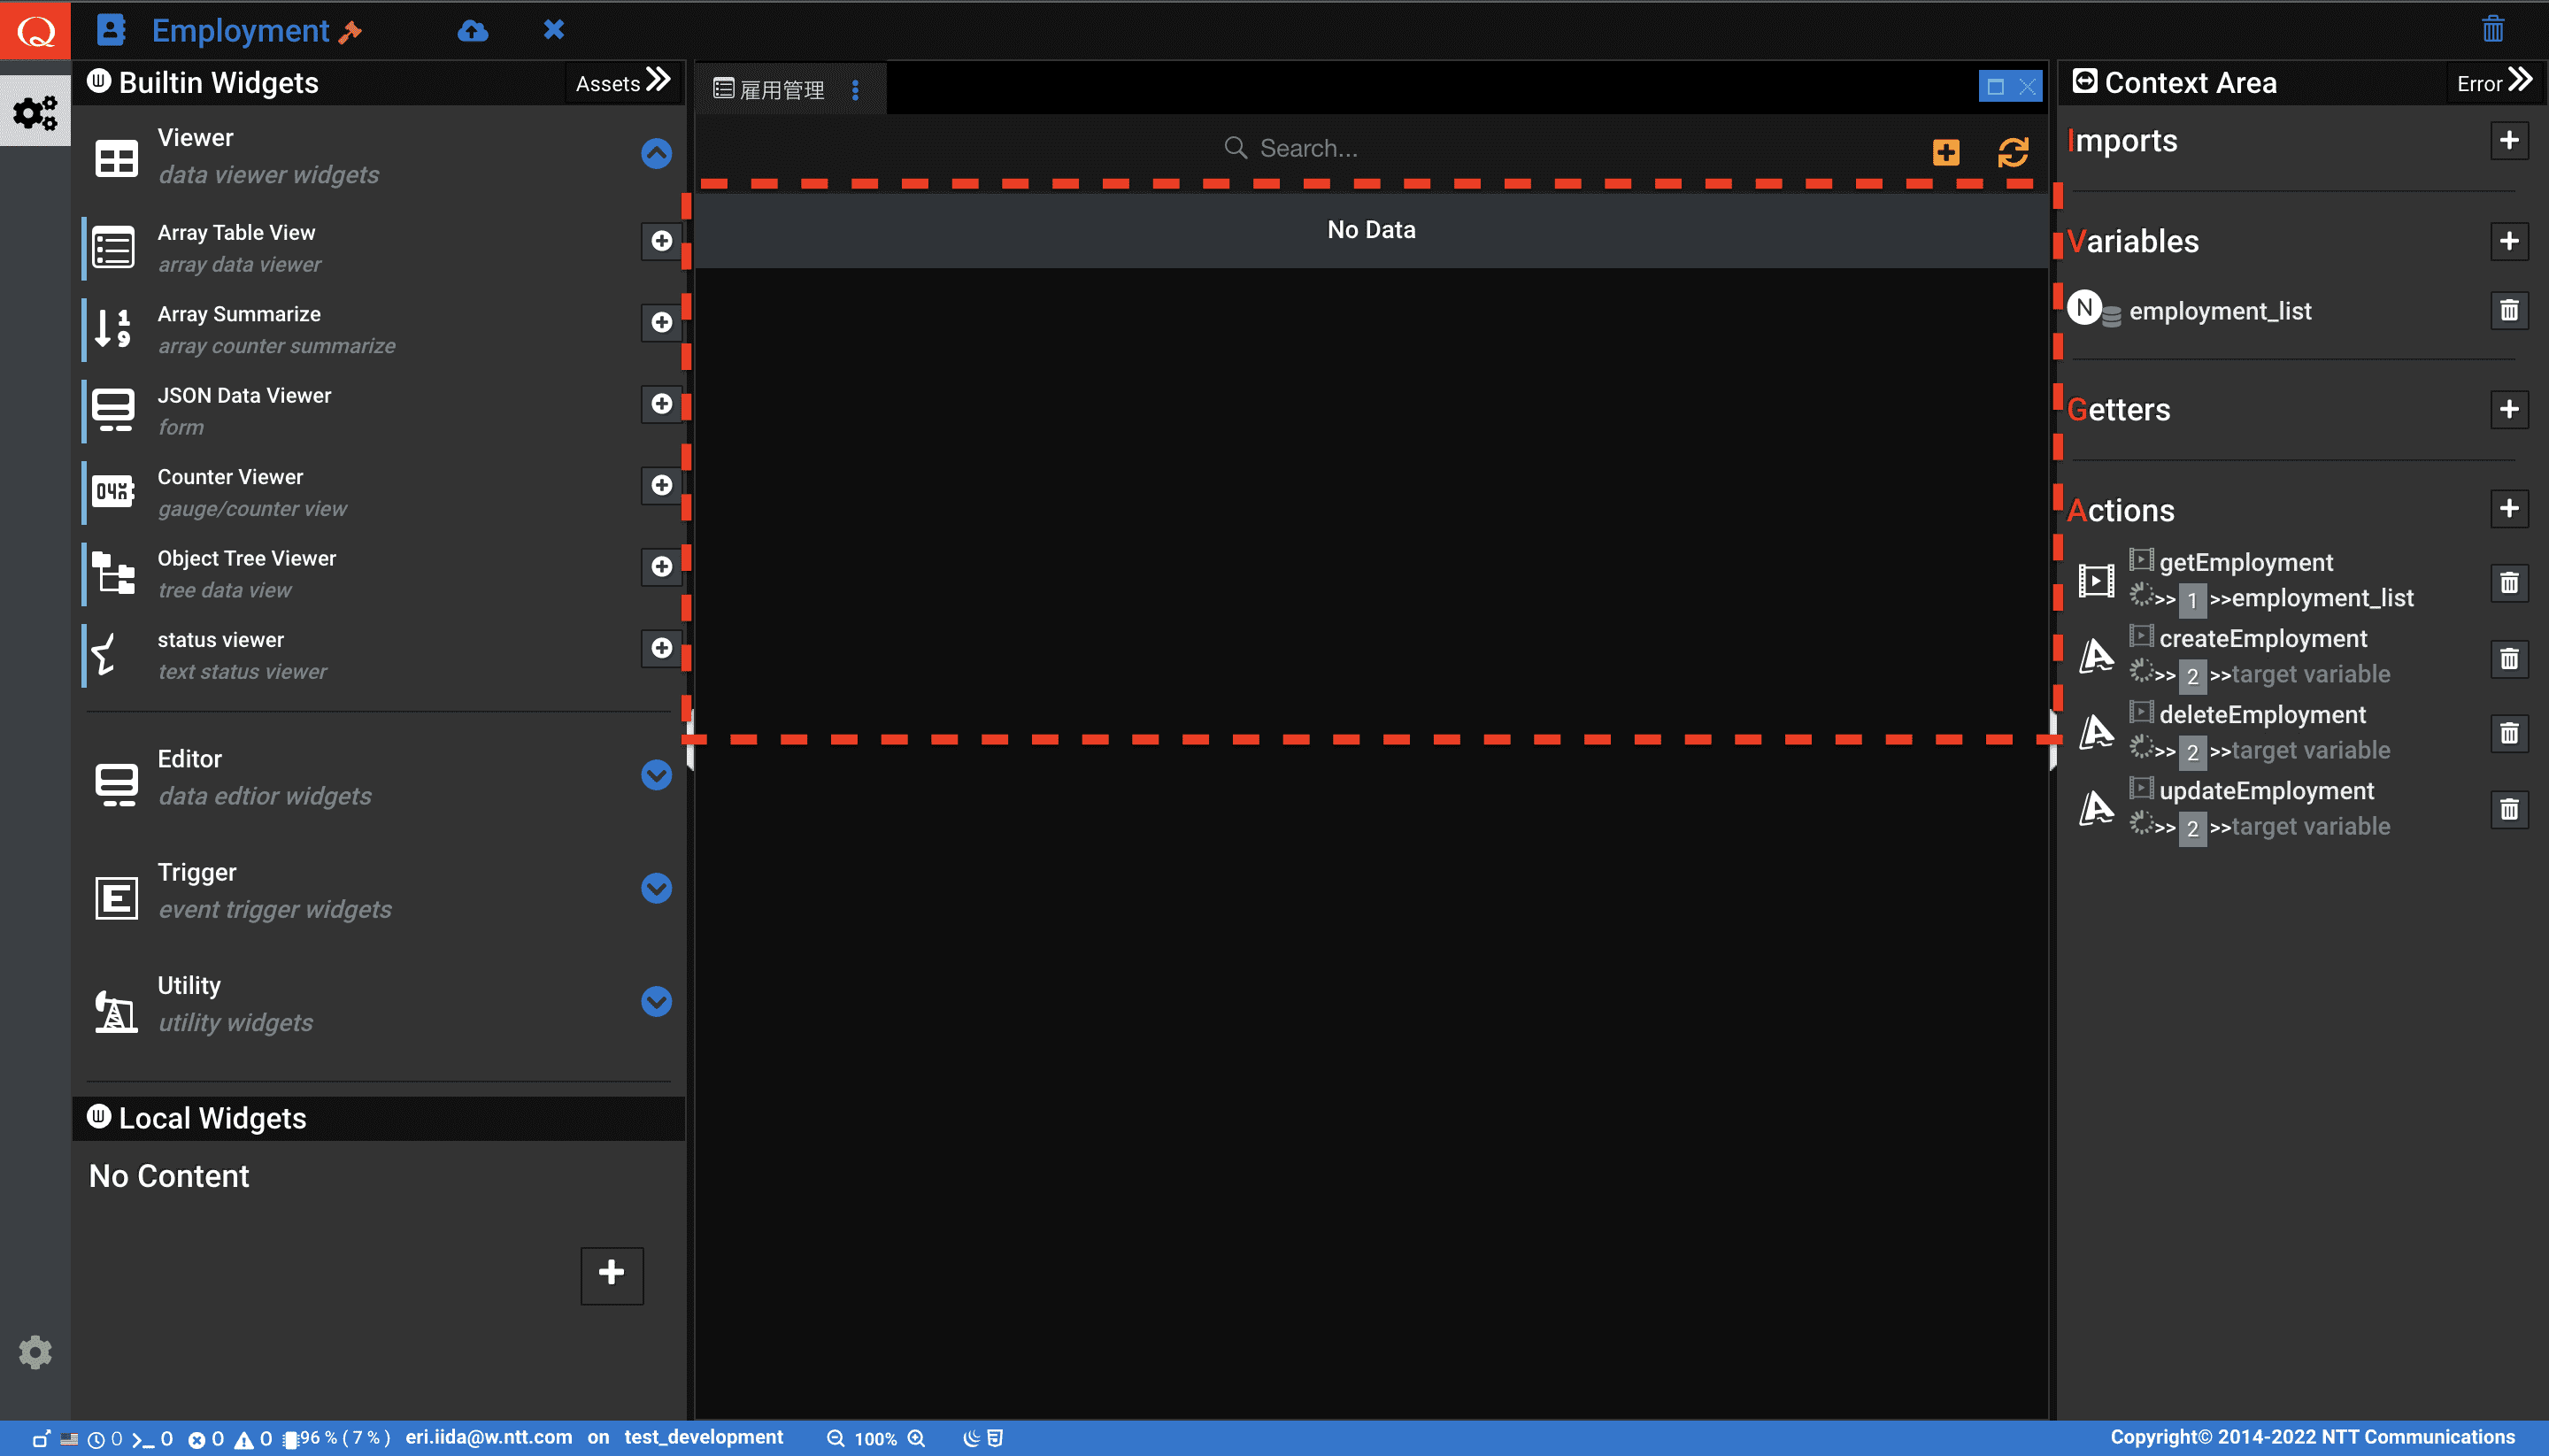
Dashboard Builder は編集モードでも動作確認することができます。顧客情報を新規登録/ 取得/ 変更/ 削除してみましょう。新規登録ボタンを押下します。
-
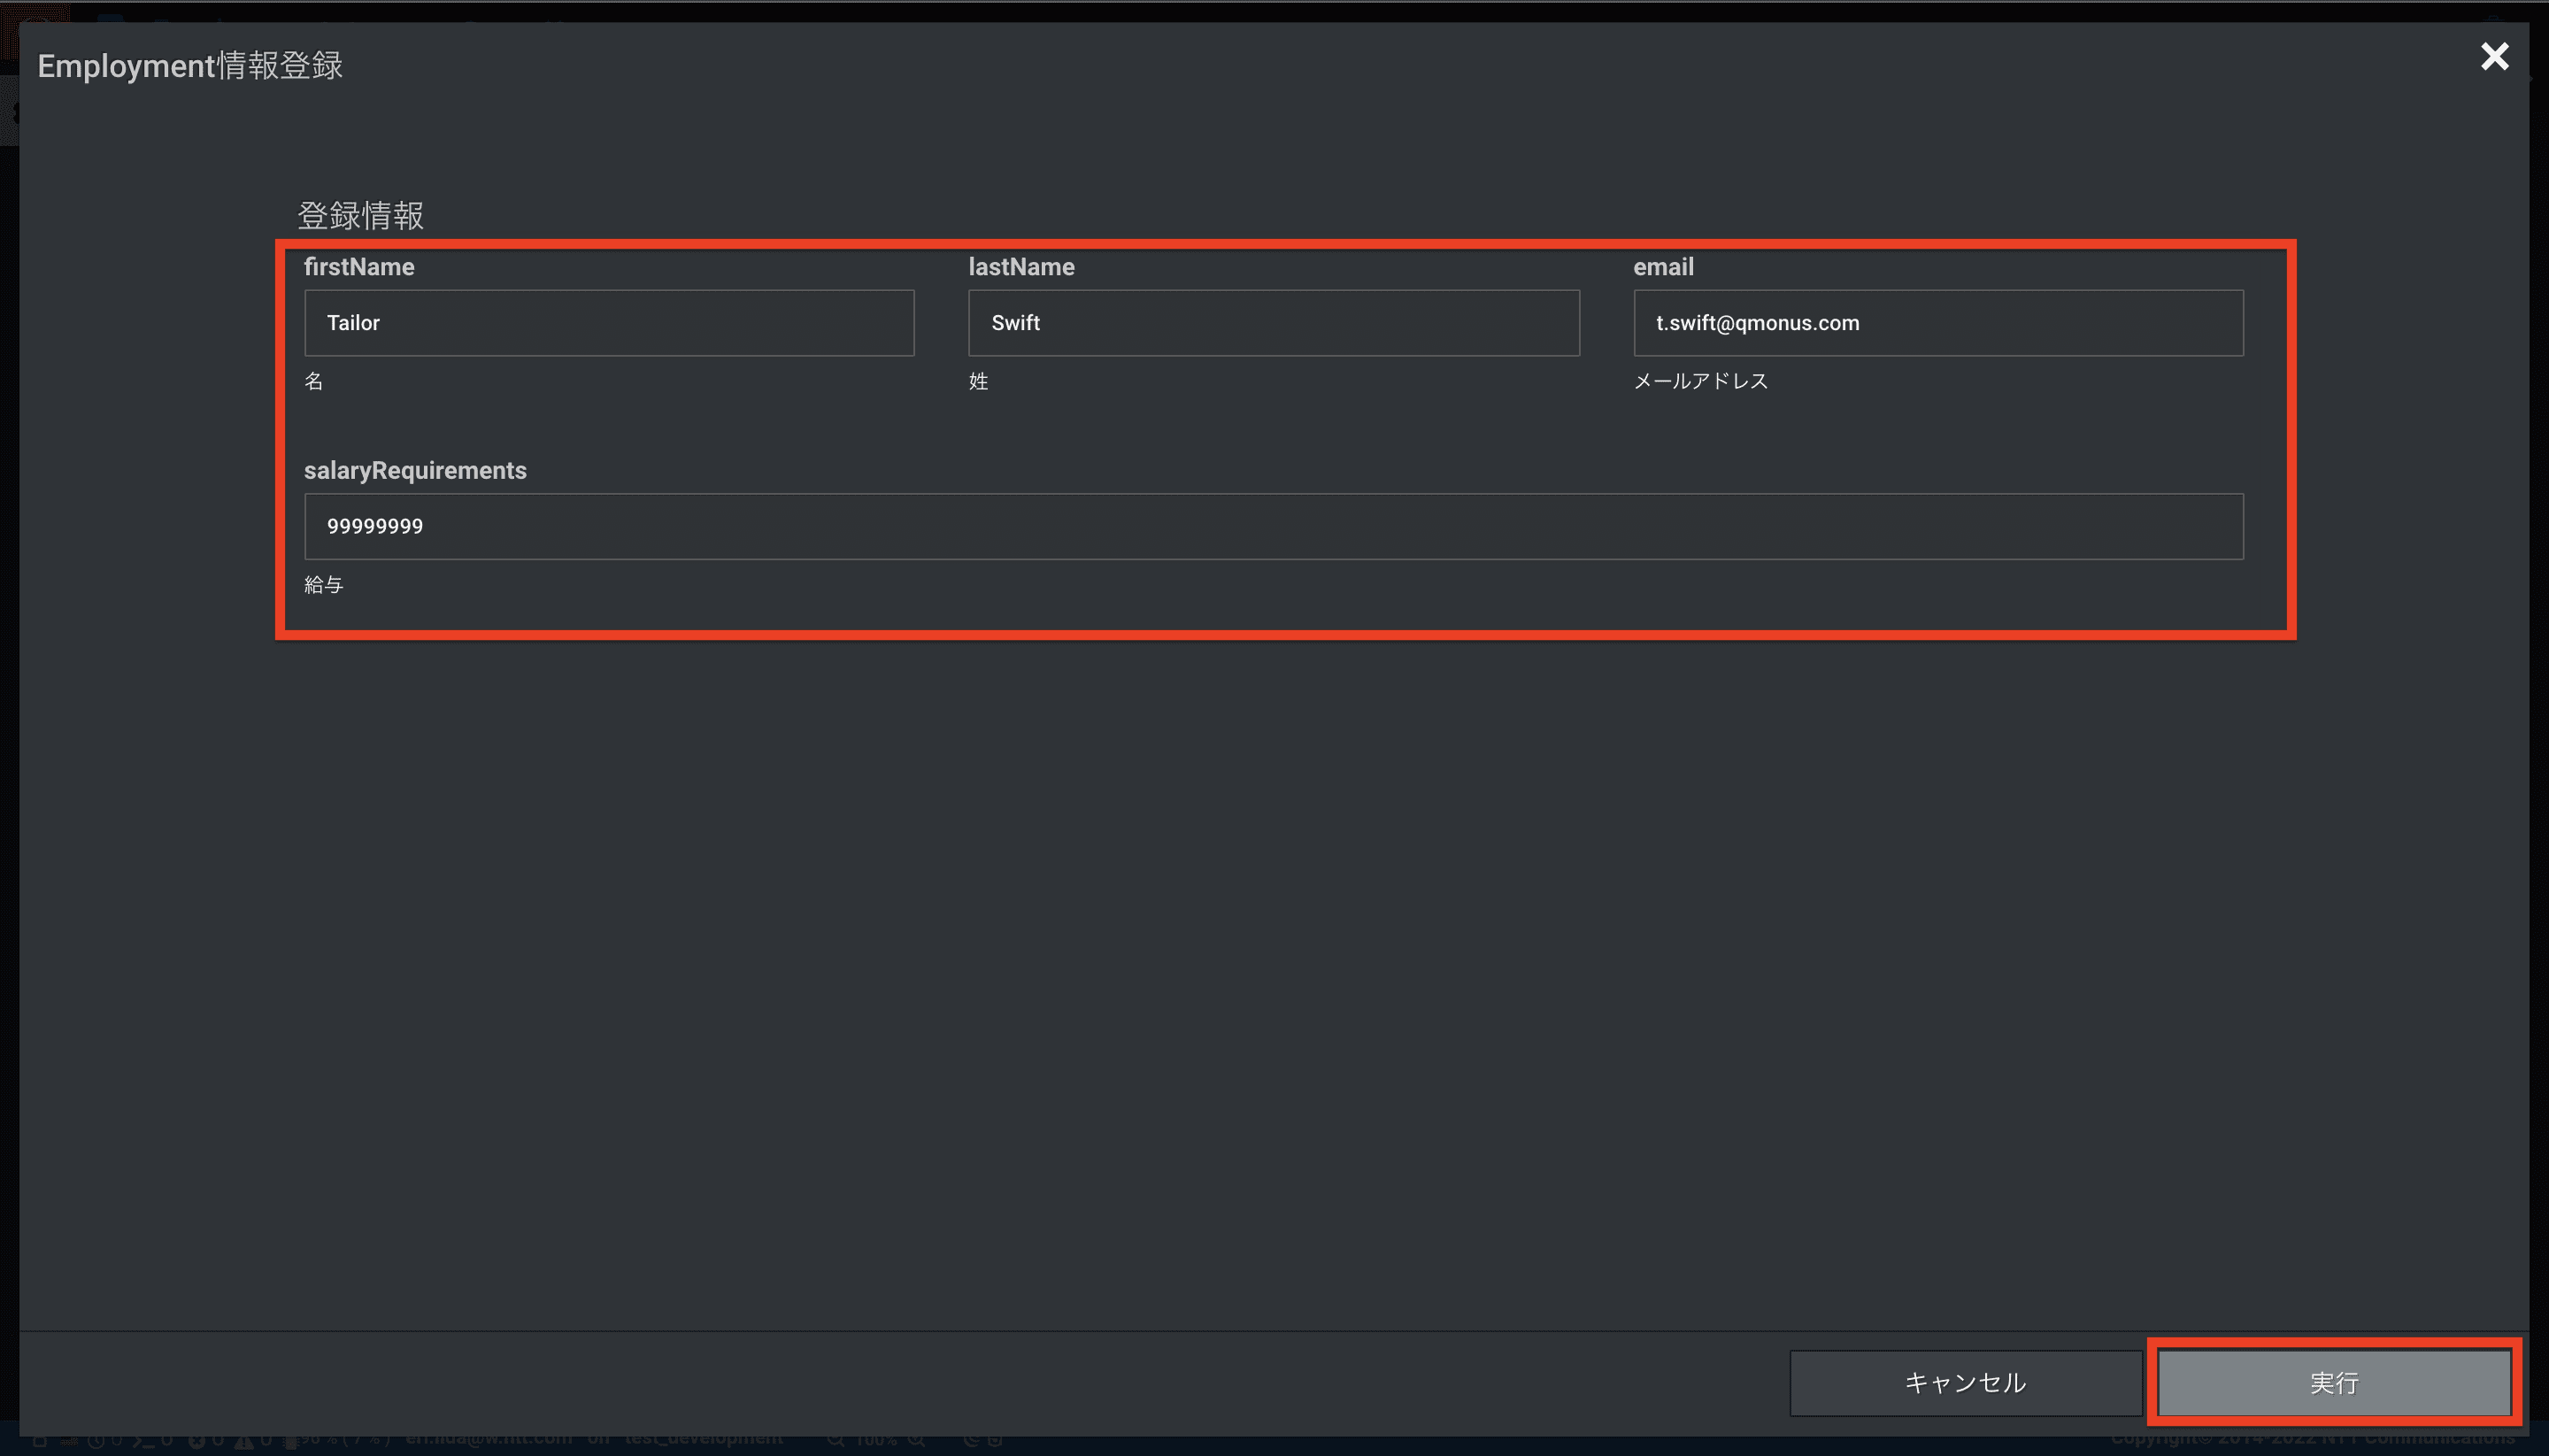
登録情報を入力し、実行ボタンを押下します。
-
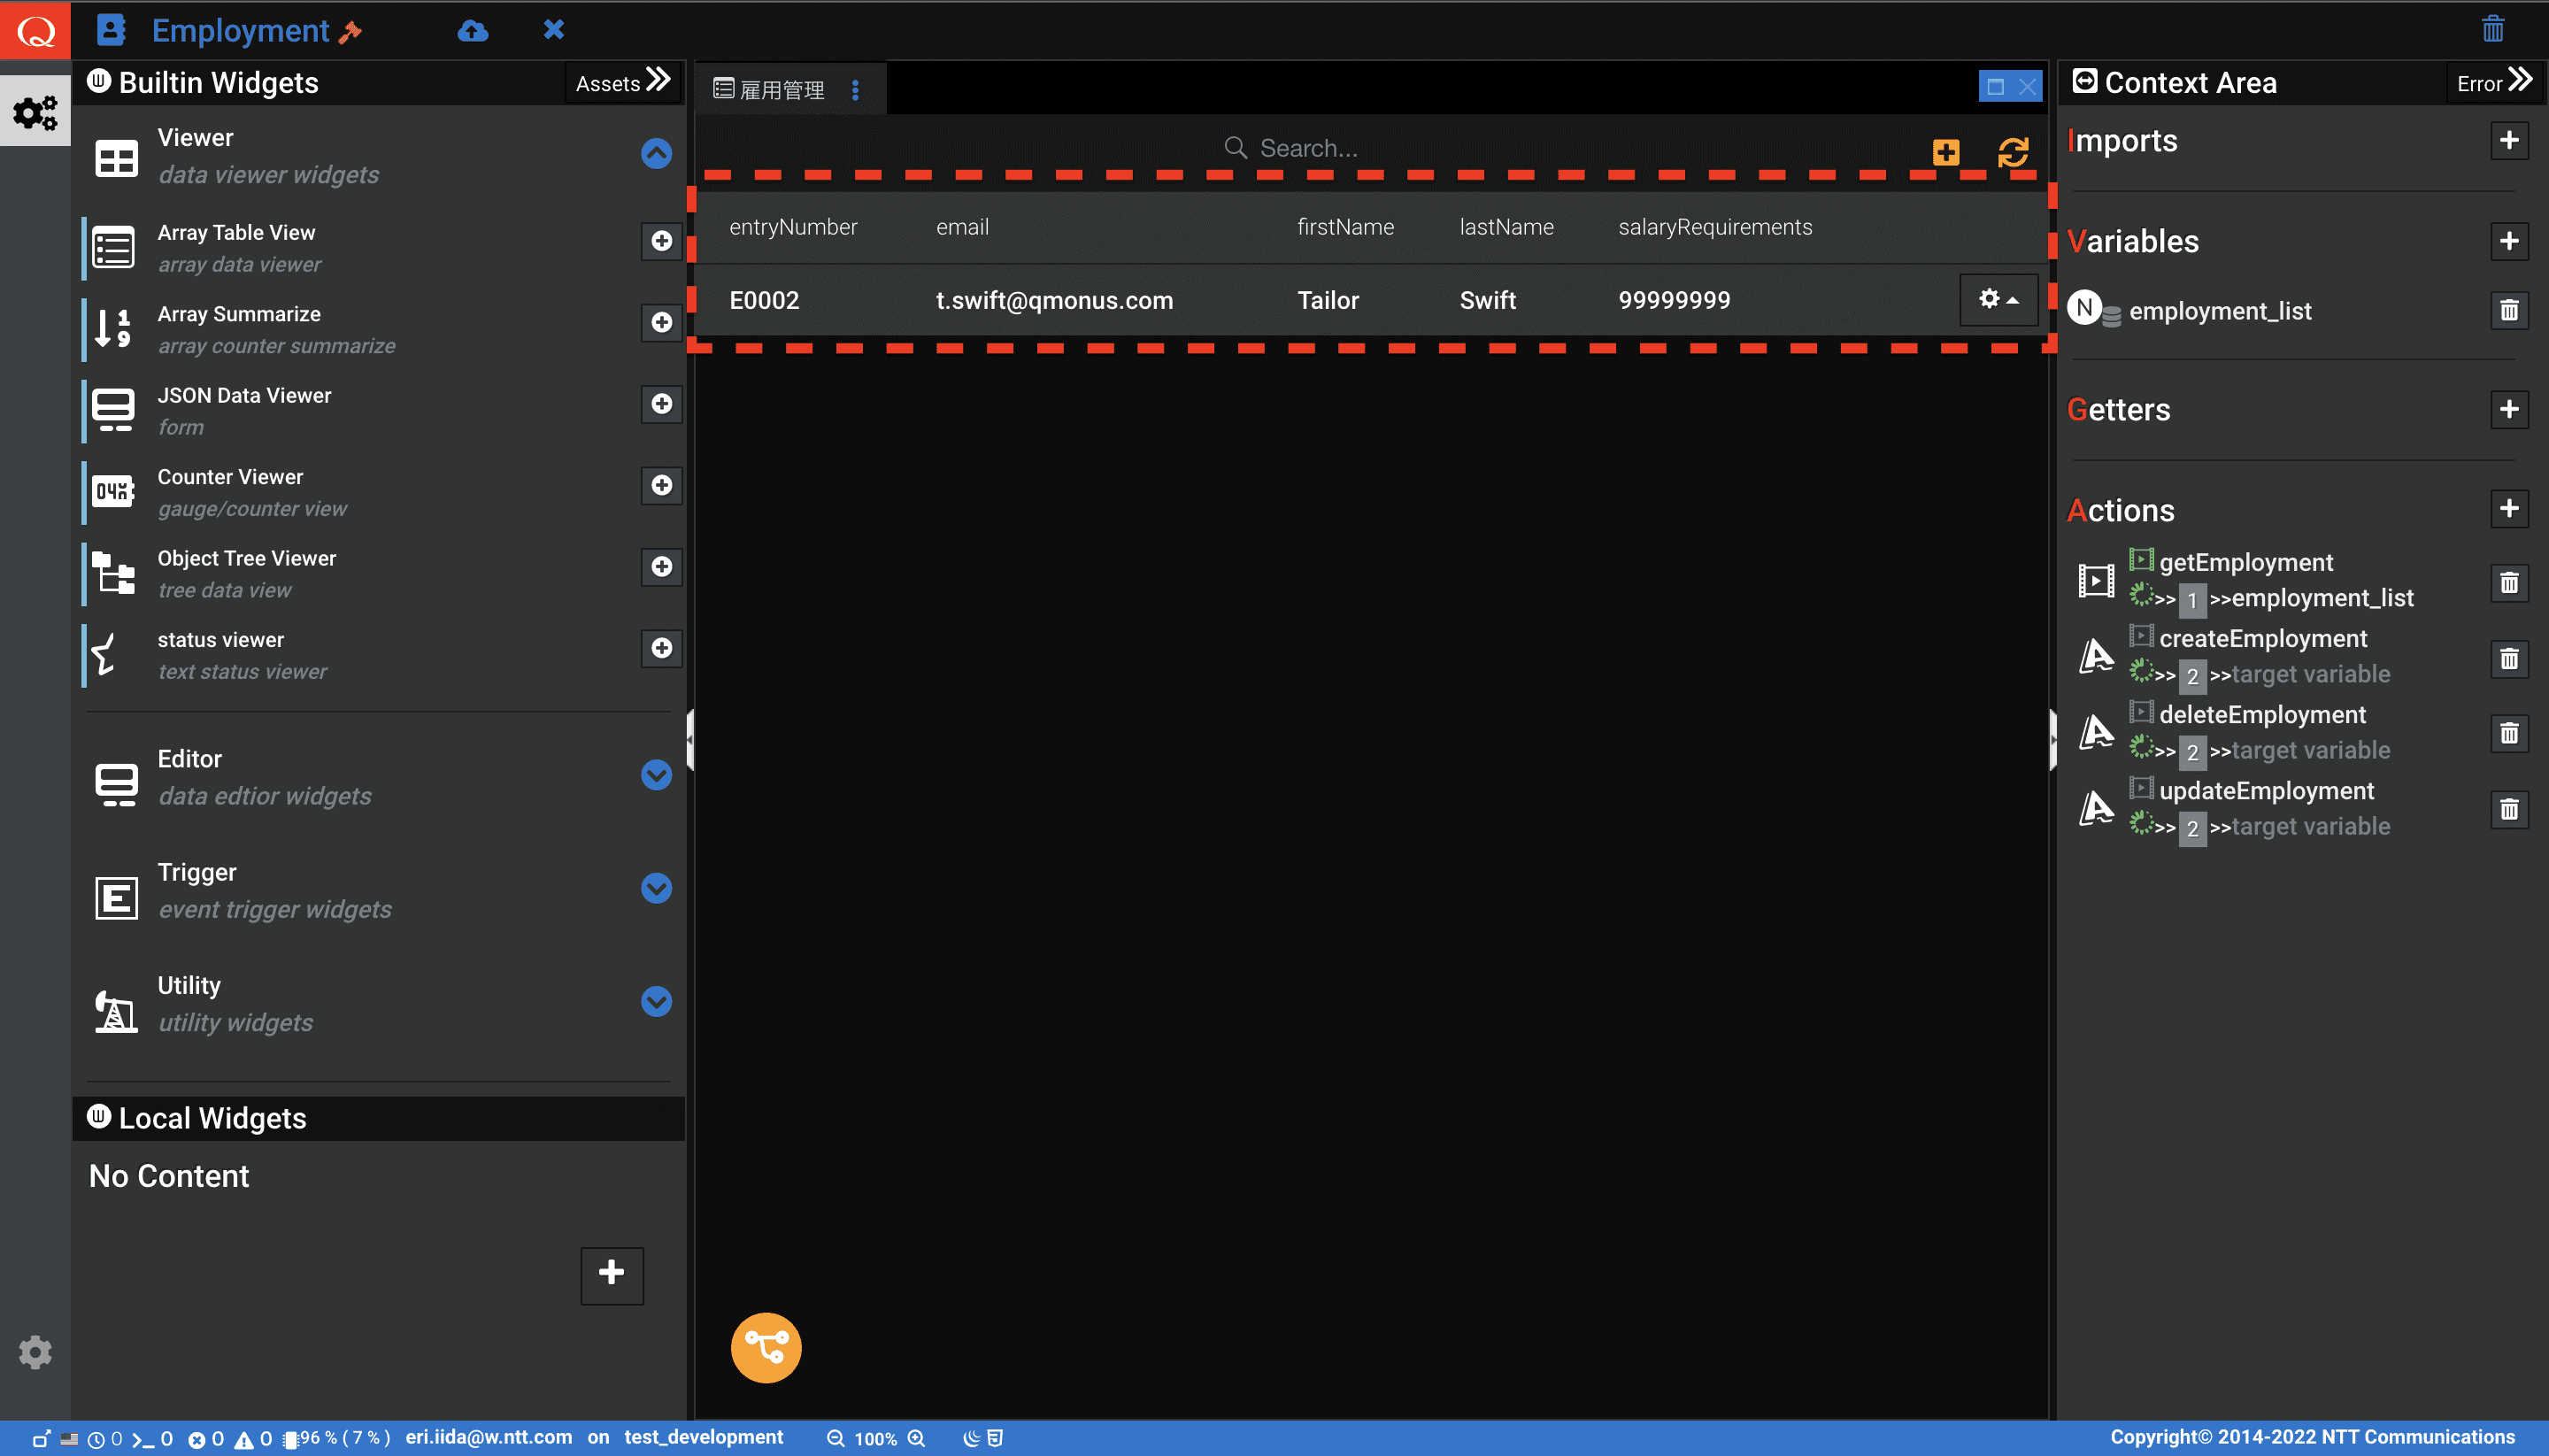
Employment 情報が保存されて、登録したEmployment 情報が一覧に表示されました。
-
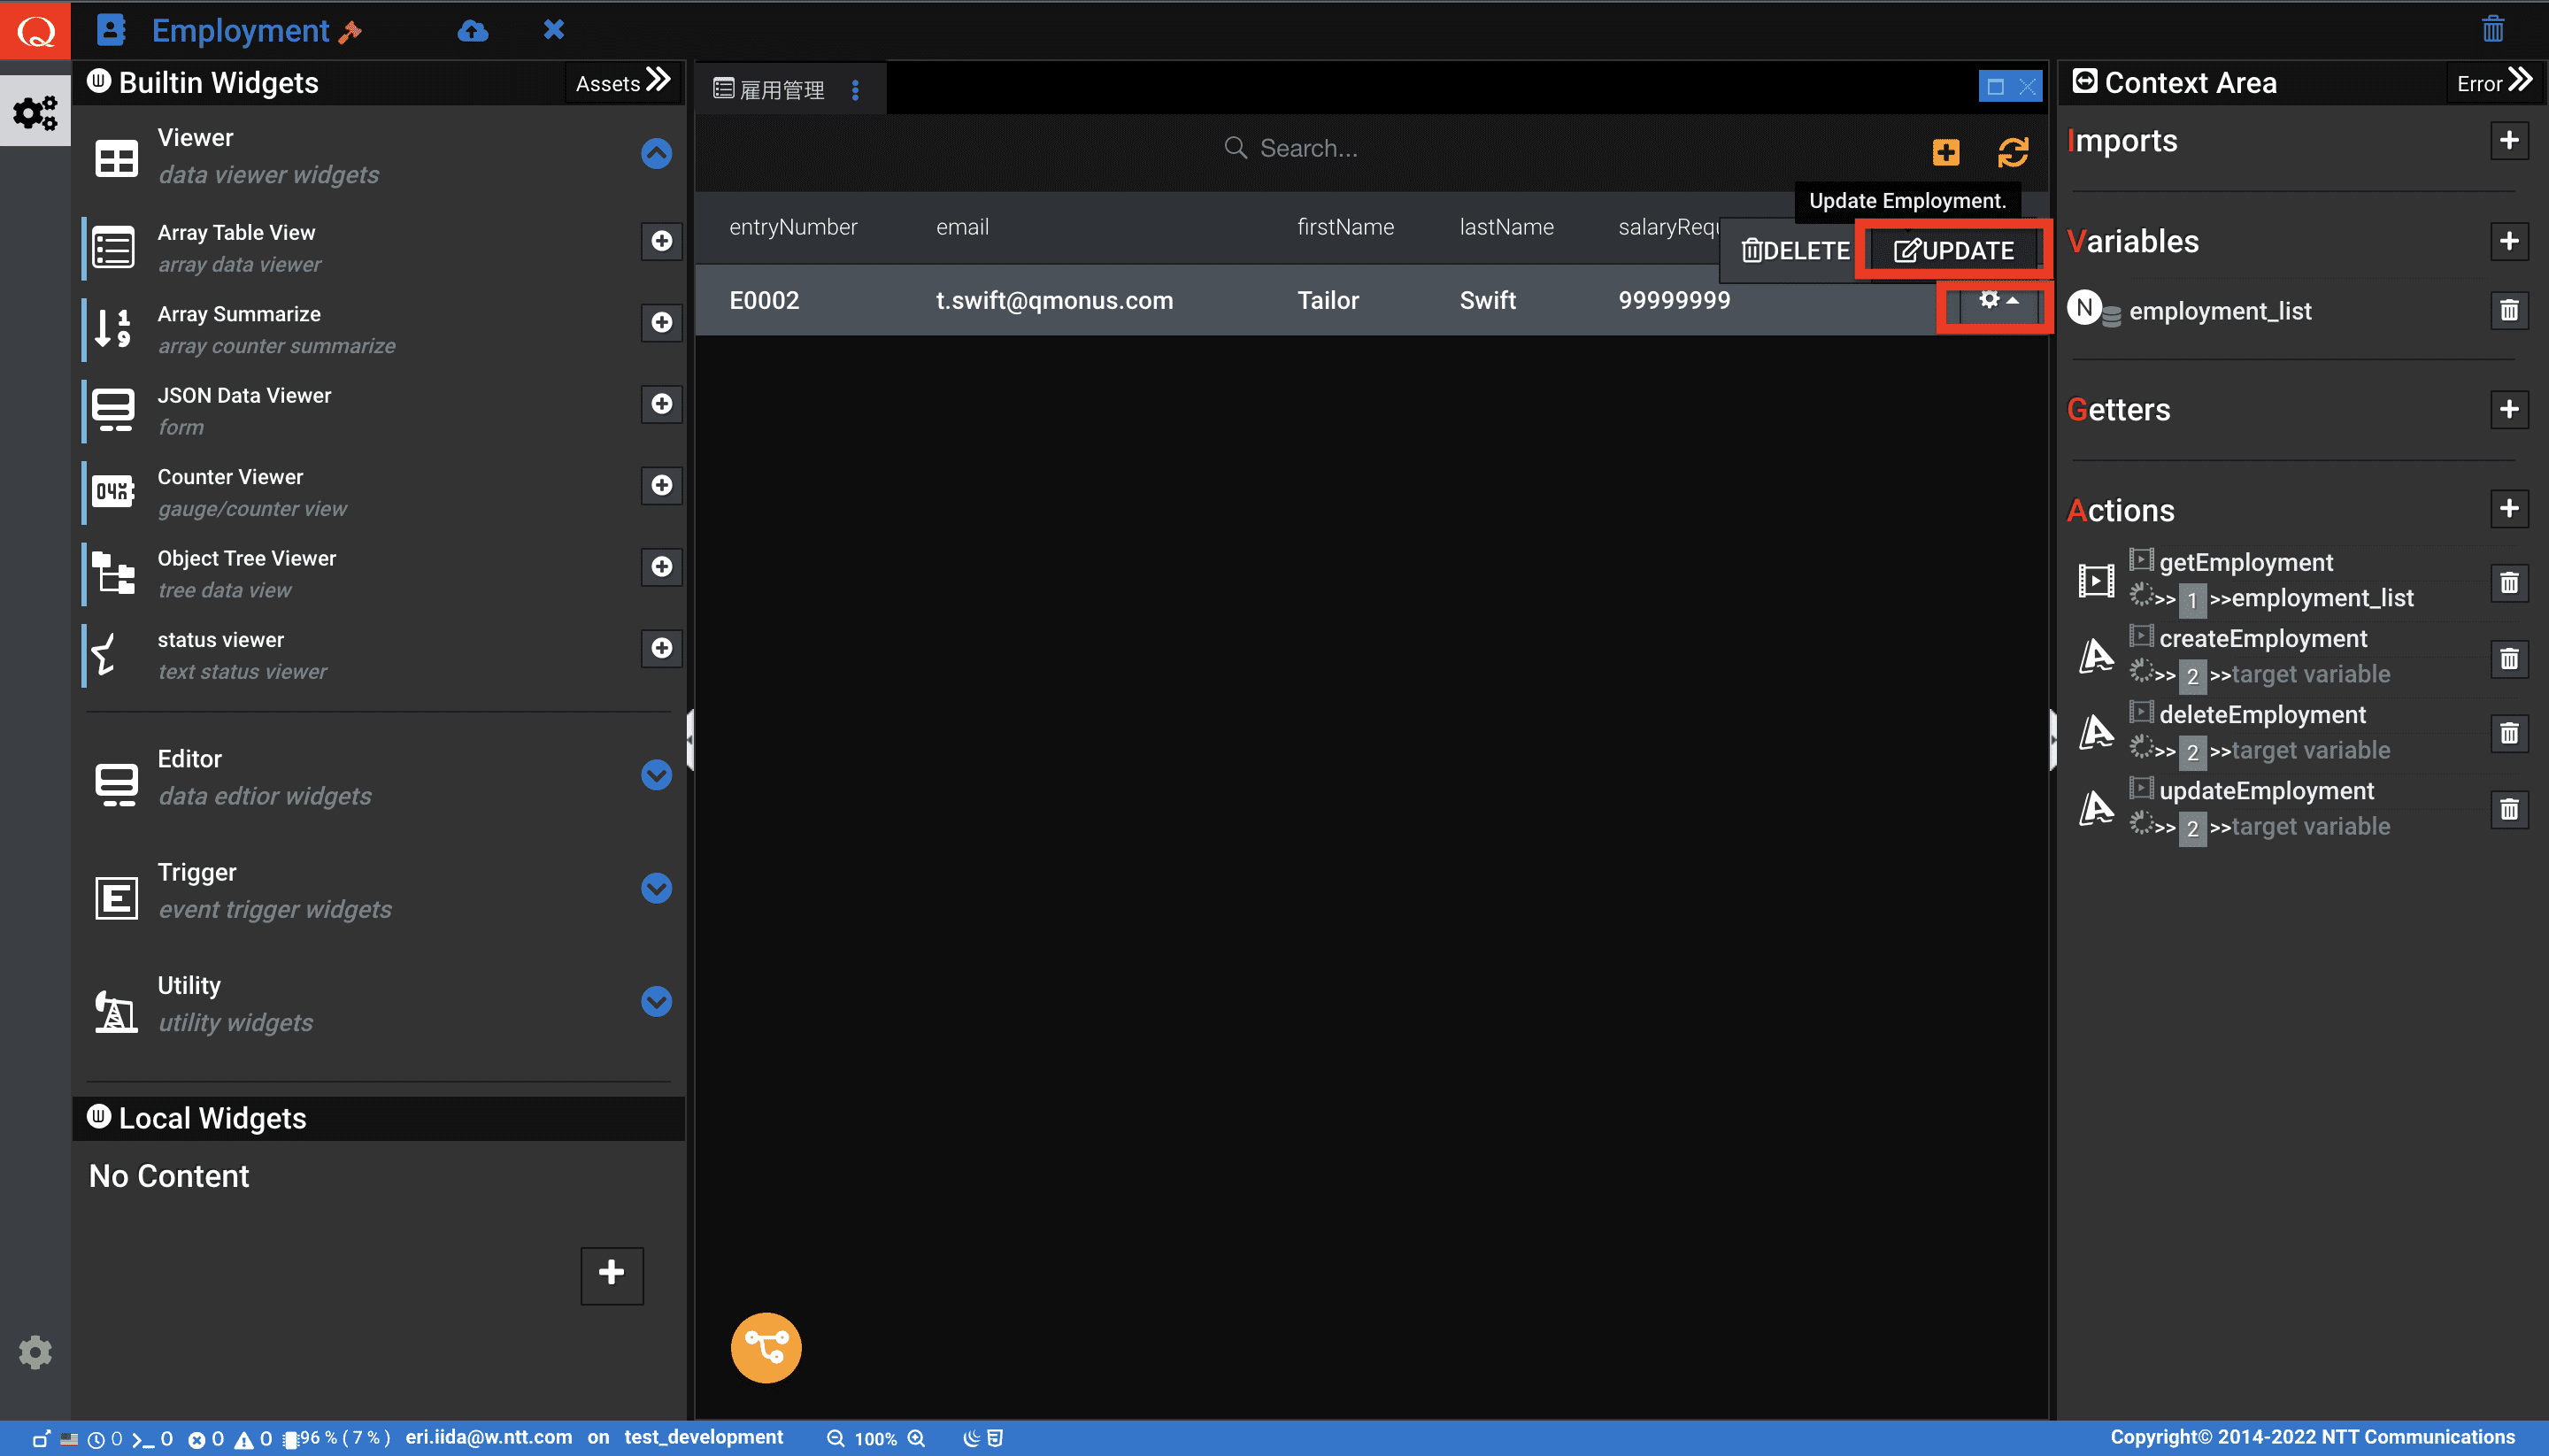
次に、Employment 情報を編集しましょう。歯車ボタン、UPDATE ボタンを押下します。
-
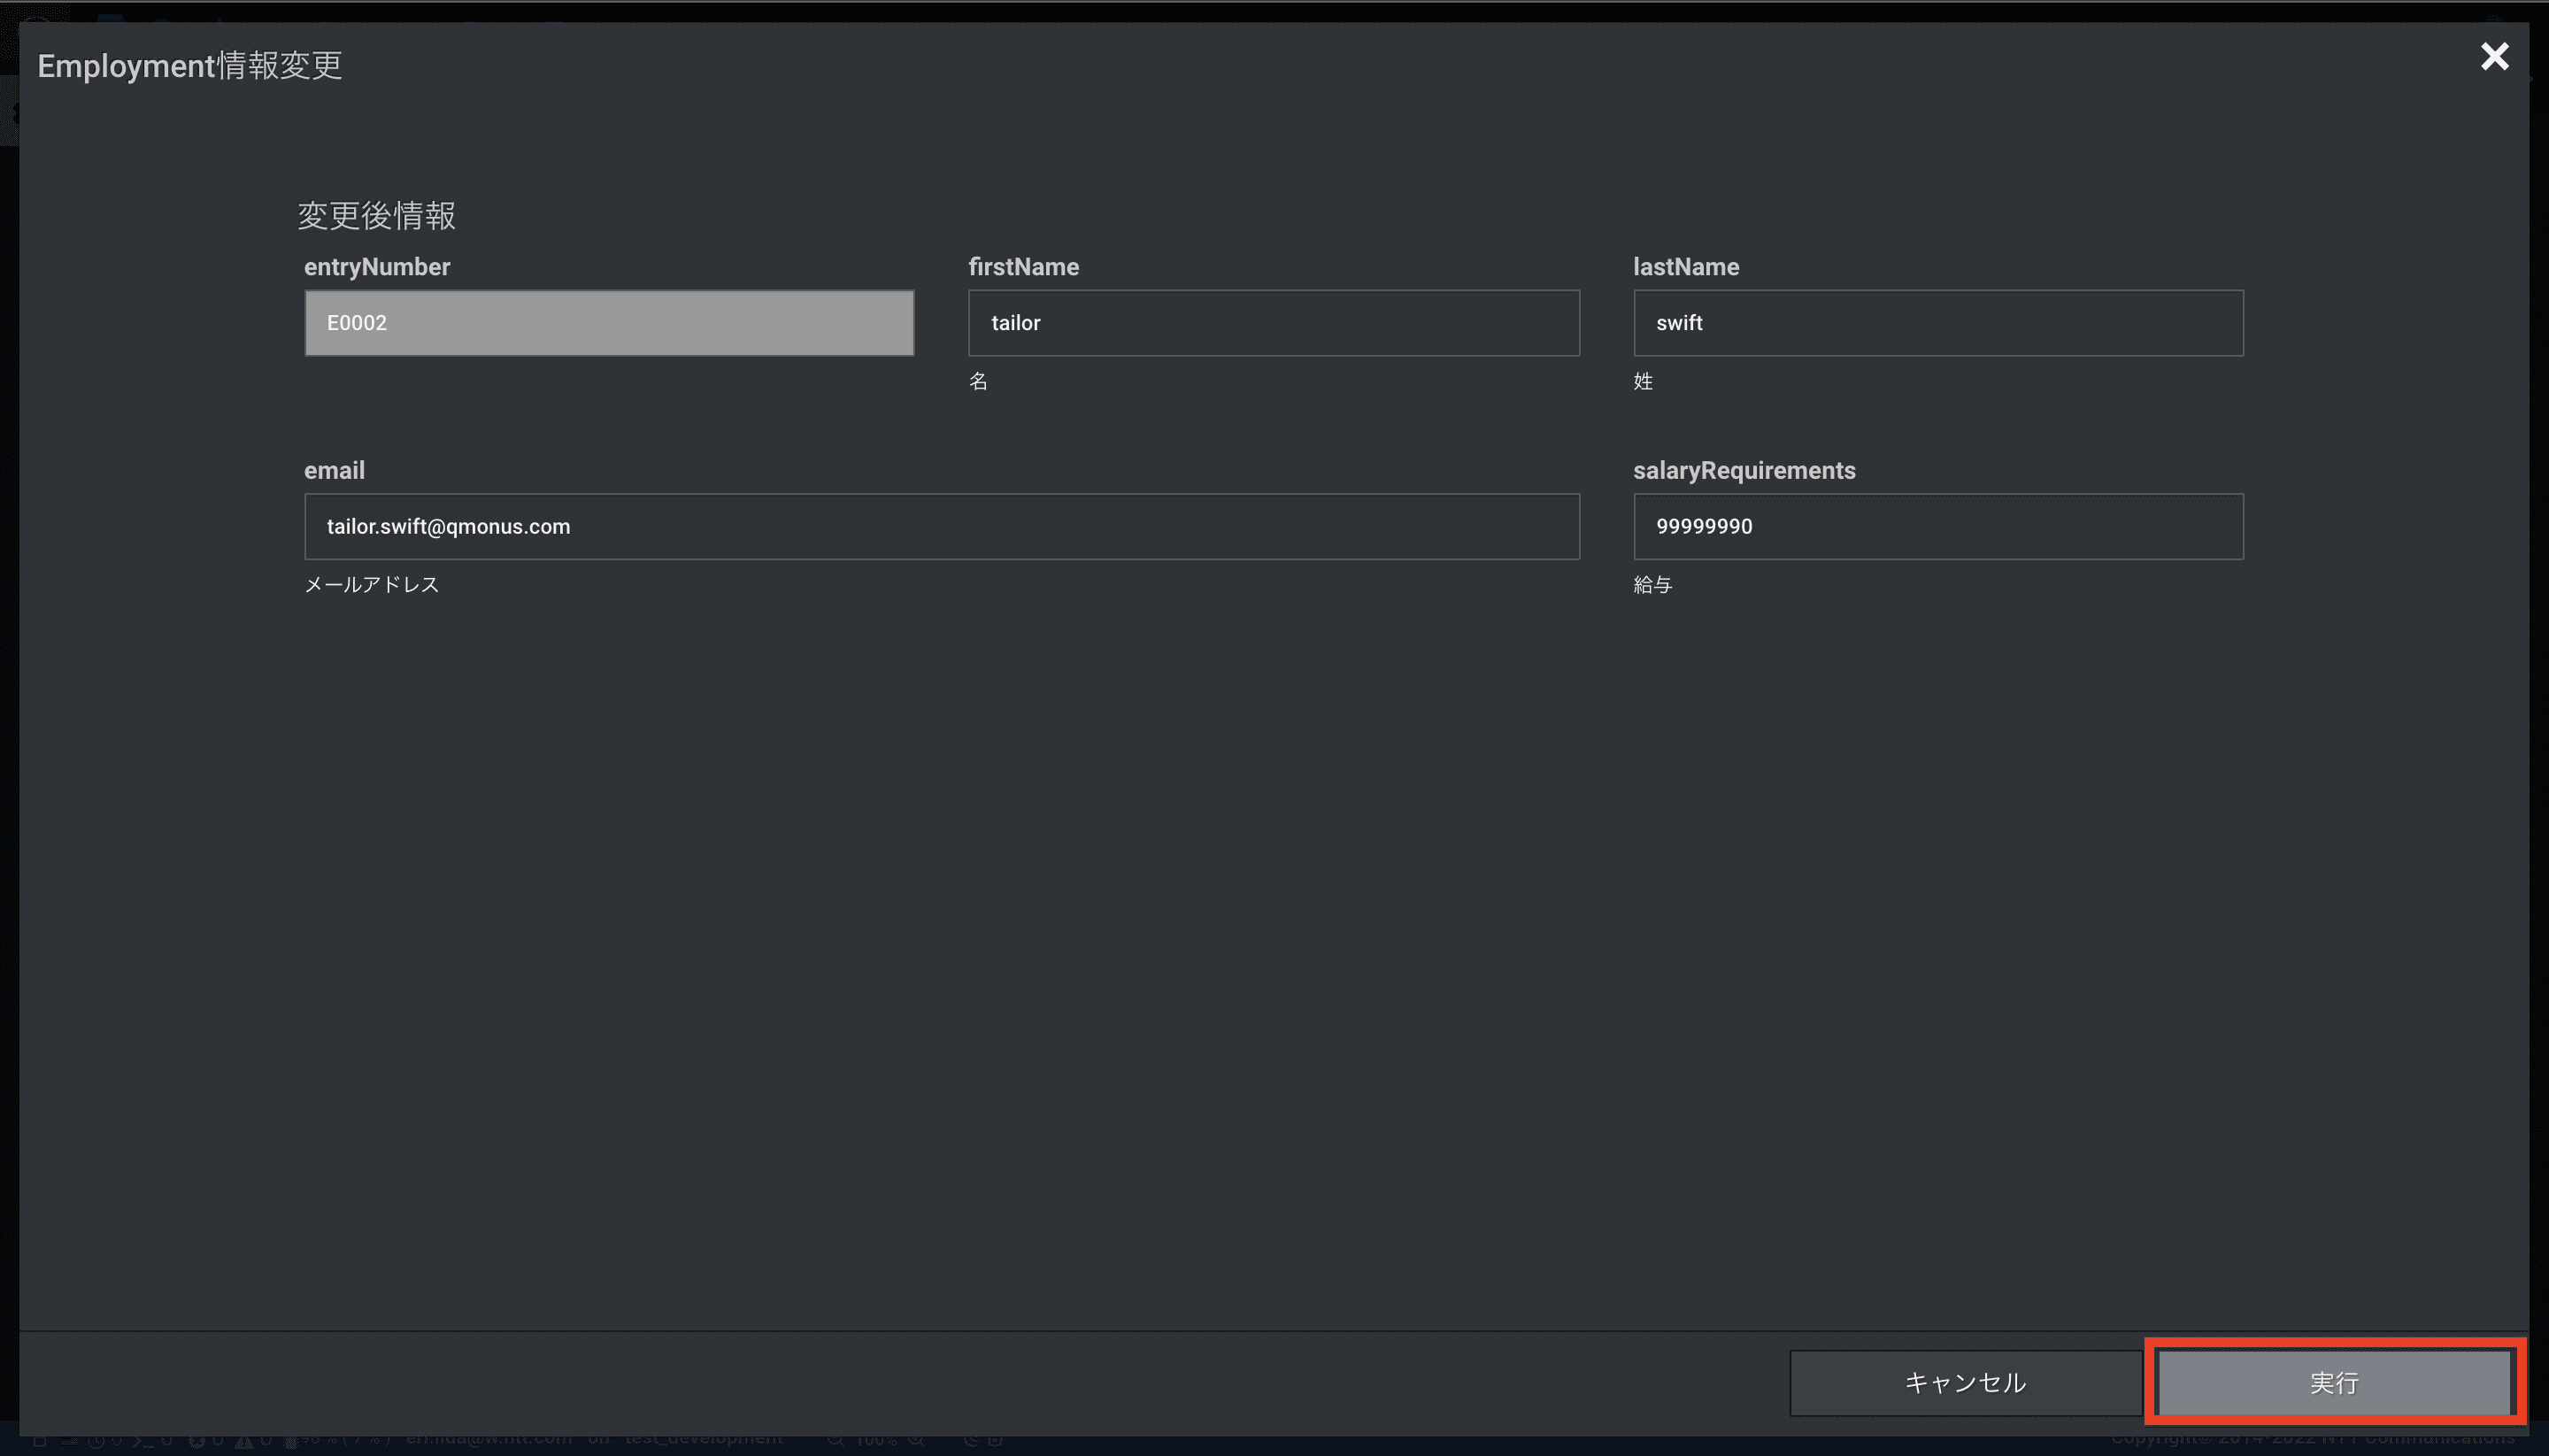
変更画面にて各値を編集し、実行ボタンを押下します。
-
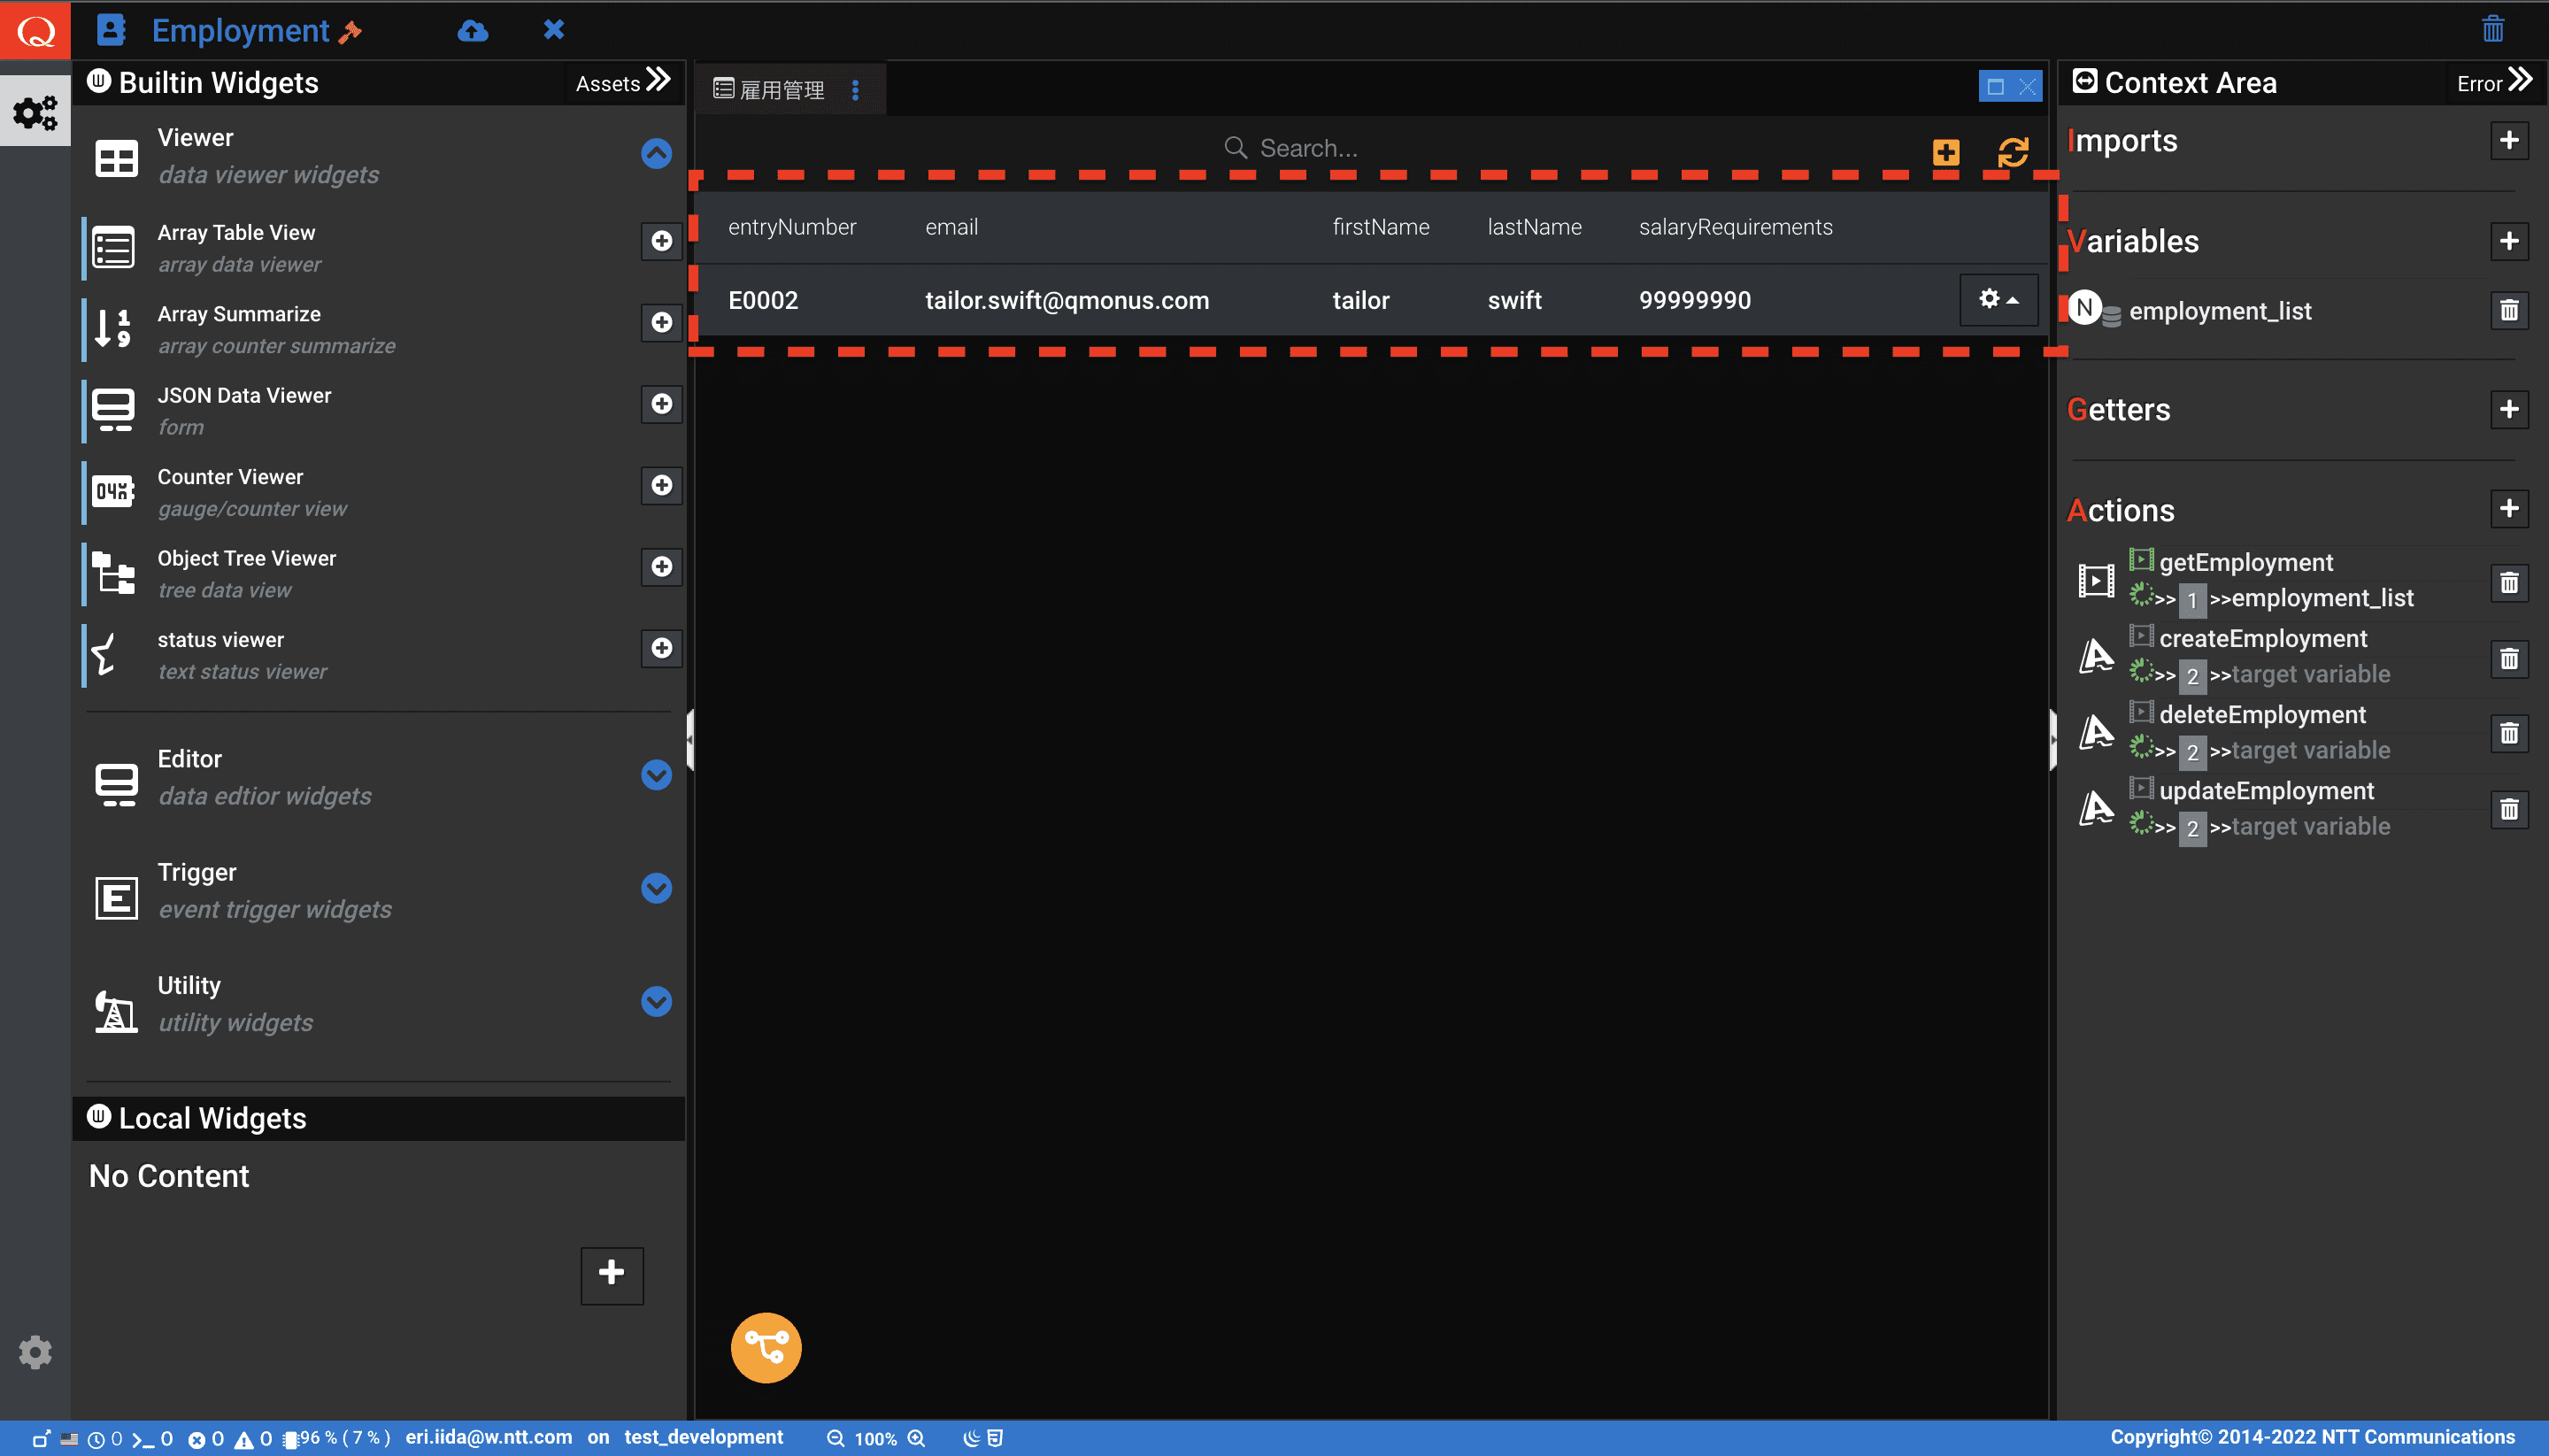
一覧の値も変更されていることが確認できます。
-
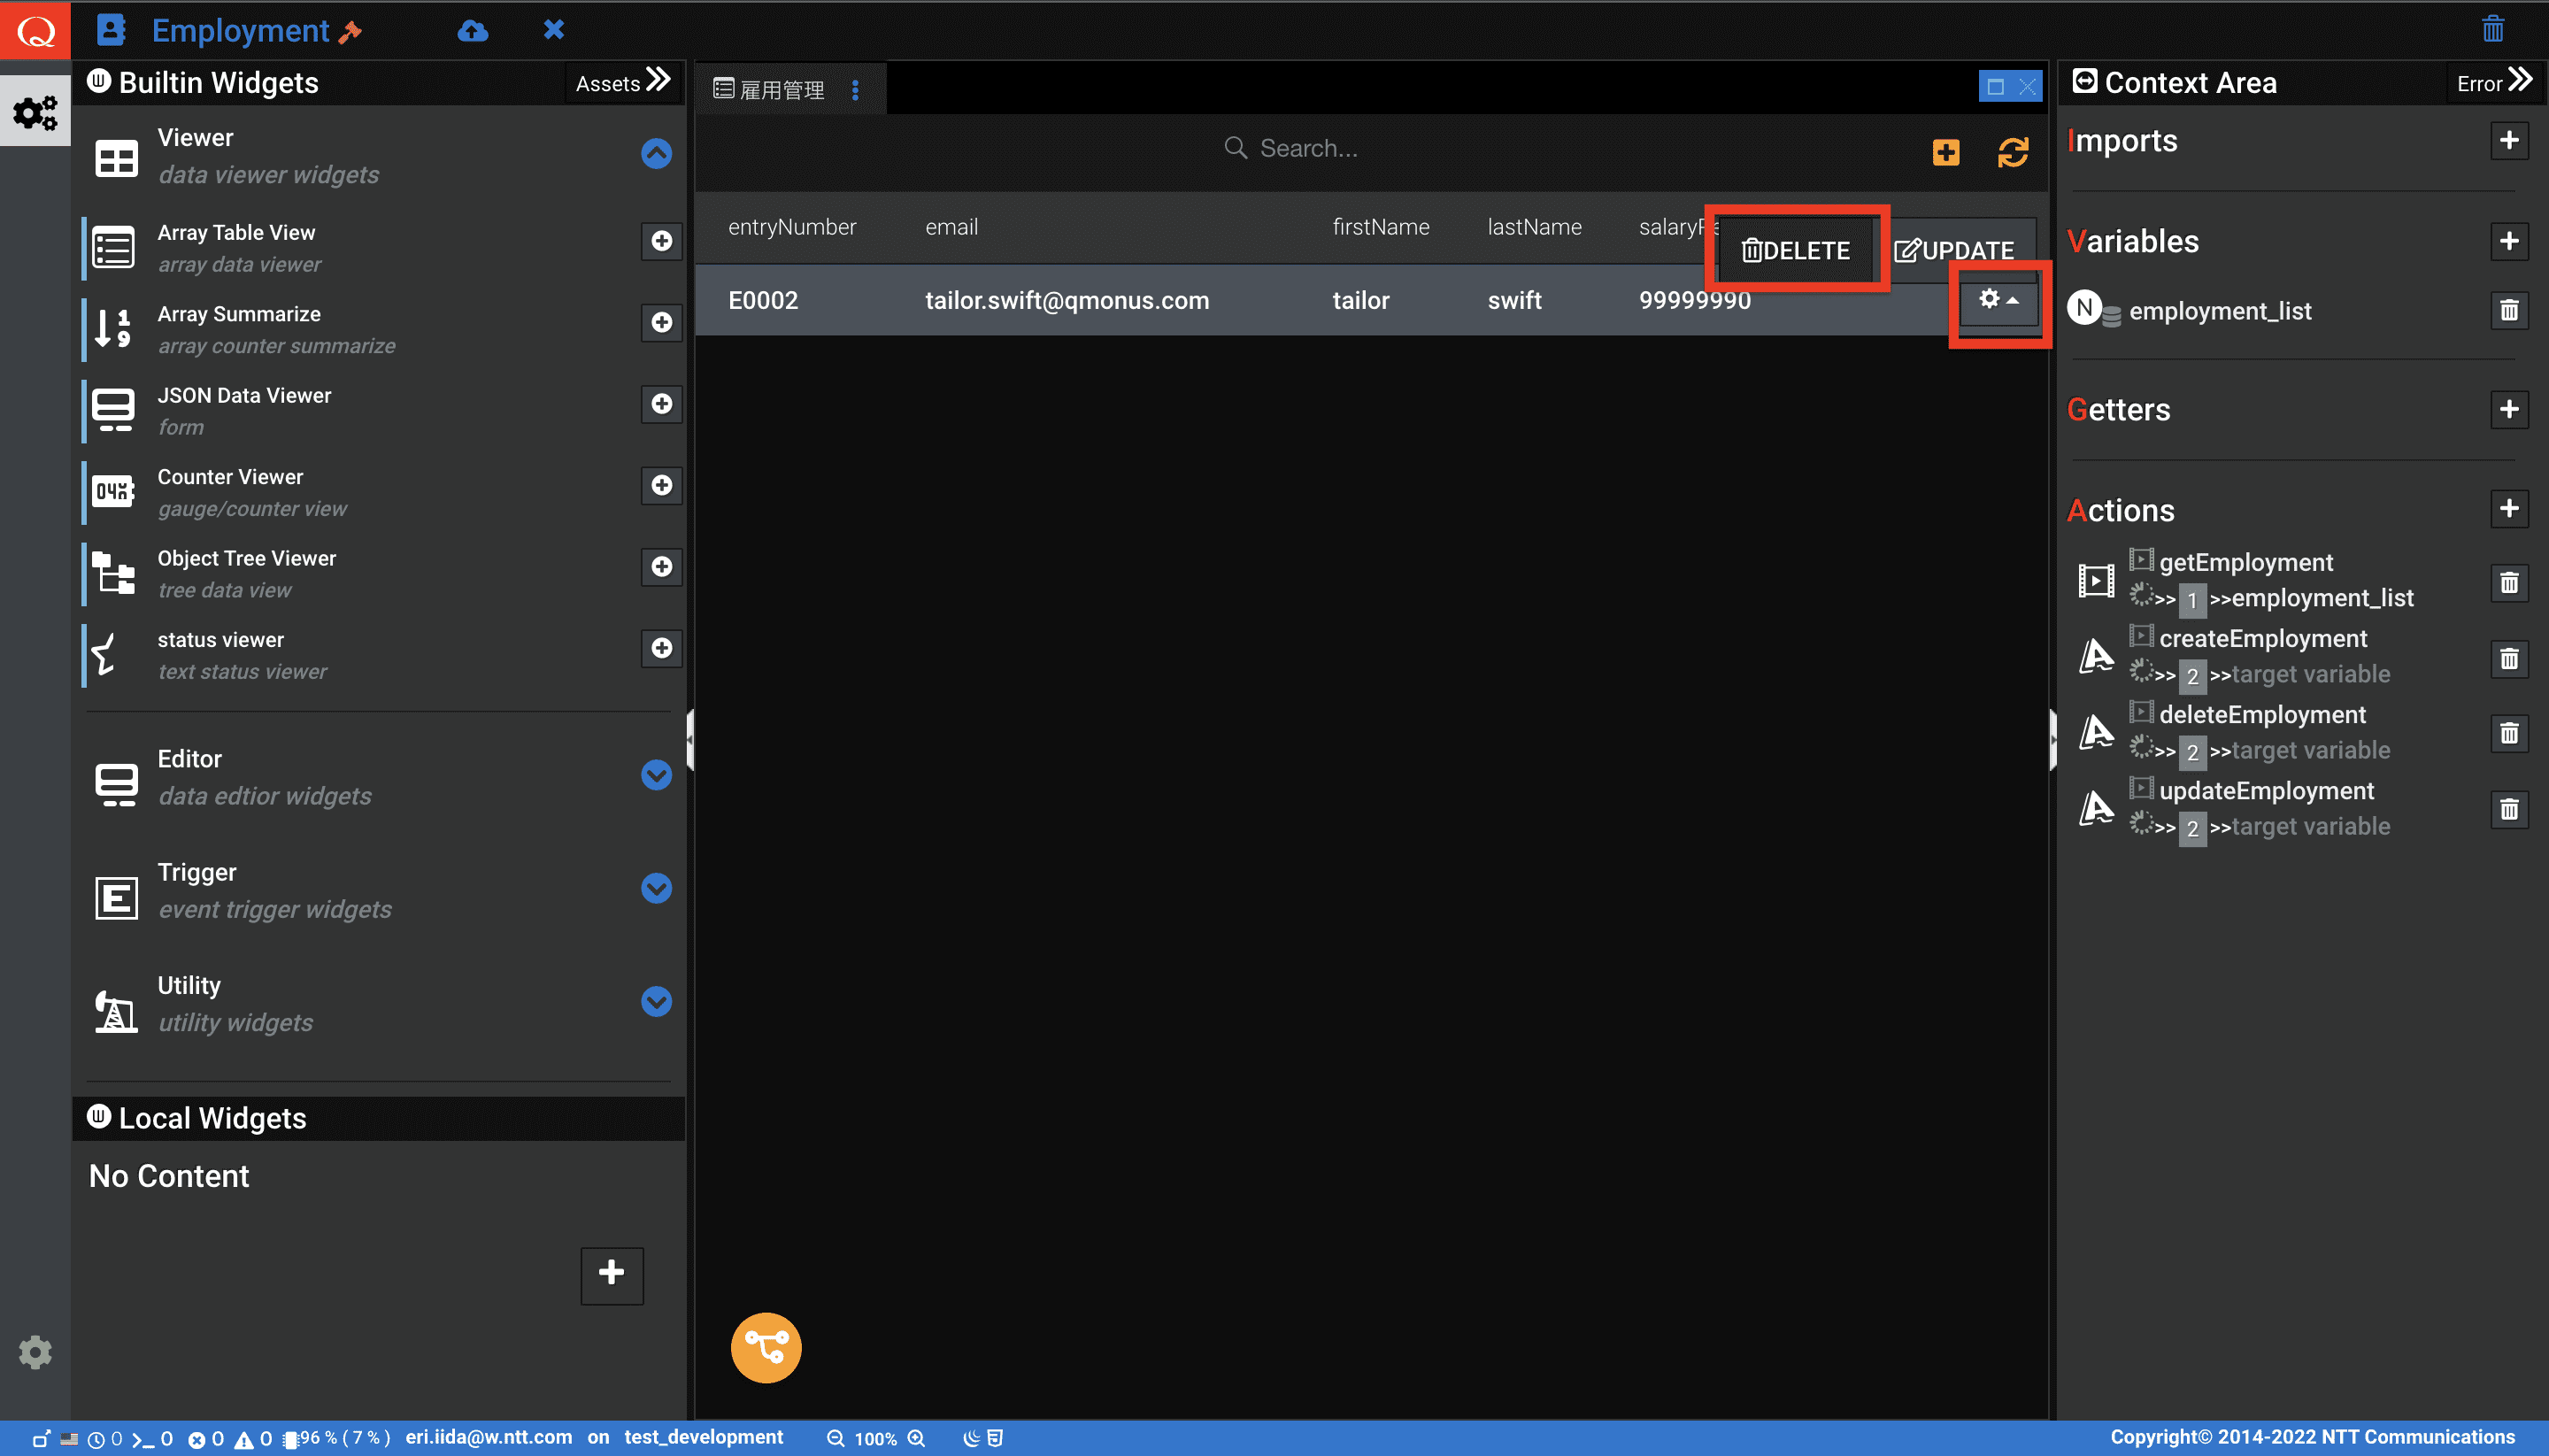
最後に、登録したEmployment 情報を削除してみましょう。歯車ボタン、DELETEボタンを押下します。
-
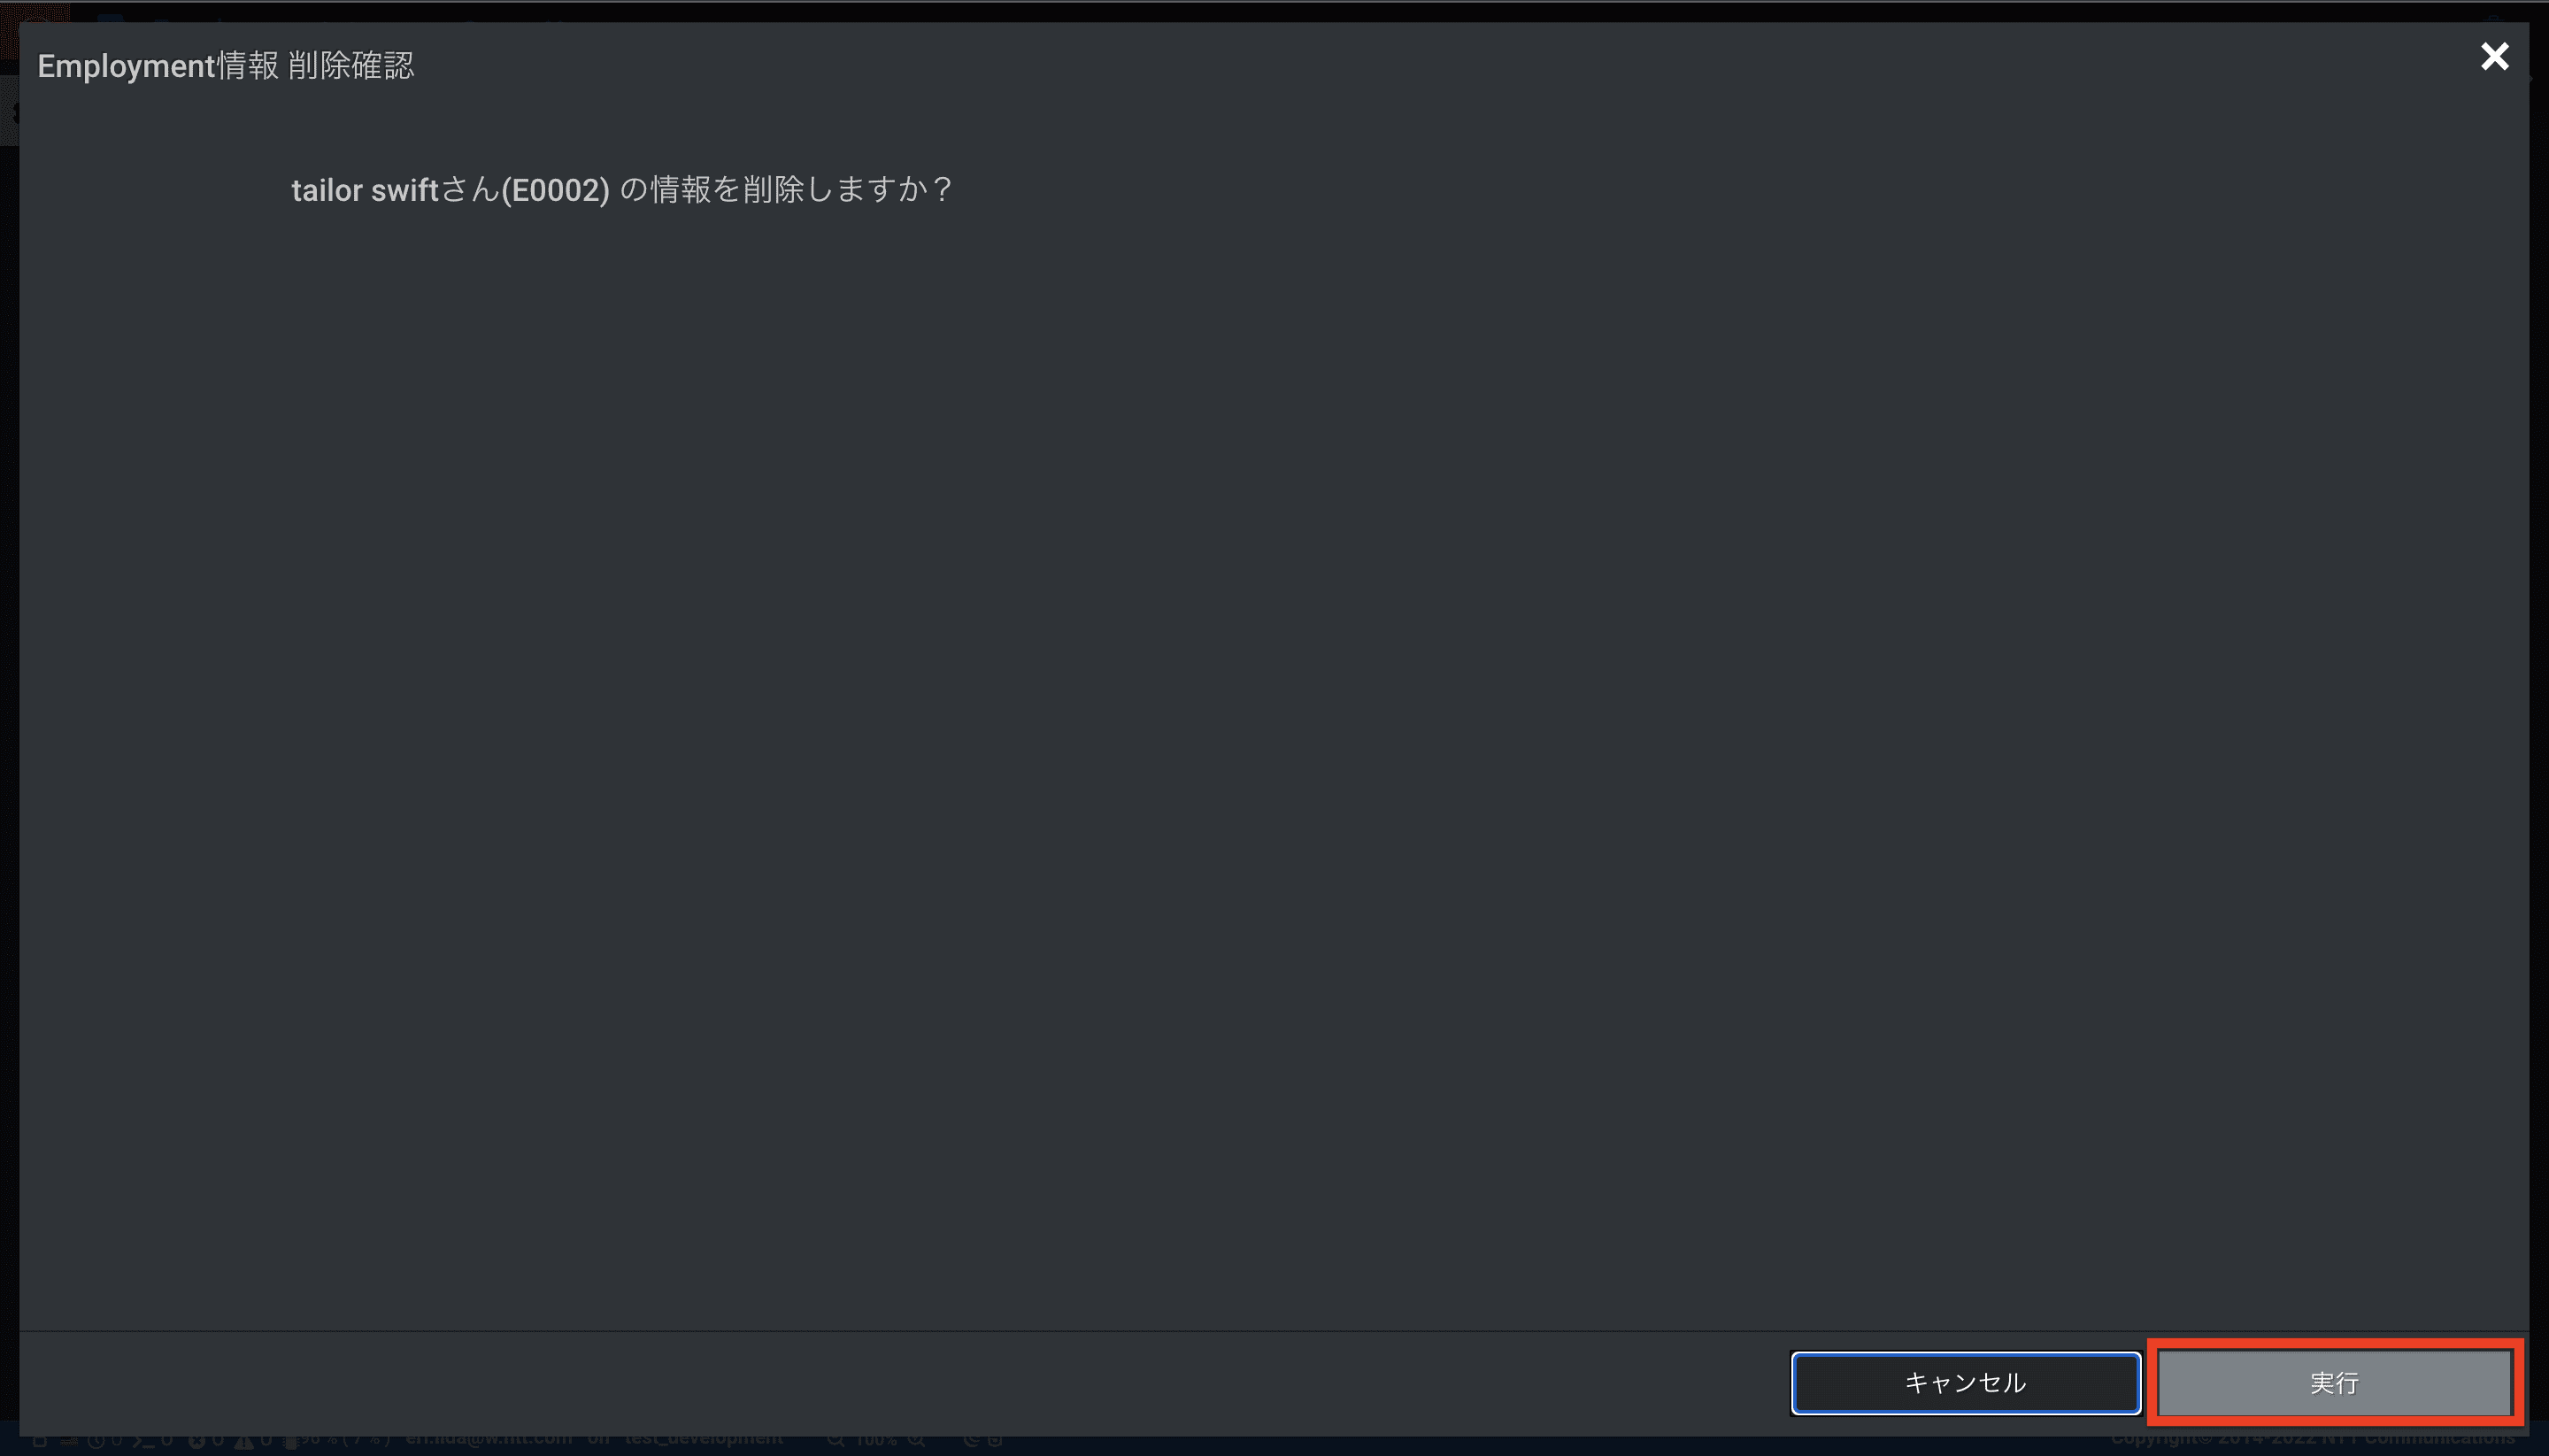
削除確認画面にて実行ボタンを押下します。
-
一覧から顧客情報が削除されました。
4.2 Dashboard を保存する
-
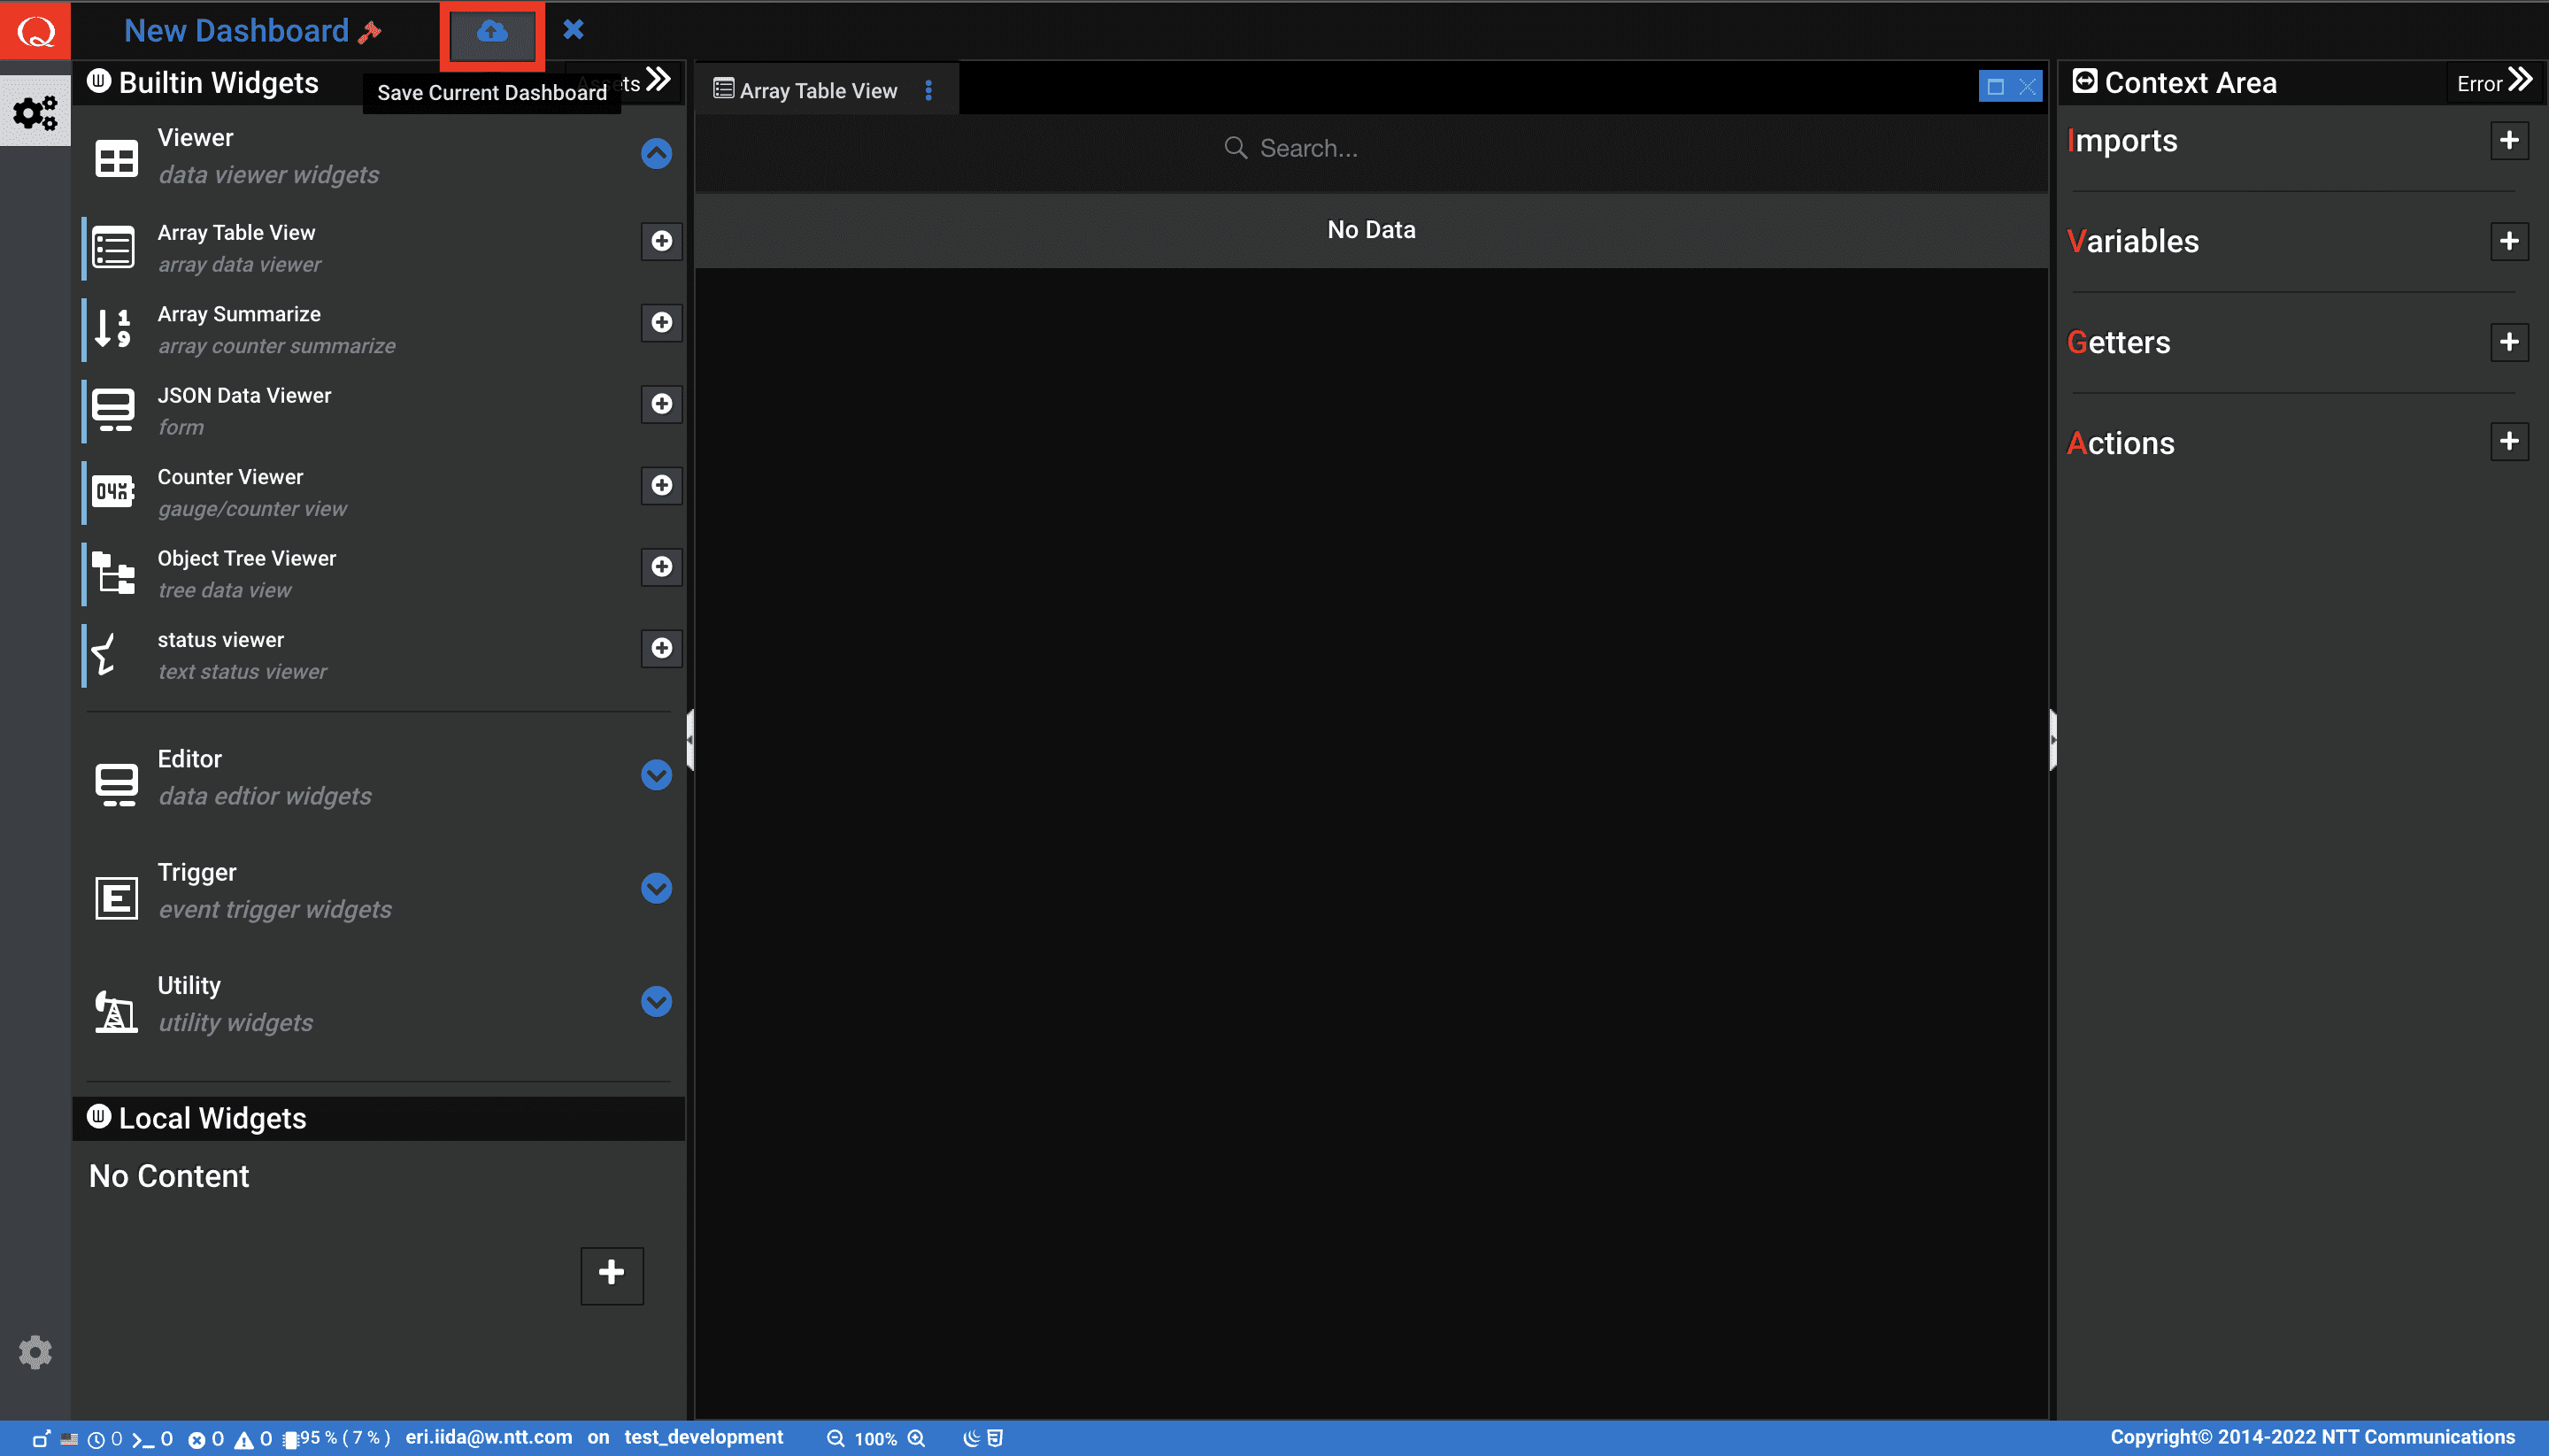
作成した Dashboard を保存しましょう。[Save Current Dashboard] ボタンを押下します。
-
下記の値を入力し、[Save Dashboard] ボタンを押下します。
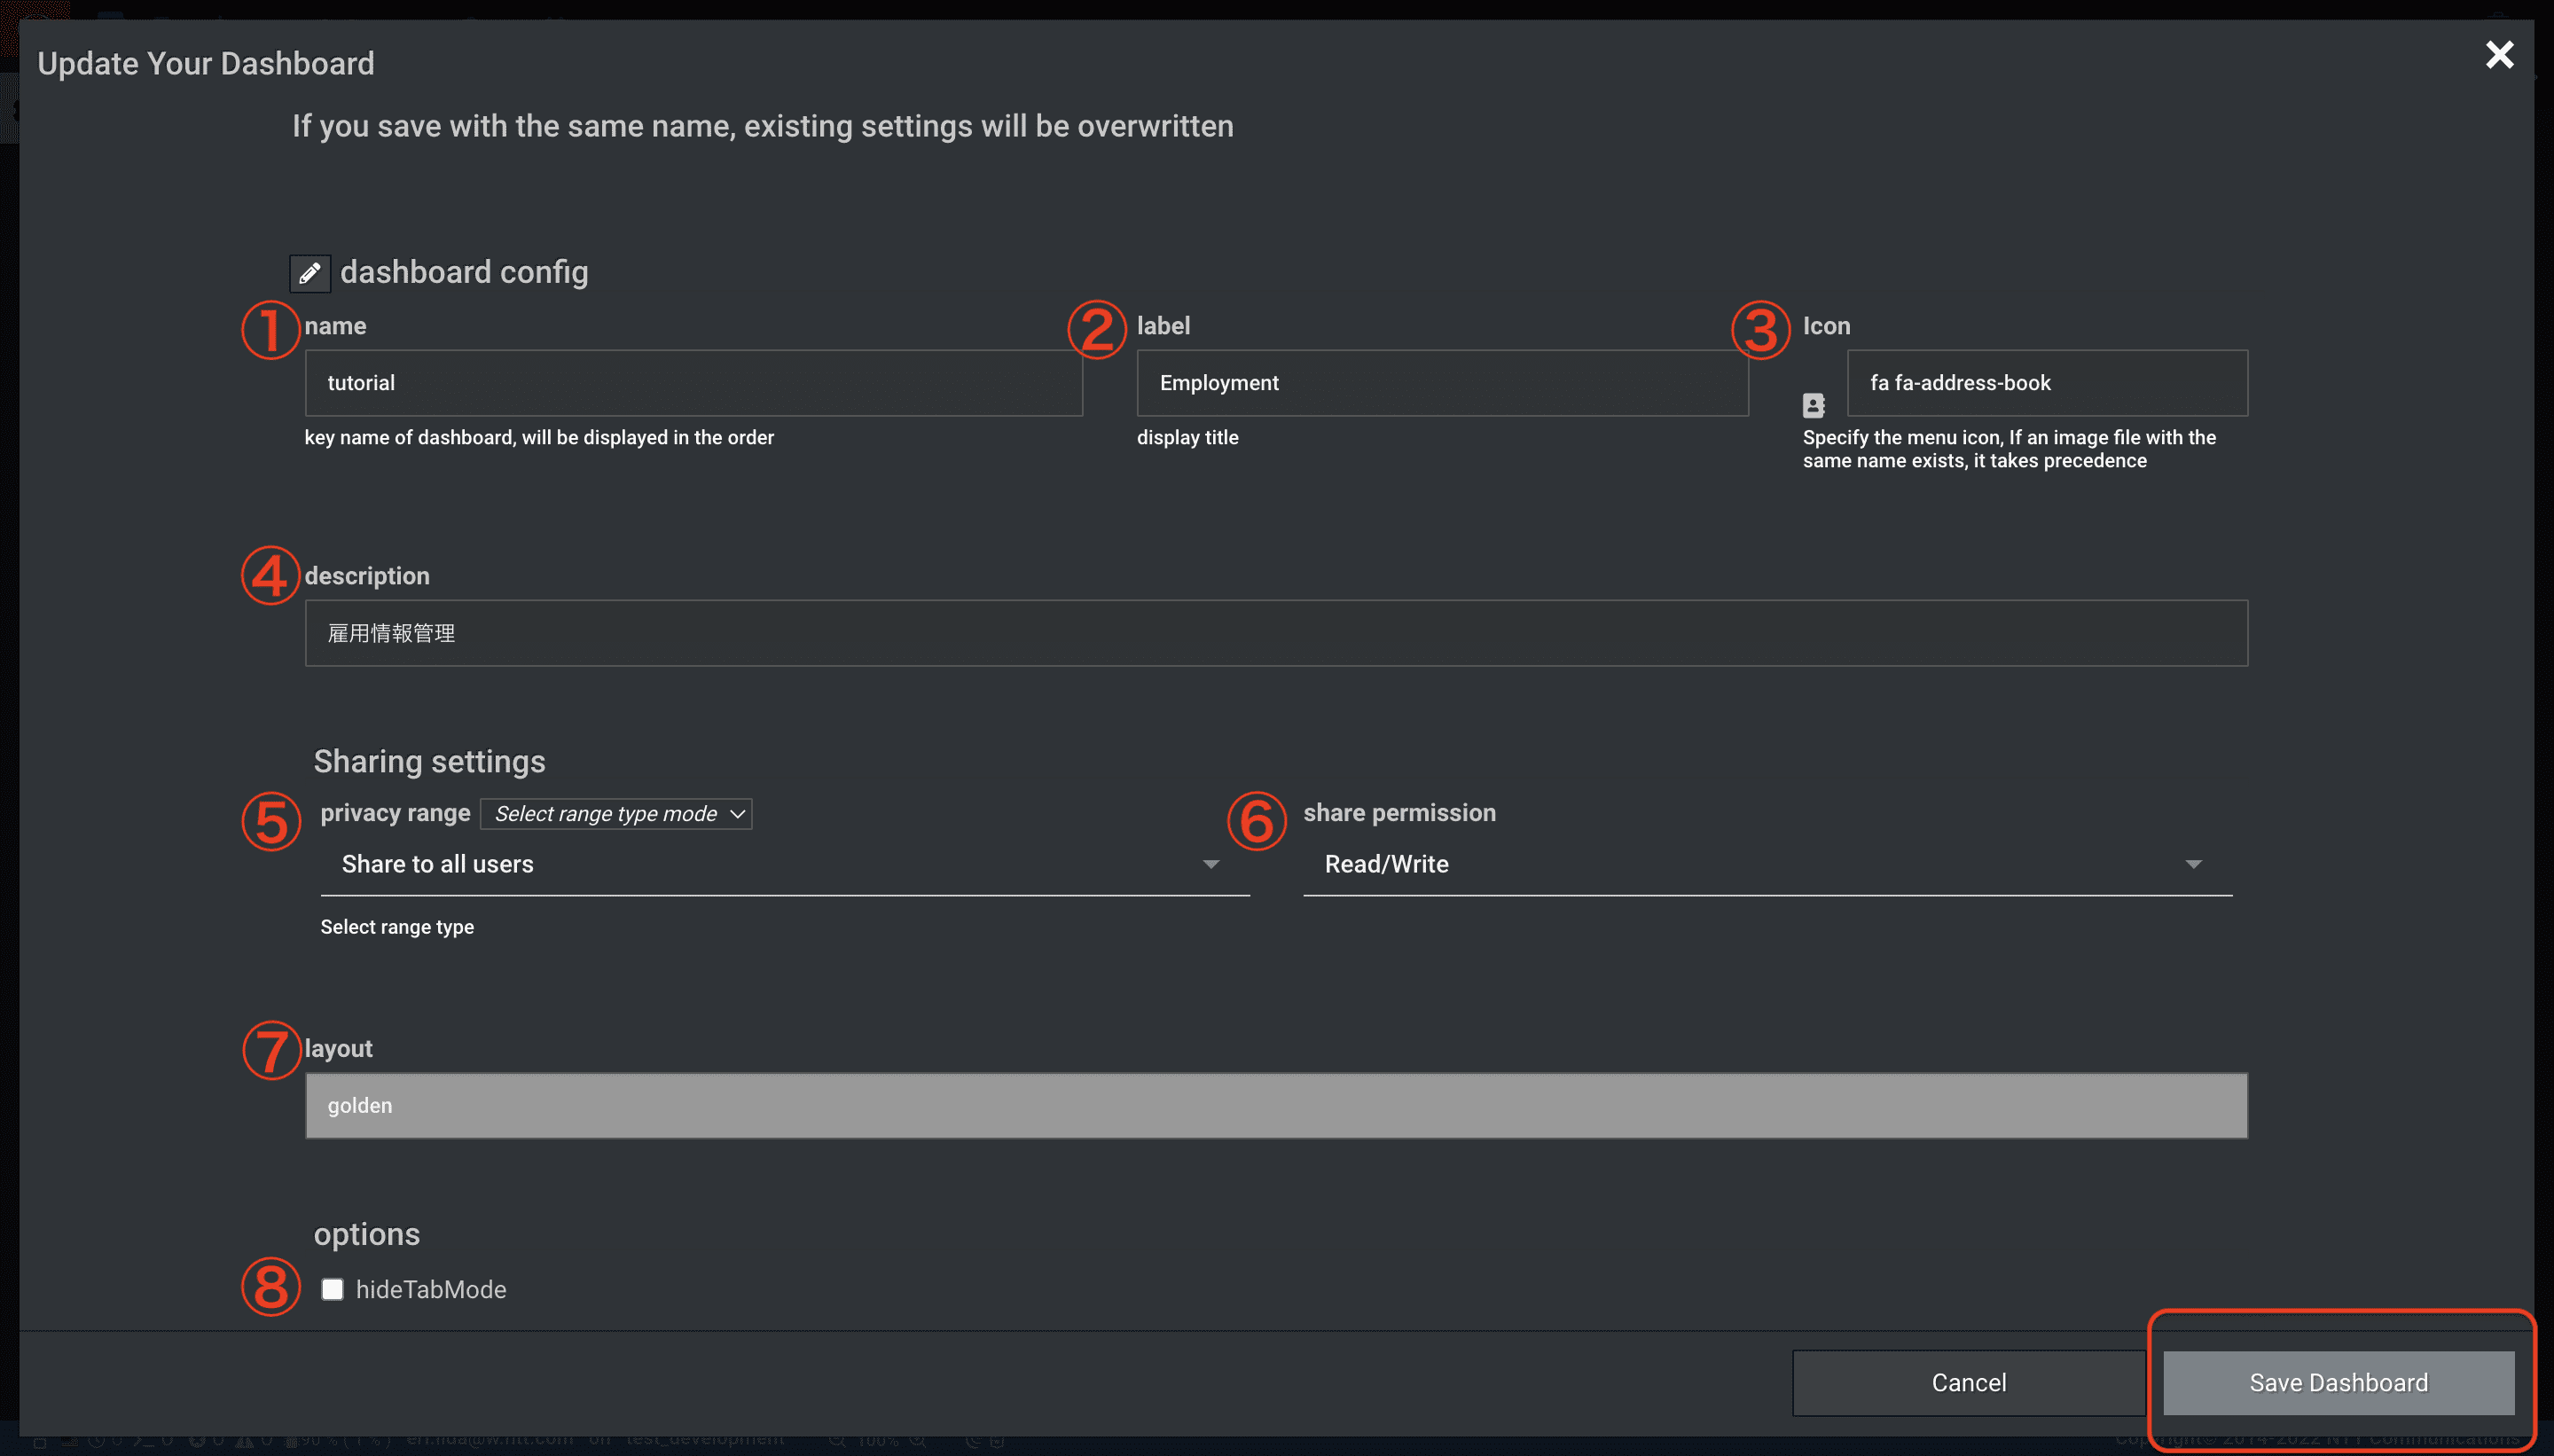
画面保存するためのする入力フォーム
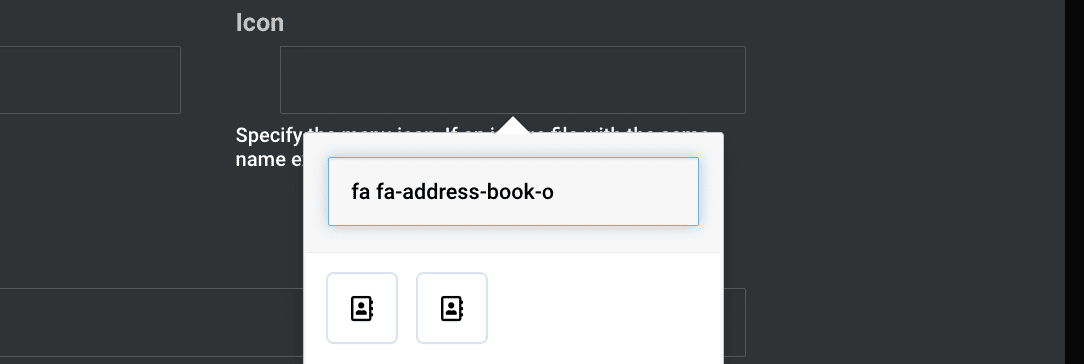
[icon] 欄について、icon欄をクリックして表示される検索窓に 指定の class 名を入力し、検索結果を選択
# パラメータ 設定値 1 name (Dashboard 名) tutorial 2 label (表示名) Employment 3 icon (label値の横に表示されるアイコン) fa fa-address-book-o (入力して検索結果にでてきたアイコンを選択) 4 description (Shared Dashboard に表示される Dashboard の説明文) 雇用情報管理 5 Sharing settings -privacy range- (Dashboard の公開範囲) Share to all users 6 Sharing settings - share permission- (編集権限) Read/ Write 7 (layout) ※ 変更不可 (golden) 8 options - (チェックなし) -
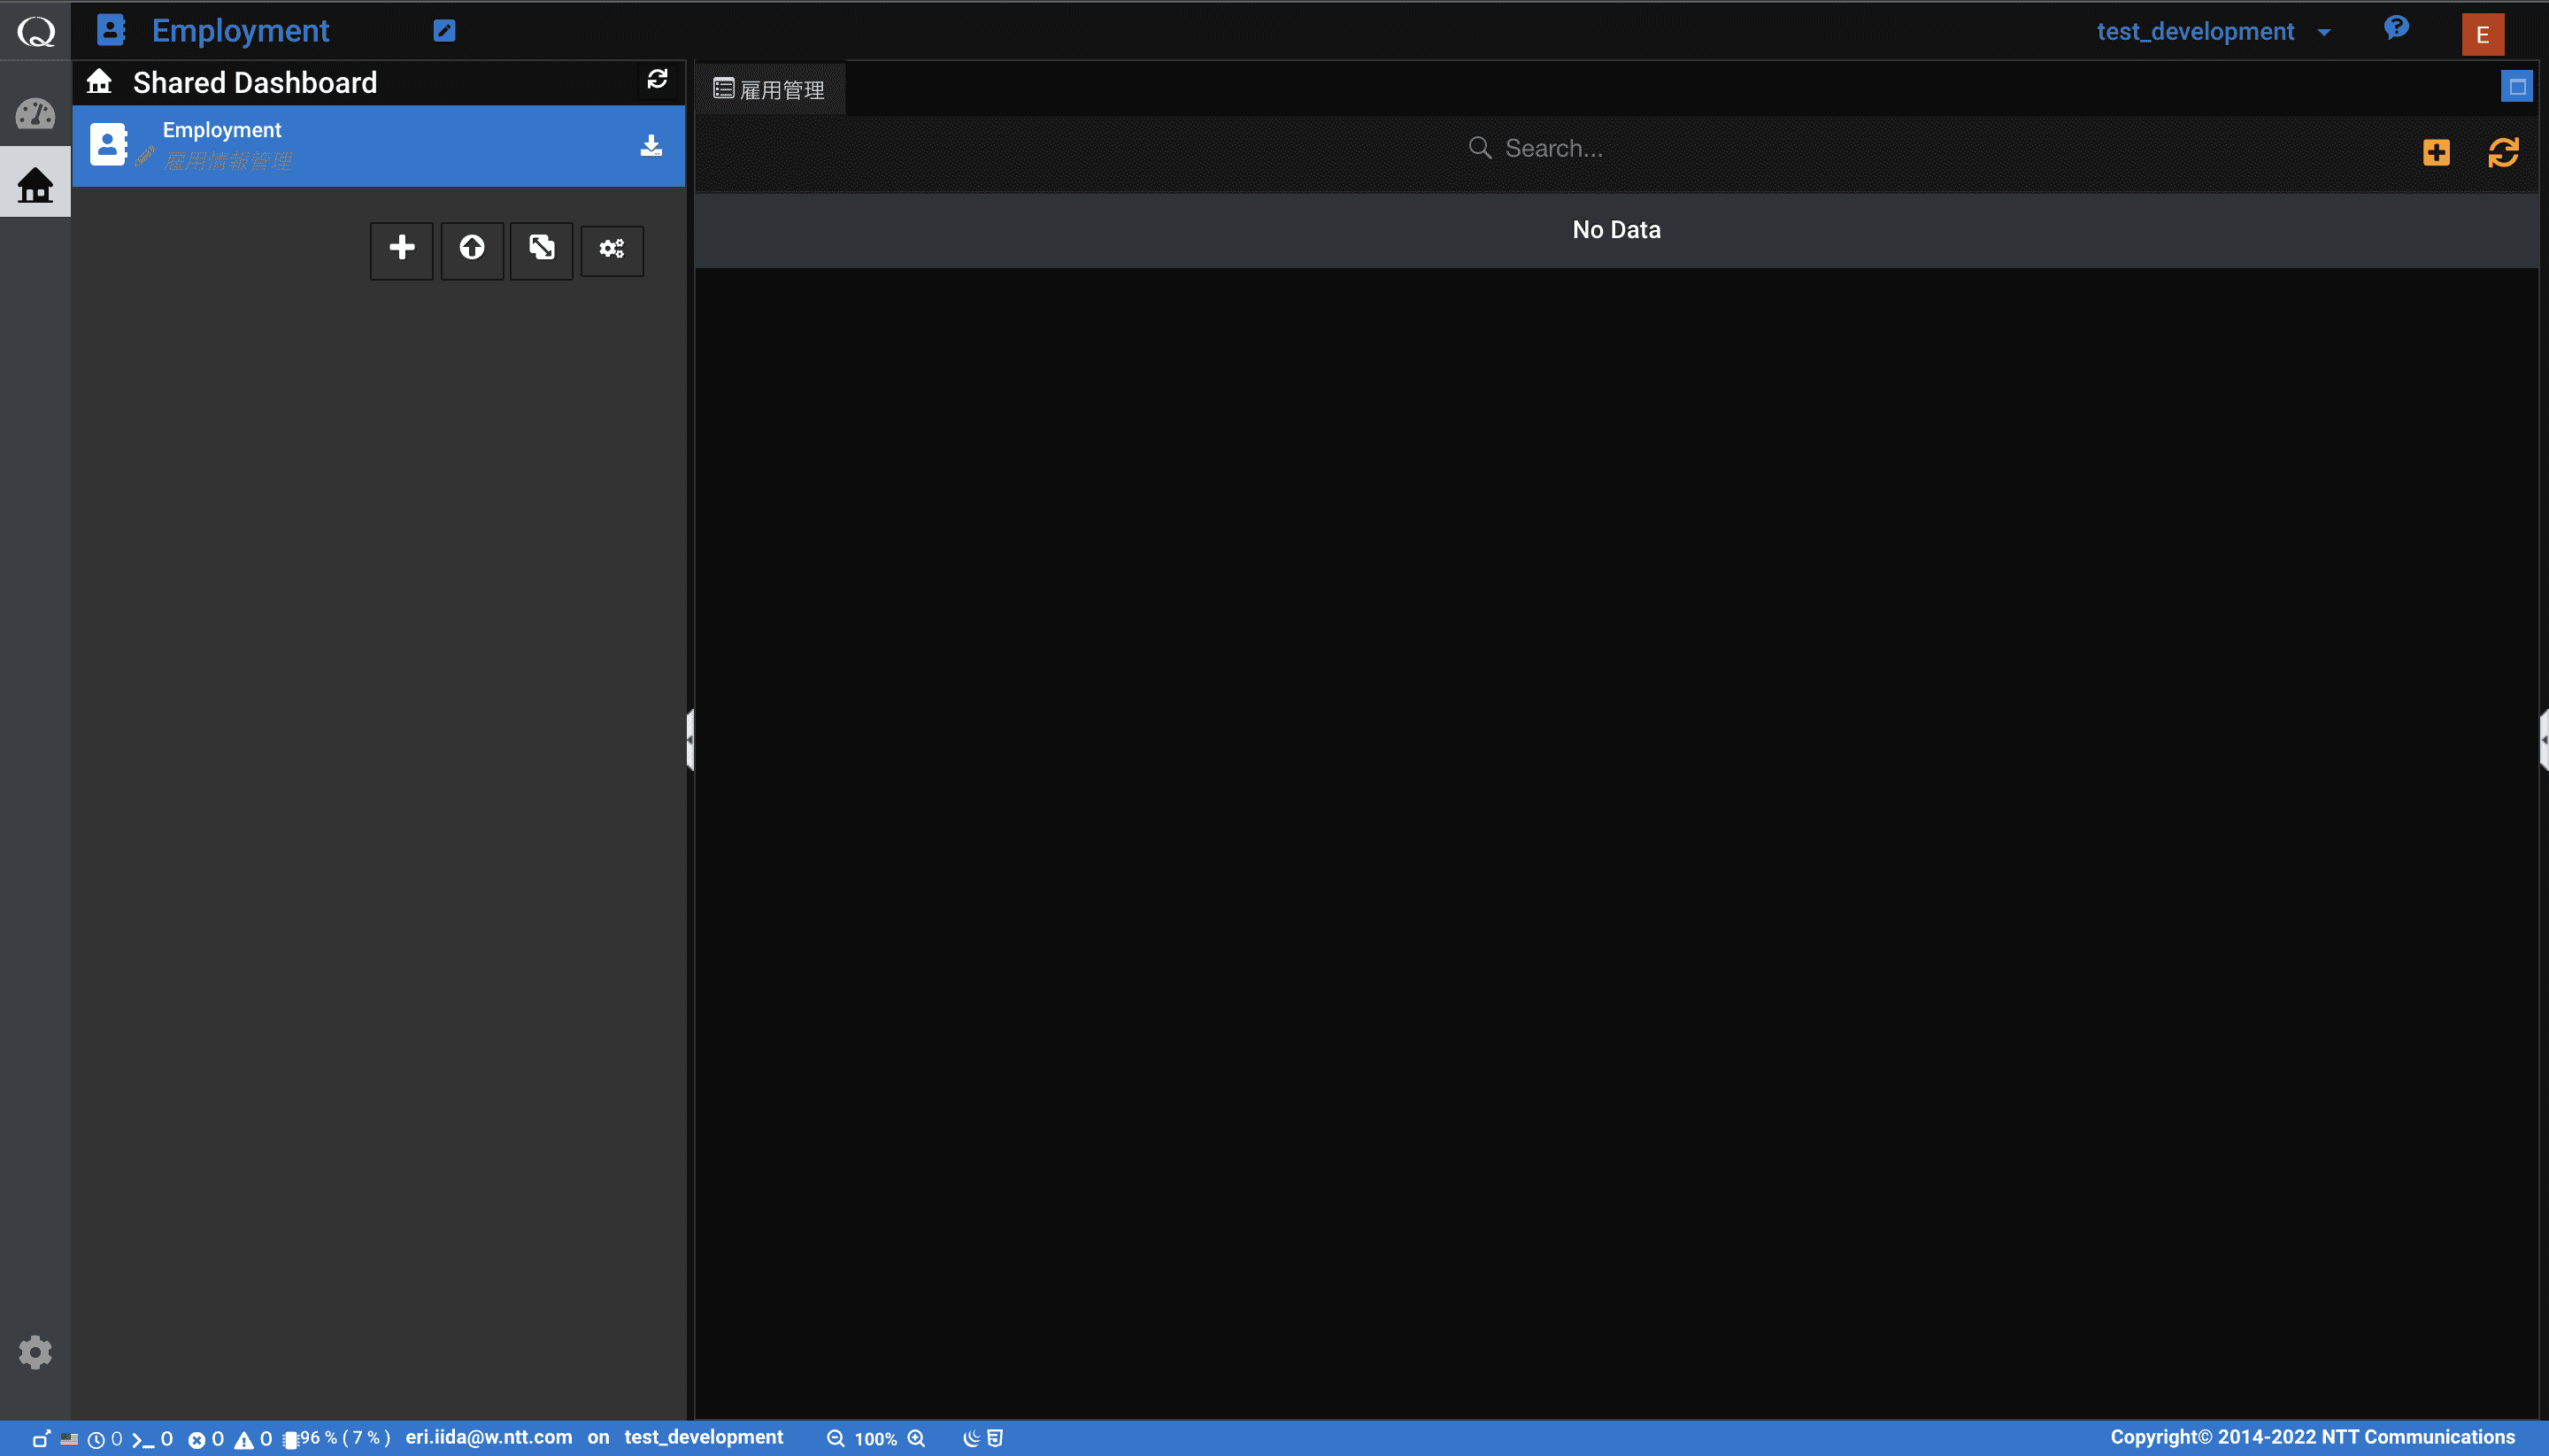
Dashboard が保存されました。Shared Dashboard 一覧にも Dashboard が追加されていることが確認できます。
以上で Dashboard チュートリアルの手順は完了です。Dashboard の要素 (Widgets/ Variables/ Actions …) の役割を理解し、Dashboard 開発に活用ください。